VALKRETROB - Kettle VALBERG - Free user manual and instructions
Find the device manual for free VALKRETROB VALBERG in PDF.
| Product type | Electric kettle |
| Brand | VALBERG |
| Model | VALKRETROB |
| Minimum capacity | 0.25 L |
| Maximum capacity | 1.7 L |
| Power | 1850 - 2200 W |
| Voltage | 220-240 V ~ 50/60 Hz |
| Protection class | Class I |
| Automatic shut-off | Yes |
| Boil-dry protection | Yes |
| Temperature display | Yes (scale from 0 to 100°C) |
| Anti-scale filter | Yes, removable |
| Swivel base | Yes, with cord storage |
| Power indicator light | Yes |
| Lid opening | By button |
| Main material | Stainless steel (likely) |
| Maintenance | Exterior cleaning with damp cloth, regular descaling with lemon juice |
| Warranty | 2 years |
Frequently Asked Questions - VALKRETROB VALBERG
User questions about VALKRETROB VALBERG
0 question about this device. Answer the ones you know or ask your own.
Ask a new question about this device
Download the instructions for your Kettle in PDF format for free! Find your manual VALKRETROB - VALBERG and take your electronic device back in hand. On this page are published all the documents necessary for the use of your device. VALKRETROB by VALBERG.
USER MANUAL VALKRETROB VALBERG
Thank you for choosing this VALBERG product. VALBERG products are chosen, tested, and recommended by ELECTRO DEPOT, so you can be sure you are getting a top-quality, easy-to-use product that won't let you down. We're confident your new device will be a pleasure to use every day!
Welcome to ELECTRO DEPOT.
Table of Contents

Product overview
Parts
Product overview
Intended use
Specifications

Product usage
Before first use
Use
Boil-dry protection

Cleaning and
maintenance
Cleaning and maintenance
Descaling
Storage
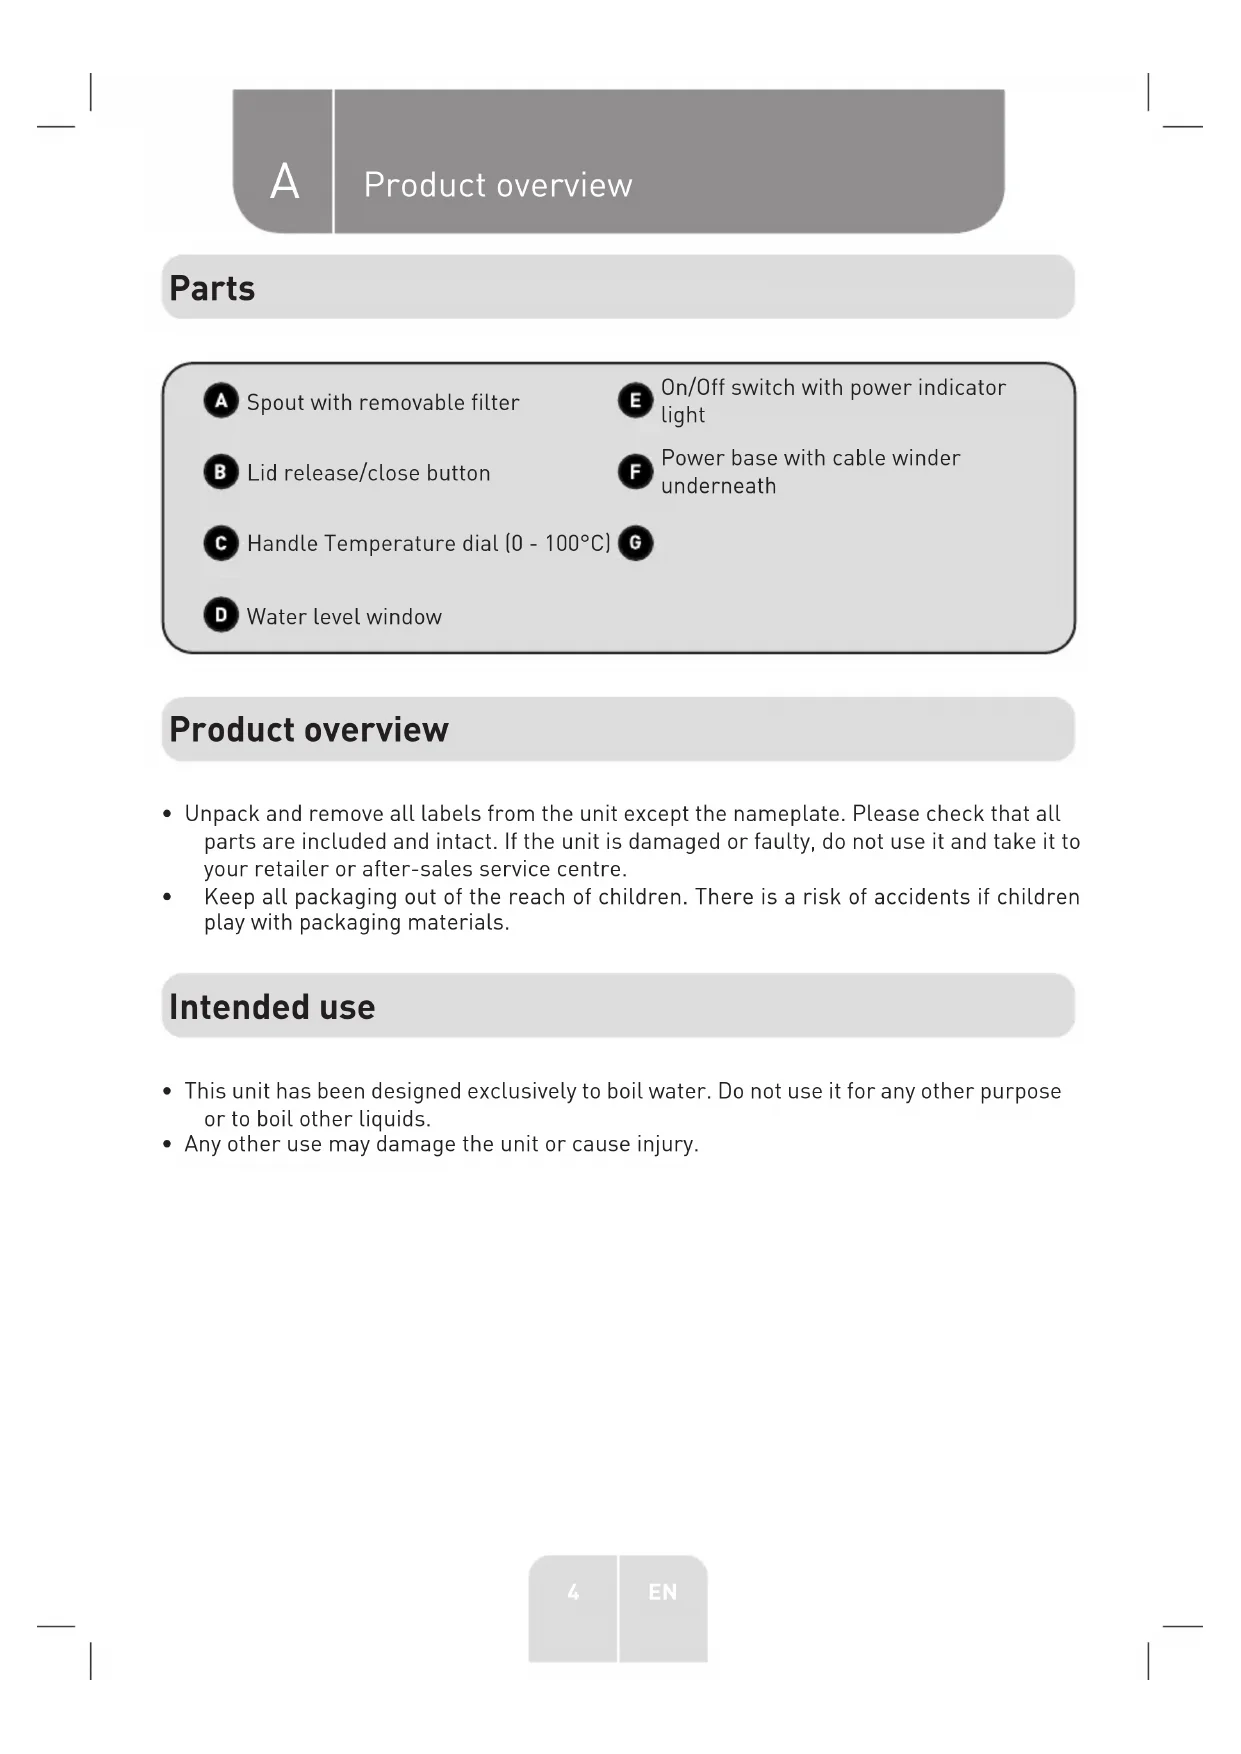
A Product overview
Parts
Spout with removable filter
On/Off switch with power indicator light
B Lid release/close button
Power base with cable winder underneath
C Handle Temperature dial (0 - 100^) G
Water level window
Product overview
- Unpack and remove all labels from the unit except the nameplate. Please check that all parts are included and intact. If the unit is damaged or faulty, do not use it and take it to your retailer or after-sales service centre.
- Keep all packaging out of the reach of children. There is a risk of accidents if children play with packaging materials.
Intended use
- This unit has been designed exclusively to boil water. Do not use it for any other purpose or to boil other liquids.
- Any other use may damage the unit or cause injury.
Specifications
Model: 10005110 / 10005121 / 10005122
Operating voltage: 220 - 240V 50 / 60Hz
Power consumption: 1850 - 2200 W
Capacity [Min. - Max.]: 0.25 - 1.7 L
Protection class: Class I
Off mode power consumption: 0 W
The period after which the equipment reaches
automatically off mode:
0 minutes
B Product usage
Before first use
- Fill the kettle with fresh water up to the MAX mark. Boil the water and discard it. Repeat the process 2 or 3 times. The kettle is ready for use.
- Clean the unit (Cleaning and maintenance).
Use
The kettle features a temperature dial that shows the current water temperature (0 - 100^)
- Place the unit on a flat, dry, stable, and heat-resistant surface. For children's safety, make sure the unit and its cable are well away from the edge of the table or counter.
- Plug the power cable into a suitable power outlet.
- Remove the kettle from the power base to fill it.
- To open the lid: Press the recessed dot on the lid release button.
- Fill the kettle with fresh water. Do not fill below the MIN or above the MAX level mark.
- To close the lid: Close the lid firmly until it snaps into place. If the lid is hot, press the flat side of the lid release button to close it.

CAUTION!
Make sure the On/Off switch is free of obstructions and the lid is closed tightly. The kettle will not switch off automatically if the On/Off switch is obstructed or the lid is open.
-
To switch on the kettle: Press the On/Off switch down. The power indicator light will light up. When the water has boiled, the kettle will automatically switch off and the power indicator light will turn off.
-
If you need to boil the water again immediately, wait 15-20 seconds before pressing the On/Off switch.
-
The kettle can be switched off manually by lifting the On/Off switch or removing the kettle from the power base.
-
After use: Unplug the power cable from the power outlet.

CAUTION!
- Do not open the lid when steam is escaping from the spout.
Exercise extreme caution when moving a unit containing hot water.
Boil-dry protection
- The kettle is fitted with a safety device to prevent overheating. This overheat protection device shuts off the unit if the kettle is empty or there is not enough water in it.
B Product usage
- If the safety device is triggered, remove the plug from the mains socket. Allow the kettle to cool down to room temperature before filling it with water. Always make sure there is enough water in the kettle. Activating the safety device repeatedly may reduce the kettle's service life.
Cleaning and maintenance

WARNING!
- Before cleaning, always unplug the unit from the power outlet and allow it to cool down completely.
- Never immerse the unit (kettle, power base, power cable or plug) in water or any other liquid. Do not rinse the unit under the tap.
General cleaning
- Unplug the power cord and clean the power base with a dry cloth only.
- Clean the exterior of the kettle with a soft, damp cloth. Dry with a soft, dry cloth.
- Dry the unit thoroughly after cleaning.
- Never use corrosive cleaners, wire brushes, abrasive scouring pads or metal/sharp tools to clean your unit.
Cleaning the spout filter
Clean the spout filter periodically.
- Remove the kettle form the power base and open the lid.
- Using both hands, reach into the spout and inside the kettle. Carefully push down on the clip at the top of the filter to unhook and remove it from the interior of the kettle.
- Rinse the filter with lukewarm water. Use a cloth or soft brush to gently remove limescale deposits.
- Reattach the filter inside the kettle by first hooking the bottom leg and then pushing the top down and forward until the clip hooks into place.
C Cleaning and maintenance
Descending
Descale the kettle periodically to eliminate mineral deposits from tap water. Follow the instructions below to descale the kettle. Alternatively, use a commercially available descaler for kettles and follow the instructions on the package.
- Fill the kettle halfway with tap water and add the juice of 1 lemon to the water.
- Bring the mixture to a boil and let it sit for 15 minutes. Bring the mixture to a second boil and let it sit for another 15 minutes.
- Bring the mixture to a third boil, discard the mixture, and rinse the interior of the kettle thoroughly.
- The kettle is ready for use.
Storage
- Always unplug the unit before storing it.
- Store the unit in a fresh, dry and dust-free place, out of the reach of children and pets.
- Please retain the packaging and use it to store your unit when it is not in use for an extended period of time.
Merci!
This product is guaranteed against faults caused by defects in manufacturing or the materials used for a period of two years, starting from the date of purchase. * This warranty does not cover defects or damage caused by failure to install the device correctly, incorrect use of the product, or excessive wear and tear.
*proof of purchase required.