Perfect Line HC1037 - Electric mower ROWENTA - Free user manual and instructions
Find the device manual for free Perfect Line HC1037 ROWENTA in PDF.

| Product type | Electric hair clipper |
| Brand | Rowenta |
| Model | Perfect Line HC1037 |
| Power supply | Mains (power cord) |
| Operating voltage | Check compatibility with electrical installation |
| Cutting height adjustment | Fine adjustment lever with multiple notches |
| Included combs | 6 combs: 3, 6, 9, 13, 18, 25 mm |
| Accessories supplied | Cleaning brush, styling comb, pair of scissors |
| Blade type | Self-lubricating blades, no maintenance required |
| Use | Household use only |
| Safety | Do not use near water, unplug after use, complies with standards |
| Maintenance and cleaning | Clean the cutting head after each use with the supplied brush |
| Replacement of the cutting head | Spare parts available in specialized stores and Rowenta authorized service centers |
| Operating conditions | Temperature between 0°C and 35°C |
| Warranty | Warranty valid for household use only |
| Dimensions (approx.) | Not specified in the manual |
| Weight (approx.) | Not specified in the manual |
Frequently Asked Questions - Perfect Line HC1037 ROWENTA
User questions about Perfect Line HC1037 ROWENTA
0 question about this device. Answer the ones you know or ask your own.
Ask a new question about this device
Download the instructions for your Electric mower in PDF format for free! Find your manual Perfect Line HC1037 - ROWENTA and take your electronic device back in hand. On this page are published all the documents necessary for the use of your device. Perfect Line HC1037 by ROWENTA.
USER MANUAL Perfect Line HC1037 ROWENTA
natural_image
Line drawing of a hairpin with a clip and handle (no text or symbols)Gebrauchsanweisung
Instructions for use
Notice d'emploi
natural_image
Technical illustration of mechanical assembly with bolts and brackets (no text or symbols)
natural_image
Illustration of a hand holding a pen with an arrow indicating motion (no text or symbols)
natural_image
Illustration of a person using a facial recognition device to observe a child's face (no text or symbols present)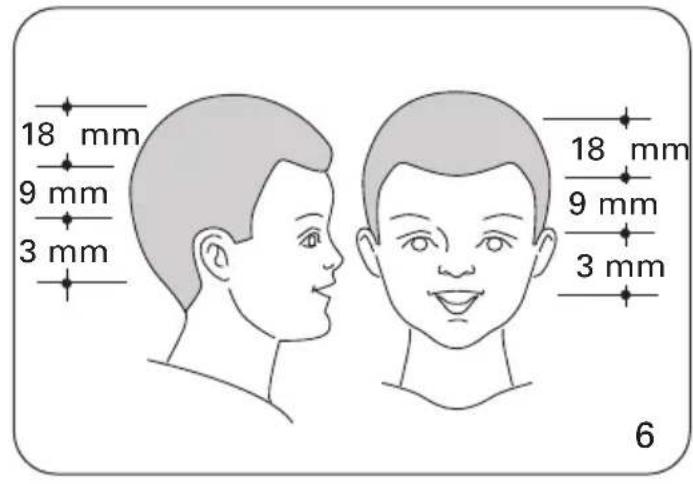
text_image
18 mm 9 mm 3 mm 18 mm 9 mm 3 mm 6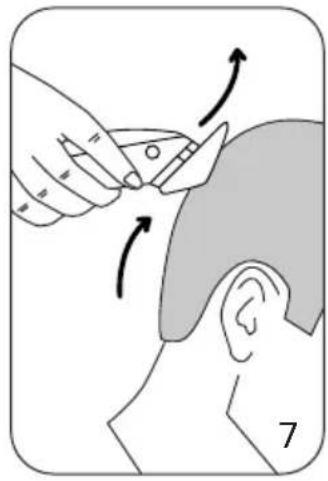
natural_image
Illustration of a hand using a tool to lift or adjust the head area, showing motion arrows (no text or symbols)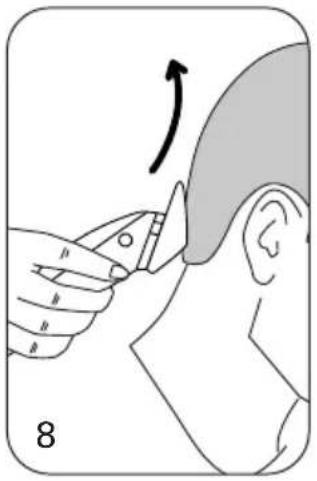
natural_image
Illustration of a person using a tool to cut the head area, showing motion direction (no text or symbols)
natural_image
Illustration of a hand using a tool to lift or lift a piece of material, with an arrow indicating the process (no text or symbols present)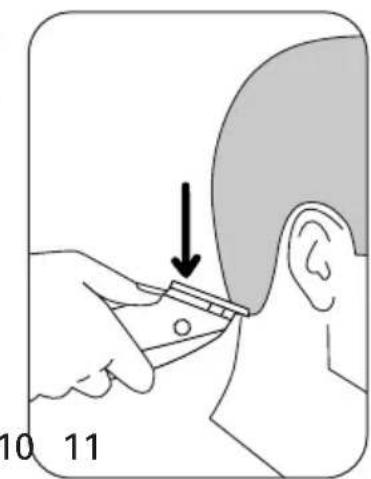
text_image
10 11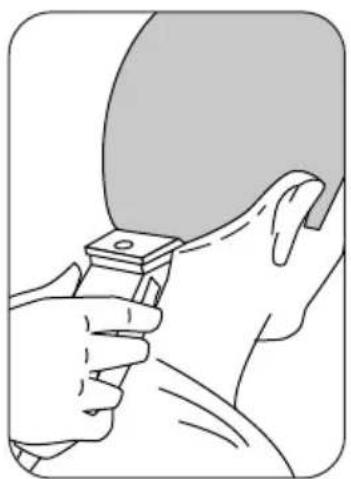
natural_image
Illustration of a person using a tool to adjust or install a table tennis paddle (no text or symbols present)
text_image
12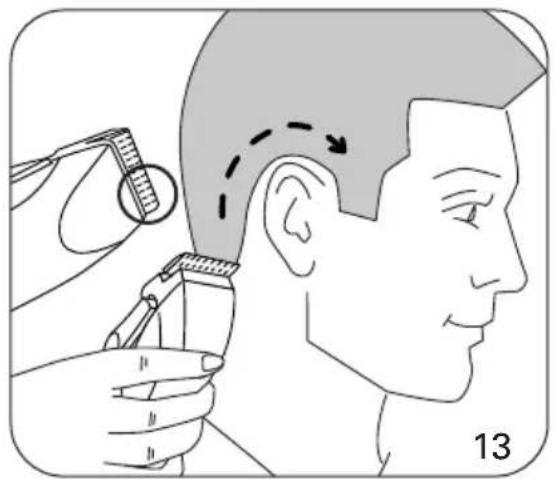
natural_image
Illustration of a person's head with a hair curler, showing the application of a second dose to the ear (no text or symbols present)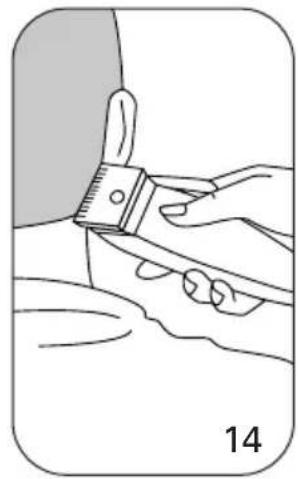
natural_image
Line drawing of a hand using a tool to cut or adjust a piece of material, labeled with number 14 (no text or symbols on the diagram itself)
natural_image
Illustration of a hand using a tool to lift or lift a surface, labeled with number 15 (no text or symbols on the diagram itself)
text_image
9 or 18 mm 3 mm 9 or 18 m 3 mm 16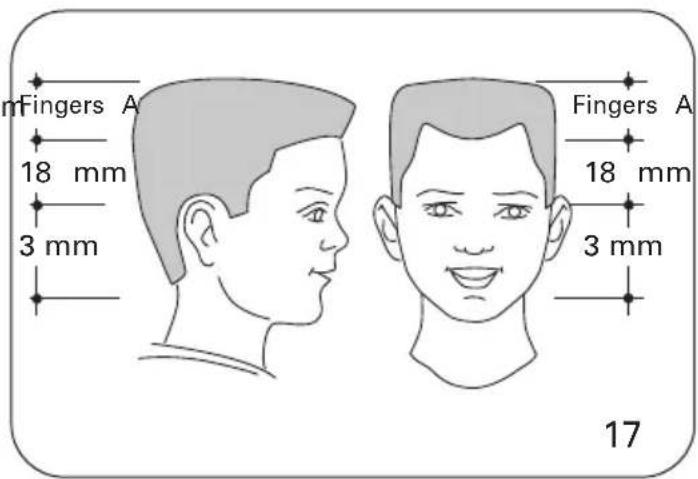
text_image
mFingers A 18 mm 3 mm Fingers A 18 mm 3 mm 17
natural_image
Illustration of a person receiving hair styling with a hand holding a tool, no text or symbols present
text_image
19
text_image
20
natural_image
Illustration of a person using a tool to cut the ear with a magnified inset showing motion (no text or symbols)
natural_image
Illustration of a person using a medical or surgical tool to adjust the ear area (no text or symbols present)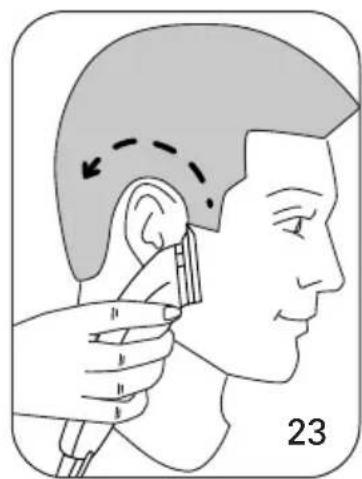
natural_image
Illustration of a person applying oral care to the ear with a tool, showing anatomical positioning (no text or symbols)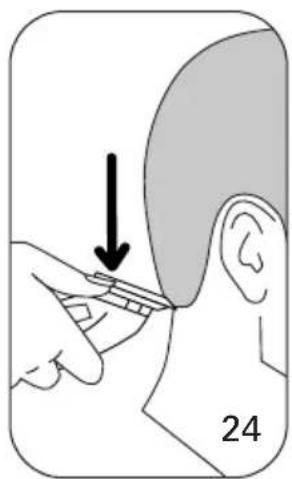
text_image
24
text_image
25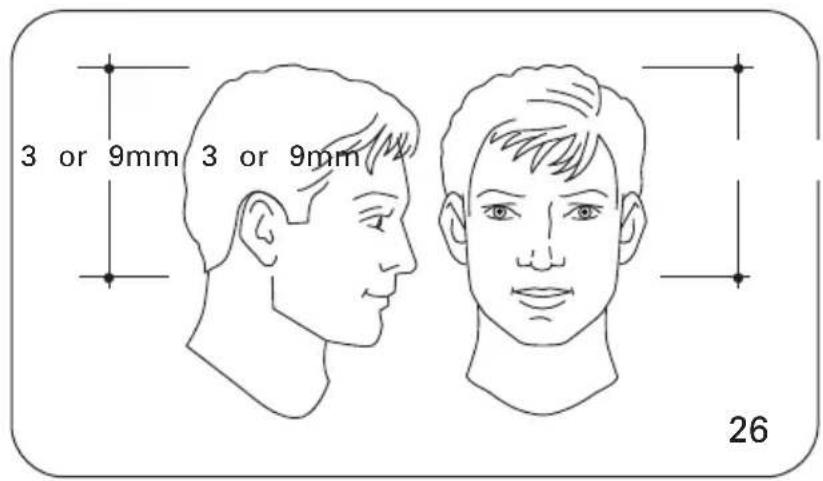
text_image
3 or 9mm 3 or 9mm 26
natural_image
Illustration of a person using a comb to trim hair, with an arrow indicating direction (no text or symbols)
natural_image
Line drawing of a human head with arrows indicating motion or direction, no text or symbols present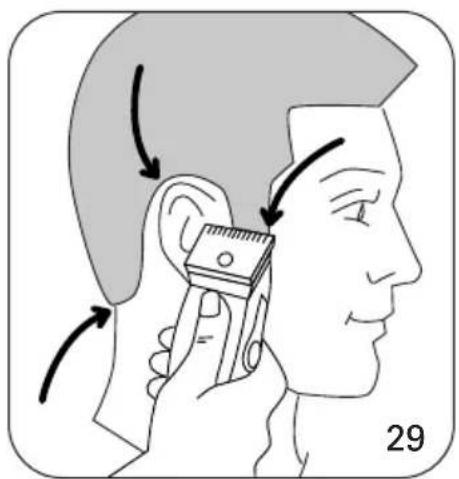
text_image
Illustration showing ear health technique with directional arrows indicating movement or pressure points on the ear.With its careful design and precise adjustment of the cut height, this trimmer is a genuine professional-quality tool of genuine professional quality.
Please read these instructions before using this appliance, to avoid any danger through incorrect use.
1. DESCRIPTION OF THE HAIR TRIMMER AND ITS ACCESSORIES (Fig. 1)
A. Cut height fine adjustment lever.
B. On/off switch.
C. 6 Combs (3, 6, 9, 13, 18, 25 mm)
D. Cleaning brush.
E. Styling comb.
F. Scissors.
2. CUT HEIGHT LEVER FOR FINE ADJUSTMENT
Your hair trimmer is equipped with a cut height fine adjustment lever. Choose the position require rotating the lever (Fig. 4).
3. SERVICE VOLTAGE
Ensure that this voltage corresponds to that of your mains supply. Incorrect connection may cause parable damage which is not covered by the guarantee.
4. GUARANTEE
This appliance has been designed for a domestic use only. It can not be used in any professional cation. The guarantee becomes null and void in case of incorrect use.
5. MAINTENANCE
We recommend that the cutting head be cleaned after each use, using the cleaning brush.
6. LUBRICATION
Auto-lubricating blades = no more lubricating needed!
7. CHANGING THE CUTTING HEAD
• After a long period of use, the cutting blade may become dull. The plate may lose a tooth if appliance is dropped.
DISASSEMBLY / REASSEMBLY (FIG. 3)
NB : spare parts are available from specialist outlets and from approved ROWENTA service centres.
8. SAFETY ADVICE
- For your safety, this appliance complies with the applicable standards and regulations (Low Voltage Di Electromagnetic Compatibility, Environmental...).
- Check that the voltage of your electricity supply matches the voltage of your appliance. Any error wh the appliance can cause irreparable harm, not covered by the guarantee.
- As an additional safety measure, we recommend the installation of a residual current difference device in the electrical circuit supplying the bathroom, acting at not more than 30 mA. Ask your installer for advice.
• The installation of the appliance and its use must however comply with the standards in force in you - CAUTION: Never use your appliance with wet hands or near water contained in bath tubs, showers, sinks or other containers...
- When using the appliance in the bathroom, unplug it after use as the presence of water nearby may pose a danger even when the appliance is turned off.
- This appliance is not intended for use by persons (including children) with reduced physical, sensory abilities, or lack of experience and knowledge, unless they have been given supervision or instruction cor the appliance by a person responsible for their safety. Children should be supervised to ensure that the with the appliance.
- If the supply cord is damaged, it must be replaced by the manufacturer, its service agent or similarly sons in order to avoid a hazard.
- Stop using your appliance and contact an Authorised Service Centre if:
- your appliance has fallen,
- it does not work correctly.


• The appliance must be unplugged:
- before cleaning and maintenance procedures.
- if it is not working correctly.
- as soon as you have finished using it.
- if you leave the room, even momentarily.
- Do not use if the cord is damaged.
- Do not immerse or put under running water, even for cleaning purposes.
- Do not hold with damp hands.
- Do not hold the appliance by the casing, which is hot, but by the handle.
- Do not unplug by pulling on the cord, rather pull out by the plug.
- Do not use an electrical extension lead.
- Do not clean with abrasive or corrosive products.
- Do not use at temperatures below 0^ and above 35^ .
GUARANTEE : Your appliance is designed for use in the home only. It should not be used for professional purposes. The guarantee becomes null and void in the case of improper usage.
9. TIPS FOR A SUCCESSFUL HAIRCUT
- Use the hair trimmer on clean, dry hair
- Dry the hair in the direction of the hairstyle you wish to obtain
- Position the person whose hair you are going to cut in such a way as to be able to see the his/her head (Fig. 5)
Before starting a cut, examine the hollows and bumps on the head, which are often located at the nape of the neck (if you place the trimmer directly against a bump, you will obtain a lighter area
- At the beginning, only cut a small quantity of hair, until you are familiar with the length left b comb.
- Never stop the trimmer in mid-stroke.
- Start with the comb with the highest number (i.e. the one which leaves the most hair) before another comb.
Key :
×××=easy cut
××××=cut which requires some practice
××××= difficult cut
10. FOR A SUCCESSFUL ROUND CREW CUT
BASIC METHOD
With this method, the cut follows the shape of the skull.
- Combs necessary for this cut: 3 mm, 9 mm, 18 mm (fig. 6).
- Do not forget to change the comb as you progress through the hair.
1st STAGE : THE CUT.
a) Nape.
- Brush the hair.
- Begin by cutting the hair at the nape upwards, using comb 18 mm.
- Hold the trimmer firmly against the hair, with the comb's teeth pointing slightly upwards (fig. 7)
- Slowly raise the hair trimmer towards the top and outside of the hair, cutting only a small arm hair at a time (fig. 8).
- Once the hair at the nape has been evenly cut using comb 18mm , replace the removable corr order to obtain the required length and repeat the first 3 operations.
- Stop the cut at regular intervals, comb the hair and check the result.
b) Sides and top
- Repeat the above operations to cut the sides.
- Change the comb as you change areas (see fig. 6).
- For the top, use the same technique, cutting the hair from the forehead to the crown, against 1 of the hair" (fig. 9). Then, level off to match the sides.
2nd STAGE : CONTOURS AND FINISH
a) Nape and sideburns
- Comb the hair.
• Take off the removable comb from the hair trimmer. - Move the cutting height lever back to 'very short' position (lever released).
- Cut the hair from the edge of the cut, moving downwards, holding the trimmer upturned and rig angles to the head. Use short strokes (figs. 10 and 11).
- Repeat these operations for the sideburns (fig. 12).
b) Around the ears.
- Comb thoroughly the hair around the edge of the ear; take off the removable comb.
- Hold the trimmer on the edge, but only use a corner of the trimmer, following slowly the required contour and following the direction of the cut (fig. 13).
Tips :
- When using the hair trimmer without a removable comb, make sure that you use controlled, light movements.
- For the finishing strokes, ensure that the hair trimmer remains at right angles to the skin, in order to avoid injury (fig. 14 and 15).
11. FOR A SUCCESSFUL AMERICAN-STYLE CUT
A very short cut on the sides and the nape, and very short on the top.
- Combs necessary for this cut : 3 mm, 9 mm or 18 mm (fig. 16).
- Do not forget to change combs as you progress through the hair.
1st STAGE : THE CUT
- To cut the hair on the sides and the nape, see the "Round Crew cut" chapter. At the end, use comb to obtain a shaven cut.
- For the top, at the locations indicated by the zone change lines (see fig. 16), use comb 9 or 1 order to keep the length longer. Cut the hair from front to back.
2nd STAGE : CONTOURS AND FINISH
- Consult the "Contours and finish" paragraph in the "Round Crew cut" section.
12. FOR A SUCCESSFUL COMB OR FINGER CUT (square crew cut)
This cut provides a flat surface on the top of the head.
- Combs necessary for this cut : 3, 18 mm + fingers (fig. 17)
- Do not forget to change combs as you progress through the hair.
1st STAGE : THE CUT
• To obtain a successful square crew cut, preliminary drying is the most important factor (fig. 18).
- Dry the hair against the lie in order to raise the crew cut.
- Begin the cut on the sides and the nape, using the combs specified in fig. 17 (for the cut pro consult the chapter entitled "Round crew cut").
• To obtain a flat top, use the normal comb or, failing that, your fingers (fig. 19 and 20).
- take off the removable comb from the hair trimmer,
- using the styling comb (or your fingers), raise a small strand of hair (the hair must be in a ve position in relation to the skull),
move the comb or your fingers along the strand until you obtain the required length,
- use the hair trimmer to cut the hair sticking out of the comb or your fingers, using the latter
- the height of the last strand cut is used as a guide for the subsequent strands,
- continue in this way, strand by strand, moving gradually from the back to the top of the skull, then to the front.
- comb the hair regularly to remove the cut hair and check the condition of the cut,
- to obtain a perfect transitional area (A on fig. 17), between the top and side hair, slightly tilt t comb and cut the excess hair (fig. 21).
2nd STAGE : CONTOURS AND FINISH
• See the paragraph entitled "Contours and finish" in the "Round Crew cut" section.
13. FOR A SUCCESSFUL TRIM
1st STAGE : THE CUT
To ensure a consistent and Professional result when cutting the excess hair. For this cut, work will be removable comb.
a) Around the ears (fig. 22 and 23)
- Comb the hair in the required style.
- Place the upturned hair trimmer between the sideburns and the ear and make sure that the black is placed at the roots of the hair (only use the tip of the hair trimmer).
- Move the trimmer slowly above, around and behind the ears.
b) Nape (fig. 24)
- For the nape, hold the hair trimmer upturned, pressing lightly against the hair.
- Proceed as shown in the sketch below, moving downwards, in short strokes.
c) Sideburns (fig. 25)
- Move the trimmer downwards, holding it upturned, with the cut line at right angles to the head. Proceed in short strokes.
14. FOR A SUCCEWSSFUL "SHORT BACK AND SIDES"
With this cut, on the sides and nape only, your hair is kept long on the top (fig. 26).
- Combs necessary: 3 or 9 mm, according to the required length (fig. 26).
1st STAGE : THE CUT
- Cut the hair on the nape of the neck and the sides (following the procedure described in the "Crew cut" paragraph), using the hair trimmer fitted with comb 3 or 9mm (according to the required length), up to point A (see sketch).
- Starting from point A (located a few cm above the ear) (fig. 26), use a flat comb to obtain a clean line. Tilt the comb in relation to the skull (fig. 28) and cut the hair exceeding the comb, u hair trimmer without its removable combs (use this comb as a guide) (fig. 27).
- Do not cut the hair on the top.
2nd STAGE : CONTOURS AND FINISH
• See the "Contours and finish" chapter in the "Round Crew cut" section (fig. 29).
ENVIRONMENT PROTECTION FIRST !
① Your appliance contains valuable materials which can be recovered or recycled.
Leave it a local civic waste collection point.