
iWa250 - Audio Amplifier MTX Audio - Free user manual and instructions
Find the device manual for free iWa250 MTX Audio in PDF.

| Product Type | Audio Amplifier |
| Brand | MTX Audio |
| Model | iWa250 |
| Dimensions (L x W x H) | 8 x 20 x 8 cm |
| Weight | 1900 g (amplifier only) |
| Power Supply | 100-120 V / 220-240 V, 50-60 Hz, universal |
| Output Power | 2 x 50 W RMS @ 4 Ω ; 2 x 25 W RMS @ 8 Ω (0.1% THD+N) |
| Compatible Impedance | 4 to 8 Ω |
| Inputs | AirPlay/DLNA (Wi-Fi), Auxiliary (RCA), Optical (TOSLINK) |
| Wireless Connectivity | Wi-Fi 2.4 GHz, compatible with AirPlay, DLNA, Spotify Connect |
| Remote Control | Infrared with cable-mounted receiver (100 cm) |
| LED Indicators | Left LED: Wi-Fi status; Right LED: active input |
| Power Consumption | Network standby: 2.9 W; Off: 0.4 W |
| Remote Control Battery | Button cell (included) |
| Care and Cleaning | Clean with a dry cloth |
| Safety | Follow safety instructions; disconnect before cleaning; do not expose to water |
| Repairability | Have repairs carried out by qualified personnel |
| Recycling | Do not dispose of; take to a collection point for recycling |
| Box Contents | Amplifier, 2 Wi-Fi antennas, power cable, IR receiver, remote control, manual |
Frequently Asked Questions - iWa250 MTX Audio
User questions about iWa250 MTX Audio
0 question about this device. Answer the ones you know or ask your own.
Ask a new question about this device
Download the instructions for your Audio Amplifier in PDF format for free! Find your manual iWa250 - MTX Audio and take your electronic device back in hand. On this page are published all the documents necessary for the use of your device. iWa250 by MTX Audio.
USER MANUAL iWa250 MTX Audio
natural_image
Exterior view of a white audio device with two black antennas and red connectors (no visible text or symbols)Owner's Manual
iWa250
Smart Wireless Airplay® DLNA® TOSLINK® 2x50W RMS Amplifier
Designed by MTX in Phoenix, AZ - USA
Made for

iPod

iPhone

iPad


Spotify

dlna
Thank you for purchasing the MTX iWa250 high-end, high-definition audio amplifier. The iWa250 is designed to deliver a deeper dimension that brings your music to life. No other system provides the exacting measure of clarity in such a small unit. Whether you are listening from your iPad ^® , iPhone ^® , iPod ^® or your computer, the iWa250 delivers outstanding sound quality. Congratulations for making a smart choice and enjoy the ultimate audio experience with MTX.
Summary
- In the Box
- Specifications
- Connections
- LED status
- Remote control keys
- Installation
- How to connect the iWa250 to your Wi-fi network (iOS macOS)
- How to choose a streaming device with iOS
- How to choose a streaming device with macOS
-
How to connect the iWa250 to your Wi-fi network (Android®/Windows®)
-
"Wi-fi Direct" Mode: the iWa250 can create its own Wi-fi network
- How to use Spotify Connect
- Automatic Networked Standby and OFF
- Safety Informations
- About Apple® & Airplay®
- RF Parameters
- Recycling
- Support / Help / Question ?
- Stay Tuned
1. In the Box 2. Specifications
1x iWa250 amp with its built in universal power supply
2x Wi-fi antennas
1x Power cable (Europlug)
1x IR (Infrared) receiver
1x Remote control
1x This owner's manual
- Output Power :
- 2x50W RMS @4Ω 0,1% THD+N
- 2x25W RMS @8Ω 0,1% THD+N
- Compatible load : 4Ω to 8Ω
- Inputs: - Airplay®/DLNA® - Aux (RCA) - TOSLINK® (JIS F05)
• Infrared remote control
• Power supply: 100V\~120V - 220V\~240V, 50\~60Hz - Dimensions: 3.15"x 8"x 3.15" (8x20x8cm)
• Weight : 1900g (Amp only)
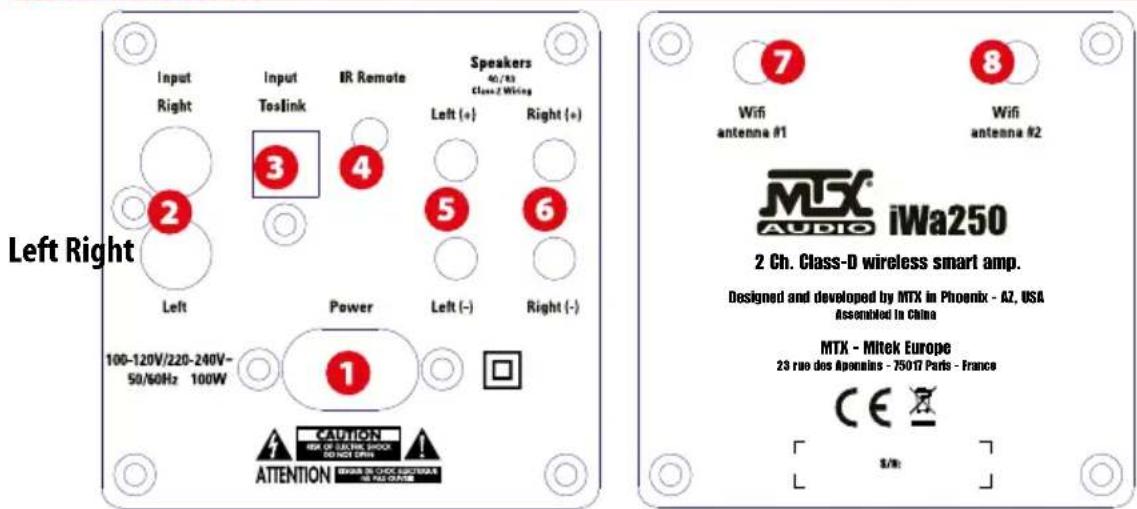
3. Connections
Top
3. Connections
- Power supply connector - use the provided power cord and connect it to a 110V or 220V wall plug. You don't need to change any setting, the power supply is universal.
- RCA Input - These RCA inputs are used with your external music source. MTX recommends only high quality RCA cables to decrease the possibility of radiated noise entering the system.
-
TOSLINK® input - this optical input is designed to be connected with any optical audio device. For example, you can use it with your TV, your DVD/CD/BR player or any streaming device.
-
Infrared receiver connector - Connect the provided IR sensor. Note that without IR sensor, the remote control will not be functional. It also requires that the IR receiver and IR remote control are in sight.
5&6. Speakers connectors - Connect 4Ω or 8Ω speakers here. Ensure correct polarity, positive-to-positive (+/+) and negative-to-negative (-/-). Reversing the polarity strongly degrades the bass level and sound quality.
7&8. Wi-fi antenna connectors - Connect the provided antennas. Note that the Airplay®/DLNA® input will not work properly without the antennas.
4. LED Colours Status
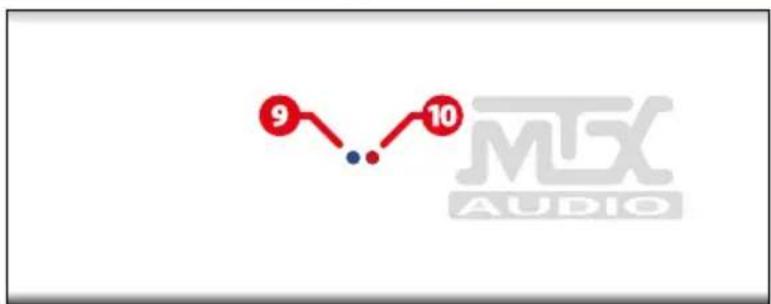
9. Wi-fi status LED (Left) :
- Blue: connected to a Wi-fi network (Regular status).
- Flashing Blue: Searching for a Wi-fi network.
- Flashing Pink : in pairing process to join the Wi-fi network. See section 7 (iOs macOS) or 10 (Android® Windows®)
- Red: "Wi-fi Direct" mode, the unit creates its own Wi-fi network called "MTX iWa250 network". See section 11.
10. Input LED (Right) :
• Green : Airplay®/DLNA®/Wi-fi input.
- Red : Aux input (RCA).
- Blue : Optical TOSLINK® input.
5. Remote control keys
1. Power OFF :
- Push once to switch the unit OFF -> Both LEDs will switch off. Note that this key doesn't switch on the amp. You have to push an input to switch the unit on.
- Push for 5 seconds to reset the amp -> The iWa250 will switch off with factory settings applied.
2. Airplay®/DLNA®/Wi-fi input :
- Push once to switch on the iWa250 on Airplay®/DLNA® input -> The right LED will switch on in green.
- Push for 10 seconds, the iWa250 will switch off the Wi-fi. If you push the "Airplay®/DLNA®" key for another 10 seconds, the iWa250 will switch on the Wi-fi again.
3. AUX (Auxiliary) input :
Push once to switch on the iWa250 and use the AUX input -> The right LED will switch on in red.
- TOSLINK® input : Push once to switch on the iWa250 and use the optical TOSLINK® input -> The right LED will switch on in blue.
- Volume UP : Use to raise the volume level.
- Volume Down : Use to reduce the volume level.
-
Skip backward : Push once to go back one track (Only with Airplay® and Spotify®).
-
Skip forward : Push once to go to the next track (Only with Airplay® and Spotify®).
-
Play/Pause : Push once to play or pause the track (Only with Airplay® and Spotify)
10. Wi-fi settings :
- Push once to start the pairing process and put the iWa250 in the network -> The left LED will flash pink during the process. When the amp will be connected to your network, the left
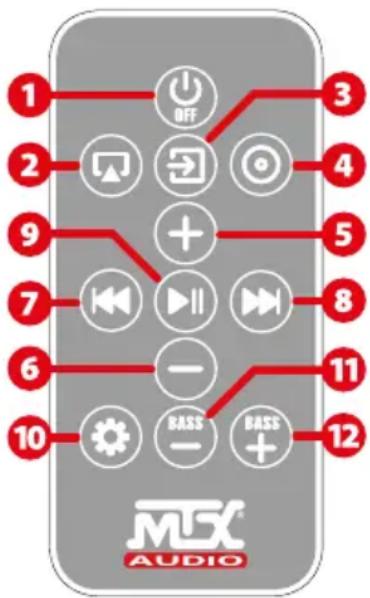
LED will turn to blue. See section 7 (iOS macOS) or 10 (Android® Windows®).
- Push for 5 seconds to turn the unit into "Wi-fi Direct" mode (The unit creates its own network) -> The left LED will turn to red. See section 11.
- Bass level down: use to reduce the bass level.
- Bass level up : use to raise the bass level.
6. Installation
- Attach the two antennas.
- Connect the speakers. Ensure correct polarity, positive-to-positive (+/+) and negative-to-negative (-/-). Reversing the polarity strongly degrades the bass level and sound quality. Note that the minimum speaker load is 4Ω. You can connect two 8Ω speakers on each side (Total will be four 8Ω speakers).
- Connect the RCA and the TOSLINK® inputs if they are available.
-
Connect the IR sensor and make it visible for the IR remote control. The remote control can't work properly if cannot "see" the receiver. The range of the infrared remote control is up to 10 m.
-
Connect the power cable to a wall socket (110V or 220V, there is no setting required). Your iWa250 is ready.
- On the remote control, remove the battery protection to activate it.
- Press the Airplay ^® , the AUX or the TOSLINK ^® input key on the remote control to turn on the amp.
- Adjust the volume level if using the AUX or TOSLINK®.
- If using Airplay®/DLNA®/Wi-fi, go to the next section.
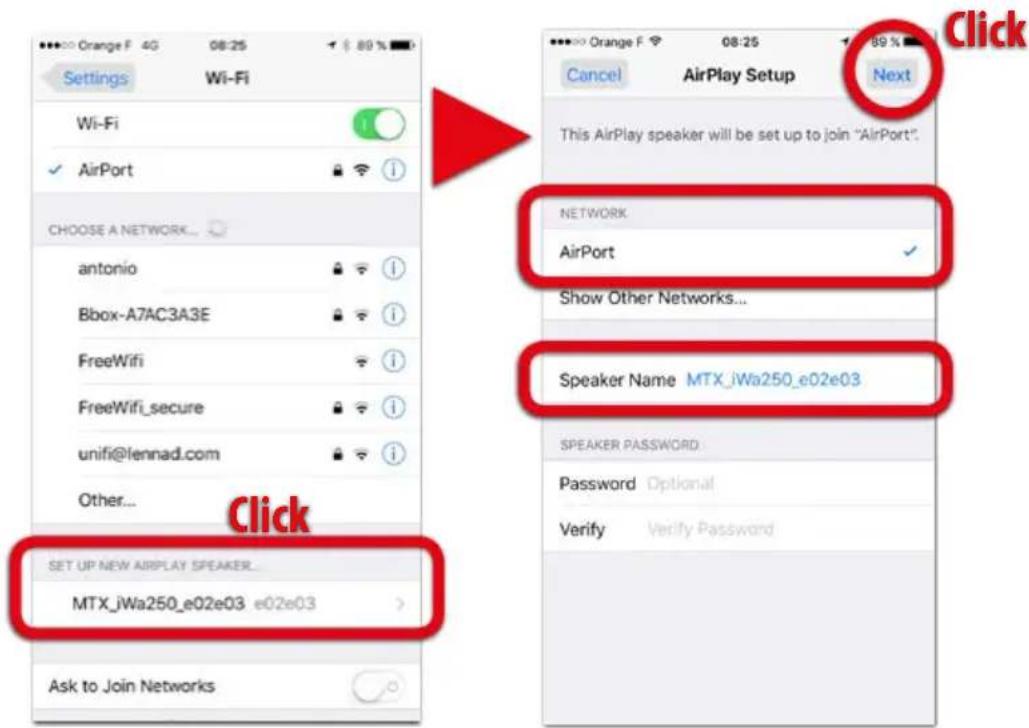
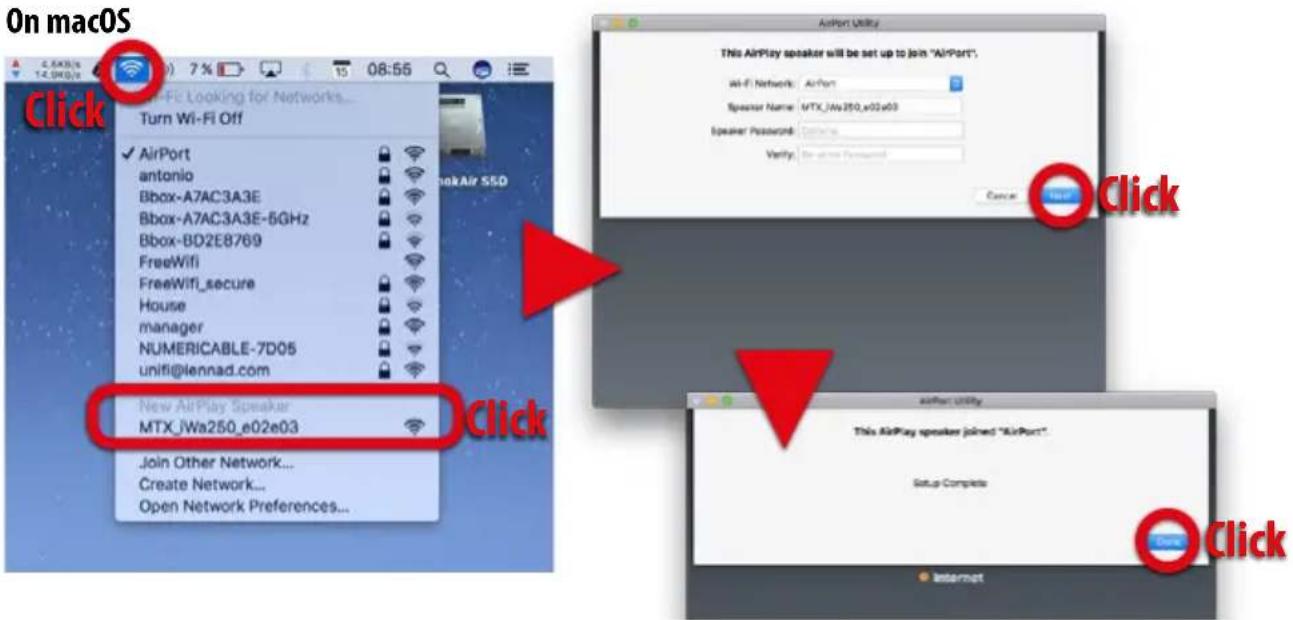
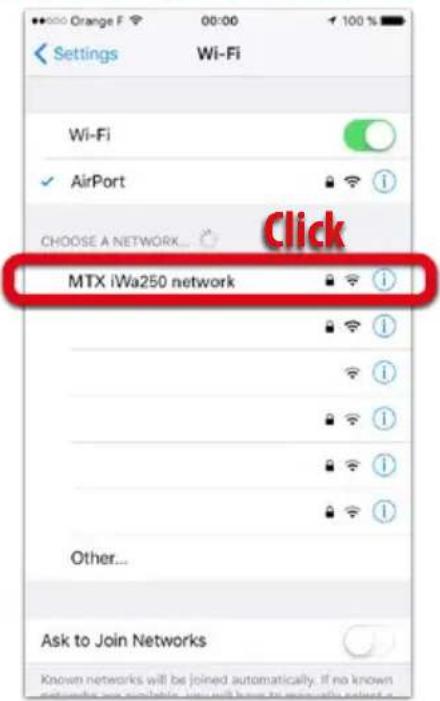
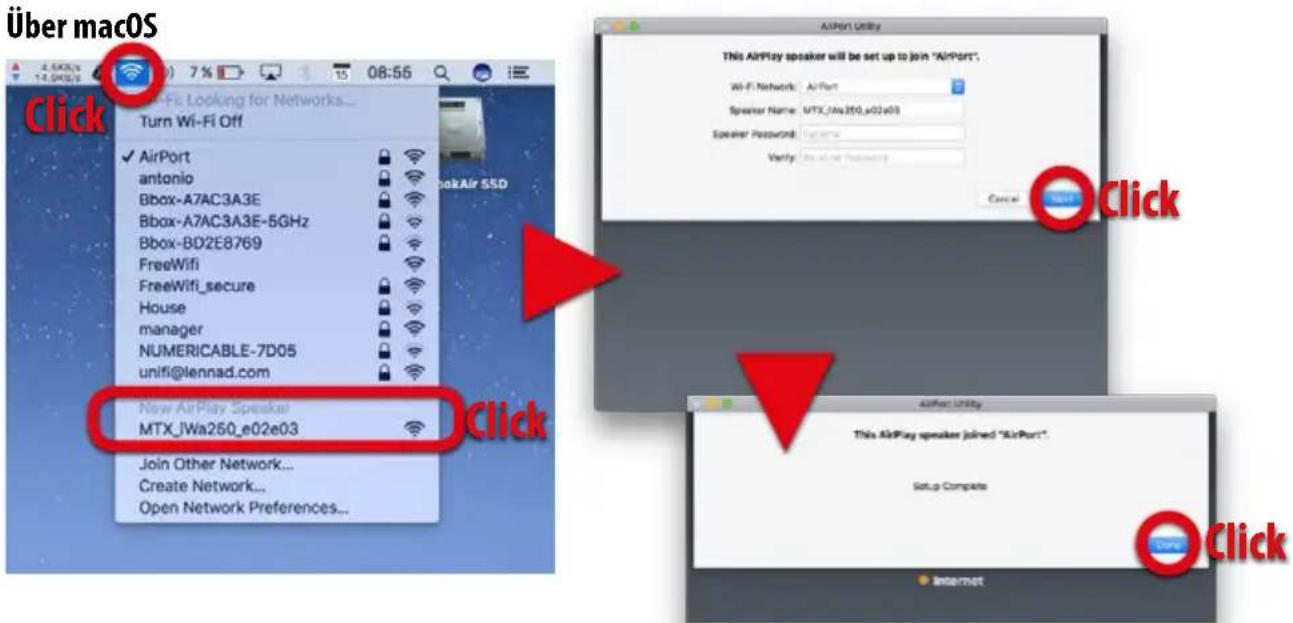
7. How to connect the iWa250 to your Wi-fi network (iOS macOS)
- The unit is switched on and the left LED is flashing blue, searching for a network.
- Push the n°10 "Wi-fi Settings" key (Gear) on the remote contrl once. The left LED will flash pink.
- On your iDevice or on your Apple® computer, go to the Wi-fi settings. On iOS, at the bottom of the dropdown list, you'll see a section named "Set up new Airplay Speaker". On macOS, in the radar drop down list, you'll see "New Airplay Speaker". Click on "MTX iWa250" and follow the instructions on your screen. The iWa250 will join the same Wi-fi network as your iDevice or your computer.
Note : at this step, you can change the name of the device (Office, Kitchen, Living room...).
For home use, we don't recommend using a password. For school or public use, we recommend using a password.
-
At the end of the process, the left LED should be constant blue.
-
If you want to joint a new Wi-fi network, just press n°10 "Wi-fi Settings" key once on the remote control and go to point 3 of this paragraph.
-
Go to your music app, play a tune and select "MTX iWa250" in your Airplay® output devices list.
On iOS
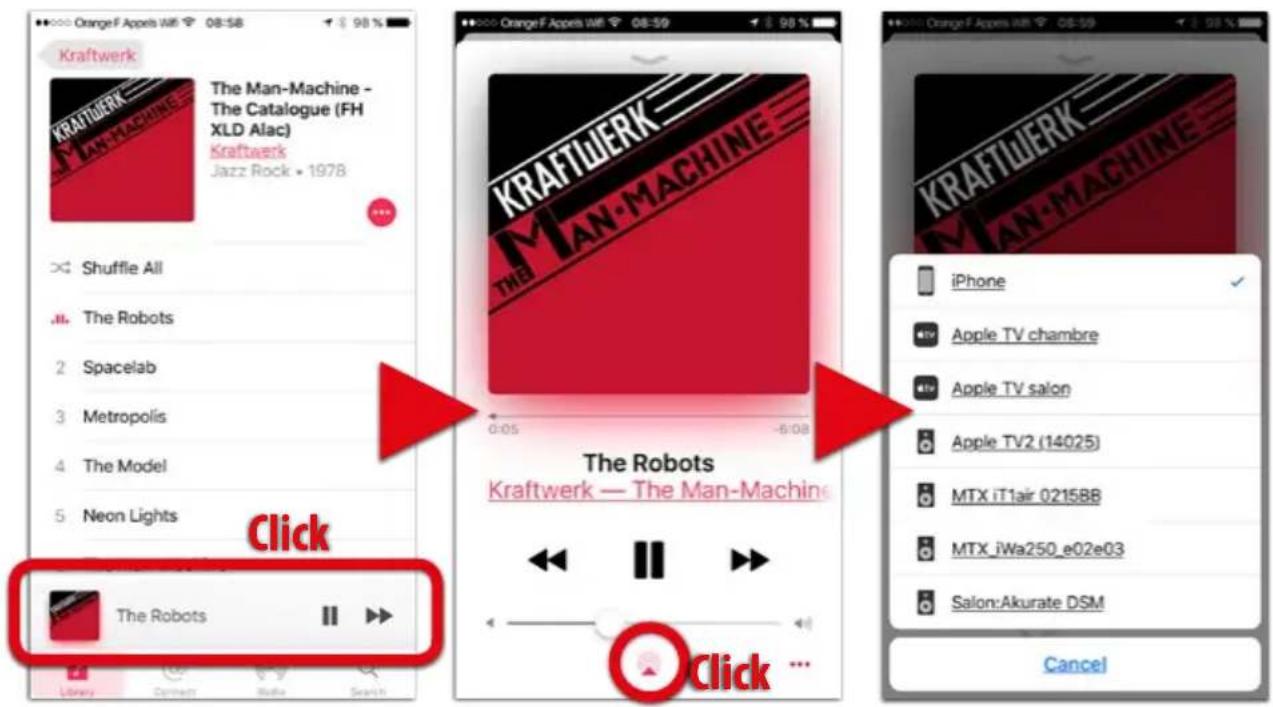
8. How to choose a streaming device with iOS
- The unit is on and the left LED is blue or red.
• If it is blue, you are connected to your network. -
If it is red, the amp is in "Wi-fi Direct" mode, so be sure your device is connected to "MTX iWa250 network".
-
Open the app "Music" and play a tune.
-
Click on the bottom bar to show the song's artwork.
-
At the right of the volume control bar, you will see the Airplay® logo. Click on it.
-
All the available Airplay ^® devices will show up.
-
In the list, select the output Airplay® device you want.
Alternative Airplay® output selection :
Open the bottom drawer, click on the Airplay ^® box at the bottom right and choose your Airplay ^® device. See picture at the bottom right.
WARNING :
If you don't see any Airplay® icon as shown below, your iDevice or the iWa250 are not in the network.
a. Check the Wi-fi connection on your iDevice. Be sure your are in the right network...
b. Restart the iWa250 pairing process from section 7.
Selecting an Airplay ^® output device
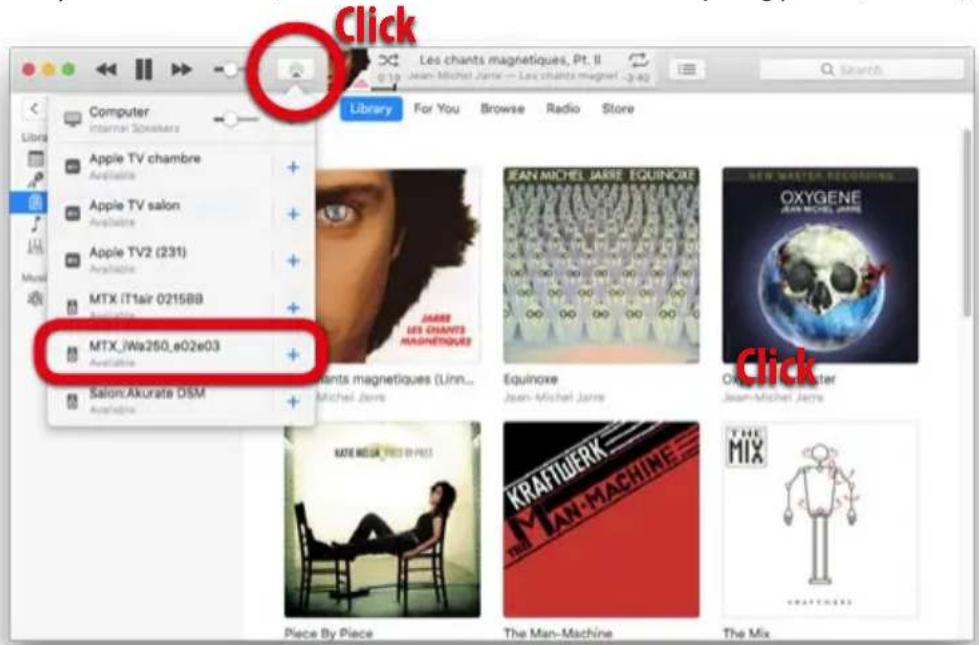
9. How to choose a streaming device with macOS
- Open iTunes on your Mac and play a tune.
- Next to the volume control bar, you'll see the Airplay® icon. Click on it.
- Select your output device in the dropdown list. The volume control can be set from the remote control or directly in iTunes.
- If you don't see your device in this list, check the network status and restart the pairing process (Section 7).
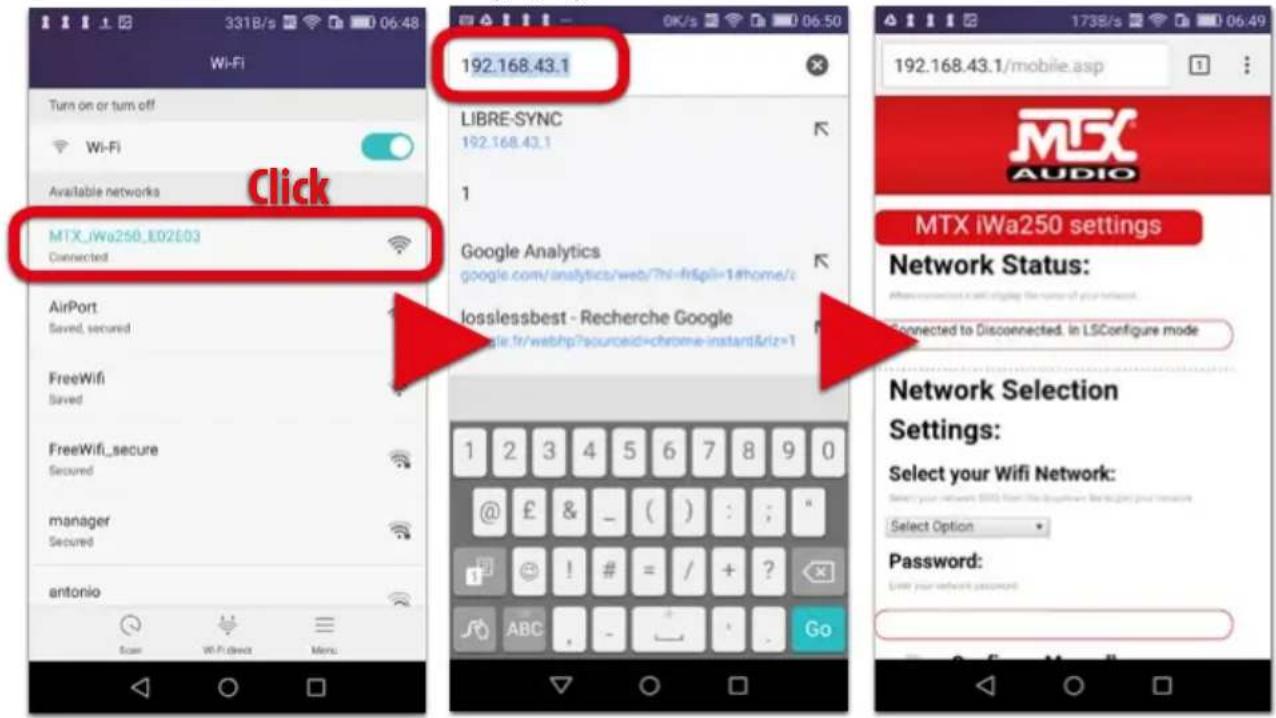
10. How to connect the iWa250 to your Wi-fi network (Android® Windows®)
- The unit is on and the left LED is flashing blue searching for a network.
- Push the n°10 "Wi-fi Settings" key on the remote control once. The left LED flashes pink.
- On your Android ^® device or on your PC computer, go to Wi-fi settings and select the network "MTX iWa250 network".
- Go to your internet browser and type 192.168.43.1 in the address field. You are in the settings page.
- Select your personal network in the list and enter its password.
- At the end of the process, the left LED should be constant blue.
- If you want to joint another Wi-fi network, just press the "Wi-fi Settings" key on the remote control and go to point 3.
- Go to your music app, play a tune and select "MTX iWa250" in your Wi-fi audio output list.
Wi-fi networks Browser Settings page
11. "Wi-fi Direct" mode : the iWa250 can create its own Wi-fi network
When there is no Wi-fi network available or when the connexion is not good enough (sound drops), the iWa250 can create its own Wi-fi network. This is call "Wi-fi Direct" mode.
- Turn on the unit and wait for 10 seconds for initialization.
- Push the "Wi-fi Settings" key on the remote control for around 5 seconds until the left LED starts flashing. The left LED will turn to red.
- On your iDevice or on your computer, go to the Wifi settings dropdown list and look for the network named "MTX iWa250 network".
- Go to your music app, play a tune and choose "MTX iWa250" as streaming device output.
- To go back to the regular "Client Mode" (The amp is available in your personal Wi-fi network), push on the "Wi-fi Settings" key (#10) on the remote control for 5 seconds and wait for the left LED to turn blue.
12. How to use Spotify Connect
The MTX iWa250 can stream directly from Spotify. Your iDevice or Android® device becomes "only" a remote control. It is convenient as it doesn't drain your battery and you can leave the room or even the house without any music interruption. You still can control the tracks (Play, pause, skip, forward, volume level...) with the iWa250 remote control.
To use this feature, just download the Spotify app on your device, register, choose a playlist, an album or some tracks,
and the iWa250 will contact Spotify by itself.
You don't have to do any special setting. It is transparent for the user. Only Spotify app is required on your device or on your compurer. When your are in the app, do not forget to select the iWa250 as audio output.
Note that Spotify Connect can't operate when the iWa250 is in "Wi-fi Direct" mode as the unit is not connected to internet.
13. Automatic "Networked Standby" and OFF
-
When the unit is ON, if there is no audio signal broadcasting on any of the 3 audio inputs, after 15 minutes, the unit will automatically enter "Networked Standby" mode. Both LEDs will switch OFF, but the unit will remain available in the Airplay®/DLNA® network.
-
When the unit is in "Networked Standby" mode, it will automatically switch ON if any signal is detected on any input, or if you call the unit from Airplay®/DLNA®.
-
In "Networked Standby" mode, the power consumption is 2,9W. If you push the "Power Off" key on the remote control, the unit will be OFF and the power consumption will be only 0,4W.
- If the Wi-fi is switched off (10 seconds push on the Air-play®/DLNA® key), the unit will turn off after 15 minutes without signal on the other inputs.
14. Safety Informations
- Read these instructions.
- Keep these instructions.
- Heed all warning.
- Follow all instructions
-
Do not use this apparatus near water.
-
Clean only with dry cloth.
-
Do not block any ventilation openings. Install in accordance with manufacturer's instructions.
-
Do not install near any heat sources such as radiators, heat registers, stoves, or other apparatus (including amplifiers) that produce heat.
-
Protect the power cord from being walked on or pinched particularly at plugs, convenience receptacles, and the point where they exit from the apparatus.
-
Only use attachments/accessories specified by the manufacturer.
-
Use only with the cart, stand, triPod ^® , bracked, or table specified by the manufacturer, or sold with the apparatus. When a cart is used, use caution when moving the cart/apparatus combination to avoid injury from tip-over.
-
Unplug this apparatus during lighting storms or when unused for long periods of time.
-
Refer all servicing to qualified service personnel. Servicing is required when the apparatus has been damaged in any way, such as power-supply cold or plug is damaged, liquid has been spilled or object have fallen into the apparatus, the apparatus has been exposed to rain or moisture, does not operate normally, or has been dropped.
-
Caution: Danger of explosion if battery is incorrectly replaced. Replace only with the same or equivalent type.
-
Warning : Batteries (battery pack or batteries installed) shall not be exposed to excessive heat such as sunshine, fire or the like.


-
The remote control is supplied with a coin/button cell battery. If the coin/button cell battery is swallowed, it can cause severe internal burns in just 2 hours and can lead to death.
-
Keep new and used batteries away from children. If the battery compartment does not close securely, stop using the product and keep it away from children.
-
If you think batteries might have been swallowed or placed inside any part of the body, seek immediate medical attention.
-
Warning : DO NOT INGEST BATTERY, CHEMICAL BURN HAZARD
This symbol is intended to alert the user to the presence of uninsulated dangerous voltage within the product's enclosure that may be of sufficient magnitude to constitute risk of fire and electric shock.
This symbol is intended to alert the user to the presence of important operating and maintenance instructions in the literature accompanying this product.
The appliance coupler is used as the disconnect device, the disconnect device shall remain readily operable.
15. About Apple® & Airplay®
Airplay ^® works with iPhone ^® , iPad ^® , and iPod ^® touch with iOS 4.3.3 or later, Mac with OS X Mountain Lion or later, and PC with iTunes 10.2.2 or later.
Made for iPhone® SE, iPhone® 6s Plus, iPhone® 6s, iPhone® 6 Plus, iPhone® 6, iPhone® 5s, iPhone® 5c, iPhone® 5, iPhone® 4s, iPad® Pro (9.7-inch), iPad® Pro (12.9-inch), iPad® mini 4, iPad® Air 2, iPad® mini 3, iPad® Air, iPad® mini 2, iPad® mini, iPad® (4th generation), iPad® (3th generation), iPad® 2, iPod® touch (6th generation), iPod® touch (5th generation).
"Made for iPod ^ ," "Made for iPhone ^ ," and "Made for iPad ^ "
mean that an electronic accessory has been designed to connect specifically to iPod ^ , iPhone ^ , or iPad ^ , respectively, and has been certified by the developer to meet Apple performance standards. Apple is not responsible for the operation of this device or its compliance with safety and regulatory standards. Please note that the use of this accessory with iPod ^ , iPhone ^ , or iPad ^ may affect wireless performance.
Airplay ^® , iPad ^® , iPhone ^® , iPod ^® , iPod ^® touch, and Retina are trademarks of Apple Inc., registered in the U.S. and other countries. iPad ^® Air, iPad ^® mini are trademarks of Apple Inc.
16. RF Parameters
Frequency Band is 2.4GHz & Maximum RF power transmitted in the frequency band is19.5+/-1.5dBm
17. Recycling
Do not trash this product. You must deliver it to the applicable collection point for recycling. The iWa250 is made of highly recyclable components and materials.
18. Support / Help / Question ?
If you need some support to set up your iWa250, if you need some help, or if you have any question, please e-mail us at (English, French and German) : support@mitekeurope.com
19. Stay Tuned

http://www.mtxaudio.eu

https://twitter.com/MTXEurope

https://www.facebook.com/MTXEurope

Merci
18. Support technique / Aide / Questions ?
https://twitter.com/MTXEurope
https://www.facebook.com/MTXEurope

Danke!
Oben


3. Anschluss
9. Wi-fi Status LED:
https://twitter.com/MTXEurope

https://www.facebook.com/MTXEurope
MTX®
AUDIO

MiTek
Corporation
Designed and Engineered by MTX in Phoenix - AZ, USA.
© 2016 Mitek. All rights reserved.
MTX is a registered trademark of Mitek.
Due to continual product development, all specifications are subject to change without notice.
Mitek Europe - MTX
23 rue des Apennins 75017 Paris - France
MTX is proud to be an American
Audio Company since 1971.

natural_image
Black and white U.S. flag with five stars (no text or symbols)
- iWa250
- Summary
- In the Box 2. Specifications
- Connections
- LED Colours Status
- Wi-fi status LED (Left) :
- Input LED (Right) :
- Remote control keys
- Power OFF :
- Airplay®/DLNA®/Wi-fi input :
- AUX (Auxiliary) input :
- Wi-fi settings :
- Installation
- How to connect the iWa250 to your Wi-fi network (iOS macOS)
- On iOS
- How to choose a streaming device with iOS
- Alternative Airplay® output selection :
- WARNING :
- How to choose a streaming device with macOS
- How to connect the iWa250 to your Wi-fi network (Android® Windows®)
- "Wi-fi Direct" mode : the iWa250 can create its own Wi-fi network
- How to use Spotify Connect
- Automatic "Networked Standby" and OFF
- Safety Informations
- About Apple® & Airplay®
- RF Parameters
- Recycling
- Support / Help / Question ?
- Stay Tuned
- Merci
- Support technique / Aide / Questions ?
- Danke!
- Anschluss
- Wi-fi Status LED:
- MTX®
- AUDIO
- MiTek
- Corporation
Brand : MTX Audio
Model : iWa250
Category : Audio Amplifier