KDW24PP - Dishwasher Hestan - Free user manual and instructions
Find the device manual for free KDW24PP Hestan in PDF.


User questions about KDW24PP Hestan
0 question about this device. Answer the ones you know or ask your own.
Ask a new question about this device
Download the instructions for your Dishwasher in PDF format for free! Find your manual KDW24PP - Hestan and take your electronic device back in hand. On this page are published all the documents necessary for the use of your device. KDW24PP by Hestan.
USER MANUAL KDW24PP Hestan
natural_image
Black-and-white still life featuring a glass of wine, a tiered plate with white ribbons, and a wavy surface of white plates (no text or symbols visible)INDOOR CLEANING
Dishwasher
KDW
Use and Care Manual
WARNING
IF THE INFORMATION IN THIS MANUAL IS NOT FOLLOWED EXACTLY, A FIRE OR EXPLOSION MAY RESULT CAUSING PROPERTY DAMAGE, PERSONAL INJURY, OR DEATH.
Do not store or use gasoline or other flammable vapors and liquids in the vicinity of this or any other appliance.
Installation and service must be performed by a qualified installer or service agency.
DO NOT REPAIR, REPLACE OR REMOVE ANY PART OF THE APPLIANCE UNLESS SPECIFICALLY RECOMMENDED IN THE MANUAL. IMPROPER INSTALLATION, SERVICE OR MAINTENANCE CAN CAUSE INJURY OR PROPERTY DAMAGE. REFER TO THIS MANUAL FOR GUIDANCE. ALL OTHER SERVICING SHOULD BE DONE BY A QUALIFIED TECHNICIAN.
READ THESE INSTRUCTIONS CAREFULLY AND COMPLETELY BEFORE INSTALLING OR USING YOUR APPLIANCE TO REDUCE THE RISK OF FIRE, BURN HAZARD, OR OTHER INJURY. KEEP THIS MANUAL FOR FUTURE REFERENCE.
SAFETY DEFINITIONS
WARNING
THIS INDICATES THAT DEATH OR SERIOUS INJURY MAY OCCUR AS A RESULT OF NOT OBSERVING THIS WARNING
CAUTION
THIS INDICATES THAT MINOR OR MODERATE INJURY MAY OCCUR AS A RESULT OF NOT OBSERVING THIS WARNING.
NOTICE
THIS INDICATES THAT DAMAGE TO THE APPLIANCE OR PROPERTY MAY OCCUR AS A RESULT OF NOT OBSERVING THIS WARNING.
INSTALLER: LEAVE THIS MANUAL WITH THE OWNER OF THE APPLIANCE.
HOMEOWNER: RETAIN THIS MANUAL FOR FUTURE REFERENCE.
Message from Hestan: Message from Hestan:
Hestan's award-winning culinary innovations and purpose-built features reinvented the restaurant kitchen and redefined culinary experience in some of America's most acclaimed restaurants. Hestan now takes this performance from the back of the house and puts it front and center in yours. Thoughtfully designed and meticulously built, Hestan will serve you beautifully for many years to come.
Hestan is the only residential brand born from the dreams and demands of professional chefs. From ranges to refrigeration, every detail is designed to deliver the performance and reliability expected in a restaurant – now available for you.
We appreciate you choosing Hestan, and we promise to deliver the very best to you.
Welcome to Hestan Welcome to Hestan

natural_image
Group of people sharing a meal together with wine glasses and a pie chart, surrounded by fresh dishes (no visible text or symbols)3 SAFETY PRECAUTIONS - BEFORE YOU BEGIN
5 MODEL NUMBERS
5 RATING LABEL
5 REGULATORY / CODE REQUIREMENTS
6 PRODUCT WARNINGS / SAFETY
9 FEATURES AND CONTROLS
11 OPERATION
29 CLEANING AND USER MAINTENANCE
33 TROUBLESHOOTING
36 PARTS / SERVICE
37 LIMITED WARRANTY
SAFETY PRECAUTIONS - BEFORE YOU BEGIN
When properly cared for, your Hestan appliance will provide safe, reliable service for many years. When using this appliance, basic safety practices must be followed as outlined below.
IMPORTANT: Save these instructions for the local utility inspector's use.
INSTALLER: Please leave these instructions with the owner.
OWNER: Please retain these instructions for future reference.
This appliance is NOT designed for installation in manufactured (mobile) homes or recreational park trailers. Do NOT install this appliance outdoors.
WARNING
ELECTRICAL SHOCK HAZARDELECTRICAL SHOCK HAZARD
Disconnect power before installing or servicing appliance. Failure to do so can result in death or electrical shock.

natural_image
Silhouette of a person in motion with a curved arrow, no text or symbols presentELECTRICAL GROUNDING ELECTRICAL GROUNDING
This appliance must be grounded. Grounding reduces the risk of electric shock in the event of a short circuit. Read the ELECTRICAL CONNECTIONS section of the Installation Manual for complete instructions.
DO NOT ground to a gas pipe.
DO NOT use an extension cord with this appliance.
DO NOT have a fuse in the NEUTRAL or GROUNDING circuit. A fuse in the NEUTRAL or GROUNDING circuit could result in an electrical shock.
INSTALLATION AND HOOK-UPINSTALLATION AND HOOK-UP
DURING INSTALLATION, TAKE CARE NOT TO INJURE YOURSELF ON THE SHARP EDGES OF THE APPLIANCE. WEAR SAFETY GLOVES.
NOTICE
INSTALLATION, REPAIRS AND SERVICING MUST BE PERFORMED BY QUALIFIED AND AUTHORIZED TECHNICIANS. AS WELL AS INVALIDATING THE WARRANTY, WORK CARRIED OUT BY UNAUTHORIZED PERSONS MAY GENERATE HAZARDS. INSTALLATION MUST BE PERFORMED IN COMPLIANCE WITH ALL THE DIRECTIVES IN FORCE IN THE COUNTRY OF INSTALLATION AND, IF THESE DO NOT EXIST: IN THE UNITED STATES THE NATIONAL ELECTRIC CODE; IN CANADA THE CANADIAN ELECTRIC CODE C22.1 - LATEST EDITION/PROVINCIAL AND MUNICIPAL CODES AND/OR LOCAL CODES.
BUILDING-IN A DISHWASHER BELOW A COOKTOP IS ABSOLUTELY FORBIDDEN.
WARNING
CHECK THAT THE VOLTAGE, FREQUENCY OF THE MAIN POWER SUPPLY MATCH THE VALUES ON THE RATING LABEL ON THE APPLIANCE, LOCATED ON THE RIGHT SIDE EDGE OF THE DOOR.
IN THE EVENT OF DAMAGE TO THE POWER CORD, HAVE IT REPLACED BY THE MANUFACTURER OR AN AUTHORIZED SERVICE TECHNICIAN.
BEFORE PROCEEDING WITH INSTALLATION, TURN THE CIRCUIT BREAKER OFF THAT SUPPLIES THE OUTLET FOR THE UNIT.
CHECK THAT THE MAIN SUPPLY IN THE PLACE OF INSTALLATION COMPLIES WITH THE REGULATIONS IN FORCE IN THE COUNTRY OF USE, AND THAT IT IS CORRECTLY GROUNDED.
THIS APPLIANCE MUST BE GROUNDED. IN CASE OF A MALFUNCTION, THE GROUND REDUCES THE RISK OF ELECTROCUTION BY PROVIDING THE ELECTRICAL CURRENT WITH AN ALTERNATIVE, LESS RESISTANT PATH. THIS APPLIANCE IS FITTED WITH A SUPPLY CORD CONTAINING AN EARTH WIRE AND PLUG. FIT THE PLUG INTO A SUITABLE SOCKET, INSTALLED AND EARTHED IN COMPLIANCE WITH THE LAWS IN FORCE IN THE COUNTRY OF INSTALLATION.
AN INCORRECTLY CONNECTED GROUND WIRE MAY GENERATE THE RISK OF ELECTROCUTION. IF IN DOUBT AS TO THE CORRECT GROUNDING OF THE APPLIANCE, CALL IN A QUALIFIED ELECTR-ICIAN OR TECHNICAL SERVICE. DO NOT CHANGE THE PLUG ATTACHED TO THE APPLIANCE. IF THE PLUG IS NOT SUITABLE FOR THE SOCKET, CONTACT A QUALIFIED ELECTRICIAN TO INSTALL A SUITABLE SOCKET.
DO NOT USE EXTENSION CORDS, ADAPTORS OR SHUNT CONNECTIONS IN ORDER TO AVOID THE POSSIBILITY OF OVERHEATING OR BURNING, WITH CONSEQUENT FIRE HAZARD.
DISHWASHER MODELSDISHWASHER MODELS
| MODEL NO. | DESCRIPTION | CIRCUIT BREAKER REQ'D |
| KDW24 24" Dishw | asher, Stainless Steel Door 15 Amp | |
| KDW24-OV 24" Dishwasher, Overlay Door 15 Amp | ||
| KDW24-XX 24" Dishwasher, Color Door 15 Amp |
NOTE: -XX indicates color model
-BK for Stealth - Black -WH for Froth - White -RD for Matador - Red
-YW for Sol - Yellow - OR for Citra - Orange - BG for Tin Roof - Burgundy
-PP for Lush - Purple -BU for Prince - Blue -GR for Grove - Green
-GG for Pacific Fog - Grey -TQ for Bora Bora - Turquoise
RATING LABEL
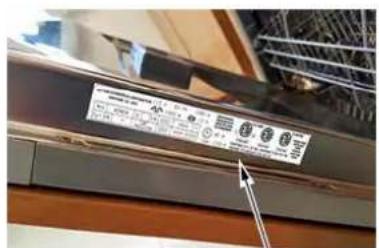
The rating label contains important information about your Hestan appliance such as the model, serial number, and electrical rating.
The rating label is located on the right side of the door edge.
If service is necessary, contact Hestan Customer Care with the model and serial number information shown on the label.
text_image
Close-up of a wall-mounted device with visible label and arrow pointing to a component, likely indicating a measurement or status.Rating Label Location
| Mod | KDWZ | R | S/N | 7ZZZZ | XXXX | Y |
| Full S/N | Y | COD MACCHINA | ZZZZZ | XXXX | 03 | 00 |
REGULATORY/CODE REQUIREMENTS
Installation of this dishwashing appliance must be made in accordance with local codes. In the absence of local codes, this unit should be installed in accordance with the National Electrical Code and local codes.
This appliance must be electrically grounded in accordance with local codes or in the absence of local codes with the National Electrical Code ANSI/NFPA 70, or Canadian Electrical code CSA C22.1.
NOTICE
THIS MANUAL IS AN INTEGRAL PART OF THE APPLIANCE. IT MUST ALWAYS BE KEPT INTACT TOGETHER WITH THE DISHWASHER. BEFORE USING THE APPLIANCE, CAREFULLY READ ALL THE
INSTRUCTIONS CONTAINED IN THIS MANUAL. INSTALLATION MUST BE PERFORMED BY A QUALIFIED TECHNICIAN, IN COMPLIANCE WITH LOCAL CODES. THIS APPLIANCE IS INTENDED FOR DOMESTIC USE AND SIMILAR APPLICATIONS SUCH AS THE STAFF KITCHENS OF SHOPS, OFFICES AND OTHER WORKPLACES, INSTITUTIONS, AND FOR THE USE OF GUESTS AT HOTELS, HOSTELS, BED AND BREAKFAST ESTABLISHMENTS AND OTHER RESIDENTIAL FACILITIES.
THE APPLIANCE IS DESIGNED FOR THE FOLLOWING PURPOSE: WASHING AND DRYING DISHES. ANY OTHER USE SHALL BE CONSIDERED IMPROPER. THE MANUFACTURER DECLINES ALL RESPONSIBILITY FOR USES OTHER THAN THOSE DESCRIBED ABOVE.
THE RATING LABEL FEATURING THE TECHNICAL DATA, SERIAL NUMBER AND MARKINGS IS VISIBLY POSITIONED ON THE OUTER EDGE OF THE DOOR. THE RATING LABEL ON THE OUTER EDGE OF THE DOOR MUST NEVER BE REMOVED.
THIS APPLIANCE IS NOT SUITABLE FOR USE ON BOATS, RECREATIONAL VEHICLES OR THE LIKE. DISHWASHERS CERTIFIED FOR DOMESTIC USE ARE NOT SUITABLE FOR COMMERCIAL APPLICATIONS.
ALWAYS TURN OFF THE DISHWASHER AFTER EACH USE TO AVOID WASTING ENERGY.
WARNING
CHECK THAT THE VOLTAGE, FREQUENCY AND CIRCUIT BREAKER MATCH THE VALUES ON THE RATING LABEL OF THE APPLIANCE.
IN THE EVENT OF A FAULT, SHUT OFF THE CIRCUIT BREAKER AND WATER VALVE.
DO NOT USE APPLIANCES WHICH HAVE BEEN DAMAGED DURING TRANSIT! IF IN DOUBT, CONSULT YOUR DEALER. THE APPLIANCE MUST BE INSTALLED AND CONNECTED IN ACCORDANCE WITH THE INSTRUCTIONS PROVIDED BY THE MANUFACTURER OR BY A QUALIFIED TECHNICIAN.
NOTICE
ONLY USE DETERGENTS SPECIALLY FORMULATED FOR DISHWASHERS.
DO NOT USE DETERGENTS FORMULATED FOR WASHING DISHES BY HAND.
ONLY USE RINSE-AID SPECIALLY FORMULATED FOR DOMESTIC DISHWASHERS.
WARNING
DO NOT INHALE OR SWALLOW DETERGENT AS THIS MAY CAUSE BURNS AND/OR PERMANENT DAMAGE TO THE NOSE, MOUTH AND THROAT, AND EVEN LEAD TO SUFFOCATION.
KEEP DETERGENT AWAY FROM YOUR EYES. IF ONE OF THE ABOVE SITUATIONS OCCURS, SEEK MEDICAL ASSISTANCE IMMEDIATELY.
TO PREVENT CHILDREN FROM COMING INTO CONTACT WITH DETERGENT, FILL THE DISHWASHER JUST BEFORE STARTING THE WASH CYCLE AND THEN KEEP THE DETERGENT OUT OF THE REACH OF CHILDREN.
THIS DISHWASHER MUST BE USED BY ADULTS. USE BY PERSONS WITH REDUCED MENTAL AND/OR PHYSICAL CAPABILITIES IS ONLY PERMITTED UNDER THE SUPERVISION OF A PERSON RESPONSIBLE FOR THEIR SAFETY.
DO NOT ALLOW CHILDREN TO APPROACH AND/OR PLAY IN OR ON THE DISHWASHER. THE APPLIANCE MAY CONTAIN RESIDUES OF DETERGENT WHICH CAN CAUSE PERMANENT DAMAGE TO THE EYES, MOUTH AND THROAT, AS WELL AS POSSIBLE DEATH BY SUFFOCATION. IF THE ABOVE OCCURS, SEEK MEDICAL ASSISTANCE IMMEDIATELY.
BEWARE - IT IS POSSIBLE FOR CHILDREN TO GET TRAPPED INSIDE THE DISHWASHER!
DO NOT INTRODUCE SOLVENTS SUCH AS ALCOHOL OR TURPENTINE WHICH MAY CAUSE AN EXPLOSION.
NOTICE
DO NOT POUR POWDER AND/OR LIQUID DETERGENT INTO THE RINSE-AID CONTAINER AS THIS WILL DAMAGE THE CONTAINER. DO NOT POUR POWDER AND/OR LIQUID DETERGENT INTO THE WATER
SOFTENER TANK AS THIS WILL DAMAGE THE TANK.
DO NOT USE INDUSTRIAL DETERGENTS AS THIS MAY DAMAGE THE APPLIANCE AND/OR TRIGGER VIOLENT CHEMICAL REACTIONS (E.G. EXPLOSIVE GAS).
DO NOT LOAD DISHES THAT ARE SOILED WITH ASH, WAX OR PAINTS.
DO NOT INTRODUCE ITEMS OF HEAT-SENSITIVE PLASTIC, SUCH AS DISPOSABLE CUTLERY OR PLATES, AS THESE MAY BECOME DEFORMED. DO NOT WASH PLASTIC OBJECTS UNLESS THEY ARE MARKED "DISHWASHER-SAFE" OR THE LIKE. FOR UNMARKED OBJECTS, FOLLOW THE INSTRUCTIONS OF THE MANUFACTURER. IF NO INFORMATION IS AVAILABLE, DO NOT WASH THESE OBJECTS IN THE DISHWASHER.
CAUTION
DO NOT INTRODUCE ANIMALS INTO THE DISHWASHER.
WHEN OPENING THE DISHWASHER DOOR DURING A CYCLE THERE IS A RISK OF SCALDING DUE TO THE HEAT CONTAINED INSIDE. DO NOT GET IN THE WAY OF THE STEAM LEAVING THE APPLIANCE AND DO NOT TOUCH THE COMPONENTS INSIDE.
WAIT 20 MINUTES AFTER THE END OF THE WASHING CYCLE OR AFTER INTERRUPTING IT BEFORE REMOVING THE DISHES IN ORDER TO ALLOW THEM TO DRY.
IN CERTAIN SITUATIONS, HYDROGEN MAY BE GENERATED INSIDE A HOT WATER SYSTEM THAT HAS NOT BEEN USED FOR OVER TWO WEEKS. HYDROGEN IS AN EXPLOSIVE GAS. IF THE HOT WATER SYSTEM HAS NOT BEEN USED FOR TWO WEEKS OR MORE, OPEN ALL THE HOT WATER VALVES AND ALLOW THE WATER TO RUN FOR A FEW MINUTES BEFORE USING THE DISHWASHER. THIS WILL DISCHARGE ANY HYDROGEN BUILDUPS. AS THIS GAS IS FLAMMABLE, DO NOT SMOKE OR USE NAKED FLAMES WHILE PERFORMING THIS OPERATION.
LEANING OR SITTING ON THE DISHWASHER DOOR WHEN OPEN MAY CAUSE THE APPLIANCE TO OVERTURN, PUTTING PEOPLE AT RISK. NEVER LEAVE THE DISHWASHER DOOR OPEN, PEOPLE MIGHT TRIP OVER IT.
DO NOT LEAN AGAINST OR STAND ON THE DISHWASHER RACKS.
DO NOT DRINK THE WATER RESIDUES WHICH MAY BE PRESENT INSIDE THE DISHES OR DISHWASHER.
KNIVES OR OTHER SHARP ENDED COOKING UTENSILS MUST BE PLACED IN THE CUTLERY BASKET BLADE DOWN, OR LAID HORIZONTAL IN THE UPPER RACK. TAKE CARE NOT TO CUT YOURSELF AND ENSURE THAT THEY DO NOT PROJECT FROM THE RACK.
POSITION SHARP/POINTED OBJECTS SO AS TO PREVENT THEM FROM DAMAGING THE DOOR GASKETS.
CAUTION
DO NOT OPERATE THE DISHWASHER UNLESS ALL THE OUTER PANELS HAVE BEEN POSITIONED CORRECTLY.
DO NOT TAMPER WITH THE DISHWASHER CONTROLS.
AQUASTOP MODELSAQUASTOP MODELS
THE AQUASTOP DEVICE PREVENTS FLOODING IN THE EVENT OF A WATER LEAK. WHEN THE AQUASTOP DEVICE IS TRIPPED (THE ERROR IS INDICATED ON THE DISPLAY), CALL IN A QUALIFIED TECHNICIAN TO IDENTIFY AND REPAIR THE FAULT.
WARNING
IN MODELS EQUIPPED WITH THE AQUASTOP DEVICE, THERE IS A SOLENOID VALVE INSIDE THE WATER INTAKE HOSE. DO NOT CUT THE HOSE AND DO NOT ALLOW THE SOLENOID VALVE TO DROP INTO WATER. IN THE EVENT OF DAMAGE TO THE WATER INTAKE HOSE, DISCONNECT THE APPLIANCE FROM THE ELECTRICAL POWER SUPPLY AND FROM THE WATER SUPPLY.
IMMEDIATELY AFTER INSTALLING THE DISHWASHER, PERFORM A QUICK TEST OF THE APPLIANCE (SEE "INSTALLATION" MANUAL). IF THE DISHWASHER FAILS TO OPERATE CORRECTLY, DISCONNECT IT FROM THE ELECTRICAL POWER SUPPLY AND CALL THE NEAREST TECHNICAL SERVICE CENTER. DO NOT ATTEMPT TO REPAIR THE APPLIANCE.
CAUTION
THE DISHWASHER MEETS ALL THE REQUIREMENTS SET OUT BY THE REGULATIONS IN FORCE CONCERNING SAFETY AND ELECTRICAL EQUIPMENT. ANY TECHNICAL CHECKS SHOULD BE CONDUCTED EXCLUSIVELY BY A TRAINED AND AUTHORIZED TECHNICIAN. REPAIRS CARRIED OUT BY UNAUTHORIZED PERSONS WILL INVALIDATE THE WARRANTY, AS WELL AS POSING A POTENTIAL HAZARD TO THE USER.
BEFORE CLEANING OR SERVICING THE APPLIANCE, REMOVE THE PLUG OR TURN OFF THE CIRCUIT BREAKER.
REMOVE THE WASHING COMPARTMENT DOOR AND DISCONNECT THE MAIN POWER SUPPLY WHEN REMOVING THE OLD DISHWASHER FOR MAINTENANCE OR DISPOSAL.
NOTICE
THE SYMBOL ON THE PRODUCT, OR ON THE DOCUMENTS ACCOMPANYING THE PRODUCT, INDICATES THAT THIS APPLIANCE MAY NOT BE TREATED AS HOUSEHOLD WASTE. INSTEAD IT SHALL BE HANDED OVER TO THE APPLICABLE COLLECTION POINT FOR THE RECYCLING OF ELECTRICAL AND ELECTRONIC EQUIPMENT. DISPOSAL MUST BE CARRIED OUT IN ACCORDANCE WITH LOCAL ENVIRONMENTAL REGULATIONS FOR WASTE DISPOSAL. FOR MORE DETAILED INFORMATION ABOUT TREATMENT, RECOVERY AND RECYCLING OF THIS PRODUCT, PLEASE CONTACT YOUR LOCAL CITY OFFICE, YOUR HOUSEHOLD WASTE DISPOSAL SERVICE OR THE SHOP WHERE YOU PURCHASED THE PRODUCT.
BY ENSURING THIS PRODUCT IS DISPOSED OF CORRECTLY, YOU WILL HELP PREVENT POTENTIAL NEGATIVE CONSEQUENCES FOR THE ENVIRONMENT AND HUMAN HEALTH.
NOTICE
THE MANUFACTURER DECLINES ALL RESPONSIBILITY FOR DAMAGE TO PERSONS, ANIMALS OR PROPERTY RESULTING FROM FAILURE TO OBSERVE THE ABOVE PRECAUTIONS, FROM TAMPERING WITH EVEN A SINGLE COMPONENT OF THE APPLIANCE, OR FROM THE USE OF NON-ORIGINAL SPARE PARTS.
IF IN DOUBT ABOUT THE CONTENTS OF THIS MANUAL, CONTACT HESTAN TECHNICAL SUPPORT.
DO NOT USE STEAM CLEANERS TO CLEAN THE DISHWASHER.
WARNING
SOME DISHWASHER DETERGENTS ARE STRONGLY ALKALINE. THEY CAN BE EXTREMELY DANGEROUS IF SWALLOWED. AVOID CONTACT WITH THE SKIN AND EYES AND KEEP CHILDREN AWAY FROM THE DISHWASHER WHEN THE DOOR IS OPEN. CHECK THAT THE DETERGENT RECEPTACLE IS EMPTY AFTER COMPLETION OF THE WASH CYCLE.
FEATURES AND CONTROLS
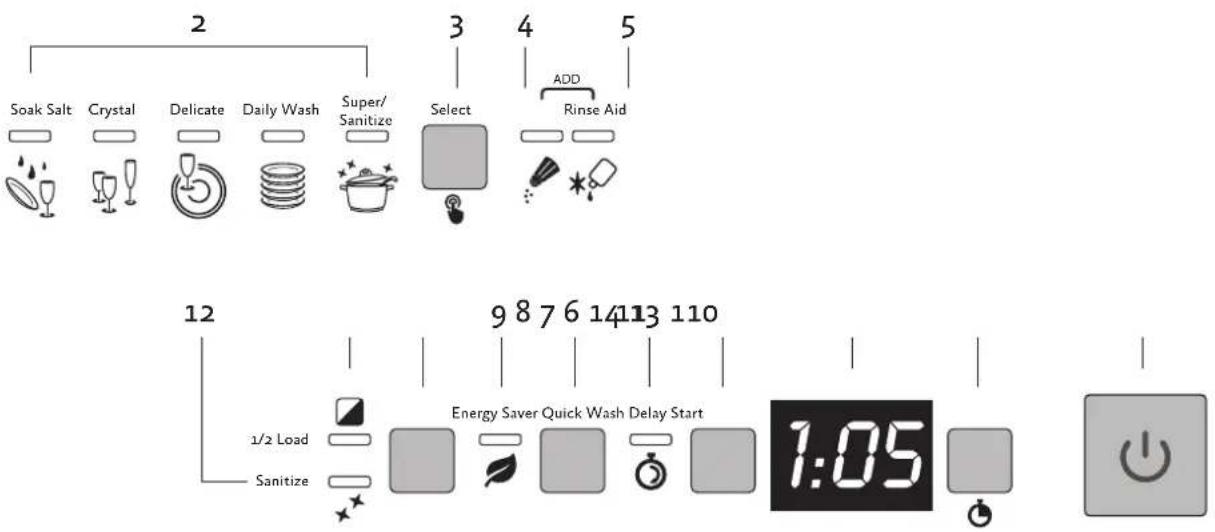
CONTROL PANEL CONTROL PANEL
All dishwasher controls are are located on the top panel of the the door.
NOTICE
The dishwasher can only be switched on, programmed, switched off, etc with door open.
The controls are depicted below, with a brief description on the following pages.

text_image
Control panel interface with icons for settings, buttons, and a timer displaying '1:05'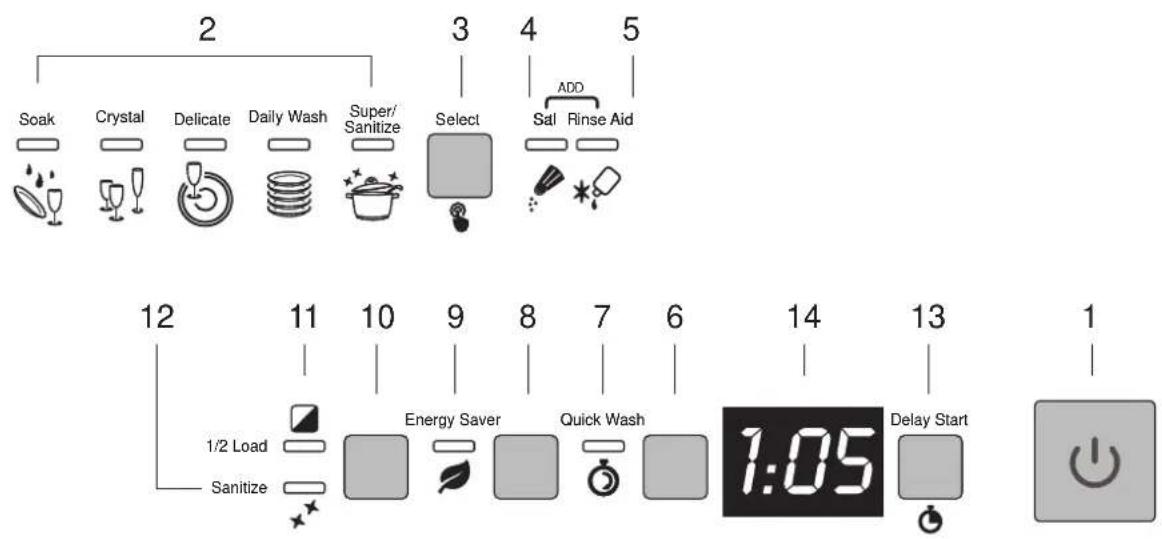
flowchart
graph TD
    A["Soak"] --> B["Crystal"]
    B --> C["Delicate"]
    C --> D["Daily Wash"]
    D --> E["Super/Sanitize"]
    E --> F["Select"]
    F --> G["Sal"]
    G --> H["Rinse Aid"]
    I["1/2 Load"] --> J["Sanitize"]
    K["Energy Saver"] --> L["Quick Wash"]
    M["1:05"] --> N["Delay Start"]
CONTROL PANEL DESCRIPTIONS CONTROL PANEL DESCRIPTIONS
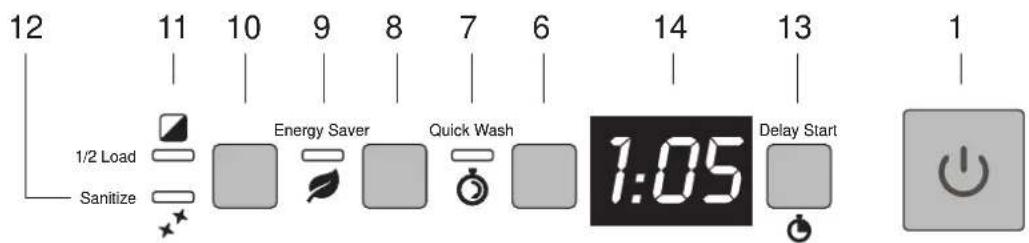
| ITEM | DESCRIPTION |
| 1 | On/Off buttonPress to switch the appliance on or off. |
| 2 | Program indicator lightsThese show which program is selected and whether there are any faults (Troubleshooting) |
| 3 | Program selection buttonPress repeatedly/as needed to select the required program. Also used to select water hardness adjustment mode. |
| 4 | Add Salt indicator lightWhen ON, indicates the appliance has run out of salt.When FLASHING, indicates that the appliance is in water hardness adjustment mode. |
| 5 | Add Rinse-Aid indicator lightWhen ON, indicates the appliance has run out of rinse-aid. |
| 6 | Quick Wash option buttonPress this button to start one of the quick wash programs (see Wash Cycles table). |
| 7 | Quick Wash programs indicator lightShows that one of the Quick Wash programs (6-10) will be run. |
| 8 | Energy Saver option buttonOption to reduce energy consumption by opening dishwasher door at end of cycle for drying. |
| 9 ON | when the Energy Saver option has been selected. |
| 10 | Half Load option buttonPress to select the half load option |
| 11 ON | when the Half Load option has been selected. |
| 12 | Sanitation indicator lightShows that sanitation has been completed (see notes in the programs table) |
| 13 | Delay Start buttonPress to delay the start of the program up to 24 hours |
| 14 Information display | |
text_image
2 Soak Salt Crystal Delicate Daily Wash Super/ Sanitize 3 Select 4 ADD Rinse Aid 5 12 1/2 Load Sanitize 9 8 7 6 14 13 110 Energy Saver Quick Wash Delay Start 1:05To select the most suitable program for the dishes to wash, consult the following table which specifies the most appropriate type of washing sequence depending on the kind of dishes and how dirty they are:
WASH CYCLES WASH CYCLES
| PROGRAM NUMBER, SYMBOL, & NAME | LOAD CROCKERY AND CUTLERY | PROGRAM PROGRESS | CONSUMPTIONDURATION | ||||
| MINUTES W | WATER | ENERGY kWh | |||||
| 1 |  | SOAK (1) | Pans and dishes awaiting completion of the load. | Cold prewash 15 | 0.95 gal.[3.5 l] | 0.02 | |
| 2 |  | CRYSTAL (2) | Glass, china and mixed dishes with light dirt. | Wash at 113°F [45°C]Cold rinseRinse at 158°F [70°C]* 131°F [53°C]Dry | 70* 140 | 3.17 gal.[12 l] | 0.5 |
| 3 |  | DELICATE (2) | Dishes washed immediately after use. | Wash at 113°F [45°C]Cold rinseRinse at 147°F [64°C]* 131°F [53°C]Dry | 150* 210 | 3.17 gal.[12 l] | 0.6-0.9 |
| 4 |  | DAILY WASH (2) | Dishes with normal dirt, including dried-on residues. | Cold prewashWash at 149°F [65°C]Cold rinseRinse at 158°F [70°C]* 131°F [53°C]Dry | 110* 170 | 3.45 gal.[13 l] | 1.00 |
| 5 |  | SUPER SANITIZE | Dishes with normal dirt, including dried-on residues. | Cold prewashWash at 149°F [65°C]Cold rinseRinse at 158°F [70°C]Dry | 105-130 | 3.17 gal3.96 gal[12-15 l] | 0.0-1.2 |
(1) Only run the Soak program with half loads.
(2) Program for Energy Star.
(*) Indicates Energy Saver activated.
- The cycle times and electrical energy listed are based on normal soil loads and 120°F [49°C] incoming water and will vary based on your actual conditions.
- Only "SUPER SANITIZED" program conforms to NSF Std 184 and is certified by INTERTEK with the ETL SANITATION LISTED.
- When the "Sanitize" light glows it means that the dishwasher and its contents have been sanitized according to the requirements of the National Sanitation Foundation (NSF).
WASH CYCLES (Cont.)
| PROGRAM NUMBER, SYMBOL, & NAME | LOAD CROCKERY AND CUTLERY | PROGRAM PROGRESS | CONSUMPTIONDURATION | ||||
| MINUTES W | WATER | ENERGY KWH | |||||
| 6 |  | RAPID 27' | Dishes with light dirt, washed immediately after use. | Wash at 100°F [38°C] Rinse at 122°F [50°C] | 27 | 1.72 gal. [6.5 l] | 0.4 |
| 7 |  | LIGHT QUICK | Dishes with light dirt. | Cold prewash Wash at 122°F [50°C] Cold rinse Rinse at 158°F [70°C] | 60 | 3.45 gal. [13 l] | 0.6 |
| 8 |  | ECO QUICK | Dishes with normal dirt, washed immediately after use. | Cold prewash Wash at 140°F [60°C] Cold rinse Rinse at 158°F [70°C] | 85 | 3.17 gal. [13 l] | 0.7 |
| 9 |  | NORMAL QUICK | Dishes with normal dirt, washed immediately after use. | Cold prewash Wash at 158°F [70°C] Cold rinse Rinse at 158°F [70°C] | 90 | 3.17 gal. [13 l] | 1.00 |
| 10 |  | STRONG and FAST | Mixed dishes with normal dirt without dried-on residues. | Wash at 149°F [65°C] Cold rinse Rinse at 158°F [70°C] | 55 | 2.51 gal. [9.5 l] | 1.12 |
(1) The cycle times and electrical energy listed are based on normal soil loads and 120^ F [49°C] incoming water and will vary based on your actual conditions.
After using the above tables to choose the most suitable washing cycle, program the appliance.
Before starting a washing program, make sure that:
• The water supply valve is open.
- The correct amount of detergent has been added to the dispenser (see "ADDING DETERGENT" on page 21).
- The spray arms are able to rotate freely and without obstruction.
- The racks have been correctly loaded (see "USING THE RACKS" on page 23).
• The dishwasher door is securely closed.
| INFORMATION DISPLAYED DISPLAY | |
| Scheduled program duration | 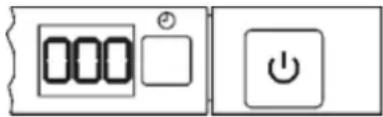 |
| Remaining program time | |
| Delayed start : 1 – 24 hours | |
| Error message: Err | |
TURNING ON THE DISHWASHER TURNING ON THE DISHWASHER
Press the On/Off button (Item 1, "CONTROL PANEL" on page 9) to start the dishwasher. Then wait for one of the program indicator lights to turn on.
SELECTING AND STARTING A PROGRAMSELECTING AND STARTING A PROGRAM
- For programs 1-5: press Select (Item 3, "CONTROL PANEL" on page 9) several times until the indicator light corresponding to the required program turns on (Items 2, same page)
- Select options as needed ("1/2 Load", "Energy Saver", "Delay Start") and close the door. The program will start after a few seconds. The indicator light will flash while the cycle is running (see "PROGRAM RUN PROJECTION INDICATOR" on page 14).
SELECTING PROGRAMS 6-10 SELECTING PROGRAMS 6-10
- To run programs 6, 7, 8, 9, 10, select the corresponding standard program (1-5) and then press the Quick Wash button (item 6 on page 10).
- For example, to select program 6, press "Select" until "Soak" is indicated, then press the "Quick Wash" button.
- Proceed as with programs 1-5.
IMPORTANT IMPORTANT
The door of the dishwasher must be closed within 4 seconds after use of the program selection button (Select) for all functions (e.g. program selection, change, deletion, etc.).
If the door is not closed within 4 seconds, the selected program's indicator lights will flash rapidly to indicate that the operation must be confirmed before the door is closed.
To confirm, simply press Select once. The indicators will blink slowly and you can close the door to start/resume the dishwasher.
The same applies if the dishwasher is opened with Delay Start set and the cycle not started (e.g. to add more dishes). Select must be pressed before the door is closed, restarting the program delay countdown.
If the door of the dishwasher has not been closed or has been incorrectly closed, the washing cycle will not begin. The "Program Run" light will be ON instead of flashing.
END OF WASH CYCLE END OF WASH CYCLE
The end of the program is signaled by a short beep. Additionally, the indicator lights of the Daily Wash and Super Sanitize wash programs will flash. The “Program Run” light will be OFF.
PROGRAM RUN PROJECTION INDICATOR PROGRAM RUN PROJECTION INDICATOR
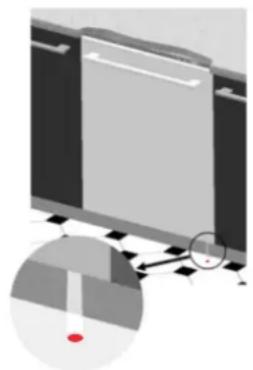
When a program is running, a flashing light is projected onto the floor under the right-hand corner of the door.
- If the program is selected but not running, the light will be steady ON.
At the end of the program, the light goes out.
natural_image
Pure electrical circuit lines without any symbols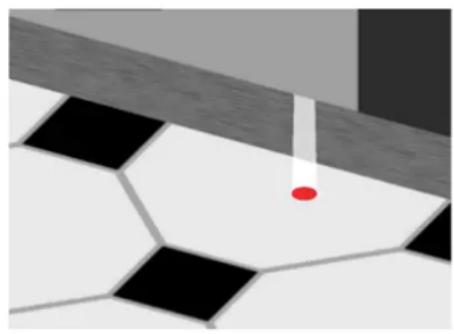
natural_image
Close-up of a tiled floor with black and white tiles, featuring a red dot and a white vertical line (no text or symbols)INTERRUPTING A WASH CYCLEINTERRUPTING A WASH CYCLE
To interrupt a wash cycle, open the dishwasher door. The cycle will be interrupted, the cycle's indicator lights will flash (blink rapidly) and a beep will indicate that the cycle has not finished.
To resume the wash cycle, press Select once (the indicators will then blink slowly) and then close the door. When the door closes, the cycle will start from where it was interrupted. This operation should be performed only if necessary as it could cause irregular performance.
CHANGING THE CURRENT WASH CYCLE CHANGING THE CURRENT WASH CYCLE
To change the current program, simply open the door of the dishwasher and press Select to select the new program. Close the door to run the new program automatically.
CANCELING THE CURRENT WASH CYCLE CANCELING THE CURRENT WASH CYCLE
To cancel the current program:
-
Open the door then press and hold Select (the cycle selection button) for a few seconds until the indicator lights of the fourth and fifth cycles turn on.
-
Close the door again.
The dishwasher will pump out and finish for about 1 minute. Then it will stop and the "Program Run" light will go OFF. When you open the door, the indicator lights of the fourth and fifth cycle will flash.
OPTIONS: OPTIONS:
These are functions to tailor the dishwasher program for your particular needs, such as delayed start, Half load, and more. (For descriptions of the basic cycles, see "Wash Cycles" on page 11.)
DELAY START DELAY START
• Available for all programs except Soak.
The DELAY START function delays the beginning of the wash cycle up to 24 hours beginning from the moment the delay programming is entered. This makes it possible to use the dishwasher at a specific time of day.
Before programming a delay, open the door of the dishwasher and select the required washing program. Select the delay by pressing the Delay Start button. Each time you press the button, the delay before the appliance starts is increased by 1 hour.
HALF LOAD HALF LOAD
Suitable when there are not many dishes to be washed, it saves energy and reduces the program duration. Place dishes in both baskets, then load the detergent dispenser (see "USING THE RINSE-AID AND DETERGENT DISPENSERS" on page 19) less than the normal amount for a full load. Press the Half Load button (item 10 on page 10) so the Half Load indicator illuminates (item 11, same page).
ENERGY SAVERENERGY SAVER
This option can be selected with the wash cycle of choice to further reduce energy consumption. Drying is aided by a special device that automatically releases the door, which opens slowly and smoothly by about an inch. This ensures perfect drying and greater control of rinsing temperatures, which can be kept at lower levels for significant energy saving. Once the door has opened, the end of the wash cycle is indicated by a short beep.
Energy Saver is activated automatically every time a wash cycle is selected (except for cycles that do not include the final drying phase) and can be disabled before the cycle is started.
NOTICE
When the function is activated, opening of the door must not be impeded in any way. Do not leave anything in the space in front of the door necessary to allow it to open.
Do not re-close the door during automatic opening as this would damage the mechanism. Wait for the mechanism to retract before re-closing the door.
At the end of the cycle, the dishwasher emits a short beep and the indicators of the fourth and fifth cycle flash. Turn off the appliance by opening the door and pressing the ON/OFF button.
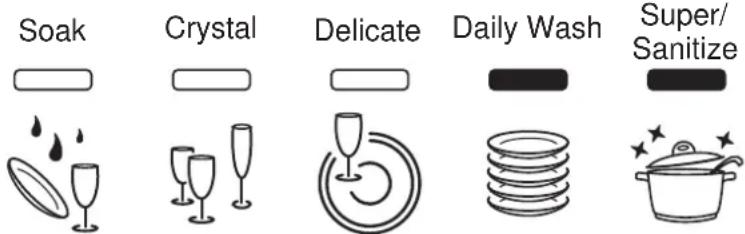
text_image
Soak Crystal Delicate Daily Wash Super/ SanitizeENERGY MANAGEMENT ENERGY MANAGEMENT
After 5 minutes of waiting (wash cycle completed, stopped or set but not started) the dishwasher switches to a standby state to reduce energy consumption.
In this state, the dishwasher indicator panel (lights/display) functions more intermittently, switching on every 5 seconds.
REMOVING DISHESREMOVING DISHES
At the end of the wash cycle, wait 20 minutes before removing the dishes in order to allow them to cool. To prevent any water droplets falling onto dishes from the upper racks, empty the lower rack items first and then the upper items.
ENERGY SAVING AND ENVIRONMENTAL RESPECTENERGY SAVING AND ENVIRONMENTAL RESPECTENERGY
• Always try to run the dishwasher fully loaded.
- Do not pre-wash the dishes under running water.
- Use the most suitable washing program for each type of load.
- Do not pre-rinse.
- If available, connect the dishwasher to a hot water system with a temperature of up to 140^ [60^] .
- When possible, skip the drying cycle by opening the door after washing. The air and the residual heat will dry the dishes to perfection.
FIRST USEFIRST USE
WARNING
BEFORE STARTING TO USE THE APPLIANCE, MAKE SURE YOU HAVE READ AND UNDERSTOOD ALL THE WARNINGS CONTAINED IN THE PRODUCT WARNINGS/SAFETY SECTION.
Once the dishwasher has been correctly installed, prepare for use as follows:
- Add the regenerating salt. (see "ADDING SALT" on page 18). When using the dishwasher for the first time, in addition to the salt it is also necessary to add one liter of water to the salt container.
- Add the rinse-aid. (see "USING THE RINSE-AID AND DETERGENT DISPENSERS" on page 19)
- Adjust the water softening system. (see next page)
- Add the detergent. (see "ADDING DETERGENT" on page 21)
REDUCING THE CONSUMPTION OF DETERGENTREDUCING THE CONSUMPTION OF
The phosphates contained in dishwasher detergents are harmful to the environment. To avoid using excessive amounts of detergent and to save on electricity:
- Separate the more delicate items from those that are more resistant to aggressive detergents and high temperatures.
- Do not pour the detergent directly onto the dishes.
ADJUSTING THE WATER SOFTENING SYSTEM ADJUSTING THE WATER SOFTENING SYS
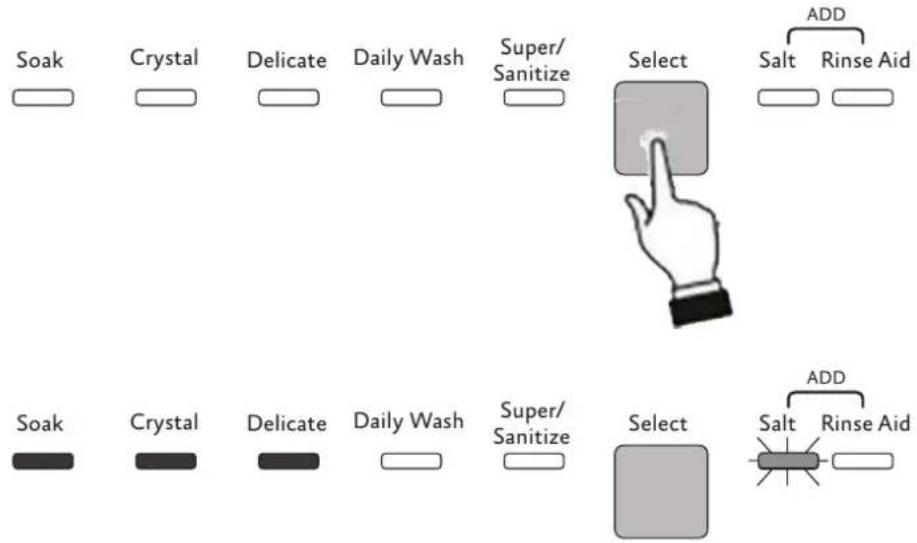
The dishwasher's water softener can be adjusted to suit the hardness of the water it is supplied with. The hardness is set using the Select (program selection) button.
The setting can be adjusted by holding the Select button down for 15 seconds until the ADD Salt indicator light flashes, while the Selected Program indicator lights to show the current hardness setting. Each press of the Select button changes the setting following the sequence in the Water Hardness Table below:
flowchart
graph TD
    A["Soak"] --> B["Crystal"]
    B --> C["Delicate"]
    C --> D["Daily Wash"]
    D --> E["Super/Sanitizeize"]
    E --> F["Select"]
    F --> G["Salt"]
    F --> H["Rinse Aid"]
    I["Soak"] --> J["Crystal"]
    J --> K["Delicate"]
    K --> L["Daily Wash"]
    L --> M["Super/Sanitizeize"]
    M --> N["Select"]
    N --> O["Salt"]
    N --> P["Rinse Aid"]
After carrying out the adjustment or displaying the current setting, if you do not touch the button for a few seconds the dishwasher will automatically exit from adjustment mode and return to the standard operating mode.
WATER HARDNESS TABLE
| WATER HARDNESS | SETTING | |||
| German degrees (°dH) | French degrees (°dF) | |||
| 0-6 | 0-11 | H0 | All lights off | |
| 7-10 | 12-18 | H1 | One light on | |
| 11-15 | 19-27 | H2 | Two lights on | |
| 16-21 | 28-37 | H3 | Three lights on | |
| 22-28 | 38-50 | H4 | Four lights on | |
| 29-50 | 51-90 | H5 | Five lights on | |
The default setting is H3. Contact your local water agency for information on the hardness of your water supply.
USING THE WATER SOFTENING SYSTEM USING THE WATER SOFTENING SYSTEM
The minerals in typical hard water (water hardness index) can cause whitish staining on dishes, which will tend to become dull over time. The dishwasher is equipped with an automatic softening system which uses a special regenerating salt to reduce the hardness of the water.
SETTING AND USAGE SETTING AND USAGE
The dishwasher is factory set for medium water hardness (level H3). When using water of medium hardness, the regenerating salt container should be refilled after approximately 20 washing cycles. For adjustment, see "ADJUSTING THE WATER SOFTENING SYSTEM" on page 17.
CAPACITY AND LEVEL INDICATOR CAPACITY AND LEVEL INDICATOR
The salt container can hold approximately 3.75 lb [1.7 kg] of granular salt. The dishwasher has an optical no-salt indicator. The cap of the salt container contains a green float which descends as the salt concentration in the water drops. When the green float can no longer be seen, the container must be topped up with regenerating salt.
ADDING SALT ADDING SALT
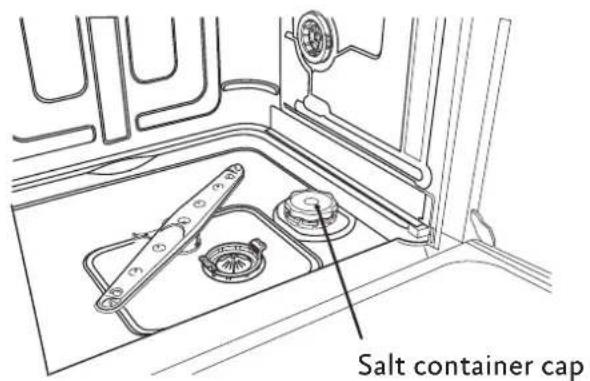
The salt container is situated at the bottom of the dishwasher. After removing the lower rack, unscrew the salt container cap by turning it counterclockwise and pour in the salt using the funnel supplied with the dishwasher. Before replacing the cap, remove any salt residues from around the opening.
text_image
Salt container cap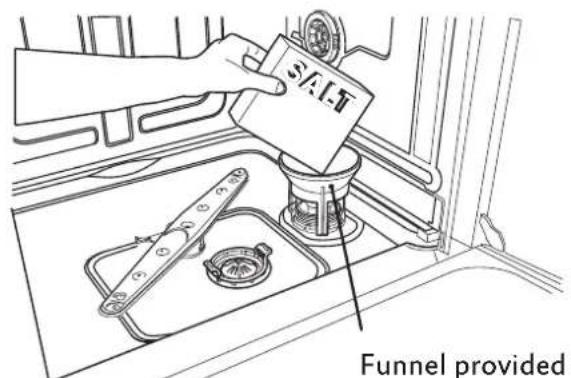
text_image
SALT Funnel provided- When using the dishwasher for the first time, in addition to the salt it is also necessary to add one liter of water to the container.
• Each time the salt container is refilled, make sure that the cap is securely closed. The mixture of water and detergent must never penetrate the salt container, as this would compromise the operation of the regeneration system. In the event of this occurring, the warranty will be invalidated. - Only use regenerating salt specially formulated for domestic dishwashers. If using salt tablets, do not fill the container completely.
- Do not use table salt as it contains insoluble substances which, over time, may damage the water softening system.
- When necessary, refill the regenerating salt container before starting the washing program. In this way, the excess saline solution will be immediately removed by the water. The prolonged presence of salt water inside the tank may lead to corrosion.
NOTICE
BE CAREFUL NOT TO CONFUSE THE SALT AND DETERGENT PACKAGES. ADDING DETERGENT TO THE SALT CONTAINER WILL DAMAGE THE WATER SOFTENING SYSTEM.
USING THE RINSE-AID AND DETERGENT DISPENSERS USING THE RINSE-AID AND DET
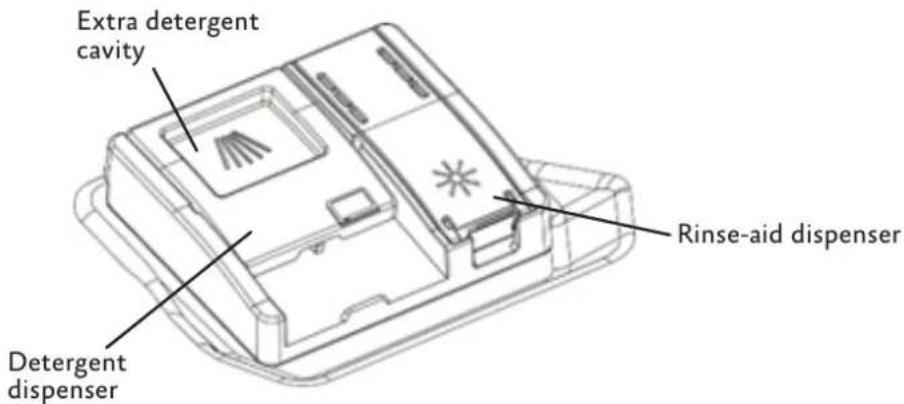
The detergent and rinse-aid dispensers are located on the inside of the door. The detergent dispenser is on the left and the rinse-aid dispenser is on the right. An external cavity on top of the main detergent dispenser is used to add extra detergent for some pre-wash cycles.
EN
text_image
Extra detergent cavity Detergent dispenser Rinse-aid dispenserWITH THE EXCEPTION OF THE SOAK PROGRAM, BEFORE EVERY WASHING CYCLE IT IS NECESSARY TO ADD THE REQUIRED AMOUNT OF DETERGENT TO THE DETERGENT DISPENSER. THE RINSE-AID, ON THE OTHER HAND, SHOULD ONLY BE ADDED AS REQUIRED.
ADDING RINSE-AID TO THE DISPENSERADDING RINSE-AID TO THE DISPENSER
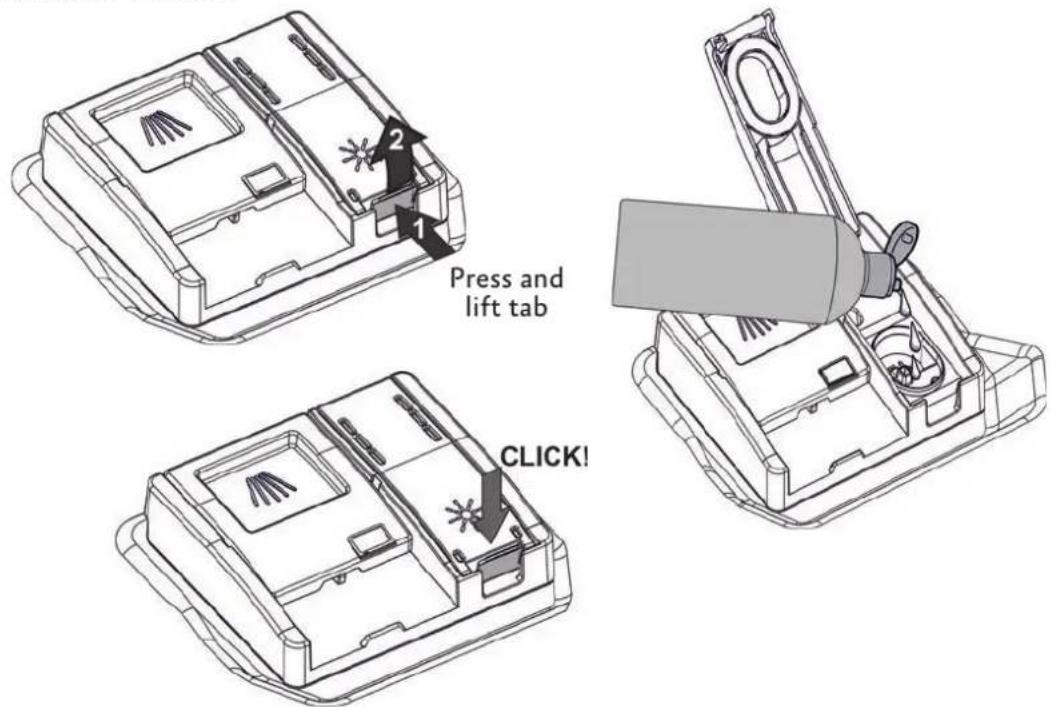
The rinse-aid helps the dishes dry faster and prevents the formation of scale deposits and staining. It is automatically added to the water during the final rinse cycle, from the container situated on the inner side of the door.
text_image
Press and lift tab CLICK!TO ADD RINSE-AID: TO ADD RINSE-AID:
- Open the dispenser by pressing and lifting the tab on the cover.
- Add the rinse-aid until the container is full (about 1/2 cup /140 ml). Refill with rinse-aid again when the rinse-aid indicator light illuminates.
- Close the cover, a click indicates when it is closed.
- Use a cloth to remove any spillage of rinse-aid which might lead to the formation of excess foam.
ADJUSTING THE RINSE-AID DISPENSER SETTING ADJUSTING THE RINSE-AID DISPENSER
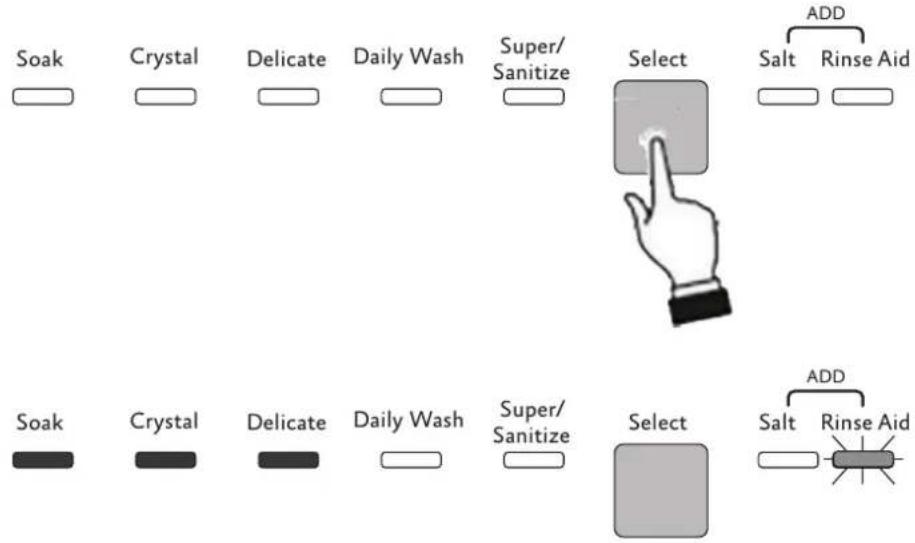
The rinse-aid dispenser can be set to one of 6 different levels. The setting can be adjusted to suit the hardness of the water to prevent spotting / staining. The hardness is set using the Select (program selection) button.
The setting can be adjusted by holding the Select button down for 20 seconds until the ADD Rinse-Aid indicator light flashes, while the Selected Program indicator lights to show the current hardness setting. Each press of the Select button changes the setting following the sequence in the Rinse-Aid Adjustment Table below:
flowchart
graph TD
    A["Soak"] --> B["Crystal"]
    B --> C["Delicate"]
    C --> D["Daily Wash"]
    D --> E["Super/Sanitizeize"]
    E --> F["Select"]
    F --> G["Salt"]
    F --> H["Rinse Aid"]
    I["Soak"] --> J["Crystal"]
    J --> K["Delicate"]
    K --> L["Daily Wash"]
    L --> M["Super/Sanitizeize"]
    M --> N["Select"]
    N --> O["Salt"]
    N --> P["Rinse Aid"]
After carrying out the adjustment or displaying the current setting, if you do not touch the button for a few seconds the dishwasher will automatically exit from adjustment mode and return to the standard operating mode.
RINSE-AID ADJUSTMENT TABLE
| Amount Dispensed | SETTING | ||
| 0 ml - not dispensed | b0 | All lights off | |
| Min. - 2 ml | b1 | One light on | |
| 3 ml | b2 | Two lights on | |
| 4 ml | b3 | Three lights on | |
| 5 ml | b4 | Four lights on | |
| Max. - 6 ml | b5 | Five lights on | |
• The default setting is b4.
- The amount of rinse-aid must be increased if the washed dishes appear dull or feature circular stains.
- If, on the other hand, the dishes are sticky or have white streaks, it is necessary to reduce the rinse-aid setting.
ADDING DETERGENTADDING DETERGENT
WARNING
DO NOT INHALE OR SWALLOW DETERGENT AS THIS MAY CAUSE BURNS AND/OR PERMANENT DAMAGE TO THE NOSE, MOUTH AND THROAT, AND EVEN LEAD TO SUFFOCATION. KEEP DETERGENT AWAY FROM YOUR EYES. IF ONE OF THE ABOVE SITUATIONS OCCURS, SEEK MEDICAL ASSISTANCE IMMEDIATELY.
PREVENT CHILDREN FROM COMING INTO CONTACT WITH DETERGENT. KEEP THEM AWAY FROM THE DISHWASHER WHEN THE DOOR IS OPEN AS IT MAY CONTAIN DETERGENT RESIDUES. FILL THE DISHWASHER JUST BEFORE STARTING THE WASHING CYCLE AND THEN KEEP THE DETERGENT OUT OF THE REACH OF CHILDREN.
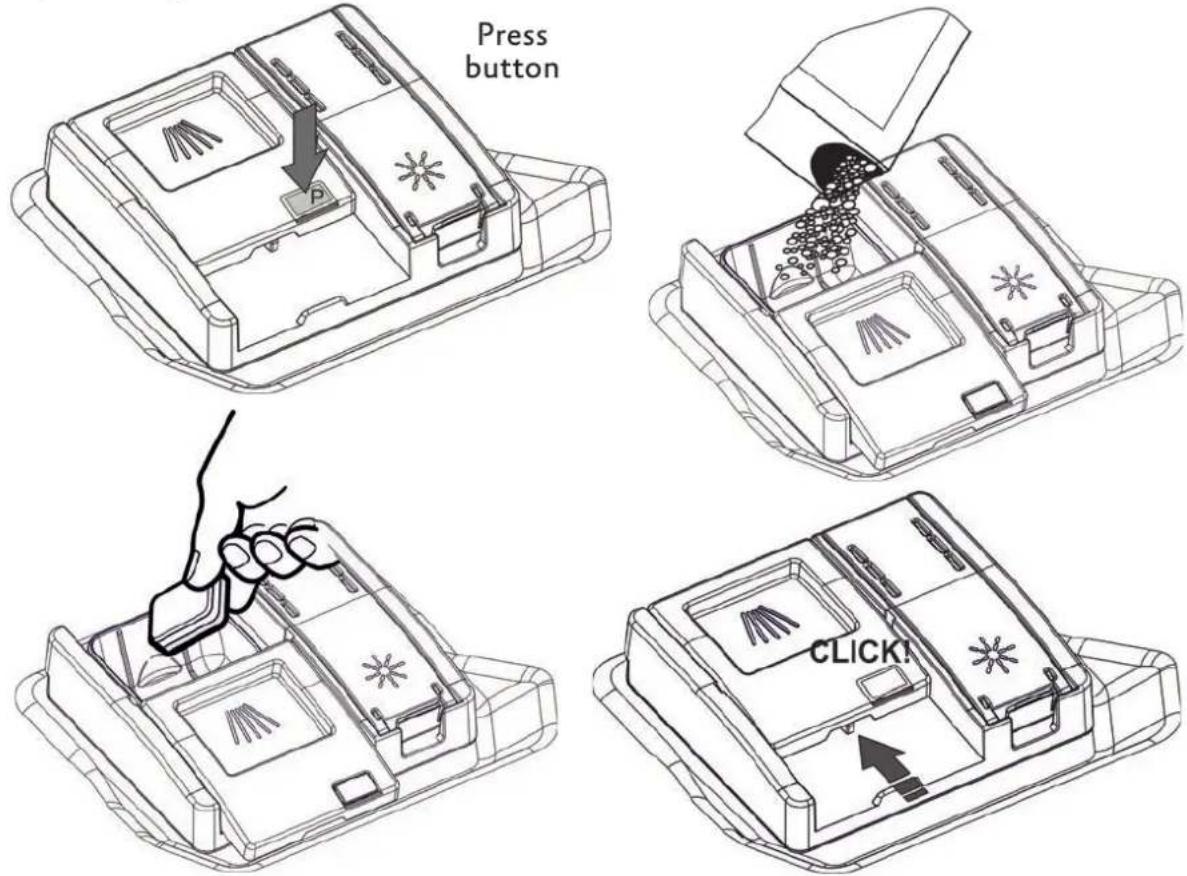
To open the detergent dispenser cover, lightly press the release button P. Add the detergent and close the cover carefully by sliding it until it stops, indicated by a click. During the washing cycle, the dispenser will open automatically. Only add detergent (powder or tablet form) if the dispenser is dry.
text_image
Press button CLICK!- When a program with hot prewash is selected (see program table), extra detergent must be placed in the cavity.
- Only use detergents specially formulated for dishwashers. For optimal washing results it is important to use a good quality detergent.
- The detergent packs must be sealed and stored in a dry place to prevent the formation of lumps which may negatively affect washing results. Once opened the detergent packs should not be kept for too long, otherwise the detergent loses its effectiveness.
- Do not use detergents formulated for washing dishes by hand, because they produce a great deal of foam and may negatively affect the operation of the dishwasher.
-
Add the correct amount of detergent. An insufficient amount of detergent will result in a partial removal of dirt from the dishes, whereas an excessive amount is wasteful and does not improve the washing results.
-
The market offers liquid, powder and tablet detergents with differing chemical compositions, which may contain phosphates, or be phosphate-free but contain natural enzymes.
- Detergents containing phosphates are more effective against grease and starch at temperatures above 140^ [60^] .
- Enzyme detergents, on the other hand, are also effective at lower temperatures (from 104° to 131°F [40 to 55°C]) and are more easily biodegradable. With enzyme detergents it is possible to obtain at low temperatures comparable results to those which can only be achieved at 149°F [65°C] using traditional detergents. For the safeguarding of the environment we recommend the use of phosphate and chlorine-free detergents.
NOTICE
THE INTRODUCTION OF DETERGENT INTO THE RINSE-AID DISPENSER, EVEN IN LIQUID FORM, WILL DAMAGE THE DISHWASHER.
GENERAL WARNING AND RECOMMENDATIONSGENERAL WARNING AND RECOMM
Before using the dishwasher for the first time, it is advisable to read the following recommendations concerning dish types to be washed and their loading. There are generally no constraints on the washing of domestic dishes, but in certain cases it is necessary to take their characteristics into account. Before loading the dishes into the racks it is necessary to:
- Remove coarse food remains such as bones, fish bones, etc... which may clog the filter or damage the wash pump.
- Soak any pots or pans with burnt-on food remains on the bottom to facilitate removal, then load them into the LOWER RACK.
Use the "1/2 load wash" option for washing small amounts of dishes as it saves water and electricity. When using this function, only load the rack selected for the 1/2 load wash - the other rack must remain empty. There is no need to pre-wash the dishes under running water before loading them into the racks since it only wastes water.
NOTICE
Make sure that the dishes are securely in place so that they cannot tip over or obstruct the rotation of the spray arms during the washing cycle.
- Do not place very small objects in the racks as these could fall and obstruct the spray arms or the wash pump.
- Containers such as cups, bowls, glasses and pots should always be loaded with the opening facing downwards and with any cavities at an angle, to allow the water to drain out.
- Do not stack dishes or place them in such a way that they cover one another.
- Do not place glasses too close together because they may knock against each other and break, or there might be staining at the point where they touch.
MAKE SURE THAT THE ITEMS BEING WASHED ARE DISHWASHER-SAFE.
Items which are not dishwasher-safe:
- Wooden utensils and dishes, pots or pans: these may be damaged by the high washing temperatures.
- Handcrafted items: these are rarely suitable for washing in a dishwasher. The relatively high water temperatures and the detergents used may damage them.
- Lightweight objects: place lightweight objects in the upper rack where the water pressure is lower.
- Dishes and objects in copper, tin, zinc or brass: these tend to stain.
- Aluminum dishes: items made from anodized aluminum may lose their color.
• Silverware: silver items may stain.
OPERATION (CONT.)
- Glass and crystal: in general, glass and crystal objects can be washed in the dishwasher. However, certain types of glass and crystal may become dull and lose their clearness after many washings. Therefore, for these items we recommend using the least aggressive program available (see Wash Cycles on pages 11-12).
- Decorated items: the decorated objects available on the market are generally able to withstand washing in the dishwasher, although the colors may fade after a great many washes. If in doubt as to the color-fastness, it is advisable to wash just a few items at a time for approximately one month.
USING THE RACKS USING THE RACKS
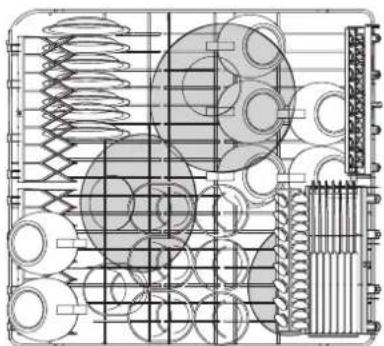
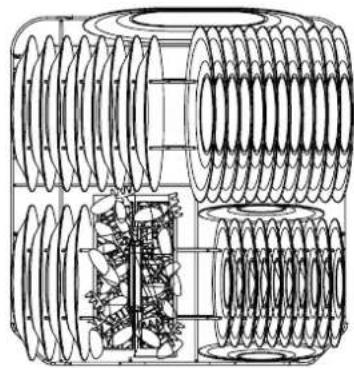
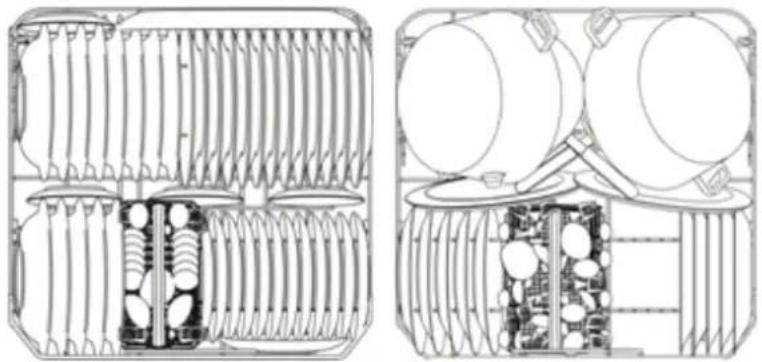
The dishwasher has a capacity of 13 place-settings, including serving dishes. An example of loading 13 place-settings in the upper and lower racks is shown below.
natural_image
Technical schematic of a mechanical assembly with springs, gears, and housing (no text or labels)Upper rack
natural_image
Technical line drawing of a mechanical assembly with coiled spring components (no text or symbols)Lower rack
The lower basket receives the full force of the lower spray arm, and should therefore be used for the toughest items with a heavier degree of soiling. All types and combinations of loads are permitted, provided that the dishes, pots and pans are arranged with all the soiled surfaces exposed to the water jets coming from the bottom.
natural_image
Isometric technical line drawing of a multi-level industrial or processing facility with vertical supports and horizontal channels (no text or symbols)The basket is equipped with the following accessories:
Plate racks, which can be laid flat when not in use (e.g. to accommodate pans, bowls, etc.). To stow the racks flat, pull them upward and turn them towards the inside on the basket.
natural_image
Architectural elevation diagram showing stairs, a building, and a signboard (no readable text or symbols)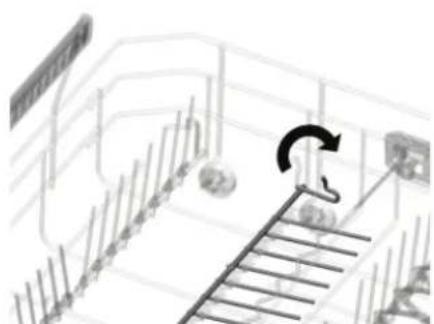
natural_image
Diagram of a train track with a curved arrow indicating clockwise motion (no text or symbols)©2021 Hestan Commercial Corporation
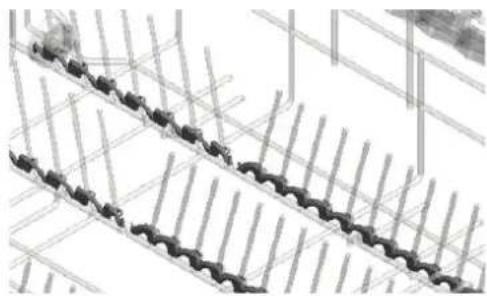
Anti-drip inserts which improve the drying of dishes.
natural_image
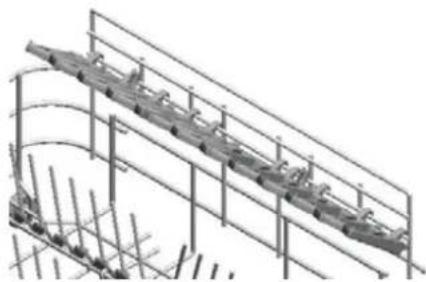
Architectural site plan showing two parallel construction lines with rebar and rebar segments (no text or labels)Support for cups and long objects (ladles, spoons, etc.), in the rear; can be tipped to the vertical position when not use.
natural_image
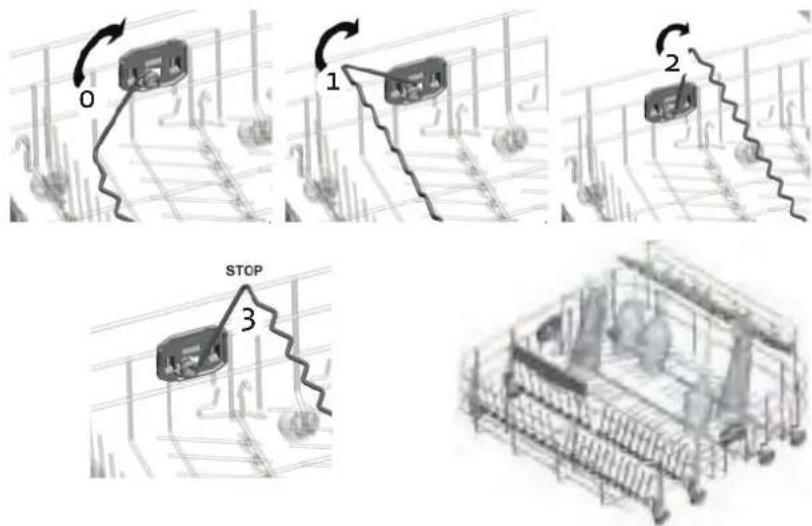
Technical line drawing of a conveyor system with multiple railings and support structures (no text or symbols)Glass holder: Support for long-stem glasses. When lifted out of the stowed position (0) it snaps into three different positions (1-2-3).
flowchart
graph TD
    A["Control System"] --> B{Step 0}
    B --> C["Control Switch"]
    C --> D{Step 1}
    D --> E["Control Switch"]
    E --> F{Step 2}
    F --> G["Control Switch"]
    G --> H{Step 3}
    H --> I["Stop"]
    style A fill:#f9f,stroke:#333
    style H fill:#f9f,stroke:#333
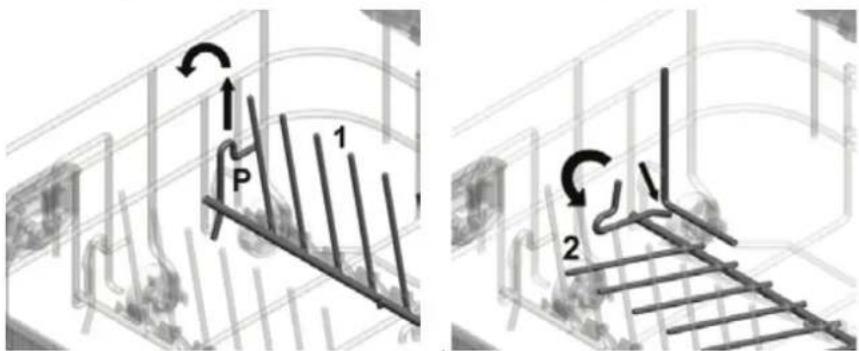
2-position fold-down supports (1-2). In position 1 (vertical) they can be used to hold plates, while in position 2 (slanted) they provide support for long-stem glasses which will be held in place by the glass holder.
Adjustment: lift the support at point P as shown and turn it to position 2.
text_image
Technical diagram showing two mechanical or structural configurations with labeled parts and directional arrows indicating motion or movement.LOADING THE LOWER RACKLOADING THE LOWER RACK
Carefully load flat plates, soup plates, dessert and serving dishes, positioning them vertically. Pots, pans and their covers must be loaded upside down.
When loading soup plates and dessert bowls, be sure to leave a gap between them.
Loading examples:
natural_image
Technical line drawings of two mechanical components with internal structural elements (no text or symbols)CUTLERY BASKET CUTLERY BASKET
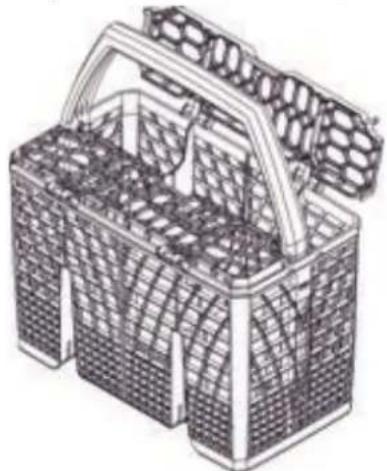
The basket is suitable for all types of cutlery, except long items that may interfere with the upper spray arm. The cutlery should be arranged in the spaces in the upper racks to allow the water to pass effectively between the items.
The cutlery should be arranged in an orderly manner inside the basket. Forks and spoons should be positioned with the handles pointing downwards. Take care during loading to avoid injury from the forks and knife blades. Knives should be placed in the tray on the upper rack, or in the cutlery basket, otherwise position them with the handles pointing upwards. Ladles, large spoons and kitchen knives can be placed in the upper rack, making sure that the knife blades do not protrude from the basket. The upper racks can be opened in order to insert, for example, small items.
natural_image
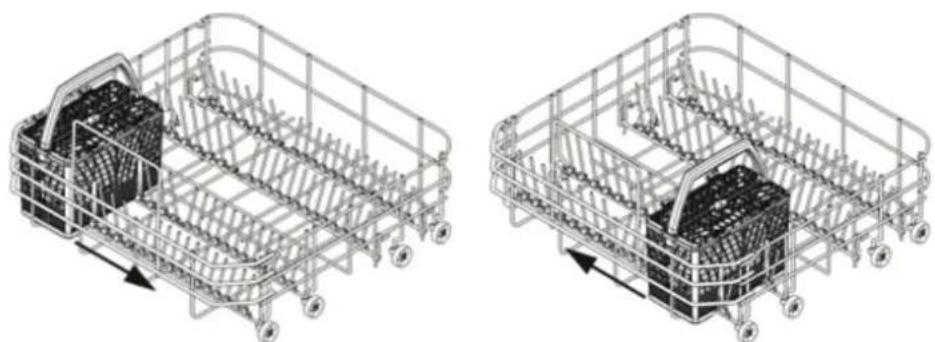
Line drawing of a woven basket with handle and side panels (no text or symbols)The cutlery basket slides across the dishwasher and can be placed in any position to allow optimal use of the space in the bottom basket.
natural_image
Two technical line drawings of a shopping cart with internal components and wheels, showing structural framework (no text or symbols)FLEXI DUO TOP RACK FLEXI DUO TOP RACK
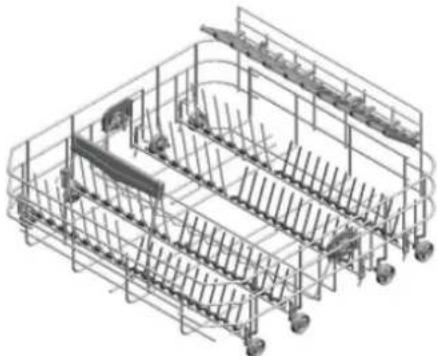
This rack is comprised of two independent sliding, pull-out tray racks for easier loading/unloading of cutlery. Various loading systems and configurations are possible. For example, tea cups can be loaded with the right-hand rack set in the low position, while the left-hand rack or both can be removed to allow large dishes to be put in the top basket.
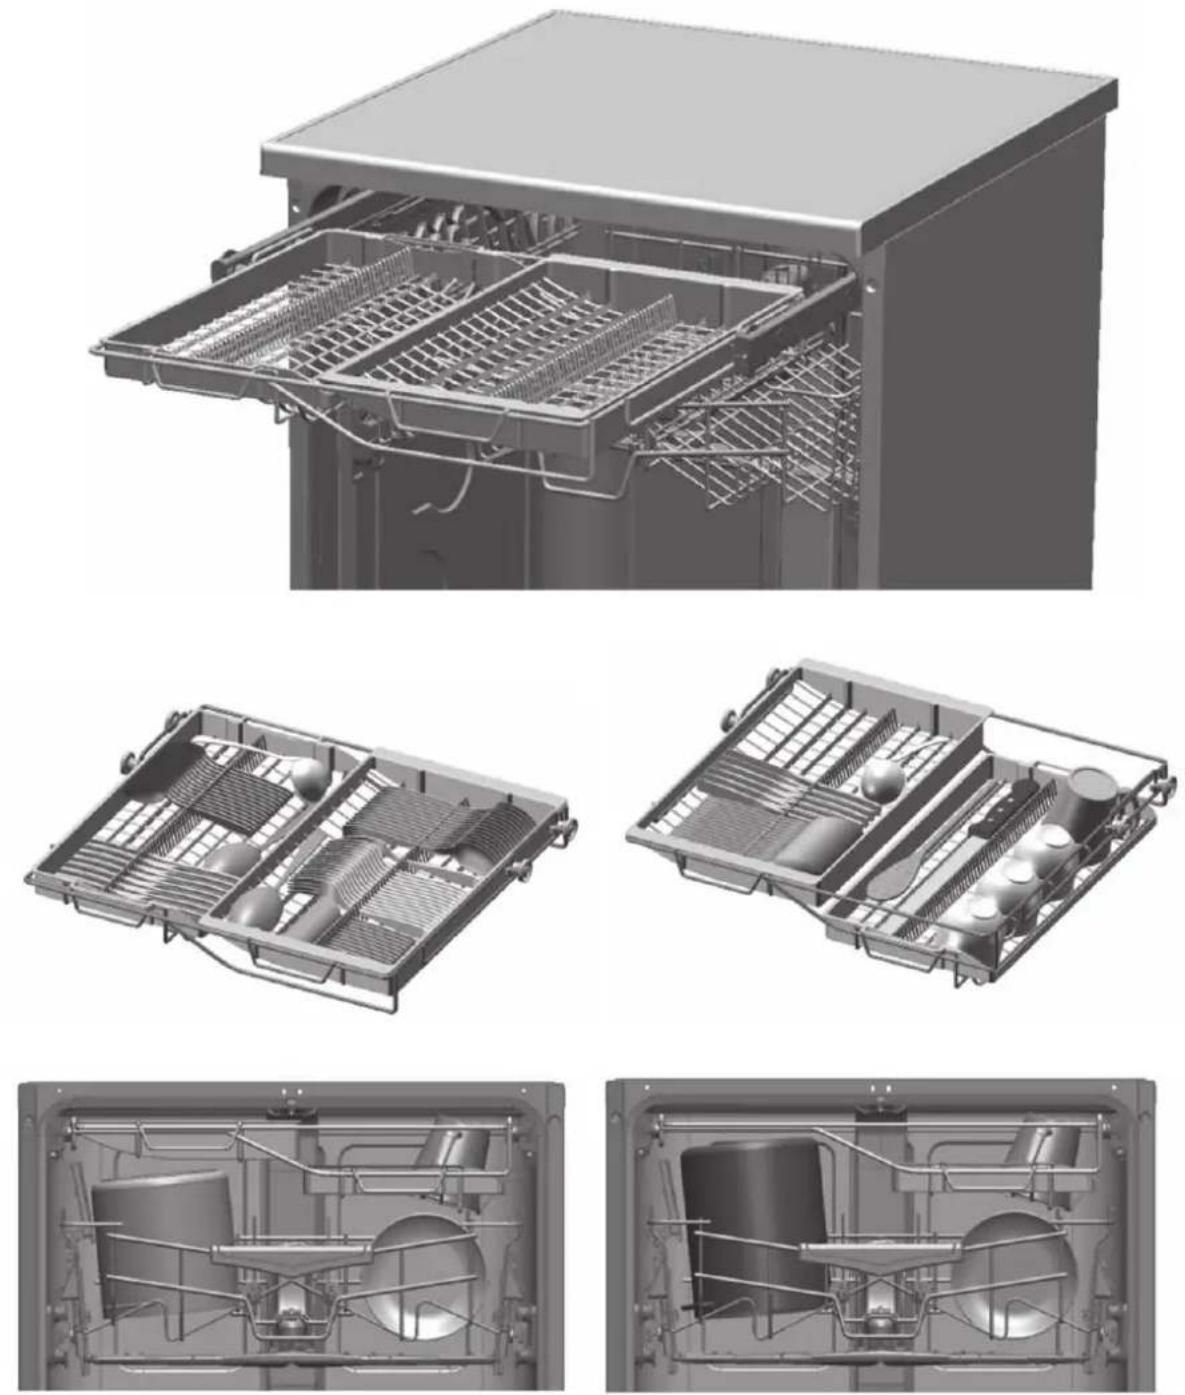
UPPER RACKUPPER RACK
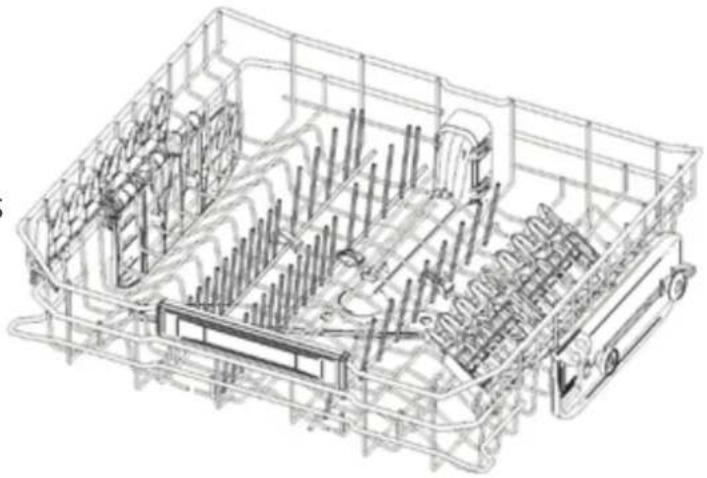
The upper rack is equipped with several folding racks and supports. The positions of each should be adjusted to fit the required load.
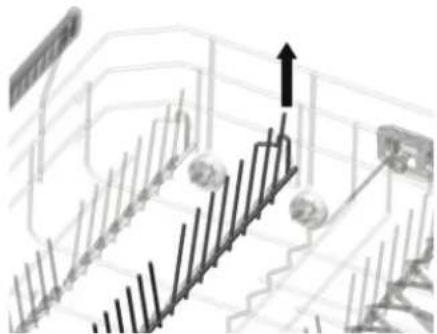
FOLD-DOWN TINES FOLD-DOWN TINES
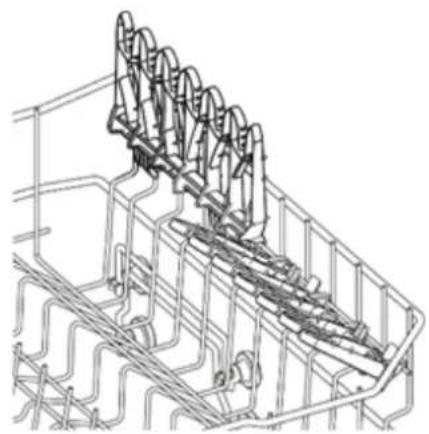
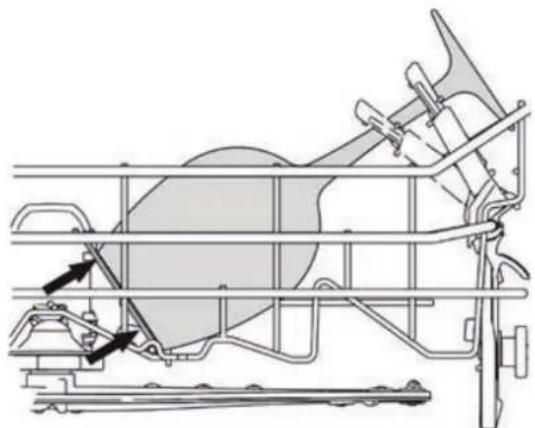
These can be secured in a vertical position, resting on the bottom of the basket if unused, or placed in an intermediate position, as required.
The single tine on the right is ideal for supporting long stemmed glasses.
natural_image
Technical line drawing of a mechanical assembly with structural ribs and mounting brackets (no text or symbols)For mugs, cups and long objects. The ends are designed to hold long stemmed glasses. When not used they can be moved to a vertical position (until a click is heard).
natural_image
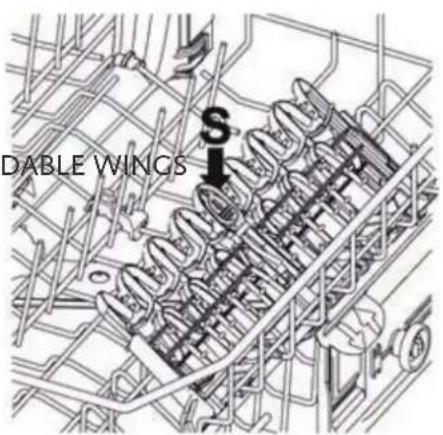
Technical line drawing of a mechanical assembly with multiple cylindrical components (no text or symbols)SHELVES WITH EXPANDABLE WINGSSHELVES WITH EXPANDABLE WINGS
For small objects, mugs and cups. They can be used either closed or open (pull the upper, sliding part). To close them, press the release device (S) and slide them downwards.
text_image
DABLE WINGS SIThe ends are designed to hold long stemmed glasses (even when closed). When not used they can be moved to a vertical position (until a click is heard).
natural_image
Technical line drawing of a vehicle chassis frame with structural components and mounting brackets (no text or labels)LOADING THE UPPER RACKLOADING THE UPPER RACK
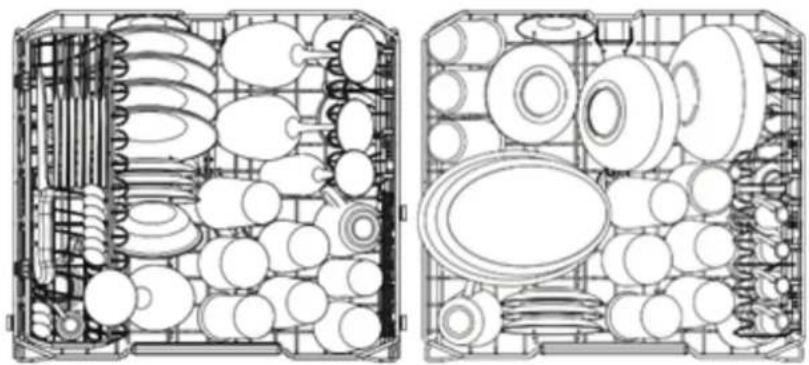
Load plates facing forward - cups, bowls etc. must always be facing downwards. The left-hand side of the rack can be loaded with two layers of cups and glasses. The center can be filled with plates and small plates, fitted upright into the supports provided.
Loading examples:
natural_image
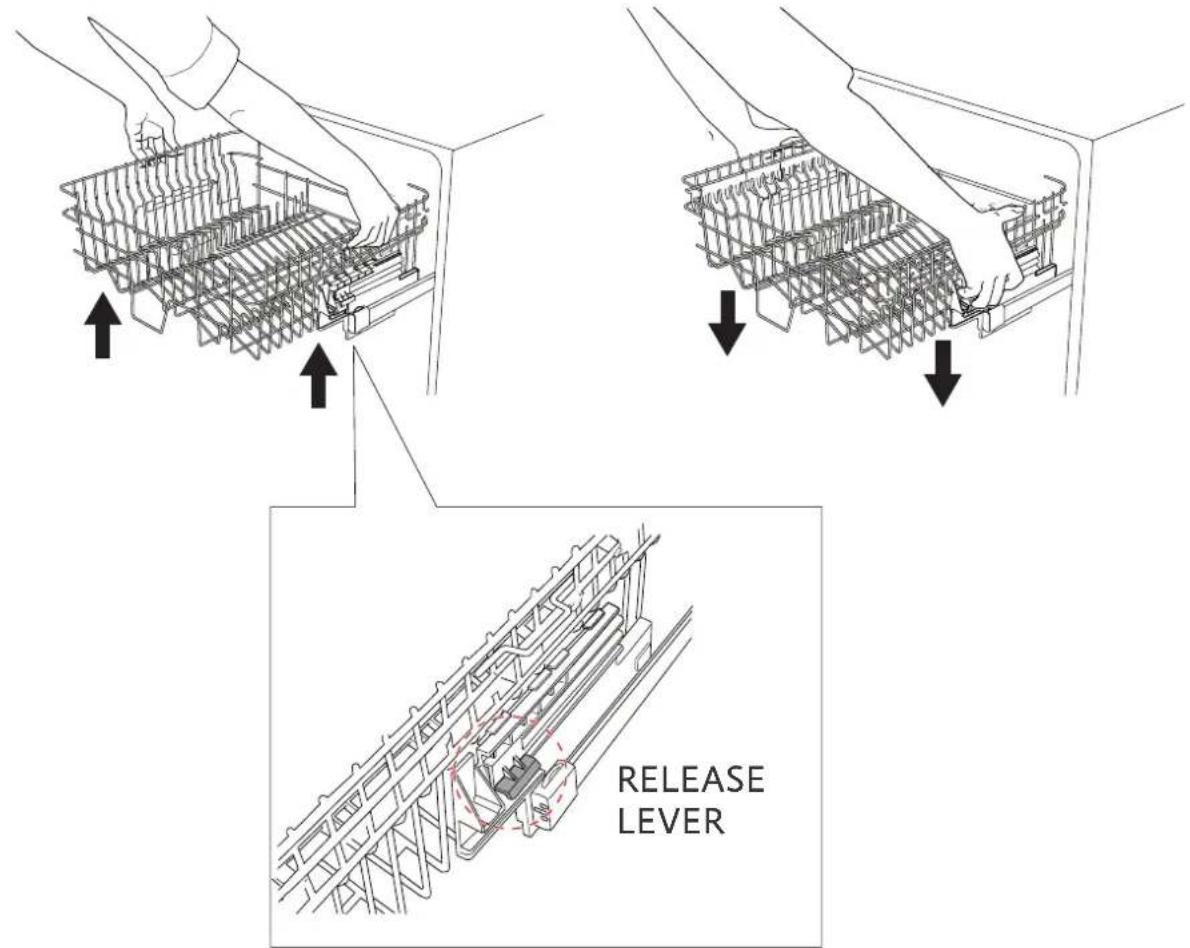
Technical line drawing of a mechanical assembly with multiple components and housing (no text or symbols)The upper rack can set in three different positions on both sides. The rack must be level on both sides.
To raise the rack, lift it to the first or second catch, depending on the height required.
To lower the rack, pull up on the two release levers. This is also possible with the rack loaded, but in this case, when lowering the rack it should be held firmly to avoid hitting other items below it.
text_image
RELEASE LEVERGENERAL WARNINGS AND RECOMMENDATIONS GENERAL WARNINGS AND RECOMMENDATIONS
WARNING
BEFORE CARRYING OUT ANY WORK, ALWAYS DISCONNECT THE APPLIANCE FROM THE ELECTRICAL POWER SUPPLY.
NOTICE
NEVER USE ABRASIVE AND/OR CORROSIVE DETERGENTS TO CLEAN THE APPLIANCE.
Clean the outer surfaces and door liner of the dishwasher regularly using a soft cloth moistened with a neutral detergent (non-abrasive and/or non-corrosive) suitable for painted surfaces. Clean the door gaskets with a damp sponge.
Periodically (once or twice a year) it is advisable to clean the liner and gaskets, using a soft cloth and water to remove any deposits.
Do not clean the controls with too much water as it may leak onto the electrical components and damage them.
After cleaning, dry the appliance with a soft, lint-free cloth.
Clean any stainless steel surfaces with a non-abrasive product specific for stainless steel. To prevent stains, a nebulizer may also be used though sparingly and with moderate pressure.
CLEANING THE WATER INTAKE FILTER CLEANING THE WATER INTAKE FILTER
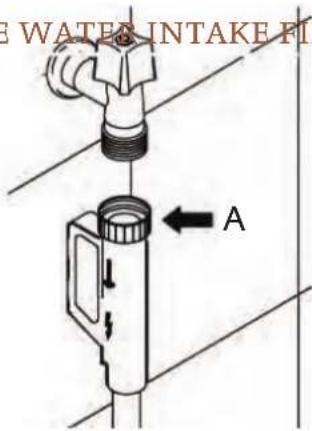
Clean the water inlet filter at regular intervals. After closing the supply valve, unscrew the ring nut (A) on the water inlet pipe (using a pair of pliers, if necessary) and gently clean the filter, removing deposits or impurities.
Then secure the pipe by tightening the ring nut (use a pair of pliers if necessary).
text_image
WATER INTAKE FI ACLEANING THE SPRAY ARMS CLEANING THE SPRAY ARMS
The spray arms can be easily removed for periodic cleaning of the nozzles, to prevent possible clogging. Wash them under running water (at room temperature) and carefully replace them in their seats, checking that their rotary movement is in no way impeded. If this is not the case, make sure they have been mounted properly.
UPPER SPRAY ARM UPPER SPRAY ARM
To remove the upper spray arm (A), unscrew the locking ring (B) by turning it clockwise. After cleaning, remount the spray arm in its seat and tighten the locking ring by turning it counterclockwise.
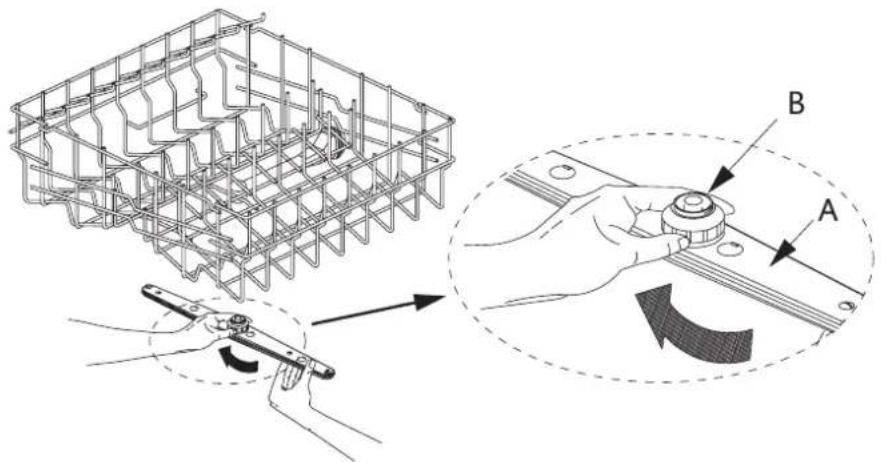
text_image
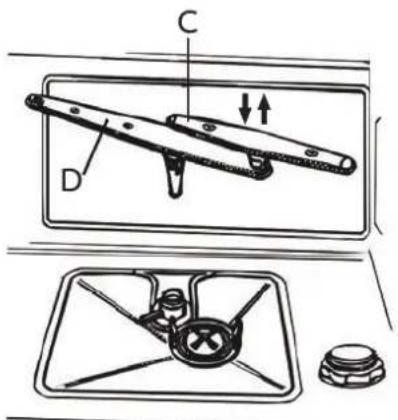
Technical diagram showing a wireframe structure with labeled components A and B, and a hand operating a tool with a curved arrow indicating rotation or adjustment.LOWER SPRAY ARMLOWER SPRAY ARM
To remove the orbital spray arm assembly (C), take hold of the lower arm (D) and pull the orbital unit upward.
After cleaning, place the orbital spray arm in its seat and push it down slightly until it clicks into place on the lower spray arm. Then place the lower spray arm into its seat and push it down slightly until it clicks into place.
text_image
Technical diagram showing labeled components of a vehicle intake system, including lever, handle, and fan assembly.CLEANING THE FILTER CLEANING THE FILTER
Periodically remove the filter assembly (A) to inspect it. To remove the filter, grip the tabs, turn counter-clockwise and lift upwards.
The filter assembly consists of the outer microfilter (fine wire mesh) and a plastic center filter.
Push the center filter (B) from the underside to remove it from the micro-filter.
To separate the two parts which make up the plastic center filter:
-
Find the arrows (C) on the sides of the top piece.
-
Press the body of the filter on each side just below the arrows.
-
Remove the center filter by lifting it upwards.
As needed, clean all parts of the filter assembly under running water (at room temperature), using a stiff brush.
After cleaning, reassemble and install the filter assembly:
-
Join the two parts comprising the center filter by pushing gently until they click into place.
-
Insert the center filter into the micro-filter.
-
Place the filter assembly (A) into its seat, turning it clockwise until it locks.
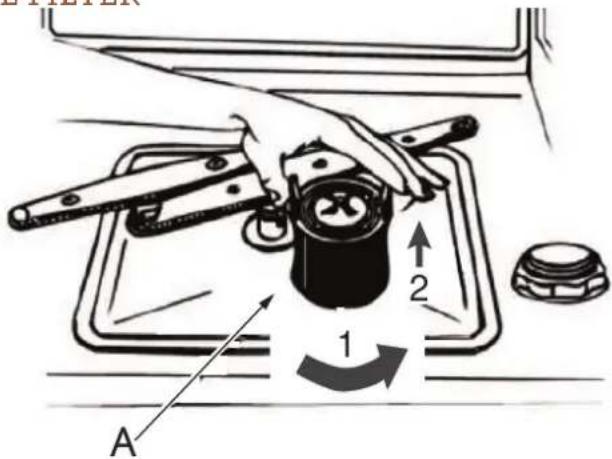
text_image
A 1 2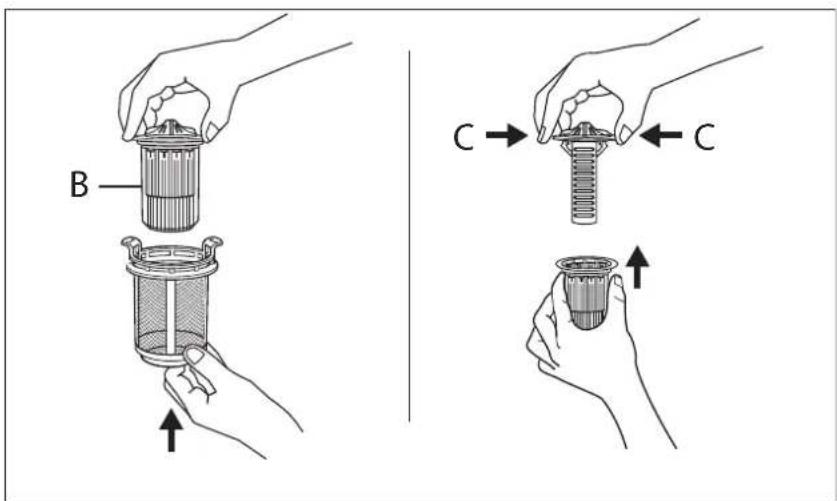
text_image
B C → C ↑ ↑GENERAL WARNINGS AND RECOMMENDATIONS FOR CORRECT MAINTENANCE MAINTENANCE
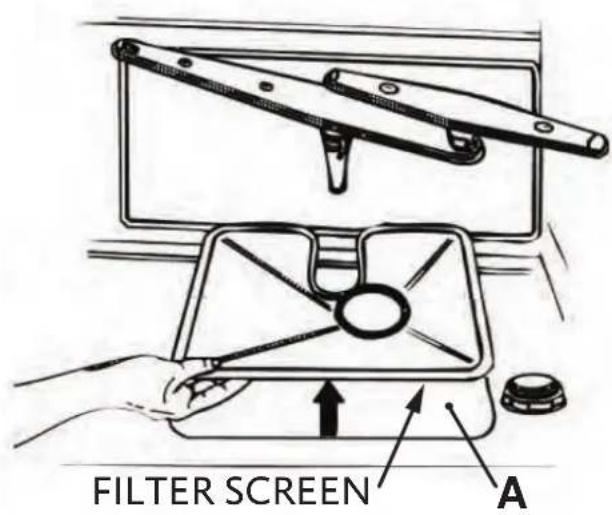
The bottom filter screen can be also removed for cleaning. To remove the screen, first remove the filter assembly and the lower spray arm as instructed on previous pages. Then gently lift the lower screen out for cleaning.
- Clean the screen under running water (at room temperature) using a stiff brush.
- When removing the bottom screen, take care that there are no food residues on it. If any residues fall into the sump (A), they might block hydraulic components or foul the spray arm nozzles.
- It is essential to thoroughly clean all the filters according to the above instructions. The dishwasher cannot function if the filters are clogged.
- Carefully replace the filter screen and the filter assembly in their seats, to avoid damaging the wash pump.
text_image
FILTER SCREEN ABEFORE PROLONGED DISUSE: BEFORE PROLONGED DISUSE:
- Run the soak program twice in succession.
• Unplug the power cord from the socket.
• Fill the rinse-aid dispenser. - Shut off the water supply valve.
- Leave the door slightly open to prevent the formation of unpleasant odors inside the dishwasher.
BEFORE STARTING THE DISHWASHER AFTER PROLONGED DISUSE:
- Check that there are no deposits of sludge or rust inside the water supply pipe. If there are, allow the water to run from the water supply for a few minutes.
- Plug the power cord back into the socket.
- Reconnect the water intake hose and open the water supply again.
IF THE DOOR DOES NOT CLOSE IF THE DOOR DOES NOT CLOSE
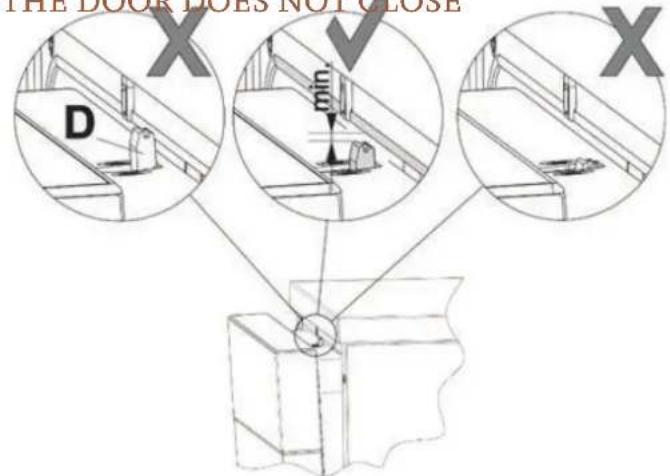
- Check the position of the door lock catch (D). The catch must be adjusted to maintain a minimum gap from the tank, without touching it.
- If the catch is too low, rotate the screw V counter-clockwise step by step, until at the minimum gap from the tank without touching it.
- If the catch is too high, rotate the screw V clockwise step by step, until at the minimum gap from the tank without touching it.
text_image
THE DOOR LIES NOT CLOSE D min X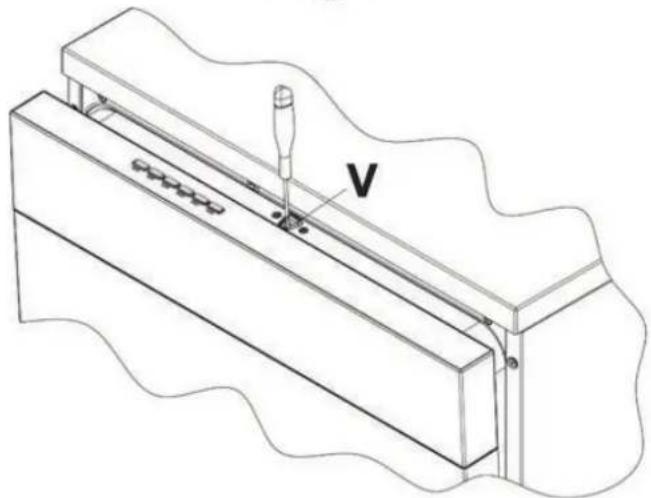
natural_image
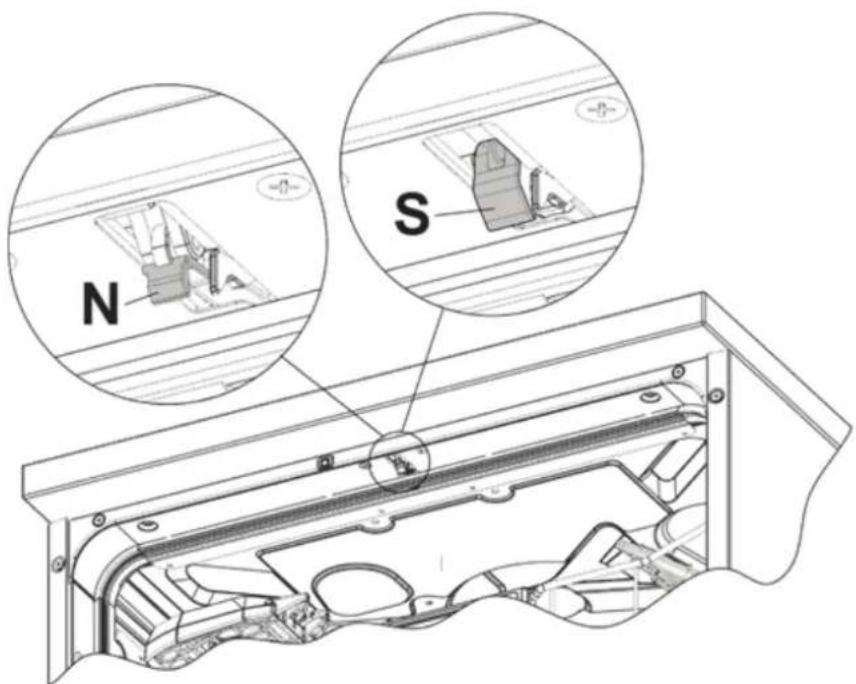
Technical line drawing of a mechanical assembly with no visible text or symbols- Check the condition of the lock hook shown here. If it has not triggered (reference N), the door opens and closes normally.
If it has triggered (reference S), close the door with force until it resets. Open and close the door.
text_image
N SError codes and their meanings are listed on the following pages. The following instructions will help you avoid error conditions and correct them if they occur.
IF THE PROGRAM FAILS, CHECK THAT: IF THE PROGRAM FAILS, CHECK THAT:
- The dishwasher is connected to the power supply.
• There is no power failure.
• The water supply is open.
• The dishwasher door is properly closed.
IF WATER REMAINS INSIDE THE DISHWASHER, CHECK THAT:
• The drain hose is not kinked.
• The drain siphon is not obstructed.
• The dishwasher filters are not clogged.
IF THE DISHES DO NOT COME OUT CLEAN, CHECK THAT:
- The correct amount of detergent has been added.
- There is regenerating salt inside the special container.
• The dishes are loaded correctly. - The selected program is suitable for the dish types and their degree of soiling.
- All the filters are clean and positioned correctly.
- The spray arm nozzles are not obstructed.
- There is no object obstructing the rotation of the spray arms.
- Run hot water faucet for a few minutes (until water gets hot) before starting dishwasher.
IF THE DISHES FAIL TO DRY AND REMAIN DULL, CHECK THAT:
- There is rinse-aid inside the special container.
- The rinse-aid dispenser setting is correct.
- The detergent used is of good quality and has not lost its effectiveness (for example, through incorrect storage such as with the container left open).
IF THE DISHES SHOW SIGNS OF STREAKING, STAINING, ETC. CHECK THAT:
- The rinse-aid dispenser setting is not too high.
IF THERE ARE VISIBLE TRACES OF RUST INSIDE THE TANK/UNIT:
- The tank is made of stainless steel and therefore any rust marks are due to external elements (fragments of rust from the water supply, pots, cutlery, etc...) Special products are commercially available to remove such marks.
- Check that the amount of detergent being used is correct. Certain detergents can be more corrosive than others.
- Check that the cap of the salt container is securely closed and that the water softening setting is correct.
IF AFTER PERFORMING THE ABOVE TROUBLESHOOTING INSTRUCTIONS THE PROBLEM PERSISTS, CALL HESTAN CUSTOMER CARE.
NOTICE
ANY OPERATIONS PERFORMED ON THE APPLIANCE BY UNAUTHORIZED PERSONS ARE NOT COVERED BY THE WARRANTY AND ARE TO BE PAID FOR BY THE USER.
ERROR CONDITIONSERROR CONDITIONS
| CODE | FAULT DESCRIPTION | |||||
| E1 |  | KC6H | GWK7 |  |  | AquaStop failureThe anti-flooding system has tripped. Activates in case of water leak.Contact Technical Service. |
| E2 |  | (ATCT) |  |  |  | Safety levelThe system limiting the water level in the dishwasher has tripped. Interrupt the current cycle. Turn off the dishwasher and back on again, program a new cycle and press start. If the problem persists, contact Technical Service. |
| E3 |  | TASY |  | 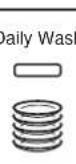 |  | Water heating malfunctionThe water is not heated or is incorrectly heated. Repeat the washing cycle. If the problem persists, contact Technical Service. |
| E4 |  | ZG2Z | HGWK | 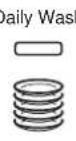 |  | Water temperature monitoring malfunctionInterrupt the current cycle. Switch off the dishwasher, switch it back on again, program a new cycle and press start. If the problem persists, contact Technical Service. |
| E5 |  |  |  | 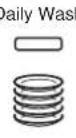 |  | Water intake malfunctionThe appliance does not take in water or does so incorrectly. Make sure the water connections are correct, that the water supply valve is open and that the filter is not clogged. If the problem persists, contact Technical Service. |
Light off Light on Light flashing
| CODE | FAULT DESCRIPTION | |||||
| E6 |  |  |  |  | [Super] | Water pump-out malfunctionThe appliance does not pump out the water or does so incorrectly. Make sure the drain hose is not kinked or crushed and that the siphon and filters are not clogged. If the problem persists, contact Technical Service. |
| E7 |  |  |  | 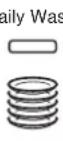 |  | Turbine flow-regulator malfunctionThe appliance is unable to precisely measure the quantity of incoming water. Interrupt the current cycle and turn off the dishwasher. Turn it back on again, program a new cycle and press start. If the problem persists, contact Technical Service. |
| E8 |  |  |  |  |  | Alternate washing system malfunctionInterrupt the current cycle and turn off the dishwasher.Turn it back on again, program a new cycle and press start. If the problem persists, contact Technical Service. |
| E9 |  |  |  |  |  | Water intake system malfunctionContact Technical Service. |
| E11 |  |  |  |  | [Super] | Wash motor pump malfunctionContact Technical Service. |
Light off Light on Light flashing

If an alarm situation occurs, the dishwasher interrupts the current program and signals the problem.
- Alarms E1, E2, E3, E4, E8 and E9 immediately terminate the current cycle. Alarms E5 and E6 interrupt the current cycle and, after the problem has been eliminated, resume the cycle.
- Alarm E7 is displayed at the end of the cycle, which however, is completed given that it does not jeopardize the operation of the dishwasher.
- For alarms E9, E11, contact customer service.
TO CLEAR AN ALARM: TO CLEAR AN ALARM:
- Open or close the door or switch off and back on again.
- If the error clears, the dishwasher can then be programmed again.
If the problem persists, contact an authorized technical servicer.
SERVICE DATA RECORD SERVICE DATA RECORD
The serial number of the product is located on the rating label, which can be seen when the dishwasher door is opened.
It is located on the right side of the door edge.
Now is a good time to write this information in the space below provided. Keep your invoice for warranty validation.
Model Number ____
Serial Number ____
Date of Installation or Occupancy ____
PARTS LIST
Please visit the Hestan website to access the parts list for your Hestan Indoor product: www.hestanhome.com.www.hestanhome.com.
SERVICE
All warranty and non-warranty repairs should be performed by qualified service personnel. To locate an authorized service agent in your area, contact your Hestan dealer, local representative, or the manufacturer. Before you call, please have the model number and serial number information ready.
Hestan Commercial Corporation
3375 E. La Palma Avenue
Anaheim, CA 92806
(888) 905-7463
WHAT THIS LIMITED WARRANTY COVERS: WHAT THIS LIMITED WARRANTY COVERS:
Hestan Commercial Corporation ("HCC") warrants to the original consumer purchaser of a Hestan Indoor Dishwasher product (the "Product") from an HCC authorized dealer that the Product is free from defective materials or workmanship for a period of three (3) years from the date of original retail purchase or closing date for new construction, whichever period is longer ("Limited Warranty Period"). HCC agrees to repair or replace, at HCC's sole option, any part or component of the Product that fails due to defective materials or workmanship during the Limited Warranty Period. This Limited Warranty is not transferable and does not extend to anyone beyond the original consumer purchaser ("Purchaser"). This Limited Warranty is valid only on Products that are (i) purchased and received from an HCC authorized dealer, (ii) delivered after purchase to a consumer, and (iii) continuously thereafter remain located, in the fifty United States, the District of Columbia and Canada. Events that will void this warranty include purchasing or taking delivery in, or moving Products to any location outside of, the fifty United States, the District of Columbia and Canada. This Limited Warranty applies only to Products in non-commercial use and does not extend to Products used in commercial applications.
HOW TO OBTAIN WARRANTY SERVICE: HOW TO OBTAIN WARRANTY SERVICE:
If the Product fails during the Limited Warranty Period for reasons covered by this Limited Warranty, the Purchaser must immediately contact the dealer from whom the Product was purchased or HCC at 888.905.7463.
Purchaser is responsible for making the Product reasonably accessible for service or for paying the cost to make the Product reasonably accessible for service. Service is to be provided during normal business hours of the authorized Hestan Commercial Service Provider. To the extent Purchaser requests service outside of the normal business hours of the authorized Hestan Commercial Service Provider, Purchaser will pay the difference between regular rates and overtime or premium rates. Purchaser is required to pay all travel costs for travel beyond 50 miles (one way) from the nearest authorized Hestan Commercial Service Provider.
EXTENSIONS TO THREE YEAR LIMITED WARRANTY PERIOD:
In addition to the Three-Year Limited Warranty, the following components have extended warranty coverage as specifically set forth below:
- The Product's microprocessor or printed circuit board; and racks (does not include rack components), (where applicable) are warranted to be free from defects in material and workmanship under normal noncommercial use and service for a period of five (5) years of the original Purchaser. This excludes surface corrosion, scratches, and discoloration which may occur during normal use and is limited to replacement of the defective part(s), with the Purchaser paying all other costs, including labor, shipping and handling, as applicable.
-
- The Product's inner tub liner is warranted to be free from defects in material and workmanship under normal non-commercial use and service from rust through for the lifetime of the original Purchaser. This excludes surface corrosion, scratches, and discoloration which may occur during normal use and is limited to replacement of the defective part, with the Purchaser paying all other costs, including labor, shipping and handling, as applicable.
WHAT THIS LIMITED WARRANTY DOES NOT COVER WHAT THIS LIMITED WARRANTY DOES NOT COVE
This Limited Warranty does not cover and HCC will not be responsible for and will not pay for: damage to or defects in any Product not purchased from an HCC authorized dealer; color variations in color finishes or other cosmetic damage; failure or damage from abuse, misuse, accident, fire, natural disaster, commercial use of the Product, or loss of electrical power to the Product; damage from alteration, improper installation, or improper operation of the Product; damage from improper or unauthorized repair or replacement of any part or component of the Product; damage from service by someone other than an authorized agent or representative of the Hestan Commercial Service Network; normal wear and tear; damage from exposure of the Product to a corrosive atmosphere containing chlorine, fluorine, or any other damaging chemicals; damage resulting from the failure to provide normal care and maintenance to the Product; damage HCC was not notified of within the Limited Warranty Period; and incidental and consequential damages caused by any defective material or workmanship.
ARBITRATION: ARBITRATION:
This Limited Warranty is governed by the Federal Arbitration Act. Any dispute between Purchaser and HCC regarding or related to the Product or to this Limited Warranty shall be resolved by binding arbitration only on an individual basis with Purchaser. Arbitration will be conducted by the American Arbitration Association (“AAA”) in accordance with its Consumer Arbitration Rules or by JAMS. The arbitration hearing shall be before one arbitrator appointed by the AAA or JAMS. The arbitrator shall not conduct class arbitration and Purchaser shall not bring any claims against HCC in a representative capacity on behalf of others.
LIMITATION OF LIABILITY: LIMITATION OF LIABILITY:
This Limited Warranty is the final, complete and exclusive agreement between HCC and Purchaser regarding the Product.
THERE ARE NO EXPRESS WARRANTIES OTHER THAN THOSE LISTED AND DESCRIBED ABOVE. NO WARRANTIES WHETHER EXPRESS OR IMPLIED, INCLUDING, BUT NOT LIMITED TO, ANY IMPLIED WARRANTIES OF MERCHANTABILITY OR FITNESS FOR A PARTICULAR PURPOSE SHALL APPLY AFTER THE LIMITED WARRANTY PERIOD STATED ABOVE. NO OTHER EXPRESS WARRANTY OR GUARANTY GIVEN BY ANY PERSON, FIRM OR CORPORATION WITH RESPECT TO THIS PRODUCT SHALL BE BINDING ON HCC. HCC ASSUMES NO RESPONSIBILITY THAT THE PRODUCT WILL BE FIT FOR ANY PARTICULAR PURPOSE, EXCEPT AS OTHERWISE PROVIDED BY APPLICABLE LAW. HCC SHALL NOT BE LIABLE FOR LOSS OF REVENUE OR PROFITS, FAILURE TO REALIZE SAVINGS OR OTHER BENEFITS, OR ANY OTHER SPECIAL, INCIDENTAL OR CONSEQUENTIAL DAMAGES CAUSED BY THE USE, MISUSE OR INABILITY TO USE THE PRODUCT, REGARDLESS OF THE LEGAL THEORY ON WHICH THE CLAIM IS BASED, AND EVEN IF HCC HAS BEEN ADVISED OF THE POSSIBILITY OF SUCH DAMAGES. NO RECOVERY OF ANY KIND AGAINST HCC SHALL BE GREATER IN AMOUNT THAN THE PURCHASE PRICE OF THE PRODUCT. WITHOUT LIMITING THE FOREGOING, YOU ASSUME ALL RISK AND LIABILITY FOR LOSS, DAMAGE OR INJURY TO YOU AND YOUR PROPERTY AND TO OTHERS AND THEIR PROPERTY ARISING OUT OF THE USE, MISUSE OR INABILITY TO USE THE PRODUCT NOT CAUSED DIRECTLY BY THE NEGLIGENCE OF HCC. THIS LIMITED WARRANTY STATES YOUR EXCLUSIVE REMEDY.
No oral or written representation or commitment given by anyone, including but not limited to, an employee representative or agent of HCC will create a warranty or in any way increase the scope of this express Limited Three Year Warranty. If there is any inconsistency between this Limited Warranty and any other agreement or statement included with or relating to the Product, this Limited Warranty shall govern. If any provision of this Limited Warranty is found invalid or unenforceable, it shall be deemed modified to the minimum extent necessary to make it enforceable and the remainder of the Limited Warranty shall remain valid and enforceable according to its terms.
INTERACTION OF LAWS WITH THIS LIMITED WARRANTY:
Some states, provinces or territories may not allow limitations on how long an implied warranty lasts or the exclusion or limitation of incidental or consequential damages, so the above limitations or exclusions may not apply to you. Some states, provinces or territories may provide for additional warranty rights and remedies, and the provisions contained in this Limited Warranty are not intended to limit, modify, take away from, disclaim or exclude any mandatory warranty requirements provided by states, provinces or territories, including certain implied warranties. This warranty gives you specific legal rights, and you may also have other rights which vary depending on location.
Any questions about this Limited Warranty may be directed to:
Hestan Commercial Corporation at (888) 905-7463
LE NON-RESPECT À LA LETTRE DE CES INSTRUCTIONS PEUT CAUSER UN INCENDIE OU UNE EXPLOSION, QUI POURRAIT ENTRAÎNER DES DOMMAGES MATÉRIELS, DES BLESSURES OU LA MORT.
natural_image
Group of people sharing a meal together with wine glasses and a pie chart, surrounded by fresh dishes (no visible text or symbols)3 PRÉCAUTIONS DE SÉCURITÉ - AVANT DE COMMENCER
5 NUMÉROS DE MODÈLE
5 PLAQUE SIGNALÉTIQUE
5 EXIGENCES RÉGLEMENTAIRES / CODE
6 AVERTISSEMENTS SUR LE PRODUIT / SÉCURITÉ
9 CARACTÉRISTIQUES ET COMMANDES
12 OPÉRATION
29 NETTOYAGE ET ENTRETIEN PAR L'UTILISATEUR
33 DÉPANNAGE
36 PIÈCES / SERVICE
36 GARANTIE LIMITÉE
PRÉCAUTIONS DE SÉCURITÉ - AVANT DE COMMENCER
natural_image
Silhouette of a person in motion, possibly running or climbing, with no visible text or symbols.text_image
Close-up of a metallic electronic device with visible label and control buttons, likely part of a device or industrial control panel.PLAQUE SIGNALÉTIQUE

text_image
HESTAN COMMERCIAL CORPORATION ANAHEIM, CA. - USA 115 V - 60 Hz 1080 W 1000 W 13 A CERITIRED RESIDENTIAL DISHAWERS ARE NOT INTENDED FOR LICENSED FOOD ESTABLISHMENTS CN 3144823 C US INTERTEK INTERTEK INTERTEK M 80 W CONFORMS TO UL STD 749, CONFORMS TO NSF STD 184, CERTIFIED TO CAN/CSA STD C22.2 NO.167 Type: 12162 A CANOAN ENERGY PERFORMANCE VERIFIED RENDEMENT ENERGYTQUE VERIFIEDPLAQUE SIGNALÉTIQUE TYPIQUE
EXIGENCES RÉGLEMENTAIRES / CODE
text_image
Control panel interface with icons and a digital display showing time 1:05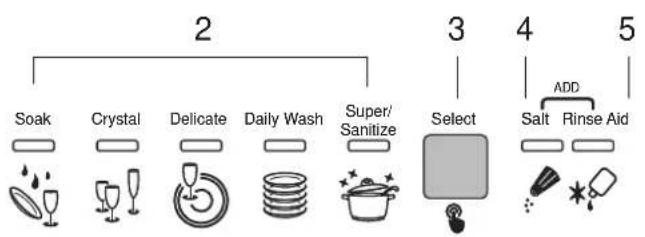
flowchart
graph TD
    A["Soak"] --> B["Crystal"]
    B --> C["Delicate"]
    C --> D["Daily Wash"]
    D --> E["Super/Sanitize"]
    E --> F["Select"]
    F --> G["Add"]
    F --> H["Rinse Aid"]
    G --> I["Salt"]
    H --> J["Rinse Aid"]
text_image
12 11 10 9 8 7 6 14 13 1 1/2 Load Sanitize Energy Saver Quick Wash 1:05 Delay StartDESCRIPTIONS DU PANNEAU DE COMMANDEDESCRIPTIONS DU PANNEAU DE COMM
©2021 Hestan Commercial Corporation
natural_image
Pure mechanical component diagram without any text, numbers, or symbols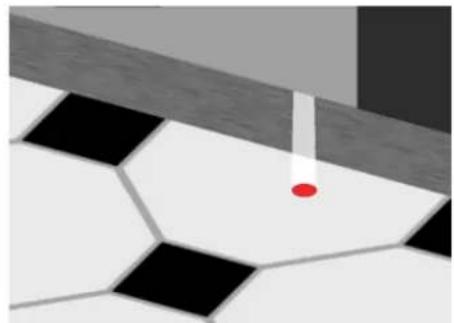
natural_image
Close-up of a tiled floor with black and white hexagonal tiles, featuring a red dot and a vertical line (no text or symbols)INTERRUPTION D'UN CYCLE DE LAVAGEINTERRUPTION D'UN CYCLE DE LAVAGE
AJOUT PRODUIT DE RINÇAGE AU DISTRIBUTEUR AJOUT PRODUIT DE RINÇAGE AU DI
POUR AJOUTER DU PRODUIT DE RINÇAGE:POUR AJOUTER DU PRODUIT DE RINÇAGE:
natural_image
Isometric technical line drawing of a multi-level industrial or agricultural processing unit with vertical supports and wheels (no text or symbols)natural_image
Two technical diagrams showing structural elements with arrows indicating direction, no text or symbols present.natural_image
Aerial view of a multi-level industrial or construction site with parallel metal structures and a central chain of chains (no visible text or symbols)natural_image
Technical line drawing of a multi-level industrial conveyor system with no visible text or symbolstext_image
Technical diagram showing two mechanical or structural configurations with labeled parts and directional arrows indicating motion or force.CHARGEMENT DU PANIER INFÉRIEUR
natural_image
Diagram of a mechanical or electrical component with vertical fins and internal channels, labeled 'COUVEECS' at bottom (no readable text or symbols within the diagram itself)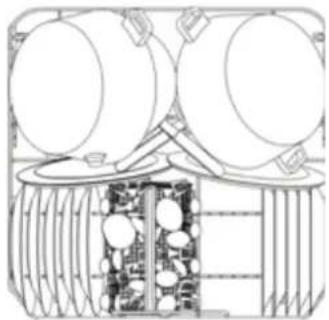
natural_image
Technical line drawing of a mechanical assembly with cylindrical components and internal components (no text or symbols)natural_image
Isometric line drawing of a woven basket with arched handle and mesh pattern (no text or symbols)natural_image
Technical line drawing of a multi-wheeled shopping cart with wheels and structural ribs (no text or symbols)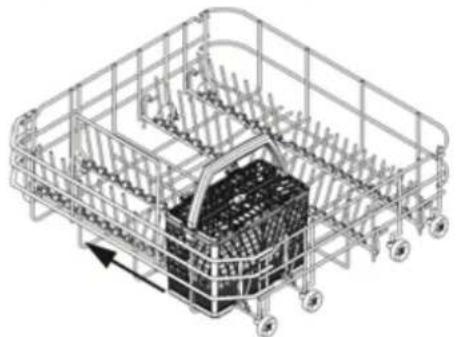
natural_image
Isometric line drawing of a shopping cart with wheels and a basket filled with items (no text or symbols)natural_image
3D rendering of a stainless steel kitchen appliance with internal grating and ventilation slots (no text or symbols visible)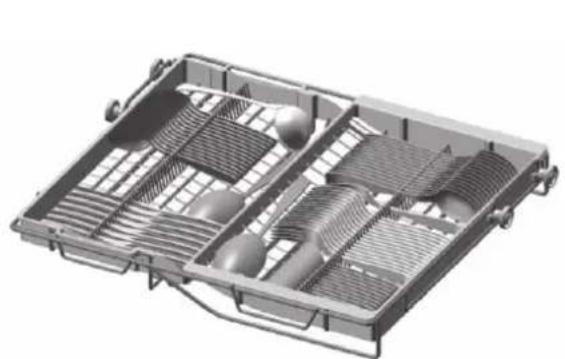
natural_image
3D technical illustration of a mechanical housing or enclosure with internal compartments and ventilation grilles (no text or symbols)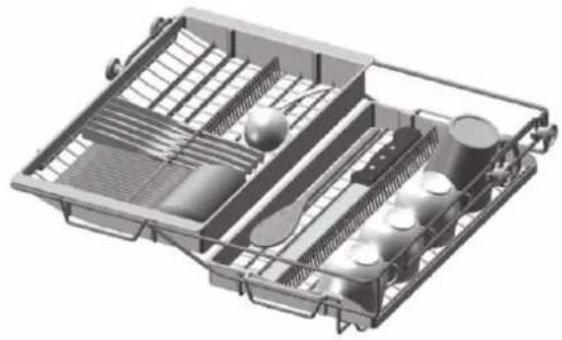
natural_image
3D technical illustration of a multi-compartment kitchen drawer with cutlery and fixtures (no text or symbols)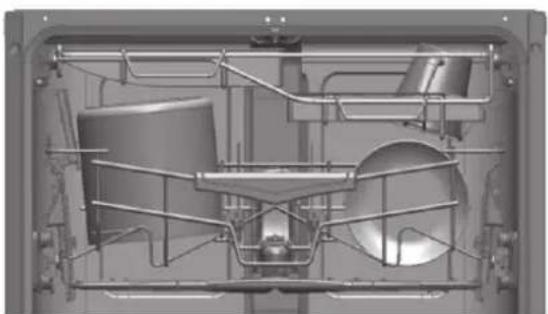
natural_image
Cross-sectional diagram of a mechanical or electrical enclosure with internal components (no text or symbols visible)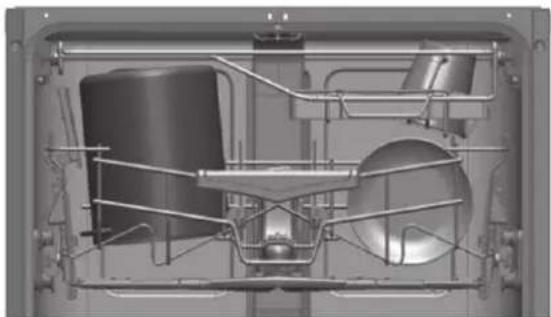
natural_image
Cross-sectional diagram of a mechanical or electrical component with internal components and piping (no visible text or symbols)LE PANIER SUPÉRIEURE LE PANIER SUPÉRIEURE
natural_image
Technical line drawing of a mechanical assembly with rebar and rollers (no text or symbols)SUPPORTS RABATTABLES SUPPORTS RABATTABLES
natural_image
Technical line drawing of a mechanical assembly with multiple cylindrical components embedded in a grid-like structure (no text or symbols)ABATTANTS COJLISSANTSABATTANTS COULISSANTS
natural_image
Technical line drawing of a vehicle chassis frame with structural components and mounting brackets (no text or symbols)CHARGEMENT DU PANIER SUPÉRIEUR CHARGEMENT DU PANIER SUPÉRIEUR
natural_image
Technical line drawing of a mechanical assembly with multiple circular components and internal channels (no text or symbols)RÉGLAGE DU PANIER SUPÉRIEURRÉGLAGE DU PANIER SUPÉRIEUR
text_image
Technical diagram showing a mechanical assembly with labeled parts A and B, including a magnified view of the component being cut.BRAS DE PULVÉRISATION INFÉRIEUR BRAS DE PULVÉRISATION INFÉRIEUR
natural_image
Technical line drawing of a mechanical assembly with no visible text or symbolsCONDITIONS D'ERREUR CONDITIONS D'ERREUR
Hestan Commercial Corporation
3375 E. La Palma Ave.
Anaheim, CA 92806
(888) 905-7463