DVDS27EB - DVD player PANASONIC - Free user manual and instructions
Find the device manual for free DVDS27EB PANASONIC in PDF.

User questions about DVDS27EB PANASONIC
0 question about this device. Answer the ones you know or ask your own.
Ask a new question about this device
Download the instructions for your DVD player in PDF format for free! Find your manual DVDS27EB - PANASONIC and take your electronic device back in hand. On this page are published all the documents necessary for the use of your device. DVDS27EB by PANASONIC.
USER MANUAL DVDS27EB PANASONIC
Operating Instructions

text_image
Panasonic DVD/OD PLAYER DVD-S27 DVO-RAM VIDEO PLAYBACK AV ENHANCED DVD VOLUME R R R R AV DV3 VOLUME R R R R DV3 VOLUME R R R DV3 VOLUME R R R DV3 VOLUME R R R DV3 VOLUME R R R DV3 VOLUME R R R DV3 VOLUME R R R DV3 VOLUME R R R DV3 VOLUME R R R DV3 VOLUME R A B C D E F G H I J K L M N O P Q R S T U V W X Y Z| Contents | Page |
| Safety Precautions | 2 - 3 |
| Included Accessories | 4 |
| Rear Panel / Inserting batteries | 5 |
| Remote control unit | 6 - 7 |
| Front DVD-Player | 8 |
| Connections | 9 |
| Home cinema | 10 |
| QUICK SETUP | 11 |
| Playback functions | 12 - 17 |
| Navigation Menu | 18 - 19 |
| HighMAT / CD Text | 20 |
| DISPLAY menu | 21 - 23 |
| SETUP menus | 24 - 25 |
| Before requesting service | 26 - 27 |
| Information | 28 - 29 |
| Specifications | 30 |
| Country codes | 31 |
| Index | last page |

Important Safety Warnings
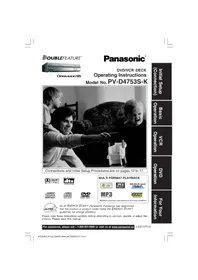
- The moulded three pin mains plug is supplied for your safety and convenience and must NOT be cut off.
- A 5 amp fuse is fitted in the mains plug. If the fuse has to be replaced, it must be of the same rating and approved by ASTA or BSI to BS1362. Check for the ASTA mark 📂 or the BSI mark 🌼 on the body of the fuse.
To replace the fuse, open the fuse compartment with a screwdriver as shown and replace the fuse and the cover securely.
text_image
1. Open the fuse cover with a screwdriver. 2. Replace the fuse and close or attach the fuse cover. Fuse cover Fuse (5 ampere)
text_image
1. Open the fuse cover with a screwdriver. 2. Replace the fuse and close or attach the fuse cover. Fuse cover Fuse (5 ampere)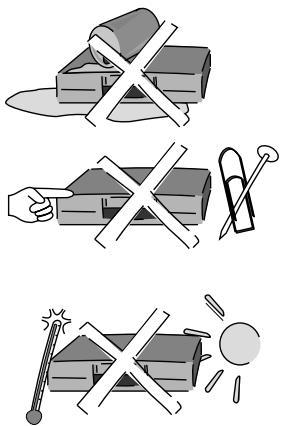
text_image
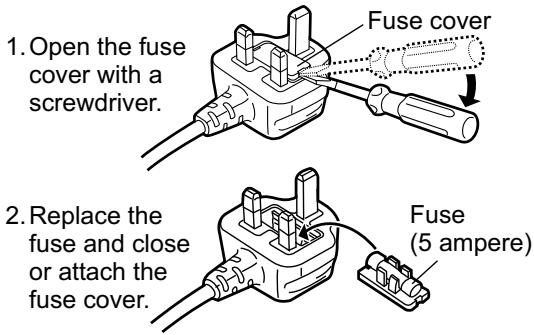
Illustration showing three steps to remove a box, with a hand using a tool and a magnifying glass nearby.- To prevent electric shock, do not remove cover. No user serviceable parts inside. Refer servicing to qualified service engineer only.
- WARNING: To reduce the risk of fire, electric shock or product damage, do not expose this apparatus to rain, moisture, dripping or splashing and that no objects filled with liquids, such as vases, shall be placed on the apparatus.
- Do not insert metal object into the slots or openings of the unit.
- This unit is not disconnected from a.c. mains while it remains connected to a live mains outlet, even if it has been turned off.
- The socket outlet shall be installed near the equipment and easily accessible or the mains plug or an appliance coupler shall remain readily operable.
- This unit is intended for use in moderate climates.

text_image
Illustration showing four types of firecrackers with snowflakes and crossed-out boxes, including a microphone and speaker.Inside of product
| CAUTION | - LASER RADIATION WHEN OPEN.DO NOT STARE INTO BEAM. | FDA 21 CFR / Class II |
| CAUTION | - VISIBLE AND INVISIBLE LASER RADIATION WHEN OPEN.AVOIDING REASURE TO BEAM. | IEC00825-1 / Class 3b |
| ATTENTION | - RAYOMNEMENT LASER VISIBLE ET INVISIBLE EN CAS D'OUVERTURE.EXPOSITION DANGEREUSE AU PARASCEAU. | |
| ADVARSEL | - SYNLIG OG USYNLIG LÆSTERSTRALING VED A'BNING.UNDGA ÚDSSETTELSE FOR STRÅLING. | |
| VARO! | - AVATTAESSA OLET ALTITINA NAKYVÄÄ JÄ NAKYMÄTÖN LASERSATELYLL&E. ALA KATSÖ SÄTEESEN. | |
| VARNING | - SYNLIG OCH OSYNLIG LÆSTERSTRALING NÄR DENNA DEL AR OPPNAD. BETRAKTA EJ STRÅLEEN. | |
| ADVARSEL | - SYNLIG OG USYNLIG LÆSTERSTRALING NÄR DEKSEL A'PNES.UNNGÄ EKSPONERING FOR STRÅLEN. | |
| VORSICHT | - SICHTBARE UND UNSICHTBARE LÆSTERSTRALHLING, WENN ABDECKUNG GEÖFFNET. NICHT DEM STRAHIL ASUSETZEN. | |
| 注意 | - 打开时有可见及不可见激光辐射,避免激光束照射. | |
| 注意 | - ここを聞くと可見及び不可視レーガー光が出ます.ピムを見たり,触れたりしないで下さい。 | ROLCA0141 |

Caution
- Avoid exposing the unit to direct sunlight or other heat sources.
- Avoid sudden change in temperature or humidity, dew or condensation may form, causing malfunction.
- Dispose of batteries in accordance with the instructions given in this book.
- Place the unit on a flat, stable surface. Do not place heavy object on top of the unit.
- Your attention is drawn to the fact that recording of pre-recorded tapes or discs or other published or broadcast materials may infringe copyright laws.
- This unit is designed for indoor use only.
- Do not use in area with strong magnetic fields, e.g. near transmitting antenna.
- This product may receive radio interference caused by mobile telephones during use. If such interference is apparent, please increase separation between the product and the mobile telephone.
- Do not install or place this unit in a bookcase, built-in cabinet or in another confined space. Ensure the unit is well ventilated. To prevent risk of electric shock or fire hazard due to overheating, ensure that curtains and any other materials do not obstruct the ventilation vents.
- Do not obstruct the unit's ventilation openings with newspapers, tablecloths, curtains, and similar items.
- Do not place sources of naked flames, such as lighted candles, on the unit.
- Dispose of batteries in an environmentally friendly manner.
- This product utilizes a laser. Use of controls or adjustments or performance of procedures other than those specified herein may result in hazardous radiation exposure.
Do not open covers and do not repair yourself.
Refer servicing to qualified personnel.

text_image
CLASS 1 LASER PRODUCTBack of product, see page 5.

Care and Maintenance
- The cabinet can be wiped clean with a damp cloth, disconnect from mains before cleaning. Do not use detergent or solution containing benzol or petroleum.
Included Accessories

Check that you have the accessories and items shown
text_image
Included Accessories AC Mains Lead RJA0044-3C Operating Instructions RQTD0107-B Batteries for the Remote Control R6 size Audio/Video Cable K2KA6CA00001 Guarantee Card Remote control N2QAJB000091Panasonic
Sales and Support Information
Customer Care Centre
• For UK customers: 08705 357357.
- For Republic of Ireland customers: 01 289 8333.
- Visit our website for product information www.panasonic.co.uk.
• E-mail: customer.care@panasonic.co.uk.
Direct Sales at Panasonic UK
- Order accessory and consumable items for your product with ease and confidence by telephoning our Customer Care Centre Mon - Friday 9:00am - 5:30pm (Excluding public holidays).
- Or go on line through our Internet Accessory ordering application at www.panasonic.co.uk.
- Most major credit and debit cards accepted.
- All enquiries, transactions and distribution facilities are provided directly by Panasonic UK Ltd.
- It couldn't be simpler!
- Also available through our internet is direct shopping for a wide range of finished products, take a browse on our website for further details.
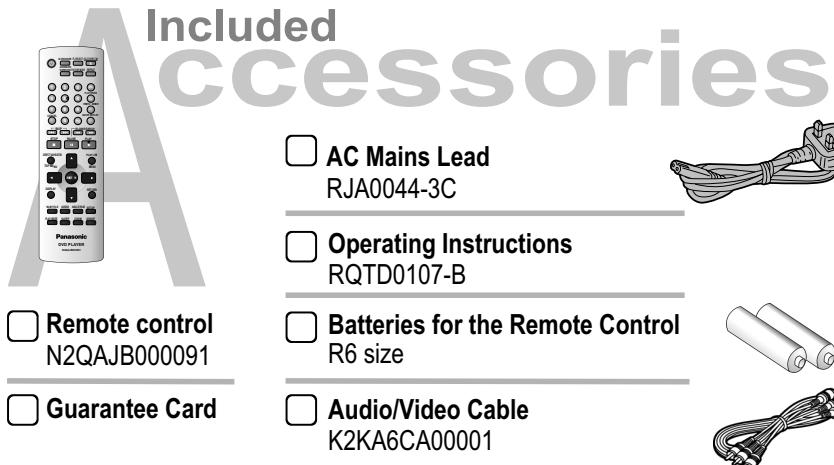
Rear Panel

text_image
AUDIO OUT VIDEO OUT Please connect directly to TV. R O AXIAL DI TAL At FANES DO OUT OUT 1 2 3 4 AV CLASS 1 LASER PRODUCT C IN~ 5| 1 | Audio Out socketL= AUDIO output left channelR= AUDIO output right channel | 3 | Video Out terminal |
| 4 | AV Scart Output | ||
| 2 | COAXIAL Digital connector | 5 | AC INPUT socket |
Batteries
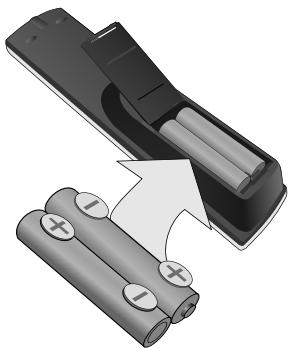
natural_image
Illustration of a black remote control with two batteries and a curved arrow indicating rotation (no text or symbols)Inserting batteries into the remote control unit:
The batteries last for about a year, depending on how often you use the RC unit.
- Do not mix old with new batteries or batteries of different types.
- Only use batteries without any harmful substances (such as lead, cadmium, mercury).
- Do not use rechargeable type batteries.
- Remove the batteries if the remote control unit will remain unused for longer periods of time.
- Do not heat or short-circuit the batteries.
- Immediately remove used-up batteries and replace with batteries of type AA, UM3 or R6.
- Be sure to put in the batteries the right way round (+and -).
Dispose of batteries, packaging material and the unit according to statutory regulations. They must not be thrown into the household refuse.

Remote control unit
General control
| Stand-by/on switchPress to switch the unit from on to stand-by mode or vice versa. In stand-by mode, the unit is still consuming a small amount of power. |  | • OSD menu selection buttons.• Select Groups (▲▼) or Titles (◄►) for JPEG, WMA or MP3.• ENTER: to accept the selected menu function. | |
| OPEN/CLOSE | Opens and closes the disc tray. | [5X388]PLAY SPEED[0x0x0x1] | Playback speed control.Adapts to a factor between x0.6 and x1.4. |
| FL SELECT | Selects the display contents.(Title/Chapter or Time) | [0W87] | Numeric key pad; input of two-digit numbers. |
| CANCEL | Discards entries. | SLEEP[0x0x3] | Switches off the unit at the set time. |
PLAY SPEED
SLEEP
Menu control
| AV ENHANCER | AV Enhancer. | 8 | RETURN | Quits a menu. | ||
| ADVANCED SURROUND | Produces an effect similar to surround sound. | 21 | SUBTITLE | Selects the language of subtitles. | 22 28 | |
| PICTURE MODE | Selects the picture mode. | 23 | AUDIO | Changes the audio track. | 22 | |
| DIRECT NAVIGATORTOP MENU | Displays the DVD-RAM menu.Displays the main menu. | 1728 | ANGLE/PAGE | ANGLE : Selects a camera angle.PAGE : Changes menu pages.Rotates JPEG images. | 19 22 | |
| PLAY LISTMENU | Displays a play list.Displays the menu. | 1718 28 | SETUP | Displays the SETUP menu. | 11 24 | |
| DISPLAY | Displays the on-screen display. | 21 23 | GROUP | Displays the DISPLAY menuGroup Search. | 22 | |

AV ENHANCER FL SELECT OPEN/CLOSE


DIRECT NAVIGATOR

OP MENU


PLAY LIST


DISPLAY


RETURN
SUBTITLE

AUDIO

ANGLE/PAGE SETUP

E SETUP

PLAY MODE

SLEEP

ZOOM

GROUP

Panasonic
DVD PLAYER
N2QAJB000091
Playback control
| PLAY | Start playbackPress PLAY▶.Playback starts automatically.12 |
| STOP | Stop playbackPress STOP ■ twice.ResumePress STOP ■ during playback to store the current position on the disc.Press PLAY▶ while [▶] is flashing on the display.Playback is resumed at the point where you stopped it.Cancel the Resume functionPress STOP ■ until [▶] disappears from the display.* Opening the disc tray or the unit going into stand-by mode also clears the stored position on the disc. |
| PAUSE | Pause playback (still image)Press PAUSE ■ during playback.Playback stops at the current picture frame.Press PLAY▶ to resume playback. |
| ZOOM | ZoomPress ZOOM during playback.To fine-tune the zoom factor press ▼▲To set the zoom mode: ENTER and ◀▶.23Restore factory settingPress ZOOM until x1.00 is shown.The zoom functionality may be restricted depending on the disc format. |
| PLAY MODE | Random Playback/Program Play.15 |
 | Skip chapters, titles or framesPress SKIP during playback or in Pause mode. |
| SLOW/SEARCHOn-screen displayOn-screen display | Slow motion (backwards/forwards)Press SLOW in Pause mode. Keeping the button pressed increases the speed of search at 5 steps.Press PLAY to resume normal playback.* VCDs do not support reverse slow motion playback.SearchPress SEARCH during playback. Keeping the button pressed increases the speed of search at 5 steps. |
| REPEAT | RepeatPress REPEAT during playback.There is no mode for repeatedly playing back entire discs.13 |
| QUICK REPLAYOn-screen display | Scene replayPress QUICK REPLAY during playback. Every push of the button replays a couple of seconds of the current track or programme. However, you cannot go back to before the beginning of a title.* QUICK REPLAY is not supported by all discs. |
| POSITION MEMORY | Resumes playback at storedPosition following an interruption.14 |
Front DVD-Player
Detailed inform is available on the specified pages.


text_image
Panasonic DVD / CD PLAYER DVD-S27 DV-RAM VIDEO PLAYBACK AV ENHANCER 1 2 3 4 5 6 7 8 0/1 RAM no disc SARUN-TBA VIDEO DA CONVERTER OPENCLOSE VICO VIDEO| 1 |  | Stand-by/on switch ⏻/IPress to switch the unit from on to stand-by mode or vice versa.In stand-by mode, the unit is still consuming a small amount of power. |
| 2 | Stand-by indicator ⏻When the unit is connected to the AC mains supply, this indicator lights up in standby mode and goes out when the unit is turned on. | |
| 3 |  | Opens and closes the disc tray. |
| 4 |  | Stops playback. |
| 5 | " | Pauses playback. |
| 6 |  | Starts playback. |
| 7 |  | SKIP: Skips chapters, titles or frames.SLOW/SEARCH(keep button pressed)Slow motion/search function. |
| 8 | AV ENHANCER | AV-Enhancer: Automatically optimises and adapts the audio and video settings to the disc used. The Picture and Audio menus are not available when this function is enabled. |
Your DVD player provides a perfect digital DVD video output. Depending on the type of DVD, your hi-fi equipment or your stereo TV set you can play back stereo sound or digital multi-channel sound in excellent cinema quality. DVD video also features options for selecting the audio channel, the synchronised language, the language of subtitles and for choosing from various camera pick-up angles.
All basic functions of your DVD player can be controlled either via the unit or by means of the remote control.
However, these operating instructions will make reference to the remote control symbols only.
The remote control lets you make any changes to the device settings which will be retained when you switch off the player unit.
Connections
Before connecting
- Verify that all devices to be connected up are unplugged from the AC mains.
Note on all connections shown
Attach the unit directly to the TV set. If you let the player connection go through a video recorder you will experience a disturbed picture when playing copy-protected DVDs.
Connection to a TV set without a scart socket or to an amplifier component (home cinema):
- Read the operating instructions of your TV set or amplifier.
- Connect the cables as shown on the illustrations. Make sure not to confuse the colours or labels.
- When the unit is fully connected plug the AC mains cable back in.
Connection to a TV set with scart socket:
AV socket on rear of TV set
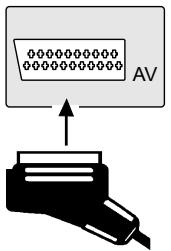
text_image
AV- Read the operating instructions of your TV set.
- Connect the cables as shown on the illustrations.
- When the unit is fully connected plug the AC mains cable back in.
Rear of DVD/CD player
Audio/Video cable
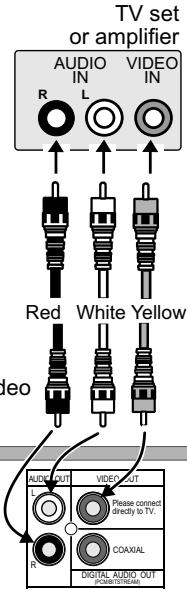
text_image
TV set or amplifier AUDIO IN VIDEO IN R L Red White Yellow deo AUDIO OUT VIDEO OUT Please connect directly to TV. COAXIAL R DIGITAL AUDIO OUT (POST/STREAM)
text_image
21-pin scart cable


AC mains lead


AC IN\~
Home cinema
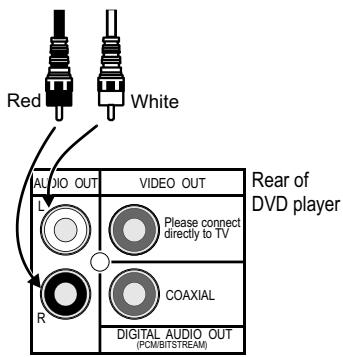
text_image
Red White AUDIO OUT VIDEO OUT L Please connect directly to TV R COAXIAL DIGITAL AUDIO OUT (PCM/BIT/STREAM) Rear of DVD player
text_image
Audio OUT L R VIDEO OUT Please connect directly to TV COAXIAL Digital AUDIO OUT (PCMB/TSTREAM) Rear of DVD playerEnjoy the powerful theater sound available with multiple channel audio found on DVDs by connecting an amplifier and speakers.
Analogue connection (AUDIO OUT)
To be able to hear sound in stereo or Dolby Pro Logic quality, attach an amplifier or an analogue audio component supporting these features.

text_image
Analogue amplifier or analogue audio component (example)- Connect the analogue outputs (L and R) with a "Dolby Pro Logic amplifier", for example (see illustration).
- Connect the audio cables as shown on the illustrations. Make sure not to confuse the colours of cables or the labels of sockets (white/L, red/R).
- To avoid sound quality problems deactivate function Advanced Surround when you attach an amplifier with Dolby Pro Logic functionality. Please refer to page 21.
Digital connection ( COAXIAL )
For optimum surround sound, connect a digital amplifier or a digital audio component.
- To play programmes with a 5.1-channel surround sound, connect the digital audio output (COAXIAL) with an external "Multi-channel Dolby Digital Decoder", for example.
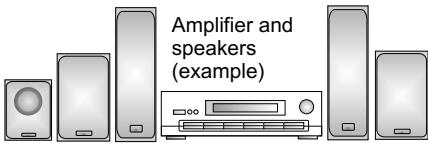
text_image
Amplifier and speakers (example)Connect 3 or more speakers to produce surround sound
Prerequisites for making recordings with an external digital recorder
- The original disc must not be copy-protected.
- The recorder must be able to process signals with a scanning frequency of 48 kHz/16 bit.
- You cannot make MP3/WMA recordings.
* Adapt the Audio SETUP menu settings (see page 24) to the following: PCM Digital Output: [up to 48 kHz] Dolby Digital / DTS Digital Surround / MPEG: [PCM]
* Deactivate function Advanced Surround (see page 21).
QUICK SETUP
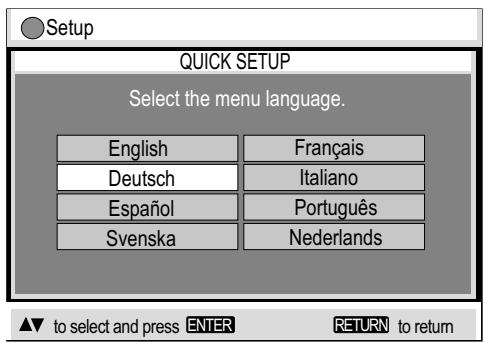
text_image
Setup QUICK SETUP Select the menu language. English Français Deutsch Italiano Español Português Svenska Nederlands ▲▼ to select and press ENTER RETURN to returnThe navigator keys of the remote control unit allow you to move between menus and to accept or change the selected settings.

Press ENTER to store a change.
Press RETURN to go back to the previous screen.
Press SETUP to quit the menu.
- Switch on the TV set and set it to the video input that matches the connection between player and TV set.
- Press the Stand-by/on button to switch on the DVD player.
- Press SETUP to display the QUICK SETUP menu.
- Use the navigator keys ◀▶▲▼ to select a menu language, then press ENTER to confirm.
- To continue with setting the defaults, press ▲▼ to select [Yes] and ENTER to confirm. You can later go to the Setup menu to run QUICK SETUP again.
- Use the Setup menu options to adapt the default settings below to your appliance. Every menu item provides further information on the options you have.
* Please refer to the operating instructions of your TV set to read more about the best settings.
Select the type of TV you have connected.
Optimise the picture settings of the connected appliance.
Select your TV's aspect ratio.
The format of TV screens is either 4:3 (standard) or 16:9 (wide-screen). Select the aspect ratio that matches the screen setting of your TV set.
Select the signal type output from the SCART terminal.
Before you proceed please check which setting is supported by your TV set.
To improve the picture quality, you can set the AV scart socket output to a variety of video signals:
[Video] = standard picture quality
[S-Video] = enhanced picture quality
[RGB] = best picture quality
S-Video and RGB: Requires a 21-pin scart cable.
Following QUICK SETUP, you can use the options of the
Setup menu to make further settings.
Press RETURN or SETUP to quit the Setup menu.


Playback functions
DVD-Video
Video CD
CD
RAM
MP3
WMA
JPEG
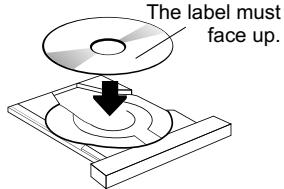
text_image
The label must face up.OPEN/CLOSE

Playback
- Press OPEN/CLOSE ▲ to open the disc tray.
- Place the disc on the disc tray.
- Press PLAY▶.
The disc tray closes and disc playback starts automatically.
* The player may take some time to read all of the disc information!
SUBTITLE

MP3, WMA, JPEG:
The Playback menu appears on the screen.

Subtitles/information:
- Press SUBTITLE to show or hide the text.

Pause playback (still image)
- Press PAUSE II during playback.

Interrupt playback
- Press STOP ■.
- Press PLAY▶ to resume playback.

Stop playback
- Press STOP ■ twice.

Playback of a particular track or title
DVD-Video
Video CD
CD
RAM
MP3
WMA
JPEG
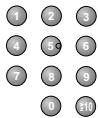
Type in a number using the RC unit's numeric key pad.
For example, to select title 23:
DVD/RAM/VCD/CD : Press ≧10 + ② + ③.
MP3/WMA/JPEG : Press ② + ③ + ENTER.
The unit automatically starts playing the selected track.
* Certain discs may not provide this function at all or only if the appliance is in stop mode.
Playback functions
REPEAT

Repeat
DVD-Video Video CD CD RAM MP3 WMA JPEG
- Press REPEAT during playback.
You can choose from the following settings, depending on the disc you use:

text_image
DVD-Video Off → Chapter → Title DVD-RAM PG Off → Program → All DVD-RAM PL Off → Scene → Playlist VCD/CD Off → Track → All WMA/MP3 Off → Content → Group JPEG Off → Group* The repeat function is available only if the disc runtime is displayed during playback. There is no mode for repeatedly playing back entire discs.
Repeating a VCD using playback control (PBC)
- Press STOP ■ during playback until [PLAY] is no longer displayed.
- Type in the number of the CD track using the RC unit's numeric key pad.
- Press REPEAT.
The display shows [TRK] or [ALL].
Single frame mode
DVD-Video Video CD RAM
In pause mode, press remote control buttons ◀ or ▶.
Every push of one of these buttons takes the film a single frame forwards or backwards. Keeping one of these buttons pressed continuously displays the next single frame in the chosen direction. You can also press PAUSE III to move the film forward a single frame at a time.
* VCDs do not support a backward motion by single frames.
Playback functions
DVD-Video
Chapter review
This function lets you browse back through the chapters of a DVD-V by playing the first couple of seconds of every chapter.
- Press STOP ■ during playback.
- Press PLAY▶.
A message appears: Press PLAY to Chapter Review.
- Press PLAY ▶ again.
The first couple of seconds of every chapter are played back. Normal playback is resumed at the point where you stopped it.
* Do not press PLAY▶ if you do not wish to browse back through the chapters. After a couple of seconds, normal playback will be automatically resumed at the point where it was stopped.
POSITION MEMORY
DVD-Video
Video CD
CD
RAM
MP3
WMA
JPEG
Use the Position Memory function to resume disc playback at a set position. You can tag and directly access up to 5 discs.
The position tag is retained when you change discs or when the unit goes into stand-by mode.
POSITION MEMORY

- Press POSITION MEMORY during playback.
A message appears: Position memorized.
You can now change discs or go into stand-by mode.
- Press PLAY▶ to play back the disc again. Playback is resumed at the stored position and the position tag is cleared.
* Some discs do not fully support all of this function.
Playback functions
DVD-Video Video CD CD MP3 WMA JPEG
PLAY MODE

Random playback
All chapters/tracks are played once each in a random order.
- Press PLAY MODE while the disc is stopped. The Program Play screen is displayed.
- Press PLAY MODE again. The Random Playback screen is displayed.
- Press PLAY▶ to start random playback.
- To deactivate the function, stop the disc and press PLAY MODE.
* DVD-V, MP3, WMA, JPEG: Press ▲▼ or the numeric keys of the remote control unit to select or specify the track/group to be played in a random order.
SLEEP

Automatic switch-off
- Press SLEEP to display that menu.
- Select a switch-off timer option pressing ▲:
Off → AUTO → 60 min → 90 min → 120 min
[SLP] appears on the display.
After the set time, the appliance goes into stand-by mode.
- Choose [Off] to disable the function.
- Choose [Auto] to have the appliance switch itself off 5 minutes after the end of the available runtime.
[Auto] is not available if you press STOP, MENU or TOP MENU.
- Press SLEEP to check the time remaining until switch-off.
* If Auto Power Off is activated, the player automatically goes into stand-by mode after approx. 30 minutes in Stop mode.
25
Playback functions
text_image
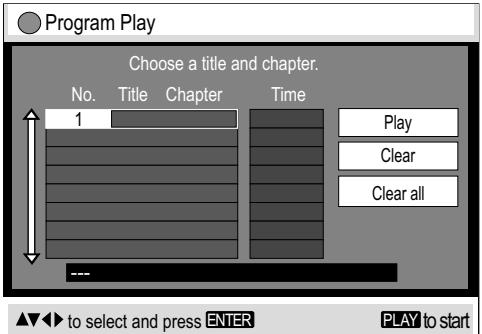
Program Play Choose a title and chapter. No. Title Chapter Time 1 Play Clear Clear all --- to select and press ENTER PLAY to startProgram play
You can programme up to 32 chapters/tracks to be played in any order.
- Press PLAY MODE while the disc is stopped. The Program Play screen appears.
* Use the numeric keys to specify the Group/Title (not with CDs) and the Content/Chapter. In the case of MP3 or WMA discs or if you select the numbers using ▲▼, press ENTER to confirm every entry. - Repeat this procedure to make further entries.
-
Press PLAY▶. The unit starts to play the programme.
* Some discs may not provide this function. -
To clear an entry, press ▼▲ to select it first.
- Press ▶ and ▼ to select [Clear], then press ENTER.
-
Choose [Clear all] and press ENTER to clear all entries.
-
To change an entry, press ▲▼ to select it, then press ENTER to confirm.
- Press ENTER to confirm any changes to the Group/Title and Content/Chapter objects.
To quit the Program Play mode
- Stop the disc and press PLAY MODE until Program Play disappears from the display. The actual programme is retained.
* To clear the programme, switch off the appliance or remove the disc.
PLAY MODE

PLAY MODE

Playback functions
text_image
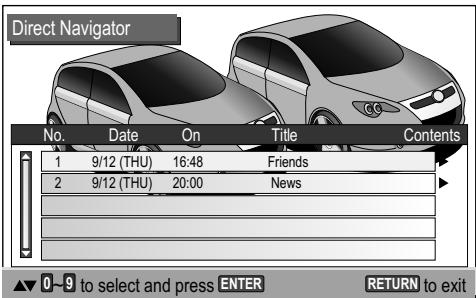
Direct Navigator No. Date On Title Contents 1 9/12 (THU) 16:48 Friends 2 9/12 (THU) 20:00 News ▲▼ 0-8 to select and press ENTER RETURN to exitYour player can play DVD-RAM discs recorded in the video recording format, version 1.1, by a DVD video recorder, DVD video camera, computer etc.
text_image
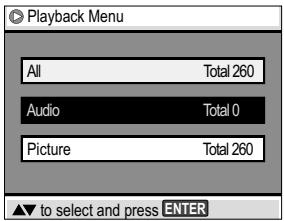
Playback Menu All Total 260 Audio Total 0 Picture Total 260 ▲ to select and press ENTERDVD-RAM Direct Navigator
- Press DIRECT NAVIGATOR to enter or exit the menu screen. Programme names are shown only if they were entered when the RAM was produced.
- Press ▶ to display the programme information.
- Press ◀▶ to browse.
- Press RETURN to go back to the previous screen.
- Press ▲▼ or use the numeric keys to select a programme. Playback starts in the background.
- Press ENTER to hide the menu screen.
To play tracks from a play list
You can play tracks contained in a play list recorded on a DVD video recorder, for example.
- Press PLAY LIST. The Playlist screen is displayed if the disc has a play list on it. Press PLAY LIST again to quit the menu.
- Press ▲▼ or use the numeric keys to select a play list, then press ENTER to confirm. Playback starts.
- Press SKIP to leave out tracks down a play list.
DIRECT NAVIGATOR

TOP MENU
PLAY LIST

MENU

Playback Menu
- The Playback Menu appears on the screen when you insert a JPEG, WMA, MP3 or HighMAT disc.
- Press ▲▼ to select the contents you wish to play, then press ENTER or PLAY to confirm.
* To display the Navigation Menu when playing HighMAT discs, go to the Setup menu, pick item Others and set HighMAT to [Enable]. Or select in STOP-Mode in the Other Menu [Play as Data Disc].
JPEG
MP3
WMA


Navigation Menu
PLAY LIST

MENU
To display the selection menu
- Display the Navigation Menu and press DISPLAY.
The Selection menu is displayed. - Press ▲▼ to select a menu item, then press ENTER to confirm or RETURN to quit the Selection menu.
DISPLAY

text_image
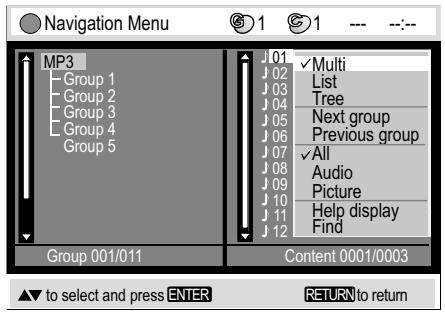
Navigation Menu MP3 Group 1 Group 2 Group 3 Group 4 Group 5 J01 J02 J03 J04 J05 J06 J07 J08 J09 J10 J11 J12 Multi List Tree Next group Previous group All Audio Picture Help display Find Group 001/011 Content 0001/0003 ▲ to select and press ENTER RETURN to returnTo display the Navigation Menu
- Press MÊNU. The Navigation Menu is displayed.
- Press ▲▼ to select a title, then press ENTER to start playing it.
- Press MENU to quit the menu.
Navigation Menu / Selection menu options
| Multi | The [Group] and [Content] panels are tiled vertically.• Press ◀▶ to move the cursor from [Group] to [Content] and back. |
| List | Shows the [Content] of the selected [Group]. |
| Tree | Displays a tree view of the groups. Press ▲▼ and ENTER to select a [Group]. The Group's contents is shown. |
| Thumbnail | Displays the JPEG Thumbnail Menu.19 |
| Next groupPrevious group | Moves to the next or previous group. |
| All / Audio / Picture | Selects the formats shown on the Navigation Menu. |
| Help display | Displays help on the menu control or the status indicator. |
| Find*A Find | To find groups or content• Press ▲▼ to enter the target word into the text box.• Press ENTER to confirm every letter.• Press ◀ to make corrections.• Press ▶ to select [Find] and ENTER to confirm.The match list contains the matching entries.If there are no matching entries, you will see: [Not found].• Press ▲▼ and ENTER to start playing the track you looked for.* In the [Multi] view press ◀▶ to select the Group or Content panel. The search is performed in the selected area.Search with asterisk:The match list covers all entries containing the word you specified.Search without asterisk:To look for the first work in a title press ◀ to delete the asterisk. |
JPEG
MP3
WMA
Navigation Menu
text_image
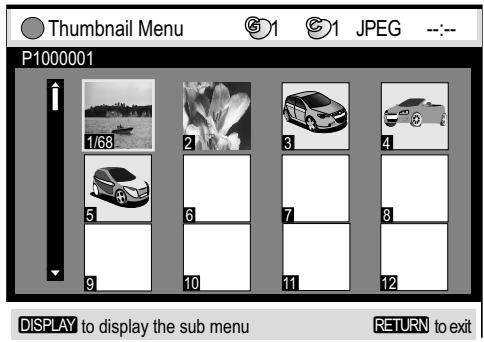
Thumbnail Menu P1000001 1/68 2 3 4 5 6 7 8 9 10 11 12 DISPLAY to display the sub menu RETURN to exitWMA / MP3 / CD-Text
Group : Songs 3
Content : 01 - Title 1
JPEG
Group Pictures 5
Content P1010002
Date 2004/01/25 17:26
Camera DMC-LC20
JPEG Thumbnail Menu
- Pick DISPLAY from the Navigation Menu and press ▲▼ to select [Thumbnail].
- Press ENTER to confirm. The Thumbnail Menu is displayed.
- Press ▲◀▶ to select a picture.
Press ▲▼◀▶ to page up or down. When you have browsed the pictures of a group, the pictures of the next group are shown.
- Press ENTER to confirm. The selected picture is shown full size.
Rotate pictures
- Press ANGLE/PAGE while the picture is shown. The picture is rotated clockwise by 90 degrees.
ANGLE/PAGE

Activate on-screen displays
WMA / MP3 / CD Text
• Information on the current track is shown during playback.
- Press SUBTITLE to hide the on-screen display.
JPEG
- Press SUBTITLE during playback. The picture creation date is shown.
- Press SUBTITLE to display further information.
- Press SUBTITLE to hide the on-screen display.

SUBTITLE

Select Group/Title
- Play back a disc and select the group or title on it.
- Press ▲▼ to select the [Group], press ◀▶ to select the [Title].
* WMA: You cannot play copy-protected WMA files.
* MP3: The appliance is incompatible with ID3 tags.
* WMA, MP3, JPEG (CD-R / CD-RW): Make sure the discs are compatible with ISO 9660 (level 1 or level 2).
JPEG
DISPLAY

HighMAT
text_image
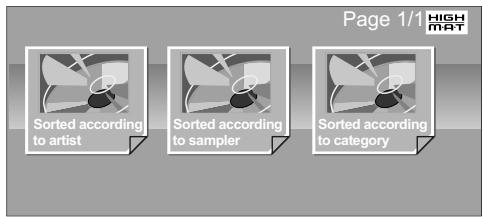
Page 1/1 HIGH MAT Sorted according to artist Sorted according to sampler Sorted according to category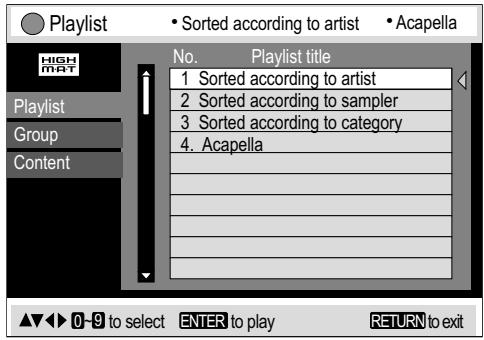
text_image
Playlist • Sorted according to artist • Acapella No. Playlist title 1 Sorted according to artist 2 Sorted according to sampler 3 Sorted according to category 4. Acapella ▲▼▶ 0-9 to select ENTER to play RETURN to exitCD Text
text_image
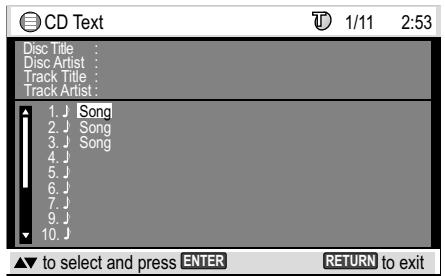
CD Text 1/11 2:53 Disc Title : Disc Artist : Track Title : Track Artist : 1. J Song 2. J Song 3. J Song 4. J 5. J 6. J 7. J 9. J 10. J ▼ to select and press ENTER RETURN to exitHighMAT (High Performance Media Access Technology) is a joint Panasonic and Microsoft technology development.
Diverse HighMAT-level 2 format data (WMA, MP3 and/or JPEG) stored on a disc by a PC can be quickly played back by the appliance with the additional help of a menu.
While the HighMAT menu is displayed:
- Press ▲▼◀▶ to select and ENTER to confirm.

Menu: Takes you to a sub-menu containing further play lists or menus.

Playlist: Starts playback
- Press TOP MENU to show or hide the HighMAT menu.
- Press RETURN to go back to the previous menu.
- Press DISPLAY to show or hide the background stored on the disc.
- Press SUBTITLE to show or hide information on the track.
Selecting from a Playlist
- Press MENU during playback.
The play list appears ( indicates the currently playing item). - Press ◀ and then ▲▼ to move from [Playlist] to [Group] and [Content] and back.
- Press ▶ and then ▲▼ to select an item, then press ENTER to confirm.
- Press MENU to quit the Playlist screen.
CD Text menu
-
Press MENU.
The CD Text menu appears on the screen.
The screen contains information on the disc and a list of tracks. -
Press ▲▼ to select a title.
- To play the selected track, press ENTER.
- Press RETURN to quit the menu.
DISPLAY menu
Playback status indicator (DVD-S27 only)

text_image
T 1 © 2 0 : 03 : 10 ---
- Press DISPLAY twice to activate the playback status indicator.
- Press ◀▶ to change the playback speed.
- Press ▲▼ to display the current and the remaining playback time.
- Press DISPLAY again to hide the status indicator.
Advanced Surround
Requires 2 or more audio channels.
- Press ADVANCED SURROUND.
- Press ▼▲ to select any of the menu items.

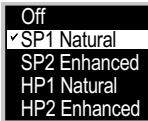
- Effect off (factory default).
- Normal degree of effect on loudspeakers.
- Enhanced degree of effect on loudspeakers.
- Normal degree of effect on headphones.
- Enhanced degree of effect on headphones.
* Advanced Surround is not supported by all discs.
* Deactivate the Advanced Surround effect if you experience distorted sound.
* Deactivate Advanced Surround if you are also using Dolby Pro Logic Amplifier. Dolby Pro Logic will not work properly if Advanced Surround is on.
text_image
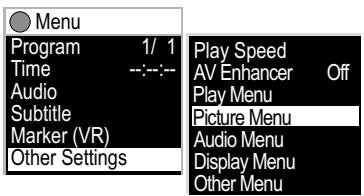
Menu Program 1/ 1 Time --:-- Audio Subtitle Marker (VR) Other Settings Play Speed AV Enhancer Off Play Menu Picture Menu Audio Menu Display Menu Other MenuDVD-RAM menu illustration


To display the DISPLAY menu.
- Press DISPLAY to invoke the DISPLAY menu of the current disc. The available options depend on the current disc.
- Press ▲▼ to select a sub-menu, then press ▶ or ENTER.
- Press ▲▼ to select a setting as described on pages 22 and 23.
- Press ENTER to confirm.
- Press ▶ to display another sub-menu.
- Press ▲▼ to select a setting as appropriate.
(Press ◀ to move to the previous menu.)
- Press ENTER to confirm your selection.
(The items of the menus may vary depending on the contents of the disc) - Press RETURN or DISPLAY to quit the menu.
DISPLAY menu
| Menu | |
| Title 1/36 | DVD-Video |
| Chapter 1/27 | |
| Time --:--- | |
| Audio ---- | |
| Subtitle ---- | |
| Angle -/- | |
| Other Settings | |
| Menu | |
| Track 1/ 2 | Video CD |
| Time 48:10 | |
| Audio L R | |
| Other Settings | |
| Menu | |
| Playlist 1/38 | HighMAT |
| Group 1/20 | |
| Content 2/12 | |
| Time 0:39 | |
| Audio 96kbps | |
| Other Settings | |
| Menu | |
| Group 1/11 | WMA/MP3 |
| Content 1/12 | |
| Time --:--- | |
| Audio | |
| Other Settings | |
| Menu | |
| Group 1/ 6 | JPEG |
| Content 1/68 | |
| Thumbnail | |
| Rotate Picture | |
| Slideshow On | |
| Other Settings | |
| Menu | |
| Track 1/14 | CD |
| Time 48:10 | |
| Other Settings | |
Title/Track Search: Allows you direct access to a title/track if the disc hosts several.
Program Search: Allows you direct access to a program if the disc hosts several.
Chapter Search: Allows you direct access to a chapter if the disc hosts several.
Group Search: Allows you direct access to MP3/WMA tracks or JPEG images defined to make up a group.
GROUP
Content Search: Directly select a MP3/WMA track or JPEG image stored on the disc.
Playlist Search: Directly select a play list stored on the disc.
Time: Display/select playback time: Alternative display of current or remaining playback time.
MP3, WMA, SVCD: Shows the playback time only.
Shows the current playback time or the remaining playback time.
Time Slip: Press ▲▼ to select the interval by which playback is to move back or forward.
Time Search: Use the numeric keys to specify the time at which playback is to be resumed.
Audio/Karaoke: Allows you to alter the pre-set language of synchronisation provided the disc gives you an alternative. In the case of VCDs, you can change the left/right audio channel setting.
AUDIO
Subtitle/Language: Selects the language of on-screen subtitles. [Off]: No subtitles displayed.

SUBTITLE
Marker (VR): Select the marker tags set on a DVD-RAM by a DVD recorder.
Angle: Change between camera angles of films recorded from various camera locations.
ANGLE/PAGE
Thumbnail: Displays the thumbnail menu. Press ▲▼◀▶ to select a JPEG image. Press ENTER to show the selected image full screen.


Rotate Picture: Select [Right] or [Left] to rotate the image on the screen in the selected direction.
Slideshow: Starts and stops the on-screen slideshow.
Choose [Interval] to set the time every slideshow picture remains on the screen (0 to 30 seconds).
DISPLAY menu
These settings are not available for every disc.
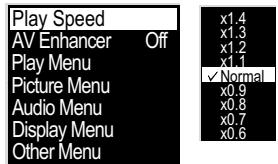
Other Settings
text_image
Play Speed AV Enhancer Off Play Menu Picture Menu Audio Menu Display Menu Other Menu x1.4 x1.3 x1.2 x1.1 ✓ Normal x0.9 x0.8 x0.7 x0.6

text_image
Play Menu Repeat Off A-B Repeat * * Marker

text_image
Audio Menu Advanced Surround Off Dialogue Enhancer Off Attenuator Off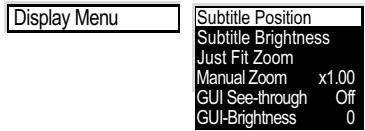
text_image
Display Menu Subtitle Position Subtitle Brightness Just Fit Zoom Manual Zoom x1.00 GUI See-through Off GUI-Brightness 0
| Play Speed: Select a factor by which to change the playback speed.The digital audio output switches to PCM. | |||
| AV-Enhancer: Automatically optimises and adapts the audio and video settings to the disc used.The Picture and Audio menus are not available when this function is enabled. | |||
| A-B Repeat: Playback repeats a defined section between positions A and B of a title.Press ENTER to set starting point A and end point B. If you do not set point B, the end of the track is used as the end point. Press ENTER to terminate this function.Repeat: Allows you to repeat the current track or chapter.Marker: Up to 5 positions can be tagged pressing ENTER. Press CANCEL to delete any mistakes. Select a marker and press ENTER Playback starts at the marker tag.The markers are cleared by opening the disc tray or switching off the appliance. | |||
| Picture ModeNormal: Factory defaultCinema1: Cinema function for viewing in dark rooms. Bright picture areas are dimmed down. | Cinema2: Enhances brighter areas of dark scenes.Animation: Intensifies the colours.Dynamic: Brightens up the picture. | ||
| Advanced Surround: Produces an effect similar to surround sound at the two front speakers (SP) or the headphones (HP). Deactivate this function if the sound becomes distorted.Dialogue Enhancer: Puts up the volume of feature film dialogues.Attenuator: Adapts the volume to the TV set connected (e.g. after sound problems). | |||
| Subtitle Position : Vertically moves the subtitle shown.Subtitle Brightness: Modifies the brightness of the subtitle shown.Just Fit Zoom: Allows you to select a pre-defined picture size.Manual Zoom: Zooms into the image to enlarge it by up to twice its original size.GUI See-through: The background of OSD text becomes transparent.GUI-Brightness: User-defined brightness of OSD text. | |||
| Sleep: After the set time, the appliance goes into stand-by mode. Choose Auto to have the appliance go into stand-by mode 5 minutes after the end of the available runtime.Play as HighMAT / Play as Data Disc: Stop the HighMAT disc and choose to play it as a data disc or as a HighMAT-format disc.Play as DVD-VR / Play as Data Disc: Stop the DVD-RAM and choose to play JPEGs or the programme. | |||
SETUP menus
To display the Setup menu
- Press SETUP to display the Setup menu.
- Press ▲▼ to select a sub-menu, then press ▶.
- Press ▲▼ to select the option to be changed, then press ENTER to confirm.
- Press ▲▼ to select a setting option, then press ENTER to confirm.
- Press ◀▲▼ to select the next menu item.
- Press RETURN to quit the menu.
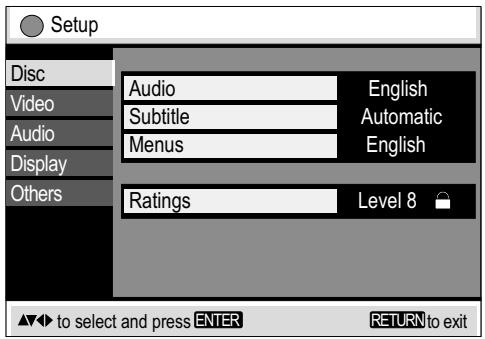
text_image
Setup Disc Audio English Video Subtitle Automatic Audio Menus English Display Ratings Level 8 Others ▲▼ to select and press ENTER RETURN to exit4:3 TV aspect ratio
Letterbox:

Pan&Scan:

Menu Disc
| Audio Subtitle Menus | Disc’s Audio Preference / Subtitle Preference / Menu Preference.Select the preferred language of either of the items. If the language you want is not on the list, select [Other] and type in the appropriate country code (see last page). |
| Ratings | Assign a ranking to disallow the viewing of some scenes [1-7] or the entire DVD video disc [0] and specify a password to guard access to the disc contents.This feature is not supported by all DVD video discs.Type in a 4-digit code using the numeric key pad of your remote control unit, then press ENTER to confirm it.Press◄or CANCEL to delete any mistakes..A closed padlock icon is displayed while this feature is enabled. Make sure not to forget your password code.To change the settingEnter your password code and press ENTER to confirm.Change the setting as appropriate and press ENTER to confirm. |
Menu Video
| TV Aspect | Sets the aspect ratio to 16:9 or 4:3 (Pan&Scan/Letterbox). |
| TV Type | Selects the connected type of TV set. |
| Time Delay | When using an audio amplifier together with a plasma TV or a digital TV, the picture can be delayed in relation to the sound signal. You can synchronize the picture signal with the sound using the Time Delay setting. |
| AV Output | Selects the video signal from the scart socket (Video, S-Video, RGB). |
| Still Mode | Select a picture quality for still image mode:Automatic:The unit selects the optically better type of image.Field:Poorer quality than a picture frame.Frame:Although the image may be somewhat fuzzy, its quality is better than that of a field-based still image. |
| NTSC Disc Output | To play a NTSC disc, select a colour rendition standard (NTSC/PAL60) that matches the function of your TV set. |
SETUP menus
Dolby Digital / DTS Digital Surround / MPEG:
Please choose the correct settings matching your audio system:
| Your equipment can not decode the signal | Your equipment can decode the signal | |
| Dolby Digital | PCM | Bitstream |
| DTS Digital Surround | PCM | Bitstream |
| MPEG | PCM | Bitstream |
Menu Audio
| PCM Digital Output | PCM is the standard method used to record digital music signals on Audio CDs. For reasons of copyright protection, the digital output of PCM audio signals may be limited to 48 kHz/16 bit. Choose [Up to 48 kHz] if the digital audio outlet is used to connect your player to an amplifier that only processes sampling frequencies of up to 48 kHz. |
| Dolby Digital DTS Digital Surround MPEG | Change the setting to PCM if the connected equipment fails to decode the relevant signal. High noise levels may otherwise damage your ears or the loudspeakers. Adapt the settings to the ratings of your audio system. |
| Dynamic Range Compression | Available in the Dolby Digital (DVD) format only.The volume range is compressed by dynamically putting up the level of soft passages and lowering the level of loud passages. |
| Audio during Search | Choose to have the sound on or off during the search. |
Menu Display
| Menu Language | Select the language of the appliance's menus as appropriate. |
| On-Screen Messages | Select [No] to suppress the display of OSD text. |
Menu Others
| FL Dimmer | You can set the display panel brightness to [Bright], [Dim] or [Automatic]. Choose [Auto] to dim the display panel during playback and restore its full brightness when the function keys are pressed. |
| Auto Power Off | On: If no disc is playing, the appliance goes into stand-by mode after approx. 30 minutes. |
| HighMAT | Enable: Activates HighMAT playbackDisable: Plays HighMAT discs in the MP3/WMA/JPEG format.  |
| QUICK SETUP | Lets you change the basic settings or your appliance.  |
| Re-initialize Setting | Resets the appliance to factory defaults. Following reset and initialisation, pressSETUPto run the QUICK SETUP utility again.  |
Before requesting service
GENERAL PROBLEMS
The player does not respond to function key commands:
- Certain control operations are not available with some discs.
- There may be interference caused by lightning or static charge.
- Press [O/I] to put the player into stand-by mode.
- Restart the player.
Playback does not start after pressing PLAY:
- Condensation has accumulated inside the player. Wait for 1 to 2 hours.
- The player only supports DVDs with regional code 2, ALL or from a group of regional codes containing regional code 2.
- The disc is dirty or damaged.
- The disc is in the wrong way round. The label of the disc you wish to play must face up.
The remote control unit does not work:
- Verify that the batteries are in the right way round (+ and -).
- Point the RC unit at the front of the appliance.
Unable to change the aspect angle:
- It depends on the disc whether this function is available.
Unable to change the audio track or the subtitle language:
- You can only choose from the languages actually recorded on the disc.
- Some discs require you to change the setting via the Disc menu.

The subtitles are not shown:
- The disc does not provide any subtitles.
- You deactivated the display of subtitles.
- The subtitles are at the wrong position. Move the position of subtitles.

The audio track or subtitles do not use the language selected from the menu:
- The disc does not provide the language you selected.
You forgot your password:
- Stop the player and keep pressing player button ☐ together with "and also OPEN/CLOSE" until [Initialised] disappears from the screen. This restores all factory defaults. When you are done switch off the unit and back on afterwards. Afterwards, display the QUICK SETUP menu to re-initialise the appliance to your preferences.
Before requesting service
SOUND AND PICTURE PROBLEMS
There is no audio output and the sound is distorted:
- Check the connections.
- Deactivate the Advanced Surround effect.

The loudspeakers emit loud noise:
- Go to the Setup screen and check the Audio menu settings of [Dolby Digital], [DTS Digital Surround] and [MPEG].

The picture is disturbed when searching:
- This is a technical issue and not indicative of a malfunction.
No picture appears on the screen:
- Check the connections.
- Verify that the correct video input of the TV set has been selected.
The picture is cut off at its left or right edge:
- Check the Video menu's [TV Aspect] setting on the Setup screen.
- Check that the player is directly plugged into the TV set's [AV Output] and not to a video cassette recorder between the two units.
- Check the Zoom setting.


DISPLAYED PROBLEMS
Message [Disc is incompatible with this player] is displayed:
- The player cannot play discs of the current format.
- The disc contains no recorded material.
![PANASONIC DVDS27EB - Message [Disc is incompatible with this player] is displayed: - 1](/content/2019/10/56216/images/10979f2a02df18e8827ebd9824e5d76503f8ebd67da021173b8f51c3a1c31513.jpg)
No messages are output to the screen:
- Go to the Setup menu and change Display menu setting [On-Screen Messages] to [On].

The OSD displays are cut off along their top edge:
- Check the [TV Aspect] setting.

Error code [U □ □] or [H □ □] appears:
• U11: Disc is dirty. Wipe it clean.
• U15: You inserted a DVD-R that has not been finalized.
- H □ □: This is indicative of a malfunction. The digits following "H" depend on what state your player is in.
- Press ⬇/I to put the player into stand-by mode, then briefly unplug and re-attach the AC mains cable.
- Contact the aftersales service if this does not remove the problem. Please state the error code displayed by the set.
Information
flowchart
graph TD
    A["Disc-Top menu"] --> B["Menu"]
    B --> C["Menu"]
    C --> D["Menu"]
    D --> E["TOP MENU"]
    E --> F["MENU"]
    F --> G["Title"]
    style A fill:#f9f,stroke:#333
    style B fill:#ccf,stroke:#333
    style C fill:#ccf,stroke:#333
    style D fill:#ccf,stroke:#333
    style E fill:#cfc,stroke:#333
    style F fill:#cfc,stroke:#333


natural_image
Two hand diagrams showing a circular object being lifted by a tool, with no text or symbols present.Playing DVDs and VCDs
The producer of the programme material can define the way in which the disc is played. Consequently, you may sometimes find that, in some cases, you cannot control the playback the way you wish using all of the functions and operations described in these operating instructions. We therefore recommend that you always read the reference material delivered with the disc.
Press SUBTITLE to display/quit the track information on TV screen.
The player may take some time to read all of the disc information!
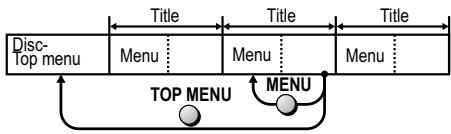
DVD menu
Some DVDs have multiple menus. Pressing TOP MENU to display the main menu may take to another menu than pressing MENU to display the menu screen.
* The functions assigned to these buttons depend on the disc.
Please refer to the disc documentation leaflet.
Decoder
This appliance features an internal Dolby Digital decoder and a DTS decoder.
You can enjoy these systems in stereo quality without the need of a separate decoder.
Problem caused by a disc
- Do not stick labels on the disc (this might render the disc useless).
- Only use a suitable pen for writing on the disc.
- Do not insert cleaning discs into the appliance.
- Do not play discs with any glue from stickers still on them.
- Do not play cracked discs.
-
Do not play warped or irregularly shaped discs.
-
First wipe the disc (DVD-RAM / DVD-V / VCD / CD) with a wet cloth, then with a dry cloth.
- If available, use the optional DVD-RAM/PD disc cleaner (LF-K200DCA1) to clean the DVD-RAM / DVD-R.
Do not use clothing or other disc cleaners.
Information
Region codes


This player accesses the regional codes stored on DVDs. It supports all discs assigned regional code "2" or "ALL". UK and continental Europe: "2".
Disc forms


Never play anything but circular discs with a diameter of 3" (8 cm) or 5" (12 cm). Discs of other shapes may damage the player hardware.
HighMAT and the HighMAT logo

AUDIO·IMAGE
are trademarks or registered trademarks of Microsoft Corporation in the United States and/or other countries.
Windows Media and the Windows logo

are trademarks or registered trademarks of Microsoft Corporation in the United States and/or other countries.
Designed for
Windows Media™
Dolby Digital
Method of encoding digital signals. The signals are very much compressed in the process to enable recordings of large volumes of data.
Manufactured under license from Dolby Laboratories. "Dolby", "Pro Logic" and the double-D symbol are trademarks of Dolby Laboratories.
DTS (Digital Theater Systems)
Sound system used in cinemas or movie theaters all over the world.
"DTS" and "DTS 2.0 + Digital Surround" are trademarks of Digital Theater Systems, Inc.
MP3 or MPEG 1 Audio Layer 3 is a file compression format used for digital audio files. It provides files of an extremely small size and may cause a consequential loss of quality.
WMA is a file compression format developed by Microsoft. It achieves the same sound quality as MP3 with a file size that is smaller than that of MP3. MPEG Layer-3 audio decoding technology licensed from Fraunhofer IIS and Thomson multimedia.
This product features a copyright protection implement whose technology is protected by US patents and intellectual property rights owned by Macrovision Corporation and other copyright proprietors.
The use of this copyright protection implement is subject to permission of Macrovision Corporation and is restricted to purely private use only.
It is prohibited to examine this appliance
for the purpose of unlicensed construction.
| Disc formats S27 / S24 | ||||||
| DVD-Video | DVD-R | DVD-RAM | SVCD | Video-CD | CD | CD-R/RW |
 VIDEODVDVIDEO VIDEODVDVIDEO |  RR4.7 RR4.7 |  RAM RAM 4.7(without Cartridge) RAM RAM 4.7(without Cartridge) |  SUPER VIDEOIEC62107 SUPER VIDEOIEC62107 |  (DIGITAL VIDEO) (DIGITAL VIDEO) |  DIGITAL AUDIO TEXTCOMPACTDISCDIGITAL AUDIO DIGITAL AUDIO TEXTCOMPACTDISCDIGITAL AUDIO | --- |
| DVD-V | RAMJPEG | VCD | CD | WMAMP3JPEG | ||
* Depending on the disc type and the conditions of recording, the appliance may sometimes fail to play the listed discs.
* DVD-RAM with JPEG: Recorded with Panasonic DVD-Video recorders. To play JPEG files, select [Play as Data Disc] in DISPLAY menu (page 23).
Specifications
Power supply: 220-240 Volt mains voltage, 50 Hz
Power consumption: 9 Watt
Power consumption in stand-by: < 1 Watt
Dimensions: 430(W) x 227(D) x 55(H) mm
Weight: 1.9 kg
Operating temp. range: +41°F to +95°F(+5°C to +35°C)
Humidity during operation: 5 to 90 % rel. humidity (non-condensing)
Compatible video system: PAL 625/50, PAL 525/60, NTSC
Video output:
Output level: 1 Vpp (75 Ohm)
Output socket: Female cinch
Scart output:
RGB output level: 0.7 Vpp (75 Ohm)
Video output level: 1 Vpp (75 Ohm)
C output level: PAL/PAL 60 : 0.3 Vpp; NTSC : 0.286 Vpp (75 Ohm)
Output socket: 21-pin AV Scart (S-Video/RGB included)
Audio output:
Output level: 2 Vrms (1 kHz, 0 dBFs)
Output sockets: Female cinch 2 channels / AV Scart 2 channels (L/R)
Audio output signal ratings:
• Frequency response: DVD (linear PCM audio): 4 Hz to 22 kHz (sampling frequency 48 kHz)
Audio-CD:
• Signal-to-noise ratio: Audio-CD:
• Dynamic range: DVD (linear PCM audio): Audio-CD:
• Total harmonic distortion: Audio-CD:
115 dB
100 dB 98 dB
0.0025 %
Digital audio output:
COAXIAL
Output socket: Female cinch
Output level: 0.5 Vpp (75 Ohm)
Pickup:
Wave length: 662 nm / 785 nm Laser classification: CLASS 2 / CLASS 3a
Compatible disc formats:
DVD-V, DVD-RAM, DVD-R, CD-Audio, CD-R/RW (CD-DA, VCD, SVCD, MP3, WMA, JPEG formatted discs), HighMAT Level 2 (Audio and Image).
WMA, MP3, JPEG : Max. 4000 tracks/ 400 groups.
Compatible compression rate:
MP3 : 32 - 320 kbps WMA : 48 - 192 kbps
JPEG format : Exif Version 2.1 Baseline files Picture resolution between 320 x 240 and 6144 x 4096; sub sampling: 4:2:2 or 4:2:0
- Technical specifications subject to change without notice.
- Weight and dimensions are approximate values.
Country codes
| Abkhazian | 6566 |
| Afar | 6565 |
| Afrikaans | 6570 |
| Albanian | 8381 |
| Ameharic | 6577 |
| Arabic | 6582 |
| Armenian | 7289 |
| Assamese | 6583 |
| Aymara | 6588 |
| Azerbaijani | 6590 |
| Bashkir | 6665 |
| Basque | 6985 |
| Bengali | 6678 |
| Bhutani | 6890 |
| Bihari | 6672 |
| Breton | 6682 |
| Bulgarian | 6671 |
| Burmese | 7789 |
| Byelorussian | 6669 |
| Cambodian | 7577 |
| Catalan | 6765 |
| Chinese | 9072 |
| Corsican | 6779 |
| Croatian | 7282 |
| Czech | 6783 |
| Danish | 6865 |
| Dutch | 7876 |
| English | 6978 |
| Esperanto | 6979 |
| Estonia | 6984 |
| Faroese | 7079 |
| Fiji | 7074 |
| Finnish | 7073 |
| French | 7082 |
| Frisian | 7089 |
| Galician | 7176 |
| Georgian | 7565 |
| German | 6869 |
| Greek | 6976 |
| Greenlandic | 7576 |
| Guarani | 7178 |
| Gujarati | 7185 |
| Hausa | 7265 |
| Hebrew | 7387 |
| Hindi | 7273 |
| Hungarian | 7285 |
| Icelandic | 7383 |
| Indonesian | 7378 |
| Interlingua | 7365 |
| Irish | 7165 |
| Italian | 7384 |
| Japanese | 7465 |
| Javanese | 7487 |
| Kannada | 7578 |
| Kashmiri | 7583 |
| Kazakh | 7575 |
| Kirghiz | 7589 |
| Korean | 7579 |
| Kurdish | 7585 |
| Laotian | 7679 |
| Latin | 7665 |
| Latvian | 7686 |
| Lingala | 7678 |
| Lithunian | 7684 |
| Macedonian | 7775 |
| Malagasy | 7771 |
| Malay | 7783 |
| Malayalam | 7776 |
| Maltese | 7784 |
| Maori | 7773 |
| Marathi | 7782 |
| Moldavian | 7779 |
| Mongolian | 7778 |
| Nauru | 7865 |
| Nepali | 7869 |
| Norwegian | 7879 |
| Oriya | 7982 |
| Pashto | 8083 |
| Persian | 7065 |
| Polish | 8076 |
| Portuguese | 8084 |
| Punjabi | 8065 |
| Quechua | 8185 |
| Rhaeto-Rom. | 8277 |
| Romanian | 8279 |
| Russian | 8285 |
| Samoan | 8377 |
| Sanskrit | 8365 |
| Scots Gaelic | 7168 |
| Serbian | 8382 |
| Serbo-Croat. | 8372 |
| Shona | 8378 |
| Sindhi | 8368 |
| Singhalese | 8373 |
| Slovac | 8375 |
| Slovenian | 8376 |
| Somali | 8379 |
| Spanish | 6983 |
| Sundanese | 8385 |
| Swahili | 8387 |
| Swedish | 8386 |
| Tagalog | 8476 |
| Tajik | 8471 |
| Tamil | 8465 |
| Tatar | 8484 |
| Telugo | 8469 |
| Thai | 8472 |
| Tibetan | 6679 |
| Tigrinya | 8473 |
| Tonga | 8479 |
| Turkish | 8482 |
| Turkmen | 8475 |
| Twi | 8487 |
| Ukrainian | 8575 |
| Urdu | 8582 |
| Uzbek | 8590 |
| Vietnamese | 8673 |
| Volapük | 8679 |
| Welsh | 6789 |
| Wolof | 8779 |
| Xhosa | 8872 |
| Yiddish | 7473 |
| Yoruba | 8979 |
| Zulu | 9085 |
Index
| Page | |
| Advanced Surround | 21,23 |
| Angle | 19 |
| Audio Preference | 24 |
| Autom. Power Off | 15,25 |
| AV Enhancer | 6,8,23 |
| Batteries | 5 |
| Bitstream | 25 |
| Chapter review | 14 |
| COAXIAL | 10 |
| Dialogue Enhancer | 23 |
| Digital connectors | 10 |
| Disc formats | 29 |
| Dolby Digital | 10,25,29 |
| DTS Digital Surround | 10,25,29 |
| DVD menu | 28 |
| Dynamic Range Compression | 25 |
| Field | 24 |
| Frame | 24 |
| Home cinema | 10 |
| Page | |
| JPEG | 18,19 |
| Laser | 3 |
| Letterbox | 24 |
| Menu Preference | 24 |
| MP3 | 18,19 |
| MPEG | 10,25 |
| NTSC Disc Output | 24 |
| PAL 60 | 24 |
| Pan&Scan | 24 |
| PCM Digital Output | 10,25 |
| Picture Mode | 23 |
| Play list | 17 |
| Playback | 12,13,14,15,16,17 |
| POSITION MEMORY | 14 |
| Program Play | 16 |
| Page | |
| RAM | 17 |
| Random Playback | 15 |
| Ratings | 24 |
| Region codes | 29 |
| Remote control | 6 |
| Repeat | 13 |
| Resume | 7 |
| RGB | 11,24 |
| Scene replay | 7 |
| Search | 18 |
| SETUP Menu | 24,25 |
| Single frame mode | 13 |
| SKIP | 7 |
| Slow motion | 7 |
| Still Mode | 24 |
| Subtitle | 22,24 |
| TOP MENU | 6,20,28 |
| TV Aspect | 11,24 |
| WMA | 18,19 |
| Zoom | 23 |