
SJCMPS1 - Composter Sun Joe - Free user manual and instructions
Find the device manual for free SJCMPS1 Sun Joe in PDF.
| Product Type | Tumbling Composter |
| Brand | Sun Joe |
| Model | SJCMPS1 |
| Total Capacity | 160 L |
| Number of Compartments | 2 |
| Drum Rotation | 360° |
| Drum Material | Polypropylene |
| Frame Material | Powder-coated Steel |
| Drum Height | 60 cm |
| Total Height | 94 cm |
| Total Width | 66 cm |
| Net Weight | 6.5 kg |
| Maximum Load | 150 kg |
| Number of Vents | 16 |
| Power | Manual (motorless) |
| Warranty | 2 years (residential use) |
| Assembly | Required, M5 and M6 screws provided |
| Maintenance | Clean with a damp cloth; store sheltered |
| Safety | Do not overload; keep children away; do not climb |
| Spare Parts | Axle, axle caps, doors, panels, tubular sections |
| Customer Service | 1-866-SNOWJOE (1-866-766-9563) |
| Optimal Temperature | 25–35 °C |
| Composting Time | 2 to 10 weeks depending on temperature |
| Waste Types | Greens (nitrogen-rich) and browns (carbon-rich) |
Frequently Asked Questions - SJCMPS1 Sun Joe
User questions about SJCMPS1 Sun Joe
0 question about this device. Answer the ones you know or ask your own.
Ask a new question about this device
Download the instructions for your Composter in PDF format for free! Find your manual SJCMPS1 - Sun Joe and take your electronic device back in hand. On this page are published all the documents necessary for the use of your device. SJCMPS1 by Sun Joe.
USER MANUAL SJCMPS1 Sun Joe
IMPORTANT! Safety Instructions
All Operators Must Read These Instructions Before Use
Read all the instructions contained in this manual. Keep this manual in a safe place, so that the information is available at all times. If you give this equipment to another person, make sure to provide these operating instructions. Basic safety precautions should always be followed to reduce the risk of personal injury or property damage.
Notice the personal safety alert symbol used in this manual to draw your attention to a WARNING given along with the particular operating instruction. This means that the operation requires special ATTENTION, CAUTION, and AWARENESS.
WARNING!
- Keep children and small pets away from the composter.
- All who participate in the assembly should wear safety glasses throughout the assembly process.
- Keep hands and loose clothing away when rotating the drum.
DANGER!
- DO NOT overload the composter. The maximum weight capacity is 330 lbs.
- DO NOT rotate the composer with frozen material inside.
- DO NOT climb in, on, or around the composter.
- DO NOT use or store hot objects near the product.
CAUTION!
- Assemble the composer on level ground.
- Remove the doors before emptying compost.
- To avoid damage to the plastic panels, do not overtighten the screws during assembly.
- Remove the drum from the frame before relocating the compost tumbler.
- Use care when using sharp objects to remove compost to avoid damaging the drum.
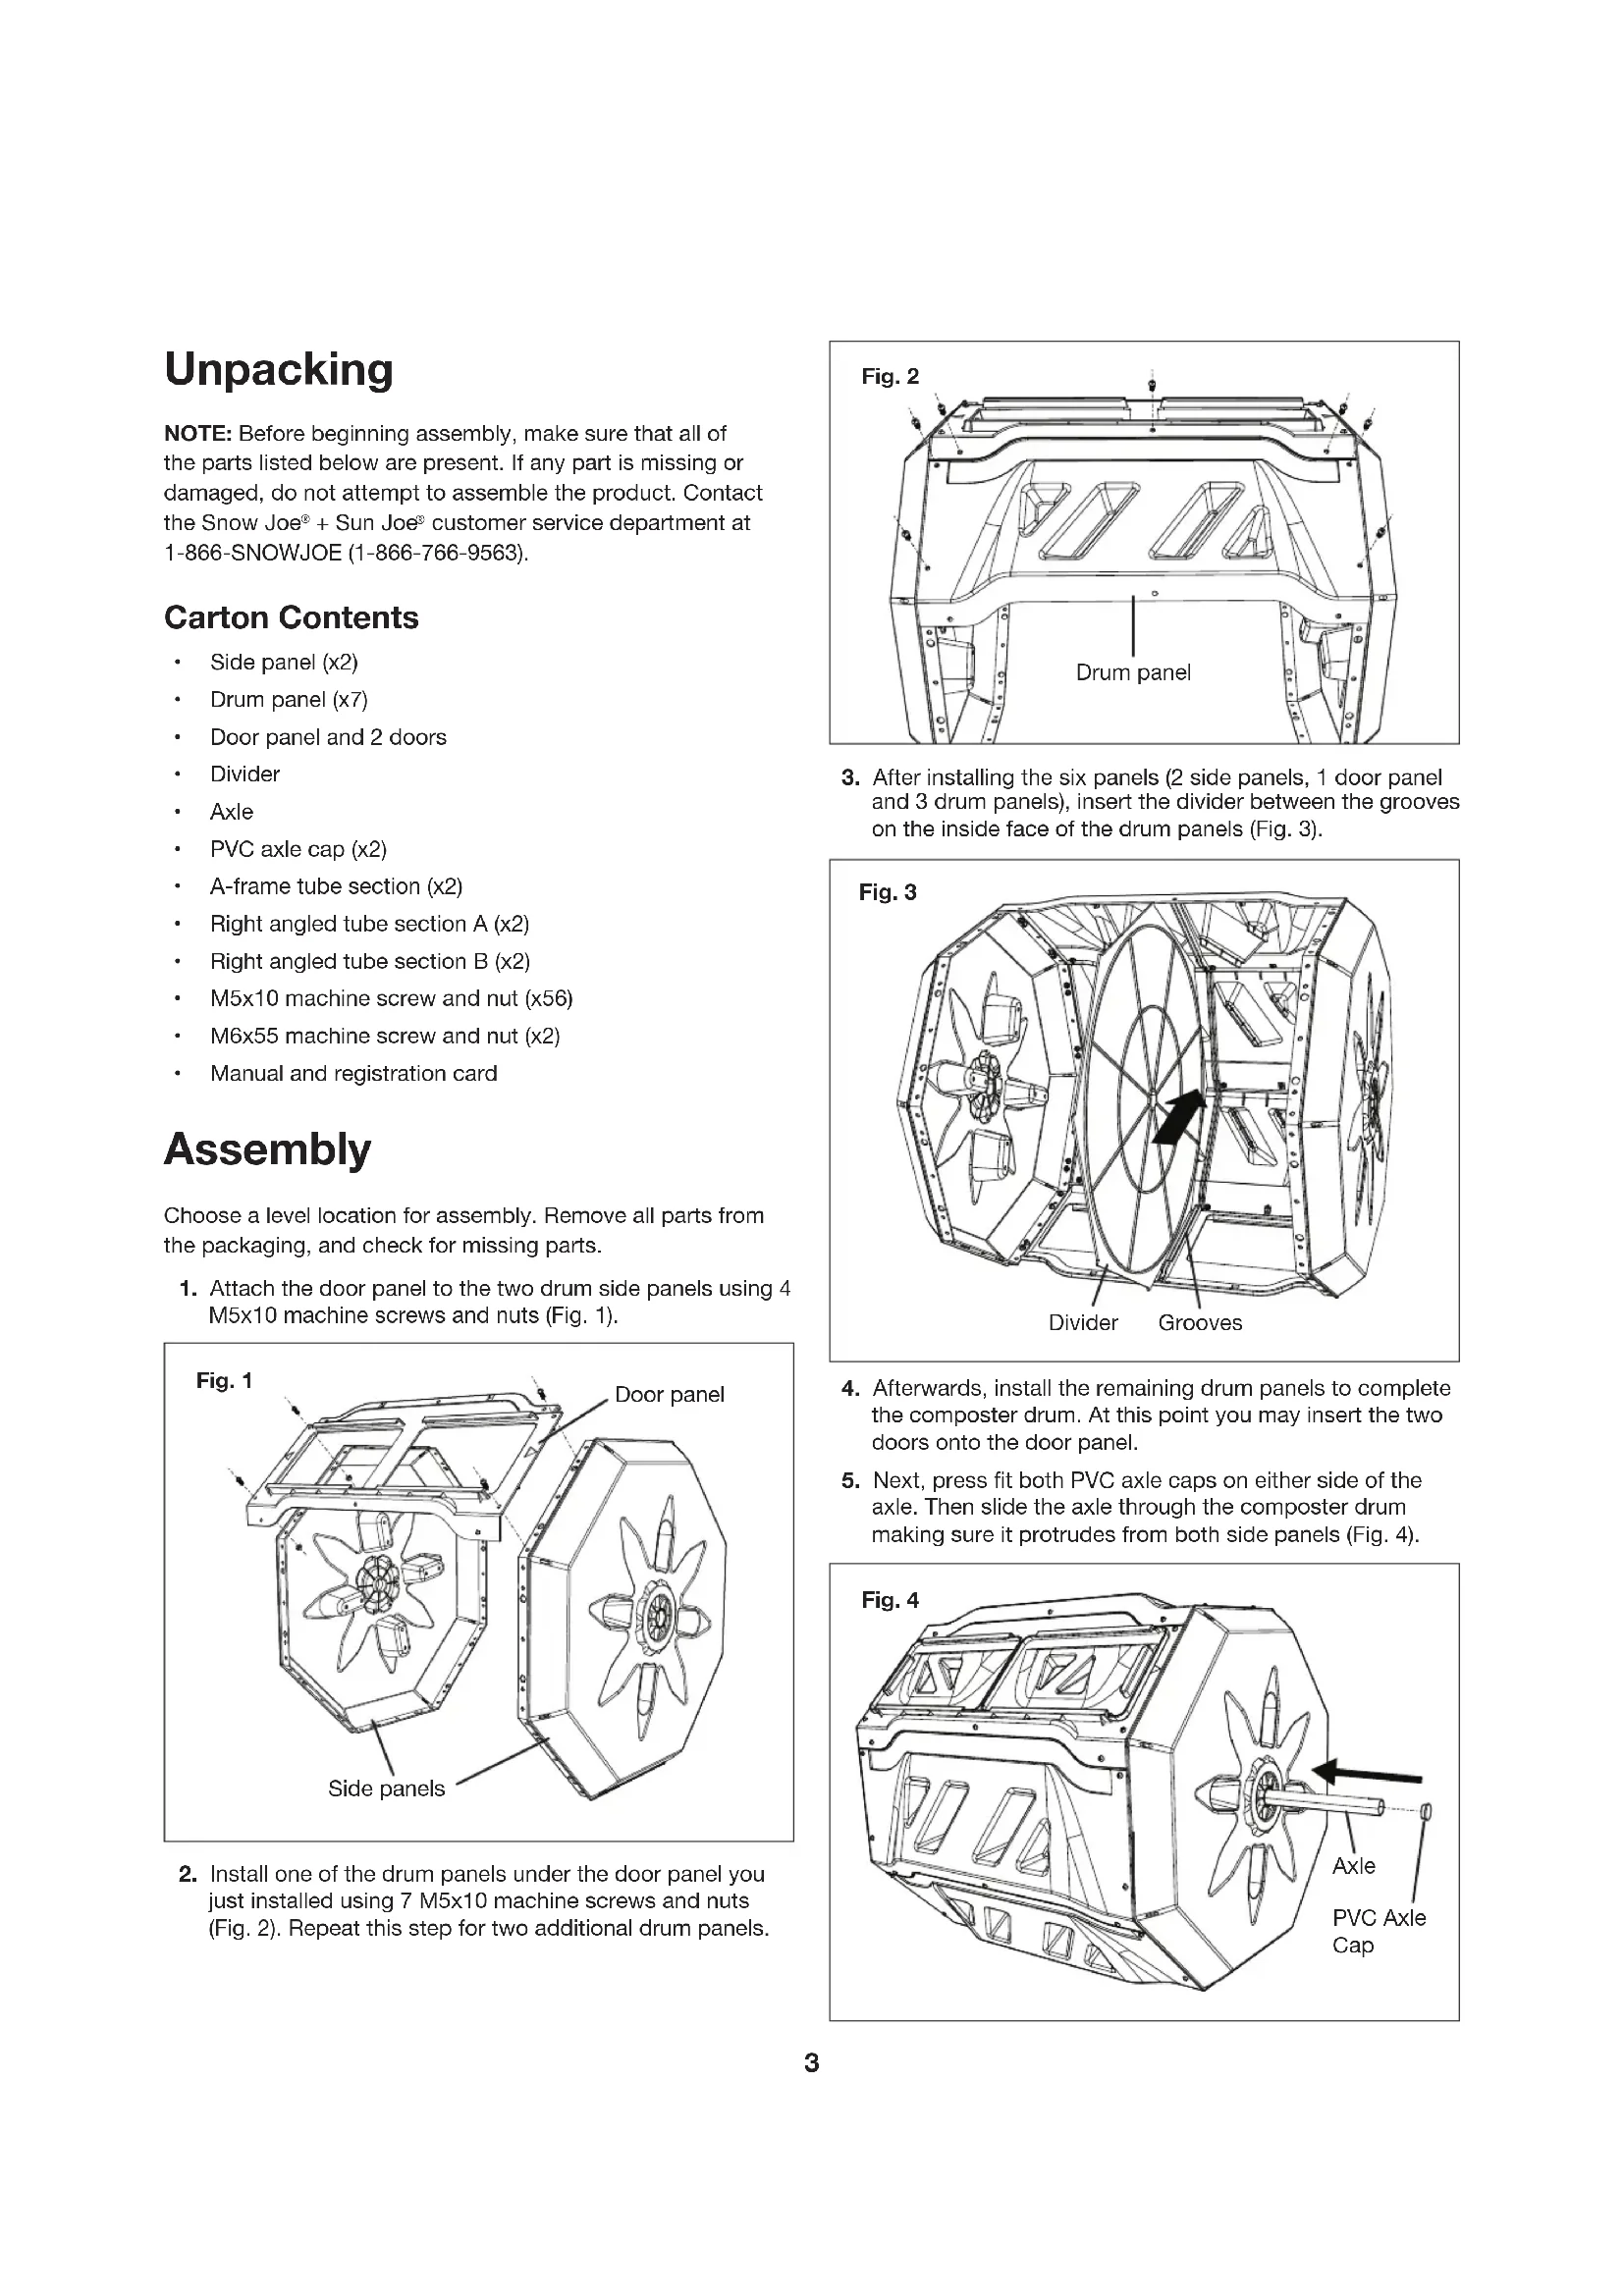
Know Your Dual Chamber Tumbling Composter
Read the owner's manual and safety rules carefully before using your tumbling composter. Compare the illustration below to the actual unit in order to familiarize yourself with the location of the various parts and hardware. Save this manual for future reference.
-
Drum Panels (x7)
-
A-Frame Tube Section (x2)
-
Axle Cap
-
Door Panel
-
Right Angled Tube Section A (x2)
-
Divider
-
Doors (x2)
-
Right Angled Tube Section B (x2)
-
Vents (x16)
-
Axle
-
Side Panels (x2)
Technical Data
Capacity 42 gal (160 L)
Drum Material . Polypropylene
Weight Capacity 330 lbs (150 kg)
Frame Material . Powder Coated Steel
Chambers 2
Drum Height 23.5 in. (60 cm)
Drum Rotation 360
Total Height 37 in. (94 cm)
Vents 16
Total Width 26 in. (66 cm)
Weatherproof Yes
Net Weight 14.3 lbs (6.5 kg)
Unpacking
NOTE: Before beginning assembly, make sure that all of the parts listed below are present. If any part is missing or damaged, do not attempt to assemble the product. Contact the Snow Joe ^包 + Sun Joe ^包 customer service department at 1-866-SNOWJOE (1-866-766-9563).
Carton Contents
- Side panel (x2)
- Drum panel (x7)
Door panel and 2 doors - Divider
- Axle
PVC axle cap (x2)
A-frame tube section (x2)
Right angled tube section A (x2)
Right angled tube section B (x2)
M5x10 machine screw and nut (x56)
M6x55 machine screw and nut (x2) - Manual and registration card
Assembly
Choose a level location for assembly. Remove all parts from the packaging, and check for missing parts.
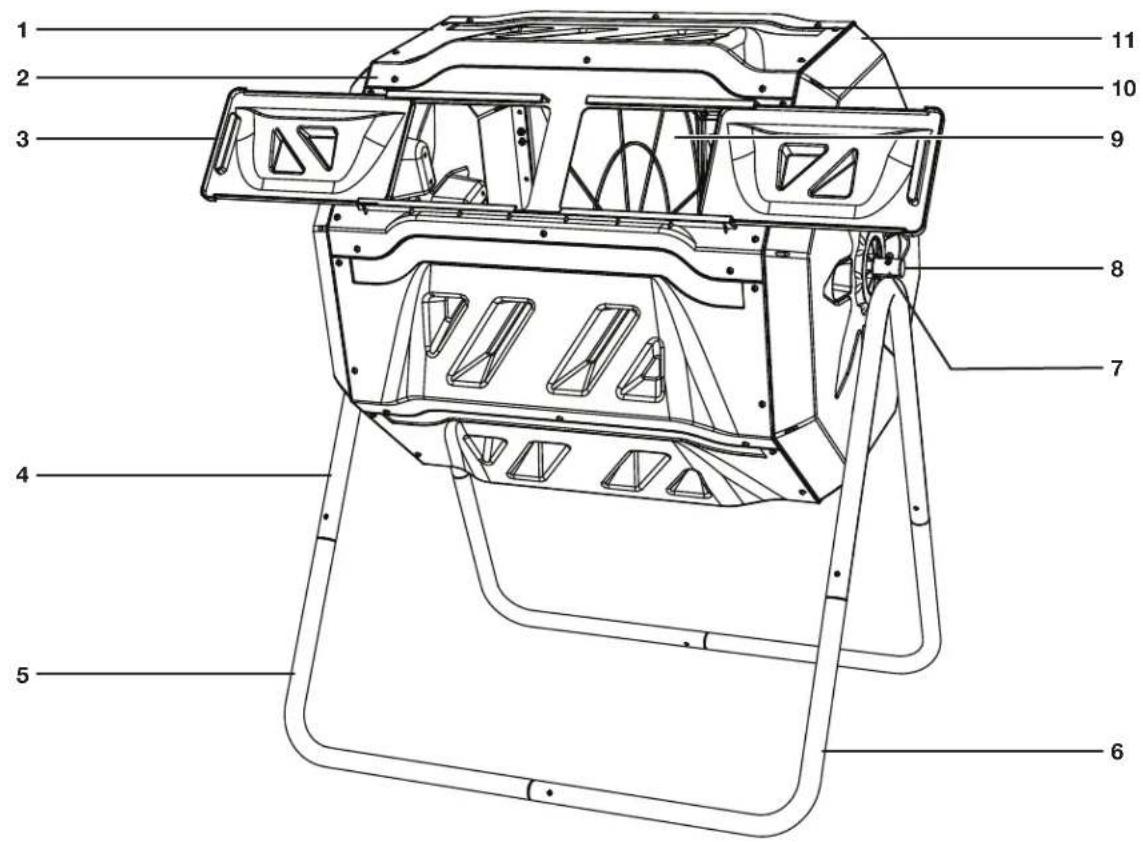
- Attach the door panel to the two drum side panels using 4 M5x10 machine screws and nuts (Fig. 1).
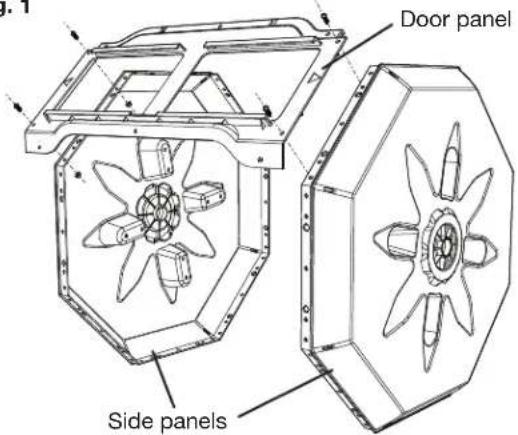
Fig.1
- Install one of the drum panels under the door panel you just installed using 7 M5x10 machine screws and nuts (Fig. 2). Repeat this step for two additional drum panels.
- After installing the six panels (2 side panels, 1 door panel and 3 drum panels), insert the divider between the grooves on the inside face of the drum panels (Fig. 3).
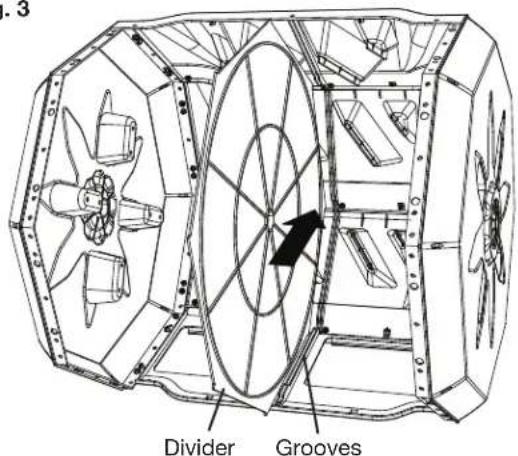
Fig. 3
- Afterwards, install the remaining drum panels to complete the composter drum. At this point you may insert the two doors onto the door panel.
- Next, press fit both PVC axle caps on either side of the axle. Then slide the axle through the composter drum making sure it protrudes from both side panels (Fig. 4).

- Assemble the frame according to the diagram below. The tube sections snap together using springed push buttons and require no screws (Fig. 5). Note that identical right angled tube sections are diagonal from one another.
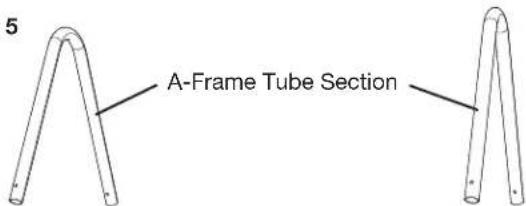
Fig. 5

Right Angled Tube Section A
- Install the assembled composer drum onto the assembled frame by securing both sides of the axle and frame together using two sets of M6x55 machine screws and nuts (Fig. 6).
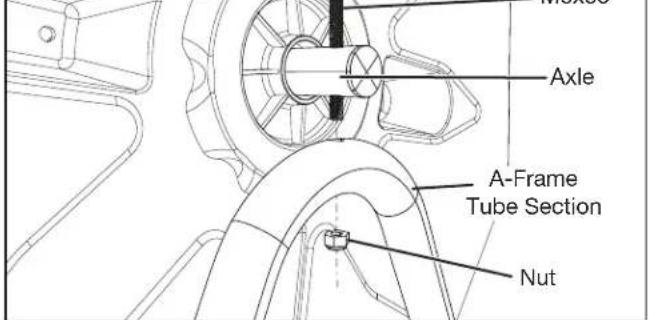
Fig. 6
6 MC-EE
Operation
What To Compost
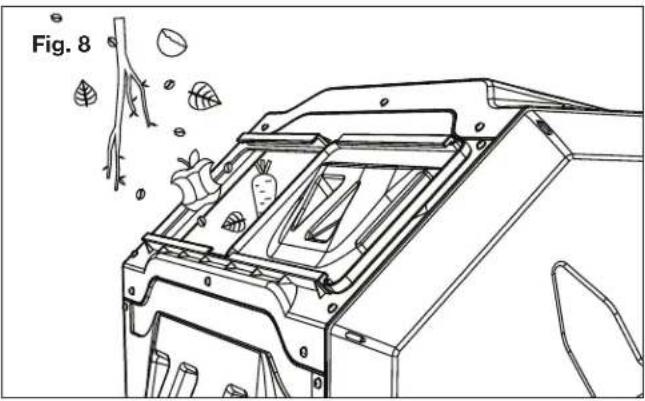
The composter works best by mixing moist nitrate-rich greens with dry, carbon-rich browns in a 2 parts green to 1 part brown ratio. The following diagram shows various examples of green and brown compostable, as well as non-compostable materials (Fig. 7).

Fig. 7
Greens (2 parts):


PlantsRaw Veggies Food Scaps Grass

Browns (1 part):

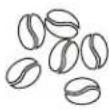
Hay/Straw Egg Shells Coffee
Leaves/Twigs

Do Not Compost:
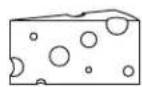


Meat/Bones Cheese Plastic/Trash
Poisonous Plants
How to Compost
- First, choose a suitable location with direct sunlight and a flat surface with enough room to accommodate the rotation of the composter.
- Slide open one of the doors and add new material for composting (Fig. 8).
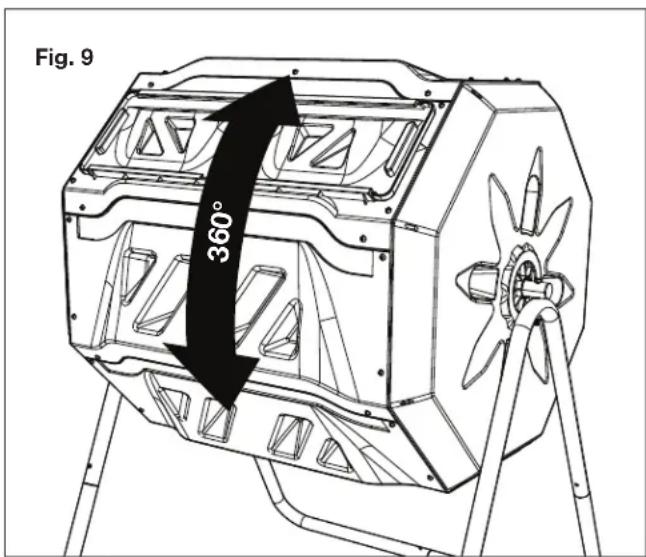
- Close the door and tumble the composer drum 5-10 times. Repeat this procedure every 2-3 days and every time new material is added (Fig. 9).
4. Once one side is full allow it to decompose and start adding new raw material into the other side to create a second batch. Alternatively, one may choose to use the two chambers to produce two different types of compost (e.g. grass clippings & food waste).
5. Depending on the materials added and the ambient temperature, your compost should be ready anywhere from 2 - 10 weeks. Follow the table below for an approximate guide.
| Ambient Temperature Time (Days) | |
| 75°F (25°C) ~ 55 | |
| 85°F (30°C) ~ 40 | |
| 95°F (35°C) ~ 35 | |
NOTE: However, the only sure fire way to check if your compost is ready is if it looks, feels and smells like rich, dark earth rather than rotting vegetables. In other words, it should be dark brown, crumbly and smell like earth.
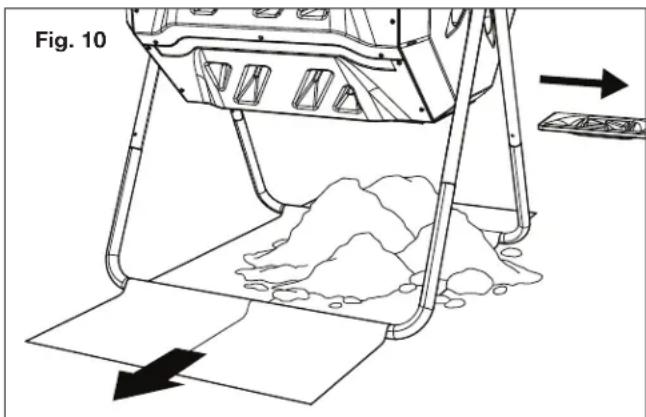
- To empty your composter, place a small tarp or plastic sheet on the ground. Rotate the composter so that the doors face down. Then slide the door open to allow the compost to fall out before sliding the tarp out (Fig. 10).
Composting Tips
Composting
- Maintain a 2:1 greens (Nitrates) to browns (Carbon) ratio.
- Smaller shredded materials decompose faster. Run your lawn mower over pine needles or leaves and cut up kitchen scraps to speed up the composting process.
Checking Your Progress
- After 2-3 days, check if the compost is getting warm to the touch. If so, it means the beneficial organisms are multiplying and decomposing the materials. Tumbling the composer 5-10 times every 2-3 days will mix the materials inside and keep the process active and uniform throughout the composer.
- Squeeze a handful of compost to check if it is sufficiently moist. Your compost should feel like a damp sponge. If it feels dry, add a little water and tumble to mix well. Avoid adding too much water.
Using Your Compost
- Finished compost will contain fine and coarse material. For a fine blend, sift the compost for use in flower pots. Use the coarser compost as top-dressing for outdoor garden beds or till directly into your garden.
- You can also reserve some of your finished compost as a starter for your next batch, or to reactive a batch that died down too quickly.
Support
If your Sun Joe SJ-CMPS1 tumbling composter requires service or maintenance, please call 1-866-SNOWJOE (1-866-766-9563) for assistance.
Model and Serial Numbers
When contacting the company, reordering parts, or arranging service from an authorized dealer, you will need to provide the model and serial numbers, which can be found on the decal located on the unit. Copy these numbers into the space provided below.

Troubleshooting
| Problem Remedy | |
| Compost does not heat up | |
| Mix is too wet Add dry browns | |
| Mix is too dry Add water | |
| Odorous | |
| Ammonia smell (too high in nitrates) Add | dry browns |
| Putrid smell (too wet/not enough oxygen) | Add dry browns to absorb excessive moisture then tumble composter and open door for air circulation |
| Pests/Insects | |
| Rodents Remove any meats or fatty foods | |
| Flies/insects Mix or cover kitchen scraps | with brown materials |
Only a company specialist may be able to correct faults that cannot be rectified with the aid of this table. Please call the Snow Joe ^念 + Sun Joe ^念 customer service center at 1-866-SNOWJOE (1-866-766-9563).
SNOW JOE ^ 念 SUN JOE ^ 念 CUSTOMER PROMISE
ABOVE ALL ELSE, Snow Joe, LLC ("Snow Joe") is dedicated to you, our customer. We strive to make your experience as pleasant as possible. Unfortunately, there are times when a Snow Joe®, Sun Joe®, or Aqua Joe® product ("Product") does not work or breaks under normal operating conditions. We think it's important that you know what you can expect from us. That's why we have a Limited Warranty ("Warranty") for our Products.
OUR WARRANTY:
Snow Joe warrants new, genuine, powered and non-powered Products to be free from defects in material or workmanship when used for ordinary household use for a period of two years from the date of purchase by the original, end-user purchaser when purchased from Snow Joe or from one of Snow Joe's authorized sellers with proof of purchase. Because Snow Joe is unable to control the quality of its Products sold by unauthorized sellers, unless otherwise prohibited by law, this Warranty does not cover Products purchased from unauthorized sellers. If your Product does not work or there's an issue with a specific part that is covered by the terms of this Warranty, Snow Joe will elect to either (1) send you a free replacement part, (2) replace the Product with a new or comparable product at no charge, or (3) repair the Product. How cool is that!
This Warranty gives you specific legal rights, and you may also have other rights which vary from State to State.
PRODUCT REGISTRATION:
Snow Joe strongly encourages you to register your Product. You can register online at snowjoe.com/register, or by printing and mailing in a registration card available online from our website, or calling our Customer Service Department at 1-866-SNOWJOE (1-866-766-9563), or by e-mailing us at help@snowjoe.com. Failure to register your Product will not diminish your warranty rights. However, registering your Product will allow Snow Joe to better serve you with any of your customer service needs.
WHO CAN SEEK LIMITED WARRANTY COVERAGE:
This Warranty is extended by Snow Joe to the original purchaser and original owner of the Product.
WHAT IS NOT COVERED?
This Warranty does not apply if the Product has been used commercially or for non-household or rental applications. This Warranty also does not apply if the Product was purchased from an unauthorized seller. This Warranty also does not cover cosmetic changes that do not affect performance. Wearing parts like belts, augers, chains and tines are not covered under this Warranty, and can be purchased at snowjoe.com or by calling 1-866-SNOWJOE (1-866-766-9563).
- IMPORTANT! Safety Instructions
- All Operators Must Read These Instructions Before Use
- WARNING!
- DANGER!
- CAUTION!
- Know Your Dual Chamber Tumbling Composter
- Technical Data
- Unpacking
- Carton Contents
- Assembly
- Operation
- What To Compost
- How to Compost
- Composting Tips
- Composting
- Checking Your Progress
- Using Your Compost
- Support
- Model and Serial Numbers
- Troubleshooting
- SNOW JOE ^ 念 SUN JOE ^ 念 CUSTOMER PROMISE
- OUR WARRANTY:
- PRODUCT REGISTRATION:
- WHO CAN SEEK LIMITED WARRANTY COVERAGE:
- WHAT IS NOT COVERED?
Brand : Sun Joe
Model : SJCMPS1
Category : Composter