
CEMF38DIG - Electric oven CONTINENTAL EDISON - Free user manual and instructions
Find the device manual for free CEMF38DIG CONTINENTAL EDISON in PDF.
| Product type | Electric oven |
| Brand | Continental Edison |
| Model | CEMF38DIG |
| Capacity | 38 liters |
| Power supply | 220-240 V ~, 50-60 Hz |
| Power | 1600 W |
| Cooking functions | Baking, grilling, pizza, rotisserie, defrosting, reheating, convection |
| Preset programs | Cookies, toasted bread, pizza/pasta, meat (steak), roast chicken, cakes, defrosting, reheating |
| Control type | Electronic with LCD screen and touch keys |
| Timer | Yes, adjustable from 0 to 120 minutes depending on programs |
| Temperature range | 40 °C to 230 °C (depending on program) |
| Convection function | Yes, for even cooking |
| Rotisserie spit | Included, supports up to 3 kg |
| Included accessories | Cooking grid, drip tray, handles, rotisserie spit with handle |
| Interior light | Yes, to view cooking |
| Door | Glass with handle |
| Cleaning | Grid and tray hand washable; exterior surface with damp sponge; do not immerse |
| Material | Enameled steel, glass |
| Safety | Automatic shut-off, hot surfaces, child supervision (8+), lock? (not specified) |
| Dimensions (approx.) | Not provided; 38 L capacity – typical dimensions: 45 x 35 x 35 cm (estimate) |
| Weight (approx.) | Approximately 8-10 kg (estimate) |
| Repairability | Spare parts available via after-sales service; temperature probe replacement possible |
Frequently Asked Questions - CEMF38DIG CONTINENTAL EDISON
User questions about CEMF38DIG CONTINENTAL EDISON
0 question about this device. Answer the ones you know or ask your own.
Ask a new question about this device
Download the instructions for your Electric oven in PDF format for free! Find your manual CEMF38DIG - CONTINENTAL EDISON and take your electronic device back in hand. On this page are published all the documents necessary for the use of your device. CEMF38DIG by CONTINENTAL EDISON.
USER MANUAL CEMF38DIG CONTINENTAL EDISON
- This appliance can be used by children aged from 8 years and above and persons with reduced physical, sensory or mental capabilities or lack of experience and knowledge if they have been given supervision or instruction concerning use of the appliance in a safe way and understand the hazards involved.
- Children shall not play with the appliance.
- Cleaning and user maintenance shall not be made by children unless they are older than 8 and supervised.
- Keep the appliance and its cord out of reach of children less than 8 years.
- Accessible surfaces may be high when the appliance is operating.
- Surfaces are liable to get hot during use.
- If the supply cord is damaged, it must be replaced by the manufacturer, its service agent or similarly qualified persons in order to avoid a hazard.
- The appliance must not be immersed.
- This appliance is not intended to be operated by means of an external timer or by a separate remote control system.
-
This appliance is intended for use in household and similar applications such as:
-
Staff kitchen areas in shops, offices and other working environments;
- Farm houses;
-
By clients in hotels, motels and other residential environments;
-
Bed and Breakfast type environments.
-
Use the appliance according to this instruction, any misuse may cause electric shock or other hazards.
- For details on how to clean surfaces in contact with food, please refer to the section "CLEANING AND MAINTENANCE".
ADDITIONAL PRECAUTIONS
- Before connecting the appliance to the mains supply, please check if the voltage indicated on the appliance corresponds with the main voltage in your home.
- Do not place the appliance on a hot surface.
- Place the appliance on a stable flat surface.
- Do not operate the appliance if damaged, after an appliance malfunctions or it has been damaged in any manner, return to the customer service department for repair.
- Do not allow the main cord to come into contact with the hot surface.
- Ensure that the mains lead does not overhang the worktop surface.
- Use the appliance out of children reach. Prevent them from pulling the main cord or knocking the appliance over.
- Close supervision is necessary when the appliance is near children.
- Make sure that the power switch is off before plug in.
- Do not leave the appliance unattended when in use.
- The temperature of accessible surfaces may be high when the appliance is operating.
- Care must be taken not to touch any hot surfaces, do not store or cover the appliance until it has fully cooled down.
- Before cleaning the appliance disconnect it from the power supply and wait until it was cooled down.
- Never immerse the appliance or power cord into water or any other liquid. Do not allow liquid to penetrate the electrical parts of
the appliance.
- The use of accessory attachments not recommended by the appliance manufacturer may cause hazard or injury.
- When operating the oven, keep at least four inches of space on all sides of the oven to allow for adequate air circulation. Rear surface of appliances should be placed against a wall.
- To disconnect, turn the control to Off, then unplug the plug. Always hold the plug, but never pull the cord.
- A fire may occur if the oven is covered or touching flammable material, including curtains, draperies, walls, and the like, when in operation. Do not store any item on the oven during operation.
- Do not place any of the following materials in the oven: cardboard, plastic, paper, or anything similar.
- The weight of the food placed in the oven cannot be over 3.0kg .
-
CAUTION: APPLIANCE SURFACES ARE HOT AFTER USE. Always wear protective, insulated oven gloves when touching hot oven or hot dishes and food, or when inserting or removing rack, pans or baking dishes.
-
CAUTION: The temperature of accessible surfaces may be high when the appliance is operating.
- The equipment may cause burns when working at high temperature: please do not touch the metal parts.
- Don't touch the hot surface without gloves or protective devices.
- Don't use extension cable to connect the equipment.
- Put the equipment on a stable surface and do not let the wires hang.
- Under the following circumstances, do not use or insert the device:
Defective or damaged wires,
The plane crashed,
It has obvious deterioration or dysfunction.
- Don't dismantle the equipment by yourself.
- Do not operate the equipment near flammable materials or external heat sources such as heating plate or gas stove.
- This device is for family use only. The manufacturer and distributor shall not be responsible or guaranteed for any improper or
non-conforming professional use.
- If the product is not used or before cleaning, the equipment must be disconnected.
- Allow the equipment to cool before any cleaning.
- Don't use the equipment outdoors.
- Don't move the device during use.
- Use equipment with enough space around. Be careful to leave space at the front, left or right of the device.
- Be careful not to block the air inlet or exhaust port.
- Please pay attention to turn off the equipment correctly after use.
- When the equipment is running, the temperature of the door, external surface and accessible surface may rise.
- When the equipment is running, the door or outer surface may become hot.
- The back surface should be placed against the wall.
- The lamp is only used for furnace lighting. It shall not be used for lighting.
RODUCT DESCRIPTION
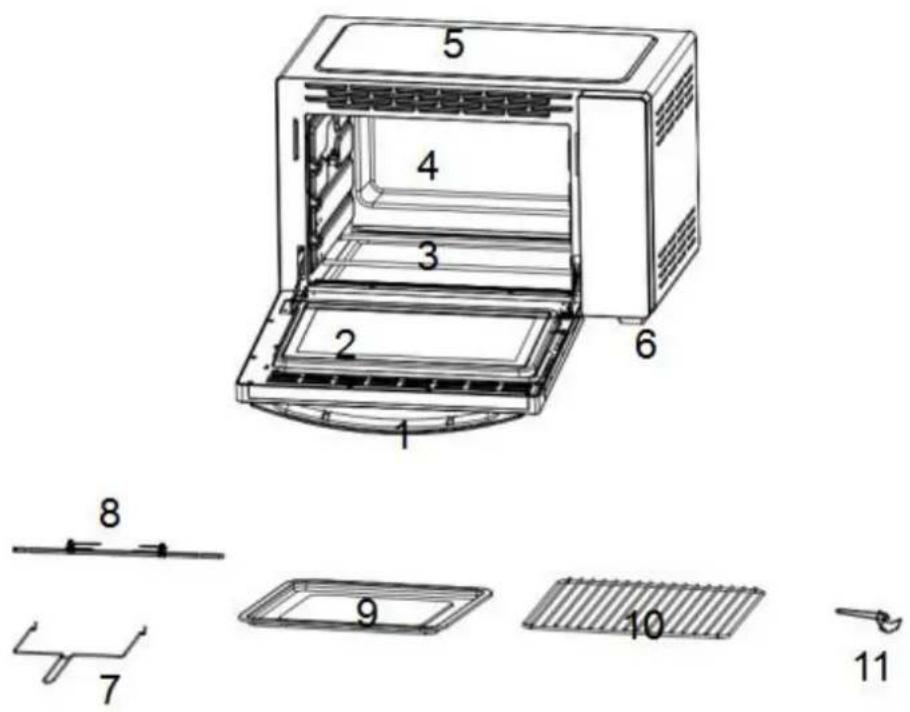
- Door handle
- Glass door
- Heating element
- Cavity
-
Housing
-
Oven feet
- Rotisserie handle
- Rotisserie fork & shaft
- Bake tray
- Wire rack
- Tray handle
BEFORE FIRST USE
Before using your electric oven for the first time, be sure to:
- Remove all packaging components from the equipment.
- Remove all accessories (grille, plate). Clean grilles and panels with hot soapy water.
- Wipe the oven and its accessories with a damp cloth, then dry them.
- Completely release the power cord and plug it into the power socket.
- Set the timer button for 15 minutes to run the oven (without food or accessories) during this time.
WARNING: When first used, the device may emit slight smell and smoke. This phenomenon is normal and will stop very quickly. Be sure to use the device in a well-ventilated room.
OPERATION
Advice
To cook or grill, it is best to always preheat the oven to the desired cooking temperature in order to achieve perfect cooking effect.
- Place the bake tray under the grill to prevent the fat from dripping onto the oven's heating element and bottom.
- If cooking foods are greasy, you can use two sheets of aluminum foil. Place one on the bake tray and cover the food with the other. This
prevents oil and fat from being splashed during cooking.

Panel
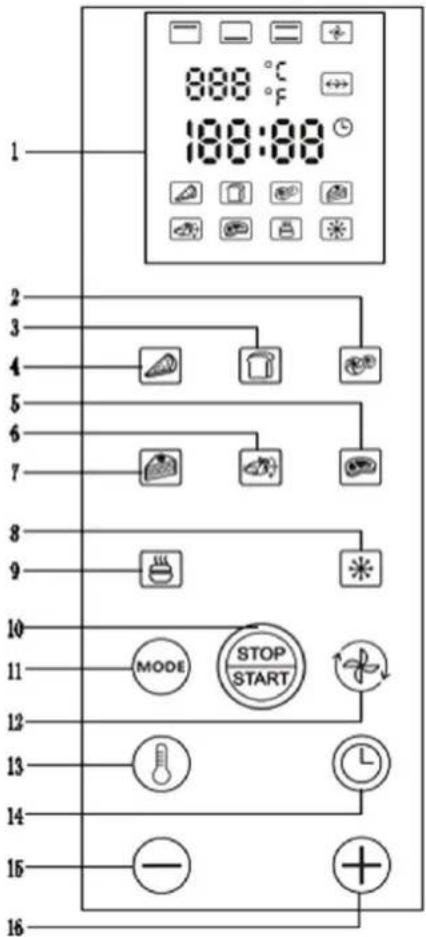
- Liquid Crystal Display (LCD)
- Baking foods like cookies and biscuits
- Toasting slices of bread
- Baking foods like pizza and pasta
- Grilling meats like steaks and pork chops
- Roasting chicken etc.
- Baking cakes etc.
- Thawing food
- Warming up food
- Start, pause and cancel
- Heating tube switching mode
- Cyclonic heating
- Temperature adjustment
- Timing adjustment
- Temperature/timing adjustment decrement
- Temperature/timing adjustment increment
Note: “*” will be only displayed when the “ ” keys is pressed.
Self-checking function
- Press and hold the " " key for 3s after the oven is powered up, and the self-checking mode will be automatically started by the program.
- The software version No. will be shown on the LCD screen, i.e., 38N.
- All icons on the LCD screen will be lit for 3s and the back-light and start-light will light up.
- All icons on the LCD screen will turn off for 1s and the back-light and start-light will go out.
- The back-light and start-light will light up and the icon for the upper heating tube will be lit on the LCD screen. The upper heating tube will then turn on for 2s.
- The back-light and start-light will light up and the icon for the lower heating tube will be lit on the LCD screen. The lower heating tube will then turn on for 2s.
- The back-light and start-light will light up and the oven light will work for 2s. (Not applicable if this function is not configured).
- The back-light and start-light will light up and the icon for the rotating fork will be lit on the LCD screen, and the rotating fork will work for 2s. (Not applicable if this function is not configured)
- The back-light and start-light will light up and the icon for the oven fan will be lit on the LCD screen, and the oven fan will work for 2s (not applicable if this function is not configured).
- The back-light will light up, but the start-light will go out. The current temperature value will be displayed on the LCD screen for 3s.
- The self-checking program finishes and the electric oven will return to its original status when it is powered on after the buzzer sounds for 2s.
- The buzzer will stay on continuously in the event of any abnormalities in the self-checking process until the electric oven is powered off.
- In working mode, when any short-circuit/open-circuit is found in the upper/ lower temperature sensors, all devices within the
system will immediately stop working (except for the illumination lamp). At the same time, the buzzer will beep 3 times and only "E1"/"E2" will be displayed on the LCD screen to warn the user.
Operation functions:
Key function
- Start/Pause Key In standby mode, when this key is pressed after any function is selected, the system will enter into the working state of the selected function. When this key is pressed in working mode, the system will stop working. In addition, all settings will be canceled if this key is pressed for 3-5s.
- Function Key: In standby mode, press this key once to select the functions in sequence as follows: Circular selection (upper heating tube, lower heating tube, upper + lower heating tube). When the button is pressed for self-configured functions, the time will be displayed from "30:00" and the temperature will be displayed from "150°C".
- Cyclonic Heating Key: Press this key to start the cyclonic heating function and press it again to cancel the function. This key can only be used together with the function key.
- Temperature Key: After the desired function is selected, press the icon to adjust the temperature. However, some temperatures in the preset menu cannot be adjusted (please refer to the function's default parameters). The temperature will be increased or decreased by 1 step (5^) when the key is pressed once, and the temperature will be rapidly increased or decreased when the "+"/-" key is pressed for more than 2s.
- Time Key: When the oven is powered on, the time shown on the LCD screen will run from 00:00 automatically. If no operation is carried out, the time running status will be displayed on the LCD screen after 1 min and the back-light will go out.
- Press the (\odot) key to adjust the time when the time digits are flashing after the desired function is selected and time adjustment is allowed under this function (if the time digits are flashing under this function, please directly press the “+”/(-” key to adjust the
time).
- During the adjustment process, the system will enter into rapidly decreasing/increasing mode with 1 min equal to one step if the "+"/-" key is pressed for more than 2s. If the setting time exceeds 30min, the system will enter into rapidly decreasing/increasing mode with 5 min equal to one step.
Specific operation procedures
- The corresponding function icon on the LCD screen will be lit if any function key is pressed and the time shown on the LCD screen will automatically switch to the menu preset time. At this time, the first three digits indicate the number of minutes, and the two digits after the colon indicate the number of seconds. The time digits will not be displayed on the LCD screen in the background timing mode and will only be displayed in the non-working standby state.
- The preset default time is displayed and flashes to remind the user to adjust the time. At this time, the user can press the "+"/-" key to set the time and then press the key again to confirm the settings or skip the above step and directly press the "START/STOP" key to confirm time settings and start working.
- If the user is allowed to adjust the temperature on his/her own, after the temperature key is pressed, the temperature digits will be flashing, but the time digits will not be flashing. At this time, the user can adjust the temperature to the desired level by pressing the "+"/-" key. Then press the temperature key again to confirm the settings, at which point the temperature digits will stop flashing on the LCD screen. The user can also confirm the settings by pressing the time key, and at this point, the time digits will be flashing.
- No time digits will be displayed when the oven is used for toasting slices of bread, and only figures (1-5) will be displayed at the end of the time displaying area to indicate the toast color. In addition, the colon will not be displayed at this time and the user can directly select the toast color by pressing the "+"/-" key. The larger the selected figure, the darker the toast color will be.
- After the function selection is completed, the user can press the "START/STOP" key to run the oven. If the above key is not pressed after 1 min, the aforementioned settings will become
invalid and the time digits will be shown on the LCD screen again.
- In the above adjustment process, if any key is pressed before any function key or time key is pressed, the LCD back-light will be activated and will light up for 1 min. No other effective responses will be available, and the preset time digits will not be displayed either.
- If no selection or adjustment is made, after 1 min, the time digits will be displayed on the LCD screen.
- When the system enters into function selection and setting program in the standby state, the internal light in the oven will not light up (if fitted).
Working process
- The LCD back-light and "START/STOP" key will be constantly lit.
- Time digits will be displayed with a flashing colon and decrease by 1s.
- For the preheating function menu, the corresponding icon will flash continuously during preheating, which indicates that the oven is in the preheating state. After preheating finishes, the buzzer will beep twice to remind the user, and at this time, the icon will stop flashing and will be constantly lit.
- When the oven is working, the time and temperature may be adjusted if applicable, but the functions on the menu cannot be changed. The changing operation is invalid and the buzzer will not beep either even if the user presses the function key. If any adjustment is required during the working process, the user should first press the temperature or time key and then the "+"/-" key. After the adjustment, the user should press the temperature or time key again to confirm the settings. If the settings are not confirmed manually, the system will automatically confirm after 3s-5s.
- During the working process, the user may press the "START/STOP" key to make the oven pause and then press it again to continue working. During the pause, the back-light of the "START/STOP" key will flash once per second.
- If the user presses and holds the "START/STOP" key for more than 3s-5s during the working process, all preset actions will be canceled. The system will enter into time status and the LCD back-light will light up. if no actions are taken within 1 min, the LCD back-light will go out.
Default parameters:
The default parameters in each function mode when the oven runs with/without food are as follows:
| Mode | Default Time | Default Temperature | Baking Time | Baking Temperature | Preheating | Default Working Status With Food |
| 11min | 210°C | Adjustable | Adjustable | 3min | Upper/ lower heating tube, illumination lamp and cyclonic fan | |
| 3Default Grades | 230°C | 3Default Grades Grade 1-5 | \ | \ | Upper/ lower heating tube and illumination lamp | |
| 30min | 230°C | Adjustable | \ | 10min | Upper heating tube, rotating fork, cyclonic fan and illumination lamp (preheating with upper and lower heating tube and then heating with upper heating tube after the preheating finishes) | |
| 12min | 170°C | Adjustable | \ | 2min | Upper/ lower heating tube, illumination lamp and cyclonic fan | |
| 36min | 150°C | Adjustable | Adjustable | 2min | Upper/ lower heating tube, illumination lamp and cyclonic fan | |
| 7min | 230°C | Adjustable | Adjustable | \ | Upper/ lower heating tube, illumination lamp and cyclonic fan | |
| 60min | 80°C | Adjustable | \ | \ | Lower heating tube and illumination lamp | |
| 120min | 40°C | Adjustable | \ | \ | Upper heating tube, illumination lamp and cyclonic fan |
End of working
- "End" will be displayed on the LCD screen.
The buzzer will beep 5 times. - The main loading circuit will be switched off.
The illumination lamp will go out if fitted.
The LCD back-light will stay lit. - The corresponding icons on the LCD screen will stay lit and the back-light for the "START/STOP" key will go out.
- If no actions are taken after 3 min, all settings by the user will be canceled, the function icons will not be lit on the LCD screen, and the time digits will be displayed. The LCD back-light will go out after 1 min.
Standby
- In standby state, the LCD back-light will be activated after pressing any key.
- In standby state, the system will enter into the function setting status if any function key is pressed.
- In standby state, if the temperature key, "START/STOP" key or "+"/-" key is pressed, the LCD back-light will be activated, but the buzzer will not work and no other effective responses will be available.
Analysis for causes of error codes and solutions:
E1: Short-circuit in temperature probe
Cause: The temperature probe is damaged.
Solution: Replace the temperature probe.
E2: Open-circuit in temperature probe
Cause: bad contact (vibration or the temperature probe is damaged).
Solution:
-
Reconnect the wiring terminals of the temperature probe.
-
- Replace the temperature probe.
E3: Temperature fault
Cause: bad contact (vibration or the temperature probe is damaged).
Solution:
- Reconnect the wiring terminals of the temperature probe.
- Replace the temperature probe.
CAUTION
| Always use the pan handle when inserting and removing the pan. Touching the pan will cause severe burns. | |
| Do not apply water to the glass when the appliance is hot. This can cause the glass to break. | |
| When unplugging the cord, always hold the plug itself. Never pull on the cord. This could break the wires inside the cord. | |
| Do not place the device near a gas burner or any other high temperature source, do not direct an electric fan, etc., onto the unit during use. This could prevent proper temperature control. | |
| Do not wet the power cord or handle the appliance with wet hands. Always unplug the cord after use, or whenever the device is to be left unattended, a malfunction while the plug is inserted into the socket could cause a fire. | |
| When cooking dishes containing oil and or fat, such as roast chicken, it is recommended to place 2 aluminum foil in order to reduce oil splashes. Put one on a fried lick. Then the oil drips between the papers. | |
USE TIPS
Warning: The accessories provided by this model.
| Bake tray | Hamburgers, gratins, Genoese and Almost, all baking foods. | Use the handle |
| Wire rack | Baked potatoes, dry foods. | |
| Bake tray + wire rack | For food that can produce fat projections. | Rotisserie fork & shaft |
| Note: Be careful when pulling entremets or burning liquids out of the oven. | ||
| Convection Function | |
| The rotating heat function diffuses heat throughout the oven through ventilation, making cooking more homogeneous and keeping the taste of the food intact. | |
| Rotisserie Function | |
| Use with Rotisserie Forks | Install Rotisserie Forks |
| With this function, even baking will be provided. Rotisserie forks can carry food under 3 kilograms. | Left Right |
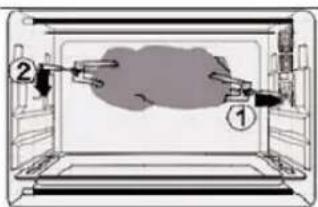
Install the Rotisserie Forks to the rotisserie hole, and then put it to the rotisserie tray.

Please always use Rotisserie Handle to take out the Rotisserie Forks.
CLEANING AND MAINTENANCE
- Allow your oven to cool completely before cleaning. Unplug the power cord from the wall socket.
- The wire rack, the bake tray, the handles and the rotisserie fork & shaft can be cleaned like other kitchen utensils, by hand with a soft cloth and liquid detergent. Make sure they are completely dry before reusing them.
- Always use a damp sponge to clean the oven outside surfaces. Avoid using abrasive products that could damage the coating. Make sure that water or soap does not enter the oven through the vents on top of the oven.
- Never immerse the oven in water or any other liquid.
- To clean the inner walls, do not use corrosive products (spray detergents) and never scratch the walls with sharp or sharp objects.
- If the device is not kept in a good state of cleanliness, its surface could degrade and inexorably affect the life of the device, leading to a dangerous situation. The oven should be cleaned regularly, and any food depots removed.
SPECIFICATIONS
Item reference : CEMF38DIG
Model:DN38N6-RML
Capacity : 38Litres
Voltage:220-240V\~
Frequency:50-60Hz
Wattage:1600W
Instruction manual version: V1
Correct Disposal of this product
13/14
This marking indicates that this product should not be disposed with other household wastes throughout the EU. To prevent possible harm to the environment or human health from uncontrolled waste disposal, recycle it responsibly to promote the sustainable reuse of material resources. To return your used device, please use the return and collection systems or contact the retailer where the product was purchased. They can take this product for environmental safe recycling.
Continental Edison
120-126 Quai de Bacalan
CS 11584
33000 Bordeaux
IMPORT BY:
A.M.C.
123, QUAI JULES GUESDE
94400 VITRY SUR SEINE France

Continental Edison


- ADDITIONAL PRECAUTIONS
- RODUCT DESCRIPTION
- BEFORE FIRST USE
- OPERATION
- Advice
- Self-checking function
- Operation functions:
- Key function
- Specific operation procedures
- Working process
- Default parameters:
- End of working
- Standby
- Analysis for causes of error codes and solutions:
- CAUTION
- USE TIPS
- CLEANING AND MAINTENANCE
- SPECIFICATIONS
- Correct Disposal of this product
- Continental Edison
Brand : CONTINENTAL EDISON
Model : CEMF38DIG
Category : Electric oven