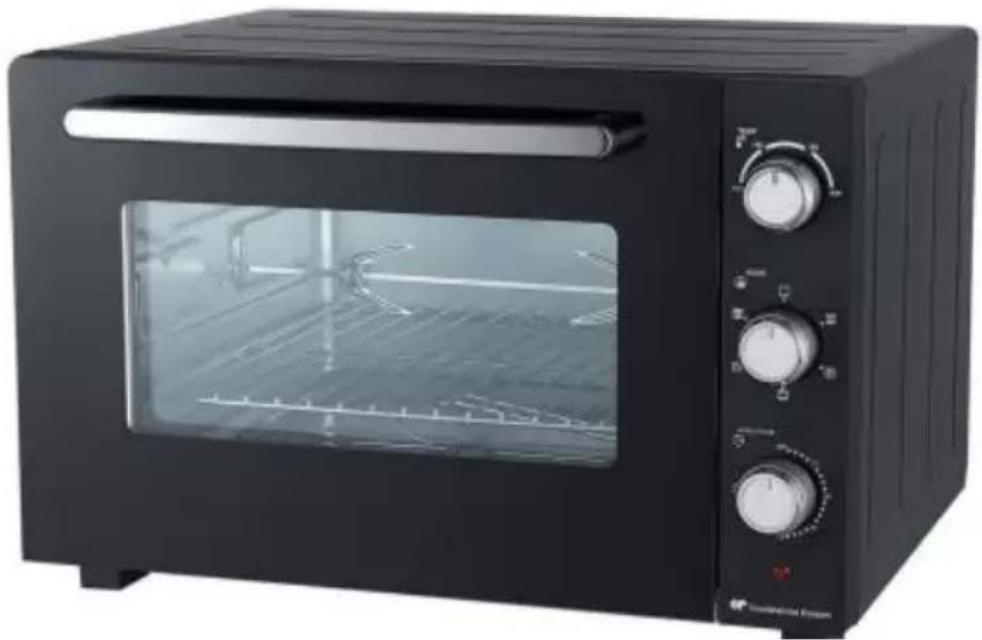
CEMF60B2 - Electric oven CONTINENTAL EDISON - Free user manual and instructions
Find the device manual for free CEMF60B2 CONTINENTAL EDISON in PDF.

| Product Type | Electric Oven |
| Brand | Continental Edison |
| Model | CEMF60B2 |
| Voltage | 220-240 V~ |
| Frequency | 50-60 Hz |
| Power | 2200 W |
| Capacity | 60 L |
| Temperature Range | 100°C - 230°C |
| Cooking Functions | Traditional Cooking, Convection Heat, Grill + Convection, Traditional Rotisserie, Turbo Rotisserie |
| Included Accessories | Cooking Grid, Drip Tray, Rotisserie with Handle |
| Control Type | Rotary Knobs (Thermostat, Function, Timer) |
| Heating Indicator Light | Yes |
| Child Safety | Keep out of reach of children under 8 years |
| Outer Surface | May become hot – caution |
| Cleaning | Clean after cooling with a damp cloth; do not use abrasive products |
| Maintenance | Unplug before cleaning; do not immerse |
| Repairability | Original parts recommended; intervention by qualified professional |
| Warranty | Standard parts and labor (according to terms) |
| Repairability Index | Not specified |
Frequently Asked Questions - CEMF60B2 CONTINENTAL EDISON
User questions about CEMF60B2 CONTINENTAL EDISON
0 question about this device. Answer the ones you know or ask your own.
Ask a new question about this device
Download the instructions for your Electric oven in PDF format for free! Find your manual CEMF60B2 - CONTINENTAL EDISON and take your electronic device back in hand. On this page are published all the documents necessary for the use of your device. CEMF60B2 by CONTINENTAL EDISON.
USER MANUAL CEMF60B2 CONTINENTAL EDISON
natural_image
Abstract geometric shapes resembling partial arcs or quotation marks (no text or symbols)Continental Edison
natural_image
Black commercial microwave oven with open lid and control knobs (no visible text or symbols)CEMF60B2
natural_image
Diagram of a mechanical or electrical component with internal components and directional arrows (no text or symbols)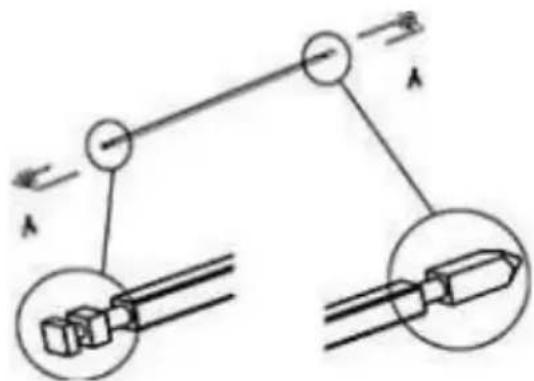
natural_image
Simple line drawing of a Y-shaped object with no text or symbolsnatural_image
Pure electrical circuit lines without any symbolsnatural_image
Symbol of a trash bin crossed with a diagonal line, no text or numbers present- Read all instructions and keep it for future use.
- This device works with high temperatures that can cause burns: do not touch the visible metal parts.
- Do not touch hot surfaces without glove or protection.
- Do not use an extension cord to connect the device.
- Place the device on a stable surface and do not let the power cord hang.
- Check the voltage of the network matches with that indicated on the device.
- Never use or plug in your device, if:
- Its power cord is defective or damaged;
- The device fell;
- It has visible deterioration or malfunctions;
-
Never disassemble the device by yourself.
-
Do not operate the device near flammable materials or near an external heat source such as hot plates or gas.
- This device is only intended for domestic use. Any professional use, inappropriate or not in accordance with the manual, does not involve the responsibility or the guarantee of the manufacturer and the distributor.
- The device should be unplugged if the product is not used or before cleaning it.
- Allow the appliance to cool before cleaning.
- Do not use the device outdoors.
- Never move the device during operation.
- Use the device with enough space all around. Be sure to leave a clear space at the front and on the left or right side of the device.
-
Be careful not to obstruct air intakes or vent openings.
-
After using, make sure to turn off your device properly.
- The temperature of the door, the outside surface and accessible surfaces can be high when the unit is operating.
- The door or outside surface may become hot when the device is operating.
- If the power cord is damaged, it must be exclusively replaced by the manufacture or his service agent or a similar qualified person in order to avoid a hazard.
- Keep the device and cord out of reach of children under the age of 8.
- The back of the oven should be placed against a wall.
- This appliance is intended to be used in household and similar applications such as:
- staff kitchen areas in shops, offices and other working environments;
- farm houses;
- b y clients in hotels, motels and other residential type environments;
-
bed and breakfast type environments.
-
The lamp should be used exclusively for the lighting of the oven. It should not be used on lighting fixtures for the lighting of the premises.
-
This appliance can be used by children aged from 8 year and above and persons with reduced physical, sensory or mental capabilities or lack of experience and knowledge if they have been given supervision or instruction concerning use of the appliance in a safe way and understand the hazards involved.
-
Children should not play with the device.
-
Cleaning and user maintenance shall not be made by children unless they are older than 8 and supervised.
-
The temperature of accessible surfaces may be high when the device is operating.
-
Never immerse the plug or device in water or any other liquid.
- In terms of detailed information on how to clean surfaces in contact with food, refer to the "Cleaning and maintenance" section.
- Allow your oven to cool completely before cleaning. Unplug the power cord from the wall socket.
- The wire rack, the bake tray, the handles and the rotisserie fork & shaft can be cleaned like other kitchen utensils, by hand with a soft cloth and liquid detergent. Make sure they are completely dry before reusing them.
- Always use a damp sponge to clean the oven outside surfaces. Avoid using abrasive products that could damage the coating. Make sure that water or soap does not enter the oven through the vents on top of the oven.
- Never immerse the oven in water or any other liquid.
- To clean the interior walls, do not use corrosive products (spray detergents) and never scratch the walls with sharp or sharp objects.
- If the device is not kept clean, its surface could degrade and inexorably affect the life of the device, leading to a dangerous situation. The oven should be cleaned regularly, and any food depots removed.
PARTS IDENTIFICATION
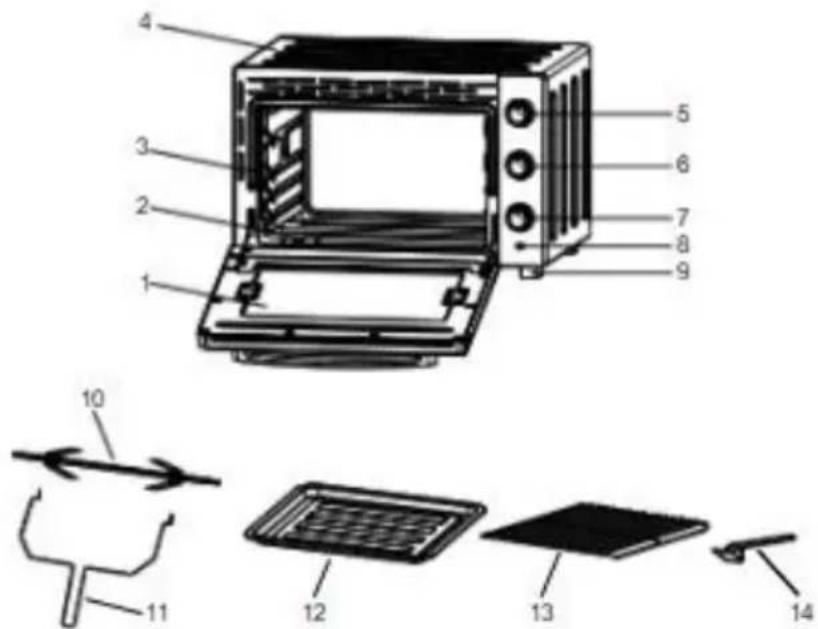
- Glass door
- Heating element
- Cavity
- Housing
- Thermostat knob
- Select knob
-
Time knob
-
Indicator light
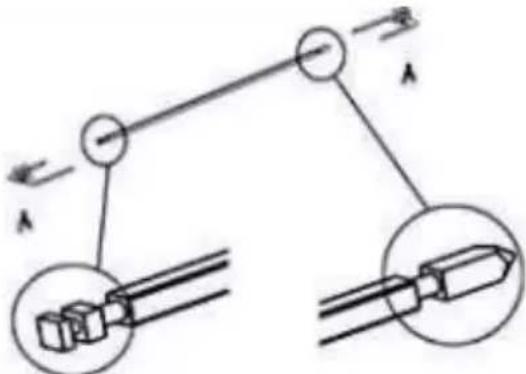
9.Oven feet - Rotisserie fork & shaft
- Rotisserie handle
- Bake tray
- Wire rack
- Tray handle
PARAMETER DATA
| REF | CEMF60B2 |
| MODEL NO. | KR-K55RCL-E2Dkh |
| POWER SUPPLY | 220-240V~ 50-60Hz |
| POWER CONSUME | 2200W |
BEFORE FIRST USE
- Remove all packaging items from the device.
- Remove all accessories (grid, tray) from the device.
- Wipe the oven and its accessories with a damp cloth, then dry them.
- Unroll the power cord completely and plug it into an electrical outlet.

- Set the function selector to
- Set the thermostat button to 230°C
- Set the timer button for 15 minutes to run the vacuum oven (without food or accessories) during this time.
WARNING: When first used, the device may emit a slight odor and a little smoke. This phenomenon is normal and will stop very quickly. Be sure to use the device in a well-ventilated room.
USING YOUR DEVICE
Advice
To cook or grill, it is best to always preheat the oven to the desired cooking temperature in order to obtain a perfect box.
- Place the bake tray under the grill to prevent the fat from dripping onto the oven's resistance and bottom.
- If cooking foods are greasy, you can use two sheets of aluminum foil. Place one on the bake tray and cover the food with the other. This prevents oil and fat from being splashed during cooking.
Functions
 | To stop the oven (STOP / OFF) | ||
 | Upper & Lower Heating | ||
 | Upper Heating + Rotisserie Function | ||
 | Upper & Lower Heating + Convection Function | ||
 | Upper Heating + Convection Function | ||
 | Upper & Lower Heating + Convection Function + Rotisserie Function |
Traditional Cooking

This function allows you to cook red meat, poultry, fish...
- Insert the grid in a low position.
- Position the function selector to

- Set the cooking temperature with the thermostat button.
- Set the cooking time with the timer button to preheat the oven.
- Wait until the oven has reached the set temperature, then insert the dish containing the food. Adjust the timer again.
- If the cooking is completed before the end of the set cooking time, manually turn the timer button to "OFF".
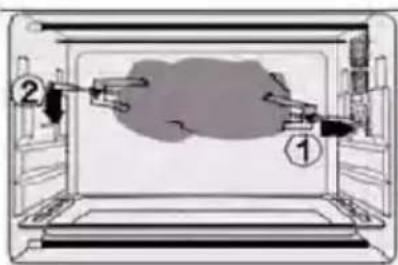
Traditional Rotary Cooking

This cooking function is ideal for roasting chickens, poultry, poultry, on a spit. For this method of cooking, there is no need to preheat the oven.
- Place the piece of meat on the spit, then secure it securely with the forks (for best results, tie the meat with kitchen twine).
- Place the bake tray at the bottom above the resistance.
- Insert the pin into its drive mechanism inside the oven (see directions in "Use Tips Below").
- Close the door by leaving it swayed (half open).
- Position the function selector to

- Set the cooking temperature with the thermostat button.
- Set the cooking time with the timer button.
Rotary Cooking

This feature is ideal in addition to using your oven in traditional mode or keeping warm. The rotating heat circulates heat in the oven and allows red meat, poultry or fish to be quickly seized and cooked, while keeping them tender, fluffy and juicy.
- Insert the grid in a low position.

- Position the function selector to
- Set the cooking temperature with the thermostat button.
- Set the cooking time with the timer button to preheat the oven.
- Wait until the oven has reached the set temperature, then insert the dish containing the food. Adjust the timer again.
- If the cooking is completed before the end of the set cooking time, manually turn the timer button on "OFF".
Turbo Rotary Cooking

This feature allows for faster cooking than traditional spin-off cooking.
Grilling - Rotary

This method of cooking is ideal for grilling minced steaks, chops, sausages... It is also suitable for browning foods, such as scallops, etc.
- Insert the grill in a high position and the bake tray at the bottom above the resistance.
Tip: We advise you to pour two glasses of water into the bake tray to avoid the formation of smoke and stubborn dirt of burnt fat and to facilitate cleaning.
- Position the function selector to

- Set the cooking temperature with the thermostat button.
- Set the cooking time with the timer button.
- Preheat the oven for about 5 minutes, leaving the door slightly opened.
- Remember to turn food halfway through cooking.
- If the cooking is completed before the end of the set cooking time, manually turn the timer button on "OFF".
CAUTIONS
 | Always use the tray handle when inserting removing the tray. Touching these will cause severe burns. |
 | When unplugging the cord, always take hold of the plug itself. Never pull on the cord. Doing so could break the wires inside the cord. |
USE INDICATION
Special indication: the parts and accessory varies from different models.
Please refer the image to the real item you buy.
Bake tray and wire rack
Bake tray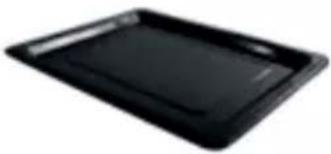 | Roast Chicken, Hamburg steak, Gratin, sponge cake, almost all other oven-cooked foods | How to use tray handle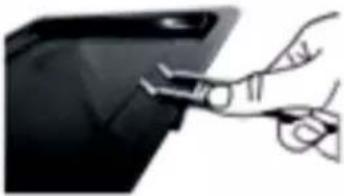 |
Wire rack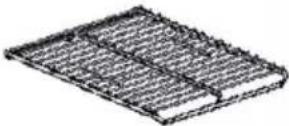 | Baked potatoes, dry foods. | 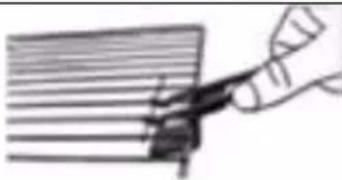 |
Bake tray + wire rack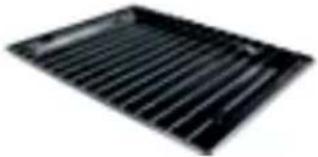 | For food which will drip/boiled fish, etc. | Rotisserie forks & shaft & Rotisserie handle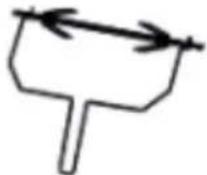 |
The trays are not perfectly square.
| Rotisserie Function | |
| Use with rotisserie forks | Install rotisserie forks |
 |  |
| With this function, even baking will be provided. | |
| Rotisserie forks can carry food under 3 kilogram. | Left Right |
| Install rotisserie forks | Remove rotisserie forks | Rotisserie handle |
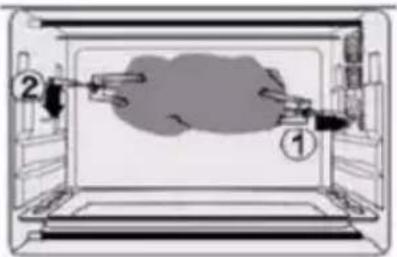 | 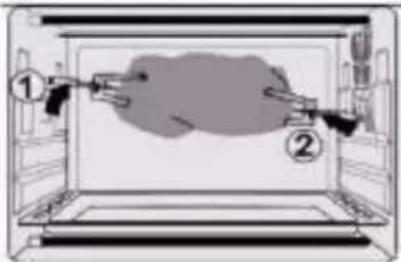 | 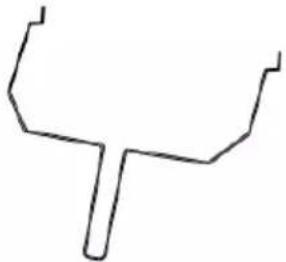 |
| Install the rotisserie forks to the rotisserie hole, and then put it to the rotisserie tray. | Use rotisserie handle to take out the rotisserie forks from the rotisserie tray, and then remove it from the rotisserie hole.CAUTION: Beware of HOT dripping oil! | Please always use rotisserie handle to take out rotisserie forks. |
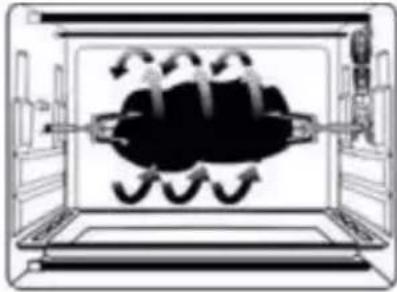
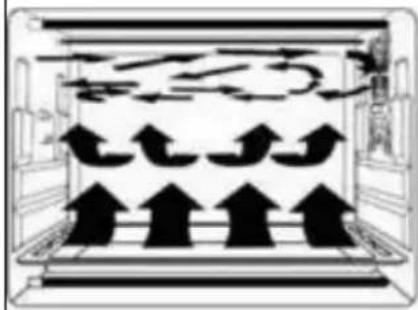
Convection Function
natural_image
Diagram of a kitchen interior with upward-pointing arrows and a horizontal line above (no text or symbols)Featured with a special convection function strong and absolute cycling airflow by making the heating more complete. Original flavor can be kept.
Correct Disposal of this product:
Defects caused by improper use of equipment, as well as damage caused by third-party intervention or repair or installation of non original components, are not within the supplier's scope of responsibility.
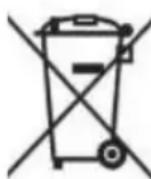
This marking indicates that the waste disposal of the equipment complies with Directive 2012/19/EC of July 4, 2012 on Waste Electrical and Electronic Equipment (WEEE). The presence of harmful substances in electrical and electronic equipment may have potential impacts on the environment and human health during the post-processing cycle of this product.
Therefore, at the end of the equipment's lifespan, it should not be disposed of together with unclassified urban waste.
As the ultimate consumer, your role in the reuse, recycling, and other forms of recycling of electrical and electronic equipment is crucial. Local communities (waste treatment plants) and distributors provide recycling and collection systems.
You are obligated to use available selective collection systems.
Continental Edison
120-126 Quai de Bacalan
CS 11584
33000 Bordeaux
IMPORTÉ PAR:
A.M.C
natural_image
Abstract geometric shapes with no text or symbolsContinental Edison

www.continentaledison.fr
CE