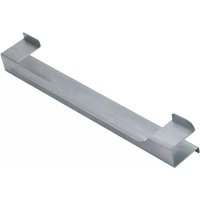
W10469901 - Other kitchen appliances MAYTAG - Free user manual and instructions
Find the device manual for free W10469901 MAYTAG in PDF.


| Product Type | Spacer Kit for Built-In Microwave Oven |
| Brand | Maytag |
| Model | W10469901 (27") / W10469903 (30") |
| Compatibility | Maytag KBHS179B (27") and KBHS109B (30") built-in ovens |
| Width (27" model) | 26 3/4" (67.9 cm) |
| Width (30" model) | 29 3/4" (75.6 cm) |
| Recommended Opening Height | 19 7/16" (49.4 cm) |
| Minimum Opening Depth | 21 7/8" (55.5 cm) |
| Material | Steel |
| Package Contents | Spacer bars (2), lower vent (1), 3/8" hex washer head screws (4), 3/4" fillister head screws (4) |
| Certifications | UL / CSA |
| Tools Required | Phillips screwdriver, level, 1/4" hex socket screwdriver, drill, 1/8" drill bit, tape measure |
| Safety | Use two people for installation; follow warnings in manual |
| Applications | Installation above a single built-in oven |
| Maximum Allowed Cabinet Temperature | 194°F (90°C) |
| Maximum Supported Weight | 90 lb (41 kg) |
Frequently Asked Questions - W10469901 MAYTAG
User questions about W10469901 MAYTAG
0 question about this device. Answer the ones you know or ask your own.
Ask a new question about this device
Download the instructions for your Other kitchen appliances in PDF format for free! Find your manual W10469901 - MAYTAG and take your electronic device back in hand. On this page are published all the documents necessary for the use of your device. W10469901 by MAYTAG.
USER MANUAL W10469901 MAYTAG
INSTALLATION INSTRUCTIONS ELECTRIC BUILT-IN MICROWAVE OVEN SPACER KIT
Built-In Spacer Kit Models W10469901 (27") and W10469903 (30")
UL listed for use with electric built-in microwave oven models:
27" (68.6 cm): KBHS179B and 30" (76.2 cm): KBHS109B.
INSTRUCTIONS D'INSTALLATION TROUSSE D'ENTRETOISE POUR FOUR À MICRO-ONDES ÉLECTRIQUE ENCASTRÉ
Location Requirements....2
INSTALLATION INSTRUCTIONS....3
Assemble Spacer Kit....3
Install Spacer Kit ....3
Install Microwave Oven....3
Complete Installation ....4
SÉCURITÉ DU FOUR À MICRO-ONDES ENCASTRÉ....5
EXIGENCES D'INSTALLATION....6
Your safety and the safety of others are very important.
We have provided many important safety messages in this manual and on your appliance. Always read and obey all safety messages.

This is the safety alert symbol.
This symbol alerts you to potential hazards that can kill or hurt you and others.
All safety messages will follow the safety alert symbol and either the word "DANGER" or "WARNING."
These words mean:
DANGER
You can be killed or seriously injured if you don't immediately follow instructions.
WARNING
You can be killed or seriously injured if you don't follow instructions.
All safety messages will tell you what the potential hazard is, tell you how to reduce the chance of injury, and tell you what can happen if the instructions are not followed.
INSTALLATION REQUIREMENTS
Tools and Parts
Gather the required tools and parts before starting installation. Read and follow the instructions provided with any tools listed here.
Tools needed
■ Phillips screwdriver
■ Level
■ 14 " (0.63 cm) hex opening screwdriver
Drill
■ 1/8" (0.32 cm) drill bit
■ Measuring tape
Parts supplied
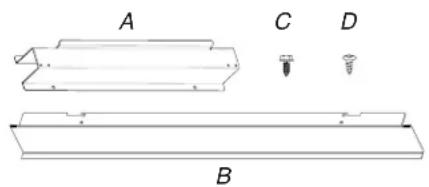
text_image
A C D BA. Spacer bars (2)
B. Bottom vent (1)
C. 38 " hex washer head screws (4)
D. 34 " pan head screws (4)
Location Requirements
IMPORTANT: Observe all governing codes and ordinances.
■ Cabinet opening dimensions that are shown must be used. Given dimensions provide minimum clearance with microwave oven.
■ Recessed installation area must provide complete enclosure around the recessed portion of the microwave oven.
■ Microwave oven support surface must be solid, level and flush with bottom of cabinet cutout. Floor must be able to support a weight of 90 lbs (41.0 kg).
IMPORTANT: To avoid damage to your cabinets, check with your builder or cabinet supplier to make sure that the materials used will not discolor, delaminate or sustain other damage. This oven has been designed in accordance with the requirements of UL and CSA International and complies with the maximum allowable wood cabinet temperatures of 194^ ( 90^ C).
Product Dimensions
27" (68.6 cm) and 30" (76.2 cm) Microwave Oven Spacer Kits
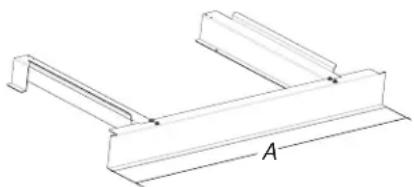
natural_image
Technical line drawing of a mechanical bracket with dimension label A (no text or symbols present)27" (68.6 cm) models
A. 26 ^3/4 " (67.9 cm) overall width
A. 29 ^3/4 " (75.6 cm) overall width
30" (76.2 cm) models
Cabinet Dimensions
27" (68.6 cm) and 30" (76.2 cm) Microwave Oven Spacer Kits
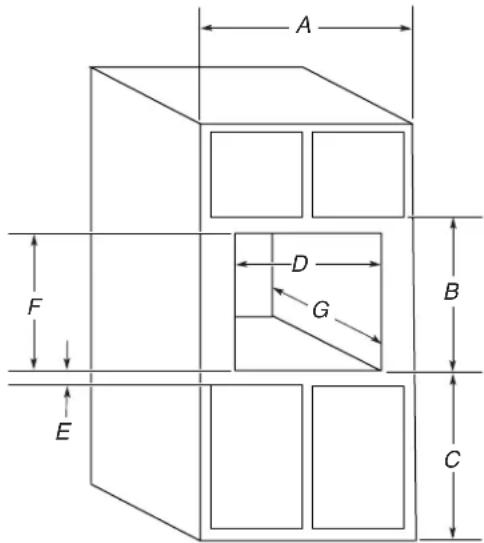
text_image
A F D G B E C27" (68.6 cm) models
A. 27" (68.6 cm) min. cabinet width
B. 20 ^7/16 " (51.9 cm) bottom of cutout to bottom of upper cabinet door
C. 40" (101.2 cm) bottom of cutout to floor (recommended)
D. 25 ^1/2 (64.8 cm) cutout width
E. 1½" (3.8 cm) min. bottom of cutout to top of cabinet door
F.19 716 " (49.4 cm) recommended cutout height (will fit cutout height from 19 14 " [48.9 cm] to 19 116 " [50.0 cm])
G. 21 ^7/8 (55.5 cm) min. cutout depth
30" (76.2 cm) models
A. 30" (76.2 cm) min. cabinet width
B. 20 ^7/16 " (51.9 cm) bottom of cutout to bottom of upper cabinet door
C. 40" (101.2 cm) bottom of cutout to floor (recommended)
D. 28 ½" (72.4 cm) cutout width
E. 1 ½" (3.8 cm) min. bottom of cutout to top of cabinet door
F.19 716 " (49.4 cm) recommended cutout height (will fit cutout height from 1914 " [48.9 cm] to 19116 " [50.0 cm])
G. 21 ^7/8 " (55.5 cm) min. cutout depth
Minimum Installation Clearances
For proper installation the following minimum clearances must exist above and below the cabinet opening.
Installation Above Single Built-In Oven
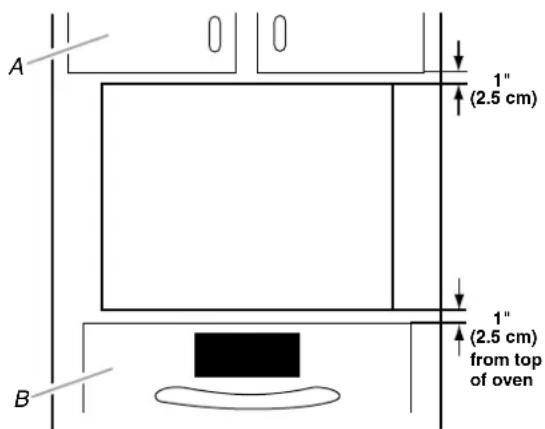
text_image
A 1" (2.5 cm) B 1" (2.5 cm) from top of ovenA. Upper cabinet
B. Lower single oven*
*Approved models: KEBK171B, KEBK101B, KEBS179B, KEBS109B, KEBU109B.
INSTALLATION INSTRUCTIONS
Assemble Spacer Kit
- Attach bottom vent to spacer bars using four 38 " hex washer head screws.
NOTE: Spacer bar flanges should be facing out.
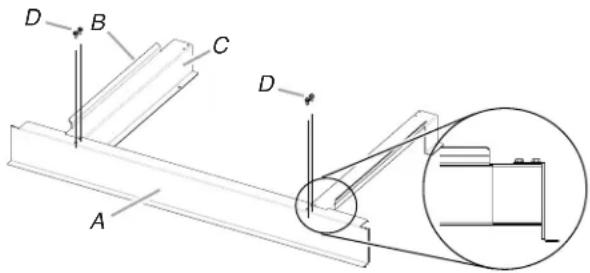
text_image
D B C D AA. Bottom vent
B. Spacer bar flange
C. Spacer bars
D. 3/8" hex washer head screws
Install Spacer Kit
- Center assembled microwave oven spacer kit against lower, front edge of the cabinet cutout.
- Using an 18 " (0.32 cm) drill bit, drill through the mounting holes in the spacer bars to create pilot holes.
- Attach the assembled spacer kit to the cabinet using four 34 " pan head screws provided. Do not overtighten screws.
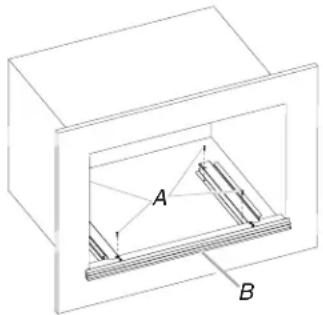
natural_image
Technical line drawing of a mechanical assembly with labeled components A and B (no text or symbols beyond labels)A. 34 " pan head screws
B. Spacer kit assembly
Install Microwave Oven
Follow the instructions below along with the instructions in the Electric Built-In Microwave Oven Installation Instructions.
Read the “Electrical Requirements” and “Electrical Connection” sections along with all other sections of the Installation Instructions before installing the microwave oven.
WARNING
Excessive Weight Hazard
Use two or more people to move and install microwave oven.
Failure to do so can result in back or other injury.
- Using 2 or more people, lift microwave oven partially into cabinet cutout above spacer kit and place microwave oven in between spacer bar flanges.
NOTE: Open microwave oven door and push against seal area of microwave oven front frame when pushing microwave oven into cabinet. Do not push against outside edges.
- Push against the front frame of the microwave oven to push oven into cabinet. Push microwave oven completely into cabinet and center in cabinet cutout.
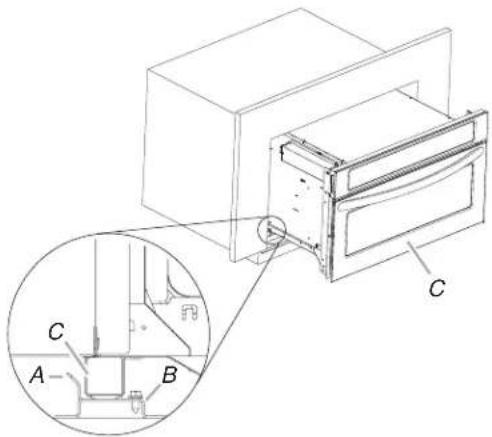
text_image
Technical diagram of a refrigerator with labeled parts A, B, and C, including an inset view showing a cross-section view.A. Spacer bar flange
B. Spacer bar
C. Microwave oven
Complete Installation
- Check that all parts are now installed. If there is an extra part, go back through the steps to see which step was skipped.
- Check that you have all of your tools.
- Dispose of/recycle all packaging materials.
If you need Assistance or Service:
Please reference the "Assistance or Service" section of the Use and Care Guide or contact the dealer from whom you purchased your built-in microwave oven spacer kit.