Nacelle - Baby products Nuna - Free user manual and instructions
Find the device manual for free Nacelle Nuna in PDF.

| Product Type | Bassinet / Carry Cot |
| Brand | Nuna |
| Model | Bassinet (compatible with MIXX stroller) |
| Maximum Child Weight | 9.1 kg (20 lbs) |
| Maximum Child Height | 68 cm (27 in) |
| Recommended Age | From birth to 6 months (until the child can roll over) |
| Usage | As a carry cot on the floor or as a bassinet on the MIXX stroller |
| Materials | Plastic frame, fabric, foam mattress |
| Main Features | Hood with canopy, Dream Drape™ screen, sun visor, carry handle, removable liner, protective cover |
| Care and Cleaning | Frame cleanable with damp cloth; mattress cover and protective cover machine washable, air dry; do not wash the mattress |
| Safety | Do not use if child can roll over or exceeds 9.1 kg; locking clips; always engage stroller brake; do not place on soft surfaces or elevated; never leave unattended |
| Spare Parts and Repairability | Only Nuna original parts; contact customer service for spare parts |
| Warranty | 1 year (registration required at www.nunababy.ca/warranty) |
| Product Registration | Required for warranty, via website |
| Customer Service | Canada: 1-800-667-4111, info@nunababy.ca |
| Included Accessories | Mattress, liner, hood, sun visor, Dream Drape™ screen, protective cover, support and attachment brackets |
| Assembly | Tool-free, assembly of support and attachment brackets |
| Compatibility | Only with Nuna MIXX stroller |
| Product Weight (bassinet only) | Not specified, about 5-6 kg |
| Bassinet Dimensions (L x W x H) | Not specified, about 80 x 45 x 30 cm |
Frequently Asked Questions - Nacelle Nuna
User questions about Nacelle Nuna
0 question about this device. Answer the ones you know or ask your own.
Ask a new question about this device
Download the instructions for your Baby products in PDF format for free! Find your manual Nacelle - Nuna and take your electronic device back in hand. On this page are published all the documents necessary for the use of your device. Nacelle by Nuna.
USER MANUAL Nacelle Nuna
text_image
mixx²™ bassinet NUNA® Find out more at nuna.euDesigned around your life
IMPORTANT! READ THESE INSTRUCTIONS CAREFULLY BEFORE USE AND KEEP THEM FOR FUTURE REFERENCE.
Contents
Product Information
Product Registration 4
Warranty
Contact
4
4
Child Usage Requirements 5
Warnings 6
Parts List 10
Product Set Up 12
Product Use 14
Cleaning and Maintenance 22
Francais (FR) 24
Product Information
Model Number:
Manufactured in (date):
Product Registration
All products include a serial label which lists the product model number and serial number. This label is located on the footend of the bassinet under the mattress pad. Before contacting customer service, please have these numbers available for reference.
To register your product please visit:
www.nuna.eu/register-gear
Warranty
We have purposely designed our high-quality products so that they can grow with both your child and your family. Because we stand by our product, our gear is covered by a custom warranty per product, starting from the day it was purchased. Please have the proof of purchase, model number and serial number available when you contact us.
For warranty information please visit:
www.nuna.ca/warranty
Contact
For replacement parts, service, or additional warranty questions, please contact our customer service department.
In Canada:
info@nunababy.ca
1.800.667.4111
Child Usage Requirements
This bassinet is suitable for use with children who meet the following requirements:
Weight: Up to 9 kg (20 lbs)
WARNING
Failure to follow these warnings and the instructions could result in serious injury or death.
For use in Bassinet Mode
Do not use this bassinet if you cannot exactly follow the instructions that come with it.
Do not use this bassinet for a child who can roll over or who has reached 9.1 kg (20 lbs).
Do not place any cord, strap or similar item in or near this bassinet that could become wrapped around a child's neck.
Do not place this bassinet near a window or patio door where a child could reach the cord of a blind or curtain and be strangled.
Check this bassinet regularly before using it, and do not use it if any part is loose or missing or if there are any signs of damage. Do not substitute parts. Contact the manufacturer if replacement parts or additional instructions are needed.
Children can suffocate on soft bedding. Do not place pillows, comforters or soft mattresses in this bassinet.
Use only the mattress supplied by the manufacturer with this bassinet. Do not add an additional mattress to this bassinet.
WARNING
Failure to follow these warnings and the instructions could result in serious injury or death.
When using the Bassinet on the MIXX series Stroller in Carry Cot Mode
THIS BASSINET when used on the MIXX series stroller in carry cot mode is suitable for use with children who weigh up to 20 lbs (9.1 kg) (birth–6 months) and whose height is 27 in. (68 cm) or less.
WARNING Never leave child unattended.
SUFFOCATION HAZARD Carry cot can roll over on soft surfaces and suffocate child. NEVER place carry cot on beds, sofas, or other soft surfaces.
FALL HAZARD Child's activity can move carry cot.
NEVER place carry cot on counter tops, tables, or any other elevated surfaces.
NEVER use this carry cot as a means to transport an infant in a motor vehicle.
WARNING A child's safety is your responsibility.
WARNING Ensure that all the locking devices are engaged before use.
WARNING Any load attached to the handle affects the stability of the stroller/pram/pushchair.
WARNING To avoid any danger of suffocation, remove all plastic covers before using this item and destroy or keep away from babies and children!
ALWAYS set the parking brake on the MIXX series stroller when you stop.
When using the Bassinet on the MIXX series Stroller in Carry Cot Mode (cont.)
NEVER leave a child in the carry cot when ascending or descending stairs or escalators, or when traveling on other forms of transport.
DO NOT carry additional children, goods, or accessories in or on this carry cot except as permitted in these instructions. They may cause the carry cot to become unstable.
NEGOTIATE curbs and rough ground carefully. Repeated impact will cause damage to the carry cot.
CHECK that the stroller body attachment devices are correctly engaged before use.
WARNING
Failure to follow these warnings and the instructions could result in serious injury or death.
General Warnings
KEEP small parts away from children as they pose a choking hazard.
DO NOT leave the MIXX series bassinet exposed in the vicinity of a strong source of heat i.e. a radiator or open fire.
USE original Nuna parts and accessories only.
DO NOT store your MIXX series bassinet in a damp place.
ALWAYS allow the fabric to dry naturally away from direct heat.
WARNING To avoid injury ensure that your child is kept away when unfolding and folding this product.
The handles and the bottom should be inspected regularly for signs of damage and wear.
DO NOT place any item on the canopy.
WARNING Do not let your child play with this product.
DO NOT use the MIXX series bassinet if it is damaged or broken.
DO NOT place more than 3 lbs. (1.3 kg) in the accessory pocket.
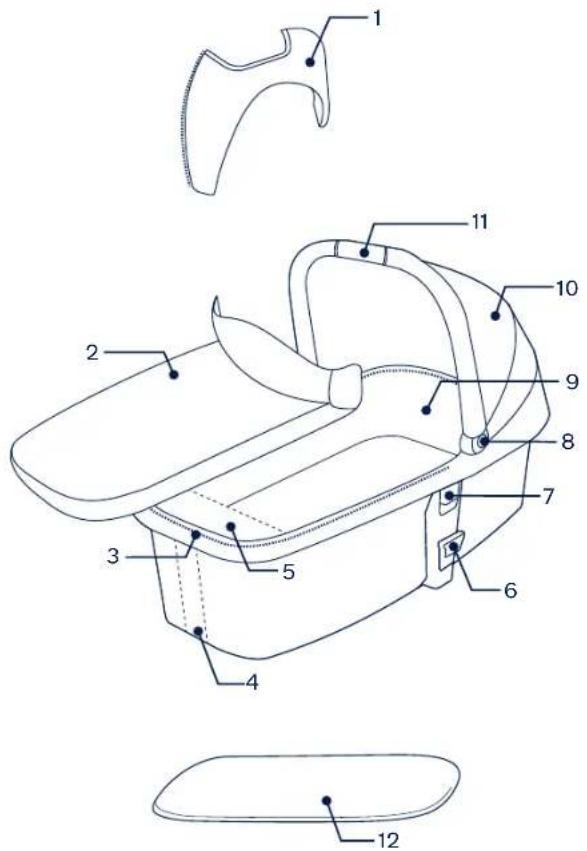
Parts List
Not all features are included in all models. Make sure all parts are available before assembly. If any part is missing, please contact local retailer. No tools are required for assembly.
1 Canopy Visor
7 Release Button
2 Cover
8 Canopy Fold Button
3 Bassinet
9 Removable Liner
4 Support Mount
10 Canopy
5 Accessory Pocket
11 Handle
6 Attachment Mount
12 Mattress
text_image
Technical diagram of a device's internal components with numbered labels pointing to various parts.Product Set Up
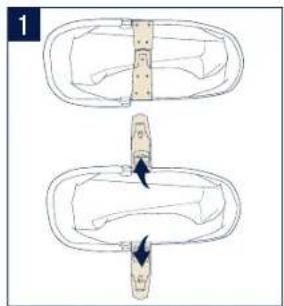
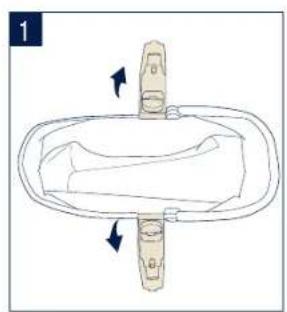
Assembling the Bassinet Support Mounts
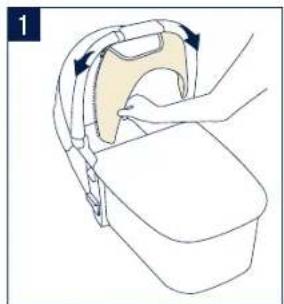
1 - Remove the mattress pad and rotate the attachment mounts out from the center of the bassinet.
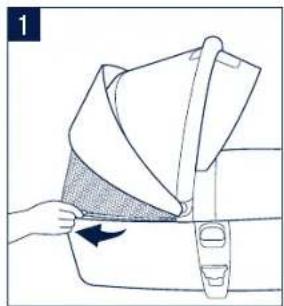
2 - Unfasten the hook and loop strips and lift the fabric away from inside the bassinet to access the two support mounts, which are located under the fabric at the canopy and foot ends of the bassinet.
3 - Holding the top rail of the foot end, push the support mount back to raise the end of the bassinet.
4 - Rotate the support mount down towards the latch at the bottom of the bassinet as shown.
5 - Push the support mount into the latch on the bottom of bassinet until it clicks into place. Repeat on the canopy end of the bassinet.
6 - To fold, push button on the latch and pull support mount out.
natural_image
Diagram showing two mechanical components with arrows indicating motion, no text or symbols present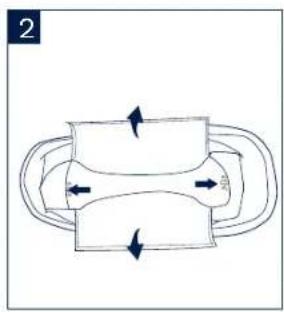
natural_image
Simple line drawing of a mechanical or fluidic component with bidirectional arrows indicating flow or movement (no text or symbols)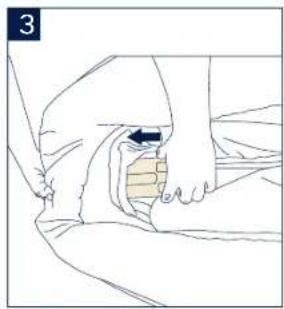
natural_image
Line drawing of a hand pressing down on a small object, possibly a tool or device, with no visible text or symbols.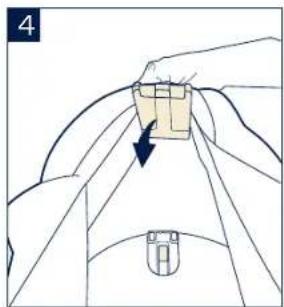
natural_image
Diagram of a hand holding a small object with an arrow indicating direction, no text or symbols present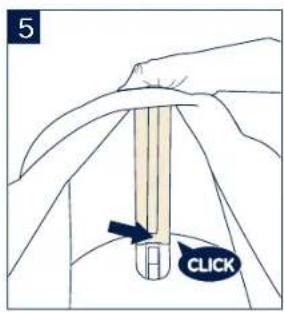
text_image
5 CLICK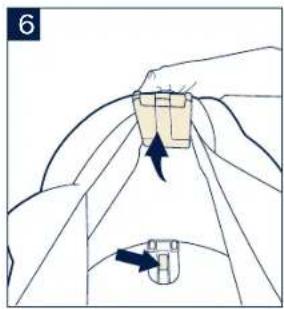
natural_image
Diagram of a mechanical assembly with arrows indicating motion or force direction (no text or symbols)Assembling the Attachment Mounts
1 - Make sure the attachment mounts are outside of the bassinet.
2 - Rotate the attachment mounts down the side of the bassinet on both sides until they click into the latch as shown.
Make sure you hear a "click".
3 - To disassemble the bassinet, push the button on the latch on the underside of the bassinet and pull the attachment mount out.
Product Use
Using the Canopy
4 - To open the canopy, rotate the canopy up.
5 - The handle will stop in the convenience position for accessing child. To continue to open the canopy further, push the buttons on both sides of the handle and pull canopy towards the foot end of the bassinet until it clicks into the fully extended position.
Be sure handle is locked in the fully extended position before lifting the bassinet by the handle.
6 - To close the canopy, press the canopy folding buttons simultaneously on both sides, and rotate down.
natural_image
Diagram of a mechanical component with directional arrows indicating motion (no text or symbols)
natural_image
Line drawing of a small container with an open lid and handle, showing a right-hand rule (no text or symbols)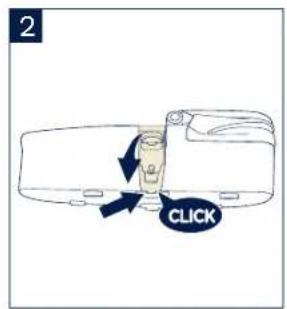
text_image
2 CLICK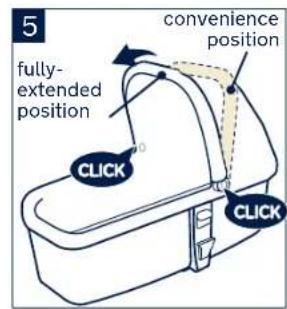
text_image
5 fully- extended position convenience position CLICK CLICK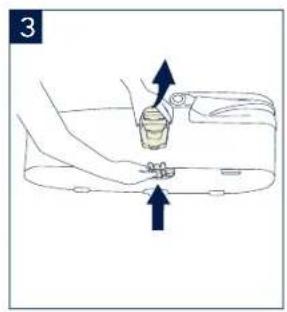
text_image
3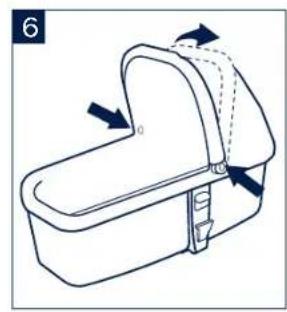
natural_image
Line drawing of a box-like device with arrows indicating movement or force (no text or symbols)Removing the Canopy
1 - To remove, unfasten the canopy zipper located on the bottom panel of the canopy as shown.
2 - Unfasten the zipper located on the inside of the canopyhandle.
3 - Remove canopy from the bassinet.
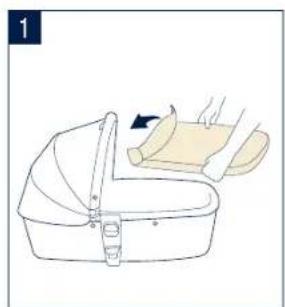
Using the Dream Drape™
4 - Pull out the dream drape from underneath the flap under the canopy as shown.
5 - Attach the magnets on the corners of the dream drape to the side rails of the bassinet.
6 - Lift up the panel on the rear of the canopy for more ventilation.
To store, tuck the dream drape back under the flap underneath the canopy.
natural_image
Illustration of a hand inserting a folded garment into a seatbelt (no text or symbols)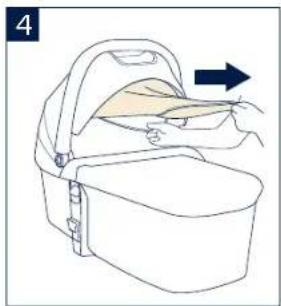
natural_image
Line drawing of a hand placing a tray onto a box with an arrow indicating direction (no text or symbols)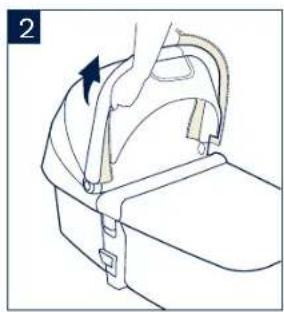
natural_image
Line drawing of a hand holding a curved mechanical device with a black arrow indicating rotation (no text or symbols)
natural_image
Line drawing of a baby walker with a curved handle and arrow indicating rotation (no text or symbols)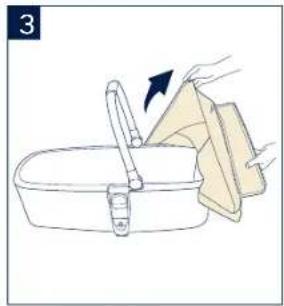
natural_image
Illustration of a hand cleaning a basin with a tool and cloth (no text or symbols)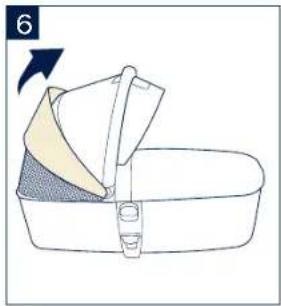
natural_image
Diagram of a folded or folded object with a shaded base and arrow indicating direction (no text or symbols)Using the Canopy Visor
1 - To attach the canopy visor, zip it to the underside of the canopy on both sides of handle. Canopy flips in or out for added sun protection. To remove the canopy visor, unzip it from the canopy on both sides of the handle.
Inserting the Mattress Pad
⚠ WARNING To avoid serious injury, always use the mattress pad when using the bassinet.
2 - CHECK to make sure the bottom of the bassinet fabric is securely fastened.
3 - Insert the mattress pad into the bassinet so that the opening seam on the mattress pad is on the bottom.
4 - Mattress pad should be completely flush with the bottom of the bassinet.
5 - To wash the mattress cover, unfasten the hook and loop strips on the bottom of the mattress pad and remove it. Machine wash. Line dry only. DO NOT wash the mattress pad.
Removing the Bassinet Liner
Close the canopy for easier access and remove bassinet mattress pad.
6 - To wash liner, unzip and remove from bassinet. Always reinstall liner before use of bassinet.
natural_image
Line drawing of a hand pressing down on a beige cushion component (no text or symbols)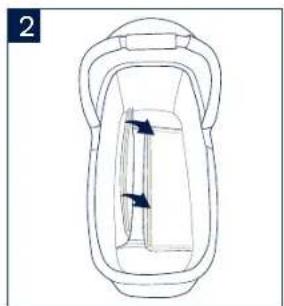
natural_image
Line drawing of a rectangular container with internal compartments and directional arrows indicating movement (no text or symbols)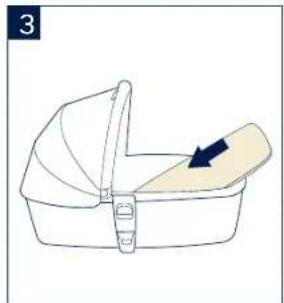
natural_image
Illustration of a baby buntington with a hand pointing to the lid area (no text or symbols)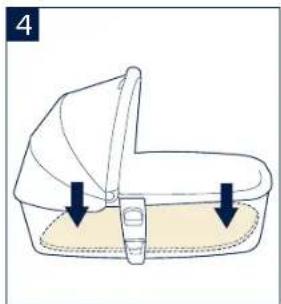
natural_image
Illustration of a baby's seat with two arrows indicating measurement or positioning (no text or symbols)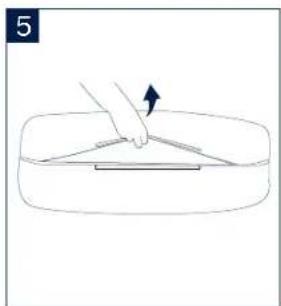
natural_image
Simple line drawing of a hand pressing down on a rectangular object with an arrow indicating motion (no text or symbols)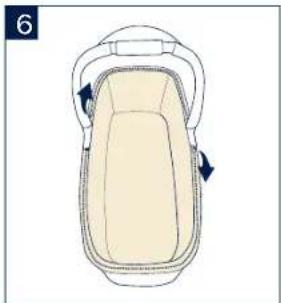
natural_image
Illustration of a beige bag with a handle and side panel, showing two arrows indicating direction (no text or symbols)Using the Bassinet Cover
1 - Place the bassinet cover on top of the bassinet so the closed section is on the foot end.
2 - Fasten the bassinet cover with the magnets to the sides of the bassinet and at the foot end.
Using the Bassinet on the MIXX series Stroller in Carry Cot Mode
WARNING
- The MIXX series bassinet, when used on the MIXX series stroller, can only be used as a carry cot.
• Never leave child unattended. - Check to be sure carry cot is securely attached by pulling up on the carry cot.
- The carry cot can only be used with the MIXX series stroller.
- Do not fold the stroller when the carry cot is attached.
3 - Line up the mounts on the side of the carry cot with the stroller mounts as shown.
4 - Attach to the MIXX series stroller mounts by inserting the attachment mounts onto both sides of the stroller frame until the carry cot CLICKS into place. CHECK to make sure it is securely attached by pulling up on it.
The carry cot can attach in a rear-facing or forward-facing mode when on the stroller frame.
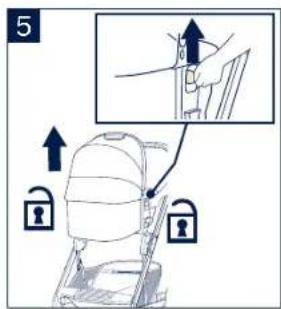
Removing Bassinet from the MIXX series Stroller in the Carry Cot Mode
5 - Press the carry cot release buttons on both sides while lifting the carry cot up.
20 MIXX2 bassinet instructions 21MIXX2 bassinet instructions
natural_image
Illustration of a hand holding a small object with a blue arrow indicating motion (no text or symbols)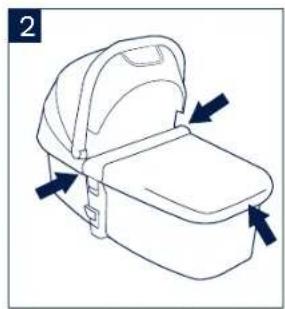
natural_image
Line drawing of a backpack with directional arrows indicating movement or force (no text or symbols)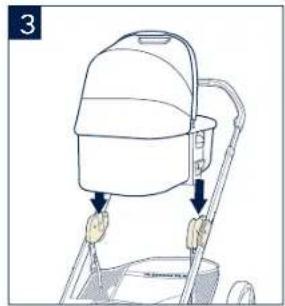
natural_image
Line drawing of a lawn mower with a bucket cover and handle, showing mechanical components (no text or symbols)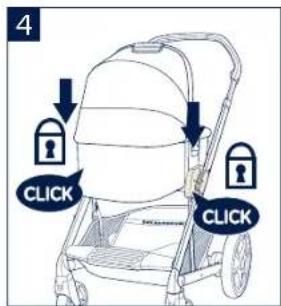
text_image
4 CLICK CLICK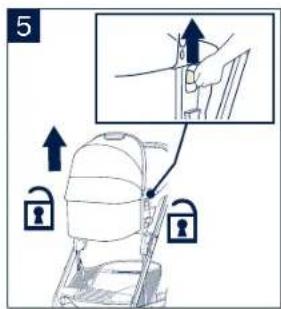
text_image
5
Cleaning and Maintenance
Your MIXX series bassinet is a valuable piece of equipment and deserves careful handling.
You can clean the frame, the plastic parts, and the fabric with a damp cloth, but don't use abrasives or bleach.
- Please handle your MIXX series bassinet with care.
- Do not use abrasives or bleach.
- The mattress cover and bassinet cover can be removed and machine-washed. Line dry only.
- Do not wash the mattress pad.
- To ensure the long-lasting use of your bassinet, wipe it dry with a soft, absorbent cloth after using in the rain.
- Continued and extended exposure to sunlight can change the color of many materials.
- Never modify any part of the bassinet. Only use parts originally provided by Nuna.
- Regularly check if any parts are torn, broken, or missing and that everything functions properly. Stop using the bassinet if damaged or missing parts.
- Do not attempt to disassemble the bassinet further than these instructions allow.
IMPORTANT- LISEZ ATTENTIVEMENT TOUTES LES INSTRUCTIONS AVANT D'UTILISER LE PRODUIT ET CONSERVEZLES POUR RÉFÉRENCE FUTURE.
Sommaire
https://www.nuna.eu/register-gear
Garantie
text_image
Technical diagram of a car interior with numbered anatomical parts labeled 1 through 12natural_image
Diagram showing two steps of a car seatbelting mechanism, with arrows indicating movement direction (no text or symbols)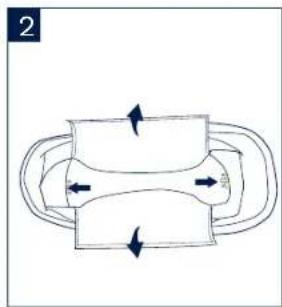
natural_image
Diagram of a mechanical or fluidic component with bidirectional arrows indicating flow or movement (no text or symbols)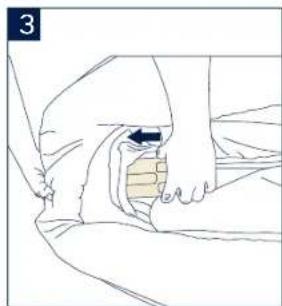
natural_image
Illustration of a hand performing a medical or ergonomic procedure on a patient's abdomen, with no visible text or symbols.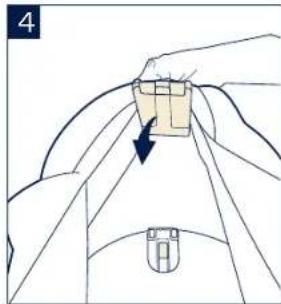
natural_image
Diagram showing a hand pressing down on a mechanical component with an arrow indicating motion (no text or symbols present)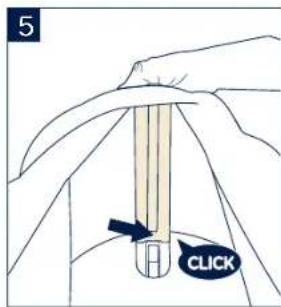
text_image
5 CLICK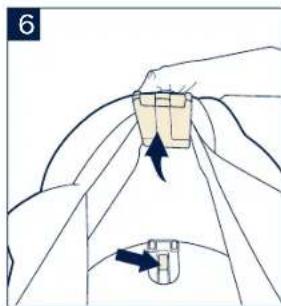
natural_image
Diagram of a mechanical assembly with two arrows indicating force directions (no text or symbols present)natural_image
Diagram of a mechanical device with rotating arms and a central handle (no text or symbols)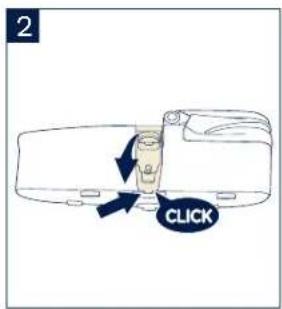
text_image
2 CLICK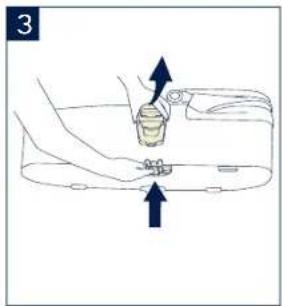
text_image
3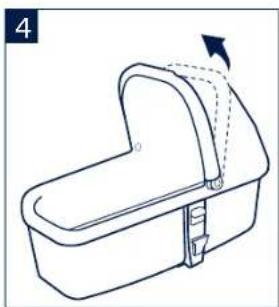
natural_image
Line drawing of a small container with an open lid and handle, showing a right-hand rule (no text or symbols)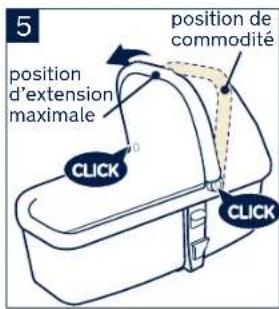
natural_image
Line drawing of a box with arrows indicating movement or force (no text or symbols)natural_image
Illustration of a hand holding a folded garment with a shaded triangular section and arrow indicating fabric direction (no text or symbols)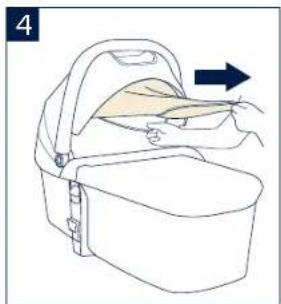
natural_image
Line drawing of a hand holding a tray with an arrow indicating direction (no text or symbols)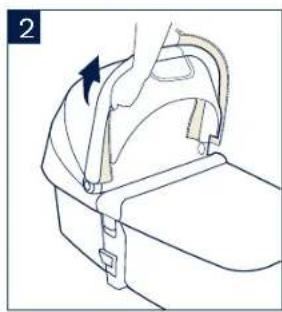
natural_image
Line drawing of a hand holding a curved mechanical device with a blue arrow indicating rotation (no text or symbols)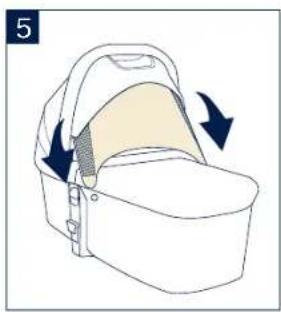
natural_image
Illustration of a baby walker with a curved arrow indicating rotation (no text or symbols)
natural_image
Illustration of a hand washing a basin with a tool, no text or symbols present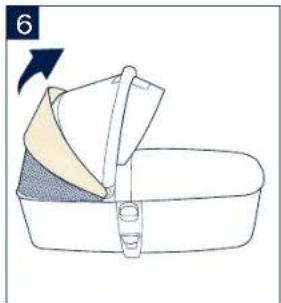
natural_image
Diagram of a folded or mechanical device with a shaded base and arrow indicating direction (no text or symbols)natural_image
Line drawing of a hand pressing down on a beige cushioned device (no text or symbols)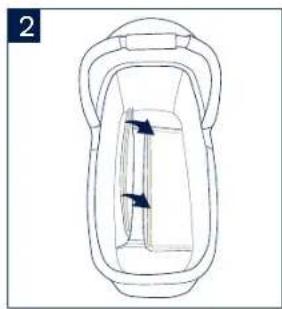
natural_image
Line drawing of a mechanical component with internal channels and directional arrows (no text or symbols)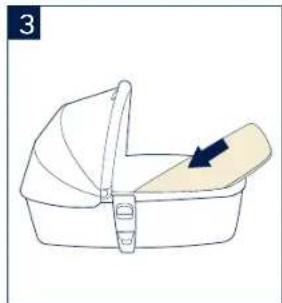
natural_image
Illustration of a baby's seat with a bandage and a blue arrow indicating direction (no text or symbols)
natural_image
Illustration of a baby's seat with two arrows indicating measurement or positioning (no text or symbols)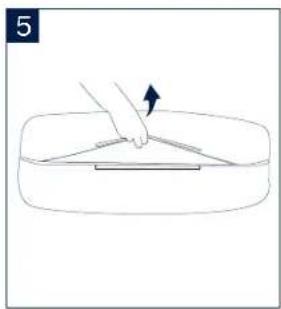
natural_image
Simple line drawing of a hand pressing down on a rectangular object with an arrow indicating motion (no text or symbols)
natural_image
Illustration of a beige bag with a handle and side panel, showing two arrows indicating direction (no text or symbols)natural_image
Illustration of a hand placing a cup into a box with a belt, showing anatomical positioning (no text or symbols)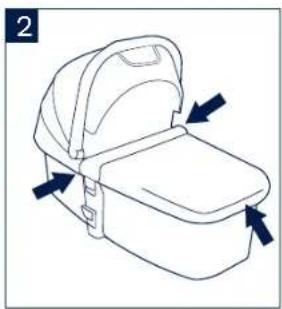
natural_image
Line drawing of a baby care kit with arrows indicating movement or placement (no text or symbols)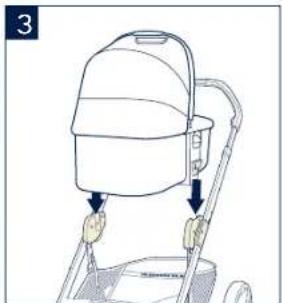
natural_image
Line drawing of a hairless machine with a head cover and attached lever, showing no text or symbols
text_image
4 CLICK CLICK