LEAF - High chair Nuna - Free user manual and instructions
Find the device manual for free LEAF Nuna in PDF.
User questions about LEAF Nuna
0 question about this device. Answer the ones you know or ask your own.
Ask a new question about this device
Download the instructions for your High chair in PDF format for free! Find your manual LEAF - Nuna and take your electronic device back in hand. On this page are published all the documents necessary for the use of your device. LEAF by Nuna.
USER MANUAL LEAF Nuna
text_image
leaf™ grow NUNA® Find out more at nunababy.ca Apprenez en plus au nunababy.ca NUNA®Designed around your life
IMPORTANT!
KEEP THESE
INSTRUCTIONS FOR
FUTURE REFERENCE:
READ ALL INSTRUCTIONS
BEFORE USE
Contents
Product Information
Warranty
Contact
Child Usage Requirements 5
Warnings 6
Parts List 10
Product Set Up 12
Stage One Use 12
Stage Two Use 14
Product Use 16
Cleaning and Maintenance 20
Product Information
Model Number:
Manufactured Date:
Warranty
We have purposely designed our high-quality products so that they can grow with both your child and your family. Because we stand by our product, our gear is covered by a custom warranty per product, starting from the day it was purchased. Please have the proof of purchase, model number and manufactured in date available when you contact us.
For warranty information please visit:
www.nunababy.ca
Contact
For replacement parts, service, or additional warranty questions, please contact our customer service department.
Nuna Canada
2520 Av Marie-Curie
St-Laurent, QC, H4S 1N1
1-800-667-4111
info@nunababy.ca
Child Usage Requirements
This product is intended for two stages of use:
Stage One: With Harness
- For use from birth until the child can sit upright or can climb out unassisted.
- Discontinue stage one use when infant can sit upright, push up on hands and knees or climb out unassisted (approximately 5 months) and is unable to walk.
Stage Two: Without Harness
- For use as a chair when the child is able to walk.
- Discontinue stage two use when child reaches 59 kg (130 lb).
WARNING
Failure to follow these warnings and instructions could result in serious injury or death.
A child's safety is your responsibility.
Use original Nuna parts and accessories only.
DO NOT use this product if it is damaged or broken.
This product is not intended for sleeping. If child falls asleep, you must provide the necessary supervision to ensure your child's safety.
For reasons of safety, only use original Nuna parts.
Check regularly if everything functions properly. If any parts are torn, broken, or missing, stop using this product.
The Nuna Leaf Wind is not compatible with the Nuna Leaf Grow.
Stage One: With Harness
For use from birth until the child can sit upright or can climb out unassisted.
Discontinue stage one use when infant can sit upright, push up on hands and knees or climb out unassisted (approximately 5 months) and is unable to walk.
FALL HAZARD
Babies have suffered skull fractures falling while in and from this product.
To prevent falls, stop using the product when infant:
- Begins to roll over, or
- Can pull up on sides (approximately 5 months).
- Use this product ONLY on floor. NEVER use on any elevated or soft surface.
- ALWAYS use restraint system. Adjust to fit snugly.
- NEVER lift or carry baby while in this product.
SUFFOCATION HAZARD
Babies have suffocated when this product was tipped over on a soft surface.
Infants have suffocated:
- On added pillows, blankets and extra padding.
- ONLY use the pad provided by the manufacturer.
- NEVER place extra padding under or beside infant.
- When trapped between product and adjacent surface.
- NEVER use inside cribs, play yards or other products.
- NEVER use on a bed, sofa, cushion, or other soft surface.
• NEVER leave baby unattended.
TO PREVENT FALLS AND SUFFOCATION:
- ALWAYS use restraints. Adjust to fit snugly.
- STOP using stage one when baby starts trying to sit up or has reached 9kg (20 lb), whichever comes first.
Strings can cause strangulation! DO NOT place items with a string around a child's neck, such as hood strings or pacifier cords. DO NOT suspend strings over product or attach strings to toys.
Stage Two: Without Harness
For use as a chair when the child is able to walk. Discontinue stage two use when child reaches 59 kg (130 lb).
Parts List
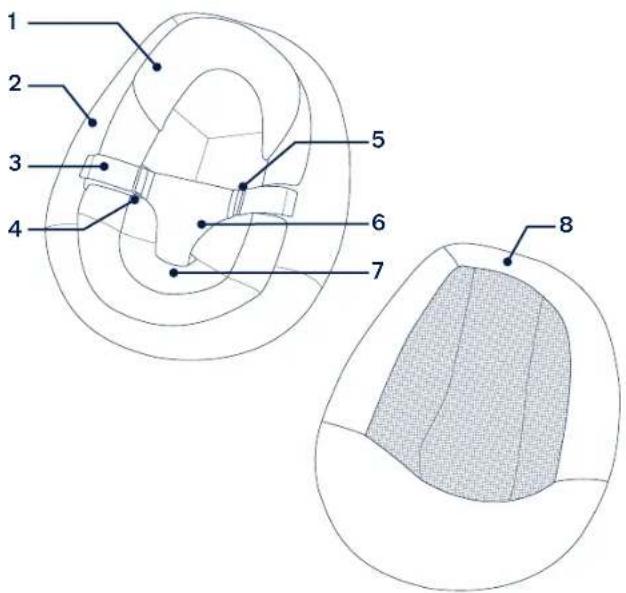
Make sure all parts are available before assembly. If any part is missing, please contact Nuna. No tools are required for assembly.
1 Infant Insert
6 Crotch Support
2 Seat Cover
7 Seat Cover
3 Harness Strap
Attachment Buckle
4 Harness Loop
(located on the back
5 HarnessAdjustment Buckle
inside of the seat cover)
8 Seat Pad
text_image
1 2 3 4 5 6 7 89 Seat Frame
10 SeatCoverAttachment Hole
11 Seat Mount
12 ReclineAdjustment Button
13 Base
14 Base Mount
15 Motion Lock

text_image
9 10 11 12 13 14 15Product Set Up
1 - Align the seat mount with the base mount. Place the seat directly down until it clicks into place. A "click" sound means the seat and base are assembled completely.
After assembly, pull up on the seat to ensure it is properly secured to the base.
Stage One Use
Stage one can be used from birth until your child can sit upright or can climb out unassisted.
2 - To secure your child, lift the ends of the harness straps away from the seat cover to unfasten the hook and loop.
3 - Remove the harness straps from the harness loops.
4 - Fold down the crotch support.
5 - Fit the harness snugly to your child by sliding the harness adjustment buckles, as needed.
Place your child in the seat and reverse these steps to secure your child in the harness.
Infant Insert
The infant insert can be used for stage one use to provide a better fit for smaller babies.
6 - To remove the infant insert, unbuckle the harness and route the harness straps through the infant insert holes.

text_image
1 click
natural_image
Technical line drawing of a helmet with no visible text or symbols
natural_image
Diagram of a car head cross-section showing internal compartments and directional arrows (no text or labels)
natural_image
Technical line drawing of a car interior showing seatbelt and wheel (no text or symbols)
natural_image
Diagram of a biological structure with directional arrows indicating movement or force (no text or labels)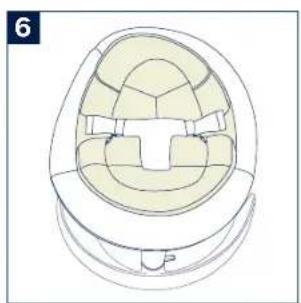
natural_image
Technical line drawing of a mechanical component with internal cavities and mounting brackets (no text or symbols)Seat Cover
Discontinue using the seat cover when the infant can sit upright, push up on hands and knees or climb out unassisted (age around 5 months).
1 - To remove the seat cover, flip the seat over and unfasten the hook and loop from the seat cover (1) and the seat pad (2).
2 - Detach the seat cover attachment buckle from the seat frame, then refasten the hook and loop on the seat pad.
3 - Flip the seat over, and starting from the bottom, remove the seat cover from the seat pad (1). Then, slide the seat cover up, off the top of the seat pad.
Stage Two Use
4 - The seat pad alone is for use as a chair when your child is able to walk.
Seat Pad
5 - To remove the seat pad, flip the seat over and unfasten the hook and loop.
6 - Flip the seat over, and starting from the bottom, remove the seat pad from the seat frame (1). Then, slide the seat pad up, off the top of the seat frame (2).
Discontinue stage two use when your child reaches 59 kg (130 lb).

text_image
1 2 1
natural_image
Line drawing of a computer mouse with a mesh head and curved base (no text or symbols)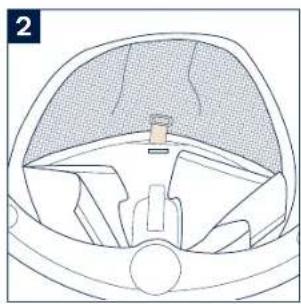
natural_image
Diagram of a car's interior and dashboard layout (no text or labels)
natural_image
Diagram of a human head with directional arrows indicating movement or force (no text or symbols present)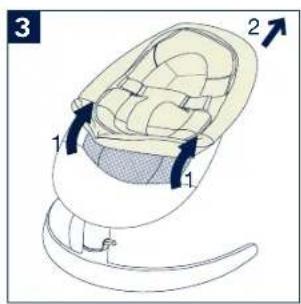
text_image
3 1 2 1
text_image
6 1 2 1Product Use
Motion Lock
The motion lock provides continuous swaying for both stages of use.
1 - Pull the motion lock up to unlock the seat.
2 - Push the seat to sway.
3 - To lock the seat and stop movement, push the motion lock down. The seat will only lock in the center position.
4 - When transporting, lock the base and carry by holding between the seat and the base.
NEVER lift or carry baby while in this product.

natural_image
Diagram of a curved mechanical component with an arrow indicating direction (no text or symbols)
natural_image
Technical line drawing of a curved mechanical component with an arrow indicating a specific feature (no text or symbols present)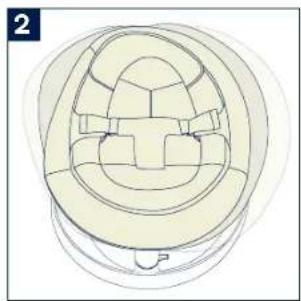
natural_image
Top-down line drawing of a car interior component (no text or symbols)
natural_image
Technical line drawing of a mechanical component with a curved base and a highlighted section (no text or symbols)Recline
There are three recline positions.
1 - For stage one use, only use in the LOWEST, MOST RECLINED position.
You MUST use the harness for stage one use. The harness is not required for stage two use.
2 - ANY recline position can be used for stage two use.
3 - To lower or raise the recline, pull up on the top of the seat to release the connection (1). Then press in on the recline adjustment button (2) and adjust the seat to the desired recline position. A "click" sound means the recline position is engaged.
Base
4 - To remove the seat from the base, insert a flat head screwdriver into the slot on the back of the seat mount, and press to disengage the connection.
5 - Once the connection is disengaged, slide the seat off the base mount.
DO NOT detach the seat from the base by any other method.

natural_image
Line drawing of a chair with a shaded seat and clasp (no text or symbols)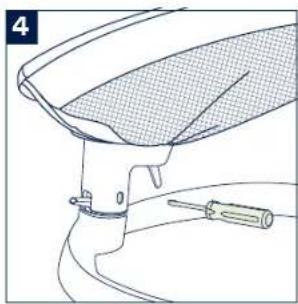
natural_image
Line drawing of a car hood with a screwdriver inserted, no text or symbols present
natural_image
Illustration of a folding chair with a mesh cover and handle (no text or symbols)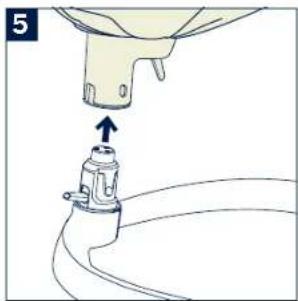
natural_image
Diagram of a mechanical component with an arrow indicating upward motion (no text or symbols present)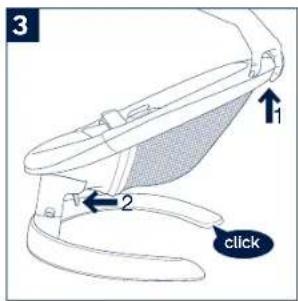
text_image
3 1 2 clickCleaning and Maintenance
Refer to the care label attached to the soft goods for washing and drying instructions.
Clean the base and seat frame with a damp cloth and a mild detergent. Dry thoroughly. Do not use abrasives.
It is normal for fabric to color from sunlight and to show wear and tear after a long period of use, even when used normally.
NUNA International B.V. Nuna and all associated logos are trademarks.
Conçu
St-Laurent, QC, H4S 1N1
1-800-667-4111
info@nunababy.ca
RISQUE DE SUFFOCATION
natural_image
Top-down line drawing of a helmet with visible ribs and seat brackets (no text or symbols)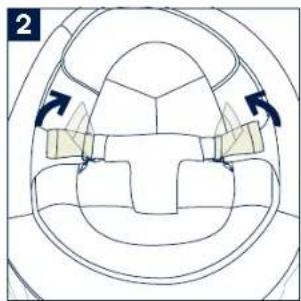
natural_image
Diagram of a car interior with directional arrows indicating movement or force (no text or symbols)
natural_image
Diagram of a car interior showing seatbelt and seatbelt connector (no text or symbols)
natural_image
Diagram of a biological structure with directional arrows indicating movement or flow (no text or symbols)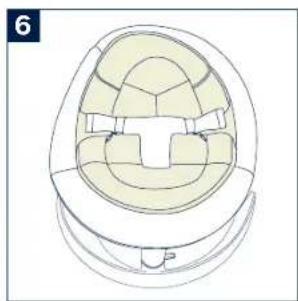
natural_image
Technical line drawing of a mechanical component with internal cavities and mounting brackets (no text or symbols)Housse de siège
natural_image
Line drawing of a computer mouse with a mesh head and curved base (no text or symbols)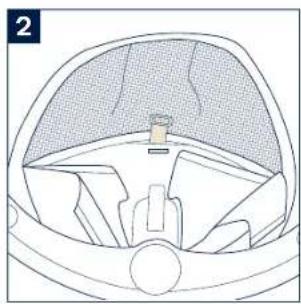
natural_image
Diagram of a car interior showing dashboard, steering wheel, and seat (no text or labels)
natural_image
Diagram of a human head with arrows indicating movement or force direction (no text or symbols present)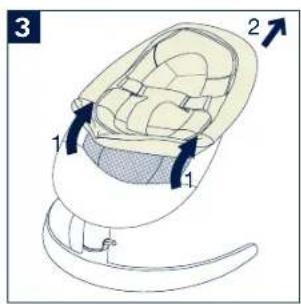
text_image
3 1 2 1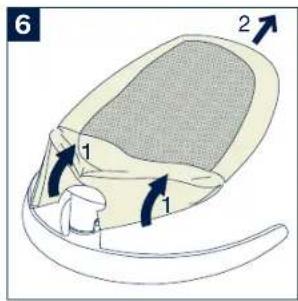
text_image
6 1 2 1natural_image
Diagram of a curved mechanical component with an arrow indicating direction (no text or symbols)
natural_image
Technical line drawing of a curved mechanical component with an arrow indicating a specific feature (no text or symbols present)
natural_image
Top-down line drawing of a car interior frame (no text or symbols)
natural_image
Pure technical line drawing of a curved mechanical component with a handle, no text or symbols presentnatural_image
Line drawing of a chair with a shaded seat and handle, no text or symbols present
natural_image
Line drawing of a car wheel assembly with a screwdriver inserted (no text or symbols)
natural_image
Illustration of a folding chair with a mesh backrest and clasp base (no text or symbols)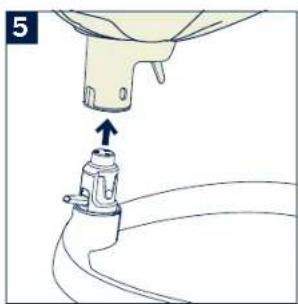
natural_image
Diagram of a mechanical component with an upward arrow indicating motion (no text or symbols)
text_image
3 1 2 clickNUNA International B.V. Nuna and all associated logos are trademarks.