LSCG306ST - Cooker LG - Free user manual and instructions
Find the device manual for free LSCG306ST LG in PDF.

User questions about LSCG306ST LG
0 question about this device. Answer the ones you know or ask your own.
Ask a new question about this device
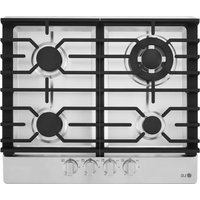
Download the instructions for your Cooker in PDF format for free! Find your manual LSCG306ST - LG and take your electronic device back in hand. On this page are published all the documents necessary for the use of your device. LSCG306ST by LG.
USER MANUAL LSCG306ST LG
Please read this guide thoroughly before operating and keep it handy for reference at all times.

WARNING
If the information in this manual is not followed exactly, a fire or explosion may result causing property damage, personal injury or death.
-
Do not store or use gasoline or other flammable vapors and liquids in the vicinity of this or any other appliance.
• WHAT TO DO IF YOU SMELL GAS -
Do not try to light any appliance.
- Do not touch any electrical switch.
- Do not use any phone in your building.
- Immediately call your gas supplier from a neighbor's phone. Follow the gas supplier's instructions.
- If you cannot reach your gas supplier, call the fire department.
- Installation and service must be performed by a qualified installer, service agency, or the gas supplier.
LSCG366ST
LSCG306ST
LSCG367ST
LSCG307ST
INTRODUCTION
IMPORTANT SAFETY INFORMATION
Safety Precautions 4\~5
Surface Burners. 5\~6
California Safe Drinking Water and Toxic Enforcement Act......6
OPERATING INSTRUCTIONS
Using the Surface Burners 7\~8
Using the Griddle....9
CARE AND CLEANING
Care and Cleaning 10
Burner Caps and Heads 11
Burner Grates 12
Cooktop Surface 12
Stainless Steel Surfaces 13
Control Knobs....13
TROUBLESHOOTING
Before Calling for Service....14
Accessories....14
WARRANTY
LG GAS COOKTOP LIMITED WARRANTY....15
THANK YOU!
Congratulations on your purchase and welcome to the LG family. Your new LG built-in cooktop combines precision cooking features with simple operation and stylish design. By following the operating and care instructions in this manual, your cooktop will provide you with many years of reliable service.
Product Registration Information
Model:
Serial Number:
Date of Purchase:
IMPORTANT SAFETY INFORMATION
READ ALL INSTRUCTIONS BEFORE USE
IMPORTANT SAFETY INSTRUCTIONS
Read and follow all instructions before using your oven to prevent the risk of fire, electric shock, personal injury, or damage when using the range. This guide does not cover all possible conditions that may occur. Always contact your service agent or manufacturer about problems that you do not understand.

This is the safety alert symbol. This symbol alerts you to potential hazards that can kill or hurt you and other.
All safety messages will follow the safety alert symbol and either the word "WARNING" or "CAUTION".
These word means :

WARNING
This symbol will alert you to hazards or unsafe practices which could cause serious bodily harm or death.

CAUTION
This symbol will alert you to hazards or unsafe practices which could cause bodily injury or property damage.
WARNING
For your safety, the information in this manual must be followed to minimize the risk of fire or explosion, electric shock, or to prevent event property to damage, personal injury, or death.
READ ALL INSTRUCTIONS BEFORE USE
SAFETY PRECAUTIONS
Let the installer show you the location of the cooktop gas shut-off valve and how to shut it off if necessary.
WARNING: These adjustments must be done by a qualified service technician according to the manufacturer's instructions and all codes and requirements of the authority having jurisdiction. Failure to follow these instructions could result in serious injury or property damage. The qualified agency performing this work assumes responsibility for the conversion.
- Make sure your cooktop is properly installed and grounded by a qualified installer, according to the Installation Instructions. Any adjustment and service should be performed only by qualified gas range installers or service technicians.
- Plug your cooktop into a 120-volt grounded outlet only. Do not remove the round grounding prong from the plug. If in doubt about the grounding of the home electrical system, it is your personal responsibility and obligation to have an ungrounded outlet replaced with a properly grounded, three-prong outlet in accordance with the National Electrical Code. Do not use an extension cord with this cooktop.
- To prevent fire hazard or electrical shock. Do not use an adapter plug, an extension cord, or remove grounding prong from electrical power cord. Failure to follow this warning can cause serious injury fire or death.
-
To prevent poor air circulation, place the cooktop out of kitchen traffic path out of drafty locations.
-
Do not attempt to repair or replace any part of your cooktop unless it is specifically mentioned in this manual. All other service should be referred to a qualified technician.
- Make sure all packaging materials are removed from the cooktop before operating it to prevent fire or smoke damage should the packaging material ignite.
- Make sure your cooktop is properly adjusted by a qualified service technician or installer for the type of gas (natural or LP) that is to be used. Your cooktop can be converted for use with either type of gas. See the Installation Instructions.
- Do not let children alone or unattended where a cooktop is hot or in operation. They could be seriously burned.
⚠️CAUTION: Items of interest to children should not be stored in cabinets above a cooktop — children climbing on the cooktop to reach items could be seriously injured.
- Storage on Appliance - Flammable materials should not be stored on the cooktop or near surface units. This includes paper, plastic and cloth items, such as cookbooks, plasticware and towels, as well as flammable liquids.
- Do not let anyone climb or stand on the cooktop. They could damage the cooktop and even tip over, causing severe personal injury.
READ ALL INSTRUCTIONS BEFORE USE
SAFETY PRECAUTIONS (continued)
- Do not allow children to climb or play around the cooktop.
WARNING: NEVER use your
cooktop as a space heater to heat or warm the room. Doing so may result in carbon monoxide poisoning and overheating of the cooktop.
- Never wear loose fitting or hanging garments while using the appliance. Be careful when reaching for items placed in cabinets over the cooktop. Flammable material could be ignited if brought into contact with flame or hot surfaces and may cause severe burns.
- Do not placed flammable materials on or near the cooktop.
- Do not place or use combustible materials, gasoline or other flammable vapors and liquids in the vicinity of this or any other appliance.
- Do not place cooking oils or other flammable materials on or near the cooktop.
- Do not store explosives, such as aerosol cans, on or near the cooktop.
Flammable materials may explode and result in fire or property damage.
- Do not use water on grease fires. NEVER touch a flaming pan. Turn the controls off.
Smother a flaming pan on a surface burner by covering the pan completely with a well-fitting lid, cookie sheet or flat tray.
Use a multi-purpose dry chemical or foam-type fire extinguisher.
Flaming grease outside a pan can be put out by covering it with baking soda or, if available, by using a multi-purpose dry chemical or foam-type fire extinguisher.
- Let the burner grates and other surfaces cool before touching them or leaving them where children can reach them.
- Stepping, leaning or sitting on this cooktop can result in serious injuries and also cause damage to the cooktop.
- Clean the cooktop with caution. If a wet spong or cloth is used to wipe spells on a hot cooktop, be careful to avoid steam burns.
- Not obstructing the flow of combustion and ventilation air.
- Leak testing of the appliance shall be conducted according to the manufacturer's instructions.
SURFACE BURNERS
WARNING
- If the top burner flame goes out, gas is still flowing to the burner until the knob is turned to the "OFF" position. Do not leave the burners "ON" unattended.
-
Use proper pan size —Do not use pans that are unstable or easily tipped. Select cookware having flat bottoms large enough to cover burner grates. To avoid spills, make sure cookware is large enough to contain the food properly. This will save cleaning time and prevent hazardous accumulations of food, Since heavy spattering or spills left on a range can ignite, use pans with handles that can be easily grasped and remain cool.
-
Never leave the surface burners unattended at high flame settings. Boiling overs can cause smoking. Smoking and greasy spillovers that may catch on fire.
- Always turn knobs to the "LITE" position when igniting the top burners and make sure the burners have ignited.
- Control the top burner flame size so it does not extend beyond the edge of the cookware. Excessive flame is hazardous.
- Use only dry pot holders—moist or damp pot holders on hot surfaces may result in burns from steam.
Do not let pot holders come near open flames when lifting cookware.
Do not use a towel or other bulky cloth instead of a pot holder.
- If using glass cookware, make sure it is designed for top-of-range cooking.
READ ALL INSTRUCTIONS BEFORE USE
SURFACE BURNERS (continued)
- To prevent burns, ignition of flammable materials and spillage, turn cookware handles toward the side or back of the cooktop without extending over adjacent burners.
- NEVER place any items on the cooktop. The hot air from the vent may ignite flammable items and will increase pressure in closed containers, which may cause them to burst.
- Carefully watch foods being fried at a high flame setting.
• Always heat fat slowly, and watch as it heats. - If frying combination of oils or fats, stir together before heating or as fats melt slowly.
- Use a deep fat thermometer if possible to prevent overheating fat beyond the smoking point.
- Use the least possible amount of fat for effective shallow or deep-fat frying. Filling the pan too full of fat can cause spillovers when food is added.
- LG does not recommend using a gas cooktop for the preparation of flaming foods. If you choose to prepare flaming foods under a hood, turn the fan on.
- Do not use a wok on the surface burners if the wok has a round metal ring that is placed over the burner grate to support the wok. This ring acts as a heat trap, which may damage the burner grate and
burner head. Also, it may cause the burner to work improperly. This may cause a carbon monoxide level above that allowed by current standards, resulting in a health hazard.
- Foods for frying should be as dry as possible. Frest or moisture on foods can cause hot fat to bubble up and over the sides of the pan.
- Never try to move a pan of hot fat, especially a deep fat fryer. Wait until the fat is cool.
- Do not place plastic items on the cooktop—they may melt if left too close to the vent.
- Keep all plastics away from the surface burners.
- To prevent burns, always be sure that the controls for all burners are at the "OFF" position and all grates are cool before attempting to remove them.
- If you smell gas, turn off the gas to the cooktop and call a qualified service technician. Never use an open flame to locate a leak.
- Always turn knob to the "OFF" position before removing cookware.
- Do not lift the cooktop. Lifting the cooktop can cause damage and improper operation of the cooktop.
- If the cooktop is located near a window, do not hang long curtains that could blow over the surface burners and catch on fire.
CALIFORNIA SAFE DRINKING WATER AND TOXIC ENFORCEMENT ACT

WARNING: This product contains chemicals known to the State of California to cause cancer and birth defects or other reproductive harm. Wash hands after handling.
Enforcement Act requires the Governor of California to publish a list of substances known to the state to cause birth defects or other reproductive harm, and requires businesses to warn customers of potential exposure to such substances.
Gas appliances can cause minor exposure to four of these substances, namely benzene, carbon monoxide, formaldehyde and soot, caused primarily by the improper combustion of natural or LP gas. Correctly adjusted burners, indicated by a blue rather than a yellow flame, will minimize improper combustion. Exposure to these substances can be minimized by opening windows or using a ventilation fan or hood.
READ AND FOLLOW THIS SAFETY INFORMATION CAREFULLY.
SAVE THESE INSTRUCTIONS
USING THE SURFACE BURNERS
Throughout this manual, features and appearance may vary from your model.
- Make sure all grates on the cooktop are properly placed before using any burner.
- Be sure the burners and grates are cool before you place your hand, a pot holder, cleaning cloths or other materials on them.
• Make sure all burners are in place.
- Do not operate the burner for an extended period of time without cookware on the grate.
The finish on the grate may chip without cookware to absorb the heat.
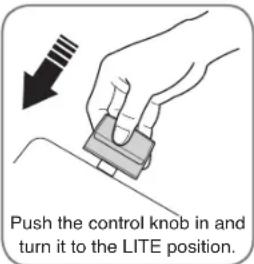
HOW TO LIGHT A GAS SURFACE BURNER
- Be sure all the surface burners are placed in their respective positions.
- Push the control knob in and turn it to the LITE positions.
- You can hear a little CLICKING noise-the sound of the electric spark igniting the burners.
text_image
Push the control knob in and turn it to the LITE position.- To control the flame size, turn the knob. If the knob stays at LITE, it will continue to click.
- When turning a burner to LITE, all the burners spark. Do not attempt to disassemble or clean around any burner while another burner is on. An electric shock may result, which could cause you to knock over hot cookware.
The medium(left front & rear) and the large(right front) burners are the primary burners for most cooking. These general-purpose burners can be turned down from HI to LO suit a wide range of cooking needs.
The extra large burner (center) is the maximum output burner. Like the other four burners, it can be turned down from HI to LO for a wide range of cooking appliances.
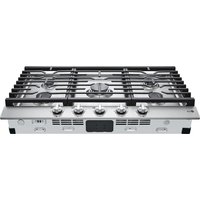
SEALED GAS BURNERS
Your cooktop has five sealed gas burners. They offer convenience, cleanability and flexibility to be used in a wide range of cooking applications. The smallest burner is in the right rear.
These burners can be turned down to LO for a very low simmer setting.
They provide precise cooking performance for delicate foods such as sauces or food that requires low heat for a long cooking time.
flowchart
graph TD
    A["Extra Large (dual)"] --> B["Large"]
    C["Medium"] --> D["○"]
    E["Small"] --> F["●"]
    G["○"] --> H["○"]
    I["○"] --> J["○"]
IN CASE OF POWER FAILURE
In case of a power failure, you can light the gas surface burners on your cooktop with a match. Hold a lit match to the burner, then push in and turn the control knob to the LITE position. Use extreme caution when lighting burners this way.
Surface burners in use when an electrical power failure occurs will continue to operate normally.
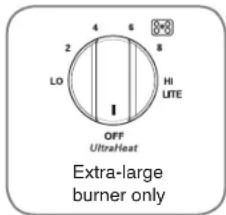
This burner is also designed to quickly bring large
amount of liquid to a boil. It has a special UtraHeat setting designed to be used with cookware 10 inches or large pots / pans or use with the griddle.
The extra large burner(dual) can also be turned down to LO for a low simmer setting almost like the small burner.
text_image
LO 4 6 8 HI UTE OFF UltraHeat Extra-large burner onlyUSING THE SURFACE BURNERS
HOW TO SELECT FLAME SIZE
NEVER let the flames extend up the sides of the cookware for safe handling of cookware.
Watch the flame, not the knob, as you reduce heat. When fast heating is desired, the flame size on a gas burner should match the cookware you are using.
Flames larger than the bottom of the cookware will not result in faster heating of the cookware and could be hazardous.

natural_image
Simple line drawing of a cooking pot with an 'X' mark on its side, placed on ground (no text or symbols)COOKWARE
Aluminum: Medium-weight cookware is recommended because it heats quickly and evenly. Most of the foods brown evenly in an aluminum skillet. Use sauce pans with tight fitting lids when cooking with minimum amounts of water.
Cast Iron: If heated slowly, most skillets will give satisfactory results.
Stainless Steel: This metal alone has poor heating properties and is usually combined with copper, aluminum or other metals for improved heat distribution. Combination metal skillets usually work satisfactorily if they are used with medium heat as the manufacturer recommends.
Enamelware: Under some conditions, the enamel of some cookware may melt. Follow cookware manufacturer's recommendations for cooking methods.
Glass: There are two types of glass cookware—those for oven use only and those for top of the range cooking (saucepans, coffee and teapots). Glass conducts heat very slowly.
Heatproof Glass Ceramic: Can be used for either surface or oven cooking. It conducts heat very slowly and cools very slowly. Check cookware manufacturer's directions to be sure it can be used on gas ranges.
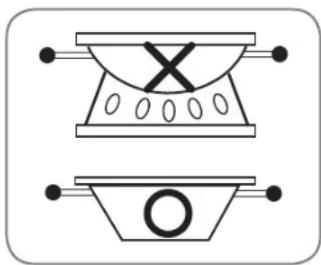
USING A WOK
Do not use a wok support ring. Placing the ring over the burner or grate may cause the burner to work improperly, resulting in carbon monoxide levels above allowable standards.
This can be hazardous to your health.
We recommend that you use a 14 inch or smaller flat bottom wok. Make sure the wok bottom sits flat on the grate.
They are available at your local retail store.
Only a flat-bottomed wok should be used.
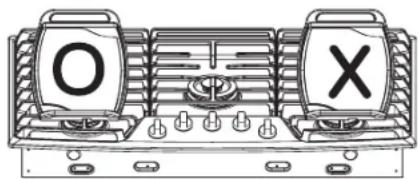
natural_image
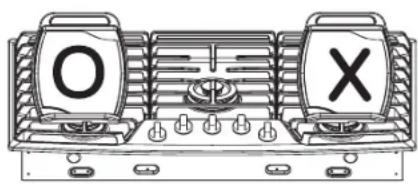
Two simple diagrammatic symbols: a bowl with an 'X' and oval shapes, and a tray with an 'O' and handles (no text or labels)STOVE-TOP GRILLS
Do not use stove top grills on your surface burners. If you use the stove top grill on the surface burner, it will cause incomplete combustion and can
result in exposure to carbon monoxide levels above allowable current standards.
This can be hazardous to your health.
natural_image
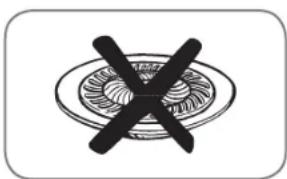
Simple line drawing of a plate with a crossed-out black X symbol (no text or labels)USING THE GRIDDLE
text_image
O XThe griddle must only be used on the left side grate.
Your non-stick coated griddle provides an extra - large cooking surface for meats, pancakes or other food usually prepared in a frying pan or skillet.
NOTE: Your griddle will discolor over time as it becomes seasoned with use.
How to Place the Griddle: The griddle can only be used on the left side grate.
The griddle must be properly placed on the center grate.
NOTE: Do not remove the left side grate when using the griddle.

CAUTION: Do not remove the griddle plate until the cooktop grates, surfaces and griddle plate are completely cooled.

CAUTION: The griddle plate on the cooktop may become very hot when using the cooktop. Always use oven mitts when placing or removing the griddle plate.
IMPORTANT NOTES:
- Avoid cooking extremely greasy foods, grease spills can occur.
- The griddle can become hot when surrounding burners are in use.
- Do not overheat the griddle. This can damage the non stick coating.
- Do not use metal utensils that can damage the griddle surface. Do not cut foods on the grid dle.
- Do not place or store items on the griddle.
CARE AND CLEANING
Make sure electrical power is off and all surfaces are cool before cleaning any part of the cooktop.
SEALED BURNER ASSEMBLIES
Turn all controls OFF before removing the burner parts.
The burner grates, caps, and burner heads can be lifted off, making them easy to clean.
The electrodes are not removable.
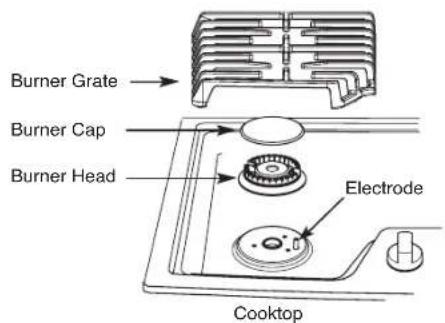
text_image
Burner Grate Burner Cap Burner Head Electrode CooktopCAUTION: DO NOT remove any parts from the cooktop until they have completely cooled and are safe to handle. Do not operate the surface burners unless all burner parts and grates are properly placed.
The electrode of the burner is exposed when the burner head and cap are removed. When one burner is turned to LITE, all the burner spark. Do not attempt to disassemble or clean around any burner while another burner is on. An electric shock may result, which could cause you to knock over hot cookware.
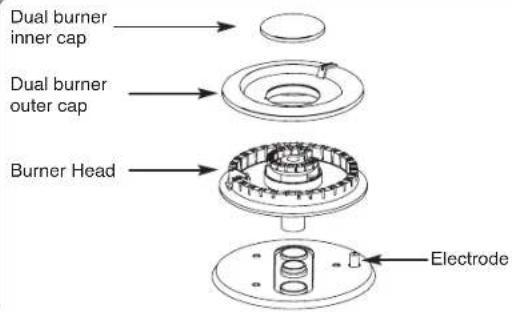
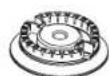
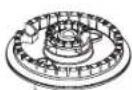
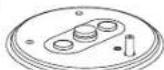
DUAL EXTRA BURNER ASSEMBLY
The burner head, the outer cap and the inner cap can be lifted off, making it easy to clean. The burner electrode is not removable.
text_image
Dual burner inner cap Dual burner outer cap Burner Head ElectrodeBURNER CAPS AND HEADS
BURNER CAPS
Lift burner caps off when they are cool.
Wash burner caps in hot, soapy water and rinse with clean water. You may scour with a plastic scouring pad to remove burned-on food particles.
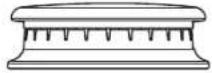
Burner cap is properly seated.
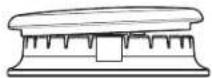
Burner cap is NOT properly seated.

Dual Extra Large Burner outer cap
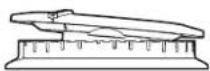
To place the dual extra large burner outer cap properly, make sure the slit in the burner cap is positioned over the assemble guide in the burner head.
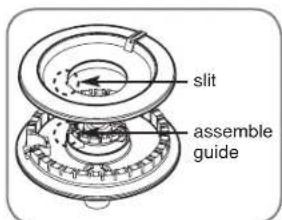
text_image
slit assemble guideBURNER HEADS
Cooktop
The burner heads are removable.
Simply lift them off the cooktop for cleaning.
The slits in the burner heads must be kept clean at all times for an even flame. Clogged or dirty burner ports or electrodes may cause improper operation of the cooktop.
Any spill on or around an electrode must be carefully cleaned. Take care to not hit an electrode with anything hard or it could be damaged.
You should clean the burner caps and heads routinely, especially after bad spillovers which could clog the openings. Lift burner heads off when they are cool.
To get rid of burned-on food, soak the burner heads in a solution of mild liquid detergent and hot water for 20–30 minutes. For more stubborn stains, use a toothbrush.
NOTES:
- Do not use steel wool or scouring powders to clean the burners.
- Burners will not light if the cap is removed.
AFTER CLEANING
Before placing the burner caps and burner heads back, shake out excess water and then dry them thoroughly.
REPLACEMENT
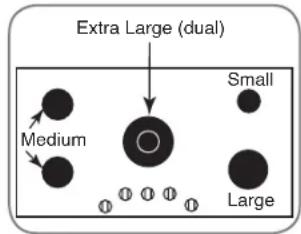
Replace burner heads and caps over the electrodes on the cooktop, in the correct locations according to their size. There are one small, two medium, one large and one extra large burner head and cap.

text_image
Extra large burner (Center) head and cap Small burner head and cap Medium burner head and cap Large burner head and capBURNER GRATES
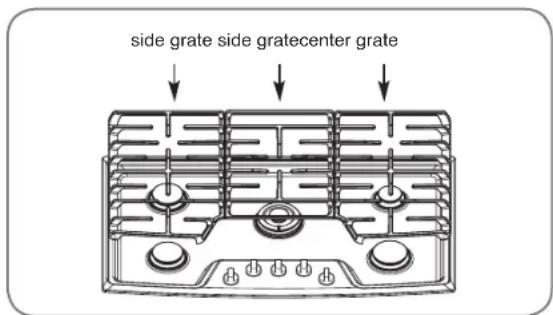
Your cooktop has three professional-style grates. These grates are position-specific.
For maximum stability, these grates should only be used in their proper position. Because of the varied burner sizes, the side grates cannot be exchanged nor can any of the grates be rotated front to back.
CLEANING
Lift grates off when they are cool.
Grates should be cleaned regularly and, of course, after spills. Wash them in hot, soapy water and rinse with clean water. When replacing the grates, be sure they are positioned properly over the burners.
Replace the grates so that continuous arcs are formed with the center ribs of all three grates.
The grates may be cleaned in a dishwasher.
Do not operate a burner for a long time without cookware on the grate.
The finish on the grate may chip without cookware to absorb the heat.
To remove burned-on food, place the grates in a covered container.
Soak them with 1/4 cup ammonia for several hours. or overnight. Wash, rinse well and dry.
text_image
side grate side gratecenter grate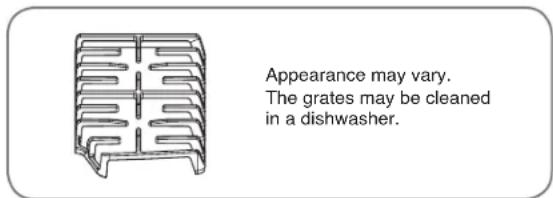
text_image
Appearance may vary. The grates may be cleaned in a dishwasher.Although they are durable, the grates will gradually lose their shine, regardless of the best care you can give them. This is due to their continual exposure to high temperatures. You will notice this sooner with lighter color grates.
NOTE: Do not clean the grates in a self-cleaning oven.
COOKTOP SURFACE
To prevent damage to the stainless steel surface of the cooktop and to prevent it from becoming dull, clean up spills immediately. Foods with a lot of acid (such as tomatoes, sauerkraut, fruit juices, etc.) or foods with high sugar content could cause a dull spot if allowed to set. When the surface has cooled, wash and rinse.
For other spills such as fat spatterings, etc., wash with soap and water after the surface has cooled. Then rinse and polish by using a dry cloth.
NOTE: Do not place flammable materials on or near the cooktop.
Do not store or use combustible materials, gasoline or other flammable vapors and liquids in the vicinity of this of any other applia
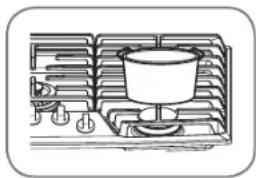
natural_image
Line drawing of a cooking pot on a stove with steamers (no text or symbols)NOTE: Do not try to lift the cooktop. Lifting the cooktop can cause damage and improper operation of the cooktop.
STAINLESS STEEL SURFACES
Do not use a steel wool pad; it will scratch the surface.
To clean the stainless steel surface, use warm soapy water or a stainless steel cleaner or polish.
Always wipe the surface in the direction of the grain.
Follow the cleaner instructions for cleaning the stainless steel surface.
To inquire about purchasing stainless steel appliance cleaner or polish, or to find the location of a dealer nearest you, please call our toll-free customer service number:
1-888-542-2623
or visit our website at:
http://www.lg.ca
CONTROL KNOBS
It's a good idea to wipe the control panel after each use of the cooktop.
Clean or rinse the control panel by using a damp cloth.
Use mild soap and water or a 50/50 solution of vinegar and water. Use clean water for rinsing.
Do not use abrasive cleansers, strong liquid cleaners, plastic scouring pads or oven cleaners on the control knobs - they can cause damage to the finish of the knobs.
Do not try to bend knobs by pulling them up or down or by hanging a towel or other such loads.
This can damage the gas valve shaft.
The control knobs may be removed for easier cleaning.
Make sure the knobs are in the OFF position and pull them straight off the stems for cleaning.

text_image
Surface burner knobTo reinstall the knobs, make sure each the knob has the OFF position aligned and slide the knob directly onto the stem.
NOTE: To prevent mis-operation during cleaning the control knobs, Unplug your cooktop.
BEFORE CALLING FOR SERVICE
Before calling for service, review this list. It may save you time and expense. This list includes common occurrences that are not the result of a defect in workmanship or materials.
| Problem Possible | Causes Solutions | |
| Burners have yellow or yellow-tipped flames | ·The combustion quality of burner flames needs to be determined visually. | ·Use the illustrations below to determine if your burner flames are normal. If burner flames look like A, call for service. Normal burner flames should look like B or C, depending on the type of gas you use. With LP gas, some yellow tipping on outer cones is normal.   A–Yellow flames B–Yellow tips C-Soft blue flamesCall for service on outer cones Normal for natural gasNormal for LP gasgas A–Yellow flames B–Yellow tips C-Soft blue flamesCall for service on outer cones Normal for natural gasNormal for LP gasgas |
| Burner flames are very large or have yellow | ·Improper air to gas ratio. | ·If cooktop is connected to LP gas, contact the person who installed your range or made the conversion. |
| Control knobs will not turn | ·Knob is not pushed down ·To turn | from OFF position, push the knob down and then turn. |
| Top burners do not light or do not burn evenly. | ·Plug on cooktop is not completely inserted in the electrical outlet.·Burner slots on the side of the burner may be clogged.·Improper burner assembly. | ·Make sure electrical plug is plugged into a live, properly grounded outlet.·Remove the burners and clean them. Check the electrode area for burned-on food or grease.See the Care and Cleaning of the Cooktop section.·Make sure the burner parts are installed correctly.See the Care and Cleaning of the Cooktop section. |
ACCESSORIES
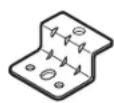
Retainer brackets (2ea)
Screw (2ea)

Screw (4ea)

Nozzles (7ea)
LG ELECTRONICS CANADA, INC.
LG GAS COOKTOP LIMITED WARRANTY - Canada
WARRANTY : Should your LG Gas Cooktop ("Product") fail due to a defect in material or workmanship under normal home use during the warranty period set forth below. LG Canada will at its option repair or replace the Product upon receipt of proof of original retail purchase. This warranty is valid only to the original retail purchaser of the product and applies only to a Product distributed in Canada by LG Canada or an authorized Canadian distributor thereof. The warranty only applies to Products located and used within Canada.
| WARRANTY PERIOD: (Note: If the original date of purchase can not be verified, the warranty will begin sixty (60) days from the date of manufacture). | |
| Gas Cooktop | Extended Component Warranty (Parts Only)(Consumer will be charged for Labor after Two (2) years from the date of purchase) |
| Two (2) years from the date of original retail purchase | Ninety (90) days from the dateof original retail purchase |
| Parts and Labor(internal/functional parts only) | Cosmetic warranty(Scratches and dents) |
■ Replacement products and parts are warranted for the remaining portion of the original warranty period or ninety (90) days, whichever is greater.
■ Replacement products and parts may be new or remanufactured.
■ LG Authorized Service Center warranties their repair work for thirty (30) days.
LG CANADA'S SOLE LIABILITY IS LIMITED TO THE WARRANTY SET OUT ABOVE. EXCEPT AS EXPRESSLY PROVIDED ABOVE, LG CANADA MAKES NO AND HEREBY DISCLAIMS ALL OTHER WARRANTIES AND CONDITIONS RESPECTING THE PRODUCT, WHETHER EXPRESS OR IMPLIED, INCLUDING, BUT NOT LIMITED TO, ANY IMPLIED WARRANTY OR CONDITION OF MERCHANTABILITY OR FITNESS FOR A PARTICULAR PURPOSE, AND NO REPRESENTATIONS SHALL BE BINDING ON LG CANADA. LG CANADA DOES NOT AUTHORIZE ANY PERSON TO CREATE OR ASSUME FOR IT ANY OTHER WARRANTY OBLIGATION OR LIABILITY IN CONNECTION WITH THE PRODUCT. TO THE EXTENT THAT ANY WARRANTY OR CONDITION IS IMPLIED BY LAW, IT IS LIMITED TO THE EXPRESS WARRANTY PERIOD ABOVE.
LG CANADA, THE MANUFACTURER OR DISTRIBUTOR SHALL NOT BE LIABLE FOR ANY INCIDENTAL, CONSEQUENTIAL, SPECIAL, DIRECT OR INDIRECT DAMAGES, LOSS OF GOODWILL, LOST PROFITS, PUNITIVE OR EXEMPLARY DAMAGES OR ANY OTHER DAMAGE, WHETHER ARISING DIRECTLY OR INDIRECTLY FROM ANY CONTRACTUAL BREACH, FUNDAMENTAL OR OTHERWISE, OR FROM ANY ACTS OR OMISSIONS, TORT, OR OTHERWISE. This warranty gives you specific legal rights. You may have other rights which may vary from province to province depending on applicable provincial laws. Any term of this warranty that negates or varies any implied condition or warranty under provincial law is severable where it conflicts with provincial law without affecting the remainder of this warranty's terms.
THIS LIMITED WARRANTY DOES NOT COVER:
- Service trips to deliver, pick up, or install the product: instructing a customer on operation of the product; repair or replacement of fuses or correction of wiring, or correction of unauthorized repairs/installation.
- Failure of the product to perform during power failures and interruptions or inadequate electrical service.
- Damage caused by leaky or broken water pipes, frozen water pipes, restricted drain lines, inadequate or interrupted water supply or inadequate supply of air.
- Damage resulting from operating the Product in a corrosive atmosphere or contrary to the instructions outlined in the Product owner's manual.
- Damage to the Product caused by accidents, pests and vermin, lightning, wind, fire, floods, or acts of God.
- Damage resulting from the misuse, abuse, improper installation, repair, or maintenance of the Product. Improper repair includes use of parts not approved or specified by LG Canada.
- Damage or product failure caused by unauthorized modification or alteration, or use for other than its intended purpose, or resulting from any water leakage due to improper installation.
- Damage or Product failure caused by incorrect electrical current, voltage, commercial or industrial use, or use of accessories, components, or cleaning products that are not approved by LG Canada.
- Damage caused by transportation and handling, including scratches, dents, chips, and/or other damage to the finish of your product, unless such damage results from defects in materials or workmanship and is reported within one (1) week of delivery.
- Damage or missing items to any display, open box, discounted, or refurbished Product.
- Products with original serial numbers that have been removed, altered, or cannot be readily determined. Model and Serial numbers, along with original retail sales receipt, are required for warranty validation.
- Increases in utility costs and additional utility expenses.
- Replacement of light bulbs, filters, or any consumable parts.
- Repairs when your Product is used in other than normal and usual household use (including, without limitation, commercial use, in offices or recreational facilities) or contrary to the instructions outlined in the Product owner's manual.
- Costs associated with removal of the Product from your home for repairs.
- The removal and reinstallation of the Product if it is installed in an inaccessible location or is not installed in accordance with published installation instructions, including the Product owner's and installation manuals.
- Accessories to the Product such as door bins, drawers, handles, shelves, etc.. Also excluded are parts besides those that were originally included with the Product.
All costs associated with the above excluded circumstances shall be borne by the consumer.
For complete warranty details and customer assistance, please call or visit our website:
Call 1-888-542-2623 (24 hours a day, 365 days a year) and select the appropriate option from the menu, or visit our website at http://www.lg.ca
Write your warranty information below:
Product Registration Information:
Model:
Serial Number:
Date of Purchase:
MEMO
MANUEL DU PROPRIÉTAIRE
SURFACE DE CUISSON AU GAZ
natural_image
Simple line drawing of a cooking pot with an 'X' mark on its side (no text or symbols)USTENSILES DE CUISINE
natural_image
Two simple diagrammatic symbols: a bowl with cross and ovals, and a bowl with letter O, both without any text or labels.natural_image
Simple line drawing of a plate with a crossed-out black X symbol (no text or labels)UTILISATION DU GRIL
text_image
O Xnatural_image
Line drawing of a cooking pot on a stove with steam rising (no text or symbols)Register your product Online!
www.lg.com