Specialist FC9108 - Vacuum Cleaner PHILIPS - Free user manual and instructions
Find the device manual for free Specialist FC9108 PHILIPS in PDF.
Download the instructions for your Vacuum Cleaner in PDF format for free! Find your manual Specialist FC9108 - PHILIPS and take your electronic device back in hand. On this page are published all the documents necessary for the use of your device. Specialist FC9108 by PHILIPS.
USER MANUAL Specialist FC9108 PHILIPS
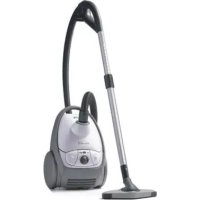
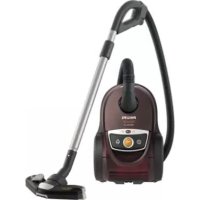
SPECIALISTImportant ◗ Only use Philips s-bag™ double-layer paper dustbags (type FC8021), or the cotton dustbag provided (some versions only). ◗ Never use the vacuum cleaner to suck up water or any other liquid.Never suck up ashes until they are cold. ◗ When the vacuum cleaner is used to suck up fine dust, the pores of the dustbag may become clogged, causing the passage of air through the dustbag to become obstructed. As a result,the dustbag-full indicator will indicate that the dustbag needs to be replaced,even though the dustbag is not full at all. ◗ Never use the appliance without the Motor Protection Filter.This could damage the motor and shorten the life of the appliance. Connecting accessories Hose 1 To connect the hose, push it firmly into the appliance (you will hear a click). 2 To disconnect the hose, push the buttons on the swivel and pull the hose out of the appliance.(fig.1) Tube There are two types of coupling systems. Depending on the type, this appliance is equipped with one of them. See the systems displayed in the following pictures. Conical coupling (specific types only) ◗ Connect the tubes to the handgrip by inserting the narrow section into the wider section while turning it a little.(fig.2) To disconnect the tubes from the handgrip, pull while turning a little. Button coupling (specific types only) ◗ Connect the tube to the handgrip by pressing the spring-loaded lock button on the handgrip and inserting the handgrip into the tube.Fit the spring-loaded lock button into the opening in the tube ('click').(fig.3) ◗ To disconnect the tube from the handgrip, press the spring-loaded lock button and pull the handgrip out of the tube. ◗ Use the same method to connect and disconnect the other accessories. Telescopic tube (specific types only) 1 Adjust the tube to the length you find most comfortable during vacuum cleaning.(fig.4) Reach & Clean nozzle ◗ The Reach & Clean nozzle can be used on either carpets or hard floors.The nozzle can be turned 360 degrees to 4 different positions, allowing you to also vacuum clean hard-to-reach places in an easy way.When the nozzle is positioned lengthwise, the suction power is concentrated at the front side of the nozzle.(fig.5) ◗ To adjust the nozzle to the type of floor and the area to be cleaned,put your foot on the indicated spot and then turn the tube until the nozzle is in the required position.(fig.6) 1 With the nozzle positioned breadthwise and the brush strip folded out,you can clean large hard floor areas.Turn the nozzle until the brush strip pops out of the nozzle housing and the nozzle is positioned breadthwise.(fig.7) 2 With the nozzle positioned lengthwise and the brush strip folded out,you can vacuum clean small hard floor areas.Turn the tube 90 degrees anti-clockwise until it is positioned lengthwise with the brush strip still folded out of the nozzle housing.(fig.8) 3 With the nozzle positioned breadthwise and the brush strip folded in,you can vacuum clean large soft floor areas.Turn the tube 90 degrees anti-clockwise again to position the nozzle breadthwise and to make the brush strip disappear into the nozzle housing.(fig.9) 4 With the nozzle positioned lengthwise and the brush strip folded in,you can vacuum clean small soft floor areas.Turn the tube 90 degrees anti-clockwise again until it is positioned lengthwise with the brush strip still folded in.(fig.10) Crevice tool, small nozzle and small brush 1 Connect the crevice tool (1), the small nozzle ENGLISH 6(2) or the small brush (3) directly to the handgrip or to the tube.(fig.11) Accessory holder 1 The accessory holder can simply be snapped onto the handgrip. (fig.12) ◗ There are two ways to store accessories in the accessory holder. ◗ The crevice tool and small nozzle can be stored in the accessory holder by pushing them into the holder.To detach them,pull them out of the holder.(fig.13) Please note the way in which the small nozzle must be placed in the accessory holder. ◗ Instead of the small nozzle, the small brush can be stored in the accessory holder by pushing it into the holder.(fig.14) Animal brush (specific types only) While combing your dog or cat with the Animal Brush, dirt, loose hairs and knots will be removed. Regular combing will keep the fur healthy. 1 Connect the animal brush to the handgrip ('click').(fig.15) 2 Place the vacuum cleaner as far away from the dog or cat as possible. Set the suction power to the lowest setting. 3 For optimal results, move the brush through the fur of the cat or dog in one direction. 4 You can remove hairs from the Animal Brush by detaching it from the appliance and vacuum cleaning it.(fig.16) Vacuum cleaning Adjusting suction power ◗ You can adjust the suction power while vacuum cleaning. 1 Use the slide control on top of the appliance.(fig.17) 2 Use maximum suction power for vacuum cleaning very dirty carpets and hard floors. 3 Use minimum power for vacuum cleaning curtains, table carpets, etc. Infrared remote control (specific types only) 1 Place the batteries in the battery compartment.(fig.18) Make sure the - and + poles are pointing in the right direction. ◗ With the infrared remote control you can set the suction power to one of 5 different suction power settings.When you switch the appliance on,it will always start running at the highest suction power setting. 2 By pushing the - button, you will reduce the suction power by one setting.(fig.19) 3 By pushing the + button, you will increase the suction power by one setting. 4 Push the standby button to temporarily switch the vacuum cleaner off,for instance when you have to move some furniture. 5 To continue vacuum cleaning,simply press the - button or the + button.The appliance will start operating at the previously selected suction power setting again. Parking the tube 1 By inserting the ridge on the nozzle in the parking slot, you can park the tube in a convenient position.(fig.20) Storing the vacuum cleaner 1 You can put the appliance in upright position and attach the nozzle to the appliance by inserting the ridge on the nozzle in the slot.(fig.21) Replacing the dustbag 1 Replace the dustbag as soon as the dustbag- full indicator changes colour. (fig.22) The dustbag is full when the colour of the indicator has changed even when the nozzle is not placed on the floor. 2 Switch the appliance off. 3 Open the cover by pulling it upwards.(fig.23) Place your fingers at the inlet of the cover and press with your thumb on the ridge on top of the cover.