MV174DC - Basket LG - Free user manual and instructions
Find the device manual for free MV174DC LG in PDF.

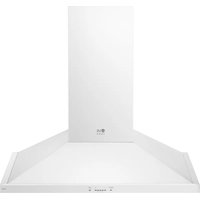
| Product type | Combination microwave hood |
| Dimensions (W x H x D) | 76.0 x 41.8 x 39.4 cm |
| Net weight | 27.2 kg |
| Rated voltage | 120 V AC, 60 Hz |
| Rated current | 13 A |
| Microwave power | 1000 W (IEC 705) |
| Total power (microwave + hood + lamp) | 1500 W |
| Cavity volume | 48 L |
| Number of power levels | 10 (including HI) |
| Automatic functions | Popcorn, Potatoes, Cook, Reheat, Defrost, Pizza, Beverage |
| Timer | Up to 99 min 59 sec |
| Clock | 24-hour display |
| Child lock | Yes |
| Hood fan | 2 speeds (HI/LO) + stop |
| Hood light | HI/LO/Off + programmable timer |
| Turntable | On/Off control |
| Wire rack | 2 positions, removable |
| Grease filters | Washable metal mesh |
| Charcoal filter | Replace every 6-12 months (if recirculating) |
| Maintenance | Clean with mild detergent; do not use abrasive products |
| Safety | Automatic shut-off when door open; multiple locks |
| Replacement parts | Bulbs (30-40 W hood, 30 W cavity), filters, rack |
Frequently Asked Questions - MV174DC LG
User questions about MV174DC LG
0 question about this device. Answer the ones you know or ask your own.
Ask a new question about this device
Download the instructions for your Basket in PDF format for free! Find your manual MV174DC - LG and take your electronic device back in hand. On this page are published all the documents necessary for the use of your device. MV174DC by LG.
USER MANUAL MV174DC LG
LG PRIVILEGE website: http://www.LGEservice.com e-mail: http://www.LGEservice.com/techsup.html
MICROWAVE OVEN
OWNER'S MANUAL & COOKING GUIDE
PLEASE READ THIS OWNER'S MANUAL
THOROUGHLY BEFORE OPERATING.
MV-1760T/1761T
P/NO.3828W5A1603
Printed in Korea
TABLE OF CONTENTS
TABLE OF CONTENTS 2
SAFETY 3
Important Safety Instructions 3
Precautions To Avoid Possible Exposure To
Excessive Microwave Energy 4
INFORMATION 5
Location of Model Number 5
Oven Specifications 5
Electrical Rating 5
Electrical Requirements 5
Grounding Instructions 5
Microwave Oven Features 6
Oven Control Panel 7
OPERATION 9
Learn about your Microwave Oven 9
Clock 9
Kitchen Timer 9
Light Timer 9
Vent Hi/Low/Off 10
Turntable On/Off 10
Child Lock 10
Light Hi/Low/Off 10
Custom Set 10
Help. 11
HoldWarm 11
EZ on 11
More/Less 11
Custom Cook 12
Cooking at Lower Power Levels 12
Cooking at High Cook Power 12
Cooking Guide for Lower Power Levels. 13
Popcorn 14
Potato 14
Cook. 14
Pizza 14
Cooking Guide for One Touch Cook 15
Reheat. 16
Beverage 16
Cooking Guide for Reheat. 16
Auto Defrost 17
Defrosting Tips 17
Auto Defrost Chart 18
Two Position Metal Rack. 19
COOKING 20
Getting the Best Cooking Results 20
Fish & Shellfish 20
Appetizers/Saues/Soups 21
Meat 21
Poultry 23
Pasta and Rice 24
MAINTENANCE 25
Care and Cleaning 25
Metal Rack 25
Cleaning the Grease Filters 25
Charcoal Filter Replacement. 25
Cooktop/Countertop Light Replacement 26
Oven Light Replacement 26
Questions and Answers 26
Microwave Utensil Guide 27
BEFORE CALLING FOR SERVICE 28
SAFETY
IMPORTANT SAFETY INSTRUCTIONS
The safety instructions below will tell you how to use your oven to avoid harm to yourself or damage to your oven.
WARNING-To reduce the risk of burns, electric shock, fire, injury to persons or exposure to excessive microwave energy.
- Read all the instructions before using your oven.
- Do not allow children to use this oven without close supervision.
- Read and follow the specific "PRECAUTIONS TO AVOID POSSIBLE EXPOSURE TO EXCESSIVE MICROWAVE ENERGY" found on page 4.
- Use the microwave oven only for its intended use as described in its manual. Do not use corrosive chemicals or vapors, in the microwave oven. This type of oven is specifically designed to heat, cook or dry food. It is not designed for industrial or laboratory use.
- Do not use or store this appliance outdoors. Do not use this product near water-for example, near a kitchen sink, in a wet basement, or near a swimming pool, and the like.
- Do not use the cavity for storage purposes. Do not leave paper products, cooking utensils, or food in the cavity when not in use.
- Clean the ventilating hood frequently. Do not allow grease to accumulate on the hood or the filters.
- When flaming foods under the hood, turn the fan on.
- Suitable for use above both gas and electric cooking equipment 36 inches wide or less.
- Use care when cleaning the vent hood filters. Corrosive cleaning agents such as lye-based oven cleaners, may damage the filters.
-
When cleaning the door and the surfaces that touch the door, use only mild, non-abrasive soaps or detergents and a sponge or soft cloth.
-
Do not tamper with the built-in safety switches on the oven door. The oven has several built-in safety switches to make sure the power is off when the door is open.
If your oven is dropped or damaged, have it thoroughly checked by a qualified service technician before using it again. -
To avoid a fire hazard:
-
Do not severely overcook food. Severely overcooked foods can start a fire in the oven. Watch the oven carefully, especially if you have paper, plastic, or other combustibles in the oven.
- Do not store combustible items (bread, cookies, etc.) in the oven, because if lightning strikes the power lines, it may cause the oven to turn on.
- Do not use wire twist-ties in the oven. Be sure to remove them before placing the item in the oven.
If a fire should start:
- Keep the oven door closed.
- Turn the oven off.
- Disconnect the power cord or shut off the power at the fuse or circuit breaker panel.
To avoid electric shock:
- This appliance must be grounded. Connect it only to a properly grounded outlet. See the electrical grounding instructions on page 5.
- Do not operate this appliance if it has a damaged cord or plug, if it is not working properly or if it has been damaged or dropped.
- Do not immerse the electrical cord or plug in water.
- Keep the cord away from heated surfaces.
-
This appliance should be serviced only by qualified service personnel.
-
Install or locate the microwave oven only in accordance with the provided installation instructions.
- Do not mount onen a sink.
- Do not let cord hang over edge of table or counter.
SAFETY
-
To avoid improperly cooking some foods.
-
Do not heat any types of baby bottles or baby food. Uneven heating may occur and possibly cause personal injury.
- Do not heat small-necked containers, such as syrup bottles.
- Do not deep-fat fry in your microwave oven.
- Do not attempt home canning in your microwave oven.
-
Do not heat the following items in the microwave oven: whole eggs in the shell; water with oil or fat; sealed containers or closed glass jars. These items may explode.
-
Do not use this oven for commercial purposes. It is made for household use only.
- Do not cover or block any openings in the oven.
-
Do not run the oven empty, without food in it.
-
Do not allow the gray film on special microwave-cooking packages to touch the oven floor. Put the package on a microwavable dish.
- Do not cook anything directly on the oven floor. Use a microwavable dish.
-
Keep a browning dish at least 3/16 inch above floor. Carefully read and follow the instructions for the browning dish. If you use a browning dish incorrectly, you could damage the oven floor.
-
Preserve the metal rack:
-
Remove the metal rack from the oven when you are not using it.
- Do not use the oven empty with the metal rack in it.
- The metal rack may get hot while cooking. Use pot holders to remove it after cooking.
-
Do not use foil or metal containers on the metal rack.
-
This appliance should be serviced only by qualified service personnel. Contact nearest authorized service facility for examination, repair or adjustment.
SAVE THESE INSTRUCTIONS
PRECAUTIONS TO AVOID POSSIBLE EXPOSURE TO EXCESSIVE MICROWAVE ENERGY ...
- Do not attempt to operate this oven with the door open, since open-door operation can result in harmful exposure to microwave energy. It is important not to defeat or tamper with the safety interlock.
- Do not operate the oven if it is damaged. It is particularly important that the oven door close properly and that there is no damage to the:
-door (bent)
- hinges and latches (broken or loosened)
- door seals and sealing surfaces.
- Do not place any object between the oven front face and the door, or allow soil or cleaner residue to accumulate on sealing surfaces.
The oven should not be adjusted or repaired by anyone except properly qualified service personnel.
INFORMATION
Please read this owner's manual. It will tell you how to use all the fine features of this microwave oven.
LOCATION OF MODEL NUMBER
To request service information or replacement parts, the service center will require the complete model number of your microwave oven. The number is on the oven front as shown in the illustration below.

OVEN SPECIFICATIONS
Output Power 1,000W (IEC 705 Standard)
Outer Dimensions 29-15/16" (W) x 16-7/16" (H) x 15-1/2" (D)
Cavity Volume 1.7 Cu.ft
Net Weight 60 lbs.
ELECTRICAL RATING
- Electrical Rating of the Oven: 120V AC, 60Hz
- 13 Amp./ 1,500W (MWO + Cooktop Lamp + Ventilation Fan)
ELECTRICAL REQUIREMENTS
The oven is designed to operate on a Standard 120V/60Hz household outlet. Be sure the circuit is at least 15A or 20A and the microwave oven is the only appliance on the circuit. It is not designed for 50Hz or any circuit other than a 120V/60Hz circuit.
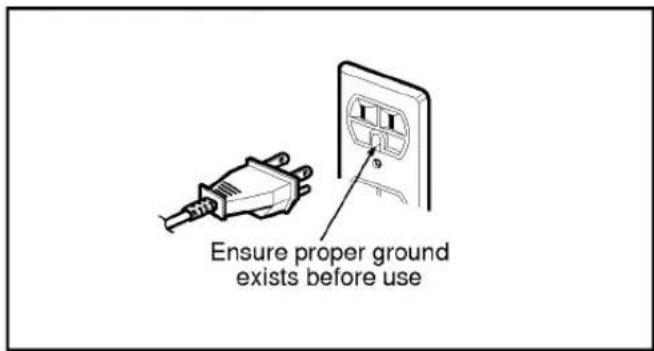
GROUNDING INSTRUCTIONS
This appliance must be grounded. If an electrical short circuit occurs, grounding reduces the risk of electric shock by providing an escape wire for the electric current. The cord for this appliance has a grounding wire with a grounding plug. Put the plug into an outlet that is properly installed and grounded.
WARNING - If you use the grounding plug improperly, you risk electric shock.
Ask a qualified electrician if you do not understand the grounding instructions or if you wonder whether the appliance is properly grounded. Because this appliance fits under the cabinet, it has a short power-supply cord. See the separate Installation Instructions for directions on placing the cord properly. Keep the electrical power cord dry and do not pinch or crush it in any way.
If it is necessary to use an extension cord, use only a 3-wire extension cord that has a 3-blade grounding plug, and a 3-slot receptacle that will accept the plug on the appliance. The marked rating of the extension cord shall be equal to or greater than the electrical rating of the appliance.
For a permanently connected appliance: This appliance must be connected to a grounded, metallic, permanent wiring system, or an equipment grounding conductor should be run with the circuit conductors and connected to the equipment grounding terminal or lead on the appliance.
INFORMATION
- DISPLAY: The display includes a clock and indicators to tell you time of day, cooking time settings, and cooking functions selected.
- MORE: Press this pad to add ten seconds of cooking time each time you press it. See page ① for more information.
3.LESS:Press this pad to subtract ten seconds of cooking time each time you press it. See page ① for more information. - AUTO DEFROST: Press this pad to select food type and defrost food by weight. See page 17 for more information.
- ONE TOUCH CONTROL: Press these keys let you cook foods easily. See page 4 for more information.
- NUMBER: Press number pads to enter cooking time, power level, quantities, or weights.
- POWER LEVEL: Press this pad to select a cooking power level.
- TIME COOK: Press this pad followed by number Pads to set a cooking time.
- STOP/CLEAR: Press this pad to stop the oven or to clear all entries.
- START: Press this pad to start a function. If you open the door after oven begins to cook, START again.
-
CUSTOM SET: Press this pad to change the oven's default settings for sound, clock, display speed, defrost weight, and demo mode operations. See page 10 for more information.
-
HOLD WARM: Press this pad to keep hot, cooked foods safely warm in your microwave oven for up to 99 minutes. See page ① for more information.
- EZ ON: Press this pad to cook for 30 seconds at 100% power level. See page ⑪ for more information.
- CUSTOM COOK: Press this pad to recall one cooking instruction previously programmed into memory. See page 2 for more information.
- LIGHT TIMER: Press this pad to set the light timer. See page ⑨ for more information.
- KITCHEN TIMER: Press this pad to set the kitchen timer. See page 9 for more information.
- TURNTABLE ON/OFF: Press this pad to turn off the turntable. OFF will appear in the display. See page 10 for more information.
- CLOCK(TIME OF DAY): Press this pad to enter the time of day. See page ⑨ for more information.
- HELP: Press this pad to learn how to use each oven function. See page ⑪ for more information.
- VENT HI/LOW/OFF: Press this pad to turn the fan on or off. See page 10 for more information.
- LIGHT HI/LOW/OFF: Press this pad to turn on the cooktop/ countertop light. See page 10 for more information.
WARNING:
DO NOT RUN THE OVEN EMPTY WITHOUT FOOD IN IT. OTHERWISE THE OVEN MAY BE DAMAGED.
This section discusses the concepts behind microwave cooking and introduces you to the basics you need to know to operate your microwave oven. Please read this information before use.
CLOCK(TIME OF DAY)
This oven includes a 24-hour clock.
Example: To set 8:00 AM.
Stop/ Clear
- Press Stop/Clear.
Clock
- Press Clock. (Press once for AM, twice for PM.)


- Enter the time by using the number key.
Clock
- Press Clock.
KITCHEN TIMER
You can use your microwave oven as a timer. Use the Timer for timing up 99 minutes, 99 seconds.
Example: To count 3 minutes.
Stop/ Clear
- Press Stop/Clear.
Kitchen Timer
- Press Kitchen Timer.


- Enter the time by using the number key.
Start
- Press Start. When the time is over, you will hear seventh long beep and TIMER END will be displayed at one time.
LIGHT TIMER
You can set the LIGHT to turn on and off automatically at any time you want. The light comes on at the same time every day until reset.
Example: Turn on 2:00 AM, turn off 7:00 AM.
Stop/ Clear
- Press Stop/Clear.
Light Timer
- Press Light Timer. (Press once for AM, twice for PM.)


- Enter the time you want the LIGHT to turn on.
Light Timer
- Press Light Timer again. (Press once for AM, twice for PM.)


- Enter the time you want the LIGHT to turn off.
Light Timer
- Press Light Timer.
NOTE: To reset that time to turn on and off the LIGHT, repeat steps 2 to 6.
Example: To cancel the Light timer.
Light Timer
- Press Light Timer.
Stop/ Clear
- Press Stop/Clear.
NOTE: If you want to cancel the Light Timer in
operation, you should press
Light Timer
key.
VENT HI/LOW/OFF

The Vent moves steam and other vapors from the surface cooking. Press Vent once for High fan speed, twice for Low fan speed, or three times to turn the fan off.
NOTE: If the temperature around the microwave oven gets too hot, the fan in the vent hood will automatically turn on at the LOW setting to cool the oven. It may stay on up to an hour to cool the oven. When this occurs, you can not turn the fan off manually.
TURNTABLE ON/OFF

For best cooking results, leave the turntable on. It can be turned off for large dishes. Press Turntable On/Off to turn the turntable on or off.
NOTE: Sometimes the turntable can become hot to touch. Be careful touching the turntable during and after cooking.
WARNING:
DO NOT RUN THE OVEN EMPTY WITHOUT FOOD IN IT, OTHERWISE THE OVEN MAY BE DAMAGED.
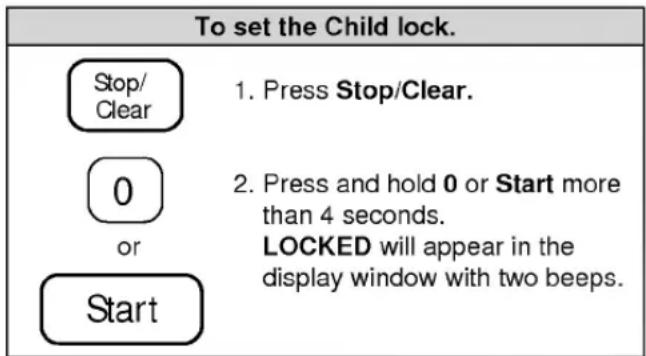
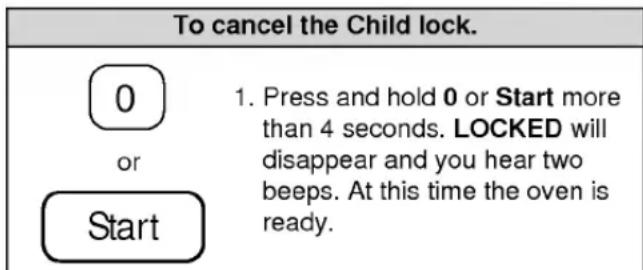
CHILD LOCK
You may lock the key to prevent the microwave from being accidentally started or used by children.
LIGHT HI/LOW/OFF

Press Light once for bright light, twice for night light, or three times to turn the light off.
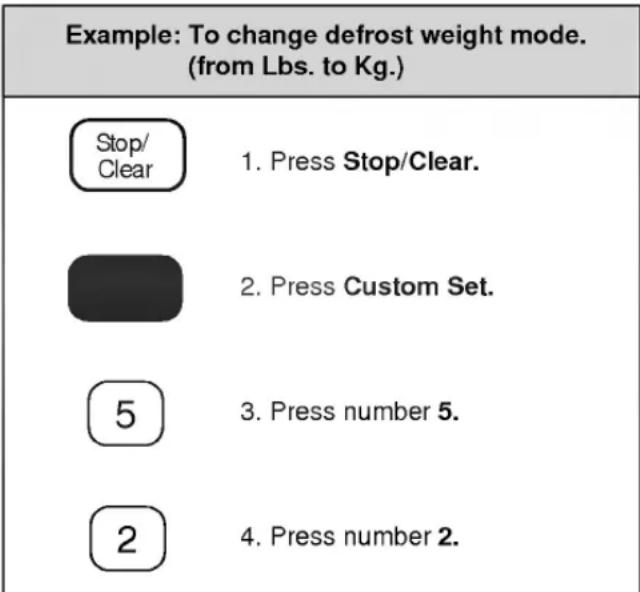
CUSTOM SET
You can change the default values for beep sound, clock, display speed, defrost weight, and demo mode operations.
See following chart for more information.
| NUMBER | FUNCTION | NUMBER | RESULT |
| 1 | Beep ON/OFF control | 1 | Sound ON |
| 2 | Sound OFF | ||
| 2 | Clock display control | 1 | Clock ON |
| 2 | Clock OFF | ||
| 3 | Display | 3 | Slow speed |
| 2 | Normal speed | ||
| 1 | Fast speed | ||
| 4 | Demo mode select | 1 | Demo ON |
| 2 | Demo OFF | ||
| 5 | Defrost weight mode select | 1 | Lbs |
| 2 | Kg |
HELP
The Help display feature information and helpful hints. Press Help, then select a key.
Example: To learn about Popcorn.
Stop/ Clear
- Press Stop/Clear.
Help
- Press Help.

- Press Popcorn.
HOLD WARM
You can safely keep hot, cooked food warm in your microwave oven for up to 99 minutes. You can use Hold Warm by itself or to follow a cooking cycle automatically.
Example: To use the Hold warm.
Stop/ Clear
- Press Stop/Clear.

- Press Hold Warm.
Start
- Press Start.
NOTES:
- Hold Warm operates for up to 99 minutes.
- Food cooked covered should be covered during Hold Warm.
- Pastry items (pies, turnovers, etc.) should be uncovered during Hold Warm.
- Complete meals kept warm on a dinner plate could be covered during Hold Warm.
Ez On
Ez On lets you cook or reheat food for 30 seconds at 100% Power. You can also use it to extend cooking time in multiples of 30 seconds, up to 99 minutes 59 seconds.
Example: To cook for 1 minutes.
Stop/ Clear
- Press Stop/Clear.

- Press Ez On twice. When the cook time is over, you will hear four beeps and END will display.
MORE/LESS
By using the More or Less keys, all of the one touch, time cook program and etc. can be adjusted to cook food for a longer or shorter time.
Pressing More will add 10 seconds of the cooking time each time you press it. Pressing Less will subtract 10 seconds of cooking time each time you press it.
Example: To adjust the 1.75 oz Popcorn cooking time for a longer time.
Stop/ Clear
- Press Stop/Clear.

- Press Popcorn.
3
- Press number 3.

- Press More.
NOTE: Press the More or Less key during time countdown.
CUSTOM COOK
Custom Cook lets you recall one cooking instruction previously placed in memory and begin cooking quickly.
Example: To memorize for 2 minutes.
Stop/ Clear
- Press Stop/Clear.
Custom Cook
- Press Custom Cook.


- Enter the cook time.
Start
- Press Start.
Example: To recall the Custom Cook.
Stop/ Clear
- Press Stop/Clear.
Custom Cook
- Press Custom Cook.
Start
- Press Start. When the cook time is over, you will hear four beeps and END will display.
HIGH power cooking does not always give you the best results with foods that need slower cooking, such as roasts or custards. Your oven has 9 power settings in addition to HIGH.
Example: To cook food for 7 minutes 30 seconds at 70% power.
Stop/ Clear
- Press Stop/Clear.


- Enter the cook time.
Power Level
- Press Power.

- Enter the power level.
Start
- Press Start.
When the cook time is over, you will hear four beeps and END will display.
COOKING AT HIGH COOK POWER
Example: To cook food for 8 minutes 30 seconds.
Stop/ Clear
- Press Stop/Clear.


- Enter the cook time.
Start
- Press Start.
When the cook time is over, you will hear four beeps and END will display.
OPERATION
The nine power levels in addition to HIGH allow you to choose the best power level for the food you are cooking. Below are listed all the power levels,
examples of foods best cooked at each level, and the amount of microwave power you are using.
| POWER LEVEL | MICROWAVE OUTPUT | USE |
| 10 HIGH | 100% | ·Boil water. ·Cook ground beef. ·Make candy. ·Cook fresh fruits and vegetables. ·Cook fish and poultry. ·Preheat browning dish. |
| 9 | 90% | ·Reheat meat slices quickly. ·Saute onions, celery, and green pepper. |
| 8 | 80% | ·All reheating. ·Cook scrambled eggs. |
| 7 | 70% | ·Cook breads and cereal products. ·Cook cheese dishes, veal. ·Cook cakes, muffins, brownies, cupcakes. |
| 6 | 60% | ·Cook pasta. |
| 5 | 50% | ·Cook meats, whole poultry. ·Cook custard. ·Cook whole chicken, turkey, spare ribs, rib roast, sirloin roast. |
| 4 | 40% | ·Cook less tender cuts of meat. ·Reheat frozen convenience foods. |
| 3 | 30% | ·Thawing meat, poultry, and seafood. ·Cooking small quantities of food. ·Finish cooking casserole, stew, and some sauscs. |
| 2 | 20% | ·Soften butter and cream cheese. ·Heating small amounts of food. |
| 1 | 10% | ·Soften ice cream. ·Raise yeast dough. |
| 0 | ·Standing time. |
ONE TOUCH CONTROL
Your oven's menu has been preprogrammed to cook food automatically. Tell the oven what you want.
Then let you microwave oven cook your selections.
POPCORN
Popcorn lets you pop 1.75, 3.0, and 3.5 ounce bags of commercially packaged microwave popcorn. Pop only one package at a time. If you are using a microwave popcorn popper, follow manufacturer's instructions. To set your microwave oven correctly, follow this chart:
| Bag Size-ounces | 3.5 | 3.0 | 1.75 |
| Press NUMBER | 1 | 2 | 3 |
Example: To pop a 3.0 oz. bag.


- Press Popcorn.
- Press number 2. When the cook time is over, you will hear four beeps and END will display.
POTATO
The Potato lets you cook potatoes with preset times and cook powers. You can choose from 1 to 4 potatoes.
NOTE:
- Cooking times are based on an average 8 ounce potato.
Before baking, pierce potato with fork several times.
After baking, let stand for 5 minutes.
Example: To cook 2 Potatoes.


- Press Potato.
- Press number 2. When the cook time is over, you will hear four beeps and END will display.
COOK
Cook provides four preset categories for cooking.
Example: To cook 2 cups of Rice.

2
3
- Press Cook.
- Choose food category.
| Category | Press pad number |
| Fresh vegetable | 1 |
| Frozen vegetable | 2 |
| Rice | 3 |
| Casserole | 4 |
| Frozen entree | 5 |
- Enter quantity/servings.
| Category | Number of cups |
| Fresh vegetable | 1 - 4 cups |
| Frozen vegetable | 1 - 4 cups |
| Rice | 1 - 2 cups |
| Casserole | 1 - 4 cups |
| Frozen entree | 10, 20 oz |
When the cook time is over, you will hear four beeps and END will display.
PIZZA (Refrigerated)
Pizza lets you reheat up to 3 slices pizza. A slice is based on a 5 ounce slice.
NOTE:
- Place on a low plate & paper towel.
- Do not cover.
Example: To reheat 2 slices of Pizza.

2
- Press Pizza.
- Press number 2. When the cook time is over, you will hear four beeps and END will display.
OPERATION
COOKING GUIDE FOR ONE TOUCH COOK
| CODE | CATEGORY | QUANTITY | DIRECTIONS |
| 1 | FRESHVEGETABLE | 1 cupVegetables and2 tbsp water | Place in a microwavable bowl or casserole.Add water according to the quantity.Cover with plastic wrap and vent.Let stand 5 minutes. |
| 2 cupsVegetables and1/4 cup of water | |||
| 3 cupsVegetables and1/3 cup of water | |||
| 4 cupsVegetables and1/2 cup of water | |||
| 2 | FROZENVEGETABLE | 1 cup | Place in a microwavable bowl or casserole.Cover with plastic wrap and vent.Let stand 5 minutes. |
| 2 cups | |||
| 3 cups | |||
| 4 cups | |||
| 3 | RICE | 1 cupof long grain rice and2 1/4 cups of water | In large microwavable casserole, combine water, rice, margarine and salt.Cover with microwavable lid or plastic wrap and vent.After cooking, let stand covered for 5 minutes. |
| 2 cupsof long grain rice and4 1/4 cups of water | |||
| 4 | CASSEROLE | 1 cup | Place in a microwavable bowl or casserole.Cover with plastic wrap and vent. |
| 2 cups | |||
| 3 cups | |||
| 4 cups | |||
| 5 | FROZEN ENTREE | 10 oz | Follow the package directions example of one frozen entree is lasagna with meat savce, chicken with rice, and sliced turkey breast with rice and vegetable. |
| 20 oz |
REHEAT
Reheat provides four preset categories for reheating.
Example: To reheat 2 servings of Dinner plate.

- Press Reheat.

- Choose food category.
| Category | Press pad number |
| Dinner plate | 1 |
| Soup/sauce | 2 |
| Casserole | 3 |
| Roll/Muffin | 4 |

- Enter quantity/servings.
| Category | Number of cups/Items |
| Dinner plate | 1-2 servings |
| Soup/sauce | 1-4 cups |
| Casserole | 1-4 cups |
| Roll/Muffin | 1-4 pieces |
When the cook time is over, you will hear four beeps and END will display.
BEVERAGE
Beverage lets you heat up to 2 beverages.
NOTE:
- Reheat times based on an 8 ounce cup.
- Beverage may be very hot; remove from oven with care.
Example: To reheat one cup of Beverage.

1
- Press Beverage.
- Press number 1. When the cook time is over, you will hear four beeps and END will display.
COOKING GUIDE FOR REHEAT
| CODE | CATEGORY | SERVING AMOUNT | DIRECTION |
| 1 | DINNER PLATE | 1 serving (small) | Place in shallow microwavable casserole. Cover with vented plastic wrap. |
| 2 servings (large) | |||
| 2 | SOUP/SAUCE | 1 cup | Place in shallow microwavable casserole. Cover with vented plastic wrap. |
| 2 cups | |||
| 3 cups | |||
| 4 cups | |||
| 3 | CASSEROLE | 1 cup | Place in a microwavable bowl or casserole. Cover with plastic wrap. |
| 2 cups | |||
| 3 cups | |||
| 4 cups | |||
| 4 | ROLL/MUFFIN | 1 piece (2 oz.) | Place on paper towel. Do not cover. |
| 2 pieces (4 oz.) | |||
| 3 pieces (6 oz.) | |||
| 4 pieces (8 oz.) |
AUTODEFROST
Your microwave oven is preset with three defrost sequences. Using AUTO DEFROST is the best way to defrost frozen foods. The Defrost Sequence Table below provides some basic guidelines for using the three defrost sequences.
Example: To defrost 1.2 lbs. of meat.
Stop/ Clear
- Press Stop/Clear.
Auto Defrost
- Press Auto Defrost.
1
- Choose food category.
| Category | Press pad number |
| Meat | 1 |
| Poultry | 2 |
| Steaks/Chops | 3 |
1
2
- Enter the weight.
Start
-
Press Start.
-
After 1/2 of the defrost time is over, The display will prompt you to turn food over. Open door, turn food over, and shield any warm portions.
Start
-
Close the door and restart.
-
When the defrost time is over, you will hear four beeps and END will display.
NOTE: If you do not open the door within 3 seconds, the display will resume the countdown.
Weight conversion chart
You are probably used to food weights being in pounds and ounces that are fractions of a pound (for example 4 ounces equals 1/4 pound).
However, in order to enter food weight in Auto Defrost, you must specify pounds and tenths of a pound. If the weight on the food package is in fractions of a pound, you can use the following chart to convert the weight to decimals.
| EQUIVALENT OUNCE WEIGHT | NUMBER AFTER DECIMAL |
| 1.6 | .10 |
| 3.2 | .20 |
| 4.0 | .25 One-Quarter Pound |
| 4.8 | .30 |
| 6.4 | .40 |
| 8.0 | .50 One- Half Pound |
| 9.6 | .60 |
| 11.2 | .70 |
| 12.0 | .75 Three-Quarters Pound |
| 12.8 | .80 |
| 14.4 | .90 |
| 16.0 | 1.00 One Pound |
DEFROSTING TIPS
- When using Auto Defrost, the weight to be entered is the net weight in pounds and tenths of pounds (the weight of the food minus the container).
- Use Auto Defrost only for raw food. Auto Defrost gives best results when food to be thawed is a minimum of 0^ (taken directly from a true freezer). If food has been stored in a refrigerator-freezer that does not maintain a temperature of 5^ or below, always program a lower food weight (for a shorter defrosting time) to prevent cooking the food.
- If the food is stored outside the freezer for up to 20 minutes, enter a lower food weight.
- The shape of the package alters the defrosting time. Shallow rectangular packets defrost more quickly than a deep block.
- Separate pieces as they begin to defrost. Separated pieces defrost more easily.
- You can use small pieces of aluminum foil to shield foods like chicken wings, leg tips, and fish tails, but the foil must not touch the side of the oven. Foil causes arcing, which can damage the oven lining.
- Shield areas of food with small pieces of foil if they start to become warm.
- For better results, a preset standing time is included in the defrosting time.
OPERATION
AUTO DEFROST CHART
| Sequence | Food | At Beep | Stand Time |
| MEAT | BEEF | ||
| Ground beef | Turn over. Remove thawed portions and break apart. Return remainder to oven. | 5 min. | |
| Cubes for stew | Turn over. Remove thawed portions with fork. | 5 min. | |
| Hamburger patties | Turn over. | 5 min. | |
| Pot roast | Turn over. Cover warm areas with aluminum foil. | 10-20 min. | |
| Rib roast, Rump roast | Turn over. Cover warm areas with aluminum foil. | 10-20 min. | |
| Chuck roast | Turn over. Cover warm areas with aluminum foil. | 10-20 min. | |
| PORK | |||
| Bacon, Hot Dogs | Turn over. | 2 min. | |
| Sausage, Links | Turn over. | 5 min. | |
| Sausage, Bulks | Turn over. | 5 min. | |
| Ribs, Roast | Turn over. Cover warm areas with aluminum foil. | 10-20 min. | |
| LAMB | |||
| Ribs | Turn over. Cover warm areas with aluminum foil. | 10-20 min. | |
| Roasts | Turn over. Cover warm areas with aluminum foil. | 10-20 min. | |
| POULTRY | POULTRY | ||
| Whole Chicken | Turn over(finish defrosting breastside down). Cover warm areas with aluminum foil. | 10-20 min. Rinse under cold running water. | |
| Chicken Pieces | Separate pieces and rearrange. | 5-10 min. | |
| CORNISH HENS | |||
| Whole, Split | Turn over. Cover warm areas with aluminum foil. | 10-20 min. Rinse under cold running water. | |
| TURKEY | Turn over and rearrange. | 10-20 min. Rinse under cold running water. | |
| Breast(under 6 lbs.) | |||
| STEAKS/CHOPS | BEEF STEAKS | Turn over. Cover warm areas with aluminum foil. | 10-20 min. |
| PORK CHOPS | Turn over. Cover warm areas with aluminum foil. | 10-20 min. | |
| LAMB CHOPS | Turn over. Cover warm areas with aluminum foil. | 10-20 min. | |
| FISH | |||
| Steaks, Whole fish | Turn over and rearrange. Cover head and tail with foil. | 5 min. | |
| Filletts | Turn over. Separate fillets when partially thawed if possible. | 5 min. Rinse under cold water to separate. | |
| SHELLFISH | |||
| Crabmeat, Shrimp | Rearrange and break apart. | 5 min. | |
| Lobster tails | Turn over and rearrange. | 5 min. | |
| Scallops | Turn over and rearrange. | 5 min. |
Note: Food to be defrosted must be not more than 6.0 lbs(4.0kg).
OPERATION
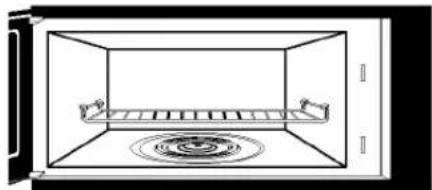
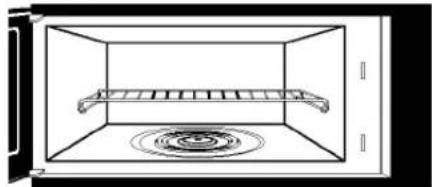
TWO POSITION METAL RACK
The two position Metal Rack gives you extra space when cooking in more than one container at the same time. The metal rack can be turned upside-down to help fit taller containers on the bottom of the oven.
NOTE:
- Rack must be on 4 supports when used.
- Insert the rack securely into the four supports on the side walls of the oven.
- Turn the rack upside-down when using taller containers on the bottom of the oven.
WARNING:
DO NOT RUN THE OVEN EMPTY WITHOUT FOOD ON METAL RACK, OTHERWISE THE OVEN MAY BE DAMAGED.
COOKING
GETTING THE BEST COOKING RESULTS
To get the best results from your microwave oven, read and follow the guidelines below.
Storage Temperature: Foods taken from the freezer or refrigerator take longer to cook than the same foods at room temperature. The time for recipes in this book is based on the normal storage temperature of the food.
- Size: Small pieces of food cook faster than large ones, pieces similar in size and shape cook more evenly. For even cooking, reduce the power when cooking large pieces of food.
Natural Moisture: Very moist foods cook more evenly because microwave energy is attracted to water molecules.
- Stir foods such as casseroles and vegetables from the outside to the center to distribute the heat evenly and speed cooking. Constant stirring is not necessary.
- Turn over foods like pork chops, baking potatoes, roasts, or whole cauliflower halfway through the cooking time to expose all sides equally to microwave energy.
- Place delicate areas of foods, such as asparagus tips, toward the center of the dish.
- Arrange unevenly shaped foods, such as chicken pieces or salmon steaks, with the thicker, meatier parts toward the outside of the dish.
- Shield, with Small pieces of aluminum foil, parts of food that may cook quickly, such as wing tips and leg ends of poultry.
- Let it Stand: After you remove the food from the microwave, cover food with foil or casserole lid and let it stand to finish cooking in the center and avoid overcooking the outer edges. The length of standing time depends on the density and surface area of the food.
- Wrapping in waxed paper or paper towel: Sandwiches and many other foods containing prebaked bread should be wrapped prior to microwaving to prevent drying out.
Fish & Shellfish
Cooking Fish and Shellfish: General Directions
- Prepare the fish for cooking.
- Completely defrost the fish or shellfish.
- Arrange unevenly shaped pieces with thicker parts toward the outside of the dish. Arrange shellfish in a single layer for even cooking.
- The type of cover you use depends on how you cook. Poached fish needs a microwavable lid or vented plastic wrap.
-
Baked fish, coated fish, or fish in sauce needs to be covered lightly with waxed paper to keep the coating crisp and sauce from getting watery.
-
Always set the shortest cooking time. Fish is done when it turns opaque and the thickest part begins to flake. Shellfish is done when the shell turns from pink to red and the flesh is opaque and firm.
The Fish and Shellfish Cooking Table below provides specific directions with Power Level and Cooking Time settings for most types of fish and shellfish.
Fish And Shellfish Cooking Table
| FISH | POWER LEVEL | COOKING TIME | DIRECTIONS |
| Fish fillets | HI | 31/2-41/2 minutes | Arrange fish in a single layer with thickest portion toward outside edge of 11/2 quart microwavable baking dish.Brush with melted butter and season, if desired. Cook covered with vented plastic wrap. Let stand covered 2 minutes. If you are cooking more than 1 lb. of fish, turn the fish halfway through cooking. |
| Fish steaks | HI | 41/2-51/2 minutes | |
| Whole fish | 7 | 41/2-6 minutes | |
| Scallops | HI | 31/2-5 minutes | Arrange in a single layer. Prepare as directed above, except stir instead of turning the shellfish. |
| Shrimp, shelled | HI | 31/2-5 minutes |
COOKING
Appetizers / Sauces / Soups
Cooking Appetizers: Tips and Techniques
Recommended
- Crisp crackers, such as melba toast, shredded wheat, and crisp rye crackers are best for microwave use. Wait until party time to add the spreads. Place a paper towel under the crackers while they cook in the microwave oven to absorb extra moisture.
- Arrange individual appetizers in a circle for even cooking.
- Stir dips to distribute heat and shorten cooking time.
Cooking Sauces: Tips and Techniques
- Use a microwavable casserole or glass measuring cup that is at least 2 or 3 times the volume of the sauce.
- Sauces made with cornstarch thicken more rapidly than those made with flour.
Cooking Soups: Tips and Techniques
Cook soups in a microwavable dish which holds double the volume of the recipe ingredients to prevent boil-over, especially if you use cream or milk in the soup.
- Generally, cover microwaved soups with VENTED plastic wrap or a microwavable lid.
- Cover foods to retain moisture. Uncover foods to retain crispness.
- Avoid overcooking by using the minimum suggested time. Add more time, if necessary, only after checking the food.
Not Recommended
- Appetizers with a crisp coating or puff pastry are best done in a conventional oven with dry heat.
-
Breaded products can be warmed in the microwave oven but will not come out crisp.
-
Cook sauces made with cornstarch or flour uncovered so you may stir them 2 or 3 times during cooking for a smooth consistency.
To adapt a conventional sauce or gravy recipe, reduce the amount of liquid slightly. - Stirring occasionally will help blend flavors, distribute heat evenly, and may even shorten the cooking time.
- When converting a conventional soup recipe to cook in the microwave, reduce the liquid, salt, and strong seasonings.
Meat
Cooking Meat: General Directions
Prepare the meat for cooking.
- Defrost completely.
- Trim off excess fat to avoid splattering.
- Place the meat, fat side down, on a microwavable rack in a microwavable dish.
- Use oven cooking bag for less tender cuts of meat.
- Arrange the meat so that thicker portions are toward the outside of the dish.
- Cover the meat with waxed paper to prevent splattering.
Tend the meat as it cooks.
- Drain juices as they accumulate to reduce splattering and keep from overcooking the bottom of the meat.
- Shield thin or bony portions with strips of foil to prevent overcooking.
NOTE: Keep the foil at least 1 inch from the oven walls, and do not cover more than one-third of the meat with foil at any one time.
- Let the meat stand covered with foil 10-15 minutes after you remove it from the oven. The internal temperature of the meat may rise from 5 - 10^ during standing time.
The Meat Cooking Table on the next page provides detailed directions, Power Level, and Cooking Time settings for most cuts of meat.
COOKING
Meat Cooking Table
| MEAT | POWER LEVEL | COOKING TIME | DIRECTIONS |
| BeefHamburgers, Fresh or defrosted(4 oz. each)1 patty2 patties4 patties | HI | 1-11/2 minutes11/2-2 minutes21/2-31/2 minutes | Form patties with depression in center of each. Place on microwavable roast rack. Brush with browning agent, if desired. Cover with waxed paper. Turn over halfway through cooking.Let stand covered 1 minute. |
| Sirloin tip roast(3-4 lbs.) | 5 | 8-10 minutesper poundRARE(135°F)11-13 minutesper poundMEDIUM(155°F) | Place roast fat side down on microwavable roast rack. Add desired seasonings and cover with waxed paper. Turn meat over halfway through cooking and shield if necessary.Remove roast from microwave oven when desired temperature is reached. Let stand covered with foil 15 minutes.(Temperature may rise about 10°F). |
| LambLamb roast, rolled boneless(3-4 lbs.) | 5 | 11-12 minutesper poundRARE(135°F)12-13 minutesper poundMEDIUM(145°F)13-14 minutesper poundWELL(155°F) | Place roast fat side down on microwavable roast rack.Brush lamb with marinade or desired seasonings such as rosemary, thyme or marjoram. Cover with waxed paper.Turn roast over after 15 minutes, and again after 30 minutes. Shield if necessary.Remove roast from microwave when desired temperature is reached. Let stand covered with foil 15 minutes(Temperature may rise about 10°F). |
| PorkBacon slices2 slices4 slices6 slices | HI | 11/2-2 minutes21/2 -3 minutes31/2-41/2 minutes | Place bacon slices on microwavable roast rackCOVER with paper towels.After cooking, let stand 1 minute. |
| Chops(5-7 oz. each)2 chops4 chops | 3 | 18-20 minutesper pound15-17 minutesper pound | Place chops in microwavable baking dish.Add desired seasonings and cover with vented plastic wrap. Cook until no longer pink or until internal temperature reaches 170°F. Turn chops over halfway through cooking.Let stand covered 5 minutes.(Temperature may rise about 10°F). |
| Loin Roast,rolled, boneless(3 1/2- 4 1/2 lbs.) | 3 | 25-27 minutesper pound(165°F) | Place roast in cooking bag in microwavable dish.Add seasonings and browning agent if desired. Close bag loosely with microwavable closure or string. After cooking, let stand in bag 15 minutes. (Temperature may rise about 10°F.) Internal temperature of pork should reach 170°F before serving. |
| Sausage links,Fresh or Frozen,defrosted(1-2 oz. each)2 links4 links6 links10 links(8 oz. pkg.) | HI | 45-60 seconds1-11/2 minutes11/2-2 minutes13/4-2 minutes | Pierce links and place on microwavable roast rackCOVER with waxed paper or paper towel.Turn over halfway through cooking.After cooking, let stand covered 1 minute. |
COOKING
Poultry
Cooking Poultry: General Directions
-
Prepare the poultry for cooking.
-
Defrost completely.
- Arrange poultry pieces with thicker pieces at the outside edge of the baking dish. When cooking legs, arrange them like the spokes of a wheel.
- Cover the baking dish with waxed paper to reduce splattering.
- Use a browning agent or cook with a sauce to give a browned appearance.
Tend the poultry as it cooks.
- Drain and discard juices as they accumulate.
-
Shield thin or bony pieces with small strips of aluminum foil to prevent overcooking. Keep foil at least 1 inch from the oven walls and other pieces of foil.
-
The poultry is done when it is no longer pink and the juices run clear. When done, the temperature in the thigh meat should be 180 - 185^ .
- Let the poultry stand after cooking covered with foil for 10 minutes.
The Poultry Cooking Table below provides detailed directions, Power Level, and Cooking Time settings for most cuts and types of poultry.
Poultry Cooking Table
| POULTRY | POWER LEVEL | COOKING TIME | DIRECTIONS |
| Chicken pieces (21/2-3 lbs). | HI | 41/2-51/2 minutes per pound | Wash, shake the water off, and go on with cooking. Place pieces in a single layer in a microwavable baking dish with thicker pieces to the outside. Brush with butter or browning agent and seasonings if desired. Cover with waxed paper. Cook until no longer pink and juices run clear. Let stand covered 5 minutes. |
| Chicken whole (3-31/2 lbs) | HI | 12-13 minutes per pound | Wash, shake the water off, and go on with cooking. Place breast side down on a microwavable roast rack. Brush with butter, or browning agent and seasoning if desired. Cover with waxed paper. Cook 1/3 of estimated time. Turn breast side up, brush with butter, or browning agent. Replace waxed paper. Cook 1/3 of estimated time again. Shield if necessary. Cook remaining 1/3 of estimated time or until no longer pink and juices run clear. Let stand covered with foil 10 minutes. (The temperature may rise about 10°F.) The temperature in the high should be 180°F-185°F when the poultry is done. |
| Cornish Hens Whole (1-11/2 lbs. each) | HI | 6-7 minutes per pound | Wash, shake the water off, and go on with cooking. Tie wings to body of hen and the legs to tail. Place hens breast side down on microwavable rack. Cover with waxed paper. Turn breast side up halfway through cooking. Shield bone ends of drumsticks with foil. Remove and discard drippings. Brush with butter or browning agent and seasonings if desired. Cook until no longer pink and juices run clear. Remove hens from microwave when they reach desired temperature. Let stand covered with foil 5 minutes. (Temperature may rise about 10°F). Temperature in breast should be 170°F before serving. |
COOKING
Pasta And Rice
Microwave cooking and conventional cooking of pasta, rice, and cereal require about the same amount of time, but the microwave is a more convenient method because you can cook and serve in the same dish.
There is no stirring needed and leftover pasta tastes just like fresh cooked when reheated in the microwave oven.
Cooking Pasta and Rice: Tips and Techniques
If you are planning to use rice or pasta in a casserole, undercook it so it is still firm.
- Allow for standing time with rice, but not for pasta.
- The Pasta and Rice Cooking Tables below provide specific directions, with Power Level and Cooking Time settings for most common types of pasta and rice.
Pasta Cooking Table
| TYPE OF PASTA | POWER LEVEL | COOKING TIME | DIRECTIONS |
| Spaghetti4 cups water.Add 8 oz. spaghetti. | HI5 | 9 to 10 minutes71/2 to 81/2 minutes | Combine hot tap water and salt, if desired. Use a 2-quart microwavable baking dish and cover with vented plastic wrap for spaghetti and lasagna noodles.Use microwavable lid or vented plastic wrap for macaroni and egg noodles.Cook at Power Level HI as directed in chart or until water boils.Stir in pasta; cook covered at Power Level 5 as directed in chart or until tender.Drain in a colander. |
| Macaroni3 cups water.Add 2 cups macaroni. | HI5 | 6 to 7 minutes51/2 to 61/2 minutes | |
| Lasagna noodles4 cups water.Add 8 oz. lasagna noodles. | HI5 | 7 to 8 minutes11 to 121/2 minutes | |
| Egg noodles6 cups water.Add 4 cups noodles. | HI5 | 8 to 10 minutes51/2 to 61/2 minutes |
Rice Cooking Table
| TYPE OF RICE | POWER LEVEL | COOKING TIME | DIRECTIONS | |
| Long grain2 1/4 cups water.Add 1 cup rice. | HI5 | 41/2 to 51/2 minutes14 minutes | Combine hot tap water and salt, if desired, in 2 quartmicrowavable casserole. Cover with microwavable lid or vented plastic wrap. Cook as directed in chart atPower Level HI or until water boils. Stir in rice and anyseasonings.Brown2 1/2 cups water.Add 1 cup rice. | Cook covered as directed in chart at Power Level 5or until water is absorbed and rice is tender.Let stand covered 5 to 10 minutes. Fluff with fork. |
| Long grain andwild rice mix2 1/3 cups water.Add 6 oz. pkg. | HI5 | 41/2 to 51/2 minutes28 minutes | ||
| Quick cooking1 cup water.Add 1 cup rice. | HI | 4 to 5 minutes24 minutes | Cook water until it boils. Stir rice into boiling water andlet stand, covered 5 to 10 minutes or until water isabsorbed and rice is tender. Fluff with fork. |
MAINTENANCE
CARE AND CLEANING
For best performance and safety, keep the oven clean inside and outside. Take special care to keep the inner door panel and the oven front frame free of food or grease build-up.
Never use rough powder or pads. Wipe the microwave oven inside and out, including the hood bottom cover, with a soft cloth and a warm (not hot) mild detergent solution. Then rinse and wipe dry. Use a chrome cleaner and polish on chrome, metal, and aluminum surfaces. Wipe spatters immediately with a wet paper towel, especially after cooking chicken or bacon. Clean your oven weekly or more often, if needed.
METAL RACK
- Wash the metal rack with a mild soap and a soft or nylon scrub brush. Dry completely.
- Do not use abrasive scrubbers or cleaners to clean rack.
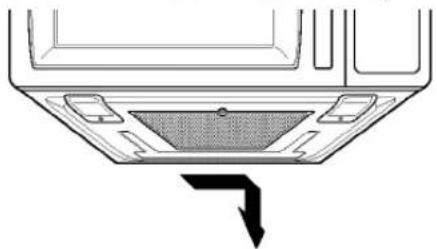
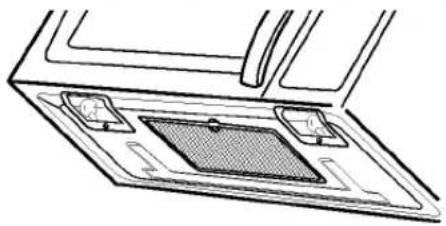
CLEANING THE GREASE FILTERS
The grease filter should be removed and cleaned often, at least once a month.
- Disconnect power or unplug microwave oven.
- To remove grease filter, slide filter to the side. Pull filter downward. The filter will drop out.
- Soak grease filters in hot water and a mild detergent. Scrub and swish to remove embedded dirt and grease. Rinse well and shake to dry. Do not clean filters with ammonia, corrosive cleaning agents such as lye-based oven cleaners, or place them in a dishwasher. The filters will turn black or could be damaged.
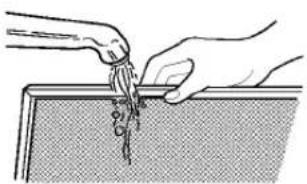
- To reinstall the filter, slide it into the side slot, then push up to lock.
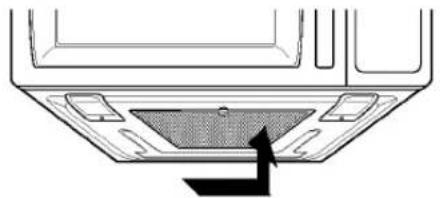
- Reconnect power or plug in microwave oven. NOTE: Do not operate the hood without the filter in place.
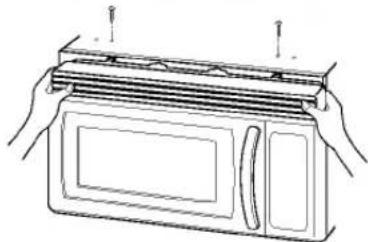
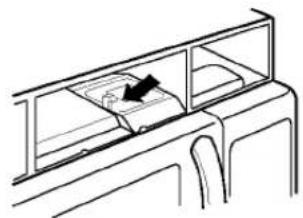
CHARCOAL FILTER REPLACEMENT
If your oven is vented inside, the charcoal filter should be replaced every 6 to 12 months, and more often if necessary. The charcoal filter cannot be cleaned. To order a new charcoal filter, contact the Parts Department at your nearest Authorized Service Center.
- Disconnect power or unplug microwave oven.
- Remove the two vent grille mounting screws. (2 middle screws)
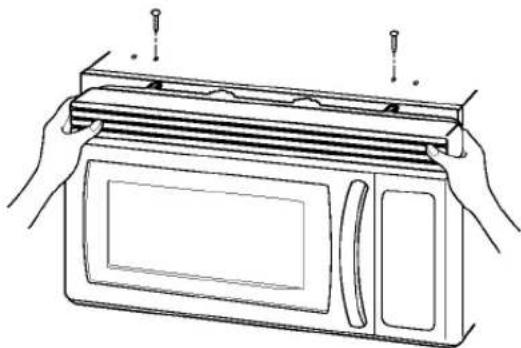
- Tip the grille forward, then lift out to remove.
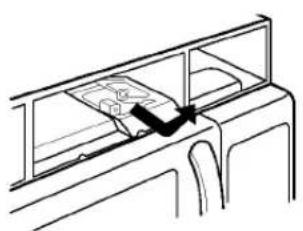
- Remove old filter.
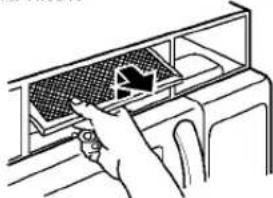
- Slide a new charcoal filter into place. The filter should rest at the angle shown.
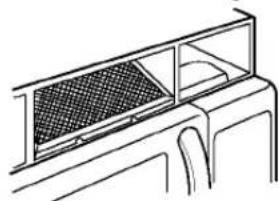
- Slide the bottom of the vent grille into place. Push the top until it snaps into place. Replace the mounting screws.
- Reconnect power or plug in microwave oven.
MAINTENANCE
COOKTOP/COUNTERTOP LIGHT REPLACEMENT
- Disconnect power or unplug microwave oven.
- Remove the bulb cover mounting screws.
- Replace bulb(s) with 30 or 40 watt appliance bulb(s).
- Replace bulb cover, and mounting screw.
- Reconnect power or plug in microwave oven.
OVEN LIGHT REPLACEMENT
- Disconnect power or unplug microwave oven.
- Remove the vent grille mounting screws. (2 middle screws)
- Tip the cover forward, then lift out to remove.
- Lift up the bulb holder.
- Replace bulb with a 30 watt appliance bulb.
- Replace the bulb holder, if damaged.
- Slide the bottom of the vent grille into place. Push the bottom until it snaps into place. Replace the mounting screws.
- Reconnect power or plug in microwave oven.
QUESTIONS AND ANSWERS
Q. Can I use a rack in my microwave oven so that I may reheat or cook in two levels at a time?
A. Only use the rack that is supplied with your microwave oven. Use of any other rack can result in poor cooking performance and/or arcing and may damage your oven.
Q. Can I use either metal or aluminum pans in my microwave oven?
A. Usable metal includes aluminum foil for shielding (use small, flat pieces), and shallow foil trays (if tray is 3/4 inch deep and filled with food to absorb microwave energy). Never allow metal to touch walls or door.
Q. Sometimes the door of my microwave oven appears wavy. Is this normal?
A. This appearance is normal and does not affect the operation of your oven.
Q. What are the humming noises that I hear when my microwave oven is operating?
A. You hear the sound of the transformer when the magnetron tube cycles on and off.
Q. Why does the dish become hot when I microwave food in it? I thought that this should not happen.
A. As the food becomes hot it will conduct the heat to the dish. Use hot pads to remove food after cooking.
Q. What does standing time mean?
A. Standing time means that food should be taken out of the oven and covered for additional time after cooking. This process allows the cooking to finish, saves energy, and frees the oven for other purpose.
Q. Can I pop popcorn in my microwave oven? How do I get the best results?
A. Yes. Pop packaged microwave popcorn following manufacturer's guidelines or use the preprogrammed Popcorn pad. Do not use regular paper bags. Use the listening test by stopping the oven as soon as the popping slows to a pop every one or two seconds. Do not try to repop unpopped kernels. You can also use special microwave poppers. When using a popper, be sure to follow manufacturer's directions. Do not pop popcorn in glass utensils.
Q. Why does steam come out of the air exhaust vent?
A. Steam is normally produced during cooking. The microwave oven has been designed to vent this steam out the top vent.
MAINTENANCE
MICROWAVE UTENSIL GUIDE
| USE | DO NOT USE |
| OVENPROOF GLASS (treated for high intensity heat): utility dishes, loaf dishes, pie plates, cake plates, liquid measuring cups, casseroles and bowls without metallic trim. | METAL UTENSILS: Metal shields the food from microwave energy and produces uneven cooking. Also avoid metal skewers, thermometers or foil trays.Metal utensils can cause arcing, which can damage your microwave oven. |
| CHINA: bowls, cups, serving plates and platters without metallic trim. | METAL DECORATION: Metal-trimmed or metal-banded dinnerware, casserole dishes, etc. The metal trim interferes with normal cooking and may damage the oven. |
| PLASTIC: Plastic wrap (as a cover)-- lay the plastic wrap loosely over the dish and press it to the sides. Vent plastic wrap by turning back one edge slightly to allow excess steam to escape. The dish should be deep enough so that the plastic wrap will not touch the food. As the food heats it may melt the plastic wrap wherever the wrap touches the food.Use plastic dishes, cups, semirigid freezer containers and plastic bags only for short cooking time. Use these with care because the plastic may soften from the heat of the food. | ALUMINUM FOIL: Avoid large sheets of aluminum foil because they hinder cooking and may cause harmful arcing. Use small pieces of foil to shield poultry legs and wings. Keep ALL aluminum foil at least 1 inch from the side walls and door of the oven. |
| WOOD: Wooden bowls and boards will dry out and may split or crack when you use them in the microwave oven. Baskets react in the same way. | |
| TIGHTLY COVERED UTENSILS: Be sure to leave openings for steam to escape from covered utensils. Pierce plastic pouches of vegetables or other food items before cooking. Tightly closed pouches could explode. | |
| PAPER: Paper towels, waxed paper, paper napkins and paper plates with no metallic trim or design. Look for the manufacturer's label for use in the microwave oven. | BROWN PAPER: Avoid using brown paper bags. They absorb too much heat and could burn. |
| FLAWED OR CHIPPED UTENSILS: Any utensil that is cracked, flawed or chipped may break in the oven. | |
| METAL TWIST TIES: Remove metal twist ties from plastic or paper bags. They become hot and could cause a fire. |
BEFORE CALLING FOR SERVICE
Check the following list to be sure a service call is really necessary. A quick reference of this manual as well as reviewing additional information on items to check, may prevent an unneeded service call.
If nothing on the oven operates:
- check for a blown circuit fuse or a tripped main circuit breaker.
- check if oven is properly connected to electric circuit in house.
- check that controls are set properly.
If the oven interior light does not works:
the light bulb is loose or defective.
If oven will not cook:
- check that control panel was programmed correctly.
- check that door is firmly closed.
- check that Start Pad was touched.
- check that probe was inserted correctly into receptacle.
- check that timer wasn't started instead of a cook function.
If oven takes longer than normal to cook or cooks too rapidly:
- be sure the Power Level is programmed properly.
If the time of day clock does not always keep correct time:
- check that the power cord is fully inserted into the outlet receptacle.
- be sure the oven is the only appliance on the electrical circuit.
If food cooks unevenly:
- be sure food is evenly shaped.
- be sure food is completely defrosted before cooking.
- check placement of aluminum strips used to prevent overcooking.
If food is undercooked:
- check recipe to be sure all directions (amount, time, & power levels) were correctly followed.
- be sure microwave oven is on a separate circuit.
- be sure food is completely defrosted before cooking.
If food is overcooked:
- check recipe to be sure all directions (amount, power level, time, size of dish) were followed.
If arcing (sparks) occur:
- be sure microwavable dishes were used.
- be sure wire twist ties weren't used.
- be sure oven wasn't operated when empty.
- make sure metal rack (if used) is properly, installed on 4 supports.
If the Display shows a time counting down but the oven is not cooking:
- check that door is firmly closed.
- check that Timer wasn't started instead of a cooking function.
BEFORE CALLING FOR SERVICE
You can often correct operating problems yourself. If your microwave oven fails to work properly, locate the operating problem in the chart below and try the solutions marked for each problem. If the microwave oven still does not work properly, contact the nearest Service Centre. Service Centers are fully equipped to handle your service requirements.
| Problem | Possible Causes |
| Oven does not start | Is power cord plugged in? Is door closed? Cooking time not set. Temperature not set or probe not plugged in. |
| Arcing or Spending | Use approved cookware only. Properly position temperature probe. Do not operate with oven empty. |
| Time of day Incorrect | Reset time of day. |
| Probe Light Flashes | Is temperature probe properly plugged in? |
| Unevenly Cooked Foods | Use approved cookware only. Turn or stir food. Completely defrost food. |
| Overcooked Foods | Properly position temperature probe. Use correct time. / Power level setting. Use correct temp setting. |
| Undercooked Foods | Use approved cookware only. Properly position temperature probe. Completely defrost food. Use correct time. / Power level setting. Use correct temp setting. Check see that oven ventilation ports are not restricted. |
| Improper Defrosting | Use approved cookware only. Turn or stir food. Use correct time. / Power level setting. |
| Oven Lamp does net Light | Is power cord plugged in? Is door closed? Cooking time not set. Is light bulb burned out? |
CENTRE DE SERVICE AUTORISÉ INDEPENDENT PAR
LG ELECTRONICS CANADA, INC.
AUTHORIZED INDEPENDENT SERVICE CENTERS
not all listed service centres repair all product, please see product code listed below
BRITISH COLUMBIA & NORTHWEST TERRITORIES
CRANBROOK
DANNYS HOME
ENTERTAINMENT
11B 14TH AVE S
VIC 2W9 (604) 426-7413
AI A2 A3 B1 B2 B3 B5 E1 E5
FORT ST-JOHN
DIVERSIFIED
ELECTRONICS
10607-101 ST AVENUE
V1J5J4 (604) 785-9119
B1 B2 B3
KAMLOOPS
GIDDENS SERVICES LTD.
1613 VALLEYVIEW DRIVE
V2C 4B4 (604)372-8842
AI A2 A3 A4 B1 B2 B3 C1 E1
E2 E4 E5
KAMLOOPS
JOHNS ELECTRIC REPAIR
CENTER
773 VICTORIA STREET
V2C 285 (604) 374-0388
A1 A2 A3 B1 B2 B3 C1 E1 E5
KELOWNA
VALLEY DIG ITRONICS
SERVICE LTD.
2453 HIGHWAY 97 NORTH
VIX 4J2 (604) 763-8366
A1 A2 A3 A4 B1 B2 B3 C1 E1
E5 Z1
KITIMAT
WINGS ELECTRONICS
161 CITY CENTRE
V8C 1T6 (604) 632-4247
A1 A2 A3 A4 B1 B2 B3 B5 C1
C2 E1 E5
LANGLEY
A.AATV SERVICE
19-9316-194TH STREET
V3T 4W2 (604) 888-7777
A1 A2 A3 A4 B1 B2 B3 B5 E1
Z1
LANGLEY
FRASER VALLEYVIDEO
REPAIR
21271-40TH STREET
V3A 4P5 (604) 530-6094
A1A2A3A4B3Z1
MAPLE RIDGE
HANey TV & SOUND
SERVICE
11781 FRASER ST
V2X 6C6 (604) 467-4955
A1 A2 A3 B1 B2 B3 B5 C1 E1
E6
NANAIMO
KEBB ELECTRONICS
CLINIC LTD
1609ABOWENRD
V9S 1G5 (604)754-6335
A1 A2 A3 A4 B1 B3 C1 E1
PORT ALBERNI
OUALITY ELECTRONICS
LTD.
4414 MARGARET STREET
V9Y6G6(604)724-3422
A1 A2 A3 A4 B1 B2 B3 B5 E1
E5
POWELL RIVER
DIAMOND TV AND RADIO
4844 JOYCE AVE
V8A 3B8 (604) 485-5793
A1 A2 A3 B1 B2 B3 C1 E1 E5
PRINCE GEORGE
ABC TV & STEREO
1-1839 1ST AVENUE
V2L 2Y8 (604) 564-9018
A1 A2 A3 B1 B2 B3 B5 C1 E1
Z1
RICHMOND
ELTEX ELECTRONIC
SERVICES
4351 NO.3 ROAD
V6X 2X8 (604) 270-8480
A1 A2 A3 A4 B1 B2 B3 B4 C1
E1 E2 E5 F2
RICHMOND
MICROTECH SERVICE
CORP
130-21885 ROAD
V6X 2T1 (604) 276-8324
B5
RICHMOND
RRVIDEOMASTERLTD
5471MINORUBLVD
V6X2B1(604)270-7288
A1 A2 A3 A4 B1 B2 B3 Z1
SECHLT
BEACON ELECTRONICS
BB1HEATHERBD
VON3A0(604)885-5963
A1 A2 A3 A4 B1 B2 B3
E5
SURREY
GUILDFORD ELECTRONICS
LTD
113-9547 152ND STS
V3R 5Y5 (604) 581-2272
A1 A2 A3 A4 B1 B2 B3 B5 C1
E1 E5 Z1
TERI
ELECTRONICS PLUS
4617 LAZELLE AVE
V8G 1S3 (604) 635-4577
A1 A2 A3 A4 B1 B2 B3 B5 C1
C2 E1
TEB
THE TV SHOP
4807 HAMER AVE
V8G2E5(604)635-4695
A1 A2 A3 A4 B1 B3 E1
VANCOUVER
VANCOUVER MICRO
SERVICE
2643 KINGSWAY
V5R 4H4 (604)433-2446
A1 A2 A3 A4 B1 B2 B3 B5 C1
E1 E5
VICTORIA
AMP SERVICE CENTRE
101 3347 OAK ST.
V8X 1R2 (604) 475-3065
A1 A2 A3 A4 B1 B2 B3 B4 C1
E1
VICTORIA
BC SOUND & RADIO
SERVICE
1805 FORT STREET
V8R 1J6 (604)595-4225
A1 A2 A3 A4 B1 B2 B3 C1 C2
E1 E5
NORTHWEST TERRITORIES
YELLOWKNIFE
ARCTIC APPLIANCE
SERVICE
4310-50TH AVE
X1A 1B5 (403) 920-4511
E1 E2 E4 E5
ALBERTA
CALGARY
ABBA ELECTRONICS
1916 37TH STREET SW
T3E 3A3 (403) 240-2669
A1 A2 A3 A4 B1 B2 B3 B5 E1
E2
CALGARY
CITY-WIDE ELECTRONICS
311-36 AVE SE
T2G 1W1 (403) 243-0925
A1 A2 A3 A4 B1 B2 B3 C1 E1
CALGARY
MICROTECH
2735-39 AVE NE 100
T3E 5R9 (403) 250-7041
A1 A2 A3 A4 B1 B3 C1 E1
CALGARY
NATIONAL ELECT SERVICE
ASC2
1266-73 AVENUE S.E.
T2H 2V5 (403) 252-6988
A1 A2 A3 A4 B1 B2 B3 B5 C1
E1 E5
CALGARY
SOUTHLAND CROSSING TV
9827-C HORTON SW
T2V 2X5 (403) 255-9647
A1 A2 A3 B1 B2 B3 B4 C1 E1
E2 E5 F2
CAMROSE
ELECTRONIC SERVICES
4612-49 AVE
T4V0M6(403)672-3601
B1 E1 E2 Z1
CANMORE
MOUNTAIN ELECTRONIC
SERVICES
BOX24591316RAILWAY
AVE TOL OMO (403) 678-64
A1 A2 A3 B1 B2 B3 B5 C1 C2 E1 E2 E5
EDMONTON
STERLING T.V. AND VIDED
15608-116 AVE
T5M385(403)455-8725
A1 A2 A3 A4 B1 B2 B3 B5 C1
E1 E5
EDMONTON
VIDED TECH
5310-89ST
T6E5P9(403)468-5856
A1 A2 A3 A4 B1 B3 C1 E1
GRAND CENTRE
CENTRE TV AND
APPLIANCE SERV
5804-50TH AVE
T0A 1T1 (403) 594-2425
A1 A2 A3 A4 B1 B3 B5 C1
GRANDE PRAIRIE
G.P. ELECTRONICS
SERVICE
10702-100TH STREET
T8V 3X8 (403) 539-4240
A1 A2 A3 A4 B1 B3 B5 C1
GRANDE PRAIRIE
T.V. KORNER
9827-97THAVE
T8V0M9(403)539-4805
A1 A2 A3 A4 B1 B2 B3
C2 E1
INNISFAIL
VIDEOTRONICS SERVICE
NO 3,4912-52 STREET
14G 187(403)227-4111
AT A2 AS BT B2 BS CT
LETHBRIDGE
FAITH ELECTRONICS LTD.
1422-2 AVE SOUTH
T1J 0E9 (403) 327-2977
A1 A2 A3 A4 B1 B2 B3 C1 E1
E5 Z1
LETHBRIDGE
1815-2nd AVENUE SOUTH
T1J0E8 (403) 328-4977
A1 A2 A3 B1 B2 B3 E1
MEDICINE HAT
GUST'S RADIO TV
913 SOUTH RAILWAY ST. S.E.
T1A 2W3 (403) 526-6815
A1 A2 A3 A4 B1 B2 B3
MEDICINE HAT
TEL-RAY TELEVISION
683 SOUTH RAILWAY
STREET SE
T1A 2V8 (403) 526-4588
A1 A2 A3 B1 B3 E1
PEERS
KARLS TV SERVICE
C.2.SITE 19,RR1
TOE 1W7 (403) 693-3737
B1 B2 B3 Z1
RED DEER
MIDWAY APPLOANCE
SERVICE
BAY 11-7895 49 TH AVE
T4N 6K2 (403) 342-1353
E1 E2 E3 E4 E5
BED DEER
TOWN & COUNTRY
RADIO & TV
4A 4999-76 STREET
T4P 1T5 (403) 347-4388
A1 A2 A3 B1 B2 B3 E1 E5
VERMILION
VERMILION COMMUNITY
T.V. BOX 786
T0B 4M0 (403)853-5007
A1 A2 A3 B1 B2 B3 C1 E1
E5
SASKATCHEWAN
CARROT RIVER
CHANNEL 16
ELECTRONICS BOX 416
SOE 0LO (306) 768-3784
A1 A2 A3 B1 B2 B3 C1 C2
KINDERSLEY
not all listed service centres repair all product, please see product code listed below
MANITOBA
BRANDON
TELEVISION CITY
1639 ROSSER AVE
CAMBRIDGE ELECTRONICS
LTD
645 KING STE
N3H 3N7 (519) 653-2120
A1 A2 A3 A4 B1 B2 B3 B5 C1 C2
CAMBRIDGE
PRESTON TV AND RADIO
238 LOWTHERTN
N3H 1Y1 (519)653-0130
A1 A2 A3 B1 B2 B3 B5 E1
COBOURG
RON LINTON APPLIANCE
SERVICE
434 KING ST W
K9A2N7 (805) 372-8761
E1 E2 E4 E5
COBOURG
UNITED TELEVISION
COBOURG LTD.
66 KING STREET EAST
K9A 1K9 (905) 372-6832
A1 A2 A3 A4 B1 B2 B3 E1 E5
CORNWALL
CURRIER REPAIR SERVICE
360 BALMORAL AVE
K6H 6K1 (613) 932-8235
E1 E2 E3 E4 E5
CORNWALL
TIM'S ELECTRONICS
1124 PAULOTREET
K6H 6H5 (613) 933-4037
A1 A2 A3 B1 B2 B3 C1 E1 E5
DOWNVIEW
RAYJAC ELECTRONICS
701 PETROLIA ROAD
M3J 2N6 (416) 661-5237
A1 A2 A3 A4 B1 B3 B5 C1 E1 Z1
ELGINBURG
HALL ELECTRONIC
SERVICE
2162UNITY RD
KOH1Mo (613)541-0808
A1 A2 A3 A4 B1 B2 B3 B5
ELLIOT LAKE
SUPERIOR AUDIO AND
VIDEO
184 ONTARIO AVE
P5A 1Y4 (705) 848-2366
A1 A2 A3 A4 B1 B2 B3 C1 E1
HAMILTON
ALL BEST AUDIO VIDEO
LTD.
70 NEBO ROAD, UNIT 3
L8W 2E3 (905) 575-3486
A1 A2 A3 A4 B1 B2 B3 C1 E1
E2 E3 E5
HAMILTON
COLTECH ELECTRONICS CO. CO.,LTD
INC 308 RENORA AVE LDF SING (205) 591-556
L8E 2W2(905)861-8606 11:40-10:4011:31-10:30-02:51
HORNERPAYNE
BOZEC ELECTRIC
90FRONTST
POM 120 (807) 868-3023
E1 E2 E4 E5
KAPUSKASING
MICHEL T.V. SERVICE
110 BRUNELLE NORTH
P5N 2M2 (705) 335-5223
A1 A2 A3 A4 B1 B2 B3 B5 C1
E1 Z1
KINGSTON
DEPOT CONSUMER
SERVICE LTD.
607 GARDINERS RD
K7M3Y4(613)384-1660
A1 A2 A3 B1 B2 B3 C1 E1 E2
E3 E5
KINGSTON
MONTGOMERY
ELECTRONICS
3079 PRINCESS STREET RR 3
L7L 4V2 (613) 389-2846
A1 A2 A3 A4 B1 B2 B3 E1 E2
E5
KITCHENER
TOP TECH ELECTRONICS
(KITCHEN)
907 FREDERICK STREET
N2B 2B9 (519) 578-7600
Z1
LONDON
ADVANCED AUDIO 8 VL DED
SERVICE
60 MEG DRIVE, UNIT 14
N6E3T6(519)686-4334
A1 A2 A3 A4 B1 B2 B3 C1 E1
LONDON
TOP TECH ELECTRONICS
(LONDON)
310 ADELAIDE ST SOUTH
N5Z 3L2 (519) 686-6515
A1A2A3A4B1B2B3Z1
MARKHAM
MULTI-ELECTRONICS
SERVICE
190 DON PARK ROAD UNITS
L3R 2V8 (905) 475-5068
B3 B4
MARKHAM
RAMTEL INC.
39 RIVIERADRIVEUNIT11
L3R BN4 (905) 940-3166
B5
MARKHAM
RELIABLE AUDIO
550 ALDEN ROAD UNIT 104
L3R 6A8 (905) 477-1222
A1 A2 A3 A4 B1 B2 B3 E1 E5
MISSISSAUGA
CENTECH ELECTRONICS
1330 MIDWAY BLVD., UNIT 3
LST2G8(905)564-8585
A1A2A3B1B3C1E1E1E2
MISSISSAUGA
KODAN ELECTRONICS
3045 SOUTH CREEK RD.50
L4X2X7 (905)625-5613
A1 A2 A3 A4 B1 B2 B3 B4 C1
E1
MISSISSALGA
NUMBER ONE
ELECTRONICS
1535 MEYERSIDE DRIVE
UNIT 17
L5T 1M9 (905) 564-1100
A1 A2 A3 A4 B1 B2 B3 C1 E1
E
MISSISSAUGA
PC SERVICE PARTNERS
6715 MILLCREEK DRIVE.
SUITE #1
L5N 5V2 (905) 567-3239
MISSISSAUGA
WINDWOODVIDEO INC.
3080 NINDWOOD DRIVE
L5N2K5(905)542-0333
A1A2A3A4B1B2B3B5C1
C2E1E2E3E4E5
NEWMARKET
HEXTECH CONSUMER
ELECTRICS 731 DAVIS DR.
L3Y 2R2 (905) 830-6797
A1 A2 A3 A4 B1 B2 B3 E1 E5
NIAGRA FALLS
BK ENTERPRISES
6355 ARMSTRONG DRIVE
1.2H 218 (905)374-0780
B3
NORTH BAY
ADRIENS APPLIANCE
SERVICE 1374 FRANKLIN ST
P1A2S2(705)474-1755
E1 E3 E4 E5
NORTH BAY
J.E.F. ELECTRONICS LTD
430 OAK STREET EAST
P1B 1A5 (705)476-2644
B1Z1
WINNIPEG
T.R. ELECTRONIC
SERVICES
1646STJAMESSTREET
B3H 0L3 (204)772-6834
A1A2A3A4B1B2B3B4E1
E5
WINNIPEG
THE VIDED RE-FIT SHOP
3147 PORTAGE AVE
R3K0W4 (204) 831-0862
A1 A2 A3 B1 B2 B3 E1 Z1
NORTH BAY
R.J. ELECTRONICS
101 FERRIS DRIVE
P1A 8Z4 (705) 474-0830
A1 A2 A3 A4 B1 B2 C1 E1 E5
OSHAWA
VCB CLINIC
1300 KING ST.E26
L1H8J4(905)723-6373
B1 B3 E1
OTTAWA
REGIONAL HOME
APPLIANCE
1221 NEWMARKET ST
K1B3V1(613)741-6520
A1A2A3B1B2B3E1E2E3
E4 E5
OTTAWA (GLOUCHESTER)
HOME ELECTRONICS
CENTER LTD
5310 CANOTEC UNIT 34
K1J9N5(613)746-7700
A1 A2 A3 A4 B1 B2 B3 C1 E1
E2
OTTAWA (NEPEAN)
CAMSERV
52AITARES DR UNIT 16
K2E 7Z1 (613) 226-3375
B3 B4 B5
OTTAWA (NEPEAN)
HOME ELECTRONICS
CENTRE
3-1950 MERIVALE RD
K2G 5T5 (613) 723-9194
A1A2A3A4B1B2B3C1C2
E1 E2 E4 E5
OTTAWA (NEPEAN)
TELE SERVICE
ELECTRONICS LTD
1891 MERIVALE ROAD
K2G 1E5 (613) 224-7748
A1 A2 A3 A4 B1 B2 B3 B4 E1
E5 F2 Z1
OWEN SOUND
HOME ELECTRONICS
REPAIR180B.12TH.ST.E
N4K 1B7 (519)371-3808
A1 A2 A3 B1 B2 B3 F1
PEMBROKE
M & N ELECTRONICS
574 MILLER STREET
K8A 5Z9 (613)735-5839
A1A2A3A4B1B2B3E1
PEMBROKE
MURRAY LEACH
APPLIANCE
152 MUD LAKE RD
K8A 6W4(613)732-4871
E1 E3 E4 E5
PETERBOROUGH
BILL HAYES RADIO & TV
213 HUNTER STREET W
K9H 2L1 (705) 742-0056
A1 A2 A3 A4 B1 B2 B3 B5 C1
E
PORT BERRY
PICTURE PERFECT TV
SERVICE
72 WATER STREET
L9L 1J2 (905) 985-9500
A1A2A3A4B1B2B3E1Z1
RICHMOND HILL
ONE STDP ELECTRONICS
SERVICE
85 WEST WILMOT ST. #7
L4B1K7(905)882-0700
F1
SARNIA
DUAL ELECTRONICS
153 MITTON STREET
NORTH
N7T6G9(519)344-2323
A1 A2 A3 A4 B1 B2 B3 E1 E5
Z1
SARNIA
KEELANS SERVICE CENTRE
190 MAXWELL STREET
N7T5C3(519)337-7557
A1 A2 A3 A4 B1 B2 B3 E1 E2
E3 E4 E5 Z1
SCARBOROUGH
AAB-TECH ELECTRONICS
INC
1050 MCNICOLL AVE UNIT 10
M1W 2L8 (416) 490-0200
A1 A2 A3 A4 B1 B2 B3 C1 E1 E5
SCARBOROUGH
CONSUMERS
ELECTRONICS
87 THORNMOUNT DRIVE 33
M1B5S5(416)281-8411
A1 A2 A3 A4 B1 B2 B3 B4 C1
E3 E4 E5
SIMCOE
K.C. ELECTRONIC SERVICE
40 SYDENHAM ST.
N3Y1R7(519)428-2803
A1 A2 A3 A4 B1 B2 B3 B5 E1 E5
SIQUX LOOKOUT
ADI'S ELECTRONICS
BOX582
P8T1A8(807)737-2946
A1A2A3B1B2B3
SUDBURY
KINGOWAY ELECTRONICS
LTD
1106 KINGOWAY ROAD
P3B2E5(705)566-9290
A1 A2 A3 A4 B1 B2 B3
SUDBURY
STRINGERS ELECTRONICS
1899 LASALLE BLVD
P3A 2A3 (705) 566-5177
A1 A2 A3 A4 B1 B2 B3 E1 E5
CENTRE DE SERVICE AUTORISÉ INDEPENDENT PAR
LG ELECTRONICS CANADA, INC.
AUTHORIZED INDEPENDENT SERVICE CENTERS
not all listed service centres repair all product, please see product code listed below
ONTARIO
THUNDER BAY
S & R ELECTRONICS
805 W FREDERICA ST
P7E 3X4 (807) 475-4956
A1 A2 A3 A4 B1 B2 B3 C1 E1
E5
THUNDER BAY
SOUND STEREO SERVICE
189 SOUTH ALGOMA
STREET
P7B 3C1 (807) 344-6763
A1 A2 A3 A4 B3 C1 Z1
TILLSONBURG
LES BOYS LTD
3 SIMCOE STREET
N4G 2H4 (519) 842-5904
E1 E2 E4 E5
TILLSONBURG
VATCHER APPLIANCE
SERVICE
108B CONCESSION ST.
EAST
N4G1P7(519)688-9030
E1 E3 E4 E5
TOBONTO
DOWNTOWN AUDIO AND
VIDEOELT
457 BATHURST ST.
M5T2S9(416)594-1468
A1 A2 A3 B1 B5 C1 C2 E1 Z1
TORONTO
DOWNTOWN
ELECTRONICS, JOHN LU
1643 ST CLAIR AVE W
M6N 1H7 (416) 653-2828
A1 A2 A3 A4 B1 B2 B5 C1 C2 E1 E5
WATERBLOO
A-V ELECTRONICS
SERVICES 450 WEBER STN
N2L4E7(519)884-866
A1 A2 A3 A4 B1 B3 B5 E1 F2
WATERLOO
NARA ELECTRONICS LTD.
372 KING STREET NORTH
N2J 2Z3 (519) 888-9696
A1 A2 A3 A4 B1 B3 B5 E1 F2
WATERLOO
WATERLOO APPLIANCE
SERVICE
90 FROBISHER DRIVE
N2V 2A1 (519) 884-2507
E1 E3 E4 E5
WAWA
SUPERIOR ELECTRIC
18 KLONDIKE ST BOX 834
POS 1KO (705) 856-2864
E1 E2 E3 54 E5
WHITBY
VIEWCOM ELECTRONICS
INC.
133-1/2 BROCK ST. NORTH
LIH 4H3 (905) 430-0954
A1 A2 A3 A4 B1 B3 C1
WINDSOR
CRESCENT TELEVISION
LTD.
3033 MARENTETTE AVENUE
N8X4G1(519)969-1622
A1 A2 A3 A4 B1 B2 B3 B4 C1
E1 E5 Z1
WINDSOR
FACTORY APPLIANCE
SERVICE
3647 RIBERDY RD
N8W3V9 (519) 972-0558
E1 E3 E4 E5
WINDSOR
P. L. G. ELECTRONICS
3314 WALKER RD
N8W3S1(519)972-7666
A1 A2 A3 B1 B2 B3 C1 E1 E5
QUEBEC
ALMA
LOUIS DION INC.
25 BOUL AUGER O
G8B 2A6 (418) 662-3073
E3 E4 E5
AMOS
A.P. ELECTRONIGUE ENR
92 RUE BEAUDRY
J9T 3V2 (819) 732-0844
A1 A2 A3
ANJOU
CIRCUITS ELECTRONIGUE
(6060) ENC
8155 LARREY
H1J 2L5 (514) 352-4111
A1 A2 A3 A4 B1 B2 B3 C1 C2
E1
BAIE COMEAU
ELECTROTECH
1680 BOUL LAFLECHE
G5C 1C9 (418) 589-7515
A1 A2 A3 A4 B1 B2 B3 C1 E1
BEAUPORT
ATELIER AUDIOVIDEO
J.F.M.INC
660 AVE. ROYALE
G1E 1Y7 (418)666-8182
A1 A2 A3 A4 B1 B2 B3 C1 C2
E1 E2
BRIGHAM
SERVICE LAROUETTE INC.
224 RUE DECELLES
JOE 1J0 (514)777-0770
E1 E2 E3 E4 E5
CHICOUTIMI
CLAUDE GIBARD TV ENR
786 RUE ST-PAUL
G7J3B7(418)549-8767
A1 A2 A3 A4 B1 B2 B3 E1 E5
Z1
CHICOUTIMI
TELEVIDEO AS. INC 2147
BOULEVARD TALBOT
G7H 5B1 (418) 696-2264
A1 A2 A3 A4 B1 B2 B3 E1 Z1
CHOMEDY LALAL
B&K AUDIO SERVICE
2025 BOUL FORTIN
H7S1P4(514)667-0491
A1 A2 A3 B1 B2 B3 B5 C1 E1
E5
DOLBEAU
VF ELECTRONIOUE ENR
1849 BOUL WALLBERG
G8L 1J1 (418) 276-8191
A1 A2 A3 B1 B2 B3 C1 C2 E1 E5
DRUMMONOVILLE
MORISETTE SERVICE INC.
4571 BLVD ST JOSEPH
J2A 1B4 (819) 472-2469
E1 E4 E5
DRUMMONOVILLE
ROSS ELECTRONIOUE INC.
- BOUL. JEAN DE
BREBOELIF
J2B 4T2 (819) 477-1522
A1 A2 A3 A4 B1 B2 B3 B5 C1
E1 Z1
OUPARGUET
GAETAN LACASSE
SERVICE
1675 RGV11 CP161
J0Z1W0(819)948-2248
E2 E4 E5
GATINEAU
COSMO-TECH SERVICES
INC.
868 MALONEY BLVD EAST
J8P1H1(B19)663-4490
A1 A2 A3 A4 B1 B2 B3 E1 E2
E3 E4 E5
GRANBY
LA CLINIQUE DU SON INC.
78 ASSOMPTION
J2G 3S1(514) 375-2323
A1 A3 B1 B2 B3 B5 E1 E5
IBERVILLE
ALAIN BONNEAU
TELEVISION INC.
21 BANG QT-EDOLIARD
J2X5G3(514)347-0563
A1 A2 A3 A4 B1 B2 B3 B5 E1
E5
JOLIETTE
B.G. ELECTRONIOUE
150 ST. PIERRE SUD
J6E5Y7(514)759-3091
A1 A2 A3 A4 B1 B2 B3 E1 E5
JONQUIERRE
SERVICE TV ARVIDA INC.
2343 MATHIAS
G7S3V6(418)548-3059
A1 A2 A3 B1 B2 B3 B5 C1 E1
E5
LA MALBAIE
ALAIN MURRAY
ELECTRONIOLIE
11 RUECIMON
G5A 1E5 (418) 665-3590
A1 A2 A3 B1 B2 B3 B5 C1 Z1
LATUQUE
LED PEPIN TV ENR.
639 DESBIENS
G9X2K2(819)523-3243
A1 A2 A3 B1 B2 B3 C1
LACHINE
CENTRE DE SERVICE DEFI
INC.
10500 COIE DE LIESSE STE 55
H8T1A4(514)633-9313
A1 A2 A3 A4 B1 B2 B3 B5 E1
E2 E5
LEMOYNE
VIDEOSUD
200 CHARRON
J4R 2K9 (514)671-9572
A1 A2 A3 A4 B1 B2 E1
LEVIS
SELECTROTEC
4717 BOUL. DE LA RIVE
SUD
G6W1H5(418)835-3966
A1 A2 A3 A4 B1 B2 B3 C1 E1
MANIWAKI
SERVICE FLANSBERRY
INC
375 BOUL DESJARDINS
J9E 2E6 (819)449-2212
E1 E3 E4 E5
MATANE
FORTIN TV SERVICE
273 RUE ST-PIERRE
G4W2B7(418)562-3571
A1A2A3B1B2B3G1G2E1
E5Z
MISTASSINI
SERVICE SERGE MICHAUD
122 RUE BOUDREAULT
GOW 2C0 (418) 276-1282
E1 E2 E3 E4 E5
MONT LAURIER
SERVITRONIUE ENR
G4R 3N2 (418) 962-2391
A1 A2 A3 B1 C1
SEPTILES
ELECTRO-REF SERVICES
161 PEREDIVET
G4R 3P8 (418) 962-9186
E1 E4 E5
SHERBROOKE
JACOULES BERGEBON TECH
2226 KING ST W
J1J2E8(819)569-1676
A1 A2 A3 A4 B1 B2 B3 B5 E1
ST JEROME
POIRIER RADIO SERVICE
506 RUE ST, GEORGES
J7Z 5B3 (514) 438-3375
A1 A2 A3 A4 B1 B3 E1
ST EUSTACHE
SERVICE OS TV RIVE NORD
307 GRANDE COTE
J7P1C6(514)623-6060
A1 A2 A3 B1 B2 E1 E5
ST GABRIEL DE BRANDON
RICHARD HENRICHON
ELECTRONICUE
37BOULEVARDHOULE
JOK 2NO (514) B35-2218
A1 A2 A3 B1 B2 E1
ST HYACINTHE
CENTRE SERVICE PLUS INC.
2145 STE ANNE SUITE 101
J2S 5H5 (514) 771-1492
A1 A2 A3 A4 B1 B2 B3
ST LAURENT
HECOTRON LTEE
4800 COTE VERTLI
H4S 1V9 (514) 331-5720
A1 A2 A3 A4 B1 B2 B3 C1 E1
E5
ST PIERRE LES BECOUSTS
J.B.ELECTRONIQUE ENF
599 MARIE VICTORIN
GOX 2Z0 (819) 263-2559
A1 A2 A3 A4 B1 B2 B3 C1 E1
E5
ST. AGAPIT
SERVICE DETELE
JACOUCS CHABOT
C.P.460
GOS 1Z0 (418) 888-3857
A1 A2 A3 B1 B2 B3 E1
STE CECILE DE MILTON
MICHAUDVIDEOTV
284 PRINCIPALE
J0E2C0(514)777-2814
A1 A2 A3 A4 B1 B2 B3
TROIS RIVIERE-QUEST
LABTRONIC
5115 BOUL JEAN XXIII
G8Z 4A5 (819) 373-0066
A1 A2 A3 A4 B1 B2 B3 C1 E1
E2
VALD'OR
VALDORREFREGRATION
LTEE.
1273 SIEME RUE
JOP 4A1 (819) 825-2505
VALLEYFIELO
LES ENTREPRISES
ELECTRONOUS
193 RUE MADEN
J6S3V7(514)373-5466
A1 A2 A3 B1 B2 B3 E1 Z1
VICTORIAVILLE
ACTION L.M. SERVICE INC.
310ST.GEORGES
G6P 3A2 (819)751-0992
E1 E2 E3 E4 E5
VICTORIAVILLE
GERARD MICHAUD
ELECJRONOUE
88 NOTRE DAME EST
G6P 3Z6 (819) 758-1877
A1 A2 A3 A4 B1 B2 B3 C1 E1
E5
WINDSOR
WINDSOR ELECTRONIOUS
INC
74-2IEME AVENUE
J1S 1Z3 (619) 845-4202
A1 A2 A3 A4 B1 B2 B3 E1 E5
| CENTRE DE SERVICE AUTORISÉ INDEPENDENT PAR LG ELECTRONICS CANADA, INC. AUTHORIZED INDEPENDENT SERVICE CENTERS not all listed service centres repair all product, please see product code listed below | ||||
| NEW BRUNSWICK | ||||
| BATHURST AL3 TV AND RADIO 579 PATTerson CRES E2A 1Z9 (506) 546-5763 B1 E1 BERESFORD BOUCHARD APPLIANCE REPAIRS BOX 4062 E08 1H0 (506) 548-3938 E1 E2 E4 E5 BERTRAND MM REPARATION ELECTRONIQUE RR 1 SITE 22 BTE 4 E08 1J0 (506) 727-7884 A1 A2 A3 B1 B2 C1 C2 | CAMPBELLION B & G IDEAL SERVICE LTD 81 WATER STREET E3N 1A9 (506) 753-5474 A1 A2 A3 B1 B3 B5 E1 EDMUNDSTON PICARD SERVICE INC. 2-47E AVENUE E3V 3BB (506) 739-9475 E1 E2 E3 E4 E5 EDMUNSTON DATA ELECTRONICS 25 HILL STREET E3V 1H7 (506) 735-4073 A1 A2 A3 B1 B2 B3 B5 C1 E1 | FREDERICTON CYGNUS TECHNOLOGY LTD 154 HAIN STREET E3A 1C8 (506) 459-4606 A1 A2 A3 A4 B1 B2 B3 B5 E1 GRAND FALLS DONALD PICARD 748 3RD AVE C.P. 743 E01 1M0 (506) 473-5496 B1 B2 B3 MONCTON BJ.W. ELECTRONICS LTD 59 PACIFIC AVE. E1E 2G2 (506) 857-2118 A1 A2 A3 A4 B1 B2 B3 B1 E1 E5 Z1 | MONCTON CHAMPLAIN ELECTRONICS LTD 247 LEWISVILLE RD E1A 6T1 (505) 854-6663 A1 A2 A3 A4 B1 B2 B3 E1 E5 ORMOCTO HARTS TV 9 SMITH ST RR3 E2V 2G3 (506) 357-9785 A1 A2 A3 A4 B1 B3 B5 C1 E1 SACKVILLE TANTRAMAR ELECTRONICS 70 PRESENT ST BOX 1686 E0A 3C0 (506) 536-3953 A1 A2 A3 B1 B2 B3 B5 E1 E5 | ST JOHN GALBRAITH ELECTRONICS LTD 646-FAIRVILLE BLVD E2M 3M2 (506) 635-0317 A1 A2 A3 B1 B2 B3 E1 E5 WOODSTOCK PLOOM ELECTRONICS BOX 798 LOWER WOODSTOCK EOJ 280 (506) 328-3205 A1 A2 A3 B1 B3 C1 E1 |
| NOVA SCOTIA | ||||
| ANTIGONISH MIKE'S HOME FURNISHING 89 ST. ANDREWS STREET B2G 2G9 (902) 663-2886 A1 A2 A3 B1 B2 B3 C1 C2 BRIDGWATER HERLIN ELECTRONICS 209 HIGH ST SUITE A B4V 1W2 (902) 543-1313 A1 A2 A3 A4 B1 B3 B5 E1 | COLDBROOK N & B EATON MARKETING LTD 2687 POPLARD DRIVE B4R 1A9 (902) 679-1852 A1 A2 A3 B1 B2 B3 C1 E1 E5 DARTMOUTH E.P. BLIGHT 169 MAIN STREET B2X 1S1 (902) 434-8306 A1 A2 A3 B1 B2 B3 B5 C1 C2 E1 Z1 | DARTMOUTH (HALIFAX) MUNRO ELECTRONIS SERVICE 75 AKERLEY BLVD UNIT J B3B 1R7 (902) 468-4991 A1 A2 A3 A4 B1 B2 B3 B5 E1 E3 KINGSTON GE KENNEY ELECTRONIC REPAIR 1050 WHITTTINGTON DRIVE BOP 1R0 (902) 765-6448 A1 A2 A3 A4 B1 B2 E1 | NEW MAINS VIDEO WORLD 1009 KENTUCKY COURT B4N 4N1 (902) 681-7577 B4 YARMOUTH BLUENOSE ELECTRONICS 19 FIRST STREET B5A 1S9 (902) 742-8885 B1 B2 B3 Z1 | PEL CHARLETTETOWN GALLANT ELECTRONICS 96 MOUNT EDWARD ROAD PO 2961 C1A 8C5 (902) 892-3100 A1 A2 A3 A4 B1 B2 B3 |
| NEW FOUNDLAND | ||||
| CORNER BROOK A-1 ELECTRONICS 98 WEST STREET A2H 2Z3 (709) 634-1581 A1 A2 A3 A4 B1 B2 B3 B5 C1 E1 Z1 | PASADENA WILSON TV SERVICE 6 ELMWOOD CRESCENT A0L 1K0 (709) 686-2617 A1 A2 A3 B1 B2 | WABUSH CLIFFS TV SERVICE WABUSH PLAZA. BOX 785 A0R 1B0 (709) 282-3941 A1 A2 A3 B1 B2 B3 C1 E1 E5 | IDENTIFICATION DES CONDES AUDIO "A1" = Radio Portafil/Cassette "A2" = Audio maison "A3" = Audio Hi-Fi "A4" = Lecteur audionumerique | |
| VIDEO "B1" = Television "B2" = In Home Service "B3" = VCR & Accessories "B4" = Camcorder | VIDEO "B1" = Téhéviseur "B2" = Service maison "B3" = Magnétique & accessorires "B4" = Caméscope | APAREL MENAGER "E1" = Four micro-ondes "E2" = Four a pain "E3" = Air conditioné "E4" = Refrigerateur "E5" = Service maison | ||
| AUTOMOTIVE "C1" = Radio/Tape/Amp. "C2" = Removev & Installation | AUTOMOTIVE "C1" = Autoradio/lecteur/Ampli. "C2" = Installation | EN AFFAIRIES "F1" = Téchéophone & access. "F2" = Téchéopieur "B5" = Moniteurs d'ordinateur | ||
| APPLIANCE "E1" = Microwave Oven "E2" = Bread Bakery "E3" = Air Conditioner "E4" = Refrigerateur "E5" = In Home Service | APAREL MENAGER "E1" = Four micro-ondes "E2" = Four a pain "E3" = Air conditioné "E4" = Refrigerateur "E5" = Service maison | EN AFFAIRIES "F1" = Téchéophone & access. "F2" = Téchéopieur "B5" = Moniteurs d'ordinateur | ||
| BUSINESS EQUIPMENT "F1" = Telephone & Attach "F2" = Fax "B5" = Computer Monitors | BUSINESS EQUIPMENT "F1" = Telephone & access. "F2" = Téchéopieur "B5" = Moniteurs d'ordinateur | BUSINESS EQUIPMENT "F1" = Téchéophone & access. "F2" = Téchéopieur "B5" = Moniteurs d'ordinateur | ||

LG
PRIVILEGE
website: http://www.LGEService.com e-mail: http://www.LGEService.com/techsup.html
FOUR À MICRO-ONDES
MANUEL DE L'UTILISATEUR ET GUIDE DE CUISSON
LIRE COMPLETEMENT CE MANUEL DE L'UTILISATEUR AVANT D'UTILISER LE FOUR
MV-1760T/1761T
N/P 3828W5A1603 Imprimé en Corre
TABLE DES MATIÈRES
TABLE DES MATIÈRES 2
MESURES DE PREVENTION 3
Brevages "beverage" 16
Guide de rechauffage 16
EZ on (MINUTE ADDITIONNELLE)
Example: To cook for 1 minutes.
Stop/ Clear