
GMI 11311 DX - Refrigerator GRUNDIG - Free user manual and instructions
Find the device manual for free GMI 11311 DX GRUNDIG in PDF.
| Product type | Built-in microwave oven |
| Brand | Grundig |
| Model | GMI 11311 DX |
| External dimensions (H x W x D) | 388 x 595 x 400 mm |
| Internal dimensions (H x W x D) | 206 x 328 x 368 mm |
| Capacity | 25 liters |
| Net weight | 18.5 kg |
| Power supply | 230 V ~ 50 Hz |
| Microwave power | 900 W |
| Grill power | 1000 W |
| Total consumption | 1450 W |
| Operating frequency | 2450 MHz |
| Current | 6.4 A |
| Main functions | Microwave, Grill, Combined, Defrost by weight and time, Auto cook (8 programs), Timer, Child lock, Quick start |
| Included accessories | Turntable glass plate, roller ring, grill rack |
| Installation type | Built-in (requires a 60 cm wide niche, min depth 55 cm, min height 85 cm from floor) |
| Cleaning and maintenance | Clean interior with a damp cloth and mild detergent; glass plate is dishwasher safe; do not use abrasive cleaners |
| Safety | Child safety lock, automatic stop when door opened, mandatory earthing |
| Emission class | ISM Group 2 Class B |
| Compliance | WEEE (2012/19/EU), RoHS (2011/65/EU) |
Frequently Asked Questions - GMI 11311 DX GRUNDIG
User questions about GMI 11311 DX GRUNDIG
0 question about this device. Answer the ones you know or ask your own.
Ask a new question about this device
Download the instructions for your Refrigerator in PDF format for free! Find your manual GMI 11311 DX - GRUNDIG and take your electronic device back in hand. On this page are published all the documents necessary for the use of your device. GMI 11311 DX by GRUNDIG.
USER MANUAL GMI 11311 DX GRUNDIG
natural_image
Abstract grayscale curled page corner on white background (no text or symbols)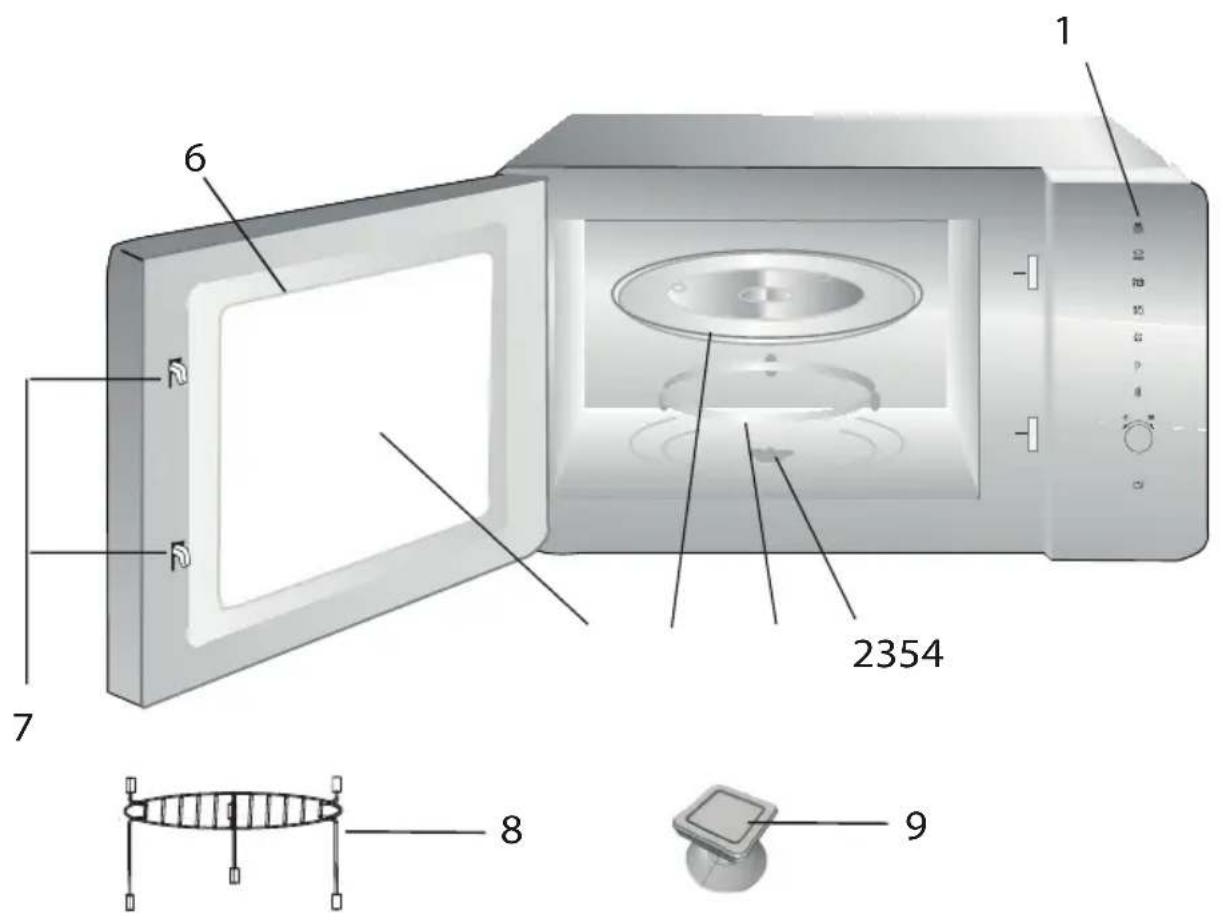
ENGLISH 05-31
ITALIANO 32-60
NORSK 61-87
ROMÂNA 88-116
DEUTSCH 117-143
FRANÇAIS 144-170
NEDERLANDS 171-197
POLSKI 198-225
CESKY 226-250
SLOVENSKÝ 251-278
Important safety and environmental instructions
Important Safety
Instructions Read
Carefully And Keep For Future Reference
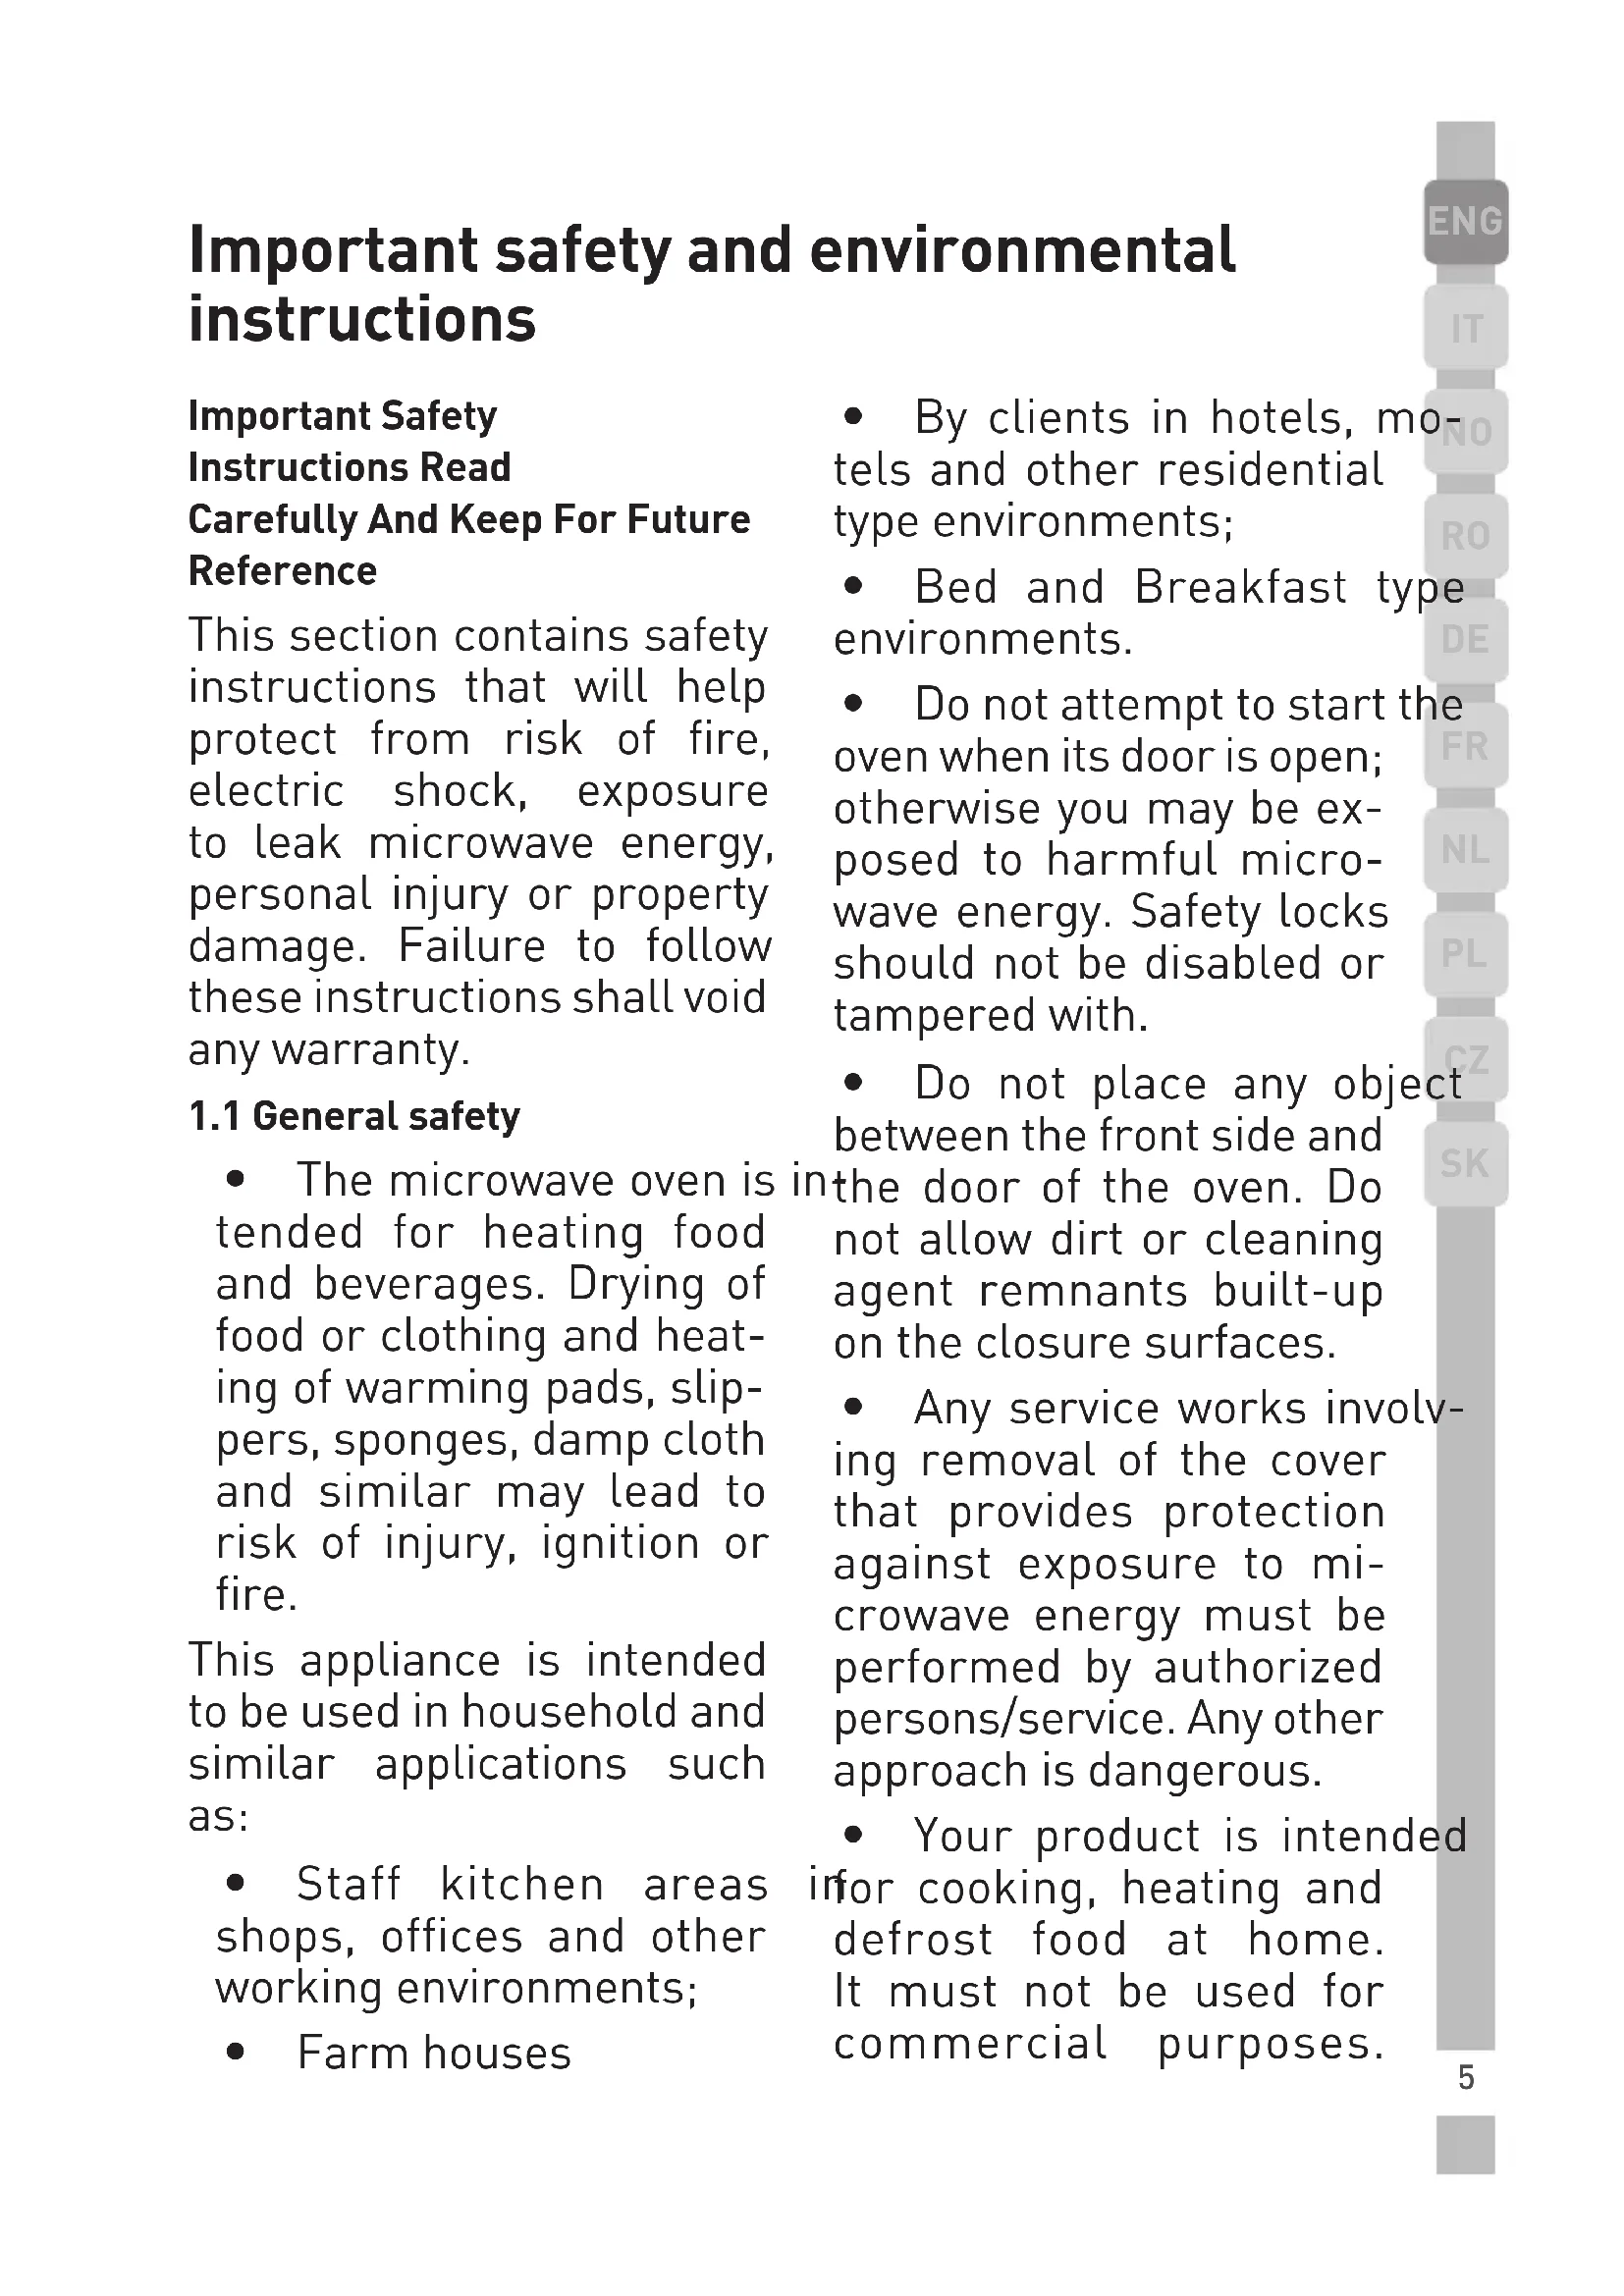
This section contains safety instructions that will help protect from risk of fire, electric shock, exposure to leak microwave energy, personal injury or property damage. Failure to follow these instructions shall void any warranty.
1.1 General safety
- The microwave oven is tended for heating food and beverages. Drying of food or clothing and heating of warming pads, slippers, sponges, damp cloth and similar may lead to risk of injury, ignition or fire.
This appliance is intended to be used in household and similar applications such as:
- Staff kitchen areas shops, offices and other working environments;
-
Farm houses
-
By clients in hotels, motels and other residential type environments;
- Bed and Breakfast type environments.
- Do not attempt to start the oven when its door is open; otherwise you may be exposed to harmful microwave energy. Safety locks should not be disabled or tampered with.
- Do not place any object between the front side and the door of the oven. Do not allow dirt or cleaning agent remnants built-up on the closure surfaces.
- Any service works involving removal of the cover that provides protection against exposure to microwave energy must be performed by authorized persons/service. Any other approach is dangerous.
- Your product is intended for cooking, heating and defrost food at home. It must not be used for commercial purposes.
Important safety and environmental instructions
Manufacturer shall not be held liable for damages that have arisen from misuse.
- The appliance should not be operated with an external clock timer or separate remote control system.
- Do not use this appliance outdoors, bathrooms, humid environments or in places where the it can get wet.
Before using the appliance for the first time, clean all parts. Please see the details given in the "Cleaning and Maintenance" section.
- No responsibility or warranty claim shall be assumed for damages arising from misuse or improper handling of the appliance.
- Operate the appliance for its intended purpose only as described in this manual. Do not use abrasive chemicals or steam on this appliance. This oven is particularly intended for heating and cooking the food.
- Never attempt to dismantle the appliance. No warranty claims are accepted for damage caused by improper handling.
It is not intended for industrial or laboratory use.
- Only use the original parts or parts recommended by the manufacturer.
- Do not use your appliance to dry clothes or kitchen towels.
- Do not leave this appliance unattended while it is in use.
e• Appliance becomes very hot while it is in use. Pay attention not to touch the hot parts inside the oven.
• Always use the appliance on a stable, flat, clean dry, and non-slip surface.
- Your oven is not designed to dry any living being. - Do not operate the oven empty.
Important safety and environmental instructions
- Only use utensils that suitable for use in microwave ovens.
- Cooking utensil may get hot due to the heat transferred from the heated food to the utensil. You may need oven gloves to hold the utensil.
- Utensils shall be checked to ensure that they are suitable for use in microwave ovens.
- Do not place the oven onto avoid a hazard.
stoves or other heat generating appliances. Otherwise, it may be damaged and the warranty becomes void.
- Microwave oven must be placed in a cabinet that is not in compliance with the installation instructions.
- Steam may come out while opening the covers or the foil after cooking the food.
- Use gloves while taking any kind of heated food out.
e• The appliance and its accessible surfaces may be very hot when the appliance is in use.
- Door and outer glass may be very hot when the appliance is in use.
1.1.1 Electrical safety
- If the supply cord is damaged, it must be replaced by the manufacturer or its service agent or a similarly qualified person in order to avoid a hazard.
- Beko Microwave Ovens comply with the applicable safety standards; therefore, in case of any damage on the appliance or no power cable, it should be repaired or replaced by the dealer, service center or a specialist and authorized service alike to avoid any danger. Faulty or unqualified repair work may be dangerous and cause risk to the user.
Important safety and environmental instructions
- Make sure that your mains power supply complies with the information supplied on the rating plate of the appliance.
The only way to disconnect the appliance from the power supply is to remove the power plug from the power outlet.
- Use the appliance with a grounded outlet only.
- Never use the appliance if the power cable or the appliance itself is damaged.
- Do not use this appliance with an extension cord.
- Never touch the appliance or its plug with damp or wet hands.
- Place the appliance in a way so that the plug is always accessible.
- Prevent damage to the power cable by not squeezing, bending, or rubbing it on sharp edges. Keep the power cable away from hot surfaces and naked flame.
s• Make sure that there is no danger that the power cable could be accidentally pulled or that someone could trip over it when the appliance is in use.
- Unplug the appliance before each cleaning and when the appliance is not in use.
- Do not pull the power cable of the appliance to disconnect it from its power supply and never wrap its power cable around the appliance.
• Do not immerse the appliance, power cable, or
power plug in water or any other liquids. Do not hold it under running water.
When heating food in plastic or paper containers, keep an eye on the oven due to the possibility of ignition.
- Remove the wire strings and/or metal handles of paper or plastic bags before placing bags suitable for use in microwave oven to the oven.
Important safety and environmental instructions
- If smoke is observ switch off or unplug the appliance and keep the door closed in order to stifle any flames.
- Do not use inside of oven to store something. Do not leave paper items, cooking material or food inside the oven when it is not being used.
- The contents of feeding bottles and baby food jars shall be stirred or shaken and the temperature shall be checked before consumption, in order to avoid burns.
- This appliance is a Group 2 Class B ISM equipment. Group 2 contains all ISM (Industrial, Scientific and Medical) equipment in which radio-frequency energy is intentionally generated and/or used in the form of electromagnetic radiation for the treatment of material, and spark erosion equipment.
Class B equipment is suitable for use in domestic establishments and establishments directly connected to a low voltage power supply network.
- Door or outer surface of the appliance may become hot when it is in use.
1.1.2 Product safety
- Heating the beverages with microwave may cause them to boil by splashing around after they have been taken out of the oven; so be careful when you are holding the containers.
- Do not roast anything in the oven. Hot oil may damage the components and materials of the oven, and it may even cause skin burns.
- Pierce food with thick crust such as potatoes, zucchini, apples and chestnuts.
- Appliance must be placed so that the rear side is facing the wall.
Important safety and environmental instructions
- Before moving the appliance, please secure the turntable to prevent damage to it.
- Eggs in their shell and whole hard-boiled eggs must not be heated in microwave ovens since they may explode, even after microwave heating has ended.
- Never remove the parts a the rear and sides of the appliance, which protect the minimum distances between the cabinet walls and the appliance in order to allow for the required air circulation.
1.2 Intended use
- The oven should cleaned regularly and any food deposits removed.
- Failure to maintain oven in a clean condition could lead to deterioration of the surface that could adversely affect the life of the appliance and possibly result in a hazardous situation.
- Cleaning the door seals and adjacent parts: Use hot soapy water. Clean with a dish cloth, do not scour. Do not use a metal or glass scraper for cleaning.
- WARNING: If the door or door seals are damaged, the oven must not be operated until it has been repaired by a competent person.
- WARNING: It is hazardous for anyone other than a competent person to carry out any service or repair operation which involves the removal of a cover which gives protection against exposure to microwave energy.
- WARNING: Liquids and other foods must not be heated in sealed containers since they are liable to explode.
- Microwave oven is intended for built-in use only.
Important safety and environmental instructions
- Do not use the appliance for anything other than its intended use.
- Do not use the appliance as a heat source.
- Microwave oven is intended to thaw, cook and stew food only.
- Do not over-cook foods otherwise, you may cause a fire.
- Do not use steam assisted cleaners to clean the appliance.
1.3 Children's safety
- Extreme caution is advised when being used near children and persons who are restricted in their physical, sensory or mental abilities.
This appliance can be used by the children who are at the age of 8 or over and by the people who have limited physical, sensory or mental capacity or who do not have knowledge and experience, as long as they are supervised with regard to safe use of the product or they are instructed accordingly or understand the risks of using the product. Children should not play with the appliance. Cleaning and user maintenance procedures should not be performed by children unless they are controlled by their elders.
- Danger of choking! Keep all the packaging materials away from children.
- Only allow children to use the oven without supervision when adequate instructions have been given so that the child is able to use the microwave oven in a safe way and understands the hazards of improper use.
Important safety and environmental instructions
• Due to excessive heat that
arises in grill and combination modes, children should only be allowed to use these modes under supervision of an adult.
- Keep the product and power cable so that they are inaccessible by children under 8 years old.
children to use the oven without supervision when adequate instructions have been given so that the child is able to use the oven in a safe way and understands the hazards of improper use.
- Do not cook the food directly on the glass plate. Put the food on adequate kitchen tools before placing them in the oven.
- The appliance and its cessible surfaces may be very hot when the appliance is in use. Keep children away.
- The appliance is not intended for use by persons (including children) with reduced physical, sensory or mental capabilities, or lack of experience and knowledge, unless they have been given supervised or instruction concerning use of the appliance by a responsible person for their safely.
- Young children should be supervised to ensure that they do not play with the appliance.
WARNING: Only allow
Important safety and environmental instructions
1.4 Compliance with the WEEE Directive and Disposing of the Waste Product:
This product complies with EU WEEE Directive (2012/19/EU). This product bears a classification symbol for waste electrical and electronic equipment (WEEE).
This product has been manufactured with high quality parts and materials which can be reused and are suitable for recycling. Do not dispose of the waste product with normal domestic and other wastes at the end of its service life. Take it to the collection center for the recycling of electrical and electronic equipment. Please consult your local authorities to learn about these collection centers.
1.5 Compliance with RoHS Directive
The product you have purchased complies with EU RoHS Directive (2011/65/EU). It does not contain harmful and prohibited materials specified in the Directive.
1.6 Package information

Packaging materials of the product are manufactured from recyclable materials in accordance with our National Environment Regulations. Do not dispose of the packaging materials together with the domestic or other wastes. Take them to the packaging material collection points designated by the local authorities.
Your microwave oven
2.2 Controls and parts
- Control panel
- Turntable shaft
- Turntable support
- Glass tray
- Oven window
- Door group
- Door safety interlock system
- Grill rack (only to be used in grill function and placed on the glass tray)
- Vacuum lifter for manual door opening (applies for model GMI 3140 B)
2.2 Technical data
CE
| Power consumption | 230 V~50 Hz,1450 W (Microwave)1000 W (Grill) |
| Output 900 W | |
| Operating frequency | 2450 MHz |
| Ampere value 6.4 A | |
| External dimensions | 388 mm (H) / 595 mm (W) / 400 mm (D) |
| Internal dimensions of the oven | 206 mm (H) / 328 mm (G) / 368 mm (D) |
| Oven Capacity 25 litres | |
| Net weight 18.5 kg |
Markings on the product or the values stated in other documents supplied with the product are values obtained under laboratory conditions as per relevant standards. These values may vary according to the usage of the appliance and ambient conditions. Power values are tested at 230V.
Your microwave oven
2.3 Installing the turntable
Hub (underside)
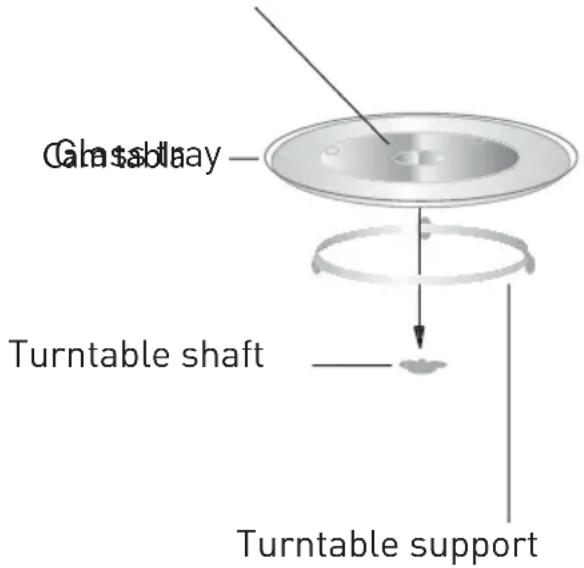
- Never place the glass tray upside down. The glass tray should never be restricted.
- Both glass tray and turntable support must always be used during cooking.
- All food and containers of food must always place on the glass tray for cooking.
- If glass tray or turntable support crack or break, contact your nearest authorized service center.
Installation and connection
3.1 Installation and connection
- Remove all packing material and accessories. Examine the oven for any damage such as dents or broken door. Do not install if oven is damaged.
- Remove any protective film found on the microwave oven cabinet surface.
- Do not remove the light brown Mica cover that is attached to the oven cavity to protect the magnetron.
- This appliance has been designed for domestic use only. - This oven is intended for built-in use only. It is not intended for counter-top use or for use inside a cabinet.
- Please observe the special installation instructions.
- The appliance can be installed in a 60cm wide wall-mounted cabinet (at least 55 cm deep and 85 cm off the floor).
- The appliance is fitted with a plug and must only be connected to a properly installed grounded socket.
- The mains voltage must correspond to the voltage specified on the rating plate.
- If the plug is no longer accessible after installation, an all-pole isolating switch must be present on the installation side with a contact gap of at least 3 mm.
- Adapters, multi-way sockets and extension cords must not be used. Overloading can result with a risk of fire.
Warning:
- The accessible surface may be hot during operation.
Note:
- Do not trap or bend the power cable.
Installation and connection
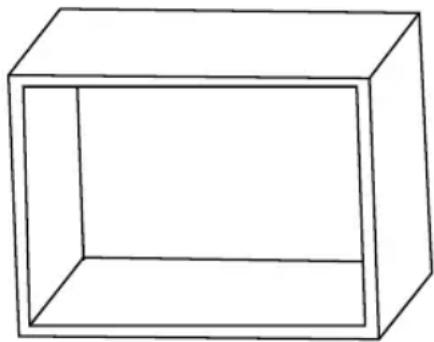
3.2 Built-in installation
3.2.1 Furniture dimensions for built-in installation
The Microwave oven frame should stand out of the cabinet

Installation and connection
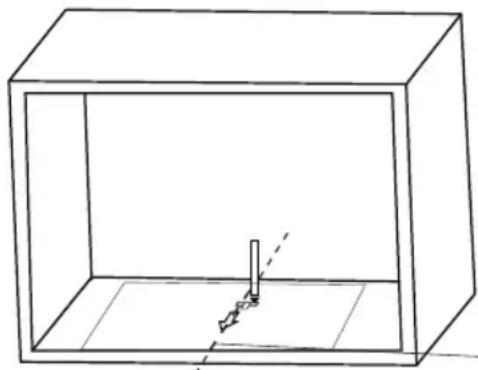
3.2.2 Preparing the cabinet
- Read the instruction on the bottom cabinet template and put the template on the bottom plane of cabinet.
natural_image
Simple line drawing of a 3D rectangular box (no text or symbols)
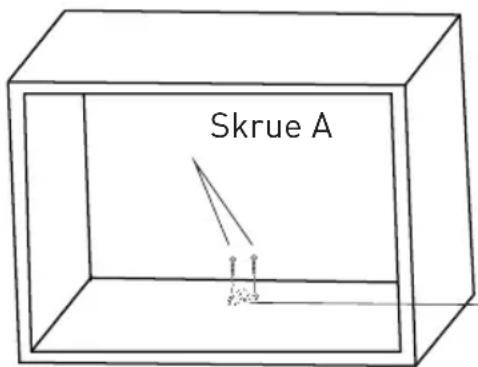
- Make the marks on the bottom plane of cabinet according to marks "a" of the template.
natural_image
Simple line drawing of a 3D box with a vertical rod inside, no text or symbols presentScrewWia A

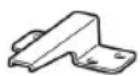
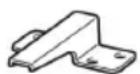
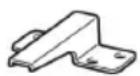
Brackbraket
Omerkezizjine
- Remove the bottom cabinet template and fix the bracket with screw A.
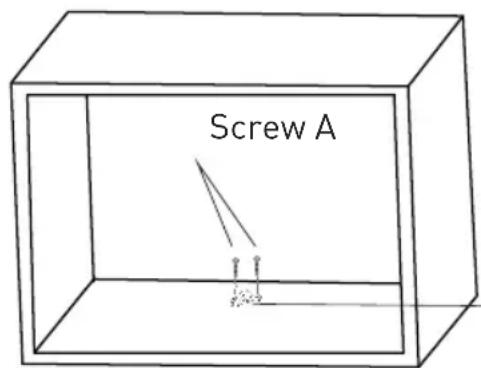
Bracket
Installation and connection
3.2.3 Fixing the oven
- Install the oven into the cabinet.
- Make sure the back of the oven is locked by bracket. - Do not trap or bend the power cable.
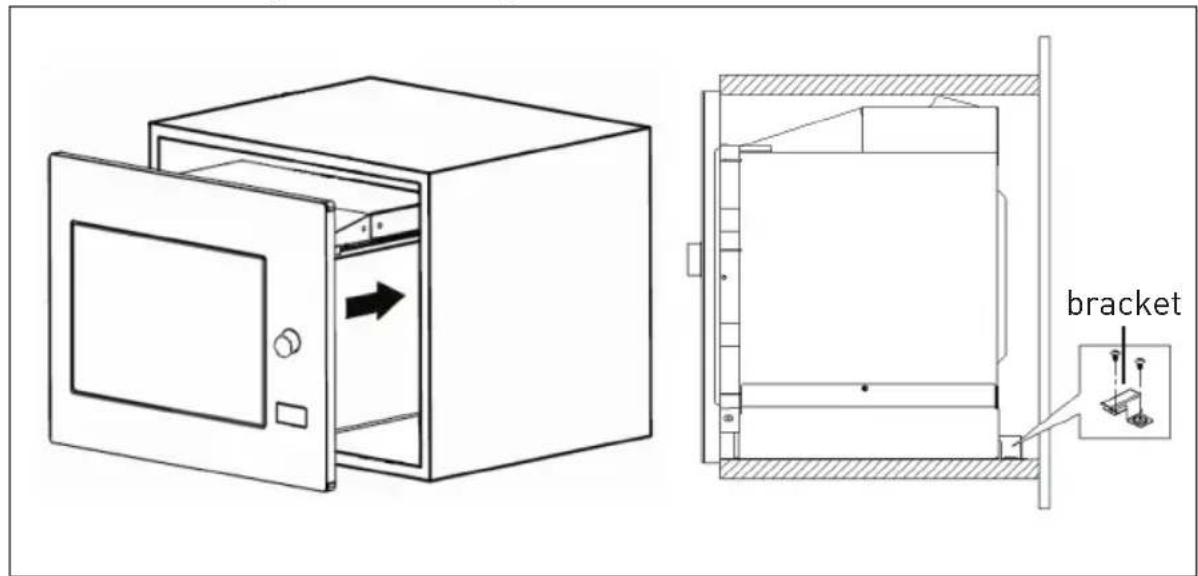
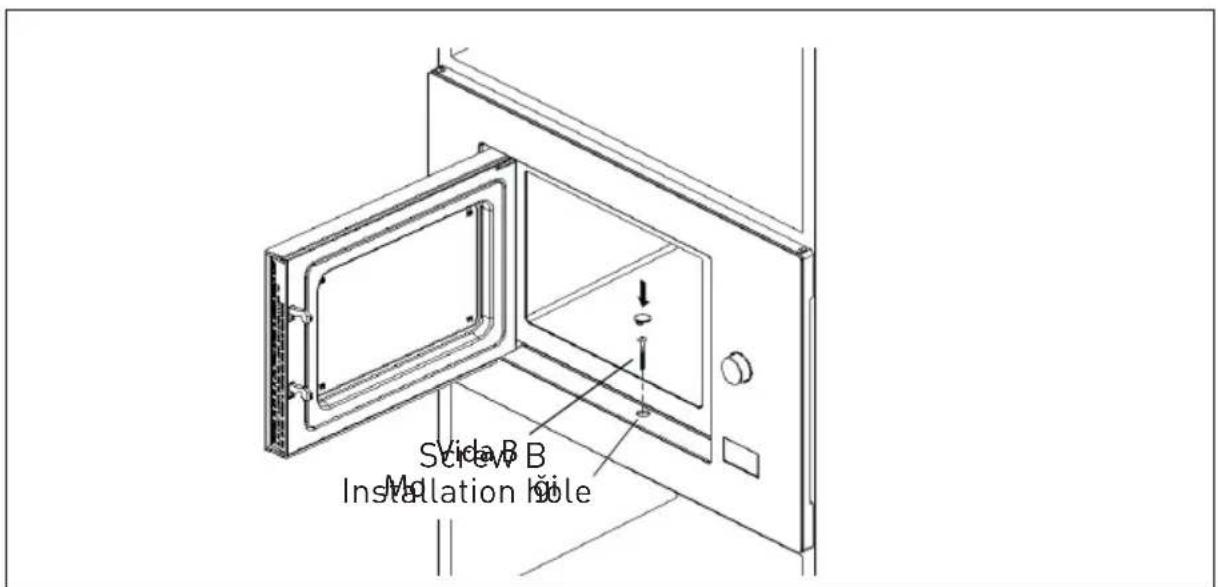
- Open the door, fix the oven to the cabinet with Screw B through the installation hole. Then fix the trim-kit plastic cover to the installation hole.
Installation and connection
3.3 Radio interference
Note:
• Operation of the microwave oven may cause interference on radios, TVs and similar appliances.
- Place the oven as far away from radios and TVs as possible. Operation of microwave oven may cause interference to your radio or TV reception. 2. Plug your oven into a standard household outlet. Be sure the voltage and the frequency is the same as the voltage and the frequency on the rating plate.
- In case of interference, it may be reduced or eliminated by taking the precautions given below:
- Clean the door and sealing surface of the oven.
- Set the antenna direction of the radio or TV again.
- Reposition the oven based on the location of the receiver.
- Place microwave oven away from the receiver.
- Plug the microwave oven to another outlet, thus microwave oven and receiver shall be on different lines.
3.4 Microwave cooking principles
• Prepare the food carefully. Place the remaining parts to the outside of the dish.
- Pay attention to the cooking time. Cook in the shortest time specified and add some more time if required. Overcooked food may cause smoke or may be burnt.
- Cover the food while cooking. Covering the food prevents any splashing and helps to ensure that food is cooked evenly.
- Turn over food such as poultry and hamburgers while cooking them in a microwave oven in order to accelerate cooking of this kind of food. Larger food such as roast must be turned over at least once.
Turn food such as meatballs up-side down in the middle of the cooking and replace them with each other from the center of the dish to the outside.
3.5 Grounding instructions
This appliance must be grounded. This oven has a grounding cable with a grounded plug. Appliance must be plugged to a wall outlet installed and grounded correctly. Grounding system allows a leak wire for the electrical current in case of a short circuit and reduces the risk of electric shock. We recommend using an electrical circuit dedicated to the oven. Operating with high voltage is dangerous and may cause fire or other accidents that would cause damage to the oven.
Warning:
- Misuse of grounding plug may cause electric shock.
Installation and connection
Note:
- If you have any questions on grounding and electrical instructions, please consult a qualified electric technician or service personnel.
- Never exceed the operating n time limit of 1 minute. If you notice arcing during 1 minute of operation, stop the microwave. Utensils causing arcing are not suitable for use in microwave.
Note:
- Manufacturer and/or dealer would not accept any responsibility for injuries or damages on the oven that may occur when electrical connection procedures are not followed.
3.6 Utensil test
Never operate the microwave oven empty. The only exception is the utensil test described in the following section. Some certain non-metal utensils may not be suitable for using in microwave. If you are not sure whether your utensil is suitable for microwave, you can perform the following test.
- Place the empty utensil to be tested into the microwave oven together with a microwave-compatible glass filled with 250 ml water.
- Operate the microwave oven at max power for 1 minute.
- Check carefully the temperature of the utensil being tested. If it is warmed up, it is not suitable for use in microwave.
Installation and connection
Following list is a general guide that would help you in selecting the right utensil.
| Cooking utensil Microwave Grill Combination | |||
| Heat-resistant glass Yes Yes Yes | |||
| Non-heat-resistant glass No No No | |||
| Heat-resistant ceramics Yes Yes Yes | |||
| Plastic dish suitable for microwave oven | Yes No No | ||
| Paper kitchenware Yes No No | |||
| Metal tray No Yes No | |||
| Metal rack | No Yes No | ||
| Aluminum foil and foil covers | No Yes No | ||
| Foam materials | No No No |
Operation
4.1 Control panel

Microwave

Grill/Combination

— Defrost by time

— Defrost by weight

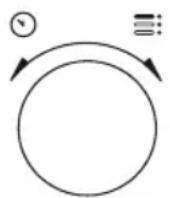
Kitchen Timer/Clock

Start/+30 sec./Confirm

— Stop/Cancel

— Door Open Key
4.2 Operating instructions
4.2.1 Setting the time
When the microwave oven is energized, "0:00" will be displayed in LED screen and buzzer will ring once.
- Press "Kitchen Timer/ Clock" twice and the figures for hours will start flashing.
- Turn to adjust the hour; the input value should be between 0 and 23.
- Press "Kitchen Timer/Clock" and the figures for minutes will start flashing.
- Turn to adjust the minutes; the input value should be between 0 and 59.
- Press "Kitchen Timer/Clock" to finish time setting. ":" symbol will flash, and the time will light.
Note:
- If you press "Stop/Cancel" during time setting, oven will automatically return back to previous mode.
4.2.2 Cooking with microwave oven
- Press "Microwave" and "P100" will be displayed in LED screen.
- Press “Microwave” again or turn to select the desired power. Each time you press the key, “P100”, “P80”, “P50”, “P30” or “P10” will be displayed respectively.
- Press "Start/+30 Sec./Confirm" to confirm and turn to set the cooking time to a value between 0:05 and 95:00.
Operation
- Press "Start/+30 Sec./Confirm" again to start cooking.
- Press "Microwave" once and "P100" will be displayed in the screen.
Example:
- If you want to use 80% microwave power to cook for 20 minutes, you can operate the oven with the following steps.
- Press "Microwave" once again or turn to set 80% microwave power.
- Press "Start/+30Sec./Confirm" to confirm and "P 80" will be displayed in the screen.
- Turn to adjust the cooking time until the oven displays "20:00".
- Press "Start/+30 Sec./Confirm" to start cooking.
The steps for adjusting the time in coding button are as below:
| Setting the duration | Increment amount |
| 0-1 minute 5 seconds | |
| 1-5 minutes 10 seconds | |
| 5-10 minutes 30 seconds | |
| 10-30 minutes 1 minute | |
| 30-95 minutes 5 minutes |
4.2.3 Microwave keypad instructions
| Order Screen Microwave Power | ||
| 1 P100 1 | 100% | |
| 2 P80 80 | % | |
| e3 P50 50 | % | |
| 4 P30 30 | % | |
| 5 P10 10 | % | |
4. 3 Cooking with grill or combination mode
- Press “Grill/Combination” and “G” will be displayed in LED screen. Press “Grill/Combination” repeatedly or turn to select the desired power. Each time you press the key, “G”, “C-1” or “C-2” will be displayed respectively.
- Press "Start/+30 Sec./Confirm" to confirm and turn to set the cooking time to a value between 0:05 and 95:00.
- Press "Start/+30 Sec./Confirm" again to start cooking.
Example:
- If you want to use 55% microwave power and 45% grill power (C-1) to cook for 10 minutes, you can operate the oven with the following steps.
- Press "Grill/Combination" once and "G" will be displayed in the screen.
Operation
- Press "Grill/Combination" once again or turn 📋 to select the Combination 1 mode.
- Press "Start/+30Sec./Confirm" to confirm and "C-1" will be displayed in the screen.
- Turn to adjust the cooking time until the oven displays "10:00".
- Press "Start/+30 Sec./Confirm" to start cooking.
4.3.1 (Grill/Combination) Key-pad instructions
| Order Screen Micro-wave Power | Grill Power | ||
| 1 G 0% | 100% | ||
| 2 C-1 55% | 45% | ||
| 3 C-2 36% | 64% | ||
Note:
- When half the grill time passes, the oven sounds twice, and this is normal. In order to have a better grilling effect, you should turn the food over, close the door, and then press "Start/+30Sec./Confirm" to continue cooking. If no operation is performed, the oven will continue cooking.
4.4 Quick start
- In standby mode, press "Start/+30Sec./Confirm" to start cooking with 100% microwave power. Each time you press the key, cooking time will increase until 95 minutes with steps of 30 seconds.
- In microwave oven cooking, grill and combination cooking or defrost by time modes, the cooking time will increase by 30 seconds each time you press "Start/+30 Sec/Confirm".
- In standby mode, turn counterclockwise to set the cooking time in order to start cooking with 100% microwave power and press "Start/+30Sec./Confirm" to start cooking.
Note:
- In auto menu and defrost by weight modes, pressing "Start/+30Sec/Confirm" will not increase the cooking time.
4.5 Defrost by weight
- Press "Defrost by weight" for once.
- Turn to select the weight of food from 100 to 2000 g.
- Press "Start/+30 Sec./Confirm"
Operation
4.6 Defrost by time
- Press "Defrost by time" for once.
- Turn to select the defrost time. The maximum time is 95 minutes.
- Press "Start/+30 Sec./Confirm" to start defrost. Defrost power is P30 and cannot be changed.
4.7 Kitchen timer (counter)
Your oven is equipped with an automatic counter which is not linked with the oven functions and can be used separately at the kitchen ( it can be set to max. 95 minutes.)
- Press "Kitchen Timer/Clock" for once and 00:00 will be displayed in LED screen.
- Turn to enter the correct time.
- Press "Start/+30Sec./Confirm" to confirm the setting.
- When the countdown from the entered time reaches to 00:00, the buzzer will ring for 5 times. If the time is set (24-hour system), current time will be displayed in LED screen.
Press "Stop/Cancel" to abort the timer at anytime.
Note:
- Kitchen timer functions different than 24-hours system. Kitchen timer is just a timer.
4.8 Auto menu
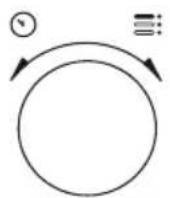
- Turn clockwise to select the desired menu. Menus between "A-1" and "A-8", namely pizza, meat, vegetable, pasta, potato, fish, beverage and popcorn, will be displayed.
- Press "Start/+30Sec./Confirm" to confirm.
- Turn to choose the default weight in accordance with the menu chart.
- Press "Start/+30 Sec./Confirm" to start cooking.
Example:
- If you want to use "Auto Menu" to cook 350 g fish:
- Turn clockwise until "A-6" is displayed in the screen.
- Press "Start/+30Sec./Confirm" to confirm.
- Turn to select the weight of fish until "350" is displayed in the screen.
- Press "Start/+30 Sec./Confirm" to start cooking.
Operation
4.8.1 Auto cooking menu
| Menu Weight | Screen | |
| A-1 Pizza | 200 g 200 | |
| 400 g 400 | ||
| A-2 Meat | 250 g 250 | |
| 350 g 350 | ||
| 450 g 450 | ||
| A-3 Vegetable | 200 g 200 | |
| 300 g 300 | ||
| 400 g 400 | ||
| A-4 Pasta | 50 g (with 450 ml cold water) 50 | |
| 100 g (with 800 ml cold water) 100 | ||
| A-5 Potato | 200 g 200 | |
| 400 g 400 | ||
| 600 g 600 | ||
| A-6 Fish | 250 g 250 | |
| 350 g 350 | ||
| 450 g 450 | ||
| A-7 Beverage | 1 glass (120 ml) 1 | |
| 2 glasses (240 ml) 2 | ||
| 3 glasses (360 ml) 3 | ||
| A-8 Popcorn | 50 g 50 | |
| 100 g 100 |
4.9 Multi-step cooking
At most 2 steps can be set for cooking. In multi-step cooking, if one step is defrosting, then defrosting must be placed in the first step.
Note:
- If you want to thaw food for 5 minutes and then cook with 80% microwave power for 7 minutes, perform the following steps:
Operation
- Press "Defrost by time" for once.
- Turn to select the defrost time until "5:00" is displayed in the screen.
- Press "Microwave" once and "P100" will be displayed in the screen.
- Press "Microwave" once again or turn to set 80% microwave power.
- Press "Start/+30Sec./Confirm" to confirm and "P 80" will be displayed in the screen.
- Turn to adjust the cooking time until the oven displays "7:00".
- Press “Start/+30Sec./Confirm” to start cooking. Buzzer will sound once for the first step and defrost time countdown will start. Buzzer will sound once again when entering the second cooking step. Buzzer will sound for 5 times at the end of cooking.
4.10 Query function
- In microwave, grill and combination modes, press "Microwave" or "Grill/Combination" and the current power level will be displayed for 3 seconds. After 3 seconds, the oven will return to the previous mode.
- While cooking, press "Kitchen Timer/Clock" and the current time will be displayed for 3 seconds.
4.11 Child lock
-
Locking: In standby mode, press "Stop/Cancel" for 3 seconds and a buzzer will sound indicating that the child lock is activated. If the time is already set, current time will also be displayed; otherwise will be displayed in the LED screen.
-
Unlocking: To disable the child lock, press "Stop/Cancel" for 3 seconds and a long "beep" will sound indicating that the child lock is disabled.
4.12 Opening the oven door
Press ☐(Open door) and the oven door will be opened.
Note:
- If the door cannot be opened with “open door” key in model GMI 3140 B (e.g., due to power failure), you can open the door with vacuum lifter for opening the door manually.
Cleaning and maintenance
5.1 Cleaning
Warning:
- Never use gasoline, solvent, abrasive cleaning agents, metal objects or hard brushes to clean the appliance.
- Never immerse the appliance its power cable in water or in any other liquid.
- Turn the appliance off and disconnect it from wall socket.
- Wait for the appliance to completely cool down.
- Keep the inside of the oven clean. Wipe with a damp cloth when splashed food or spilled liquids stick on the walls of the oven. A mild detergent may be used if the oven gets very dirty. Avoid using sprays and other harsh cleaning agents as they may cause stains, marks, and opaqueness on the door surface.
- Outer surfaces of the oven must be cleaned with a damp cloth. Do not allow water ingress from ventilation openings to prevent damage to the operating parts in the oven.
-
Wipe both sides of the door and the glass, door gaskets and parts near the gaskets frequently with a damp cloth in order to remove the overflowing and splashing stains. Do not use abrasive cleaning agents.
-
Do not allow control panel to get wet. Clean with a soft damp cloth. Leave the door of the oven open to prevent inadvertent operation while cleaning the control panel.
- If steam accumulates inside or around the oven door, wipe with a soft cloth. This may occur when the microwave oven is operated under high humidity conditions. It is normal.
- In some cases, you may need to remove the glass tray for cleaning. Wash the tray in warm soapy water or in a dishwasher.
- The roller ring and oven floor should be cleaned regularly to avoid excessive noise. It would be sufficient to wipe the lower surface of the oven with a mild detergent. Roller ring may be washed in warm soapy water or in a dishwasher. When you remove the roller ring from oven internal floor for cleaning, ensure that you install it in the correct position while replacing it.
- In order to remove bad odors in your oven, put a glass of water and juice and peel of a lemon to a deep bowl suitable for use in microwave and operate the oven for 5 minutes in microwave mode. Wipe thoroughly and dry with a soft cloth.
- Please contact the authorized service when the oven lamp needs to be replaced.
Cleaning and maintenance
- The oven should be cleaned regularly and any food deposits should be removed. If the oven is not kept clean, this may cause surface defects that would affect the lifecycle of the appliance negatively and that would possibly cause risks.
- Please do not dispose this appliance with household waste; old ovens shall be disposed to special waste centers provided by the municipalities.
- When the microwave oven is used in grill function, a small amount of smoke and odor may occur which will disappear after a certain time of usage.
5.2 Storage
- If you do not intend to use the appliance for a long time, please store it carefully.
- Please make sure that the appliance is unplugged, cooled down and totally dry.
- Store the appliance in a cool and dry place.
- Keep the appliance out of the reach of children
5.3 Handling and transportation
- During handling and transportation, carry the appliance in its original packaging. The packaging of the appliance protects it against physical damages.
- Do not place heavy loads on the appliance or the packaging. The appliance may be damaged.
- Dropping the appliance will render it non-operational or cause permanent damage..
Troubleshooting
| Normal | |
| Microwave oven interferes with TV reception q | Radio and TV reception may be interfered when microwave oven is operating. It is similar to the interference caused by small electrical appliances, like mixer, vacuum cleaner, and electric fan. It is normal. |
| Oven light is dimmed In low power microwave cooking, oven light may be dimmed. It is normal. | |
| Steam accumulating on door, hot air coming out of vents | During cooking, steam may arise from the food. Most of this steam will get out from vents. But some may accumulate on a cool place like oven door. It is normal. |
| Oven started accidentally with no food in it. It is not allowed to run the appliance without any food inside. It is very dangerous. | |
| Problem Possible Reason Solution | ||
| Oven cannot be started. 1) Power cable is not plugged in properly. | Unplug. Then plug again after 10 seconds. | |
| 2) Fuse is blown or circuit breaker is activated. | ||
| 3) Trouble with outlet. Test the outlet with other electrical appliances. | ||
| Oven does not heat. 4) Door is not closed properly. | Close the door properly. | |
| Glass turntable makes noise when microwave oven operates | 5) Turntable and bottom of the oven is dirty. | |
| Oven displays E-3 error and does not function (for model GMI 3140 B) | 6) Oven door does not open (due to an obstruction in front of the door, low voltage and etc.) | |
natural_image
Simple line drawing of a 3D rectangular box (no text or symbols)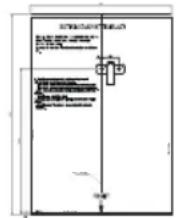
natural_image
Simple line drawing of a 3D rectangular box with a vertical rod inside, placed on a flat surface (no text or symbols)Vite A Vida A

StaffaBraket

Merkea zizgntrale
Start/+30 sec./Confirm

[EMPTY]
Stop/Cancel


____
Door Open Key
natural_image
Simple line drawing of a 3D rectangular box (no text or symbols)
natural_image
Simple line drawing of a 3D box with a vertical rod inside, no text or symbols presentSkruëViäa A

Brake Braket
Medelzi pizgi
- Ta ut skapmalen og fest braketten med skrue A.
Brakekett
Start/+30 sec./Confirm

— Stop/Cancel


—— Door Open Key
4.2 Bruksanvisning
4.2.1 Stille klokken
Når ovnen mottar strøm, står det «0:00» på LED-skjermen, og summeren ringer én gang.
natural_image
Simple line drawing of a 3D rectangular box (no text or symbols)
natural_image
Simple line drawing of a 3D rectangular box with a vertical rod inside, placed on a flat surface (no text or symbols)ŞurubVida A

Bridă Braket

Merkazdizgicentru
| Co-mandă | Ecran Putere microun-de | Grill Pute-re | |
| 1 G | 0% | 100% | |
| 2 C-1 | 55% | 45% | |
| 3 C-2 | 36% | 64% |
Notă:
Installation et raccordement
3.1 Installation et raccordement
Installation et raccordement
Installation et raccordement
natural_image
Technical line drawing of a 3D rectangular box and its side view showing internal components (no text or symbols)Installation et raccordement
Installation et raccordement
Installation et raccordement
The Ground Truth image displays a single, solid horizontal line. According to Rule 2 (UNDERSCORE & LINE RULES), if the GT contains lines used for stylistic emphasis or as background (like ruled paper), the OCR result must ignore them. The line in the GT is clearly a stylistic or background line, not a placeholder for text. Therefore, the OCR should not have output any underscores. Outputting `____` constitutes an error under Rule 2, as it hallucinates placeholder symbols where none are semantically intended. Hence, the OCR result is inconsistent with the Ground Truth.
natural_image
Technical line drawing of a 3D cube with an inset showing internal components (no text or symbols)natural_image
Technical line drawing of a 3D cube with an inset showing its internal structure (no text or symbols)natural_image
Technical line drawing of a 3D cube with an inset showing its internal structure (no text or symbols)4.2 Pokyny k obsluze
natural_image
Simple line drawing of a 3D rectangular box (no text or symbols)
natural_image
Simple line drawing of a 3D box with a vertical rod inside, no text or symbols presentSkrutVidaA

VzperBraket
Smerkez qizgi os
Brapeira
Start/+30 sec./Confirm

— Stop/Cancel

— Door Open Key
- Important safety and environmental instructions
- Important Safety
- Instructions Read
- Carefully And Keep For Future Reference
- General safety
- Electrical safety
- Product safety
- Intended use
- Children's safety
- WARNING: Only allow
- Compliance with the WEEE Directive and Disposing of the Waste Product:
- Compliance with RoHS Directive
- Package information
- Your microwave oven
- Controls and parts
- Technical data
- CE
- Installing the turntable
- Installation and connection
- Installation and connection
- Warning:
- Note:
- Built-in installation
- Furniture dimensions for built-in installation
- Preparing the cabinet
- Fixing the oven
- Radio interference
- Microwave cooking principles
- Grounding instructions
- Utensil test
- Operation
- Control panel
- Operating instructions
- Setting the time
- Cooking with microwave oven
- Example:
- Microwave keypad instructions
- 3 Cooking with grill or combination mode
- Quick start
- Defrost by weight
- Defrost by time
- Kitchen timer (counter)
- Auto menu
- Multi-step cooking
- Query function
- Child lock
- Opening the oven door
- Cleaning and maintenance
- Cleaning
- Storage
- Handling and transportation
- Troubleshooting
- Bruksanvisning
- Stille klokken
- Notă:
- Installation et raccordement
- Installation et raccordement
- Pokyny k obsluze
Brand : GRUNDIG
Model : GMI 11311 DX
Category : Refrigerator