WD 6 P S V30622T - Vacuum Cleaner Kärcher - Free user manual and instructions
Find the device manual for free WD 6 P S V30622T Kärcher in PDF.
Download the instructions for your Vacuum Cleaner in PDF format for free! Find your manual WD 6 P S V30622T - Kärcher and take your electronic device back in hand. On this page are published all the documents necessary for the use of your device. WD 6 P S V30622T by Kärcher.
USER MANUAL WD 6 P S V30622T Kärcher
Register your product www.kaercher.com/welcome 59657810 (02/21)28
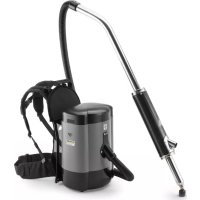
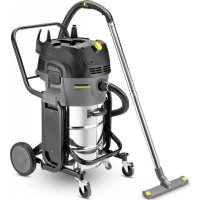
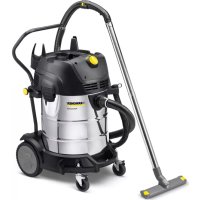
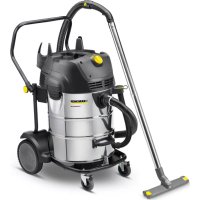
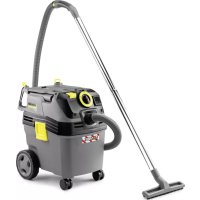
Netzabsicherung (träge) Behältervolumen Wasseraufnahme mit Handgriff Wasseraufnahme mit Bodendüse Netzkabel Schalldruckpegel (EN 60704-2-1) Gewicht (ohne Zubehör) 11DE– 5 Dear Customer, Please read and comply with these origi- nal instructions prior to the initial opera- tion of your appliance and store them for later use or subsequent owners. In accordance with the descriptions and the safety infor- mation in these operating instructions the appliance is intended for use as a multi-purpose vacuum cleaner. This appliance has been designed for use in private households and is not intended for commercial use. – Protect the unit from rain. Do not store outside. – This device may not be used to suck in ash and soot. Use the multi-purpose vacuum cleaner only with: – Original filter bag. – Original spare parts, accessories and special ac- cessories. The manufacturer is not responsible for any damages that may occur on account of improper use or wrong op- erations. The packaging material can be recycled. Please do not place the packaging into the ordinary re- fuse for disposal, but arrange for the proper re- cycling. Old appliances contain valuable materials that can be recycled. Please arrange for the proper recycling of old appliances. Please dispose your old appliances using appropriate collection sys- tems. Electrical and electronic devices often contain compo- nents which could potentially pose a danger to human health and the environment if handled or disposed of in- correctly. However, these components are necessary for the proper operation of the device. Devices marked with this symbol must not be disposed of with regular household rubbish. Filters and filter bags are made from environment- friendly materials. They can therefore be disposed off through the normal household garbage provided you have not sucked in substances that are not permitted to be thrown into household garbage. Notes about the ingredients (REACH) You will find current information about the ingredients at: www.kaercher.com/REACH The warranty terms published by the relevant sales company are applicable in each country. We will repair potential failures of your appliance within the warranty period free of charge, provided that such failure is caused by faulty material or defects in manufacturing. In the event of a warranty claim please contact your dealer or the nearest authorized Customer Service center. Please submit the proof of purchase. Our KÄRCHER branch will be pleased to help you fur- ther in the case of questions or faults. DANGER – The appliance may only be connected to alternat- ing current. The voltage must correspond with the type plate on the appliance. – Never touch the mains plug and the socket with wet hands. – Do not pull the plug from the socket by pulling on the connecting cable. – Check the power cord with mains plug for damage before every use. To avoid risks, arrange immedi- ately the exchange by an authorized customer ser- vice or a skilled electrician, if the power cord is damaged. – To avoid accidents due to electrical faults we rec- ommend the use of sockets with a line-side current- limiting circuit breaker (max. 30 mA nominal trip- ping current). – Turn off the appliance and remove the mains plug prior to any care and maintenance work. – Repair works may only be performed by the author- ised customer service. WARNING – This appliance is not intended for use by persons with limited physical, sensory or mental capacities or lacking experience and/or skills, unless such persons are accompanied and supervised by a per- son in charge of their safety or they have received precise instructions on the use of this appliance and have understood the resulting risks. – Children may only use this appliance if they are over the age of 8 and supervised by a person in charge of their safety, or if they have received in- structions on the use of this appliance and have un- derstood the resulting risks. – Children must not play with this appliance. – Supervise children to prevent them from playing with the appliance. – Cleaning and user maintenance must not be per- formed by children without supervision. – Keep packaging film away from children - risk of suffocation! Contents General notes ... EN 5 Safety instructions ... EN 5 Description of the Appliance ... EN 6 Operation...EN 7 Care and maintenance ... EN 8 Troubleshooting... EN 9 Technical specifications... EN 9 General notes Proper use Environmental protection Disposing the filters and filter bags Warranty Customer Service Safety instructions 12 EN Only use original accessories and spare parts, they en- sure the safe and trouble-free operation of the device. For information about accessories and spare parts, please visit www.kaercher.com. Accessories and Spare Parts– 6 – Switch the appliance off after every use and prior to every cleaning/maintenance procedure.– Risk of fire. Do not vacuum up any burning or glow-ing objects.– The appliance may not be used in areas where a risk of explosion is present.– Immediately switch the appliance off or pull the power plug if foam forms or liquids escape!– Do not use abrasives, glass or universal cleaners! Never immerse the appliance in water.Certain materials may produce explosive vapours or mixtures when agitated by the suction air!Never vacuum up the following materials:– Explosive or combustible gases, liquids and dust particles (reactive dust particles)– Reactive metal dust particles (such as aluminium, magnesium, zinc) in combination with highly alka-line or acidic detergents– Undiluted, strong acids and alkalies– Organic solvents (such as petrol, paint thinners, ac-etone, heating oil).In addition, these substances may cause the appliance materials to corrode. DANGER Pointer to immediate danger, which leads to severe in-juries or death. 몇 WARNING Pointer to a possibly dangerous situation, which can lead to severe injuries or death. 몇 CAUTION Pointer to a possibly dangerous situation, which can lead to minor injuries. ATTENTION Pointer to a possibly dangerous situation, which can lead to property damage.Illustrations on fold-out pages! These operating instructions de-scribe the multi-purpose vacuum cleaners listed on the front cover. The illustrations show the maximum equipment; depending on the model, there are differences in equipment and supplied accessories.When unpacking the product, make sure that no acces-sories are missing and that none of the package con-tents have been damaged. If you detect any transport damages please contact your dealer. included in the scope of deliverypossible accessoriesIllustration To connect the suction hose during vacuuming.Illustration Position I: Suction or blowingPosition 0: Appliance is switched offIllustration Position MAX: Vacuuming or blowing. Position MAX: Vacuuming with connected electric tool Performance regulation: Reduce the suction if nec-essary during vacuuming, blowing or when working with an electric tool. Position 0: The appliance is switched off. Electric tool is supplied with voltage.Note: Observe the maximum connected load (see Chapter "Technical data").Illustration To connect an electric tool.Illustration Connect the suction hose to the blower connection, this will activate the blower function.Illustration For cleaning the flat pleated filter fitted.Note: Do not operate the button when the flat pleated fil-ter is wet. After unlocking it, grab the appliance head by the handle recess and remove it.Illustration The carrying handle is also used to lock the appli-ance head and the container. To unlock, push the bow all the way forward until you clear the lock. Grab the appliance head by the handle recess and remove it.Illustration Illustration In order to clean the filter, press the release key, fold out and remove the filter box.Illustration The accessories compartment allows the storage of suction pipes and suction nozzles on the appli-ance.Illustration To store the mains cable. Hazard levels Description of the Appliance Suction hose connectionON/OFF switch for appliance(without built-in socket)ON/OFF switch for appliance(with built-in socket)Machine socketBlowing connectionFilter cleaning buttonRecessed gripCarry handleFilter box and release keyAccessory mountCable hook H 2 13EN– 7 Illustration To rest the floor nozzle during work interruptions. Illustration Turn the container, press in the steering roller in the openings at the base of the container till the end- point. Illustration The drain screw is used to quickly and comfortably empty wastewater in the container. Tilt the contain- er forward for easier emptying. Illustration Note: Do not use a filter bag for wet vacuuming! ATTENTION Always work with an inserted flat fold filter - during wet as well as dry vacuum cleaning! Illustration Push the suction hose into the connection on the appliance, it snaps in place. In order to disconnect it, push down with your thumb and pull the suction hose out. Note: Accessories, such as suction brushes (optional) can be directly attached to the connecting piece and thus connected to the suction hose. For convenient working even in tight spaces. The removable handle can be attached between the ac- cessories and the suction hose if necessary. See position 17. Recommendation: In order to vacuum the floor, attach the handle to the suction hose. Illustration Connect the handle with the suction hose until it snaps in place. Illustration To remove the handle from the suction hose, press the notch using your thumb and pull off the handle. Note: Due to removing the handle, accessories can be directly attached to the suction hose. Recommendation: In order to vacuum the floor, attach the handle to the suction hose. Illustration Put both suction tubes together and connect them with the handle. Illustration For convenient switching between dry and wet dirt: For vacuuming dry dirt off the floor, use position with extended brush strips. For vacuuming water off the floor, use position with extended rubber lips. For edges, joints, heaters and hard to reach loca- tions. Illustration To connect the suction hose with an electric tool Adapt the adapter to the connection diameter of the electric tool using a knife if necessary. Illustration For more flexibility when working with electric tools. Note: Can also be used with an adapter. ATTENTION Always work with an inserted flat fold filter - during wet as well as dry vacuum cleaning! Illustration Remove the appliance head and take the contents out of the container. Turn the container, press in the steering roller in the openings at the base of the container till the end- point. Insert and lock the appliance head. Clip the holder for the accessory compartment onto the rear side of the appliance. Illustration Connect accessories. Illustration Plug in the mains plug. Illustration Turn on the machine. ATTENTION Work with a dry flat fold filter only. Check the filter for damage prior to installation and re- place as necessary. Illustration For vacuuming dry dirt an additional filter bag can be inserted if necessary. ATTENTION Only operate the filter cleaning without a filter bag in- serted, otherwise the filter bag can get damaged. Parking position Steering roller Drain screw Filter bag Flat fold filter (already installed in the appliance) Suction hose with connecting piece Removable handle Suction tubes 2 x 0.5 m Floor nozzle (with switching lever) Crevice nozzle Adapter Flexible tool hose Operation Before Startup Start up Dry vacuum cleaning 14 EN– 8 – The filling level of the filter bag depends on the dirt that is sucked in. – The filter bag needs to be replaced more frequently while sucking in fine dust, sand, etc. – Clogged filter bags can burst - therefore make sure to replace the filter bag in a timely manner! ATTENTION Vacuum cold ashes only when using a prefilter. ATTENTION Do not use a filter bag! Note: If the container is full, a float closes the suction opening, and the appliance works at a higher speed. Switch off the appliance immediately, and empty the container. For vacuuming up moisture or wetness pay atten- tion to the correct floor nozzle setting and connect the corresponding accessories. Adapt the adapter to the connection diameter of the electric tool using a knife if necessary. Illustration A) Plug the enclosed adapter onto the handle of the suction hose and connect the electric tool with the connection.