Kubik Xtra - Speaker Dali - Free user manual and instructions
Find the device manual for free Kubik Xtra Dali in PDF.
User questions about Kubik Xtra Dali
0 question about this device. Answer the ones you know or ask your own.
Ask a new question about this device
Download the instructions for your Speaker in PDF format for free! Find your manual Kubik Xtra - Dali and take your electronic device back in hand. On this page are published all the documents necessary for the use of your device. Kubik Xtra by Dali.
USER MANUAL Kubik Xtra Dali
Congratulations with your new DALI KUBIK FREE loudspeaker. It is important to us that your new loudspeaker is set-up and connected optimally. We strongly recommend that you read this manual and follow its instructions before unpacking and installing the speaker. This manual contains instructions for set-up and connection, as well as tips and advice on how to get the most out of your KUBIK FREE loudspeaker.
DALI is acclaimed around the world for unique loudspeakers developed to meet our uncompromising standards for design and performance. The goal for every single DALI loudspeaker is to create a listening experience in your home that will make you forget time and place.
Remember to sign up for the DALI newsletter at www.dali-speakers.com. Enjoy.
UNPACKING
Be careful not to damage the contents when unpacking the parts. Check that all parts are included in the cardboard box. Keep the packaging materials in case your speaker needs to be relocated or serviced.
Note - NEVER place the DALI KUBIK FREE with the front facing down without the grille, as this will cause deformation of the silk dome tweeter, which may damage its performance.
CONNECTIONS
CONNECTIONS

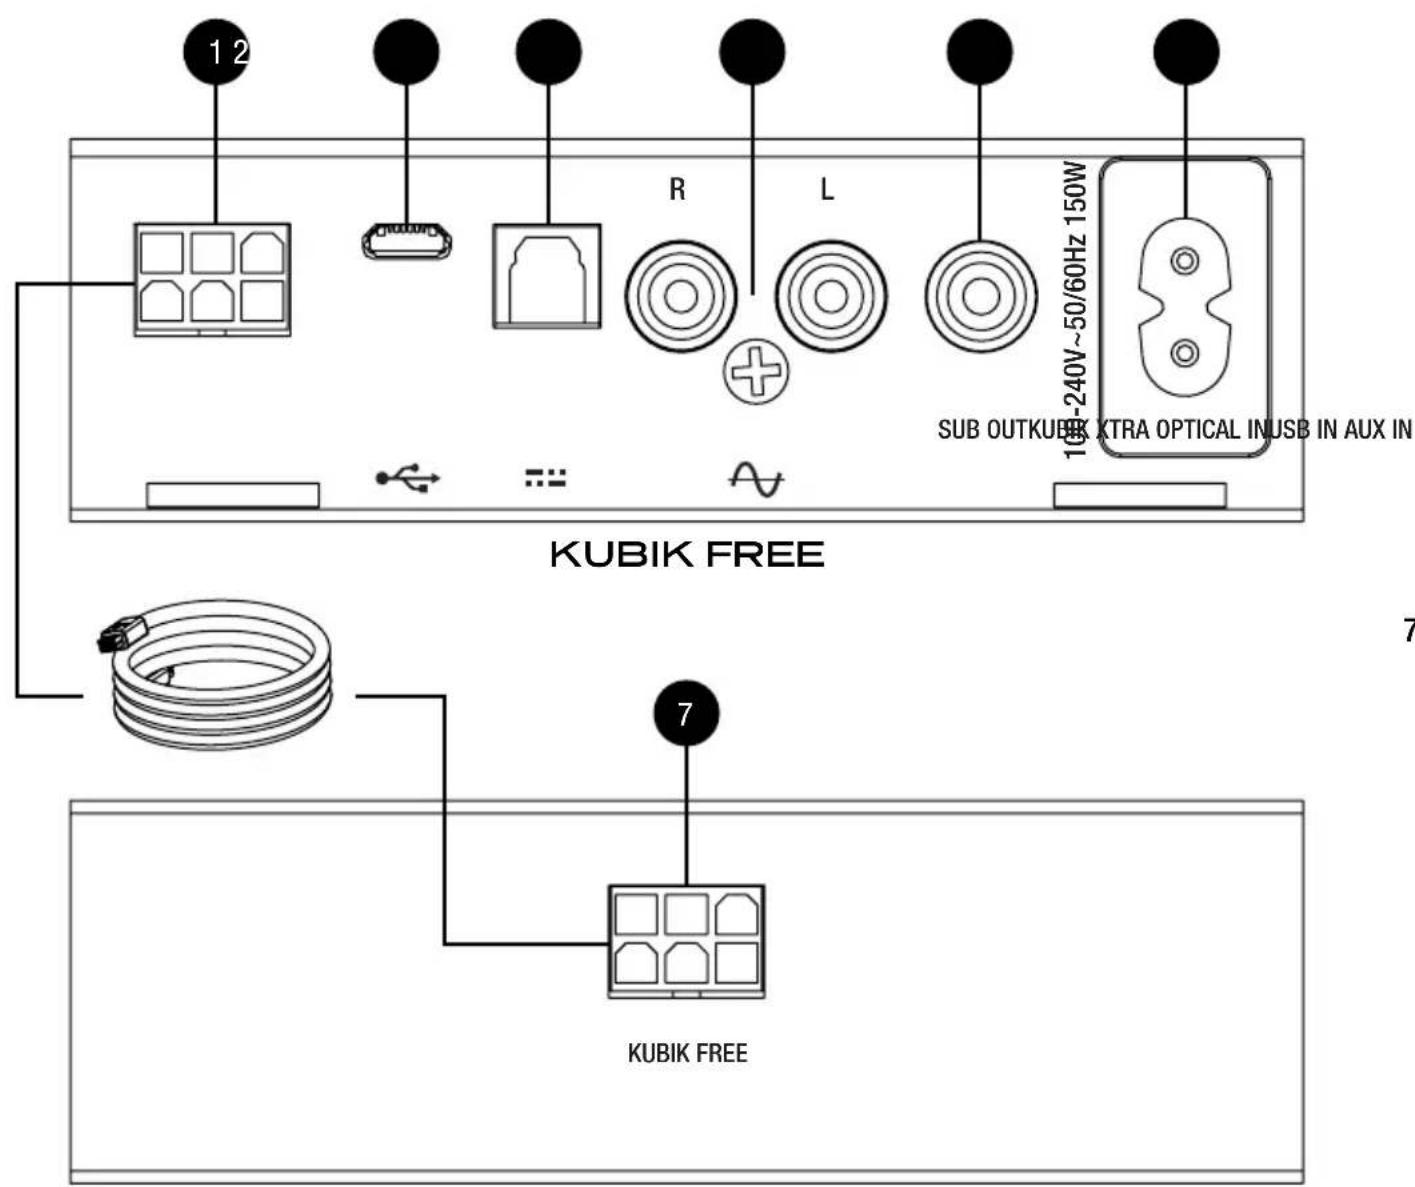
KUBIK XTRA connector
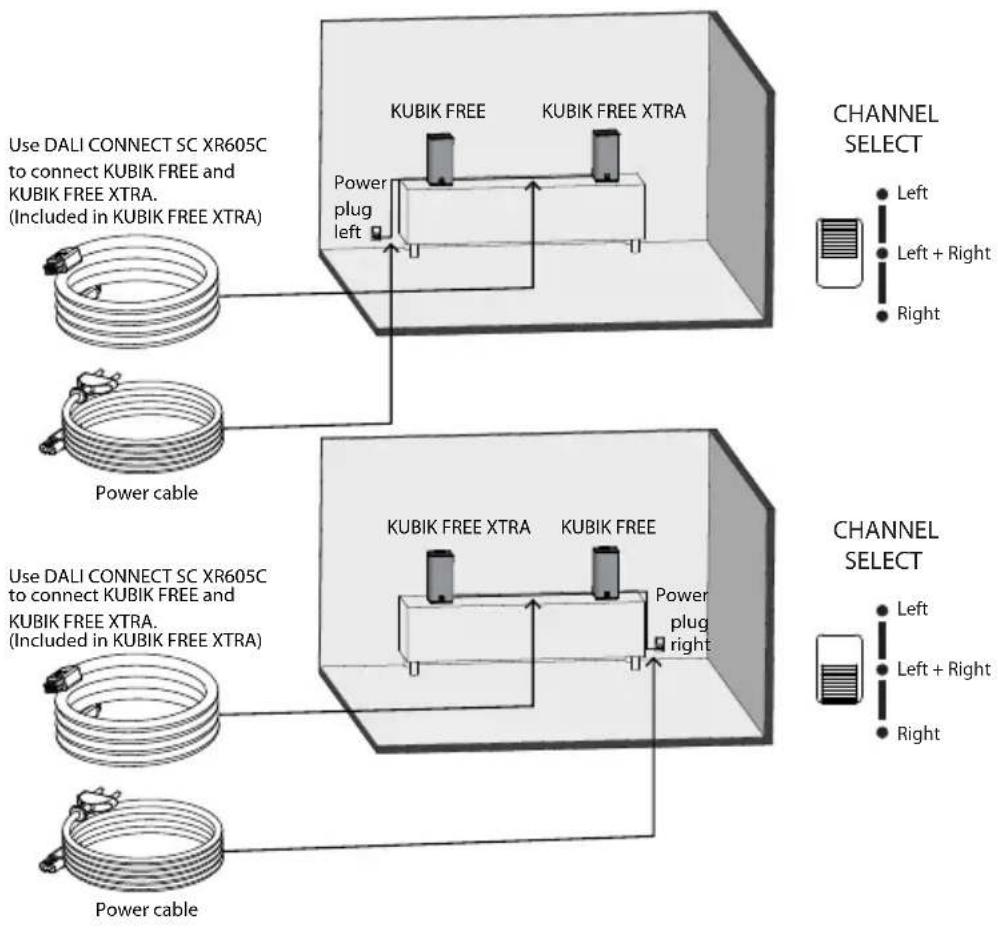
Connect the cable supplied with the KUBIK FREE XTRA.
Adjust the L-L+R-R button on the back of the KUBIK FREE (see page 9) to reflect the position of the KUBIK FREE.

USB connector
Connect a Micro USB cable to the KUBIK FREE.
Note - The Micro USB input only works with a PC or MAC (iPad when using the Apple Camera Connection Kit).

Optical connector
Connect an optical cable (TOSLINK) to the KUBIK FREE.

AUX connector
Connect an analogue source via a RCA (Cinch) cable.

Subwoofer connector
Connect any active Subwoofer to the KUBIK FREE.
The KUBIK FREE automatically activates the Subwoofer output when the cable is connected.

Power cord connector

KUBIK FREE connector
Adjust the L-L+R-R button on the back of the KUBIK FREE (see page 9) to reflect the position of the KUBIK FREE.
CONNECTIONS
KUBIK FREE XTRA
SPEAKER SETUP
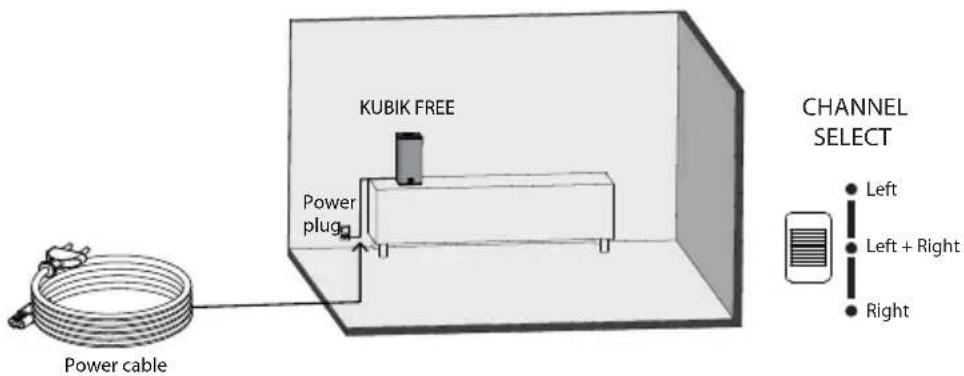
POSITIONING
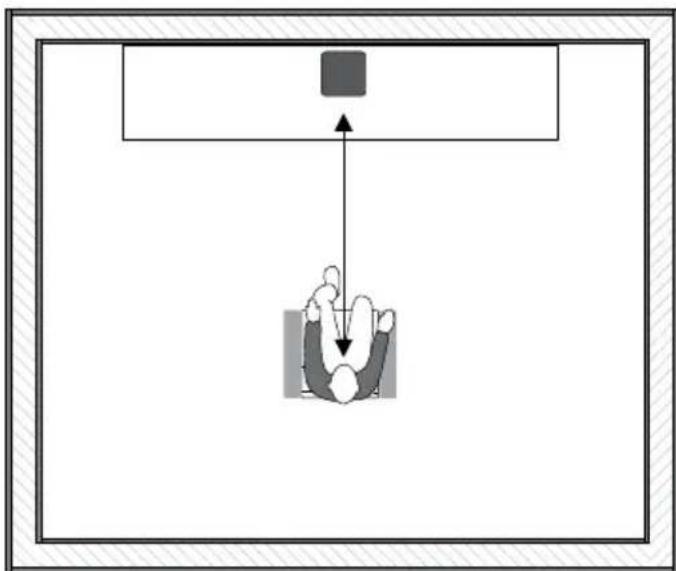
KUBIK FREE
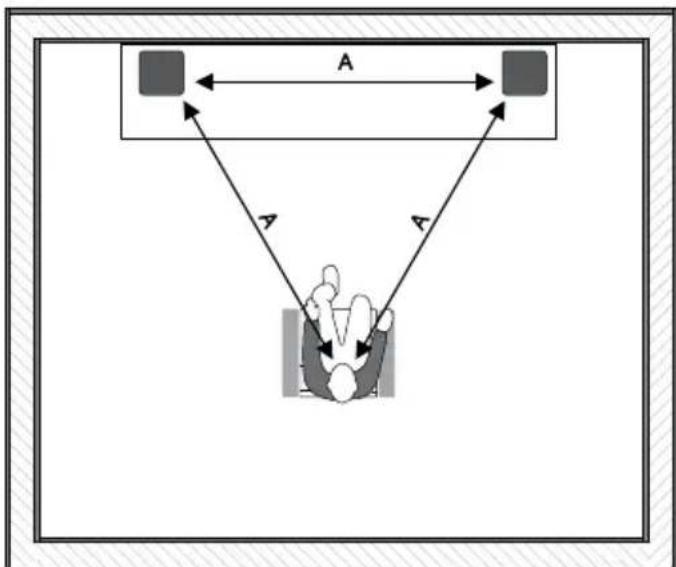
KUBIK FREE and KUBIK FREE XTRA
SPEAKER SETUP
CONTROLS
CONTROLS
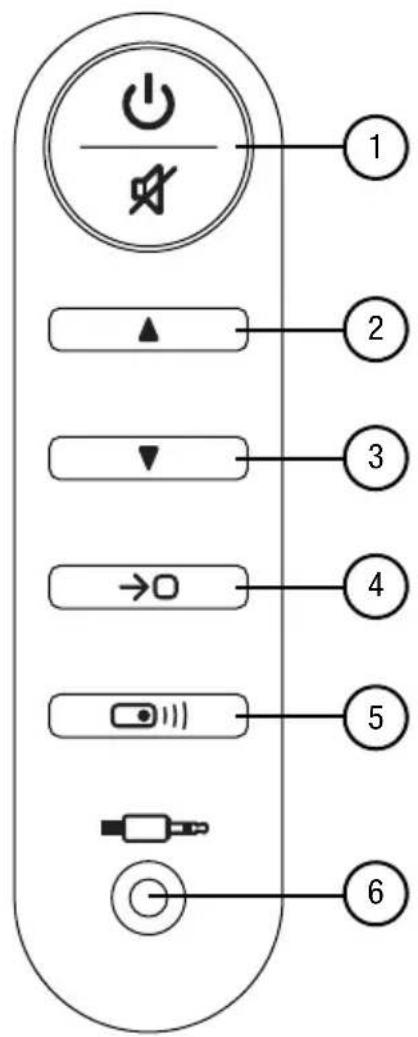
1 Power Button
To turn on the KUBIK FREE press the Power Button.
To turn off the KUBIK FREE (standby mode) press and hold the Power Button.
To mute the KUBIK FREE press the Power Button, press again to un-mute.
2 Volume up
Volume down
4 Input Selector
To change input press the Input Selector button.
The light on the front of the KUBIK FREE will indicate the active input source.
5 IR Learning
Operate the KUBIK FREE from any remote control, see page 14 for more information.
6 Mini Jack in
The KUBIK FREE automatically selects this input when a cable is connected. Therefore when connected, the KUBIK FREE can only play from this input.
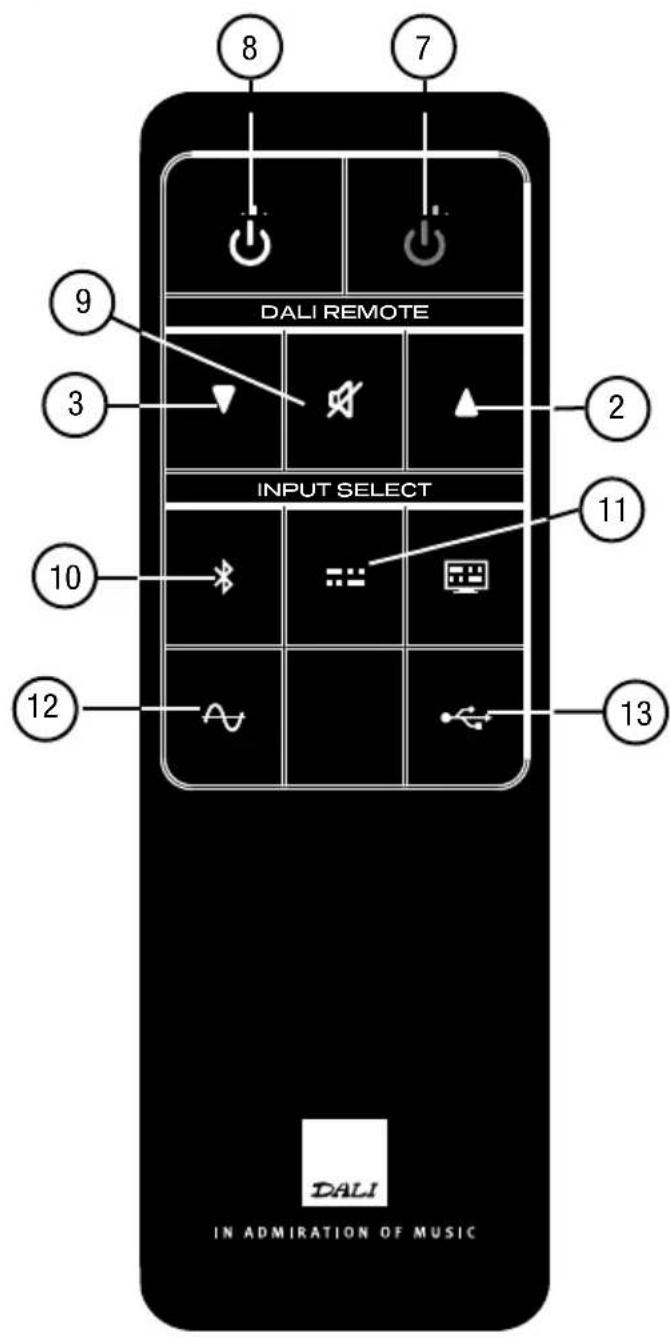
7 Power off (Standby mode)
8 Power on
9Mute
10 Bluetooth input selector
11 Optical input selector
12 AUX input selector
13 USB input selector
CONTROLS
CONTROLS
12
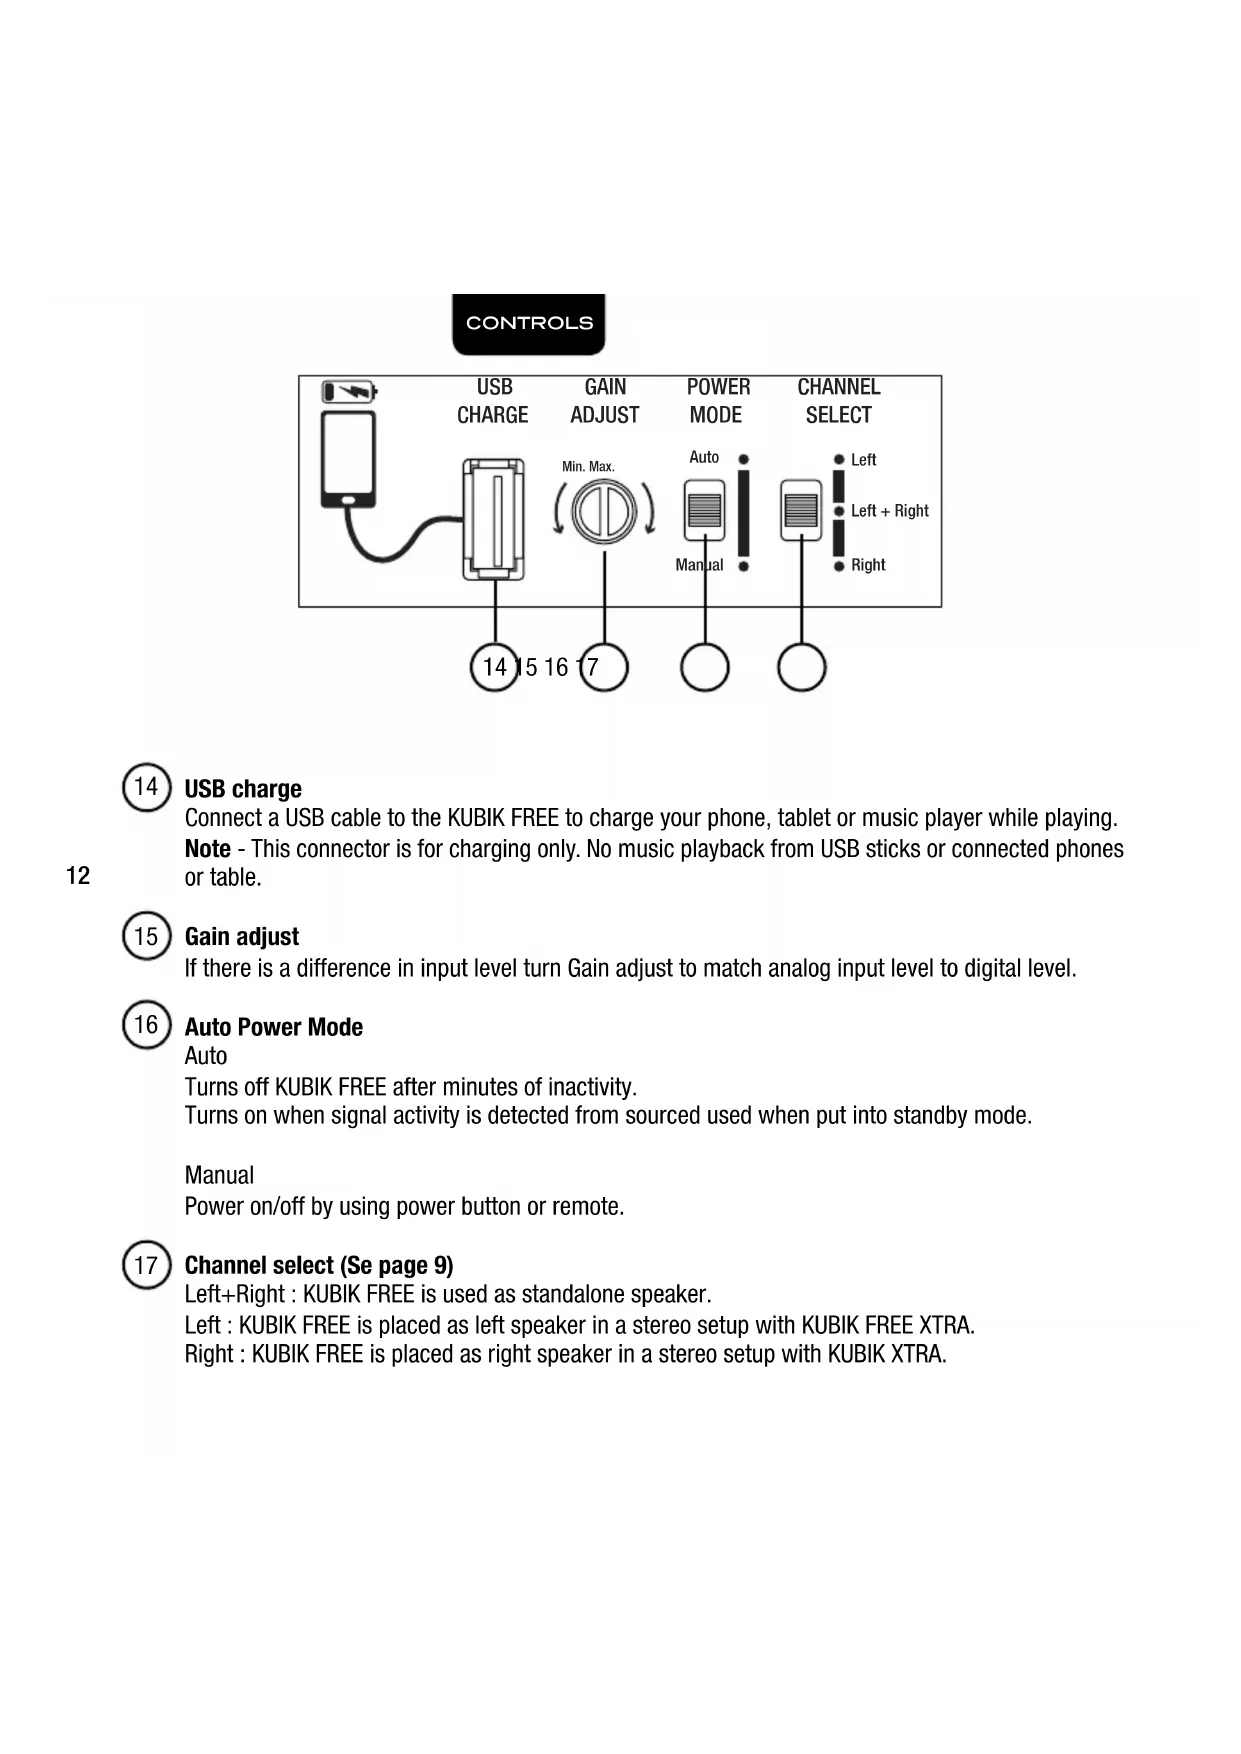
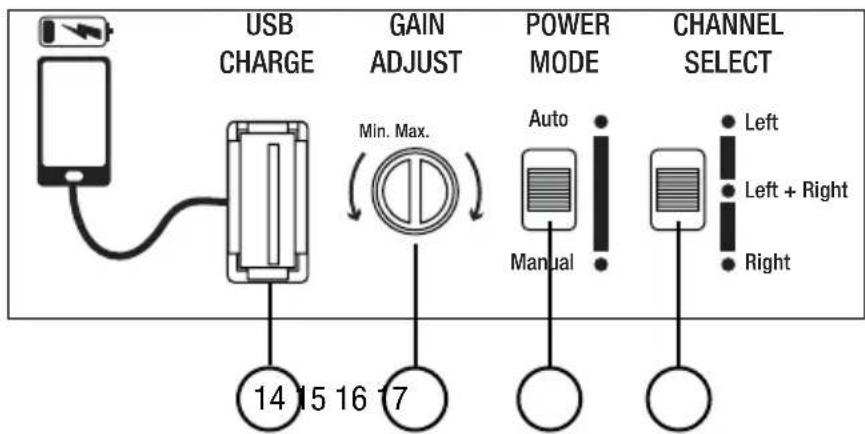
14 USB charge
Connect a USB cable to the KUBIK FREE to charge your phone, tablet or music player while playing.
Note - This connector is for charging only. No music playback from USB sticks or connected phones or table.
15 Gain adjust
If there is a difference in input level turn Gain adjust to match analog input level to digital level.
16 Auto Power Mode
Auto
Turns off KUBIK FREE after minutes of inactivity.
Turns on when signal activity is detected from sourced used when put into standby mode.
Manual
Power on/off by using power button or remote.
17 Channel select (Se page 9)
Left+Right: KUBIK FREE is used as standalone speaker.
Left : KUBIK FREE is placed as left speaker in a stereo setup with KUBIK FREE XTRA.
Right : KUBIK FREE is placed as right speaker in a stereo setup with KUBIK XTRA.
PLAYBACK
BLUETOOTH SETUP
| Action | Status | |
| 1 Select Bluetooth on the KUBIK FREE. | The light next to the symbol will start flashing, indicating the KUBIK FREE is ready for pairing. | |
| 2 Enable Bluetooth on phone, tablet or PC. | ||
| 3 On the phone, tablet or PC, scan for Bluetooth devices. | DALI KUBIK FREE will show up on the list of Bluetooth devices. | |
| 4 Select 'DALI KUBIK FREE' and finalize the pairing process. | If asked to input a code use four zeros (0000). | |
| 5 KUBIK FREE is now connected to your phone, tablet or PC. | KUBIK FREE is now connected and will play music and video audio. | |
When turned on in Bluetooth mode, or switched to Bluetooth mode via the input selector or remote control, the KUBIK FREE will automatically try to reconnect to the last used phone, tablet or PC.
As long as a phone, tablet or PC is connected to the KUBIK FREE no other phone, tablet or PC can connect. Release Bluetooth connection on phone, tablet or PC to activate pairing process for new phone, tablet or PC.
KUBIK FREE will not function as a hands free speaker for your phone or PC.
Note: To achieve the best audio quality set the volume on your phone, tablet or PC to maximum and use the volume control on the KUBIK FREE.
APPENDIX
IR LEARNING
The IR learning function lets you use an existing remote control to operate the KUBIK FREE. This means that you can use your TV remote control, or any other remote control to adjust the volume and activate any input on the KUBIK FREE. To achieve this you must first enable the KUBIK FREE to accept the IR signals from the remote you wish to use. Follow the simple steps below to activate IR learning for your remote control.
Place yourself in close proximity to the front of the KUBIK FREE. Have both your primary remote control and the KUBIK FREE remote control ready at hand, and the KUBIK FREE turned on.
NOTE: The KUBIK FREE will automatically exit IR learning mode if no user activity is detected for 30 seconds.
NOTE: KUBIK FREE's IR learning only works with IR (Infrared) remote controls. Bluetooth, Radio frequency or WiFi based remote controls will not work.
Even though IR is a standard, it is sometimes used differently by manufacturers. For this reason, DALI cannot guarantee that the KUBIK FREE IR learning will work with all IR remote controls on the market.
APPENDIX
| Action Status | ||
| 1 | Start process To enter IR learning mode press and hold the button directly on the KUBIK FREE control panel or on the KUBIK FREE remote control. | All indicator lights on the front of the KUBIK FREE will turn on to show IR learning mode is active. |
| 2 | Define function Press the button directly on the KUBIK FREE or on the KUBIK FREE remote that performs the function that you wish to be transferred to your primary remote control. | The red indicator light on the front of the KUBIK FREE will turn off when the input is accepted. |
| 3 | Define primary remote control button 3.1. Press the button on the primary remote that you wish to perform the function indicated in the previous step. 3.2. Press and hold the same button for 5 seconds. 3.3. Press the same button again. | 3.1. Theindicato lights turns off when input is accepted. 3.2. Theindicator lights turns off when input is accepted. 3.3. Theindicator lights blinks when final input is accepted. |
| 4 | Continue or exit process To teach other functions Repeat step 2 and 3 until all the desired functions have been taught. To exit IR learning mode Press and hold the button directly on the KUBIK FREE or on the KUBIK FREE remote, alternatively wait 30 seconds. | |
| 5 | You are done It is now possible to control the KUBIK FREE from your primary remote. |
If you accidentally assign a wrong primary remote control key to a KUBIK FREE function, just restart the learning process for that function to overwrite.
APPENDIX
RUNNING IN
Like any mechanical system (e.g. a new car), a loudspeaker requires a "running-in" period to perform at its best. You will experience a gradual increase in sound quality during the first period of use. The break-in period will vary depending on use and playback volume (approximately 50 hours at medium volume is recommended). Unlike other mechanical systems, the life-span of a loudspeaker is increased by normal, regular playback of music.
OVERLOAD
If the KUBIK FREE is overloaded it will automatically turn off to protect itself and the power LED will start flashing. Turn on KUBIK FREE manually after approximately 15-20 min.
CLEANING
Clean the cabinets with a soft, dry cloth. If the cabinets are dirty, wipe with a soft cloth dipped in all-purpose cleaner and then well wrung out. Be very careful when wiping the speaker cones, as they are very fragile. Front grilles can be cleaned with a clothes brush and wiped with a wellwrung, lint-free cloth and mild all-purpose cleaner.
DISPOSAL
If you want to dispose of this product, do not mix it with general household waste. There is a separate collection system for used electronic products in accordance with legislation that requires proper treatment, recovery and recycling. Private households in the EU member states, Switzerland, Liechtenstein and Norway may return their used electronic products free of charge to designated collection facilities or to a retailer (if you purchase a similar new one). If you reside in countries not mentioned above, please contact your local authorities for the correct method of disposal. By following this process, you will ensure that your disposed product undergoes the necessary treatment, recovery and recycling and thus prevent potential negative effects on the environment and human health.
CAUTION
RISK OF ELECTRIC SHOCK DO NOT OPEN. TO REDUCE THE RISK OF ELECTRIC SHOCK, DO NOT REMOVE THE BACK PANEL. NO USER-SERVICEABLE PARTS INSIDE. REFER SERVICING TO QUALIFIED PERSONNEL.
APPENDIX
The lightning flash within an equilateral triangle is intended to alert you to the presence of non-insulated "dangerous voltage" within the product's enclosure that may be of sufficient magnitude to constitute an electric shock to persons.

The exclamation point within an equilateral triangle is intended to alert you to the presence of important operating and maintenance (servicing) instructions in the literature accompanying the appliance.
1 Read instructions - all the safety and operating instructions should be read before the appliance is operated.
2 Retain instructions - the safety and operating instructions should be retained for future reference.
3 Heed warnings - all warnings on the appliance and in the operating instructions should be adhered to.
4 Follow instructions - all operating and use instructions should be followed.
5 Water and moisture - the appliance should not be used near water - for example, near a bathtub, washbowl, kitchen sink, laundry tub, in a wet basement, or near a swimming pool and the like.
6 Carts and stands - the appliance should be used only with a cart or stand if recommended by the manufacturer.
7 Wall or ceiling mounting - the appliance should be mounted to a wall or ceiling only as recommended by the manufacturer.
8 Ventilation - the appliance should be situated so that its location or position does not interfere with proper ventilation. For example, the appliance should not be situated on a bed, sofa, rug, or similar surface that may block the ventilation openings; or placed in a built-in installation, such as a bookcase or cabinet, that may impede the flow of air through the ventilation openings.
9 Heat - the appliance should be situated away from heat sources such as radiators, heat registers, stoves, or other appliances that produce heat.
10 Power sources - the appliance should be connected to a power supply only of the type described in the operating instructions or as marked on the appliance.
11 Power cord protection - power-supply cords should be routed so that they are not likely to be walked on or pinched by items placed on or against them, paying particular attention to cords at plugs, convenience receptacles and the point where they exit from appliance. Appliance coupler serves as disconnecting device.
12 Cleaning - do not use any liquid cleaners. Use only a dry cloth to wipe off dust and grease.
13 Non-use periods - the power cord of the appliance should be unplugged from the outlet when left unused for a long period of time.
14 Object and liquid entry - care should be taken so that objects do not fall and liquids are not spilled into the enclosure through openings.
15 Damage requiring service - the appliance should be serviced by qualified personnel when:
a) The power-supply cord or the plug has been damaged; or
b) Objects have fallen, or liquid has been spilled into the appliance; or
c) The appliance has been exposed to rain; or
d) The appliance does not appear to operate normally, or exhibits a marked change in performance; or
e) The appliance has been dropped, or the enclosure damaged.
16 Servicing - the user should not attempt to service the appliance beyond that described in the opera ting instructions. All other servicing should be referred to qualified service personnel.
DE
INHALT
LIEfEruMfANG 20
EINLEItuNG 21
AuSpAcKEN 21
ANSCHLUSSE
ANScHLUSSE 22
INBETRIEBNAHME
AufStELLuNG 24
BEDIENELEMENTE
BEDIENELEMENTE 26
WIEDERGABE
BLUETOOTH OPSAETNING
coNfGurAtloN BLuEtooth 77
ANNEXES
ApprENTlSSAGE Ir 78
roDAGE 80
SurcHArGE 80
NEttoYAGE 80
MISE Au rEBut 80
CONTENU DE LA BOITE
| KUBIK FREE KUBIK FREE XTRA | ||
| KUBIK FREE | √ | |
| KUBIK FREE XTRA | √ | |
| DALI CONNECT SC XR605C | √ | |
| Power cable | √ | |
| KUBIK Remote | √ | |
| √ | √ | |
INTRODUCTION
| KUBIK FREE KUBIK FREE XTRA | ||
| Frequency Range +/-3dB [Hz] 48-22,000 48-22,000 | ||
| Maximum SPL [dB] 103 103 | ||
| Crossover Frequency [Hz] 3,000 - | ||
| Crossover Principle DSP based digital IIR, 2. order - | ||
| High Frequency Driver 25mm soft textile dome 25mm soft textile dome | ||
| Low Frequency/midrange Driver(s) 5.25" wood fibre cone 5.25" wood fibre cone | ||
| Enclosure Type Closed box Closed box | ||
| Recommend Placement Shelf, Wall, Stand | Shelf, Wall, Stand | |
| Connection Input(s) | USB (Micro), Optical (Toslink), RCA (Phono), 3.5mm mini jack | KUBIK Link In |
| Wireless Input(s) | Bluetooth™ Apt-X | - |
| Connection Output(s) | Sub out, KUBIK Link Out | - |
| Amplifier Type | Fully digital Class D, open loop type | - |
| Continuous IEC Power Output [RMS Watts] | 4 x 25 | - |
| Magnetic Shielding no | no | |
| Max. Power Consumption [Watts] | 150 | - |
| Standby Power Consumption [Watts] | <0.5 | - |
| Dimensions (H x W x D) [mm] | 305 x 145 x 145 | 305 x 145 x 145 |
| Dimensions (H x W x D) [inches] | 12 x 5.7 x 5.7 | 12 x 5.7 x 5.7 |
| Weight [kg/lb] | 4.5/9.9 | 3.8/8.4 |
All technical specifications are subject to change without notice.


IN ADMINATION OF MUSIC
DALI Denmark +45 9672 1155
www.dali-speakers.com