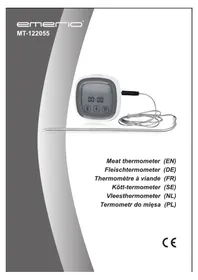
MT122055 - Food thermometer Emerio - Free user manual and instructions
Find the device manual for free MT122055 Emerio in PDF.


| Product Type | Digital Cooking Thermometer |
| Brand | Emerio |
| Model | MT122055 |
| Power Source | 2 AAA batteries (not included) |
| Display | LCD with backlight |
| Measurement Range | -10°C to 250°C (14°F to 482°F) |
| Cooking Modes | 9 preset meat types + custom mode (PROGM) |
| Timer | Up to 99 minutes 59 seconds |
| Temperature Alarm | Yes, adjustable with audible beep |
| Probe | Metal wire with connector |
| Built-in magnets | Yes, for attachment to metal surface |
| Preset Meat Types | Beef, pork, chicken, turkey, veal, lamb, ham, fish |
| Doneness Setting | Rare, medium, well done (for beef, veal, lamb) |
| Warranty | 2 years |
| Safety | Do not immerse, do not use in a closed oven |
| Cleaning | Probe and wire with hot water, main unit with damp cloth |
| Certifications | CE (WEEE directive, recycling) |
| Included Accessories | Probe with wire, main unit, instruction manual |
| Temperature Scale | °C or °F selectable |
| Probe Cover | Not provided (bare probe) |
Frequently Asked Questions - MT122055 Emerio
User questions about MT122055 Emerio
0 question about this device. Answer the ones you know or ask your own.
Ask a new question about this device
Download the instructions for your Food thermometer in PDF format for free! Find your manual MT122055 - Emerio and take your electronic device back in hand. On this page are published all the documents necessary for the use of your device. MT122055 by Emerio.
USER MANUAL MT122055 Emerio
Meat thermometer (EN)
Instruction manual - English
SAFETY INSTRUCTIONS
- This appliance can be used by children aged from 8 years and above and persons with reduced physical, sensory or mental capabilities or lack of experience and knowledge if they have been given supervision or instruction concerning use of the appliance in a safe way and understand the hazards involved.
- Children shall not play with the appliance.
- Cleaning and user maintenance shall not be made by children without supervision.
- Different types of batteries or new and used batteries are not to be mixed.
- Batteries are to be inserted with the correct polarity.
- Exhausted batteries are to be removed from the appliance.
- Keep new and used batteries out of the reach of children.
- Do not ingest the batteries. If a battery is swallowed, it can cause severe internal harms.
- Ensure that no water and/or other liquids get inside the main unit.
- Remove the batteries if you do not use the appliance for an extended period of time.
- In case any operating elements are damaged, do not try to repair it on yourself. In such case a professional should carry out the repair.
- Do not store in damp areas or in high-temperature areas.
- Never use the appliance in a closed oven.
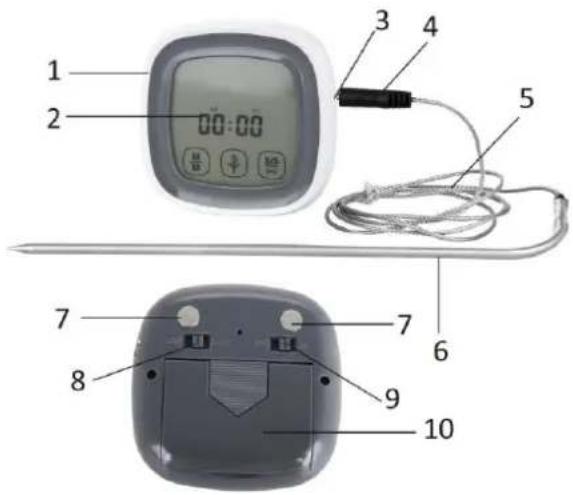
PARTS DESCRIPTION
- Main unit
- LCD display
- Connector jack for probe
- Connector
- Wire
- Probe
- Magnets
- Mode switch
- On/off switch
- Battery compartment
Note: The appliance has two magnets to enable it to be stuck onto a fridge for example.
INSTALLING THE BATTERIES
- Open the battery cover on the back of the main unit.
- Place two AAA batteries in the compartment as indicated by the polarity symbols (+/-) .
- Replace the cover.
- Replace the batteries when the display becomes dim. Please dispose of the used ones in a responsible manner.
OPERATION
1. Cook mode
1) Toggle the on/off switch in the back of the main unit to position "on", then set the mode switch to COOK mode.
2) Insert the connector into the connector jack of the main unit.
3) Touch icon (M/M) to set the type of meat.
4) Press repeatedly to browse between types of meat in the following order. BEEF, PORK, CHICK, TURKEY, VEAL, LAMB, HAM, FISH, PROGM, BEEF ... (PROGM is a custom mode and the default temperature is 70^ / 158^ )
5) Touch icon (S/T) to select tastes for mode BEEF, VEAL, and LAMB. The temperature of other meat types defaults to a properly cooked temperature. Icon "DONE" means "well-done" for these other meat types. WELL (well-medium) MEDIUM (medium)
MED RARE (med-rare)
RARE (rare)
6) The target temperature (ALERT TEMP) in Celsius or Fahrenheit is shown on the display. To select the preferred temperature scale, touch and hold icon (S/T) for 3 seconds to set ^ C or ^ F .
7) If you want to set your desired alert temperature (ALERT TEMP), touch and hold icon (S/S/ ) icon for 3 seconds and temperature will flash, then touch icon (M/M) to increase or icon (S/T) to decrease the temperature.
8) Insert the probe into the food to be cooked. The cooking temperature (COOKING TEMP) is shown on the display.
Note: Insert the probe into the thickest part of the meat. Pay attention do not go right through the meat.
9) Touch icon (S/S/ to turn on the alarm, the icon "ALERT" will be on; touch icon (S/S/ again to turn off the alarm, the icon "ALERT" will be off.
10) When the alarm is on and the food reaches the desired temperature, the appliance will beep and the icon "ALERT" will flash.
11) Touch icon (S/S/0) once, the beep sound will be off. Touch icon (S/S/0) twice to turn off the alarm.
12) After use, pull out the probe. Use a potholder, or equivalent.
Caution: the probe is a sharp metal object, and will become hot during cooking. Take care when handling.
2. Timer mode
1) Set the mode switch to TIMER mode.
2) The display shows 00 (Min): 00 (Sec). Touch icon (M/M) to set minutes and icon (S/T) to set seconds.
To reset the timer, touch and hold icons (M/M) and (S/T) simultaneously
3) To start and stop the timer, touch icon (S/S/).
CLEANING
- Before cleaning, make sure the probe is cooling down.
- Do not immerse the whole product in water.
- Clean the probe and wire with hot water and a mild detergent. Wipe the main unit and connector with a damp cloth.
Specifications
- Timer: max.99 minutes and 59 seconds.
- Note: Probe heat-resisting range: -10^(14^) 250^ (482°F). Do not use the appliance to measure the temperature less than -10^(14^) or over 250^ (482°F). Do not set alert temperature less than -10^(14^) or over 250^ (482°F).
- The backlight will light on when touch (M/M) or (S/T) or (S/S/ ) icons or alarming.
Default temperature for each type of meat
| Well | Medium | Medium rare | Rare | Done | |||||||
| °C | °F | °C | °F | °C | °F | °C | °F | °C | °F | ||
| 1 | Beef | 77 | 171 | 71 | 160 | 63 | 145 | 60 | 140 | ||
| 2 | Pork | 79 | 174 | ||||||||
| 3 | Chick | 79 | 174 | ||||||||
| 4 | Turky | 79 | 174 | ||||||||
| 5 | Veal | 74 | 165 | 68 | 154 | 60 | 140 | 57 | 135 | ||
| 6 | Lamb | 77 | 171 | 71 | 160 | 63 | 145 | 60 | 140 | ||
| 7 | Ham | 71 | 160 | ||||||||
| 8 | Fish | 63 | 145 | ||||||||
| 9 | Prog | 70 | 158 | ||||||||
GUARANTEE AND CUSTOMER SERVICE
Before delivery our devices are subjected to rigorous quality control. If, despite all care, damage has occurred during production or transportation, please return the device to your dealer. In addition to statutory legal rights, the purchaser has an option to claim under the terms of the following guarantee:
For the purchased device we provide 2 years guarantee, commencing from the day of sale. If you have a defective product, you can directly go back to the point of purchase.
Defects which arise due to improper handling of the device and malfunctions due to interventions and repairs by third parties or the fitting of non-original parts are not covered by this guarantee. Always keep your receipt, without the receipt you can't claim any form of warranty. Damage caused by not following the instruction manual, will lead to a void of warranty, if this results in consequential damages then we will not be liable.
Neither can we hold responsible for material damage or personal injury caused by improper use or if the instruction manual are not properly executed. Damage to accessories does not mean free replacement of the whole appliance. In such case please contact our service department. Broken glass or breakage of plastic parts is always subject to a charge. Defects to consumables or parts subjected to wearing, as well as cleaning, maintenance or the replacement of said parts are not covered by the warranty and are to be paid.
ENVIRONMENT FRIENDLY DISPOSAL

Recycling - European Directive 2012/19/EU
This marking indicates that this product should not be disposed with other household wastes. To prevent possible harm to the environment or human health from uncontrolled waste disposal, recycle it responsibly to promote the sustainable reuse of material resources. To return your used device, please use the return and collection systems or contact the retailer where the product was
purchased. They can take this product for environmental safe recycling.


BATTERY MUST BE RECYCLED OR DISPOSED OF PROPERLY. DO NOT OPEN. DO NOT
DISPOSE OR IN FIRE OR SHORT CIRCUIT.
Emerio Deutschland GmbH (no service address)
Hoffer Weg 14
51519 Odenthal
Germany
Customer service:
T: +49 (0) 3222 1097 600
E: info.de@emerio.eu
Bruksanvising - Swedish
SAKERHETSANVISNINGAR

Brand : Emerio
Model : MT122055
Category : Food thermometer