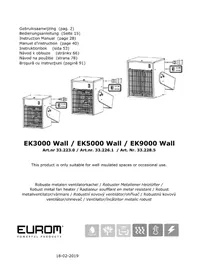
EK5000 Wall - Heating Eurom - Free user manual and instructions
Find the device manual for free EK5000 Wall Eurom in PDF.


| Brand | Eurom |
| Model | EK5000 Wall |
| Product type | Suspended heater with separate control panel |
| Dimensions (W x D x H) | 50 x 27.5 x 35 cm |
| Weight | 8.2 kg |
| Power supply | 400 V / 50 Hz (three-phase) |
| Maximum power | 5000 W |
| Adjustable power levels | 2500 W (half power) / 5000 W (full power) |
| Insulation class | IP24 (splash-proof) |
| Operating modes | 4 modes: manual, automatic, simple/repeat weekly programming, with adaptive start |
| Thermostat setting range | 5 °C to 40 °C |
| Overheat protection | Yes, with manual reset |
| Minimum room volume | 50 m³ |
| Minimum safety distance | 60 cm from side walls, 60 cm from ceiling, 180 cm from floor, 100 cm in front |
| Recommended use | Workshops, garages, warehouses, damp rooms (bathroom under conditions) |
| Maintenance and cleaning | Clean the exterior with a well-wrung damp cloth; vacuum the grilles regularly |
| Repairability | Opening and repair exclusively by a qualified professional; original parts required |
| Warranty | Manufacturer's warranty (conditions not detailed in the manual) |
Frequently Asked Questions - EK5000 Wall Eurom
User questions about EK5000 Wall Eurom
0 question about this device. Answer the ones you know or ask your own.
Ask a new question about this device
Download the instructions for your Heating in PDF format for free! Find your manual EK5000 Wall - Eurom and take your electronic device back in hand. On this page are published all the documents necessary for the use of your device. EK5000 Wall by Eurom.
USER MANUAL EK5000 Wall Eurom
This product is only suitable for well insulated spaces or occasional use.
Robuste metalen ventilatorkachel / Robuster Metallener Heizlüfter / Robust metal fan heater / Radiateur soufflant en metal resistant / Robust metallventilator/varmare / Robustni kovovy ventilator/ohrivac / Robustny kovovy ventilator/ohrievač / Ventilator/incálzitor metallic robust
Inhoudsopgave
Thank you 29
Symbol statement 29
Product description 29
Technical data 30
Product image 30
Safety instruction / Safety warnings 30
Description 33
Location and connection 34
Set-up and operation 35
Safety features 38
Cleaning and maintenance 38
Removal 39
CE-statement 39
Thank you
Thank you very much for choosing for a Eurom device. You have made a good choice! We hope you will be satisfied about its functioning.
To get maximum profit from your panel, it is important to read this manual attentive and totally before use, and to understand what is written. Read especially the safety instructions: they are there to protect you and your environment.
Keep the manual in a safe place for future reference. Store also the package: that is the best protection for your heater in times of no-use. And if you at any time pass the appliance on, pass on the manual and package too.
We wish you a lot of fun with the EK Wall fan heater!
Eurom
Kokosstraat 20
8281 JC Genemuiden (NL)
info@eurom.nl
www.eurom.nl
This manual has been complied with the utmost care. Nevertheless, we reserve the right to optimize this manual at any time and to adjust it technically. The images used may differ.
Symbol statement
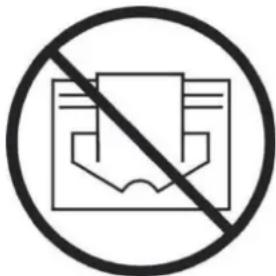
Do not cover your device!
Product description
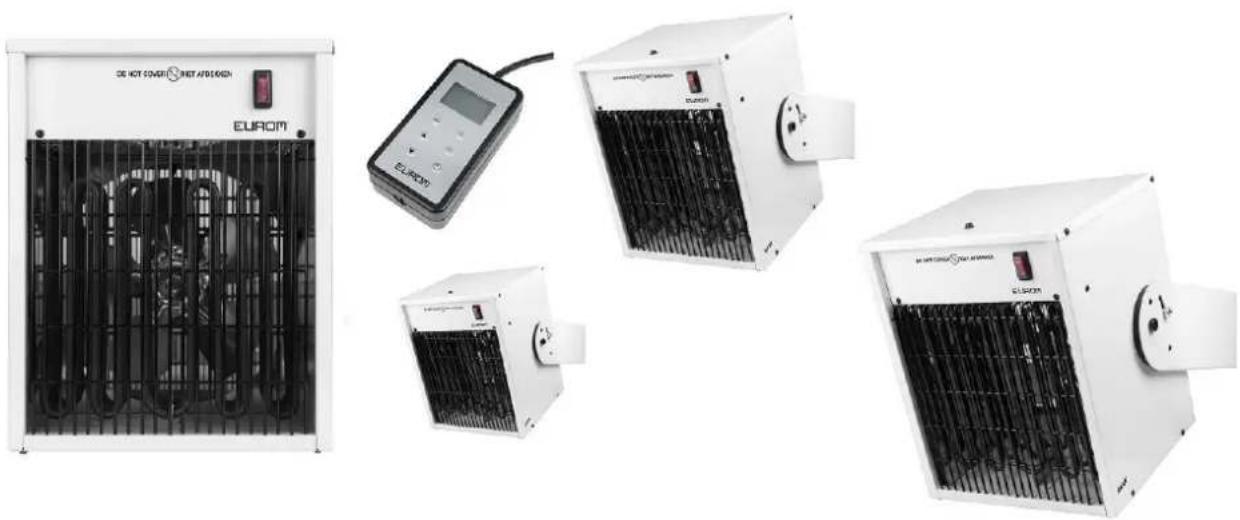
The EUROM EK3000 Wall / EK5000 Wall / EK9000 Wall is a hanging heater with a separate operation panel which is connected to the heater via a cable. The operation panel works on a low voltage and is supplied with a wall holder. The operational panel allows you to select an output and the desired temperature. It is equipped with a thermostat (with sensor) which maintains the area at the desired temperature. The heater has 4 settings (MODES) and the thermostat can be set to between 5 and 40^ .
The heater is equipped with an overheating safeguard that can be manually reset if necessary.
EUROM EK heaters are 'real space' heaters, with a powerful fan which disseminates a great deal of air.
Cold air is sucked in at the back, heated, and then blown out as hot air. Because a relatively large quantity of air is sucked in and blown out, the air expelled by the heater does not feel particularly hot. As a great deal of air is heated and blown out, however, the entire space (not just the air around the heater!) is gradually warmed up.
Technical data
| Type | EK3000 Wall | EK5000 Wall | EK9000 Wall | |
| Supply voltage | Volt/Hz | 230 / 50 | 400/50 | 400/50 |
| Maximum capacity | Watt | 3000 | 5000 | 9000 |
| Settings | Watt | 1500/3000 | 2500/5000 | 4500/9000 |
| Insulation class | IP24 | IP24 | IP24 | |
| Dimensions | cm | 50 x 27,5 x 35 | 50 x 27,5 x 35 | 52 x 33,5 x 39 |
| Weight | kg | 7,4 | 8,2 | 11,9 |
Product image
Safety instruction / Safety warnings
- Before using the machine, carefully read this entire instruction manual.
- Before using your new heater, check it, including electric cables and plug, for any visible damage. Do not use a damaged heater, but send it back to your dealer for replacement.
- This heater is exclusively intended to heat workspaces such as workshops, garages and storage spaces. Use the appliance for this purpose only.
-
This heater is insulated to IP24 (splash-proof). That means that it may be used in damp spaces such as bathrooms, washing areas or similar indoor areas. You must however observe a distance of at least 1m to baths, taps, basins, showers etc. Make sure it cannot fall into water and prevent water from getting into the heater itself. If, at any time, the heater does fall into water, unplug it immediately! Do not use a heater that has a damp interior but have it repaired. Never immerse the heater, cord or plug in water or other liquid and never touch it with wet hands.
-
The supply voltage and utility frequency, specified on the machine, need to match those of the socket that is used. The electrical installation needs to be protected by a residual current device (max. 30 mA).
- Fully extend the cord before plugging in the heater. Make sure it does not come into contact with any part of the heater and prevent it from heating up any other way. Do not run the cord underneath carpeting; do not cover it with mats, carpet strips or similar and make sure it is not placed in any passageways. Make sure the cord cannot be stepped on and that no furniture is placed on top of it. Do not lead the cord around sharp corners and do not roll it up too tightly after use!
- If possible, do not use an extension cord, as this poses the risk of overheating and fire. If the use of an extension cord is unavoidable, then make sure it is an undamaged, approved extension cord with a minimum diameter of 2.5mm^2 , suitable for a minimum permissible power of 3500 Watt (EK3000) / 6000 Watt (EK5000) / 10.000 Watt (EK9000). To prevent overheating, always fully extend the cord!
- To prevent the circuit overloading and fuses being blown, make sure no other appliances are connected to the same socket or wired to the same electrical circuit as the heater.
- Do not use the heater outdoors and do not use it in spaces smaller than 30m^3 (EK3000) / 50m^3 (EK5000) / 90m^3 (EK9000).
- A heater contains hot and/or glowing and sparking components. Do not, therefore, use in areas where fuels, paint, flammable liquids and/or gasses etc. are stored.
- Do not place the heater near, under or directly opposite a socket and do not place it near an open fire or other heat source.
- Do not use the heater near or directly opposite furniture, animals, curtains, paper, clothes, bedding or other inflammable objects. Keep them at least 1 metre away from the heater!
- Never cover a heater! The heater's air inlets and outlets should never be obstructed in any way, so as to prevent the possibility of fire. Never use the heater to dry clothes and do not place anything on top of the heater.
- Make sure that the air around the heater can circulate freely. Do not place the heater too close to walls or large objects and do not place it under shelves, cupboards, and similar.
-
Prevent foreign objects from entering the heater via the venting or exhaust openings as this may lead to electric shock, fire or damage.
-
Never leave the heater unattended when switched on. Always switch if off before removing the plug from the socket. Always unplug the heater when not in use! Pull on the plug to remove from the socket, never pull on the cord.
-
Always switch the heater off, unplug it and leave to cool down before:
-
cleaning the heater
- carrying out maintenance to the heater
-
touching or moving the heater.
-
Be careful! Some parts of this product can become very hot and cause burns. Particular attention has to be given where children and vulnerable people are present. do not let bare skin come into contact with hot surfaces.
- This heater can also be controlled with a timer as well as manually. However you operate it, always ensure that all safety regulations have been observed!
- This heater should never be used upright, so only hanging.
- Close supervision is necessary if the product is used near children or incapacitated persons. Children of less than 3 years should be kept away unless continuously supervised. Children aged from 3 years and less than 8 years shall only switch on/off the appliance provided that it has been placed or installed in its intended normal operating position and they have been given supervision or instruction concerning use of the appliance in a safe way and understand the hazards involved. Children aged from 3 years and less than 8 years shall not plug in, regulate and clean the appliance or perform user maintenance.
This appliance is not suitable to be operated by children or persons who have physical, sensory and/or mental limitations, or by persons who have no knowledge of, or experience with, this appliance. This appliance can be used by children aged from 8 years and above and persons with reduced physical, sensory or mental capabilities or lack of experience and knowledge if they have been given supervision or instruction concerning use of the appliance in a safe way and understand the hazards involved. Children shall not play with the appliance. Cleaning and user maintenance shall not be made by children without supervision.
- Keep the heater clean. Dust, dirt and/or a build-up of deposits in the heater are a common cause of overheating. Make sure these deposits are removed regularly.
- Do not turn on the appliance if you have discovered damage to the appliance, cords or plug, if the appliance is malfunctioning, if it has been dropped or if there are signs of any other defect. Return the
complete product to the vendor or to a certified electrician for inspection and/or repair. Always ask for original parts.
- Do not use attachments and/or accessories that have not been recommended or supplied by the manufacturer.
- The appliance (incl. cord and plug) may only be opened and/or repaired by properly authorised and qualified persons.
- Only use this heater for its intended purpose and as described in this instruction manual.
Not abiding by instructions 24, 25 & 26 may lead to damage, fire and/or personal injuries. A failure to adhere to these rules also immediately nullifies the guarantee and vendor, importer and/or manufacturer do not take responsibility for any of the consequences!
Description
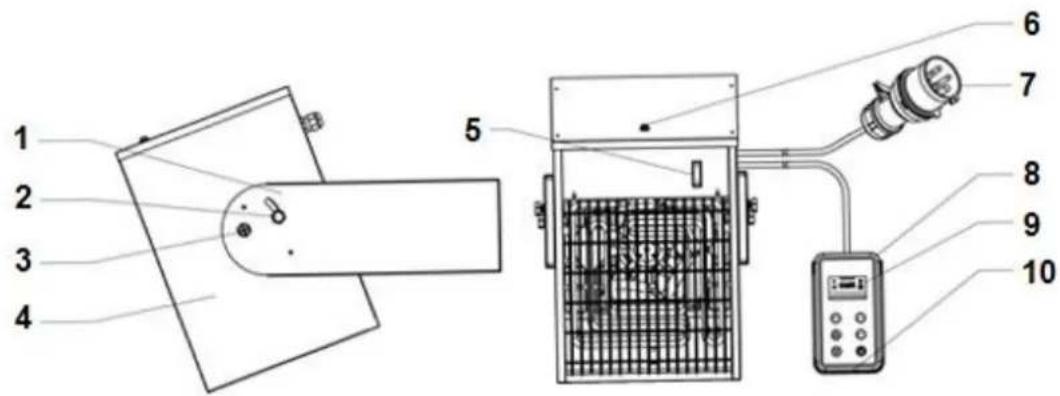
- Wall bracket
- Setting screw
- Fixing screw
- Heater
-
Main switch
-
Reset-button
- Electrical cable with plug (model may vary)
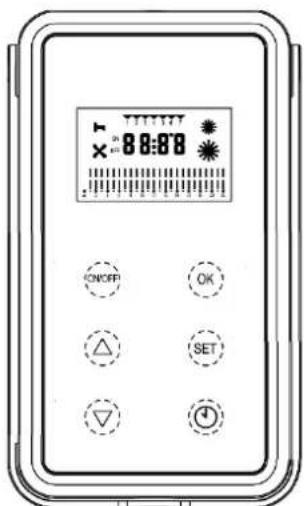
- Operating panel in wall holder
- Display
- Thermostat
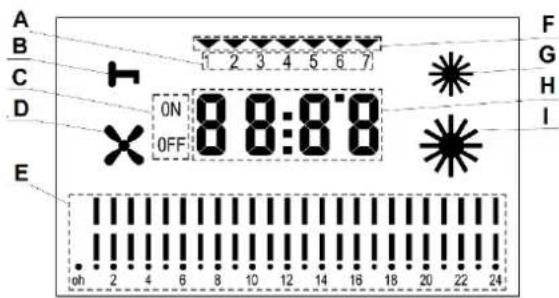
A. Day indicator
B. Operational protection
C. Time-setting on/off
D. Fan speed
E. Weekly timer
F. Weekly system
G. Output low
H. Ambient temperature + time
I. Output high
This heater has been designed to hang securely from the wall. Do not use it until it has been properly installed, as described in these instructions for use and never, for example, in a standing position or when leaning against something.
Location and connection
- Remove all packaging material and keep out of reach of children. After removing packaging, check the appliance for damage or other signs that could indicate a fault/defect/malfunction. In case of doubt, do not use the appliance, but contact your vendor for inspection or replacement.
- Select a suitable place for the device, taking into account the safety instructions. The wall on which the device is hung has to be firm, flat and perfectly vertical and made from non-inflammable material that cannot melt. The sides of the device must be at least 60~cm from the side walls, the top at least 60 cm from the ceiling and the base at least 180~cm above the ground. Always ensure that the heater has sufficient space at the back to suck in air and at the front, to blow out hot air (100 cm.).
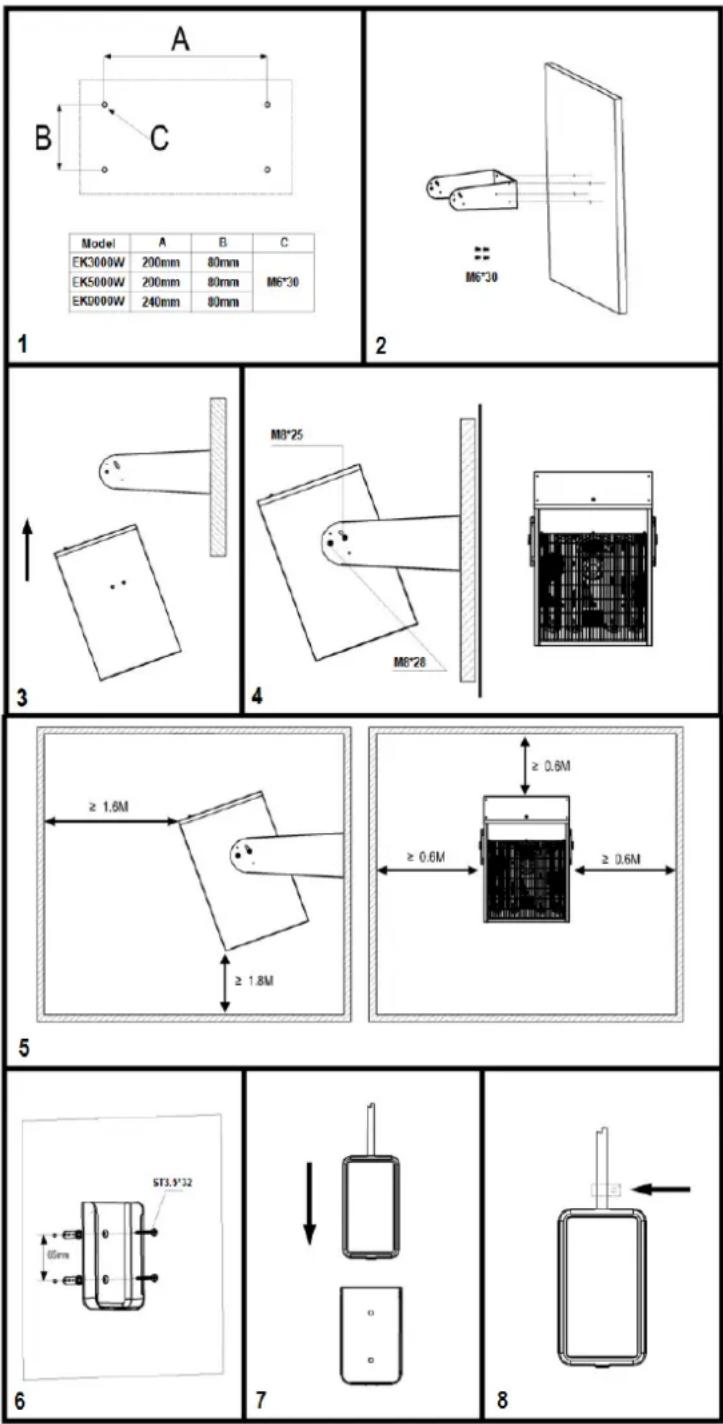
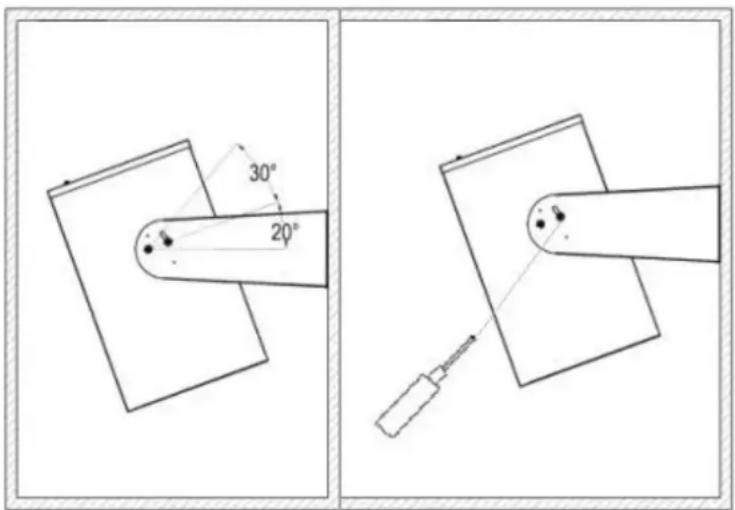
- Secure the bracket, device and operational panel to the wall according the diagrams. Check, before hanging the device in the bracket, that it is securely fastened to the wall. Then secure both M837 fixing screws (3) (left and right) and then both M830 setting screws (2). When hanging the holder for the operational panel, take account of the length of the cable between the device and operational panel. You are advised to secure the operational panel to the wall in order to prevent it being dropped, see diagrams 6, 7 and 8.
- Now set the fan angle at the desired position using both setting screws M8*30, see diagram.
- Make sure the heater is switched off (switch to O position), then plug into a correctly functioning, properly grounded 230V-50Hz (EK3000) / 400V-50Hz (EK5000 & EK9000) socket.
Set-up and operation
Please note! When you use the heater for the first time, you may smell smoke. This is normal and will disappear after a short while. During production, the steel heating elements are coated with a protective oil and the residues may give off an odour when heating.
Please note! When the heater stops heating (after being turned off or due to the thermostat), the fan will continue for a while in order to cool it down. It will stop automatically after around one minute.
Operating
- Set the main switch to 'on' (I pressed); the screen on the remote control will light up.
- Press the ON/OFF button on the remote control; 01 starts to flash.
-
Use the / buttons to choose the MODE you want to use and confirm this choice by pressing OK:
-
MODE 01 = with thermostat and manual output choice
- MODE 02 = with thermostat and automatic output choice
- MODE 03 = with thermostat, weekly timer and always full output
-
MODE 04 = with thermostat, weekly timer, automatic output choice and adaptive start.
-
If you don't make a choice, the heater will select MODE 01 after 1 minute. The fan starts to work (symbol lights up). The screen shows the ambient temperature and jumps to the operational safeguard (symbol display). You must first unlock (press any button, then press & v buttons at the same time - disappears) and then you can continue with MODE 01 (or choose another MODE).
-
Please note! If you do not change any settings for 1 minute, the heater will switch to the operational safeguard (symbol lights up); you get rid of this by pressing any button and then pressing & v buttons at the same time; the key will disappear).
- Please note! Only in MODE 03 can day and time be set.
MODE 01 = with thermostat and manual output choice
- Once you have chosen MODE 01 with OK, the display shows the ambient temperature. The fan begins to blow (fan in the diagram) without heating.
-
Now choose the desired temperature and output, then the heater will start to heat:
-
The desired temperature is set with the & v buttons; the desired temperature will flash 5 times on the screen, then you will see the ambient temperature again.
-
The desired temperature is set with the SET-button; half power = 1 sun, full power = 2 suns.
-
If the set temperature is 2 degrees above the ambient temperature, the heater will heat at the set power.
- Once the set temperature is reached, the heating element will turn off; the fan will carry on running for another 60 seconds (cool down).
- If the ambient temperature drops up to 2 degrees below the set temperature, the heater will turn on automatically.
MODE 02 = with thermostat and automatic output choice
-
Same as MODE 01 but the heater chooses the heating output itself:
-
If it must heat a maximum of 3 degrees: half power
- If it must heat more than 3 degrees: full power
MODE 03 = with thermostat, weekly timer and always full output
-
Once you have chosen MODE 03 with OK, you must then choose:
-
03-01 = weekly timer one-off
- 03-] [ = weekly timer repeated
Use the & v buttons to choose the desired setting and confirm with OK.
Setting day/time
-
Now, set the day and time:
-
Press SET: the day indicator at the top of the screen will flash; use the & v buttons to choose the current day: (01 = Monday, etc.).
- Press SET again and use the & buttons to set the current hour
- Press SET again and use the & buttons to set the current minutes
-
Confirm by pressing SET again.
-
The screen will switch between ambient temperature and time, while the arrow at the top points to the current day.
Setting weekly timer
-
Set the weekly timer:
-
Press and hold the TIMER button; the screen will show 01 (first timer setting). Confirm with OK.
- At the top of the screen, the day indication will flash and the screen with show ON and OFF. You can now choose the day(s) when you'd like to set the timer 01. Use the & buttons to switch between ON and OFF; use the TIMER button to go to the following day. Once all the days are correct, you can confirm with OK.
- Now the hour setting will flash. On the left, there is the text ON to indicate that you are setting the time when the heater should work. Use the & v buttons to choose the desired hour and confirm with OK. The minute setting will now flash. Use the & v buttons to choose the desired minutes and confirm with OK.
- The hour setting will now flash with the text OFF to the left. Set the time at which the heater must switch off in the same way and confirm with OK. At the bottom of the screen, you will see the entered start and stop time and a time bar.
- Use the & v buttons to set the desired temperature and confirm with OK. Time and ambient temperature now flash on the screen.
- The heater will heat at full power for the set period.
- If you'd like to set another timer setting, press and hold the TIMER button. 01 is displayed in the screen. Use the button to go to 02 (or 03, 04 etc., up to max. 08) and confirm with OK. Now you can enter a new timer setting in the same way.
- Please note! The heater will work through all of the settings for a particular day successively, even if they overlap!
- Please note! If you have chosen 03-01, the heater will work through the set weekly programme once; if you have chosen 03-][, it will carry on applying the weekly programme until it is changed.
- Please note! When switching off the heater, it will retain all settings irrespective of whether you use the ON/OFF switch, the main switch or the plug. The day and time settings work separately on two long-life batteries (behind operational panel); when they run out, the day and time settings will be lost. The heater will then assume, when it is switched on, that it is Monday at 00.00 and work through the timer settings accordingly (and turn on and off on the wrong days and times). Make sure that the date and time are set correctly and, if not, replace the batteries and set the date and time again.
- In order to change the timer settings, set the day to OFF.
MODE 04 = with thermostat, weekly timer, automatic output choice and 20 minute adaptive start
-
Same as MODE 03 but the heater chooses the heating output itself:
-
If it must heat a maximum of 3 degrees: half power
-
If it must heat more than 3 degrees: full power
-
Twenty minutes before the set start time, the heater will check the ambient temperature. If it is under the set temperature, the heater will begin to heat and will choose the output level:
≥ 6 degrees to heat: full power
≥ 3 degrees but ≤ 6 degrees: half power
≤ 3 degrees: no pre-heating.
- If you select MODE 04 with less than 20 minutes before the first timer setting, the heater could start heating immediately.
To change MODE, press and hold the SET button. Use the & v buttons to choose a new MODE and confirm with OK.
Safety features
In the event of overheating or disrupted functioning, the heating safeguard will turn the heater off. In this event, switch the main switch to off (O) and remove the plug from the socket. Once the heater has cooled down, you will be able to resolve the issue by pressing the reset button. You can now put the plug back into the socket and use the heater.
There is, however, generally a reason for an appliance overheating. This may be because the heater cannot adequately release its heat or take in fresh air (because the heater is covered, the grills are blocked, the heater is placed too near a wall etcetera). Before using the heater again, therefore, remove or adjust whatever caused the appliance to overheat. If you cannot find the cause and overheating recurs, stop using the heater and contact your vendor or a certified electrician for inspection/repair. Overheating poses a serious fire risk!
Cleaning and maintenance
Keep the heater clean. Deposits of dust and dirt in the appliance are a common cause of overheating so these should be removed regularly. Switch off the heater, remove the plug from the socket and allow the heater to cool down before cleaning or carrying out maintenance work..
- Wipe the outside of the heater regularly with a dry or slightly damp cloth (<50^) . Do not use aggressive soaps, sprays, cleaners or abrasives, waxes, polishes or chemical solutions! Prevent moisture getting into the heater. Never immerse the heater, electrical cable or remote control in liquid!
- Use a vacuum cleaner or compressor to carefully remove any dust and dirt from the grills and ensure that the air intake and outlet openings are clean. Be careful not to touch or damage any internal parts during cleaning!
- The heater contains no other parts which need maintenance.
- At the end of the season, store the cleaned heater in the original packaging if possible. Store upright in a cool, dry and dust-free place.
- Do not dispose of the heater with household waste when it becomes worn or damaged beyond repair. Take it to your local authority's collection point for electrical appliances where any reusable materials will be collected and redistributed.
Removal
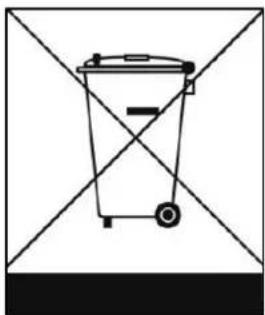
In the EU this symbol indicates that this product may not be disposed of as ordinary household waste. Old equipment contains valuable materials, suitable for recycling. These materials should be made suitable for reuse in order to prevent any adverse effects to health and the environment caused by unregulated waste collection. Therefore, please make sure that you bring old equipment to a designated collection point. Alternatively, contact the original supplier, who can make sure that as many of the components as possible can be recycled.
CE-statement
Eurom - Genemuiden-NL hereby declares that the EUROM workspace heaters, type EK3000 WALL / EK5000 WALL / EK9000 WALL, comply with the LVD guideline 2014/35/EU and the EMC guideline 2014/30/EU and meet the following standards:
Low Voltage 2014/35/EU
EN 60335-2-30:2009+A11:2012
EN 60335-1:2012+AC2014+A11:2014+A13:2017
EN 62233:2008
EMC 2014/30/EU
EN 55014-1:2017
EN 55014-2:2015
EN 61000-3-2:2014
EN 61000-3-3:2013
EN 61000-11-2:2000 (EK5000 WALL and EK9000 WALL)
EN 61000-3-12:2011 (EK5000 WALL and EK9000 WALL)
Genemuiden, 18-02-2019
W.J. Bakker, alg. dir.
Table des matéries
EN 61000-11-2:2000 (EK5000 WALL and EK9000 WALL)
EN 61000-3-12:2011 (EK5000 WALL and EK9000 WALL)
Genemuiden, 18-02-2019
W.J. Bakker, alg. dir.
Cuprins
Information requirement for the electric space heaters
| Model identifier(s):EK3000 WALL | |||||
| Item | Symbol | Value | Unit | Item | Unit |
| Heat output | Type of heat input, for electric storage local space heaters only (select one) | ||||
| Nominal heat output | Pnom | 3,0 | kW | manual heat charge control, with integrated thermostat | No |
| Minimum heat output (indicative) | Pmin | 1,5 | kW | manual heat charge control with room and/or outdoor temperature feedback | No |
| Maximum continuous heat output | Pmax,c | 3,0 | kW | electronic heat charge control with room and/or outdoor temperature feedback | No |
| Auxiliary electricity consumption | fan assisted heat output | No | |||
| At nominal heat output | elmax | N/A | kW | Type of heat output/room temperature control (select one) | |
| At minimum heat output | elmin | N/A | kW | single stage heat output and no room temperature control | No |
| In standby mode | eISB | 0,00076 | kW | Two or more manual stages, no room temperature control | No |
| with mechanic thermostat room temperature control | No | ||||
| with electronic room temperature control | No | ||||
| electronic room temperature control plus day timer | No | ||||
| electronic room temperature control plus week timer | Yes | ||||
| Other control options (multiple selections possible) | |||||
| room temperature control, with presence detection | No | ||||
| room temperature control, with open window detection | No | ||||
| with distance control option | No | ||||
| with adaptive start control | Yes | ||||
| with working time limitation | No | ||||
| with black bulb sensor | No | ||||
| Contact details | EUROM-KOKOSSTRAAT 20-8281JC-GENEMUIDEN-NETHERLANDS | ||||
| Model identifier(s):EK5000 WALL | |||||
| Item | Symbol | Value | Unit | Item | Unit |
| Heat output | Type of heat input, for electric storage local space heaters only (select one) | ||||
| Nominal heat output | Pnom | 5,0 | kW | manual heat charge control, with integrated thermostat | No |
| Minimum heat output (indicative) | Pmin | 2,5 | kW | manual heat charge control with room and/or outdoor temperature feedback | No |
| Maximum continuous heat output | Pmax,c | 5,0 | kW | electronic heat charge control with room and/or outdoor temperature feedback | No |
| Auxiliary electricity consumption | fan assisted heat output | No | |||
| At nominal heat output | elmax | N/A | kW | Type of heat output/room temperature control (select one) | |
| At minimum heat output | elmin | N/A | kW | single stage heat output and no room temperature control | No |
| In standby mode | eISB | 0,00076 | kW | Two or more manual stages, no room temperature control | No |
| with mechanic thermostat room temperature control | No | ||||
| with electronic room temperature control | No | ||||
| electronic room temperature control plus day timer | No | ||||
| electronic room temperature control plus week timer | Yes | ||||
| Other control options (multiple selections possible) | |||||
| room temperature control, with presence detection | No | ||||
| room temperature control, with open window detection | No | ||||
| with distance control option | No | ||||
| with adaptive start control | Yes | ||||
| with working time limitation | No | ||||
| with black bulb sensor | No | ||||
| Contact details | EUROM-KOKOSSTRAAT 20-8281JC-GENEMUIDEN-NETHERLANDS | ||||
| Model identifier(s):EK9000 WALL | |||||
| Item | Symbol | Value | Unit | Item | Unit |
| Heat output | Type of heat input, for electric storage local space heaters only (select one) | ||||
| Nominal heat output | Pnom | 9,0 | kW | manual heat charge control, with integrated thermostat | No |
| Minimum heat output (indicative) | Pmin | 4,5 | kW | manual heat charge control with room and/or outdoor temperature feedback | No |
| Maximum continuous heat output | Pmax,c | 9,0 | kW | electronic heat charge control with room and/or outdoor temperature feedback | No |
| Auxiliary electricity consumption | fan assisted heat output | No | |||
| At nominal heat output | elmax | N/A | kW | Type of heat output/room temperature control (select one) | |
| At minimum heat output | elmin | N/A | kW | single stage heat output and no room temperature control | No |
| In standby mode | eISB | 0,00076 | kW | Two or more manual stages, no room temperature control | No |
| with mechanic thermostat room temperature control | No | ||||
| with electronic room temperature control | No | ||||
| electronic room temperature control plus day timer | No | ||||
| electronic room temperature control plus week timer | Yes | ||||
| Other control options (multiple selections possible) | |||||
| room temperature control, with presence detection | No | ||||
| room temperature control, with open window detection | No | ||||
| with distance control option | No | ||||
| with adaptive start control | Yes | ||||
| with working time limitation | No | ||||
| with black bulb sensor | No | ||||
| Contact details | EUROM-KOKOSSTRAAT 20-8281JC-GENEMUIDEN-NETHERLANDS | ||||
Eurom
Kokosstraat 20
8281 JC Genemuiden (NL)
info@eurom.nl
www.eurom.nl

- Inhoudsopgave
- Thank you
- Symbol statement
- Do not cover your device!
- Product description
- Technical data
- Product image
- Safety instruction / Safety warnings
- Description
- Location and connection
- Set-up and operation
- Operating
- MODE 01 = with thermostat and manual output choice
- MODE 02 = with thermostat and automatic output choice
- MODE 03 = with thermostat, weekly timer and always full output
- Setting day/time
- MODE 04 = with thermostat, weekly timer, automatic output choice and 20 minute adaptive start
- Safety features
- Cleaning and maintenance
- Removal
- CE-statement
- Table des matéries
- Cuprins
Brand : Eurom
Model : EK5000 Wall
Category : Heating