
AF124772 - Deep fryer Emerio - Free user manual and instructions
Find the device manual for free AF124772 Emerio in PDF.
| Product type | Air fryer |
| Brand | Emerio |
| Model | AF124772 |
| Power supply | 220-240 V~, 50/60 Hz |
| Power | 1800 W |
| Temperature range | 30 °C to 200 °C |
| Timer | 1 to 90 minutes (up to 24 h in drying mode) |
| Rotating basket capacity | Fill up to 3/4 full maximum |
| Display | Digital screen |
| Preset programs | 10 (fries, steak, fish, shrimp, pizza, chicken, pastries, rotisserie grill, drying, reheating) |
| Included accessories | Rotating basket, rotisserie rod, forks, skewers, wheel discs, 3 cooking grids, oil tray |
| Main material | Stainless steel and plastic |
| Cleaning | Surfaces with damp cloth; accessories dishwasher safe |
| Safety | Overheat protection, automatic shut-off |
| Rotation function | Yes, for rotisserie and rotating basket |
| Interior light | Yes, cooking chamber lamp |
| Warranty | 2 years |
| Repairability | Contact customer service; no user repair |
Frequently Asked Questions - AF124772 Emerio
User questions about AF124772 Emerio
0 question about this device. Answer the ones you know or ask your own.
Ask a new question about this device
Download the instructions for your Deep fryer in PDF format for free! Find your manual AF124772 - Emerio and take your electronic device back in hand. On this page are published all the documents necessary for the use of your device. AF124772 by Emerio.
USER MANUAL AF124772 Emerio
natural_image
Black and white photo of a modern air fryer with digital display and open oven (no visible text or symbols)Smart Fryer Multi Oven (EN)
Smart Fryer Multiofen (DE)
Multi-friteuse intelligente (FR)
Smart multiugn med fritös (SE)
Smart Fryer Multi Oven (NL)
Instruction manual – English ...... - 2 -
Before use make sure to read all of the below instructions in order to avoid injury or damage, and to get the best results from the appliance. Make sure to keep this manual in a safe place. If you give or transfer this appliance to someone else make sure to also include this manual.
In case of damage caused by user failing to follow the instructions in this manual the warranty will be void. The manufacturer/importer accepts no liability for damages caused by failure to follow the manual, a negligent use or use not in accordance with the requirements of this manual.
-
This appliance can be used by children aged from 8 years and above and persons with reduced physical, sensory or mental capabilities or lack of experience and knowledge if they have been given supervision or instruction concerning use of the appliance in a safe way and understand the hazards involved.
-
Children shall not play with the appliance.
-
Cleaning and user maintenance shall not be made by children unless they are older than 8 and supervised.
-
Keep the appliance and its cord out of reach of children less than 8 years.
-
If the supply cord is damaged, it must be replaced by the manufacturer, its service agent or similarly qualified persons in order to avoid a hazard.
-
Regarding the instructions for cleaning the surfaces which come in contact with food or oil, please refer to the paragraph “cleaning and maintenance” of the manual.
-
This appliance is not intended to be operated by means of an external timer or separate remote-control system.
-
This appliance is intended to be used in household and similar applications such as: staff kitchen areas in shops, offices and other working environments; farm houses; by clients in hotels, motels and other residential type environments; bed and breakfast type environments.
-
Before inserting the plug into the mains socket, please check that the voltage and frequency comply with the specifications on the rating label.
-
Disconnect the mains plug from the socket when the appliance is not in use and before cleaning.
-
If an extension cord is used it must be suited to the power consumption of the appliance, otherwise overheating of the extension cord and/or plug may occur. There is a potential risk of injuries from tripping over the extension cord. Be careful to avoid dangerous situations.
-
Ensure that the mains cable is not hung over sharp edges and keep it away from hot objects and open flames.
-
Do not immerse the appliance or the mains plug in water or other liquids. There is danger to life due to electric shock!
-
To remove the plug from the plug socket, pull the plug. Do not pull the power cord.
-
Do not touch the appliance if it falls into water. Remove the plug from its socket and send it to an authorized service center for repair.
-
Do not plug or unplug the appliance from the electrical outlet with a wet hand.
-
Never attempt to open the housing of the appliance, or to repair the appliance yourself. This could cause electric shock.
-
Never leave the appliance unattended during use.
-
This appliance is not designed for commercial use.
-
Do not use the appliance for other than intended use.
-
Do not wind the cord around the appliance and do not bend it.
-
Place the appliance on a stable, level surface from which it cannot fall off.
-
Please prevent the product to be exposed to excessive dirt and humidity.
-
Do not operate the machine without supervision, if you should leave the workplace, always switch the machine off or remove the plug from socket (pull the plug itself, not the lead).
-
Do not place the appliance against a wall or against other appliance. Leave at least 10cm free space on the back and sides and above the appliance.
-
During hot air frying, hot steam is released through the air outlet openings. Keep your hands and face at a safe distance from the steam and from the air outlet openings. Also be careful of hot steam and air when you remove the pan from the appliance.
- Immediately unplug the appliance if you see dark smoke coming out of the appliance. Wait for the smoke emission to stop before you remove the pan from the appliance.
- Make sure before each use of the appliance that the heating element and surroundings are clean and clear from any food remainders in order to ensure a flawless function.
- Caution, hot surface.
WARNING!! Please do not touch surface while in use. The temperature of accessible surfaces may be high when the appliance is operating.
- Hot air comes out of the air vent at the back side of the appliance. Be sure to keep sufficient distance to materials, like glass, that are sensitive to heat.
- Never place the hot accessories on the surface of the open door. The hot accessories could damage the door. In addition, the device could tip over and present a risk of injury.
- Do not connect the device along with other consumers (with a high wattage) to a multiple socket in order to prevent overloading and a possible short circuit (fire).
- Do not insert anything into the ventilation openings of the device and make sure that these do not become clogged.
- Make sure that foodstuffs containing oil and fats are not overheated. Do not place any vessels filled with oil or other liquids into the device.
- Do not cover the device during operation in order to prevent it from catching fire.
PARTS DESCRIPTION
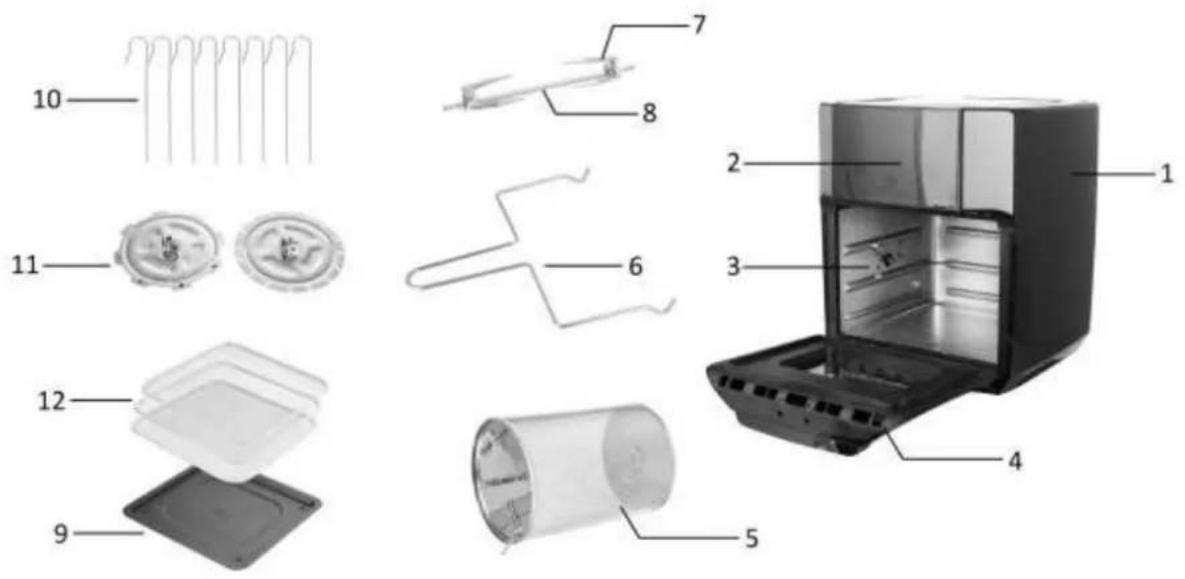
- Main unit
- Control panel
- Cooking chamber
- Door
- Rotating basket
-
Handle for rotisserie spit rod and rotating basket
-
Rotisserie fork
- Rotisserie spit rod
- Oil tray
- Skewers
- Wheel discs
- Baking rack (3 pieces)
Control panel
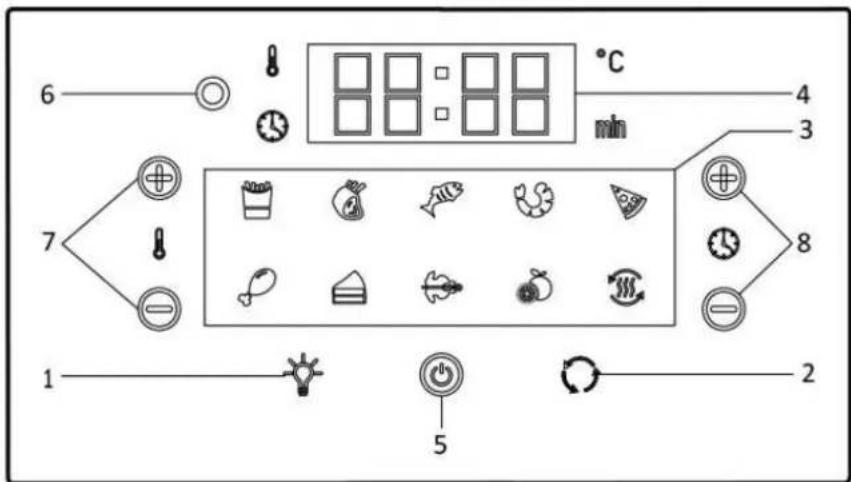
- Cooking chamber lamp
- Rotating function
- Menu list
- Digital display
- On/Off switch button
- Fan symbol
- Temperature increasing "+" / decreasing "-" buttons
- Cooking time increasing "+" / decreasing "-" buttons
BEFORE USE
First read all instructions before use and retain the manual for later reference. Only plug this appliance into an earthed socket. Before first use, remove the packing materials. Clean the appliance according to the section "cleaning and maintenance". Wipe inside and outside of the appliance with a soft cloth. Make sure that the electrical parts remain dry.
Operate the appliance before first use for approximately 10 minutes in order to burn off production residues. Make sure there is good ventilation. The appliance may emit some smoke and a characteristic smell when you switch it on for the first time. This is normal and will stop soon.
USE
-
Place the appliance on a dry, stable and heat-resistant surface. Since the appliance becomes hot during use, make sure that it is not too close to other objects.
-
Open the cooking chamber by the door handle and put in the food to be cooked. Choose your desired accessories:
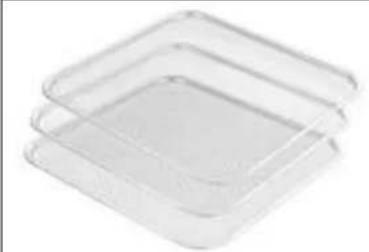 | Baking rack: The baking racks are intended for drying. However, they can also be used for crisping, warming up etc. The heating element is located at the top. In the upper position, the food will be cooked faster and crispy. The middle position can be selected to achieve uniform heating from all sides. The bottom position is suitable for gentle cooking. Insert the rack into the cooking chamber. Choose your desired cooking position. |
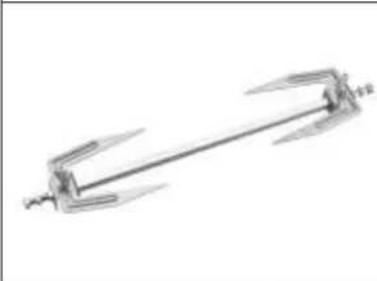 | Rotisserie spit rod with forks: to cook large pieces of meat. Have the rotisserie spit rod across the centre of the food you are going to prepare. Fix the food with the forks; secure with screws. Do not secure over the notches which mark the outermost positions for the locking screws. Plug one end of the rotisserie spit rod into the round holder on the left-hand side of the cooking chamber, and then hang the other end of the rotisserie spit rod into the support on the right-hand side of the cooking chamber. |
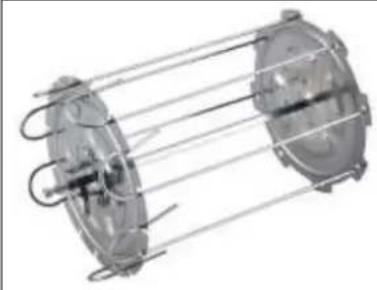 | Rotisserie spit rod with skewers and wheel discs: Insert the rotisserie spit rod into the wheel discs. Secure with the locking screws. Insert the skewers with meat into the wheel discs. Make sure the skewers are locked in position. Plug one end of the rotisserie spit rod into the round holder on the left-hand side of the cooking chamber, and then hang the other end of the rotisserie spit rod into the support on the right-hand side of the cooking chamber. |
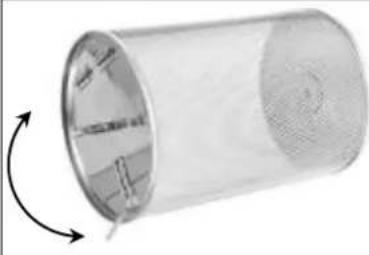 | Rotating basket: to cook chips or other potato products, pieces of vegetables, meat and frozen products like chicken nuggets or squid rings. Open the rotating basket by the flap. Fill the rotating basket no more than 3/4 full with food. Do not overfill the basket with ingredients. Otherwise, the food will not be cooked evenly. Close the basket and make sure it is shut correctly so that it cannot open during cooking process. Insert the basket into the cooking chamber according to the direction marks on two sides of the basket: L= Left; R= Right. |
-
Place the oil tray on the bottom to collect the dripping oils.
-
Close the cooking chamber and plug in. The buzzer sends out a beep sound. The digital display and control panel flash once while the indicator light of the key “💡” keeps on. The appliance enters into standby mode. Under standby mode, only the key “💡” is operable; others are not.
-
Press the key “☐” under standby mode, the buzzer sends out a beep sound. The appliance enters into setting mode. All the indicator lights (except for the fan symbol) on the control panel illuminate. The digital display shows the default working temperature (185°C) and the default working time (15 minutes) alternately. Under setting mode, all the keys are operable.
-
Press the keys on the menu list to choose your desired food type to be cooked. The working temperature and working time are in default. You can also press the keys “+” / “-” to set your own working temperature (adjusted from 80 - 200°C) and working time (adjusted from 1 - 90 minutes) manually. Note: If no operation of the keys over 4 seconds, the appliance will begin to work automatically.
Two more functions:
- “💡”: If you would like to check the food condition during cooking process, press the key to turn on the lamp inside the cooking chamber. Press the key again, the lamp will be turned off.
- “☐”: Press the key to turn on the rotating function when rotisserie spit rod or rotating basket is used. Press the key again, the rotating will stop.
-
After the setting is finished, press the key “💡” to start the appliance. The appliance enters into working mode. The digital display shows the set working temperature and the remaining working time.
-
During working, the digital display shows the countdown time till "OFF" and then the appliance turns into shutdown mode. For example: 08→07→...→01→OFF (shutdown mode). When the appliance enters into shutdown mode, the heating element stops working immediately and the fan keeps on running for approx. 26 seconds. With 5 long beep sounds, the appliance enters into standby mode.
You can also press the key “☐” to shut down the appliance manually. The heating element stops working immediately and the fan keeps on running for approx. 26 seconds. The appliance will enter into standby mode.
-
Open the cooking chamber to take out the food. Check if the ingredients are ready. If not, set the working time to a few extra minutes. Then press the key “💡” to start the appliance again. You can also open the cooking chamber to check the ingredients during cooking process. The appliance will stop working immediately. Close the cooking chamber and the unit will continue to work with the setting. Press the keys “+” / “-” to adjust the working temperature/time as needed.
-
After use, remove the mains plug from the wall socket. Always use the oven gloves and the handle (for rotisserie spit rod and rotating basket) to take the food out of the appliance.
Note: The device has overheating protection. It switches off if it is overloaded. In this case, pull the mains plug out of the plug socket and allow the device to cool down completely.
CAUTION:
- Do not immerse the housing in water or rinse it under the tap.
- Avoid any liquid entering the appliance to prevent from electric shock or short circuit.
- Do not cover the air inlet and the outlet when the appliance is working.
-
Do not touch the inside of the appliance when it is in operation.
-
During operation, hot steam is released through the air outlet. Keep your hands and face at a safe distance from the steam and the air outlet.
-
Before handling or cleaning the appliance, let it cool down for approximately 30 minutes.
Menu list for reference
| Symbol | Programme | Temperature | Cooking time |
 | Chips | 200 °C | 15 min |
 | Steaks / cutlets | 175 °C | 25 min |
 | Fish | 165 °C | 15 min |
 | Shrimps | 160 °C | 12 min |
 | Pizza | 180 °C | 15 min |
 | Chicken | 185 °C | 40 min |
 | Baking | 160 °C | 30 min |
 | Rotary grilling(with automatic rotating function) | 190 °C | 30 min |
 | Drying | 30 °C | 2 h |
 | Heat up | 115 °C | 12 min |
Note: The default working temperature and time for dried fruit is 30^ C and 2h, the set temperature range is 30-80^ C, and the time range is 2-24h.
CLEANING AND MAINTENANCE
- Remove the mains plug from the wall socket and let the appliance cool down completely.
- Clean the outside and inside of the appliance with a damp cloth and dry with a soft, clean cloth.
- Never use abrasive cleaners or sponges.
- Rinse all the used accessories with dish soap and warm water. Clean thoroughly and dry well before use. In the case of stubborn dirt, we recommend soaking the accessories in warm water and detergent beforehand. All the accessories are dishwasher safe.
- Do not immerse the main unit in water or other liquids! Do not place it in the dishwasher!
- Clean the main unit and the used accessories after each use to prevent germ formation and burning of food residues. Do not allow food residues to dry on.
TROUBLESHOOTING
If the device does not work properly, first check whether you are able to rectify the problem yourself. If the problem cannot be solved with the following steps, contact the customer service department.

Do not attempt to repair an electrical device yourself!
| Problem | Possible cause | Solution |
| The device does not work. The displays on the control panel does not switch on. | The door is not closed properly. | Close the door. |
| The mains plug is not inserted correctly in the plug socket. | Push the mains plug into the plug socket as far as it will go. | |
| The plug socket is defective. | Try another plug socket. | |
| No mains voltage is predent. | Check the fuse of the electrical distributor (fuse box). | |
| The overheating protection has been triggered. | Pull the mains plug out of the plug socket and allow the device to cool down completely. Then try again. | |
| The fuse in the electrical distributor (fuse box) is triggered. | Too many devices connected to the same circuit. | Reduce the number of devices in the circuit. |
| The food has not been cooked evenly. | Different items of food with different cooking times have been prepared at the same time. | Place food with a longer cooking time in the device first, and then add ingredients with a shorter cooking time later. |
| Items of food which require different cooking temperatures have been prepared at the same time. | Prepare items of food with different cooking temperatures one after another. | |
| The set cooking time was too short or the temperature was too low. | Increase the cooking time or temperature. | |
| The rotating basket or baking rack is overfilled. | Reduce the amount of food. | |
| The items of food are piled on top of one after another. | Spread the food and mix it around from time to time. | |
| The food is slightly burnt. | The selected temperature is too high or the cooking time is too long. | Reduce the temperature or cooking time. |
| Chips made from fresh potatoes are not crispy. | The potatoes contain too much water. | Cut the potatoes into narrow pieces. Dab the potato pieces dry with some kitchen towel and then trickle a little cooking oil over them. |
| During use, an unpleasant smell or smoke is detected. | The device is dirty. | Follow the instructions in the section “cleaning and maintenance”. |
| The device is being used for the first time. | A smell often develops when new devices are first used. The smell should disappear once the device has been used several times. | |
| Too much oil or grease. | Remove excessive oil or grease. | |
| Error messages E1 or E2 | The sensor is defective. | Contact the customer service department. |
TECHNICAL DATA
Operating voltage: 220-240V\~ 50/60Hz
Power: 1800W
GUARANTEE AND CUSTOMER SERVICE
Before delivery our devices are subjected to rigorous quality control. If, despite all care, damage has occurred during production or transportation, please return the device to your dealer. In addition to statutory legal rights, the purchaser has an option to claim under the terms of the following guarantee:
For the purchased device we provide 2 years guarantee, commencing from the day of sale. If you have a defective product, you can directly go back to the point of purchase.
Defects which arise due to improper handling of the device and malfunctions due to interventions and repairs by third parties or the fitting of non-original parts are not covered by this guarantee. Always keep your receipt, without the receipt you can't claim any form of warranty. Damage caused by not following the instruction manual, will lead to a void of warranty, if this results in consequential damages then we will not be liable.
Neither can we hold responsible for material damage or personal injury caused by improper use if the instruction manual is not properly executed. Damage to accessories does not mean free replacement of the whole appliance. In such case please contact our service department. Broken glass or breakage of plastic parts is always subject to a charge. Defects to consumables or parts subjected to wearing, as well as cleaning, maintenance or the replacement of said parts are not covered by the warranty and are to be paid.
ENVIRONMENT FRIENDLY DISPOSAL

Recycling – European Directive 2012/19/EU
This marking indicates that this product should not be disposed with other household wastes. To prevent possible harm to the environment or human health from uncontrolled waste disposal, recycle it responsibly to promote the sustainable reuse of material resources. To return your used
device, please use the return and collection systems or contact the retailer where the product was purchased. They can take this product for environmental safe recycling.
Emerio Deutschland GmbH (no service address)
Lerchenweg 3
40789 Monheim am Rhein
Deutschland
Customer service:
T: +49 (0) 3222 1097 600
E: info.de@emerio.eu
SICHERHEITSHINWEISE
natural_image
Stack of three transparent plastic containers with no visible text or symbolsnatural_image
Mechanical component with two cylindrical parts connected by metal rods (no visible text or symbols)natural_image
Metallic cylindrical container with internal mesh structure and directional arrows indicating rotation (no text or symbols)- Attention, surface chaude.

Brand : Emerio
Model : AF124772
Category : Deep fryer