FN110142 - Fan Emerio - Free user manual and instructions
Find the device manual for free FN110142 Emerio in PDF.



User questions about FN110142 Emerio
0 question about this device. Answer the ones you know or ask your own.
Ask a new question about this device
Download the instructions for your Fan in PDF format for free! Find your manual FN110142 - Emerio and take your electronic device back in hand. On this page are published all the documents necessary for the use of your device. FN110142 by Emerio.
USER MANUAL FN110142 Emerio
natural_image
Black-and-white photo of a desktop electric fan with visible blades and mesh grille (no text or symbols)
CE
Inhalt – Съдържание – Sadržaj – Obsah – Indhold – Contenido – Sisukord – Sisältö – Contenu – Content – Sadržaj – Tartalom – Innihald – Contenuto – Turinys – Saturs – Inhoud – Innhold – Содержание – Sadržaj – Obsah – Vsebina – Innehåll – İçerik
Bedienungsanleitung – German....- 2 -
Ръководство с инструкции – Bulgarian ...... - 6 -
Uputstvo – Bosnian....- 10 -
Návod k použití – Czech ...... - 14 -
Brugsanvisning – Danish ...... - 18 -
Manual de Instrucciones – Spanish....- 22 -
Kasutusjuhend – Estonian....- 26 -
Käyttöopas – Finnish....- 30 -
Mode d'emploi – French ...... - 34 -
Instruction manual – English....- 38 -
Upute za rad – Croatian ....- 42 -
Használati útmutató – Hungarian ...... - 46 -
Leiðbeiningarhandbók – Icelandic....- 50 -
Manuale d'istruzioni – Italian....- 54 -
Instrukciju vadovas – Lithuanian....- 58 -
Instrukciju rokasgrāmata – Latvian ...... - 62 -
Gebruiksaanwijzing – Dutch......- 66 -
Brukermanual – Norwegian ...... - 70 -
Инструкция по эксплуатации – Russian ...... - 74 -
Uputstvo – Serbian-Latin ...... - 79 -
Návod na obsluhu – Slovakian ....- 83 -
Priročnik za uporabo – Slovenian....- 87 -
Bruksanvisning – Swedish ...... - 91 -
Kullanım talimatı – Turkish......- 95 -
GEBRAUCHSANWEISUNG
MONTAGEANLEITUNGEN
ТЕХНИЧЕСКИ ДАННИ
UPUTSTVA ZA SASTAVLJANJE
NÁVOD NA MONTÁŽ
SAMLEVEJLEDNING
- Tag alle ventilatorens dele ud af emballagen.
- Sæ t den ekstra del til foden (10) ind i ståfoden (9). Sæ t standerens yderdel (8) ind i hullet i ståfoden (9). Skru L-skruen (12) og ringen (11) fast sammen med ekstradelen til foden, ståfoden og standerens yderdel.
- Fastgør standerens inderdel (6) og yderdel (8) til monteringsbeslaget (7).
- Sæ t ventilatorhovedet fast på standerens inderdel (6) med skruerne (5). Sørg for, at ventilatoren kan vippe frit, både op og ned, uden at overstræ kke eller fange ledningen.
BETJENINGSVEJLEDNING
INSTRUCCIONES DE MONTAJE
TEHNILISED ANDMED
Tööpinge : 220-240V \~ 50Hz
Võimsustarve: 120W
CONSIGNES D'ASSEMBLAGE
Please read these Operating Instructions through carefully before connecting your appliance to the mains, in order to avoid damage due to incorrect use. Please pay particular attention to the safety information. If you pass the appliance on to a third party, these Operating Instructions must also be handed over.
WARNING – When using electrical appliance, basic safety precautions should always be followed to reduce the risk of fire, electrical shock and personal injury.
SAFETY INFORMATION
- This appliance can be used by children aged from 8 years and above and persons with reduced physical, sensory or mental capabilities or lack of experience and knowledge if they have been given supervision or instruction concerning use of the appliance in a safe way and understand the hazards involved.
- Children shall not play with the appliance.
- Cleaning and user maintenance shall not be made by children without supervision.
- If the supply cord is damaged, it must be replaced by the manufacturer, its service agent or similarly qualified persons in order to avoid a hazard.
- Incorrect operation and improper handling can lead to faults on the appliance and injuries to the user.
- In the event of improper use or incorrect handling, no liability can be accepted for any damage that may occur.
- Do not immerse the unit or mains plug in water or other liquids. There is danger to life due to electric shock! However, if this occurs, remove the mains plug immediately and then have the unit checked by an expert before using it again.
- Do not operate the appliance if the mains cable or the mains plug show signs of damage, if the appliance has fallen on the floor or has been otherwise damaged. In such
cases take the appliance to a specialist for checking and repair if necessary.
- Never remove the mains plug from the socket by pulling on the mains cable, or with wet hands.
- Ensure that the mains cable does not hang over sharp edges or allow it to become trapped.
- Keep the appliance away from damp, and protect from splashes.
- Keep the appliance away from hot objects (e.g. hotplates) and open flames.
- Use the appliance on a flat, dry and heat resistance surface.
- Never leave the appliance unattended during use.
- Do not store or operate the appliance in the open air.
- Keep the appliance in a dry place, inaccessible to children (in its packaging).
- Never put fingers or any other objects through the grilles (fan guards) when the fan is running.
- Never operate the appliance without the grilles (fan guards) in place, as serious personal injury may result.
- The appliance must be assembled completely before use.
- Watch out for long hair! It can be caught in the fan owing to the air turbulence.
- Do not point the air flow to the people for a long time.
- Ensure that the fan is switched off from the supply mains before removing the guard.
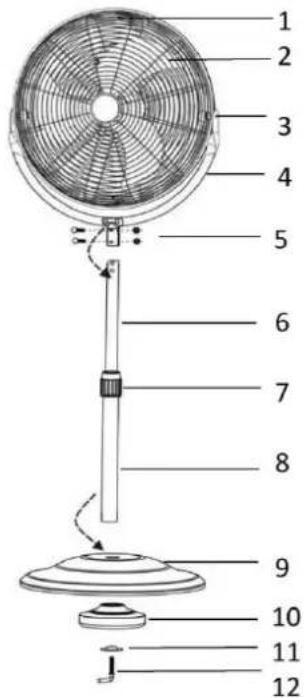
PARTS DESCRIPTION
- Fan guard
- Fan blade
- Screw and nut
- Stand
- Screw
- Inner pillar
- Outer connector
- Outer pillar
- Stand base
- Base addition part
- Ring
- L screw
ASSEMBLING INSTRUCTIONS
- Remove all the fan parts from the packaging.
- Insert the base addition part (10) into the stand base (9). Insert the outer pillar (8) into the hole of the stand base (9). Fasten the L screw (12) and the ring (11) to fix the base addition part, the stand base and the outer pillar firmly.
- Fix the inner pillar (6) and outer pillar (8) with the connector (7).
- Fasten the fan head onto the inner pillar (6) with the screws (5). Ensure that the fan can be fully tilted, both up and down without stressing or trapping the cable.
OPERATING INSTRUCTIONS
- Plug the power cord into a suitable socket.
-
After use, switch off the appliance and unplug it.
-
Turn the switch at the rear of the motor housing to select the speed. 0 = OFF, 1 = Low speed, 2 = Medium speed, 3 = High speed.
FAN DIRECTION ADJUSTMENT
- Do not attempt to make any adjustments to the direction of the grille and fan assembly until the fan has been turned off and unplugged from the socket.
- To adjust the direction of the fan, hold the grille and gently tilt the fan until the desired position is reached.
- Plug the fan back into the socket and turn the fan on.
CLEANING
- Before servicing the fan and after each occasion of use, switch off the appliance and unplug the mains cable from the socket.
- Never immerse the appliance in water (danger of short-circuit). To clean the appliance, only wipe it down with a damp cloth and then dry it carefully. Always take out the mains plug first.
- Take care that excessive dust does not build up in the air-intake and air-outlet grille, and clean it occasionally using a dry brush or vacuum cleaner.
TECHNICAL DATA
Operating voltage: 220-240V \~ 50Hz
Power consumption: 120W
| Eco design requirements | |
| Product information requirements | |
| Maximum fan flow rate (F) | 107,4 m^3/min |
| Fan power input (P) | 120,0 W |
| Service value (SV) | 0,9 ( m^3/min )/W |
| Measurement standard for service value | IEC 60879: 1986 (corr.1992) |
| Standby power consumption (PSB) | N/A W |
| Fan sound power level (LWA) | 68 dB(A) |
| Maximum air velocity (c) | 4,3 meter/sec |
| Contact details for obtaining more information | BAHAG AGGutenbergstr. 2168167 MannheimGermany |
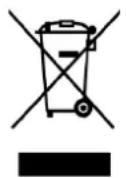
Recycling
This marking indicates that this product should not be disposed with other household wastes throughout the 2012/19/EU. To prevent possible harm to the environment or human health from uncontrolled waste disposal, recycle it responsibly to promote the sustainable reuse of material resources. To return your used device, please use the return and collection systems or contact the
retailer where the product was purchased. They can take this product for environmental safe recycling.
UPUTE ZA UPOTREBU
TEHNICKI PODACI
Radni napon: 220-240V \~ 50Hz
Potrosnja energije: 120W
| Zahtjevi u eko-dizajnu | |
| Zahtjevi informacija o uređaju | |
| Maksimalna brzina ventilatora (F) | 107,4 m^3/min |
| Ulazna snaga ventilatora (P) | 120,0 W |
| Servisna vrijednost (SV) | 0,9 ( m^3/min )/W |
| Standardne mjere za servisnu vrijednost | IEC 60879: 1986 (corr.1992) |
| Potrošnja energije u stanju čekanja (PSB) | N/A W |
| Razina zvučne snage ventilatora (LWA) | 68 dB(A) |
| Maksimalna brzina zraka (c) | 4,3 meter/sek |
| Detalji za kontakt radi dobivanja više informacija | BAHAG AGGutenbergstr. 2168167 MannheimGermany |
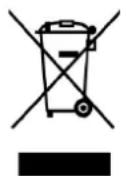
Recikliranje
Ova oznaka naznačuje da se ovaj proizvod ne smije odlagati s ostalim kućanskim otpadom u cijeloj 2012/19/EU. Kako biste spriječili moguće štete za prirodno okruženje ili ljudsko zdravlje od nekontroliranog zbrinjavanja otpada, odgovorno ga reciklirajte kako biste promicali održivu ponovnu upotrebu materijalnih resursa. Za vraćanje vašeg korištenog uređaja molimo vas da koristite
postojeće sustave za vraćanje i prikupljanje ili kontaktirajte vašeg prodavača gdje je uređaj kupljen. Oni mogu uzeti ovaj uređaj za ekološki sigurno recikliranje.
HASZNÁLATI Ú TMUTATÓ
Ö SSZESZERELÉSI Ú TMUTATÓ
| Vistvæ nar hönnunarkröfur | |
| Skilyrõi varõandi võruupplýsingar | |
| Hámarks streymishraõi viftu (F) | 107,4 m^3/min |
| Orkuinntak viftu (P) | 120,0 W |
| þjónustugildi (SV) | 0,9 ( m^3/min )/W |
| Mæ listuõull fyrir þjónustugildi | IEC 60879: 1986 (corr.1992) |
| Aflpörf í reiõuham (PSB) | N/A W |
| Hljóðaflsstig viftu (LWA) | 68 dB(A) |
| Hámarks lofthraõi (c) | 4,3 meter/sek |
| Samskiptaupplýsingar til aõ nálgast frekari upplýsingar | BAHAG AGGutenbergstr. 2168167 MannheimGermany |
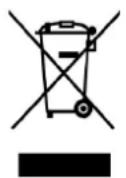
Endurvinnsla
SURINKIMO INSTRUKCIJA
TEHNISKIE DATI
MONTAGE-INSTRUCTIES
MONTERINGSANVISNINGER
UPUTSTVA ZA SKLAPANJE
- Izvadite sve delove ventilatora iz ambalaže.
- Umetnite dodatni deo postolja (10) u postolje (9). Umetnite spoljnu cev (8) u otvor postolja (9). Zategnite L zavrtanj (12) i prsten (11) da biste čvrsto spojili dodatni deo postolja, postolje i spoljnu cev.
- Spojite unutrašnju cev (6) i spoljnu cev (8) pomoću spojnice (7).
- Pričvrstite glavu ventilatora na unutrašnju cev (6) zavrtnjevima (5). Uverite se da se ventilator može u potpunosti nagnuti gore i dole bez pritiskanja ili zahvatanja kabla.
UPUTSTVA ZA RUKOVANJE
- Uključite strujni kabl u odgovarajuću utičnicu.
- Okrenite prekidač na zadnjoj strani kućišta motora da biste izabrali brzinu. 0 = ISKLJUČENO, 1 = mala brzina, 2 = srednja brzina, 3 = velika brzina.
- Posle upotrebe, isključite aparat i izvucite utikač iz utičnice.
PODEŠAVANJE SMERA VAZDUŠNE STRUJE VENTILATORA
MONTÁŽNE POKYNY
TEHNIČNI PODATKI
Delovna napetost: 220-240V \~ 50Hz
Poraba energije: 120W
MONTERINGSANVISNINGAR
MONTAJ TALİMATI

- GEBRAUCHSANWEISUNG
- MONTAGEANLEITUNGEN
- ТЕХНИЧЕСКИ ДАННИ
- UPUTSTVA ZA SASTAVLJANJE
- NÁVOD NA MONTÁŽ
- SAMLEVEJLEDNING
- BETJENINGSVEJLEDNING
- INSTRUCCIONES DE MONTAJE
- TEHNILISED ANDMED
- CONSIGNES D'ASSEMBLAGE
- SAFETY INFORMATION
- PARTS DESCRIPTION
- ASSEMBLING INSTRUCTIONS
- OPERATING INSTRUCTIONS
- FAN DIRECTION ADJUSTMENT
- CLEANING
- TECHNICAL DATA
- Recycling
- UPUTE ZA UPOTREBU
- TEHNICKI PODACI
- Recikliranje
- HASZNÁLATI Ú TMUTATÓ
- Ö SSZESZERELÉSI Ú TMUTATÓ
- SURINKIMO INSTRUKCIJA
- TEHNISKIE DATI
- MONTAGE-INSTRUCTIES
- MONTERINGSANVISNINGER
- UPUTSTVA ZA SKLAPANJE
- UPUTSTVA ZA RUKOVANJE
- PODEŠAVANJE SMERA VAZDUŠNE STRUJE VENTILATORA
- MONTÁŽNE POKYNY
- TEHNIČNI PODATKI
- MONTERINGSANVISNINGAR
- MONTAJ TALİMATI
Brand : Emerio
Model : FN110142
Category : Fan