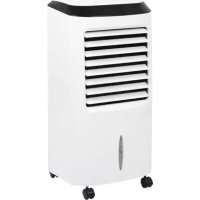
CoolStar 10.0 - Air Conditioning Eurom - Free user manual and instructions
Find the device manual for free CoolStar 10.0 Eurom in PDF.


| Product type | Evaporative air cooler |
| Brand | Eurom |
| Model | CoolStar 10.0 |
| Supply voltage | 220-240 V ~ 50 Hz |
| Rated power | 65 W |
| Maximum airflow | 150 m³/h |
| Water tank capacity | 10 L |
| Dimensions (L x W x H) | 38,5 x 31,0 x 76,0 cm |
| Weight | 7,3 kg |
| Functions | Fan (3 speeds), evaporative cooling, humidification, horizontal oscillation, ionization |
| Timer | 1 to 8 hours |
| Remote control | Yes, with CR2025 battery (included) |
| Housing material | ABS plastic |
| Dust filter | Washable, removable |
| Evaporation element | Honeycomb, washable |
| Recommended maintenance | Cleaning every 2 weeks, drain tank if unused |
| Auto shut-off | Yes (timer) |
| Use | Indoor only |
| Certifications | CE (LVD 2014/35/EU, EMC 2014/30/EU) |
| Package contents | Unit, remote control, battery, user manual |
Frequently Asked Questions - CoolStar 10.0 Eurom
User questions about CoolStar 10.0 Eurom
0 question about this device. Answer the ones you know or ask your own.
Ask a new question about this device
Download the instructions for your Air Conditioning in PDF format for free! Find your manual CoolStar 10.0 - Eurom and take your electronic device back in hand. On this page are published all the documents necessary for the use of your device. CoolStar 10.0 by Eurom.
USER MANUAL CoolStar 10.0 Eurom
Thanks 31
Technische Daten 31
Product Image 31
Instruction (Symbol statement) top up water tank 32
Safety notice 33
Description 36
Installation and preparation 36
Operation 37
Cleaning and maintenance 39
Problems and solutions 40
Removal. 41
CE-declaration 41
Thanks
Thank you very much for choosing for a EUROM product. You have made a good choice! We hope you will be satisfied about its functioning.
To get maximum profit from your product, it is important to read this manual attentive and totally before use, and to understand what is written. Read especially the safety instructions: they are there to protect you and your environment.
Keep the manual in a safe place for future reference. Store also the package: that is the best protection for your product in times of no-use. And if you at any time pass the product on, pass on the manual and package too.
We wish you a lot of fun with the CoolStar 10.0!
Eurom
Kokosstraat 20
8281 JC Genemuiden (NL)
info@eurom.nl
www.eurom.nl
This manual has been compiled with the utmost care. Nevertheless, we reserve the right to optimize and technically adjust this manual at any time.
Technische Daten
| Supply voltage | 220-240V~50HZ |
| Input power | 65 Watt |
| Air displacement | 150 m³/hour |
| Capacity Water tank | 10,0 liter |
| Dimensions | 38,5 x 31,0 x 76,0 cm |
| Weight | 7,3 kg |
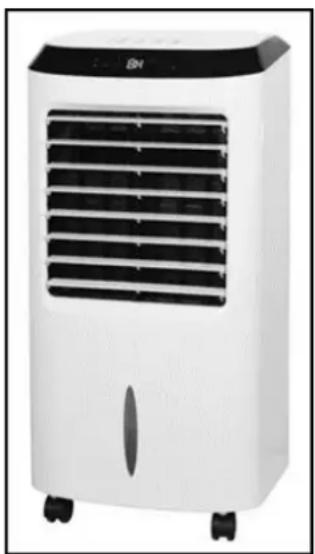
Product Image
Instruction (Symbol statement) top up water tank
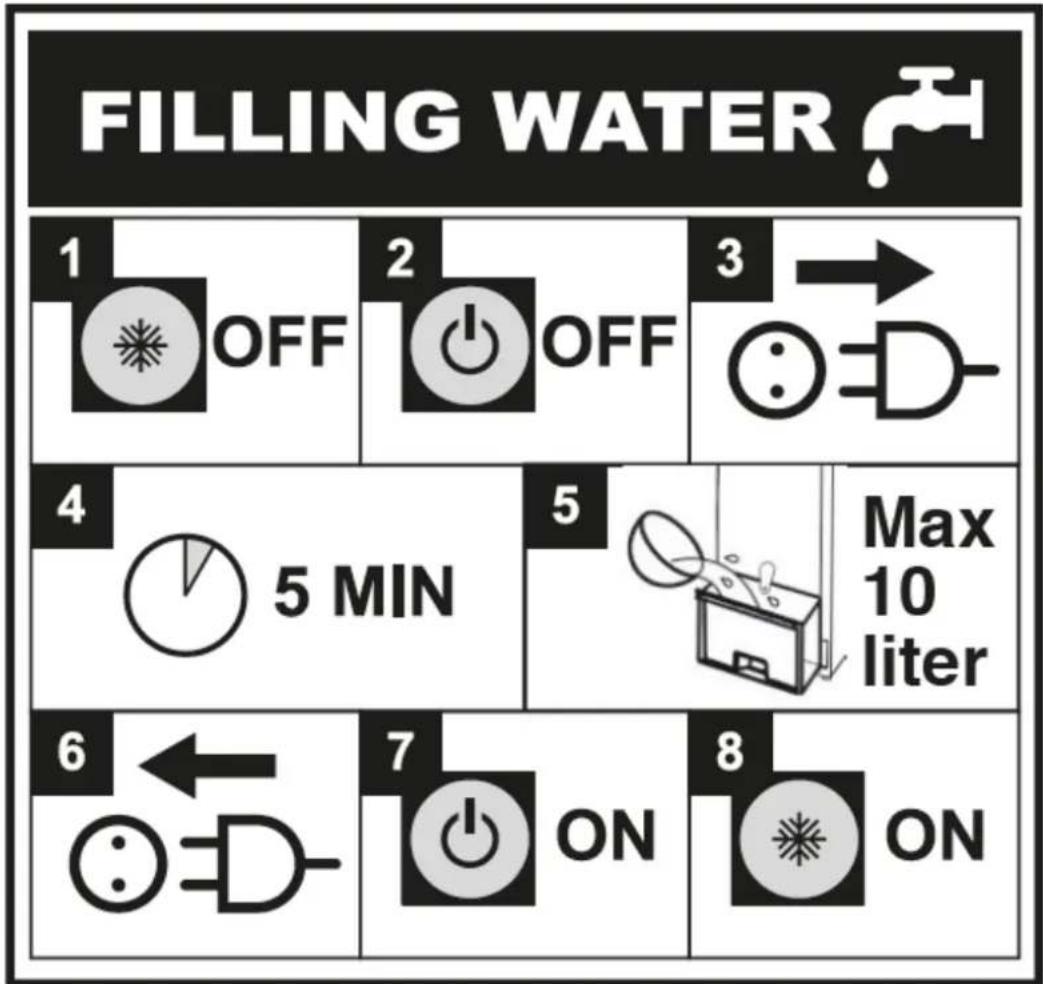

- Switch off the humidification and cooling function
- Switch off the on-off button
- Remove the plug from the power point
- Allow the device to rest for 5 minutes
- Top up tank with max. 10,0 liter water
-
- and 8. If desired plug in the power cord and switch on the ventilation, cooling and humidification function
Refer to the manual for cleaning requirements
Safety notice
-
Do not store or use the device:
-
Before using the device carefully read this entire instruction manual.
- Before using your new device, check it, including cord and plug, for any visible damage. Do not use a damaged unit, but send it back to your dealer for replacement.
- Remove the plug from the socket and immediately switch the appliance off when there is a strange noise, smell or smoke.
- This equipment is strictly intended for normal domestic use, indoors. Use this appliance only for the purpose for which it was designed (cooling / ventilating / humidifying a domestic room) and in the manner described in this manual.
- This device in not suitable for use in wet or damp spaces such as bathrooms and laundry rooms. Do not place the device in the vicinity of taps, bathtub, shower, pool, fountains or other sources of moisture. Make sure it cannot fall into water and prevent water from getting into the device itself. If, at any time, the device does fall into water, unplug it immediately! Do not use a device that has a damp interior but have it repaired. Never immerse the device, cord or plug in water and never touch it with wet hands.
- The supply voltage and utility frequency (220-240V~50Hz), specified on the machine, need to match those of the socket that is used. The electrical installation needs to be protected by a residual current device (max. 30 mA).
- Fully extend the cord before plugging in the heater. Prevent it from heating up any way. Do not run the cord underneath carpeting; do not cover it with mats, carpet strips, or similar and make sure it is not placed in any passageways. Make sure the cord cannot be stepped on and that no furniture is placed on top of it. Do not lead the cord around sharp corners and do not roll it up too tightly after use!
-
If possible, do not use an extension cord. If the use of an extension cord is unavoidable, then make sure it is an undamaged, approved extension cord with enough. To prevent overheating, always fully extend the cord!
-
in places where it can get wet or fall into water
- in the vicinity of highly flammable, explosive or gaseous substances. A spark from the switch could ignite it.
- in the vicinity of acids, alkalis, oil and other substances that can
cause corrosion.
- Always place the device on a dry, stable, horizontal and even surface.
- Do not place the device directly beneath a wall socket.
- Do not place objects on the device or sit on them.
- Make sure the air supply and air vent are not affected by blockages. Do not place anything on or over the device and do not place the unit too close to walls, curtains, furniture etc. Obstruction of the air supply and air vent can affect the operation and service life!
- Keep the intake and discharge grilles clean and free of dust and ensure a minimum clearance of 30 to 50~cm around the appliance.
- Do not touch the unit, move/reposition it or hold it at an angle once you have filled it with water; to prevent moisture in the electrical part. If you accidentally end up with water in the electrical part, remove the plug from the socket immediately and remove as much of the water as you can. Leave the unit to dry out for at least 24 hours. Keep a close eye on the device when you want to start using it again. If you determine that it is working or sounding abnormal, immediately pull the plug out of the socket and have the device checked / repaired by a qualified electrician.
- Replace the water regularly, especially in case of warm weather, to prevent contamination. Remove the remaining water from the unit during frosty conditions!
- Do not exceed the 'MAX' level when refilling the water reservoir; For 'cooling and humidifying', the water must be above the 'MIN' level. Ensure that the plug does not get wet or fall into the water tank. Never use the cooling of humidifying function without sufficient water in the water tank. Only use cold water, no lukewarm of hot water.
- Do not use the 'cool and humidify' function in a small, enclosed space.
- Always remove the plug from the socket when the unit is not in use.
- Do not leave a working air cooler unattended in a room.
- Never insert a finger, pen, stick or any object through the openings of the device. This can cause injury, electric shock, fire or damage.
- Do not spray any means (anti-insect, cleaning or whatever) on or in the appliance; this can cause physical complaints (especially in children) or damage parts.
-
Do not knock on or shake an operating device! Always switch the unit off and unplug it before:
-
refilling water
- cleaning the unit
- carrying out maintenance on the unit
-
moving the unit.
-
Do not use a timer or a similar product to automatically switch on the unit. Always perform safety checks before using the heater! Do not connect the air cooler to a dimmer.
- Do not use the air cooler at temperatures above 40^ , close to heating equipment and not in dusty rooms.
- Close supervision is necessary if the product is used near children, incapacitated persons or pets. This appliance can be used by children aged from 8 years and above and persons with reduced physical, sensory or mental capabilities or lack of experience and knowledge if they have been given supervision or instruction concerning use of the appliance in a safe way and understand the hazards involved. Children shall not play with the appliance. Cleaning and user maintenance shall not be made by children without supervision.
- Remove the water and dry the tank if the unit is not to be used for some time, for winter storage or before you transport it. This will prevent moisture vapours and bad odours.
- Prevent the device from continuously blowing on small children, patients or people who are difficult to move.
- Do not turn on the appliance if you have discovered damage to the appliance, cord or plug, if the appliance is malfunctioning, if it has been dropped or if there are signs of any other defect. Return the complete product to the vendor or to a certified electrician for inspection and/or repair. Always ask for original parts.
- The appliance (incl. cord and plug) may only be opened and/or repaired by properly authorised and qualified persons. If the electrical cable or plug is damaged, it must be replaced by a qualified person. Never carry out repairs yourself.
- Only use this equipment for its intended purpose and as described in this instruction manual.
Not abiding by instructions 29, 30 & 31 may lead to damage, fire and/or personal injuries. A failure to adhere to these rules also immediately nullifies the guarantee and vendor, importer and/or manufacturer do not take responsibility for any of the consequences
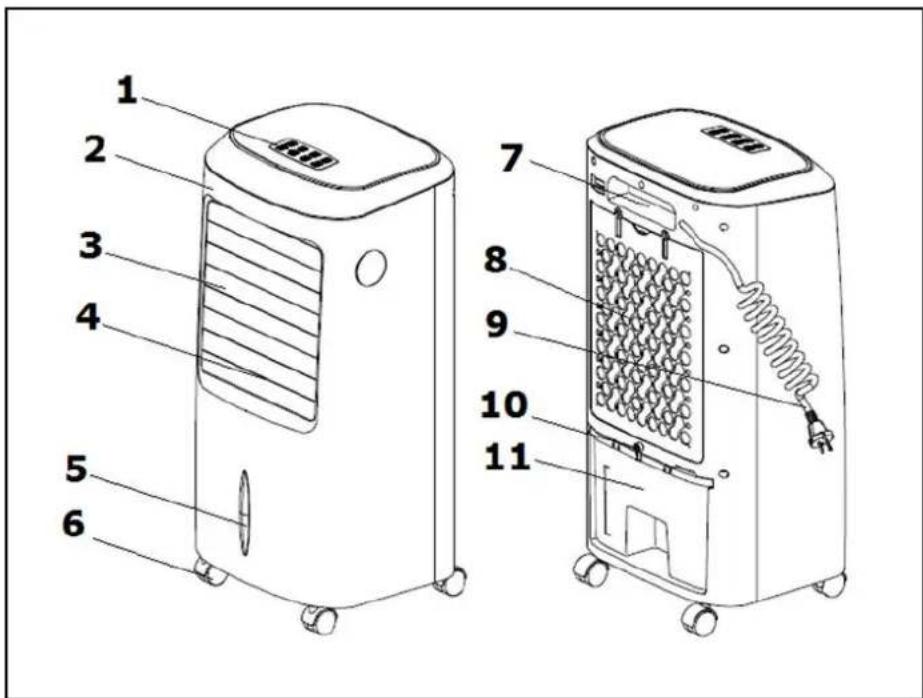
Description
- Operation panel
- Housing
- Vertical blinds
- Air outlet
- Water level glass
- Swivel wheels
- Handle
- Air inlet with dust filter and evaporation element
- Cable with plug
- Lock button
- Water tank
The CoolStar 10.0
evaporates water with heat that is removed from the room and sends the cool, humid air back into the room: a process that can be compared to wind blowing across water.
The CoolStar 10.0 has the following functions:
- Ventilation (3 power settings)
- Ventilation, cooling (3 power settings)
- Ventilation, humidify (1 power setting)
- Rotation
- Ioniser air-cleaning function
Installation and preparation
- Do not start using the air cooler until:
- all packaging is removed and placed away from children.
- all safety instructions have been observed.
- the air cooler or the plug is NOT plugged into the socket.
- Turn the lock button (9) open and pull the water reservoir roughly 20~cm backwards and fill with clean cold water; Fill the reservoir above the "MIN"- but below the "MAX" level. Ensure that the plug does not get wet or fall into the water tank. Never use the cooling or the humidifying function without sufficient water in the water tank.
- If you require extra cooling, you could add frozen ice packs or ice cubes in the water reservoir (not included).
- If you wish to use the cool of humidifying function, ensure there is sufficient water in the reservoir.
- If you have not used the unit for some time, refresh any remaining water.
- Put the air cooler in the correct position.
- Insert the supplied battery into the remote control. The remote control operates on a button cell battery CR2025 (3V).
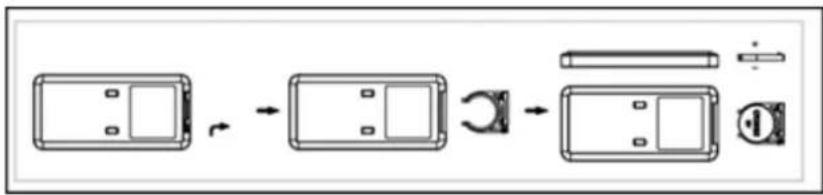
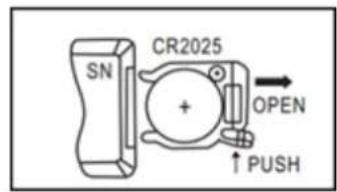
Always unplug the power cord when you pour water in or out of the tank!
Operation
-
Insert the plug into a wall socket. The device will switch on in stand-by position. The device is now ready for use. Check that the vertical blinds are open at the front Press the button and the fan will start blowing at the Medium fan speed. By pressing the button again, the device will return to the stand-by position.
-
Select the required mode on the control panel or the remote control.
The control panel and the remote control have similar functions.
| Picture control panel | Picture remote control | |
| Picture | Function | |
| On/Off/Stand-by button | Press this button to switch the air cooler On/Off. The air cooler will start blowing with the Medium fan speed. | |
| Cooling funtion button | Press this button to switch the cooling function On/Off. The water reservoir must be filled in order to use this function. The corresponding icon on the display will burn. The pump circulates the water from the reservoir via the honeycomb evaporation element where it evaporates partially and provides cooling. | |
| Fan speed button Low Middle High | Press this button to set the fan speed: Low, Medium or High. The corresponding icon on the display will burn. The device will always start in the Medium fan speed position. | |
| Timer button | Press this button to set the timer to the number of hours that the air cooler should operate; adjustable from 1 to 8 hours. Press once (1x) equals 1 hour, press twice (2x) equals 2 hours, etc. The display shows the number of set hours and subsequently. The air cooler will stop automatically after the number of set hours has elapsed. | |
| Swivel button | Press this button to switch the swivelling function On/Off (left - right). The horizontal slats can be set manually upwards and downwards. | |
| Mode button | Press this button to set the MODE function. The device will always start in Normal Wind mode. | |
| Normal wind mode | You can set the fan speed manually in the Normal Wind mode (Low, Medium or High). You can also switch the cooling function On/Off in this mode. | |
| Natural wind mode | In the Natural Wind mode, the fan speed is automatically changed every 5 seconds to imitate a natural wind. In this mode, you can select Natural Wind Low, Natural Wind Medium or Natural Wind High using the fan speed button. The average fan speed depends on selecting Low, Medium or High. In this mode, you can also switch the cooling function On or Off. | |
| Sleep wind mode | In the Sleep Wind mode, the fan speed is automatically changed to imitate a sleep wind. In this mode, you can select Sleep Wind Low, Sleep Wind Medium or Sleep Wind High using the fan speed button. The average fan speed depends on selecting Low, Medium or High. In the Sleep Wind mode, the average fan speed is lower than the speed in the Natural Wind mode in connection with the noise level. | |
| In this mode, you can also switch the cooling function On or Off. | ||
| Humidifier button | Press this button to switch the humidifier function On/Off. The water reservoir must be filled in order to use this function.The corresponding icon on the display will burn. The pump circulates the water from the reservoir via the honeycomb evaporation element in which it evaporates partially and provides humidity Selecting this function, you can use the device to humidify the air when the relative humidity in the room is too low.In this function, the fan speed is set to Low automatically. The MODE button and the fan speed button cannot be used when you use the humidifier function.If you press the cooling function button, the humidifier function will be cancelled automatically.The humidifier function always operates in the Normal Wind mode. | |
| Ioniser air-cleaning button | Press this button to switch the ioniser air-cleaning function On/Off. The ioniser air-cleaning function can be used in all MODE settings, also in the humidifier function mode. | |
Warning: Take note of the water level during operation!
Cleaning and maintenance
Switch off the equipment and remove the plug from the socket before cleaning or carrying out maintenance work.
-
Wipe the outside of the equipment regularly with a dry or slightly damp cloth. Do not use aggressive soaps, sprays, cleaners or abrasives, waxes, polishes or chemical solutions! Ensure that the operating panel does not get wet.
-
The device should be cleaned bi-weekly to prevent odours, bacteria and lime scale and to ensure proper operation. To take out the dust filter, including the evaporation element (8), remove both screws at the rear of the device. Carefully remove the honeycomb evaporation element from its holder. (By bending the holder slightly outwards, you create room to take out the honeycomb
evaporation element undamaged from its holder.) Carefully clean the dust filter and the honeycomb evaporation element using a soft brush or under mildly running water, and let them dry thoroughly. Do not damage or deform the honeycomb evaporation element.
Before you return the entirety into its place, check whether the drain holes in the synthetic element-holder are not clogged. If necessary, clear these drain holes.
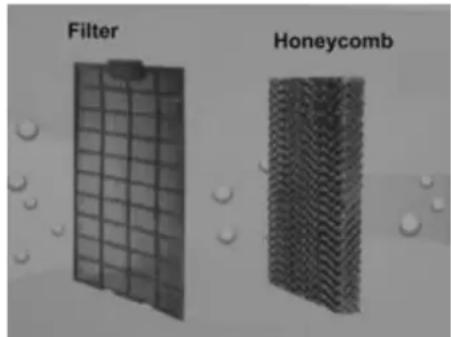
Install all the components in their original position.
Never use the device without a completely assembled element, otherwise you risk water damage!
- Pull the water tank out of the appliance as far as possible ( ± 15 cm), first remove the pump in the water tank by turning both balls that hold the pump in place. Now you can remove the pump. The water tank can now be removed in its entirety. Empty the water tank and clean it thoroughly. Pump should also be cleaned once a month or when very dirty or in case of a malfunction. The pump is in the water reservoir. Then turn both tabs that hold the pump in place, away. Now you can remove the pump. Click the filter (the side with the diagonal openings) of the pump and clean the filter and the space behind this. Refit all the parts in the original position. Beware: If the pump is not correctly fitted, it could start to vibrate!
- At the end of the season, store the cleaned and dried heater in the original packaging if possible. Store it upright in a cool, dry and dust-free place.
Warning: Never leave water in the water tank or casing for longer than a few days. Change it/throw it away; rinse the tank and let the air cooler dry if you are not planning to use it for a while (on ventilation-position).
Problems and solutions
The device does not work
- Is the plug properly inserted into the socket?
- Is there power on the outlet?
- Has the ON / OFF button been pressed?
The device has little air displacement.
The fan function is set to Low
- The dust filter and / or the honeycomb evaporating element are (partially) blocked (clean the element as described in this booklet).
Removal
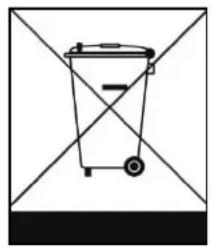
In the EU this symbol indicates that this product may not be disposed of as ordinary household waste. Old equipment contains valuable materials, suitable for recycling. These materials should be made suitable for reuse in order to prevent any adverse effects to health and the environment caused by unregulated waste collection. Therefore, please make sure that you bring old equipment to a designated collection point. Alternatively, contact the original supplier, make sure that as many of the components as possible can be recycle
CE-declaration
Herewith declares the signer, Eurom - Kokosstraat 20 - 8281 JC Genemuiden - NL, that the product Air cooler known under the brand Eurom typ CoolStar 10.0, agree with the demands of the subjoined standards:
LVD 2014/35/EU
EN 60335-1:2012+A11:2014
EN 60335-2-80:2003+A1:2004+A2:2009
EN 60335-2-98:2003+A1:2005+A2 :2008
EN 62233:2008
Genemuiden, 17-01-2019
W.J. Bakker, alg. dir.
EMC 2014/30/EU
EN 55014-1:2017
EN 55014-2:2015
EN 61000-3-2:2014
EN 61000-3-3:2013
Tables des matieres
- Thanks
- Safety notice
- Description
- The CoolStar 10.0
- Installation and preparation
- Always unplug the power cord when you pour water in or out of the tank!
- Operation
- Cleaning and maintenance
- Problems and solutions
- The device does not work
- The device has little air displacement.
- Removal
- CE-declaration
- LVD 2014/35/EU
- EMC 2014/30/EU
- Tables des matieres
Brand : Eurom
Model : CoolStar 10.0
Category : Air Conditioning