
CFT6105S1 - Range hood CANDY - Free user manual and instructions
Find the device manual for free CFT6105S1 CANDY in PDF.
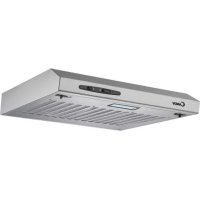



| Product type | Wall-mounted or under-cabinet range hood |
| Brand | Candy |
| Model | CFT6105S1 |
| Width | 60 cm |
| Depth | Approximately 50 cm |
| Height | Approximately 15 cm (without duct) |
| Net weight | Approximately 10 kg |
| Power supply | 220-240 V ~ 50/60 Hz |
| Motor power | Approximately 200 W |
| Lighting | LED 2 W max (rectangular module) |
| Motor speeds | 3 speeds (low, medium, high) |
| Control type | Rocker switch |
| Extraction mode | Extraction or recirculation (with optional charcoal filter) |
| Minimum distance gas hob | 75 cm |
| Minimum distance electric hob | 65 cm |
| Grease filter | Washable metal mesh filters |
| Charcoal filter | Optional, replace every 3 to 6 months |
| Noise level | Approximately 55-65 dB (depending on speed) |
| Energy efficiency class | Not specified (estimated class B) |
| Repairability | Spare parts available via after-sales service |
| Warranty | 2 years (according to applicable law) |
Frequently Asked Questions - CFT6105S1 CANDY
User questions about CFT6105S1 CANDY
0 question about this device. Answer the ones you know or ask your own.
Ask a new question about this device
Download the instructions for your Range hood in PDF format for free! Find your manual CFT6105S1 - CANDY and take your electronic device back in hand. On this page are published all the documents necessary for the use of your device. CFT6105S1 by CANDY.
USER MANUAL CFT6105S1 CANDY
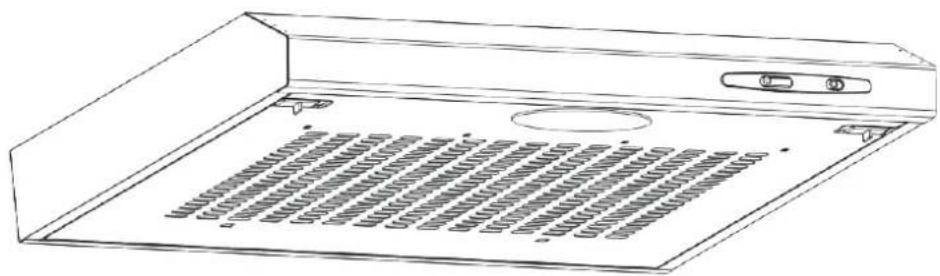
Cooker Hood Instruction Manual

Content
1. Safety instructions 2. Installation 3. Start using your cooker hood 4. Troubleshooting 5. Maintenance and cleaning 6. Environment protection
SAFETY INSTRUCTIONS
This manual explains the proper installation and use of your cooker hood. Please read it carefully before using, even if you are familiar with the product. The manual should be kept in a safe place for future reference.
Never to do:
- Do not try to use the cooker hood without the grease filters or if the filters are excessively greasy! Do not install above a cooker with a high level grill.
- Do not leave frying pans unattended during use because overheated fats or oils might catch fire. Never leave naked flames under the cooker hood.
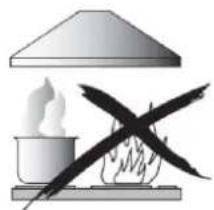
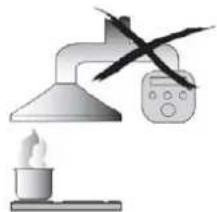
If the cooker hood is damaged, do not attempt to use it. Do not flambé under the cooker hood. CAUTION: Accessible parts may become hot when used with cooking appliances. The minimum distance between the supporting surface for the cooking vessels on the hob and the lowest part of the cooker hood (when the cooker hood is located above a gas appliance, this distance shall be at least 65 cm). The air must not be discharged into a flue that is used for exhausting fumes from appliances burning gas or other fuels.
Always to do:
Important! Always switch off the electricity supply at the mains during installation and maintenance such as light bulb replacement.
The cooker hood must be installed in accordance with the installation instructions and all measurements followed.
All installation work must be carried out by a competent person or qualified electrician.
Please dispose of the packing material carefully. Children are vulnerable to it.
Pay attention to the sharp edges inside the cooker hood especially during installation and cleaning.
When the cooker hood is located above a gas appliance, the minimum distance between the supporting surface for the cooking vessels on the hob and the lowest part of the cooker hood must be: Gas cookers: 75 cm Electric cookers: 65 cm Coal or oil cookers: 75 cm
Make sure the ducting has no bends sharper than 90 degrees as this will reduce the efficiency of the cooker hood.
● Warning: Failure to install the screws or fixing device in accordance with these instructions may result in electrical hazards.
Always to do:
● Always put lids on pots and pans when cooking on a gas cooker. - When in extraction mode, air in the room is being removed by the cooker hood. Please make sure that proper ventilation measures are being observed. The cooker hood removes odours from room but not steam. ● Cooker hood is for domestic use only.

- If the supply cord is damaged, it must be replaced by the manufacturer, its service agent or similarly qualified persons in order to avoid a hazard. ● This appliance can be used by children aged from 8 years and above and persons with reduced physical, sensory or mental capabilities or lack of experience and knowledge if they have been given supervision or instruction concerning use of the appliance in a safe way and understand the hazards involved. Children shall not play with the appliance. Cleaning and user maintenance shall not be made by children without supervision.

● Warning: Before obtaining access to terminals, all supply circuits must be disconnected.
Always to do:
● Caution: The appliance and its accessible parts can become hot during operation. Be careful to avoid touching the heating elements. Children younger than 8 years old should stay away unless they are under permanent supervision. ● There shall be adequate ventilation of the room when the cooker hood is used at the same time as appliances burning gas or other fuels. ● There is a fire risk if cleaning is not carried out in accordance with the instructions. ● Regulations concerning the discharge of air have to be fulfilled. ● Clean your appliance periodically by following the method given in the chapter MAINTENANCE. ● For safety reason, please use only the same size of fixing or mounting screw which are recommended in this instruction manual. ● Regarding the details about the method and frequency of cleaning, please refer to maintenance and cleaning section in the instruction manual. ● Cleaning and user maintenance shall not be made by children without supervision. - When the cooker hood and appliances supplied with energy other than electricity are simultaneously in operation, the negative pressure in the room must not exceed 4 Pa (4 x 10⁻⁵ bar). ● WARNING: Danger of fire: do not store items on the cooking surfaces. ● A steam cleaner is not to be used. ● NEVER try to extinguish a fire with water, but switch off the appliance and then cover flame e.g. with a lid or a fire blanket.
INSTALLATION
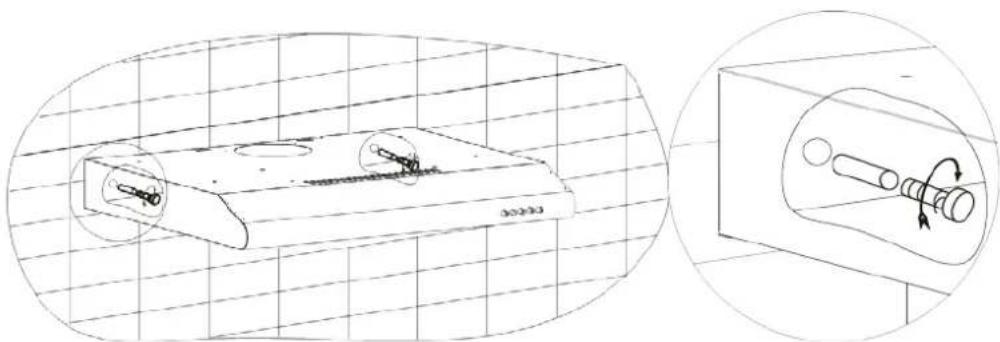
A. INSTALLATION (Wall Mounting)
(1) Decide the location of the holes for fixing the cooker hood. (2) Mount the cooker hood on the wall by 4 screws (4x 30mm)
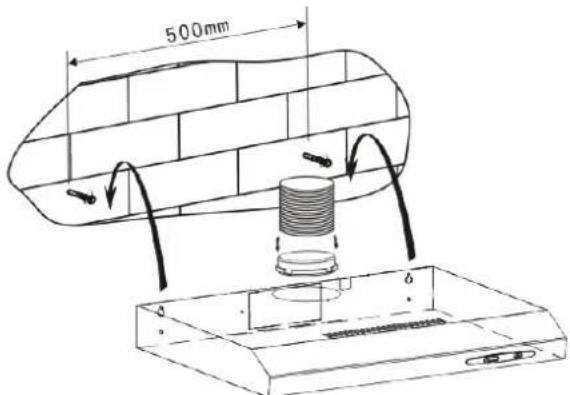
60cm cooker hood
B. INSTALLATION (Cabinet Mounting)
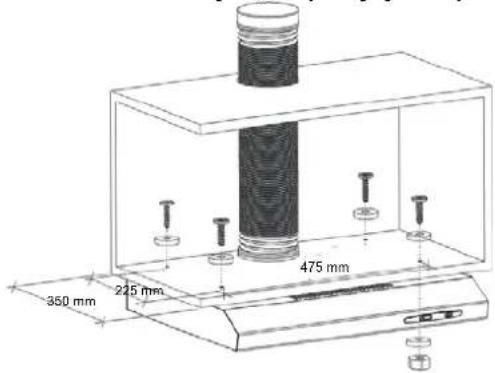
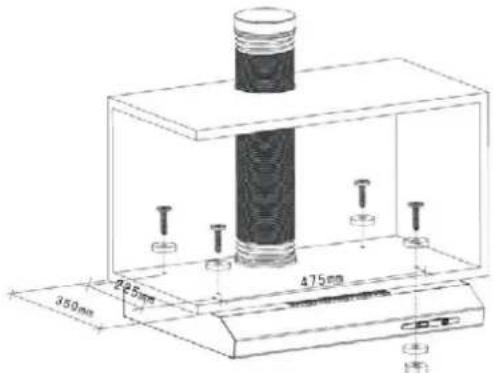
(1) Mount the cooker hood on the cabinet using 4 screws (4x35mm), 4 nuts, and flat washers. Fix the hood on the cabinet by passing 4 screws and 4 flat washers from the top of the cabinet to the cooker hood. Then, inside the cooker hood, pass the flat washer and nut through the screw to hold the appliance on the cabinet.
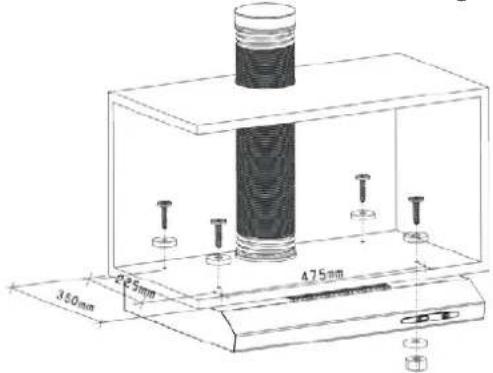
60cm cooker hood
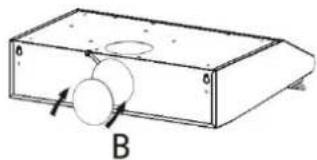
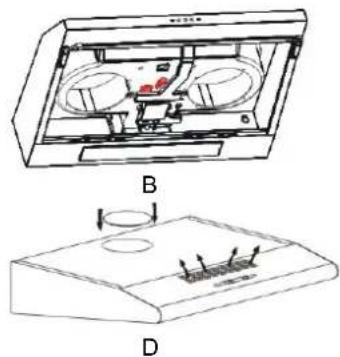
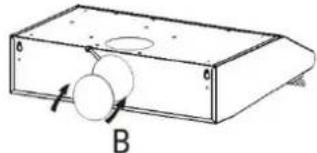
Noise: There are 2 methods for ventilation, including 'horizontal ventilation' and 'vertical ventilation'. Please pay attention to the ventilation method during installation.
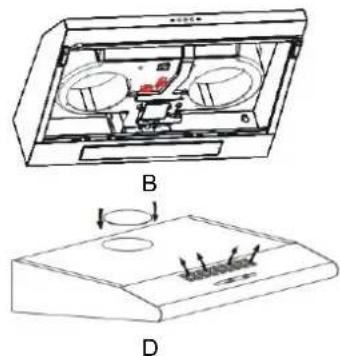
Horizontal ventilation: See Pic 4A, use the cover to seal the outlet on the top, then the air can be vented from the back.
Vertical ventilation: See Pic 4B, use the cover to seal the outlet on the back, then the air can be vented from the top.
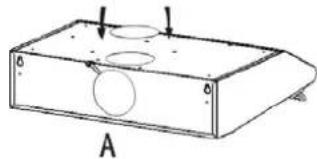
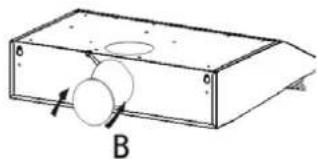
Pic 4
Air ventilation setting
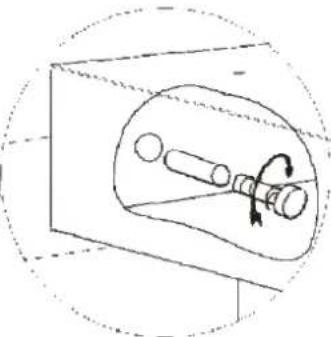
Outdoor air ventilation: Turn the adjuster to the outdoor position (pic.5A), install the outlet, turn on the cooker hood, then the air will be vented from the outside outlet.
Indoor air ventilation: Turn the adjuster to the indoor position (pic.5B), install the outlet cover, turn on the cooker hood, then the air can be vented from the inside outlet.
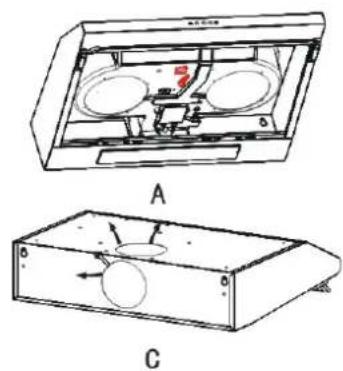
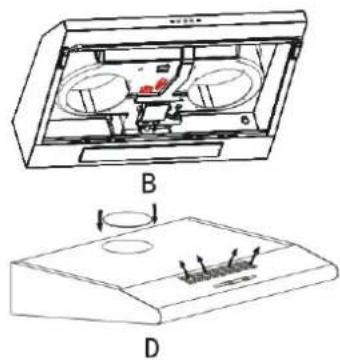
Pic 5
WARNING: | ➢ For safety reason, please use only the same size of fixing or mounting screw which recommended in this instruction manual.➢ Failure to install the screws or fixing device in accordance with these instructions may result in electrical hazards. |
Start Using Your Cooker Hood
Toggle switch
There are 3 speeds for the motor and an on/off switch for the lamp.
Slide the switch for operation.
Motor Operation
0- off
1- Low Power Setting
2- Mid Power Setting
3- High Power Setting
Light Operation
0- Off
1- On
3210


10
TROUBLESHOOTING
| Fault | Possible Cause | Solution |
| Light on, but motor does not work | Fan switch turned off | Select a fan switch position. |
| Fan switch failed | Contact service center. | |
| Motor failed Contact service center. | ||
| Light does not work, motor does not work | House fuses blown | Reset/Replace fuses. |
| Power cord loose or disconnected | Refit cord to power outlet.Switch power outlet on. | |
| Oil leakage | One way valve and the outlet are not tightly sealed | Take down the one way valve and seal with sealant. |
| Leakage from the connection of chimney and cover | Take chimney down and seal. | |
| Lights not working | Broken/Faulty globes | Replace globes as per this instruction. |
| Insufficient suction | The distance between the cooker hood and the gas top is too far | Refit the cooker hood to the correct distance. |
| The Cooker hood inclines | The fixing screw not tight enough | Tighten the hanging screw and make it horizontal. |
NOTE:

Any electrical repairs to this appliance must conform to your local, state and federal laws. Please contact the service centre if in any doubt before
undertaking any of the above. Always disconnect the unit from the power source when opening the unit.
MAINTENANCE AND CLEANING
Caution:
- Before maintenance or cleaning is carried out, the cooker hood should be disconnected from the main power supply. Ensure that the cooker hood is switched off at the wall socket and the plug removed.
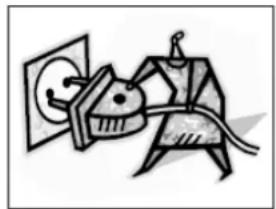
- External surfaces are susceptible to scratches and abrasions, so please follow the cleaning instructions to ensure the best possible result is achieved without damage.
GENERAL
Cleaning and maintenance should be carried out with the appliance cold especially when cleaning. Avoid leaving alkaline or acid substances (lemon juice, vinegar etc.) on the surfaces.
STAINLESS STEEL
The stainless steel must be cleaned regularly (e.g. weekly) to ensure long life expectancy. Dry with a clean soft cloth. A specialized stainless steel cleaning fluid may be used.
NOTE:
Ensure that wiping is done along with the grain of the stainless steel to prevent any unsightly crisscross scratching patterns from appearing.
CONTROL PANEL SURFACE
The inlay control panel can be cleaned using warm soapy water. Ensure the cloth is clean and well wrung before cleaning. Use a dry soft cloth to remove any excess moisture left after cleaning.
Important
Using neutral detergents and avoid using harsh cleaning chemicals, strong household detergents or products containing abrasives, as this will affect the appliance appearance and potentially remove any printing of artwork on the control panel and will void manufactures warrantee.
GREASE MESH FILTERS
The filters can be cleaned by hand. Soak them for about 3 minutes in water with a grease-loosening detergent then brush it gently with a soft brush. Please do not apply too much pressure, avoid to damage it. (Leave to dry naturally out of direct sun light)
Filters should be washed separately to crockery and kitchen utensils. it is advisable not to use rinse aid.
- Remove the filters as instructed in the picture below.
- Do not use abrasive detergents, as they may damage the hood.
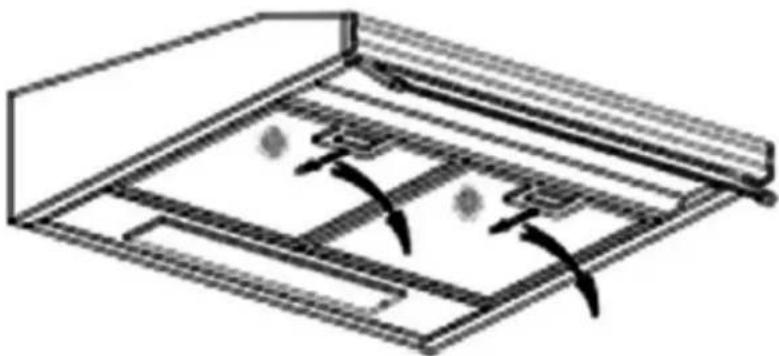
INSTALLING GREASE MESH FILTERS
To install the filters, follow these four steps: angle the filter into the slots at the back of the hood, push the button on the handle of the filter, release the handle once the filter fits into a resting position, and repeat to install all filters.
CARBON FILTER
Activated carbon filters can be used to trap odors. Normally, the activated carbon filter should be changed every three to six months, depending on your cooking habits. The installation procedure for the activated carbon filter is as follows.
- Remove the grease filter.
- Place the carbon filter onto the grease filter.
- Fix the properly adjusted carbon filter with the small steel wire.
- Reinstall the grease filter.
- Use carbon filters for recirculation mode only.
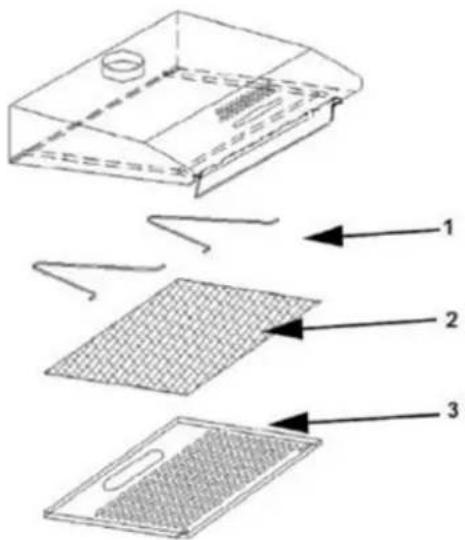
1 Steel hanger
2 Carbon filter
3 Grease filter
NOTE:
- Make sure the filter is securely locked. Otherwise, it would loosen and cause danger.
- When the activated carbon filter is attached, the suction power will be lowered.
BULB REPLACEMENT
Important:

The bulb must be replaced by the manufacturer, its service agent, or similarly qualified persons. Always switch off the electricity supply before carrying out any operations on the appliance. When handling the bulb, make sure it is completely cool before any direct contact with hands. When handling globes, hold with a cloth or gloves to ensure perspiration does not come in contact with the globe, as this can reduce the life of the globe.
Changing the light:
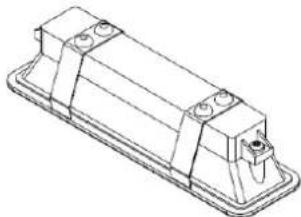
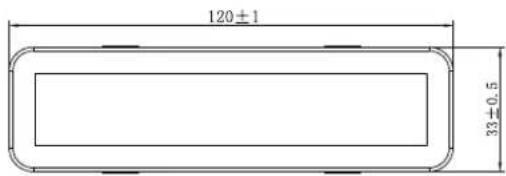
*Before changing the lights, make sure that the appliance is unplugged. *Use the screwdriver to loosen the ST4*8MM self-tapping screws (2 pcs) from the lighting panel, and take out the lighting fixture. Open the terminal box that is connected with the wire, disconnect the wire connector, and replace the lamp.
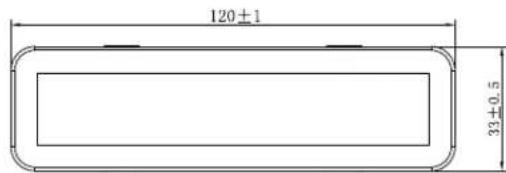
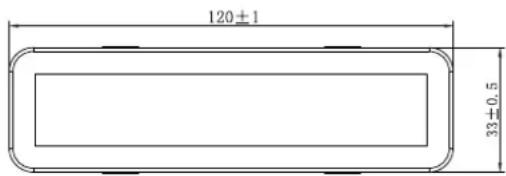
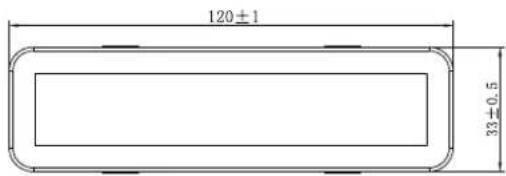
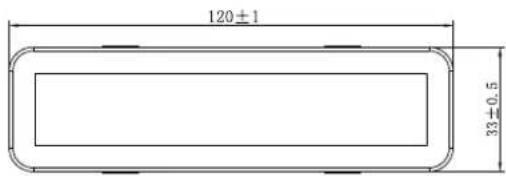
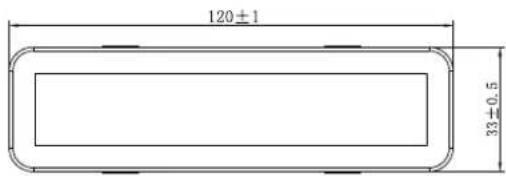
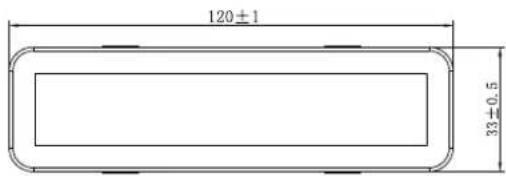
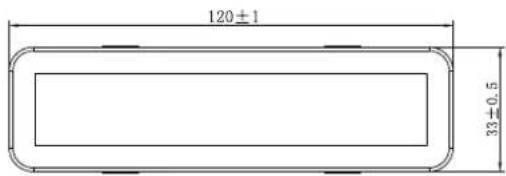
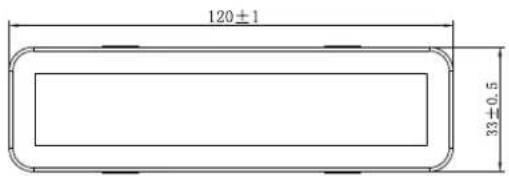
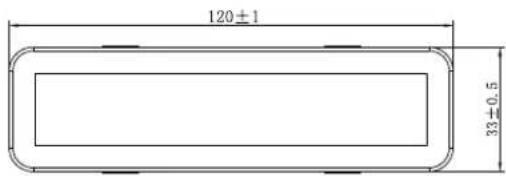
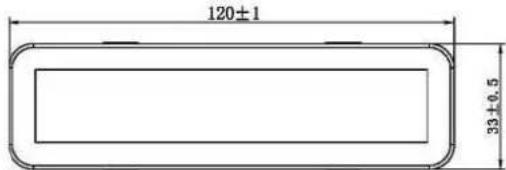
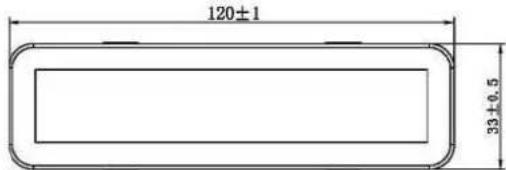
• ILCOS D code for this lamp is: DBS-2/65-H-120/33
- LED modules - rectangle lamp
- Max wattage: 2 W
- Voltage range: AC 110-240V
- Dimensions:
ENVIRONMENTAL PROTECTION:
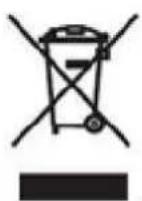
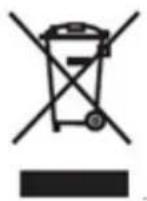 | This product is marked with the symbol on the selective sorting of waste electronic equipment. This means that this product must not be disposed of with household waste but must be supported by a system of selective collection in accordance with Directive 2012/19/EU. It will then be recycled or dismantled to minimize impacts on the environment, electrical and electronic products are potentially dangerous for the environment and human health due to the presence of hazardous substances.For more information, please contact your local or regional authorities. |
NOTE:
The following shows how to reduce the total environmental impact (e.g., energy use) of the cooking process.
(1) Install the cooker hood in a proper place where there is efficient ventilation. (2) Clean the cooker hood regularly so as not to block the airway. (3) Remember to switch off the cooker hood light after cooking. (4) Remember to switch off the cooker hood after cooking.
INFORMATION FOR DISMANTLING
Do not dismantle the appliance in a way which is not shown in the user manual. The appliance could not be dismantled by user. At the end of life, the appliance should not be disposed of with household waste. Check with you Local Authority or retainer for recycling advice.
Aspirator
Instruction manual
Instructions
Contents
What to do:
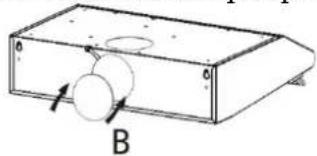
FIGURE 4
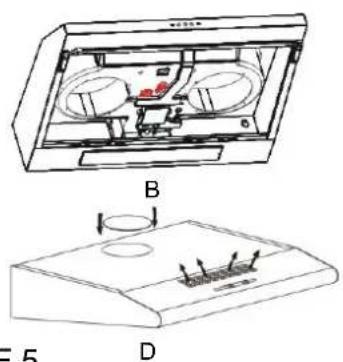
FIGURE 5
WARNING

GENERAL INFORMATION
INSTALLING THE GREASE FILTERS
ENVIRONMENTAL PROTECTION:

Contents
Always necessary:
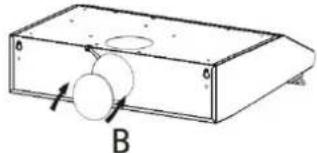
Fig. 4
Ventilation setting
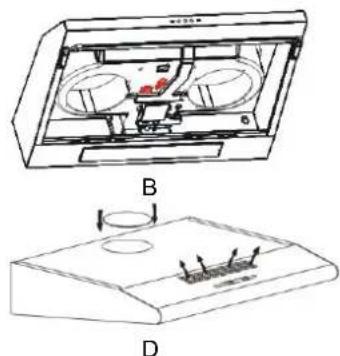
Fig. 5
WARNING:

INSTALLATION OF METAL GREASE FILTERS
1 Steel brace
2 Carbon filter
3 Grease filter
NOTE:
ENVIRONMENTAL PROTECTION
Contents
A. INSTALLATION (Wall mounting)
B. INSTALLATION (Cabinet mounting)
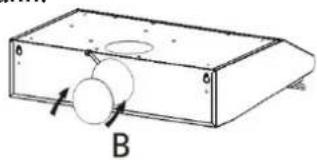
ABB 4.
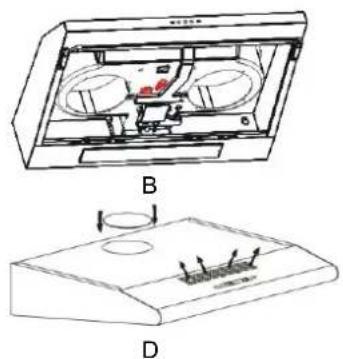
ABB 5.
WARNING:

INSERTING THE GREASE FILTERS
1 Fastening wire
2 Carbon filter
3 Grease filter
NOTE:
ENVIRONMENTAL PROTECTION:

Index
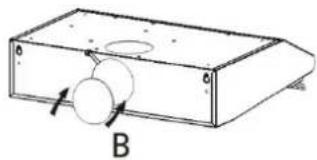
FIG 4
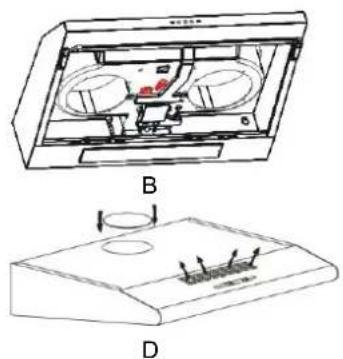
FIG 5
CAUTION:

1 Steel hook
2 Carbon filter
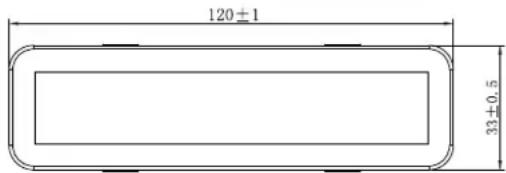
Table of contents
Always do:
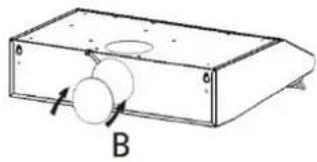
Fig. 4
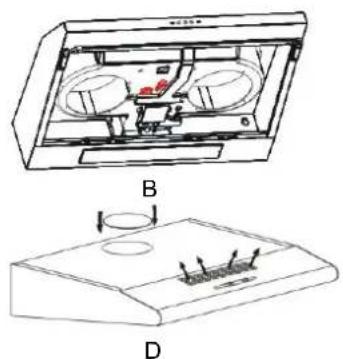
Fig. 5
WARNING:

1 Steel support
2 Charcoal filter
3 Grease filter
NOTE:
REPLACING THE BULB
Important:

ENVIRONMENTAL PROTECTION
Contents
1 ...... Safety instructions 2....Installation 3 Getting started with your cooker hood 4....Troubleshooting 5 Maintenance and cleaning 6. Environmental protection
SAFETY INSTRUCTIONS
This manual describes the correct installation and use of your cooker hood; read it carefully before use even if you are familiar with the product. Keep the manual in a safe place for future reference.
SL. 4
SL. 5
WARNING:

For safety reasons, use only the size of fixing or mounting screws recommended in this instruction manual.
Failure to install screws or fixing devices in accordance with these instructions may result in electrical hazards.
Start using the cooker hood
Toggle switch
External surfaces are subject to scratches and abrasion; therefore, follow the cleaning instructions to achieve the best results without damage.
GENERAL
INSTALLATION OF GREASE MESH FILTERS
- Steel hook
- Charcoal filter
- Grease filter
NOTE:
ENVIRONMENTAL PROTECTION:

Index
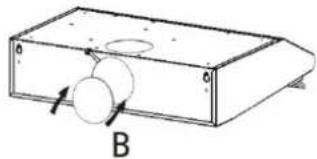
Figure 4
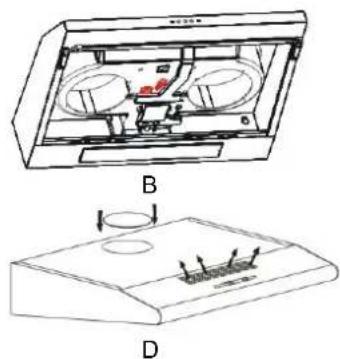
Figure 5
WARNING:

1 Steel brackets
2 Charcoal filter
3 Grease filter
NOTE:
Contents
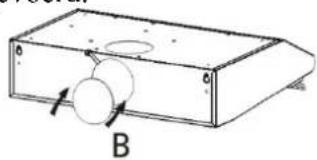
FIG 4
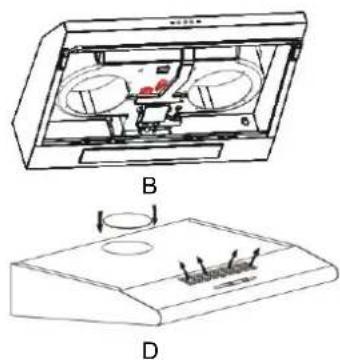
FIG 5
WARNING:

INSTALLING THE GREASE FILTERS
1 Steel hanger
2 Carbon filter
3 Grease filter
NOTE:
ENVIRONMENTAL PROTECTION:

Contents
Always:
IMG 4
Venting configuration
IMG 5
WARNING:

INSTALLING THE GREASE FILTERS
1 Steel support
2 Carbon filter
ENVIRONMENTAL PROTECTION:
Contents
Always:
●WARNING: Before accessing the terminals, disconnect all power supplies.
Always:
B. INSTALLATION (mounting on cabinets)
(1) Mount the cooker hood onto the cabinet using 4 screws (4 x 35 mm), 4 nuts, and flat washers. Secure the cooker hood to the cabinet with 4 screws and 4 flat washers from the top of the cabinet onto the hood. Then, inside the hood, place a flat washer and nut on the screw that attaches the hood to the cabinet.
60 cm cooker hood
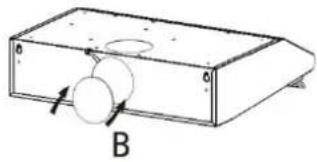
Fig. 4
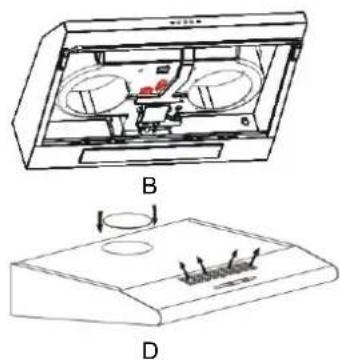
Fig. 5
WARNING:

INSTALLING THE MESH GREASE FILTER
1 Steel hanger
2 Charcoal filter
3 Grease filter
CAUTION:
ENVIRONMENTAL PROTECTION:
Contents
B. INSTALLATION (mounting on the cabinet)
(1) Mount the extractor hood on the cabinet with 4 screws (4x35 mm), 4 nuts and flat washers. Place the hood on the cabinet by passing the 4 screws and 4 flat washers from above through the cabinet to the hood. Then, inside the hood, place a flat washer and a nut on each screw to secure the appliance to the cabinet.
60 cm hood
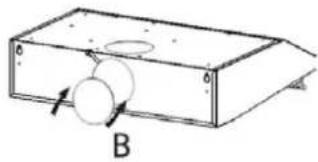
Fig. 4
Fig. 5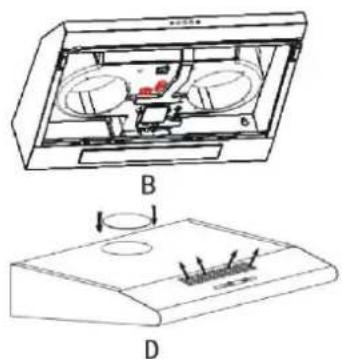
WARNING:

INSTALLATION OF THE GREASE MESH FILTER
ENVIRONMENTAL PROTECTION:
Contents
- Safety instructions 2.... Installation 3.... Starting the kitchen extractor hood 4...... Troubleshooting 5...... Maintenance and cleaning 6...... Environmental protection
SAFETY INSTRUCTIONS
This manual explains the correct installation and use of the extractor hood.
Read it carefully before use, even if you are familiar with the product.
B. INSTALLATION (mounting on a hanging kitchen cabinet)
60 cm extractor hood
Note: There are 2 ventilation methods, including "horizontal ventilation" and "vertical ventilation". Pay attention to the ventilation method during installation.
Horizontal ventilation: See Figure 4A – use the cover to close the outlet on the top, and then the air can be discharged from the rear.
Vertical ventilation: See Figure 4B – use the cover to close the outlet
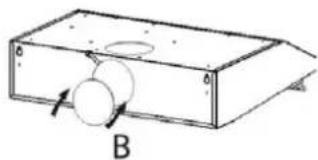
Figure 4
Adjusting the air ventilation
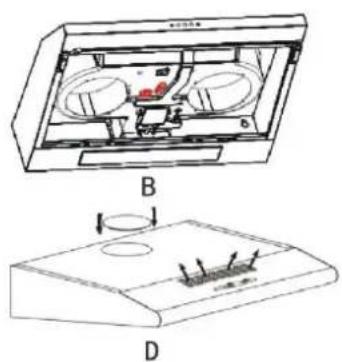
Figure 5
WARNING:
For safety reasons, use only the size of fixing or mounting screw recommended in this manual for use. A screw or fixing device setting that is not in accordance with these instructions may lead to a risk of electric shock.
Starting to use the kitchen extractor hood
GENERAL
CONTROL PANEL SURFACE
The touch control panel can be cleaned with warm soapy water. Before cleaning, make sure the cloth is clean and well wrung out. Use a dry soft cloth to remove any excess moisture left after cleaning.
Important
Use neutral detergents and avoid using harsh chemicals for cleaning, strong household detergents, or products containing abrasives, as this will affect the appearance of the appliance and potentially remove the printed markings on the control panel and void the manufacturer's warranty.
MESH GREASE FILTERS
INSTALLING THE MESH GREASE FILTERS
- To install the filters, follow the four steps below.
- Insert the filter into the slots on the rear side of the hood.
- Press the button on the filter handle.
- Release the handle when the filter is in the intended position.
- Repeat the procedure to install all filters.
ACTIVATED CARBON FILTER
ENVIRONMENTAL PROTECTION:
This product is marked with the symbol for selective separation of waste electrical equipment. This means that the product must not be disposed of with other household waste but must be separated using selective collection systems in accordance with Directive 2012/19/EU. The product will then be recycled or dismantled to reduce its impact on the environment – electrical and electronic products pose a potential risk to the environment and human health because they contain hazardous substances. For more information, contact your local or regional authorities.
NOTE:



- COOKER HOOD INSTRUCTION MANUAL
- CONTENT
- SAFETY INSTRUCTIONS
- NEVER TO DO
- ALWAYS TO DO
- INSTALLATION
- INSTALLATION (WALL MOUNTING)
- INSTALLATION (CABINET MOUNTING)
- AIR VENTILATION SETTING
- START USING YOUR COOKER HOOD
- TOGGLE SWITCH
- NOTE
- MAINTENANCE AND CLEANING
- CAUTION
- GENERAL
- STAINLESS STEEL
- CONTROL PANEL SURFACE
- IMPORTANT
- GREASE MESH FILTERS
- INSTALLING GREASE MESH FILTERS
- CARBON FILTER
- BULB REPLACEMENT
- CHANGING THE LIGHT
- ENVIRONMENTAL PROTECTION
- INFORMATION FOR DISMANTLING
- ASPIRATOR
- INSTRUCTION MANUAL
- INSTRUCTIONS
- CONTENTS
- WHAT TO DO
- WARNING
- GENERAL INFORMATION
- INSTALLING THE GREASE FILTERS
- ALWAYS NECESSARY
- VENTILATION SETTING
- INSTALLATION OF METAL GREASE FILTERS
- INSERTING THE GREASE FILTERS
- INDEX
- TABLE OF CONTENTS
- ALWAYS DO
- REPLACING THE BULB
- START USING THE COOKER HOOD
- INSTALLATION OF GREASE MESH FILTERS
- ALWAYS
- VENTING CONFIGURATION
- INSTALLATION (MOUNTING ON CABINETS)
- INSTALLING THE MESH GREASE FILTER
- INSTALLATION (MOUNTING ON THE CABINET)
- INSTALLATION OF THE GREASE MESH FILTER
- INSTALLATION (MOUNTING ON A HANGING KITCHEN CABINET)
- ADJUSTING THE AIR VENTILATION
- STARTING TO USE THE KITCHEN EXTRACTOR HOOD
- MESH GREASE FILTERS
- INSTALLING THE MESH GREASE FILTERS
- ACTIVATED CARBON FILTER
Brand : CANDY
Model : CFT6105S1
Category : Range hood