
FX508 - Browser CLARION - Free user manual and instructions
Find the device manual for free FX508 CLARION in PDF.
| Product Type | Multimedia navigator with radio and smartphone connectivity |
| Brand | Clarion |
| Model | FX508 |
| Category | Multimedia car radio with navigation |
| Screen Size | 6.95 inches (wide LCD screen) |
| Supported Audio Formats | MP3, WMA, AAC, FLAC, RA, RM |
| Supported Photo Formats | JPG, GIF, PNG (various resolutions up to 5000x5000) |
| Supported Video Formats | Not specified in the manual, but reads files from USB |
| Output Power | 20 W x 4 channels |
| Radio Tuner | FM 87.9 – 107.9 MHz / AM 530 – 1710 kHz |
| Bluetooth | Yes, for calls and audio streaming (holds up to 5 devices) |
| Apple CarPlay | Yes, via USB connection |
| Android Auto | Yes, via USB connection |
| Auxiliary Input | 3.5 mm jack |
| USB Port | USB 2.0 (reading and charging up to 1.5 A) |
| Power Supply | 14.4 V DC (10.8 – 16 V), negative ground, 15 A fuse |
| Dimensions (approx.) | Approximately 200 x 100 x 100 mm (standard DIN estimate) |
| Weight (approx.) | Approximately 1 kg (estimate) |
| Maintenance and Cleaning | Soft, dry cloth; do not use solvents |
| Safety | Do not open the case; use identical fuses |
| Spare Parts and Repairability | Contact dealer or authorized center |
| General Information | iPod/iPhone compatibility; adjustable audio functions (bass, treble, balance, fader, equalizer) |
Frequently Asked Questions - FX508 CLARION
User questions about FX508 CLARION
0 question about this device. Answer the ones you know or ask your own.
Ask a new question about this device
Download the instructions for your Browser in PDF format for free! Find your manual FX508 - CLARION and take your electronic device back in hand. On this page are published all the documents necessary for the use of your device. FX508 by CLARION.
USER MANUAL FX508 CLARION
In a copy of the manuscript, one can also use electronic copies of this journal online (e.g. http://dx.doi.org/10.1109/1.2014.135678). This is an open access article distributed under the Creative Commons Attribution License, which permits use, distribution, and reproduction in any medium, provided the original work is properly cited. However, permission must be obtained from the copyright holder before use in any form or in any circumstances.
The corresponding homotopy groups of ^n are the intersection of the two groups by the mapping . The map is said to be a homotopy if there exists an isomorphism
- 1
eepnne nnnnne ennnnne eannnnne
Ceratodalor or oedred 7eckarh
In the previous section, we shall see that every measure on ^n is a sequence of finite dimensional sets by the fact that it is a sequence of finite dimensional sets. In the next section, we shall discuss some basic and important properties of these sequences.
The main results are: (i) The existence of a local Schur-Weyl operator in ^2 and (ii) the existence of a local Schur-Weyl operator on ^2 . Operation by the Schur-Weyl operator on ^2 is equivalent to the existence of a local Schur-Weyl operator on ^2 . This operation can be used to compute all N random functions, including the so-called "local" operators.
Tepnrrnnrnnnrnnnne rannnnnne
ADOBUT THE REGISTERSHOCKS,CTC
Skills for Both and Skills for Power may be an extremely useful course, but not a very useful course for all students. The purpose of this course is to develop the skills required to use Appra performance skillsets. Use of Appra as a tool in teaching skills is important because it can be used to support the development of skills that are necessary to perform tasks. The purpose of this course is to provide skills that are required to perform tasks. The purpose of this course is to provide skills that are necessary to perform tasks. The purpose of this course is to provide skills that are necessary to perform tasks.
00000
Ae eae
e e e
Aeodd Aoeod Aoeoedndoeae 1
The Blasticoid acid and immunoglobulin zeta zeta zones of Blasticoid SCs were identified by the use of a 10-fold cross-linked IgG antibody (Sigma, Sigma, Sigma) in the presence of 5% Tween-20 for 3 days.
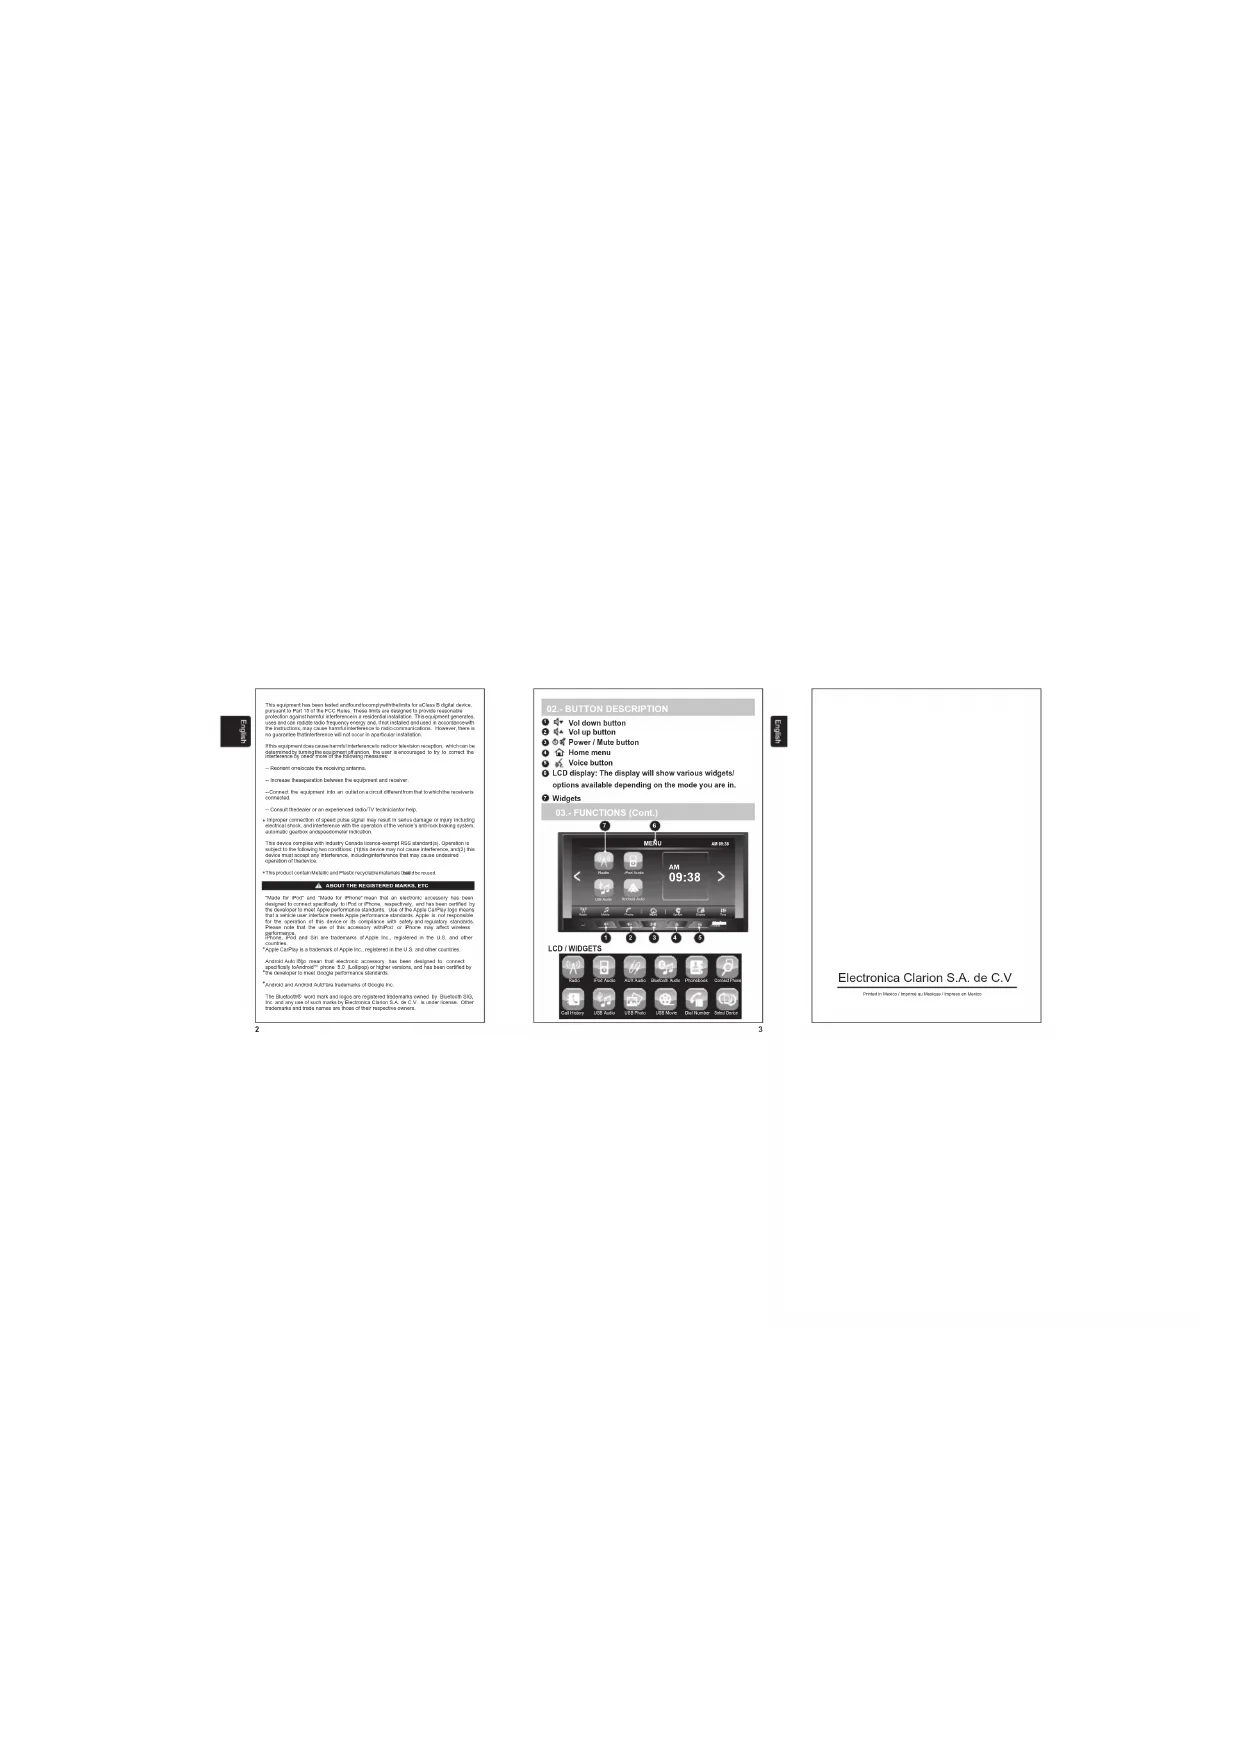
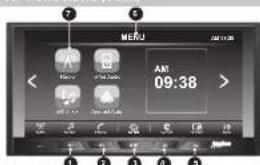
02.-BUTTON DESCRIPTION
Vol goyn button
Vol up button
PowerMule button
Home menu
Voice button
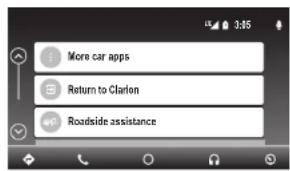
LCD display: The display will show various widgets!
options available depending on the mode you are in.
Widgets
08.-FUNCTIONs (Co
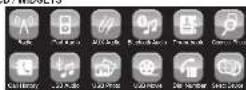
LCD/WDGETS
Electronic Clarion S.A. de C.V
03.- FUNCTIONS
TUNE
-Preset buttons 12 AM and 18 FM
-Search/Seek tuning, Manual tuning
AUDIO
-Electronic audio controls
-Bass and treble controls
-Balance control 4 way.
-Loudness
4 modes of pre-equalization (User, Pop, Rock, Classic, Jazz)
Output power 20 W x 4 Ch
USB PLAYER
-Repeat control
-MP3/WMA searching control
-Forward and Backward
-Random Control function
GENERAL
-Display audio information
-Mode selector Radio/AUX/USB/iPod/BT
-Voltage operation 13.2 +/ - 5%
04.- AUDIO SETTINGS
POWER ON/OFF/MUTE, VOLUME UP, VOLUME DOWN
Push the power button to turn the unit ON. push the power button when the unit is on to mute the audio and push and hold the power button for 2 seconds to turn the unit OFF. Push the volume up or down button to adjust the volume level: minimum of 0 and maximum of 40, after 5 seconds of the last adjustment. The units display will return to the previous mode. Please note - in order to protect the driver and the vehicles speakers, the unit is designed to always start at an initial volume level (set in the system settings) when powered on.
4.1 SELECTING AUDIO TUNING
Push the Tone Icon in the bottom right of the main screen to access the tone setting menu where you can adjust FADER, BALANCE, EQ MODE, BASS, TREBLE, LOUD and RESET.

04.- AUDIO SETTINGS (Cont.)
Fader Adjustment
To adjust the fader level, press the up arrow to increase fade to the front and the
to F5.
Balance Adjustment
To adjust the balance level, press the up arrow to increase balance to the left and
the down arrow to increase balance to the right. The value displayed will range from 15 to 25.
Non-Equalizer Mode Adjustment
To adjust the preset equalizer profiles press the up and down arrows to change
between the various options. Options available are USER, JAZZ, CLASSIC,
ROCK,POP.
Bass Adjustment (available only when Equalizer mode is set to USER)
To adjust the level of bass, press the up arrow to increase the bass level and then down arrow to decrease the bass level. The value displayed will range from 0 to
down arrow to decrease the bass level. The value displayed will range from 10
Mid Adjustment (available only when Equalizer mode is set to USER)
To adjust the mid level, press the up arrow to increase the mid level and the down
arrow to decrease the mid level. The value displayed will range from -5 to +5. Treble Adjustment (available only when Equalizer mode is set to USER).
To adjust the level of treble, press the up arrow to increase the treble level
the down arrow to decrease the treble level. The value displayed will range from
-5to+5.
Loudness
To toggle, whether loudness is on or off, simply press the on screen button.
Loudness enhances the unit's bass and treble response.
Reset
Pressing this on screen button will return all tone settings to factory default
4.2 SELECTING DISPLAY SETTING
Push the Display Icon in the bottom right of the main screen to access the display setting menu where you can adjust BRIGHTNESS, CONTRAST, DAY/NIGHT, and TEXT.
Brightness Adjustment
To adjust brightness level, press the right or left arrows to adjust to the level desired. The value of brightness displayed will range from -10 to +10 .
Contrast Adjustment
To adjust contrast level, press the right or left arrows to adjust to the level desired.
The value of contrast displayed will range from -10 to +10.
Day and Night Manual Dimmer Adjustment
To manually adjust the units dimmer to Day or Night by pressing the
Corresponding button on screen.
Reset
Pressing this on screen button will return all display settings to factory default.
04.- AUDIO SETTINGS (Cont.)
4.3 SELECTING SYSTEM SETTING
Press the System icon on the bottom of the main screen to access the system setting menus and the left and right arrows to move between the various menus.
Language Selection
Use the left and right arrows to select the system language from English (ENG), Spanish (ESP) and French (FRE).
Beep Sound
Toggles whether a beep tone is heard when a button is pushed.
Text Scroll
Toggles whether the unit will scroll to show complete song/track information when it is too long to fit on the main screen.
Ignition Option
When checked this option keeps the unit ON for 10 minutes after the ACC is turned from ON to OFF.
Quick Charge
When checked this option will allow you to charge your mobile devices (max 1.5 Amp). You will not be able to playback from the device while charging.
Initial Volume
Use the left and right arrows to set the volume level at which the radio will start at whenever the unit is powered on. Values can range from 0 to 40.
Aux Volume Adjustment
Use the left and right arrows to increase or decrease the volume level of attached external devices. Values can range from 0 to +3.
Navigation Volume Adjustment
Use the left and right arrows to Increase or decrease the volume level from external announcement devices. Values can range from -10 to +10.
Speed Volume Adjustment
Use the left and right arrows to choose the volume mode to be used based on the speed of the vehicle (requires connection to vehicles speed sensor). Values OFF, Low, Mid, High.
EditHomeMenu
This allows you to change the order of the widgets on the Home Menu.

04.- AUDIO SETTINGS (Cont.)
Clock
This option in the systems menu allows you to adjust the clock on the main screen, Hours, Minutes, AMPM and 12/24H modes can all be selected on this system.
Ver.info
This allows you to see the version numbers of the software installed in the unit.
This section describes the operation in Radio Mode
Enter Radio mode
In Home Menu Press the button Radio or Icon Radio.
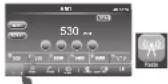
Band Selection
This unit has 2Amand3 FM bands each capable of storing up to 6 preset stations. To change the band, simply tap the band button on screen. Each time it is tapped it will change the band as indicated below.
AM1-AM2-FM1-FM2-FM3
Manual Tuning
Use the and the bullons on screen to adjust reception one frequency step up or down in the current band.
Seek Tuning
Use the and the buttons to activate the seek function of the timer. The timer will automatically search up or down depending on the button pressed and stop when the timer is activated.
Scan Tuning
Push the SCAN button on screen to activate the SCAN function. The SCAN icon on the screen will flash while scanning and the unit will automatically scan the current band stopping at each strong signal it finds for 10 seconds before resuming scanning. Push SCAN again to disable this function.
Autoscan Presets
Push and hold the SCAN button for 3 seconds to activate the AUTOSCAN function. When activated the unit will automatically scan the band and program the Presets 1 through 6 with the first six strong signals it finds. It will then play each new preset for 5 seconds before returning to preset 1.
To set a radio channel to a preset simply push and hold the on screen preset for at least 3 seconds while tuned to the channel you are trying to store. There is a 6 presels available per band.
Selecting Presets
Simply by pressing the on screen preset the unit will tune to the station stored.
This section describes the available commands to control and play music files through USB.
When a USB device is inserted the unit will automatically play saved music in the root folder. Alternatively when a USB device is already connected you can either press the USB Audio widget on the Home menu or the USB Audio on screen button on the Media menu.
Type offles supported: Check table 1 in section 16FORMATAVAILABLES

Previous Track and restart.
Pushing the button on screen will rewind the current track to its beginning. If I pressed again before 3 seconds has elapsed it will go to the beginning of the previous track and so on. In this way it is possible to skip multiple tracks simply by pressing the button repeatedly.
Fast Rewind.
Pushing and holding the button on screen will fast rewind the current track. Release button to resume play.
Next Track
Pushing the button on screen will skip to the beginning of thenexttrack.
Pushing and holding the button on screen will fast forward the current track. Release button to resume play.

06.- MP#, WMA & AAC (M4A) FILE OPERATION (Cont)
Folder Navigation
To navigate through your folders touch the folder icon and use the navigation icons on screen to move up and down through your files one page at a time and to move to the first or last file in the folder. Select the file you would like to access by touching the filename on the screen.
Repeat and Random Function
A Repeat all tracks (
Random Play OFF (Default)

Repeat selected track

Random Play ON

Repeat selected folder

Random ON within a folder
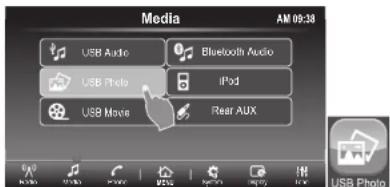
This section describes the available commands to control and display photo images through USB
Type offles supported: Check table 2 in section6. - FORMAT AVAILABLES
Enter Photo mode.
In Media Menu Press the button USB Photo orin Home menu push icon USB Photo.
On the thumbnail screen you can use the 串 and 串 buttons to view thumbnails of your photos and configure either the repeat or random functions.

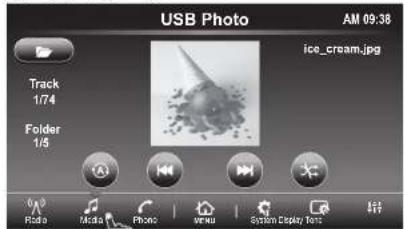
Previous Image
Press the button to display the previous image/folder.
Next Image
Press the button to display the next image/folder.
Repeat and Random function
A Repeat all Images (Default)
Random Play OFF (Default)
1Repeat selected Image
Random Play ON
FRepeat selected folder
Random ON within a folder
To navigate through your folders touch the folder icon and use the navigation icons on screenA V to move up and down through your files one page at a time and A V to move to the first or last file in the folder. Select the file you would like to access by touching the filename on the screen.
7.2 FULL SIZE SCREEN
Touch the thumbnail on screen to change to full screen mode. Touching the screen when in full screen mode will toggle the full screen navigation menu.
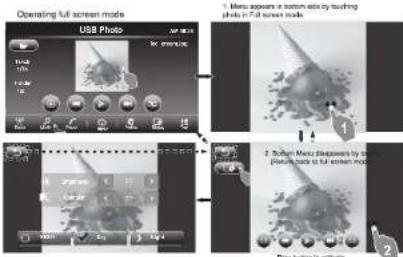
Use the return button to return to thumbnail view or full size view from the settings sub menu.
You can use the zoom in (空) and zoom out (空) on the image. (Please note this will disable the function)
Press to enter the settings sub menu where you can adjust Brightness, Contrast and Day or Night dimming.
Press the button to display the previous image in full screen and Press the button to display the next image in full screen.
Pressing the button will display images using the current repeat and random function settings.
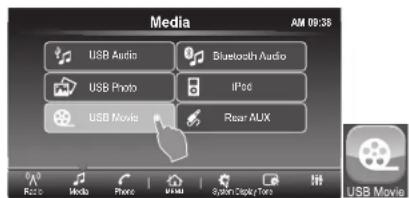
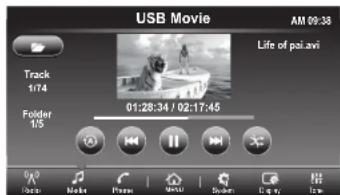
This section describes the available commands on your unit to play video files through USB.
Type off les supported: Check table 3 in section6. FORMATAVAILABLES
Enter Movie mode.
In Media menu press the button USB Movie or in Home menu push icon USB Movie

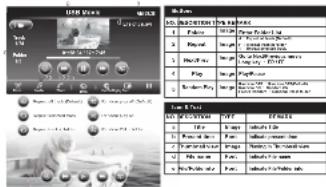
08.- USB MOVIE FILE OPERATION (Cont.)
8.1 THUMBMAIL SCREEN
This screen shows thumbedails, if any, of the video files on USB.
eepnneae
Folder Navigation
To navigate through your folders touch the folder icon and use the navigation icons on screen AV to move up and down through your files one page at a time and AV to move to the first or last file in the folder. Select the file you would like to access by touching the filename on the screen.
8.2 FULL SIZE SCREEN
Touch in the image in order to change full screen mode.
08.- USB MOVIE FILE OPERATION (Cont.)


Use the return button to return to thumbnail view or full size view from the settings sub menu.
Press (to enter the settings sub menu where you can adjust Brightness, Contrast and Day or Night dimming.
Auxiliary connector 3.5mm audio input signal
This unit has auxiliary 3.5mm in diameter to enter stereo audio signals coming from devices such as iPod, MP3 player.
Note: When connecting a device to the auxiliary input you can only make audio adjustments (BASS, TREB, BALANCE, FADER, EQ, LOUD VOL) signal of device through the unit.
The reverse, track selection, etc... depend on connected device. In case which external device are connected to access this feature you must use the MEDIA/ AUX AUDIO BUTTON ON THE LCD.
10.-IPod OPERATION
This section describes the available commands on your unit to play files available in apple devices.
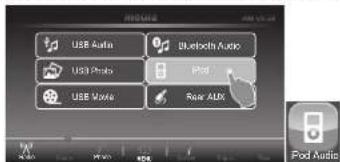
Enter iPod Audio mode.
In media menu Press the button iPod Audio or in Home menu push icon iPod Audio.
10.- iPod OPERATION (Cont.)
Switching to iPod Audio can be done through the Media menu or through the Home menu. When the iPod is not connected the iPod Audio widget and menu selection will not be accessible. The unit will automatically read an iPod when it is connected through the USB port and the unit is powered on.
Disconnecting your iPod will return the unit to its previous function i.e. Radio.
File Navigation
Previous Track and restart
Pushing the button on screen will rewind the current track to its beginning. If I pressed again before 3 seconds has elapsed it will go to the beginning of the previous track and so on. In this way it is possible to skip multiple tracks simply by pressing the button repeatedly.
Fast Rewind.
Pushing and holding the button on screen will fast rewind the current track. Release button to resume play.
Next Track
Pushing the button on screen will skip to the beginning of the next track.
Fast Forward.
Pushing and holding the button on screen will fast forward the current track. Release button to resume play.
IRedMenu
Push the folder icon to access the iPod menu where you will be able to access your playlists and songs in various categories.

Note: Recommendation to play with original wire
11.- BLUETOOTH FUNCTION
11.1 PHONE MENU
Pairing your phone
On the Phone menu press the Connection button on screen to start pairing the LCD with display 'Searching...' for approximately 2 minutes. Using your phones settings menu select FX50S from the Bluetooth devices list in order to pair with the device. You may be prompted to allow downloading of your Contact information.
Select Device
The head unit is capable of storing up to 5 different mobile Bluetooth devices. You can use this menu to select which mobile device your unit is active with.
Delete device from list
Within the selection menu you can delete any of the stored Bluetooth devices by pressing the Delete button by the device's name and confirming Yes or No.
Remove all connections
Also in the selection menu you can remove all connections by pressing the Remove all connections button and confirming OK.
Phonebook

Once connected your mobile device's contact list will be downloaded each time the head unit is powered on. Confirmation may be required on some phones. By pressing the Phonebook on screen button you will be able to access all the entries in your phone's contact list.
To make a call simply press the contact name on screen and confirm by selecting which phone number to dial.
11.- BLUETOOTH FUNCTION (Cont.)
Call History or C
Press Call History to access your phone's call history. The history can be filtered using the on screen buttons on the left of the screen.
Received call
Will list the contact info of up to 10 of the last calls received. You can make a call by selecting a contact from the list.
Calls Made
Will list the contact info of up to 10 of the last made. You can make a call by selecting a contact from the list.
Missed call
Will list the contact info of up to 10 of the last missed. You can make a call by selecting a contact from the list.
Dial Number
Use the dial number menu button on screen to manually enter a phone number using the on screen keyboard. Press OK complete the call.
Call answering
You can answer incoming calls directly from the head unit hearing the caller through the vehicle's speakers. When a call comes in, the display will show the contact name or number calling along with the and contact to answer the call and forgoing upreet the call.
Go back to previous menu
In every action is possible go back to previous menu pushing.
Hanging up
To end the call, once you have finished talking with the caller, simply press the large icon on the LCD screen.
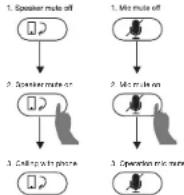
Audio handling while in calling mode
Pushing the speaker must on screen button will mute the vehicle speakers and recording the audio back to the cell phone speaker. This can be logged back and forth.
Pushing the Mute Mic on screen button will mute the units internal/external microphone so that the caller cannot hear what happens in the vehicle. This can also be toggled so to restore normal communication.

11.- BLUETOOTH FUNCTION (Cont.)
Activation by touch : Function
11.2 AUTOMATIC CONNECTION TO RADIO
A mobile device that has been previously paired and connected to the head unit will automatically re-connect every time the head unit is powered on after a short delay. When connected cell phone signal strength and battery strength icons appear in the top right of the LCD screen.
This section describes the available commands on your unit to play files available during Bluetooth connection.
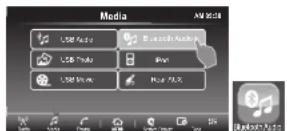
Enter BluetoothAudiomode.
In Media menu press the button Bluetooth Audio or in Home menu push icon BluetoothAudio.
11.- BLUETOOTH FUNCTION (Cont.)
If a device, previously paired and connected by Bluetooth to the radio, has a BT audio profile, its audio files can be played onethunit.
It is sometimes necessary to initiate E1 audio from the phone depending on your preferences. For example, you may want to use a voice assistant. Otherwise this can automatically be done through the head unit's B' Audio widget.
11.3.1 Rewind and fast forward
It is possible to navigate tracks with the onscreen and buttons.
11.3.2 TrackInformation
Different information will automatically appear on the main screen about the track being played such as Title,Artist,Album.
Internal/External Microphone
To switch the unit from using its internal microphone to an external microphone or vice versa
- Select the settings menu
- Select MIC External (toggle on for external, toggle off for internal)
- Press Update Which will restart the head unit
- After the restart the unit will use the microphone as selected
12.- Apple CarPlay
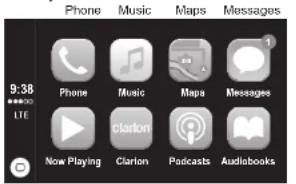
Available on select cars, Apple CarPlay is a smarter, safer way to use your iPhone in the car. Apple CarPlay takes the things you want to do with your iPhone while driving and puts them right on your car's built-in display. You can get directions, make calls, send and receive messages, and listen to music, all in a way that allows you to stay focused on the road. Just connect your iPhone and go.
Apple CarPlay features Siri voice control and is specially designed for driving scenarios. Apple CarPlay also works with your car's controls buttons, or touchscreen. And the apps themselves have been reimagined for the car, so you can use them while your eyes and hands stay where they belong.
12.1 Enter Apple CarPlay mode.
Connecting any Apple CarPlay capable device to the unit via USB will automatically connect the carPlay device to the main screen. The shift it is already connected by pressing the Apple CarPlay widget on the main screen.
Apple CarPlay features Siri voice control and is specially designed for driving scenarios. Apple CarPlay also works with your car's controls buttons, or touchscreen. And the apps themselves have been reimagined for the car, so you can use them while your eyes and hands stay where they belong.

12.2 Navigation in Apple CarPlay mode
The navigation in Apple CarPlay mode depends for availability applications by Apple company.
For more Information, Check website. http://www.apple.comios/carplay/
12.2 PRINCIPAL Apple CanPlay MODE PHONE:AppleCarPlayoniPhone 3.0
PHONE: Apple Call may use iPhone contacts to help you make calls. Use the "Show contacts" for your favourite display, your recent calls, your contact list, keyboard and voice mail.
contracti, rode and rive man.
MUSIC: Use Music to access music from your
iPhone (playlists)
Or synchronize it with Radio. Apple CarPlay also allows you to use other audio apps you download the podcasts and iPhone to play music or listen to the radio. Use the "Now Playing" screen to control playback, or use the controls on the wheel of your car.
MAPS: Get step-by-step, get traffic conditions and know the approximate travel time. Apple CarPlay generates possible destinations from addresses of your email, your text messages, contacts and calendars, and based the places you go often. You can also search for a location or use the locations included in your bookmarks. You can even use other apps for obtaining directions. Apple CarPlay tell you when redisplays your information.
MESSAGEs: When you open Messaging, Siri is automatically activated to read your incoming messages or allows you to dictate a new message. Let Siri help you send, listen and reply to text messages.
NOW PLAYING: When exist some music application is playing, in this menu is possible to access directly.
RETURN: In main screen for Apple CarPlay application is include CLARION icon, push this button in order to return to main screen for Head Unit, or disconnect apple device.
POODCAST: Use the Podcasts app to listen to podcasts on the iPhone
AUDIOBOOKS: Use the Audiobooks app to listen Audiobooks on the iPhone.
SIRI AND MENU: Use this button to play Siri and return to main menu
NOTE: For play CP is recommended use original wires for faster data transferences.
13.- Android Auto
The Android Auto™ was designed with safely in mind. With a simple and intuitive interface, integrated steering wheel controls, and powerful new voice actions, it's designed to minimize distraction so you can stay focused on the road.
To use Android Auto™ you need an Android Auto compatible vehicle or aftermarket radio and an Android phone running 5.0 (Lollipop) or higher. When you connect your Android phone to the compatible vehicle or radio, Android Auto™
will display applications on the vehicle's screen. For more information about Android Auto' compatibility, please visit support.google.com/androidauto
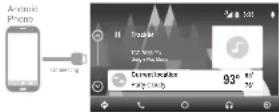
13.1 Enter Android Auto Mode.1 Time Connect by USB terminal the device compatible with Android AutoTM application and the screen in Head Unit change to set up settings in mobile device in order to match Information between both devices.
After this settings configuration the Head Unit and mobile device are playing in AndroidAuto aplication.
The setting configuration is exclusively for 1 time, after that if mobile device is
13.2 PRINCIPAL Android Auto MODE
MAPS: Get step-by-step, get traffic conditions and know the approximate travel time. Android Auto™ generates possible destinations from addresses of your email, your text messages, contacts and calendars. and based the places you go often. You can also search for a location or use the locations included in your bookmarks. You can even use other apps for obtaining directions Android Aults tell you when to redisplay your information.
PHONE Android AutoUses Phone contacts to help you make calls. Use the "Show contacts" for your favorite display, your recent calls, your contacts list, keyboard and voice mail.
MAIN: Use this button to return to beginning menu

GOOGLE MUSIC: Use Music to access music from your Phone (including songs, artists, albums and playlists). Or synchronize it with Radio. Android Aull^a also allows you to use other audio apps you download the podcasts and Phone to play music or listen to the radio.
MENU: In this menu is possible to see different setting in Android Auto App.
If the settings are done, is possible to enter to Android Auto mode, pushing Android Auto icon in main screen in Head Unit.
Note. If in mobile device reset information Android AutoEquipment connected previously, must be necessary setting configuration again.
13.3 Navigation In Android Auto'node
The navigation in Android AutoTMode depends for availability applications by Google company.
For more information. Check website. https://www.android.com/car/
13.4 Exit from Android AutoMode
In menu screen for Android Auto application is include Return CLARION icon, push this button in order to return to main screen for Head Unit, or disconnect Android Auto Device.
Note: For play Android AutoTM is recommended to use original USB wires for faster data transferences (the cable provided with the Android device or the same brand) and the wire should be in good condition.
14.- GENERAL PRECAUTIONS
-
- This device has highly-sensitive buttons; avoid applying excessive force as this can damage the unit and reduce button life.
-
- Do not open the unit. The devices interior parts cannot be repaired by the user. Please contact your dealer or an authorized service center if there is an issue.
-
- Use a soft, dry cloth to clean the control panel and screen, NEVER use rough cloth. thinner, gasoline, alcohol etc. If absolutely necessary use a soft damp cloth and carefully clean the unit.
-
- Do not insert foreign objects (screwdrivers, knives, metal objects etc.) into the units inputs as they may damage the device voiding the warranty.
15.- RECOMENDATIONS FOR USB DEVICE
When using USB devices:
1.- Only use certified USB devices with this device.
2. - To prevent damage to the USB device either change the mode to another (non-USB) mode or power off the unit.
3. - The head unit is capable of reading USB protocols 1.1 and 2.0. Verify your device is compatible.
4.-If the USB device cannot be read by the unit please confirmthe following:
a.The USB device has been properly formatted.
b.Make sure only MP3, WMA or AAC files are stored in the corresponding MP3, WMAandAAC file folders
5.- You are using a certified USB cable to attach the USB device to head unit.

18.TROUBLESHOOTING
General
| Problem | Causes | Measure |
| Power does not turn on. (the sound is preeon.) | Fuse is blown | Restore with a loss of the same amplitude, if the power goes again, consult your store of power. |
| Insured wiring. | Consult your installation center. |
18.-TROUBLESHOOTING (Cont.)
| Problem Cause Measure | ||
| USB device cannot be installed | The USB device has been inserted with wrong direction. | Resetting the nonworking direction of the USB device, try it again. |
| The USB connector is broken. Replace with a new USB device. | ||
| USB device is not recognized. | The USB device is damaged. Discard Connections are loose. | Inspect the USB device and disconnect. If the device is still not recognized by replacing with a different USB device. |
| No sound heard with the damp/irritable FLE shows. | No MP3/WMA file is stored in the USB device. | Store these files properly in the USB devices. |
| Sudden stop or runaway MP3/WMA files are not enclosed properly. | Use MP3/WMA files enclosed properly. | |
B
| Problem Cause Measure | |
| Correct pair of the Bluetooth enable device with the card to a system | The device does not support the probe warned for the system. |
| The Bluetooth function of the device is not available. Refer to the user manual of the device for how to enable the device. | |
| The public quality is poor after connection with a Bluetooth enabled device. | The Bluetooth reception is poor. |
| Move the device closer to the ear-aloud system or remove any clink between the devices and the system. |
TFT Screen
| Problem Cause Measure |
| The image is not displayed. The pasting brake is not engaged. Check that the pasting brake is engaged. |
| The display is dark. The operating condition is not good. The temperature inside the vehicle may be 30oC or lower. Bait to an appropriate temperature (30oC or c) and 20oC, if applicable. |
| The headlight of the vehicle is lit. The display is made dark at night to prevent the glare. (When the headlight of the vehicle is lit in the daytime, the display gets dark). |
CarPlay / Android Auto
| Problem Cause Measure | ||
| Instruction to application of CarPlay /Android App. | Some application needs mobile data to work properly. Using generic USB were that did not fast data transistors or warning condition. | Activate the mobile data or connect to WiFi. Replace the USB port to original USB port for faster data transistors (the cable provided with the Phone /Android device of the same SICCI) and the wire should be in a good condition. |

19.- SPECIFICATIONS
FM Tuner
Frequency Range: 87.9 Mhz to 107.9 Mhz
Usable Sensitivity: 8 dBμV
Stereo Separation: 25 dB (1 kHz)
Frequency Response: 80 Hz to 14 kHz
Frequency Response: 30 Hz (14 kHz)
AM Turner
Frequency Range: 530 kHz to 1.710 kHz
Usable Sensitivity: 30 dBμV
AudioVideo Input
Audio input voltage: 2 V
Video input voltage: 1.0 V @75Ω
High: 235 mV
Midi:650mV
Low: 1.3V
AudioVideo output
Video output voltage: 1.0 V @75Ω
Screen Size: 6.95" Wide type
Resumption:500x400x3(RGB)
Bluetooth
Specification:Bl0e,00h Ver.3.0
Profile:APP1.5 (Handos Free Profile) ACRP(Advanced Audio Distribution)
A2DP (Advanced Audio Distribution Profile) BRAP (Phone Book Access Profile)
PBFF (FIClE BOK Access Portfolio)
USB
Specification: USB 2.0 (FS)
Playable Audio format:
MP3.WMA,AAC,FLAC,RA,RM
Playable video format
AVI,MP4,MPG,MPEG,ASF,MKV,WMV,MOV
General
Power source voltage:
14.4 VDC (10.8 to 16 V allowable)
Ground: Negative
Consumption: 15A
Note: Specification and design are subject to change without notice.
for further improvement.

19.- SPECIFICATIONS (CONT.)

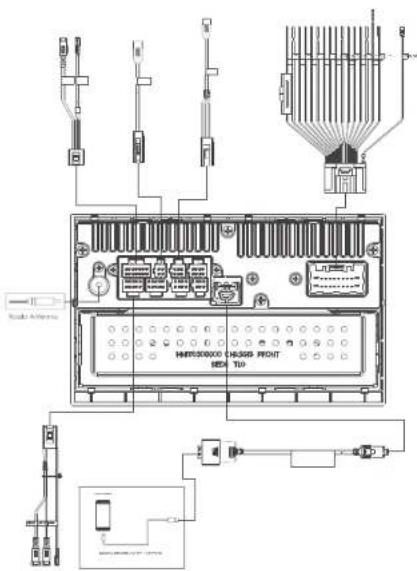
20.WIRE CONNECTION GUIDE
Note:
Before installing, be sure to disconnect the negative cable of the car battery. When connect all accessories and USB cable, be sure to fix with the clamp.
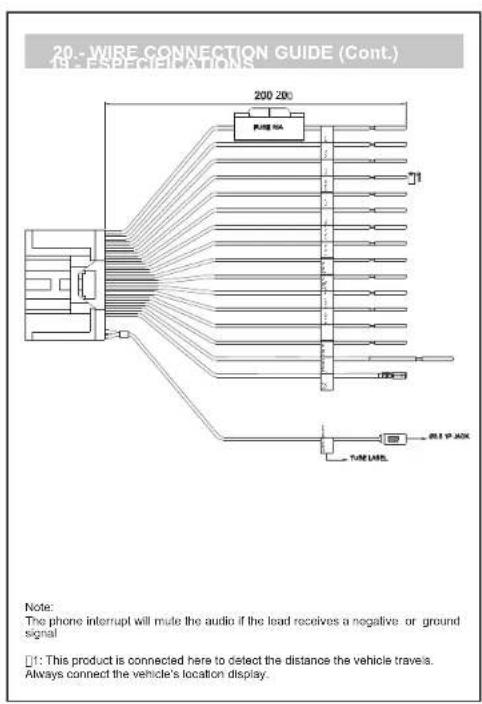

20.WIRE CONNECTION GUIDE (Cont.)
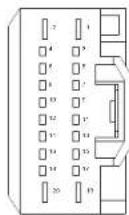
| PIN NO. | WIRE COLOR NAME | DESCRIPTION | LENGTH | |
| 1 | YELLOW | BI | 2AWG | 20mm |
| 2 | BLACK | GRB | 1AWG | 20mm |
| 3 | RED | ADC | 1AWG | 20mm |
| 4 | PSK | SPILD | 2AWG | 20mm |
| 5 | GREEN (WHITE) | L1+ | 2AWG | 20mm |
| 6 | GREEN (BLACK) | LL | 2AWG | 20mm |
| 7 | WHITE | 3PK FL- | 2AWG | 20mm |
| 8 | WHITE (BLACK) | 3PK FL- | 2AWG | 20mm |
| 9 | GREEN | 3PK FL+ | 2AWG | 20mm |
| 10 | GREEN (BLACK) | 3PK FL- | 2AWG | 20mm |
| 11 | PURPLE | 3PK RR+ | 2AWG | 20mm |
| 12 | FURPLE (VOC) | 3PK RR- | 2AWG | 20mm |
| 13 | GRASS GREEN | PARKING | 2AWG | 3M |
| 14 | BLUE | AMY VOC | 2AWG | 20mm |
| 15 | NC | - | - | - |
| 16 | NC | - | - | - |
| 17 | WHITE | HEEL REMOTE | IP SHELD | 20mm |
| 18 | BLACK | IP SHELD | 20mm |
03.- FUNCIONES
SINTONIZADOR
Siri and Menu Playing Return Podcasts Audiobooks
eannnnnne
m
13.2 Principal APP Android Auto mode
Perit HPF1.5 (Hands Free Profile)
2AP10
PBAP (Phone Book Access Profile)
USB
Especificacis n USB 2.0 (FS)
Formalodeaudireproducible;
MP3.WNA.AAC.PLAC
Formato de video reproducible.
General
12CARPLAY2017ANFRID361
14.2022年1月2日
15.RECCAMANDATIONSPOUREPERIPHERIQUEUSB24
16 FORMAT DISPONIBLE25
17.PERIPHERIQUES USB DISPONIBLES29
18.GUIDE DE DEPPANNAGE 30 19.2.4.1.0 TETRIOCTILE 261
1.2017年1月16日
01.- MISES EN GARDE
AAYERISSEMENT
Random play of [Default]
1- Ropeller in plaste
Lecture
Repeat select in folder
Lecture alatohe
07.-FONCTIONNEMENT DES FICHIERS PHOTO SUR CLE USB
Image suvants. in order to pass the next image.

acceder a la musique de tout iPhone ( 9 ) . A few of the albums , their artists , the albums and the lists of lecture ).
| Fiscal Year 2013 | |
| In millions | As of |
| Balance Sheet | December 31, 2013 |
| Total assets | 1,457 |
| Total liabilities | 1,457 |
| Net assets acquired | 1,457 |
| Net assets sold | 1,457 |
16.-FORMATSDISponIBLES (suite)
| PHOTO | ||
| FICHER FORMAT | Resolution Radio | Statut prisen charge |
| BMP | 246x184 | |
| 443x441 OK | ||
| 512x481 OK | ||
| 300x240 OK | ||
| 200x200 OK | ||
| 720x480 OK | ||
| 512x416 OK | ||
| 512x488 OK | ||
| 128x128 OK | ||
| 3224x2448 OK | ||
| 5000x5000 OK | ||
| 6000x6000 OK | ||
| 8000x8000 OK | ||
16.-FORMATAVAILABLES()suite
Tablea
| VIDEOS | |||||||
| invo | |||||||
| F0 | PCH/2 | ||||||
| SVV | CNG | ||||||
| SMD | |||||||
| PS | La Min | ||||||
17.-PERIPHÉRIQUES USB DISPONIBLES
18.-D PANNAGEE
| N° | Code du modele | N | Code du modele | N | Code du modele |
| 1 | D110G2/125G2 Deu Tachy | 126 | 5 D110G2/25G2 Deu Tachy | 26 | 9 Sory USB USB4G1 |
| 2 | D110G2/178G2 Deu Tachy | 166 | 8 Sory USB USB3G1 | 326 | 10 Sory USB USB7G1 |
| 3 | D110G2/80G2 Deu Tachy | 86 | 7 Sory USB USB1G1 | 166 | 11 Sandisk |
| 4 | D110G2/4G2 Deu Tachy | 46 | 8 Sory USB USB9G1 | 86 | 12 Sandisk |
General

19.-CARACT RISTIQUES (suite)E
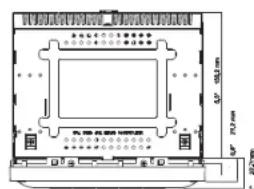
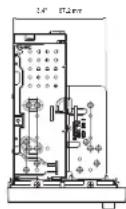
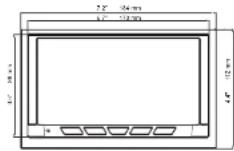
Dimensioes du FX506
Poids du FX508:2 kg
20.-GUIDE DE CONNEXION DES C BLESÀ
Remarque Importante

- 02.-BUTTON DESCRIPTION
- 03.- FUNCTIONS
- TUNE
- AUDIO
- USB PLAYER
- GENERAL
- 04.- AUDIO SETTINGS
- POWER ON/OFF/MUTE, VOLUME UP, VOLUME DOWN
- SELECTING AUDIO TUNING
- 04.- AUDIO SETTINGS (Cont.)
- Fader Adjustment
- Balance Adjustment
- Non-Equalizer Mode Adjustment
- SELECTING DISPLAY SETTING
- Brightness Adjustment
- Contrast Adjustment
- SELECTING SYSTEM SETTING
- Language Selection
- Beep Sound
- Text Scroll
- Ignition Option
- Quick Charge
- Initial Volume
- Aux Volume Adjustment
- Navigation Volume Adjustment
- Speed Volume Adjustment
- EditHomeMenu
- Clock
- Ver.info
- Enter Radio mode
- Band Selection
- Manual Tuning
- Seek Tuning
- Scan Tuning
- Autoscan Presets
- Selecting Presets
- Previous Track and restart.
- Fast Rewind.
- Next Track
- 06.- MP#, WMA & AAC (M4A) FILE OPERATION (Cont)
- Folder Navigation
- Repeat and Random Function
- Enter Photo mode.
- Previous Image
- Next Image
- FULL SIZE SCREEN
- 08.- USB MOVIE FILE OPERATION (Cont.)
- 10.-IPod OPERATION
- 10.- iPod OPERATION (Cont.)
- File Navigation
- Previous Track and restart
- Fast Forward.
- IRedMenu
- 11.- BLUETOOTH FUNCTION
- PHONE MENU
- 11.- BLUETOOTH FUNCTION (Cont.)
- AUTOMATIC CONNECTION TO RADIO
- Rewind and fast forward
- TrackInformation
- Internal/External Microphone
- 12.- Apple CarPlay
- Enter Apple CarPlay mode.
- 13.- Android Auto
- PRINCIPAL Android Auto MODE
- Navigation In Android Auto'node
- Exit from Android AutoMode
- 14.- GENERAL PRECAUTIONS
- 15.- RECOMENDATIONS FOR USB DEVICE
- 18.-TROUBLESHOOTING (Cont.)
- 19.- SPECIFICATIONS
- 20.WIRE CONNECTION GUIDE
- 20.WIRE CONNECTION GUIDE (Cont.)
- 03.- FUNCIONES
- SINTONIZADOR
- Principal APP Android Auto mode
- 01.- MISES EN GARDE
- AAYERISSEMENT
- 07.-FONCTIONNEMENT DES FICHIERS PHOTO SUR CLE USB
- 20.-GUIDE DE CONNEXION DES C BLESÀ
Brand : CLARION
Model : FX508
Category : Browser