
Invictus X3 - Vacuum Cleaner GENIUS - Free user manual and instructions
Find the device manual for free Invictus X3 GENIUS in PDF.
| Product type | Stick vacuum cleaner |
| Brand | Genius |
| Model | Invictus X3 |
| Dimensions (H x W x D) | Approximately 118 x 24 x 21 cm |
| Suction tube length | Approximately 70 cm |
| Power (without accessories) | 160 W |
| Battery type | Li-ion 22.2 V |
| Battery capacity | 2200 mAh |
| Runtime | 4 to 5 hours |
| Dustbin capacity | 0.5 L |
| Charger input | 100-240 V ~ 50/60 Hz, 0.4 A max |
| Charger output | 27 V / 0.5 A / 13.5 W |
| Filtration | Multicyclone filter + Washable HEPA filter |
| Noise level | Not specified |
| Included accessories | Universal motorized brush, 360° hard floor brush, mini motorized brush, electric mop, pet hair brush, LED crevice tool, 2-in-1 combination brush, extension hose, storage stand with charger, wall mount |
| Functions | Adjustable suction power (normal/boost), quick-dustbin release (quick clean), removable battery, charge in appliance or on stand |
| Maintenance | Empty dustbin via bottom opening, clean filters (do not wash HEPA, tap it), clean brushes (remove hair, wash with water if necessary) |
| HEPA filter replacement | Every 6 months with regular use |
| Warranty | Not specified |
| Country of origin | Not specified |
Frequently Asked Questions - Invictus X3 GENIUS
User questions about Invictus X3 GENIUS
0 question about this device. Answer the ones you know or ask your own.
Ask a new question about this device
Download the instructions for your Vacuum Cleaner in PDF format for free! Find your manual Invictus X3 - GENIUS and take your electronic device back in hand. On this page are published all the documents necessary for the use of your device. Invictus X3 by GENIUS.
USER MANUAL Invictus X3 GENIUS
Product components. 19
General information 20
Explanation of symbols. 20
Safety. 20
Proper use 20
Safety and warning instructions 20
Application of the accessories 23
Before using for the first time 24
Charging the battery. 24
Application. 25
Use 25
Storage 26
Cleaning and user maintenance 26
Troubleshooting 28
Disposal 29
Technical details. 29
Customer service 29
BEFORE USING THIS APPLIANCE FIRST READ ALL INSTRUCTIONS AND SAFETY PRECAUTIONS IN THIS INSTRUCTIONS FOR USE.
KEEP THIS MANUAL FOR FUTURE REFERENCE.
ONLY GIVE THE APPLIANCE TO THIRD PARTIES TOGETHER WITH THE INSTRUCTIONS FOR USE.
WHEN USING ELECTRICAL APPLIANCES, THE FOLLOWING BASIC PRECAUTIONS MUST BE OBSERVED AT ALL TIMES, INCLUDING THE FOLLOWING:
These instructions for use to INVICTUS X3. The illustrations in these instructions for use are intended to schematic representation of the correct use. They may differ from the original product in detail.
These operating instructions cover all available accessories for the appliance. The content of the set that you have purchased is indicated on the packaging or a separate insert. You can also purchase additional accessories which are not included in your set.
Product components
1 Main unit X3
2 Suction tube
3 Motorised brush with universal brush roll
Storage station with charging function
5 Wall mount
6 Charger
7 Extension hose
8 2in1 combi brush
9 Lithium-ion battery
10 Motorised mini brush
11 Crevice nozzle / LED crevice nozzle
12 360^ hard floor electric brush
13 Motorised mop
14 Pet hair brush
Main unit
15 Transparent dust container
16 Multi-cyclone filter / HEPA filter
Suction opening on the dust container
18 Dust container release button (quick clean)
19 On/Off button
20 Mode button
21 Handle
22 Charging socket
23 Release button for removing the dust container
24 Battery release button
General information
Explanation of symbols
The following symbols and signal words are used in this manual, on the device or on the packaging.

WARNING!
Failure to observe this warning could lead to a serious or potentially lethal accident.

CAUTION!
Failure to observe this caution could lead to injury.

NOTE!
Information about potential material damage.
Safety
Proper use
The appliance is intended for home use only. It is not suitable for commercial or industrial use. Only use the appliance for the cleaning of dry surfaces.
This appliance is not suitable for the following applications:
- Vacuuming hot ash/coals, cigarettes, matches or any other combustible or flammable substances - risk of fire
Vacuuming water and other liquids - risk of short circuit
Use the device only as described in this manual. Any other use is regarded as improper and may result in damage to property or even personal injury. The device is not a toy for children.
The manufacturer and distributor accept no liability for damages resulting from improper or incorrect use. Safety instructions
Safety and warning instructions

WARNING!
RISK OF ELECTROCUTION!
Improper electrical installation or excessive mains voltages can result in electric shock.
Only connect the device if the mains voltage of the socket matches the information on the nameplate of the power supply unit.
Only connect the power supply to an easily accessible plug socket, in order that it can be quickly disconnected from the mains in case of a fault.
Do not operate the device if it displays visible damage or if the mains adapter is defective.
Only use the included power adapter to charge the device.
The power cable of the power supply cannot be replaced. Dispose of the power supply if it is damaged and replace it with a power supply of the same type.
Do not under any circumstances open the housing of the device: repairs must be left to specialists. For repairs, visit a specialist workshop.
Never touch the mains plug with wet hands.
Never pull the power supply from the socket by the power cable, but rather always grip the plug itself.
Never use the power cable as a carry handle.
Keep the device and mains adapter away from open flames and hot surfaces.
Run the power cable in such a way that it does not present a tripping hazard.
Do not kink the power cable and do not run it over sharp edges.
Only use the device indoors. Never use it in wet rooms or in the rain.
Store the device in such a way that there is no risk of it falling into a tub or sink.
Ensure that children do not place any items into the device.
Do not leave the device unsupervised whilst in operation.
When you are not using the device, for cleaning or in the event of a fault, always turn the device off and remove the mains plug from the socket.
Do not use the device with wet hands, if you are on a wet surface, or if the device is wet.
Do not use the appliance when it is connected to the adapter or the mains.

WARNING!
DANGER FOR CHILDREN AND PEOPLE WITH LIMITED PHYSICAL, SENSORY OR MENTAL CAPACITIES (FOR EXAMPLE PARTIALLY DISABLED PEOPLE, OLDER PEOPLE WITH LIMITED PHYSICAL AND MENTAL CAPACITIES) OR THOSE LACKING IN EXPERIENCE AND KNOWLEDGE (E.G. OLDER CHILDREN).
Do not allow children aged under 8 years or people with physical, sensory or mental handicaps or a lack of experience or knowledge use the appliance without supervision or instruction on the safe use of the appliance and potential risks. Never allow children to play with the appliance.
Keep children under 8 years of age away from the device and mains adapter.
Do not allow children to play with the packaging film. Children could become entangled or suffocate when playing.

WARNING!
RISK OF EXPLOSION AND CHEMICAL BURNS!
There is a risk of explosion if batteries and accumulators are not handled correctly. In case of contact with leaking battery acid, chemical burns may occur.
Do not heat the battery and never throw it into an open fire. Do not destroy or open the battery, do not submerge it in liquid, and do not short-circuit it.
Do not expose the battery to direct sunlight, strong temperature fluctuations or temperatures above 60^ .
Avoid battery acid from coming into contact with the skin, eyes and mucous membranes. In case of contact with battery acid, rinse the affected areas immediately with plenty of clean water and if necessary consult a doctor
Only use the included power adapter to charge the device.

CAUTION!
RISK OF INJURY!
Failure to use the device correctly can result in injury to you or others.
Do not aim the device at people or animals.
Keep hair and loose clothing away from the openings of the device. During operation, the device sucks in air and can cause injury if it sucks in hair or loose clothing.
Do not use the device on surfaces that are covered with cement or other finely- porous surfaces or surfaces covered with materials that are toxic when inhaled.
Do not allow the power brushes to run over cables etc. because they can get caught up in the rotating brush and damaged.

NOTE!
RISK OF DAMAGE!
The improper handling of the device may result in damage to the device itself.
Do not cover the air vents on the device during operation.
Keep the device and mains adapter away from hot surfaces. Never subject the device to high temperatures (heating etc.) or climatic conditions (rain etc.).
Never fill the housing of the device with liquid.
Remove blockages caused by dust, fluff, hair etc. because they reduce the appliance's suction power.
Do not continue to use the device if the plastic components display cracks or fissures or have become deformed. Only replace damaged parts with suitable original replacement parts.
Application of the accessories
| Accessories Image Use | ||
| Storage station with charging function | To store the appliance and charge it at the same time. The battery does not need to be removed from the appliance for charging. | |
| Motorised electric brush with universal brush roller | With integrated electric motor. With universal brush roller. For cleaning larger surfaces such as hard floors or carpets. | |
| 360° hard floor electric brush | With integrated electric motor. 2 x ultra-soft brush rollers For 360° cleaning of hard floors. | |
| Motorised mini electric brush with universal brush roller | With integrated electric motor. With brush roller. For cleaning upholstery, furniture, mattresses, etc. | |
| Motorised electric mop | With integrated water tank and mop pads. For damp cleaning of smooth surfaces. | |
| Pet hair brush | With integrated comb. For vacuuming up pet hair. | |
| 2-in-1 combination brush | With adjustable brush attachment. Removes dust and dirt from delicate surfaces and upholstery, etc. | |
| Crevice nozzle / LED crevice nozzle | For cleaning hard-to-reach areas. |
Before using for the first time

NOTE!
DANGER OF DAMAGE
If you open the packaging carelessly with a sharp knife or other pointed objects, the appliance may be damaged.
Open very carefully.
- Remove the appliance from the packaging.
- Remove the packaging material and any labels on the product that are used for protection during transportation or advertising.
- Check that the delivery is complete.
- Check whether there is any apparent damage to the appliance or its accessories. If this is the case, do not use the appliance. Contact the service address given in the Customer Service section.
- Fully charge the battery before using it for the first time.
Setting up the storage station with charging function (see fig. R)
- Connect the two tubes with the sleeve and fasten with 2 screws.
- Insert the tube into the base plate with the cable guide facing backwards.
- Put the head section on.
- Secure the head section and base plate with two screws.
Charging the battery
The battery can be left on the handset for charging, removed, or charged using the storage station. Make sure the appliance is switched off before charging.
Removing/inserting the battery (see fig. A)
Release the latch on the underside.
Pull the battery away from the handset.
Push the battery back onto the guide until it audiably clicks into place.
Option 1: Charging in the handset
- Insert the mains plug into the charging socket on the back of the handset. Open the small protective cover beforehand. (see fig. B)
- Connect the mains adaptor to a functioning socket.
- The LEDs on the top of the handset indicate the charging progress.
Option 2: Charging the battery once removed
- Insert the mains plug into the charging socket at the back of the battery. Open the small protective cover beforehand. (see fig. B)
- Connect the mains adaptor to a functioning socket.
- The LED on the inside of the battery will start to flash. When the battery is fully charged, the LED lights up continuously. (see fig. C)
Option 3: Charging in the storage station
- Insert the mains plug into the charging socket on the back of the storage station. (see fig. D)
- Connect the mains adaptor to a functioning socket.
-
Hang the appliance in the receptacle so that the charging contact is established.
-
The LEDs on the top of the handset indicate the charging progress.
| Battery capacity | |
| 25 % LED 1 shining | |
| 50 % LED 1 + 2 shining | |
| 75 % LED 1 + 2 + 3 shining | |
| 100 % ALL LEDs shining |
Application

WARNING!
DANGER OF EXPLOSION
Liquids can form explosive vapours or mixtures by swirling with the suction air of the vacuum cleaner.
Never suck up liquids with the vacuum cleaner.

WARNING!
DANGER OF FIRE
If you vacuum glowing ashes, burning cigarettes or similar with the vacuum cleaner, the filters may catch fire.
Do not vacuum any glowing or smouldering materials or objects.

NOTE!
DANGER OF DAMAGE
Improper handling of the appliance may cause damage.
Do not vacuum sharp particles.
Make sure that the filters are correctly inserted and undamaged before switching on the appliance.
Do not cover the ventilation openings during operation.
Switch off the appliance immediately if you accidentally suck up any liquids.
Do not run over cables with the electric brushes.
Use
- You can either connect the various attachments directly to the hand-held appliance or extend the range using the suction tube or extension hose.
- The extension hose has no power supply, so the electric brush attachments do not work with it.
- To remove accessories, release the relevant lock. (see fig. E)
- To switch on/off, press the lower half of the on/off switch.
- The appliance starts with normal suction power. By pressing the upper half of the on/off switch (,MODE^ ) , you can
increase the suction strength (boost).
- Press MODE again to switch back to normal suction power.
Motorised electric mop

NOTE!
The electric mop is not designed for vacuuming liquids, but for damp cleaning of smooth surfaces.
- Make sure the microfibre mop pads are attached to the bottom of the mop.
- Open the cover on the top of the mop and fill the tank with water (see fig. F).
- Close the cover again.
- Put the motorised electric mop onto the suction tube.
- After switching on, the mop pads are automatically moistened and rotate during use.
- When you have finished cleaning, rinse and dry the mop pads and pour out any remaining water from the tank.

NOTE!
The water slowly drips onto the mop pads during use, so we recommend that you moisten them once by hand before use.
Pet hair brush
- Attach the pet hair brush to the extension hose.
- Switch on the appliance and carefully vacuum up any fur using the pet hair brush.
- For more intensive cleaning and fur removal, squeeze the handpiece so that the integrated comb is exposed.
Storage
Store the appliance in a dry place and protect it from excessive heat or direct sunlight.
The storage station with charging function provides space for the hand-held appliance with suction tube and motorised electric brush, as well as some accessories.
Wall mount

WARNING!
Before drilling, make sure that there are no cables in the wall where.
Fix the wall bracket to the wall using the screws provided.
Make sure that it is aligned correctly: the recesses in the large mount must point upwards.
Hook the hand-held appliance into the large attachment from above.
Cleaning and user maintenance

WARNING!
Risk of electric shock!
Switch the appliance off and disconnect it from the mains before cleaning or user maintenance.
Never hold the appliance or accessories under running water or immerse them in water or other liquids.
Clean the appliance by wiping it with a dry cloth.
Do not use harsh or abrasive cleaning agents or cleaning pads.
The accessories can be wiped with a damp cloth if necessary.
Emptying the dust container (see .S
- Hold the hand-held appliance over a dustbin and release the lock.
- The flap will open and the dirt will fall out.
- Close the flap again.
Removing/cleaning the dust container
- Press the safety catch above the suction opening.
- Turn the dust container clockwise to release the lock. (see fig. G)
- Removing the dust container.
- Empty the container and, if necessary, wipe it out with a dry or slightly damp cloth.
- When putting the dust container back on, make sure that the lug on the lid is placed in the corresponding recess. (see fig. H)
- Turn the dust container anticlockwise until it audibly clicks into place.
Cleaning the lter

NOTE!
Only tap the HEPA filter to remove dirt - do not clean it with water. If the appliance is used regularly, replace the HEPA filter every 6 months.
- Opening or removing the dust container. (see previous section)
- Turn the multi-cyclone filter clockwise to release the lock.
- Remove the multi-cyclone filter.
- The HEPA filter is located on the top of the multi-cyclone filter.
- Remove the HEPA filter (see fig. I) and tap it out.
- Clean the multi-cyclone filter with a brush or dry cloth. Rinse with clean water if necessary.
- Allow to dry completely before reinserting.
- Insert the HEPA filter into the multi-cyclone filter (see fig. J). Ensure it is correctly positioned. The HEPA filter must be level, and the seal must not be squashed.
- Insert the multi-cyclone filter into the hand-held appliance and tighten it anticlockwise.
- Close or replace the dust container.
Cleaning the motorised electric brush:
- Wipe the housing with a damp cloth.
- To remove the brush roller, release the lock and remove the side cover. (see fig. K)
- Remove the brush roller from the side (see fig. L).
- Wipe the brush roller or clean it under running water if necessary. Remove hair and other dirt.
- Allow the brush roller to dry completely.
- Replace the brush roller and put the side cover back on.
360^ hard floor electric brush cleaning:
- Wipe the housing with a damp cloth.
- To remove the brush rollers, release the side lock and separate the rollers from the housing. (see fig. M)
- Pull the brush rollers off the attachment. (see fig. N)
- Wipe the brush rollers or clean under running water if necessary. Remove hair and other dirt.
- Allow the brush rollers to dry completely.
- Place the brush rollers on the fastening and push them back into the housing. (see fig. 0)
Cleaning the motorised mini electric brush:
- Wipe the housing with a damp cloth.
- To remove the brush roller, loosen the side lock anticlockwise using a coin and remove the side cover. (see fig. P)
- Pull out the brush roller sideways. (see fig. Q)
- Wipe the brush roller or clean it under running water if necessary. Remove hair and other dirt.
- Allow the brush roller to dry completely.
- Replace the brush roller, insert the side cover and close it again clockwise using a coin.
Troubleshooting
Only for electrical appliances

WARNING!
Switch off the appliance and disconnect the mains plug before addressing any faults! Failure to do so may result in injury or electric shock.
| Problem Possible causes Solution | ||
| Appliance isn't working | Battery is empty Charge the battery | |
| Brush roller is blocked Clean the brachr roller and remove debris such as hair and fibres if necessary. | ||
| Battery will not charge | Appliance or charging station is not correctly connected to a power socket | Connect the mains adaptor correctly to a functioning power socket |
| Contact with charging station has not been established | Hang the hand-held appliance correctly in the charging station | |
| Suction power decreases | Suction opening on the container is blocked | Clean the suction opening on the hand-held appliance and check the suction tube for any dirt. |
| Dust container is full Empty the dust container | ||
| Filters are dirty Clean the filters, replace the HEPA filter if necessary | ||
| Brush roller is blocked Clean the brush roller and remove debris such as hair and fibres if necessary. | ||
| Filter cannot be inserted correctly | Filter not fitting properly in slot Check filter and fitting are correct | |

NOTE!
If the fault cannot be rectified, please contact our customer service. Never open up the appliance!
Disposal
(Applicable in the European Union and other European states with systems for the separate collection of waste and recyclables).
Packaging
The packaging material can be recycled. Dispose of the packaging in an environmentally friendly way for recycling.
Electrical appliances
The symbol with the crossed out dustbin means that this product cannot be disposed of in the household waste. Electrical waste should be taken to a local acceptance point.
You can obtain further information about the disposal and recycling of this appliance from your municipal utility company, the retailer where you purchased it or the manufacturer.
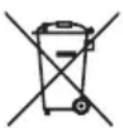
Before disposing of the appliance remove the batteries because they have to be disposed of separately. To protect the environment, batteries and rechargeable batteries must not be disposed of alongside normal household waste, regardless of whether they contain harmful substances* or not, and should instead be taken to the relevant collection point. Contact your local authority to find out where you can dispose of batteries in your area.
Even empty batteries have a residual charge. Before you dispose of them, cover the poles with insulating tape to prevent them short circuiting, which could cause fire or an explosion.
*marked with: Cd = Cadmium, Hg = Mercury, Pb = Lead
Technical details
| Model X3 | |
| Size (H x W x D) Approx. 118 x 24 x 21 cm | |
| Tube length Approx. 70 cm | |
| Performance (without accessories) 160 W | |
| Battery 22,2 V, Lithium-ion battery | |
| Battery capacity 2200 mAh | |
| Battery duration 4-5 hours | |
| Dust container capacity 0,5 l | |
| MAINS ADAPTOR | |
| Model BZ15-270050-AG | |
| Input voltage / AC frequency 100-240 V ~ 50/60 Hz 0,4 A Max | |
| Output voltage / current / power 27 V / 0,5 A / 13,5 W | |
| Average active efficiency 83,58 % Min | |
| Efficiency at low load (10 %) 70 % | |
| No-load power consumption 0,1 W Max |
Customer service
If you have any questions about the device or spare parts/accessories, please contact your local retailer.
Table des matieres

- Product components
- Main unit
- General information
- WARNING!
- CAUTION!
- NOTE!
- Safety
- Proper use
- Safety and warning instructions
- RISK OF ELECTROCUTION!
- RISK OF EXPLOSION AND CHEMICAL BURNS!
- RISK OF INJURY!
- RISK OF DAMAGE!
- Before using for the first time
- DANGER OF DAMAGE
- Setting up the storage station with charging function (see fig. R)
- Charging the battery
- Removing/inserting the battery (see fig. A)
- Option 1: Charging in the handset
- Option 2: Charging the battery once removed
- Option 3: Charging in the storage station
- Application
- Use
- Motorised electric mop
- Pet hair brush
- Storage
- Wall mount
- Cleaning and user maintenance
- Never hold the appliance or accessories under running water or immerse them in water or other liquids.
- Emptying the dust container (see Ig .S
- Removing/cleaning the dust container
- Cleaning the lter
- Cleaning the motorised electric brush:
- 360° hard floor electric brush cleaning:
- Cleaning the motorised mini electric brush:
- Troubleshooting
- Only for electrical appliances
- Disposal
- Packaging
- Electrical appliances
- Technical details
- Customer service
- Table des matieres
Brand : GENIUS
Model : Invictus X3
Category : Vacuum Cleaner