
CS1216 - Saw LawnMaster - Free user manual and instructions
Find the device manual for free CS1216 LawnMaster in PDF.

User questions about CS1216 LawnMaster
0 question about this device. Answer the ones you know or ask your own.
Ask a new question about this device
Download the instructions for your Saw in PDF format for free! Find your manual CS1216 - LawnMaster and take your electronic device back in hand. On this page are published all the documents necessary for the use of your device. CS1216 by LawnMaster.
USER MANUAL CS1216 LawnMaster
Read all safety rules and instructions carefully before operating this tool.
Distributed By Cleva North America 601 Regent Park Court Greenville, SC 29607 (866)-384-8432

| 16' AC CHAIN SAW CS1216 | |
| Rated Voltage: 120 V 60Hz | |
| Capacity: 12A | |
| Chain Speed(No-load): 12m/s | |
| Chain Bar Length: 16 Inch | |
| Chain Pitch: 3/8 Inch | |
| Oil Tank: 120ml | |
| Toolless Chain Tensioning(Sds): | Yes |
| Automatic Chain Oiler: | Yes |
| Steel Bucking Spikes: | Yes |
| Lock-off Button For On/Off Switch: | Yes |
| Maximum Cutting Diameter | 16inch |
| Oregon Bar | 516480 and 112364 |
| Oregon Chain | 91PX057 |
WARNING
Do not attempt to operate this tool until you have read all of the instructions, safety information, etc. contained in this manual thoroughly and understand them completely. Failure to comply may result in accidents involving fire, electric shock, or serious personal injury.
- Donotstartcuttinguntil you have a clearworkarea, securefooting, and a pathfrom thefallingtree. Clutteredareasas inviteaccidents.
- Keep all children, bystanders, visitors, and animals out of the work area when cutting with the chainsaw.
- Do not operate chainsaw in an explosive atmosphere, such as in the presence of flammable liquids, gases, or dust. Power tools create sparks that may ignite the dust or fumes.
WARNING
Use outdoor extension cords marked SW-A, SOW-A, STW-A, STOW-A, SJW-A, SJTW-A, or SJTOW-A. These cords are rated for outdoor use, and reduce the risk of electric shock.
- Polarized Plugs. Toreducetheriskofelectricshock, this tool has a polar is wider than the other). This plug will only fit into a polarized outlet one way. If the plug does not fit fully into the outlet, reverse the plug. If it still does not fit, contact a qualified electrician to install the proper outlet. Don't change the plugin anyway.
- Makesure you'rextension cordising good condition. Whenusing anextensi to use one heavy enough to carry the current your product will draw. A wire gauge size (A.W.G.) of at least 14 is recommended for an extension cord 50^ (15 m) or less in length. A cordexceeding 100^(30m) is notrecommended. Ifindoubt,usethenexttheat smaller the gauge number, the heavier the cord. An undersized cord will cause a drop in line voltage, resulting in losssof power and overheating.
- Inspectextensioncordsperiodically, and if damaged, haverepaired by a Constantlystayawareofcordlocation. Following this rule will reduce etheri or fire.
- Wear snug fitting clothing. Always wear heavy, long pants, overalls, jeans or chaps made of cut-resistant material or one that contains cut-resistant inserts. Wear non-wear non-slip heavy duty gloves to improve your grip and top protect your hairjewellery, short pants, sandals, or go barefoot. Do not wear loose-fitting clothing that could bedraw ninto themotoror catch the chain or under brush. Secure hairsoitisa level.
- Heavy protective clothing may increase operator fatigue, which could lead
- During weather that is hot and humid, heavy work should be scheduled for early morning or late afternoon hours, when temperatures are cooler.
- Weareyeprotectionthatismarkedto complywithANSIZ87.1aswellashea protectionwhenoperatingthisequipment.Hearingprotectionshouldbew
-
Always be aware of what you are doing when using the chainsaw. Use common not operate the chainsaw when you are tired, ill, or under the influence of alcohol, drugs, or medication.
-
Donotexposethechainsawtorain.
- Donotusethechainsawindamporwetlocations.
- Stay alert and pay attention to what you are doing.
- Keep all parts of your body away from the saw chain when the unit is running.
- Always carry the chains saw by the front handle with the battery removed and saw chain positioned to the rear.
- Never let anyone use your chainsaw who has not received adequate instructions in its proper use. This applies to rentals as well as privately owned saws.
- Before you start the unit, makes sure the saw chain is not contacting any job
- Stop the chain saw before setting it down.
- To avoid accidental starting, never carry the unit with your finger on the trigger switch.
- Maintain the unit with care. Keep the cutting edges sharp and clean for best to reduce the risk of injury. Follow instructions for lubricating and changing
- Keep handles dry, clean, and free of oil and grease.
- Do not operate a chainsaw with one hand! Use a firm grip with thumbs and fingers encircling the chainsaw handles. Serious injury to the operator, helpers, bystanders of these persons may result from one-handed operation. A chainsaw is intended for two-handed use.
- A void body contact with grounded surfaces such as metal pipes and wire increases risk of electric shock if your body is grounded.
- Do not operate a chainsaw that is damaged, improperly adjusted, or not completely and securely assembled. Chain should slow to a stop when the trigger switch is released. If the chain continues to turn after the triggers switch has been released, have the your nearest LawnMaster service dealer.
- Check for damaged parts, misalignment or binding of moving parts, broken parts and mountings, and any other condition that may affect the operation of the tool.
- All chainsaw service, other than the items listed in the operation and maintenance sections, should be performed by your nearest LawnMaster service dealer.
Always maintain a proper stance. - Dnotusechainsawifswitchdeshoesnotturnitonaccioff.Havedefectiveswiteauthorized service centre.
- Do not adapt your chainsaw to a bow guide or use it to power any attachments or devices not listed for the saw.
- Disconnect chains saw from powersupply when not inuse, beforeservicing adjustments and changing attachments, such as saw chain and guard.
- Do not cut vines and/or small underbrush.
-
Do not operate a chainsaw in a tree, on a ladder, or on scaffolding. Doing so is extremely dangerous.
-
Use extreme caution when cutting small brush and saplings, because small material may catch the saw chain and bewhipped toward you or pull you off balance.
- Whencutting a limb that is under tension, bealertforspring back, sothat y struck when the tension in the wood fibers is released.
- Donotforcethechainsaw. Thejobcanepeformedbetterifthesawisuseitwasdesignedtoworkat.
- Always use the right product for your application. The chains saw should be wood only. Never use the chainsaw to cut plastic, masonry or non-wooden building materials.
- Do not use the chainsaw for purposes other than what it is intended for.
- Store chainsaw whennotinuse. Chainsaw should be stored in dry and hot out of the reach of children.
- Save these instructions. Refer to them frequently, and use them to instruct others who may use this tool. If you loan someone this tool, also loan them these instructions.

WARNING
Some dust created by power sanding, sawing, grinding, drilling, and other construction activities contains chemicals known to cause cancer, birth defects or other reproductive harm. Some examples of these chemicals are:
- lead from lead-based paints
crystallinesilicalfrombricksandcementandothermasonryproducts, a - arsenicand chromiumfrom chemicallytreatedlumber.
Your risk of exposure to these chemicals varies depending on how often you do this type of work. To reduce your exposure to these chemicals, work in a well-ventilated area, and work with approved safety equipment, such as dust masks that are specially designed to filter out microscopic particles.
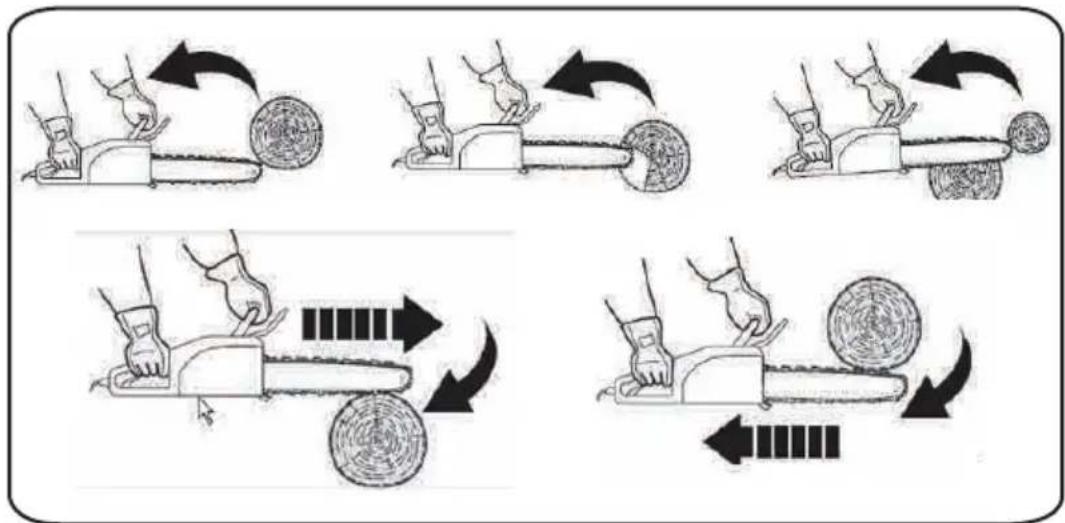
KICKBACK (See Fig. 1 - 2.)
WARNING
Kickback may occur when the moving chain contacts an object at the upper portion of the tip of the guide bar, or when the wood closes in and pinches the saw chain in the cut. Contact at the upper portion of the tip of the guide bar can cause the chain to dig into the object and stop the chain for an instant. The result is a lightning fast reverse reaction that kicks the guide bar up and back toward the operator. If the saw chain is pinched along the top of the guide bar, the guide bar can be driven rapidly back toward the operator. Either of these reactions can cause loss of saw control, which can result in serious injury. Do not rely exclusively on the safety devices built into the saw. As a chainsaw user, you should take several steps to keep your cutting jobs free from accident or injury.
THE FOLLOWING PRECAUTIONS SHOULD BE FOLLOWED TO MINIMIZE KICKBACK:
- Always grip the saw firmly with both hands. Hold the saw firmly with both hands when the unitis running. Place your right hand on therear handle and your left hand, with your thumbs and fingers encircling the chain saw handles. A firm grip and a stiffleftarm will help you maintain control of the saw if kick back oocurs.
- Makesurethattheareainwhich you arecuttingisfreeofobstructions.D noseoftheguidebarcontactalog,branch,fence,oranyotherobstructi hitwhileyouareoperatingthesaw.
- Always cut with the unit running. Fully squeeze the trigger switch and maintain cutting speed.
- Use only the replacement guide bars and low-kickback chains specified by the manufacturer for the saw.
- With a basic understanding of kickback, you can reduce or eliminate the element of surprise. Sudden surprise contributes to accidents.
- Keep properfooting and balance at all times.
- Do not cut above shoulder height or overreach when cutting.
- Follow the sharpening and maintenance instructions for the saw chain.
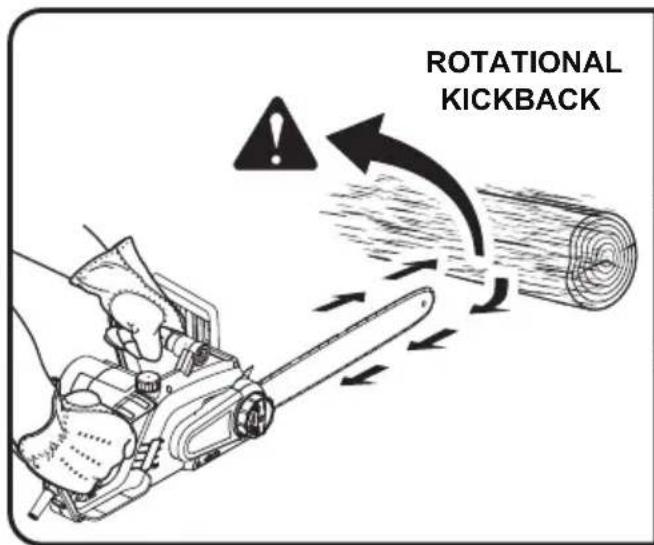
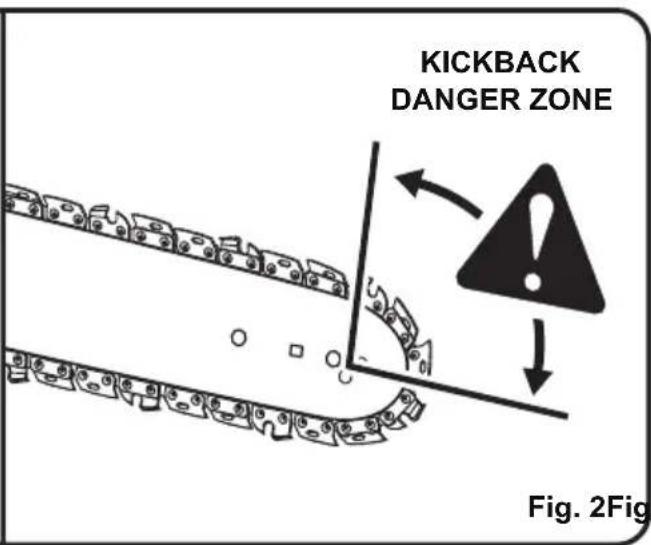
Fig. 2Fig. 1
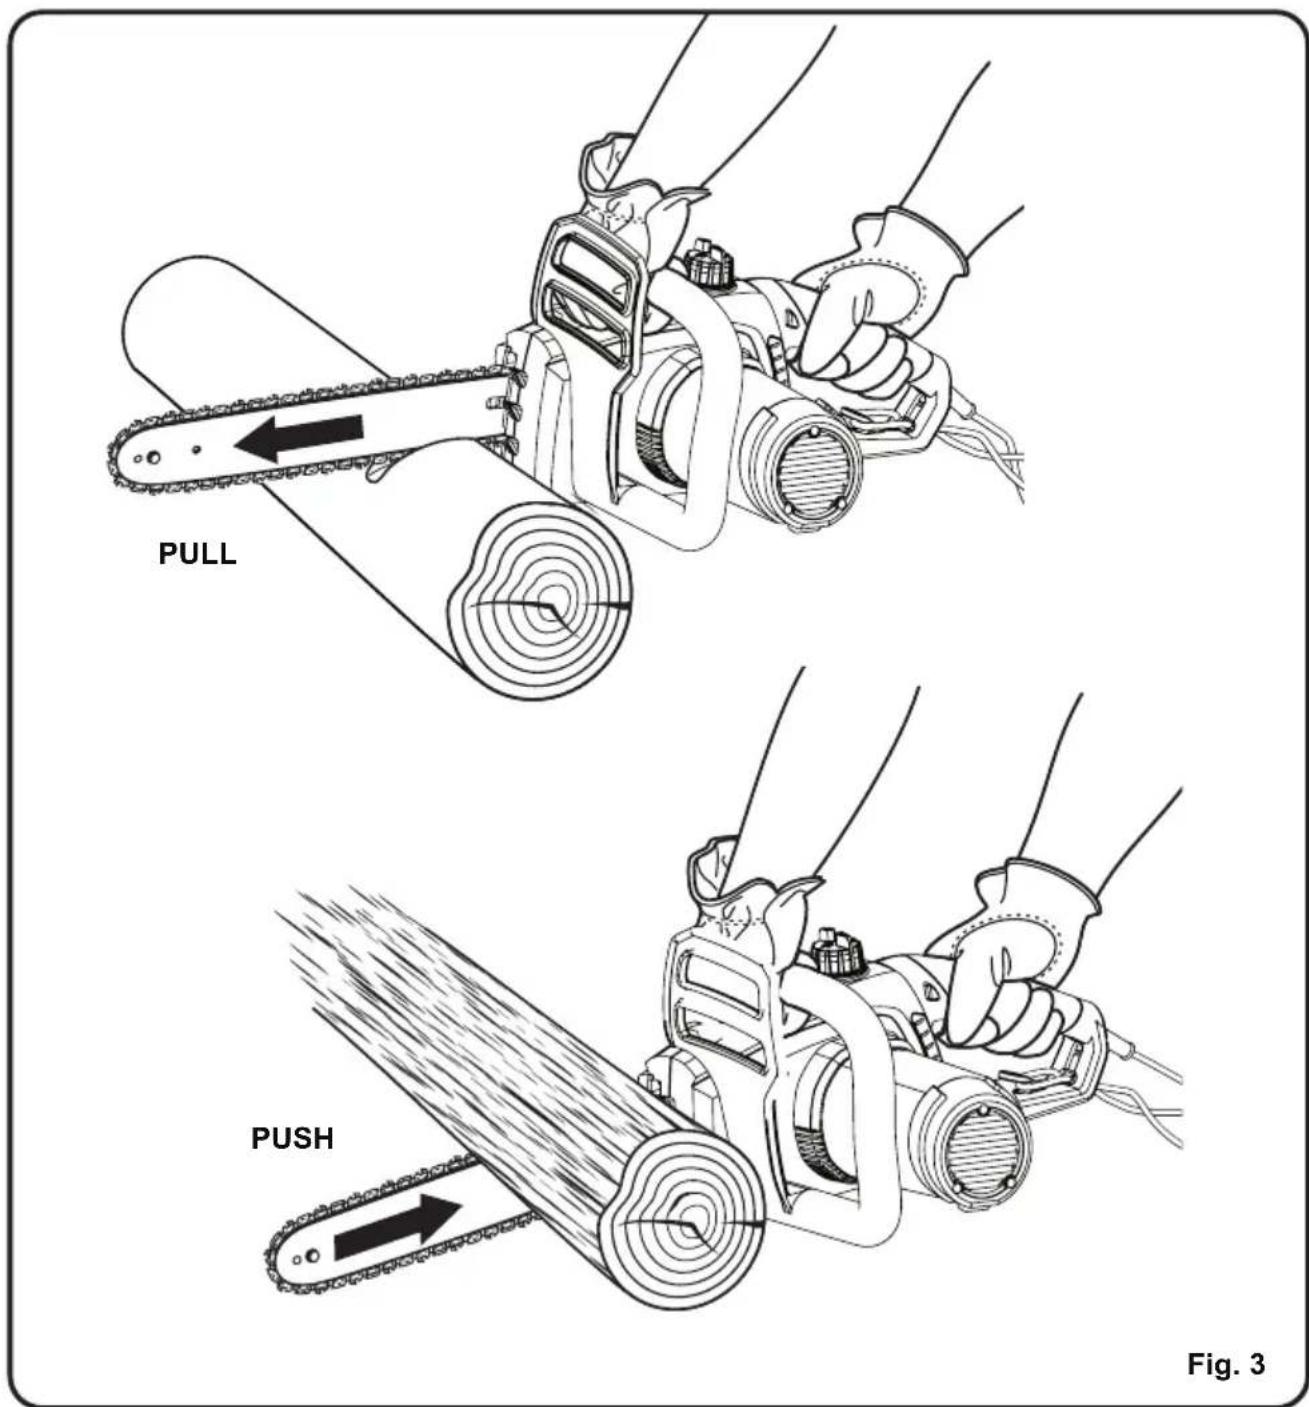
- Push and Pull — This reaction force is always opposite to the direction the chain is moving where contact is made with the wood. Thus, the operator must be ready to control the PULL when cutting on the bottom edge of the bar, and the PUSH when cutting along the top edge. (See Fig. 3)
Some of the following symbols may be used on this product. Please study them and learn their meaning. Proper interpretation of these symbols will allow you to operate the product better and safer.
| SYMBOL | NAME DESIGNATION/EXPLANATION |
| V Volts | Voltage |
| A Amperes Current | |
| Hz Hertz Frequency (cycles per second) | |
| W Watts Power | |
| min Minutes Time | |
| ~ | Alternating Current Type of current |
| = | Direct Current Type or a characteristic of current |
| n0 | No Load Speed Rational speed, at no load |
| Class II Construction | |
| /min | Per Minute |
| Wet Conditions Alert | |
| Read The Operator's Manual | |
| Eye and Head Protection | |
| Safety Alert | |
| Operate With Two Hands | |
| Kickback DANGER! Beware of | |
| Bar Nose Contact | |
| Wear Gloves | |
| Wear Safety Footwear | |
| Keep Bystanders Away | |
The following signal words and meanings are intended to explain the levels of risk associated with this product.
| SYMBOL SIGNAL MEANING | ||
| DANGER | Indicates an imminently hazardous situation, which, if not avoided, will result in death or serious injury. | |
| WARNING | Indicates a potentially hazardous situation, which, if not avoided, could result in death or serious injury. | |
| CAUTION | Indicates a potentially hazardous situation, which, if not avoided, may result in minor or moderate injury. | |
| CAUTION | (Without Safety Alert Symbol) Indicates a situation that may result in property damage. | |
SERVICE
Servicing requires extreme care and knowledge and should be performed only by a qualified service technician. For service we suggest you return the product to your nearest AUTHORIZED SERVICE CENTER for repair. When servicing, use only identical replacement parts.

WARNING
To avoid serious personal injury, do not attempt to use this product until you have read this Owner's Manual thoroughly and understand it completely. If you do not understand the warnings and instructions in this Owner's Manual, do not use this product. Call the Toll-free Helpline (1-866-384-843) for assistance. The operation of any power tool can result in foreign objects being thrown into your eyes, which can result in severe eye damage. Before operating a power tool, always wear safety goggles, safety glasses with side shields, or a full face shield when needed. We recommend a Wide Vision Safety Mask for use over eyeglasses or standard safety glasses with side shields. Always use eye protection that is marked to comply with ANSI Z87.1.

WARNING

The operation of any power tool can result in foreign objects being thrown into your eyes, which can result in severe eye damage. Before beginning power tool operation, always wear safety goggles or safety glasses with side shields and, when needed, a full face shield. We recommend Wide Vision Safety Mask for use over eyeglasses or standard safety glasses with side shields. Always use eye protection which is marked to comply with ANSI Z87.1.
SAVE THESE INSTRUCTIONS
WARNING
TO AVOID ELECTRICAL HAZARDS, FIRE HAZARDS, OR DAMAGE TO THE TOOL, USE PROPER CIRCUIT PROTECTION. THIS CHAINSAW IS WIRED AT THE FACTORYFOR 120 V OPERATION. CONNECT TO A 120 V, 15 A CIRCUIT, AND USE A 15 A TIME-DELAYED FUSE OR CIRCUIT BREAKER. TO AVOID SHOCK OR FIRE WHEN THE POWER CORD IS WORN, CUT, OR DAMAGED IN ANY WAY, REPLACE IT IMMEDIATELY.
DOUBLE INSULATED (See Fig. 4)
This chainsaw has a plug that looks like the one shown in Fig. 4. The chainsaw is double insulated to provide a double thickness of insulation between you and the tool's electrical system. All exposed metal parts are isolated from the internal metal motor components with protective insulation.
WARNING
TO AVOID INJURY, USE ONLY IDENTICAL CHAINSAW REPLACEMENT PARTS
WARNING
DOUBLE INSULATION DOES NOT TAKE THE PLACE OF NORMAL SAFETY PRECAUTIONS WHEN OPERATING THIS TOOL.
WARNING
TO AVOID ELECTRIC SHOCK:
- Use only identical replacement parts when servicing a tool with double insulation. Servicing should be performed by a qualified technician.
- Donotuseinwetordampareasorexposetorain.
CAUTION
IN ALL CASES, MAKE CERTAIN THE RECEPTACLE IN QUESTION IS PROPERLY GROUNDED. IF YOU ARE NOT SURE, HAVE A CERTIFIED ELECTRICIAN CHECK THE RECEPTACLE.
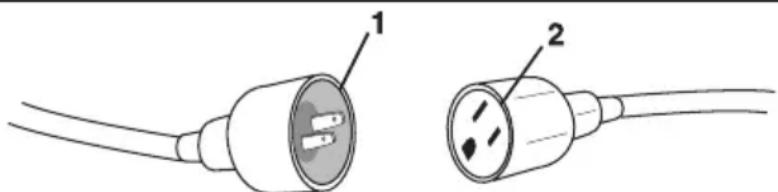
1) 2-prong plug
2) Properly grounded extension cord
Fig. 4
WARNING
THIS LAWN TOOL IS FOR OUTDOOR USE ONLY. DO NOT EXPOSE TO RAIN OR USE IN DAMP LOCATIONS.
GUIDELINES FOR USING EXTENSION CORDS
USE THE PROPER EXTENSION CORD. Make sure your extension cord is in good condition. When using an extension cord, be sure to use one of heavy enough gauge to carry the current your product will draw. An undersized cord will cause overheating. The table below shows the correct size to use depending on cord length and nameplate ampere rating. If in doubt, use the next heavier gauge. The smaller the gauge number, the heavier the cord.
MINIMUM GAUGE FOR EXTENSION CORDS (AWG)
(WHEN USING 120 V ONLY)
Amp Rating Total Length of Cord in Feet (meters)
| More Than | Not More Than | 25' (7.6 m) | 50' (15 m) | 100' (30.4 m) | 150' (45.7 m) |
| 0 | 6 | 18 | 16 | 16 | 14 |
| 6 | 10 | 18 | 16 | 14 | 12 |
| 10 | 12 | 16 | 16 | 14 | 12 |
| 12 | 16 | 14 | 12 | Not Recommended | |
Be sure your extension cord is properly wired and in good condition. Always replace a damaged extension cord or have it repaired by a qualified person before using it. Keep your extension cords away from sharp objects, excessive heat and damp or wet areas.
Use a separate electrical circuit for your tools. This circuit must not be less than 12-gauge cord and should be protected with a 15-amp time delayed fuse. Before connecting the motor to the power line, make sure the switch is in the OFF position and the electric current is rated the same as the current stamped on the motor nameplate. Running at a lower voltage will damage the motor.
WARNING
THIS TOOL MUST BE GROUNDED WHILE IN USE TO PROTECT THE OPERATOR FROM ELECTRICAL SHOCK.
SAVE THESE INSTRUCTIONS
The safe use of this product requires an understanding of the information on the tool and in this Owner's Manual, as well as a knowledge of the project you are attempting.
Before using this product, familiarize yourself with all operating features and safety rules.
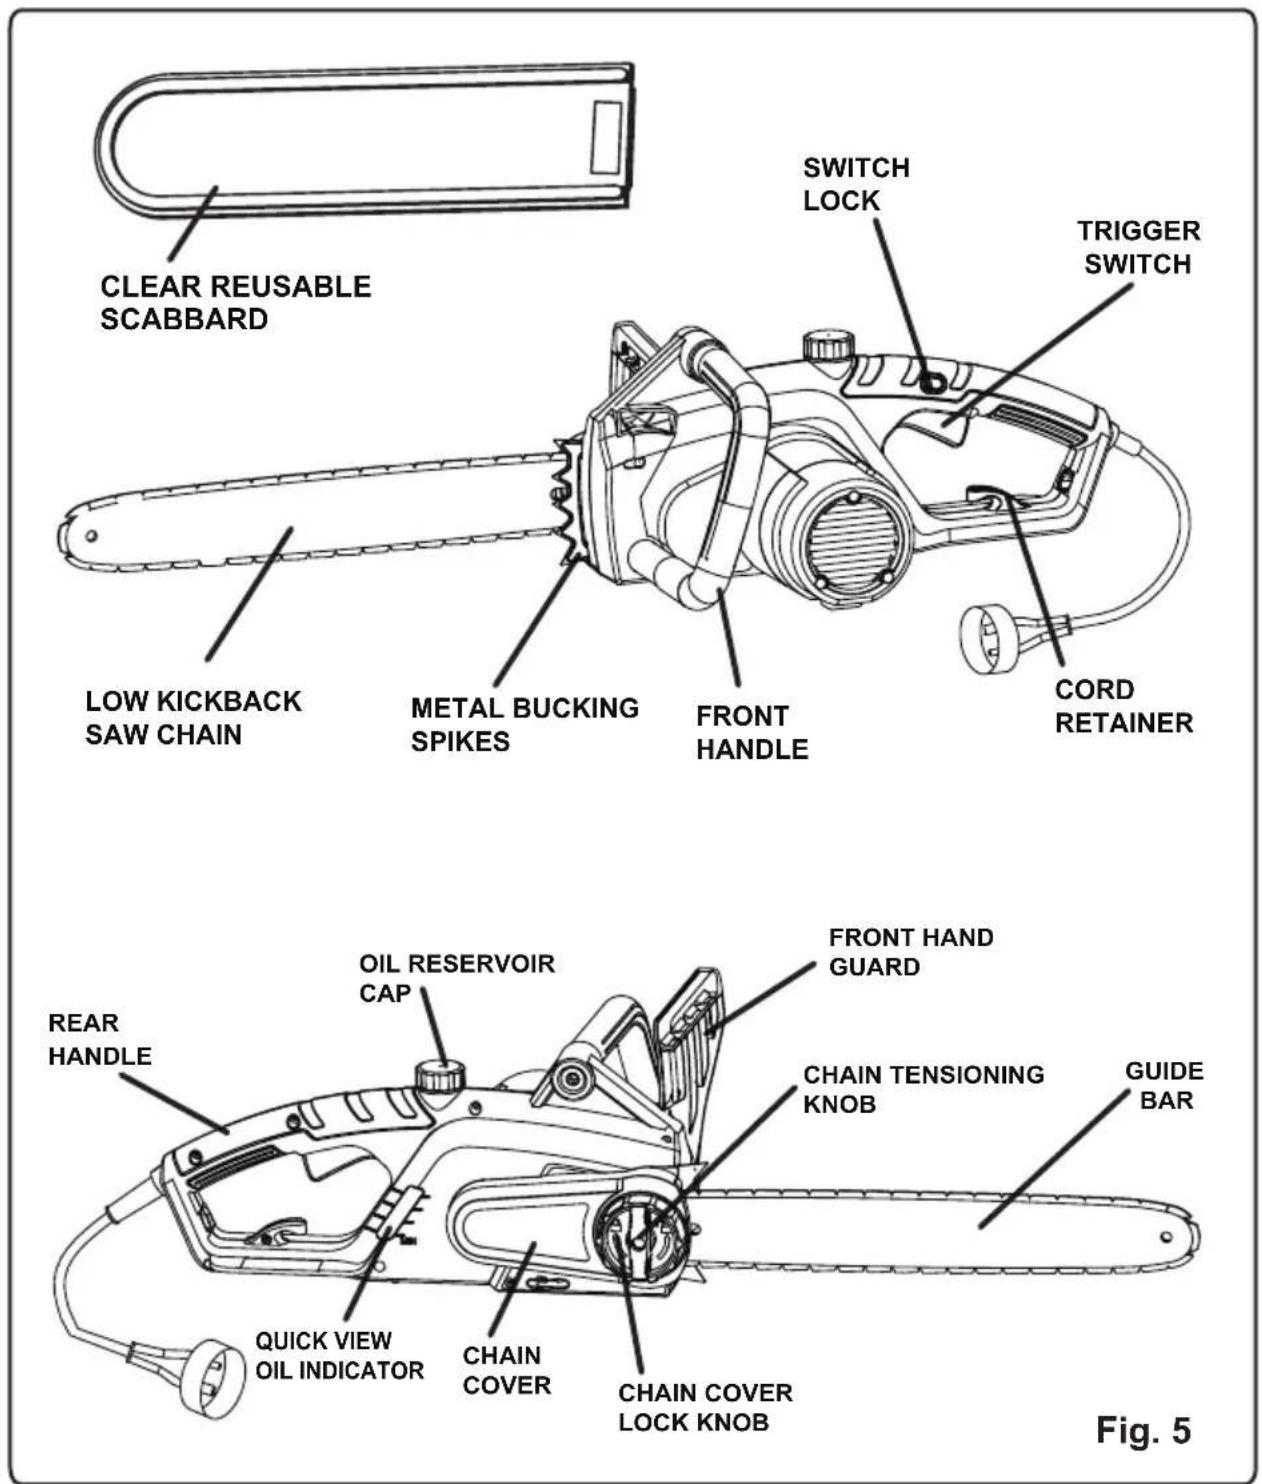
CHAIN TENSIONING KNOB
This feature allows user to adjust the tension of the chain.
GUIDE BAR
The factory-equipped guide bar has a small radius tip that offers a somewhat lower kickback potential.
LOW-KICKBACK SAW CHAIN
The low-kickback saw chain helps minimize the force of a kickback reaction by preventing the cutters from digging in too deeply at the kickback zone.
QUICK-VIEW OIL INDICATOR
Semi-transparent oil reservoir that allows user to see when to add oil.
SWITCH LOCK
A control feature designed to prevent the motor from being started accidentally..
TRIGGER SWITCH
Squeeze the trigger switch to operate the unit after switch lock has been pushed in. Release the trigger switch to stop the unit.
UNPACKING
This product has been shipped completely assembled.
- Carefully remove the product and any accessories from the box. Make sure that all items listed in the packing list are included.
- Inspect the product carefully to make sure no breakage or damage occurred during shipping.
- Do not discard the packing material until you have carefully inspected and satisfactorily operated the product.
- If any parts are damaged or missing, please call 1-866-384-8432 for assistance.
PACKING LIST
- Chainsaw
- Clear Resuable Scabbard
Owner's Manual

WARNING
If any parts are damaged or missing, do not operate this product until the parts are replaced. Failure to heed this warning could result in serious personal injury.

WARNING
Do not connect to power supply until assembly is complete. Failure to comply could result in accidental starting and possible serious personal injury.

WARNING
Do not attempt to modify this product or create accessories not recommended for use with this product. Any such alteration or modification is misuse, and could result in a hazardous condition leading to possible serious personal injury.
WARNING
Do not allow familiarity with this product to make you careless. Remember that a careless fraction of a second is sufficient to inflict serious injury.
WARNING
Always wear safety goggles or safety glasses with side shields when operating power tools. Failure to do so could result in objects being thrown into your eyes, resulting in possible serious injury.
WARNING
Do not use any attachments or accessories not recommended by the manufacturer of this product. The use of attachments or accessories not recommended can result in serious personal injury.
APPLICATIONS
You can use this product for the purposes listed below:
- Basic limbing, felling, and woodcutting
- Removing buttress roots
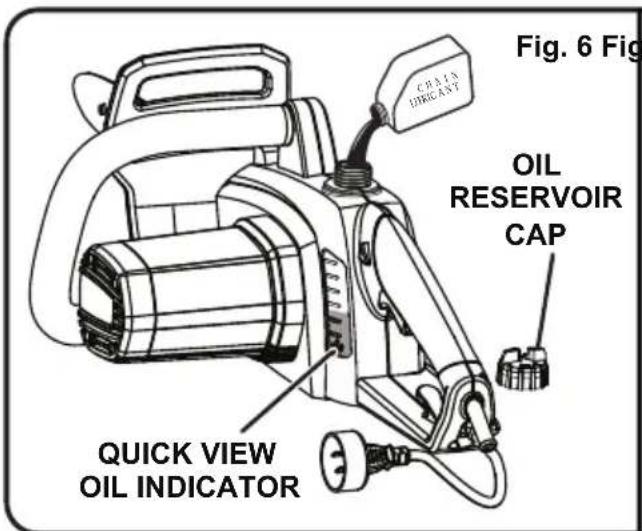
ADDING BAR AND CHAIN LUBRICANT (See Fig. 6)
Use standard chainsaw bar and chain Lubricant. It is designed for chains and chain oilers, and is formulated to perform over a wide temperature range with no dilution required.
NOTE: The chainsaw comes from the factory with no bar and chain oil added. Level should also be checked after every 20 minutes of use, and refilled as needed.
- Remove oil cap.
- Carefully pour the bar and chain oil into the tank.
- Wipe off excess oil.
- Check and fill the oil tank when quick-view oil indicator is below the MIN. line.
- Repeat as needed.
NOTE: Donotusedirty, usedorotherwisecontaminatedoils. Damagemayoccur
NOTE: It is normal for oil to seep from these saw when not inuse. Top prevent see a tank after reach use, then run for on e minute. When storing the unit for along pe month sor longer), besure the chain is lightly lubricated. This will prevent trussprocket.
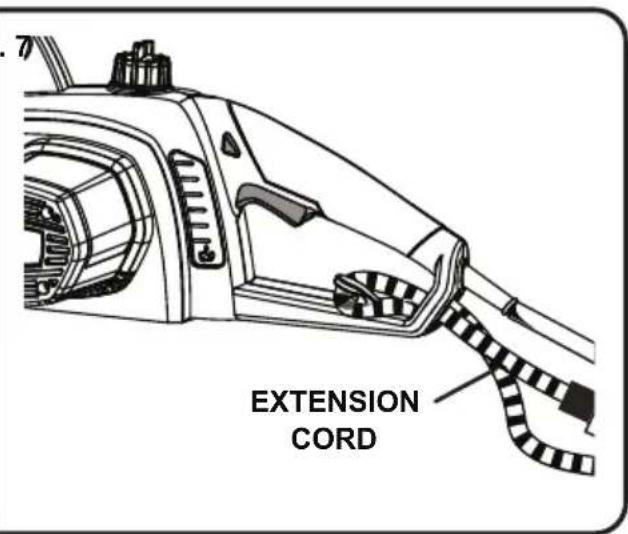
CONNECTING TO POWER SUPPLY (See Fig. 7)
This chainsaw is designed with a cord retainer that prevents the extension cord from being pulled loose while using.
- Form a loop with the end of the extension cord.
- Insertloopportionofextensioncord through the opening in the side of the and place over cord hitch.
- Slowly pull loop against cord retainer until the slack is removed.
- Plug chainsaw into extension cord.
NOTE: Failure to remove all excess cords slack from extension cord retainer could result from receptacle.
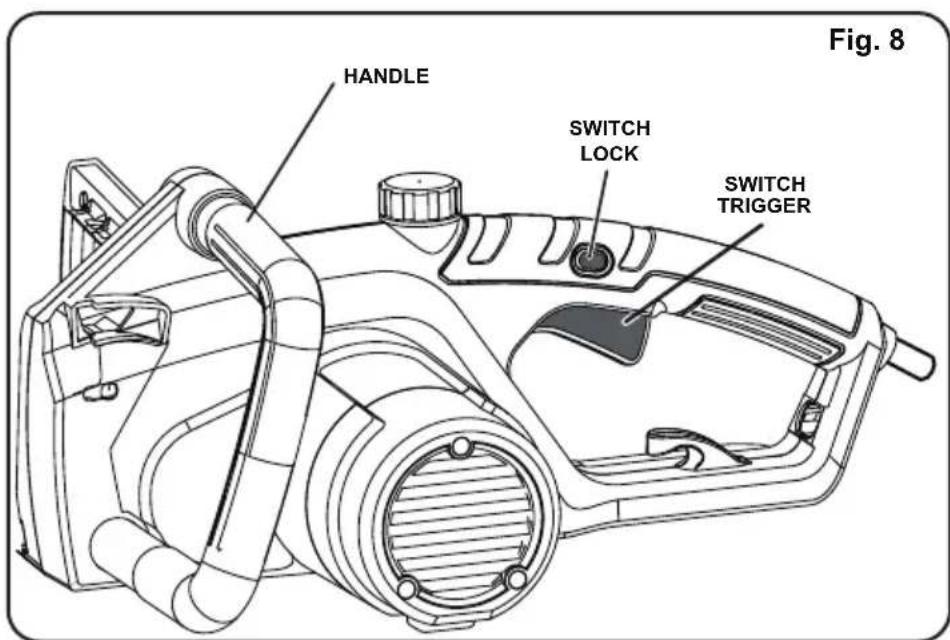
STARTING AND STOPPING THE CHAINSAW (See Fig. 8)

WARNING
Keep body to the left of the chain line. Never straddle the saw or chain, or lean over past the chain line.
STARTING THE CHAIN SAW:
-
Make sure chain tension is at desired setting. Refer to Adjusting the Chain Tension in the Maintenance section of this manual.
-
Makesurethechaincoverlockknobistighttothechaincover.
-
Makesurenoobjectsorobstructionsareinimmediatevicinitywhichco with the bar and chain.
-
Press and hold the switch lock. This makes the trigger switch operational.
-
Press and hold the triggers switch, release the wetting, and press the button to trigger switch for continued operation.
STOPPING THE CHAINSAW:
NOTE: It is normal for the chain to coast toastop once the triggers switch is rea
-
Release the trigger switch to stop the chainsaw.
-
Upon release of the triggers switch, the switch clock will be automatically position.
PREPARING FOR CUTTING
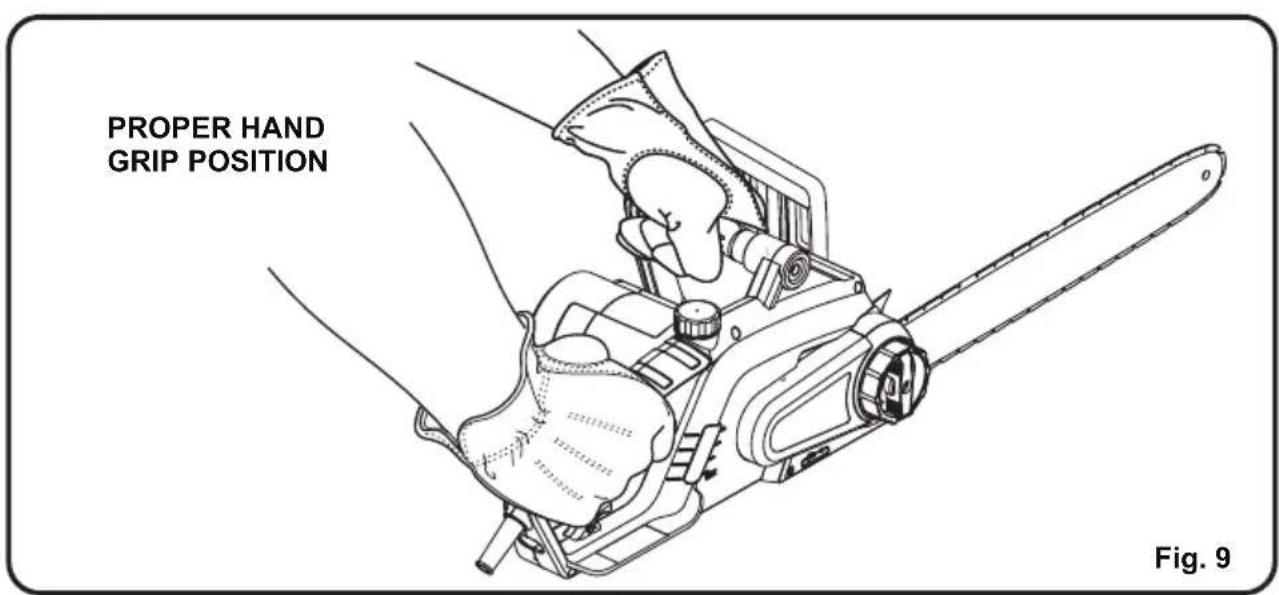
PROPER GRIP ON HANDLES (See Fig. 9)
See General Safety Rules for appropriate safety equipment.
- Wearnon-slipglovesformaximumgripandprotection.
- Hold the saw firmly with both hands. Always keep your left hand on the front handle and your right hand on therear handles so that your body is tothe left of the chair
- Maintain a proper grip on the saw whenever the motor is running. The fingers should encircle the handle, with the thumb wrapped under the handlebar. This gr to be broken by a kickback or other sudden reaction of the saw. Any grip in which the thumb and fingers are on the same side of the handle is dangerous, because a slight kick of the saw can cause loss of control.
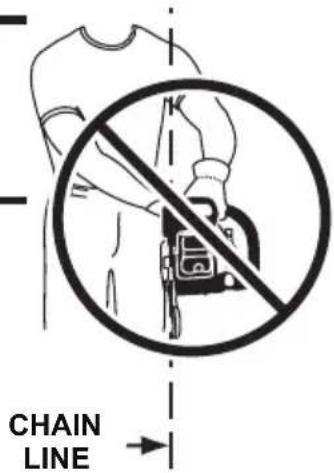
WARNING
Never use a left-handed (cross-handed) grip or any stance that would place your body or arm across the chain line.
WARNING
DO NOT operate the trigger switch with your left hand and hold the front handle with your right hand. Never allow any part of your body to be in the chain line while operating a saw.
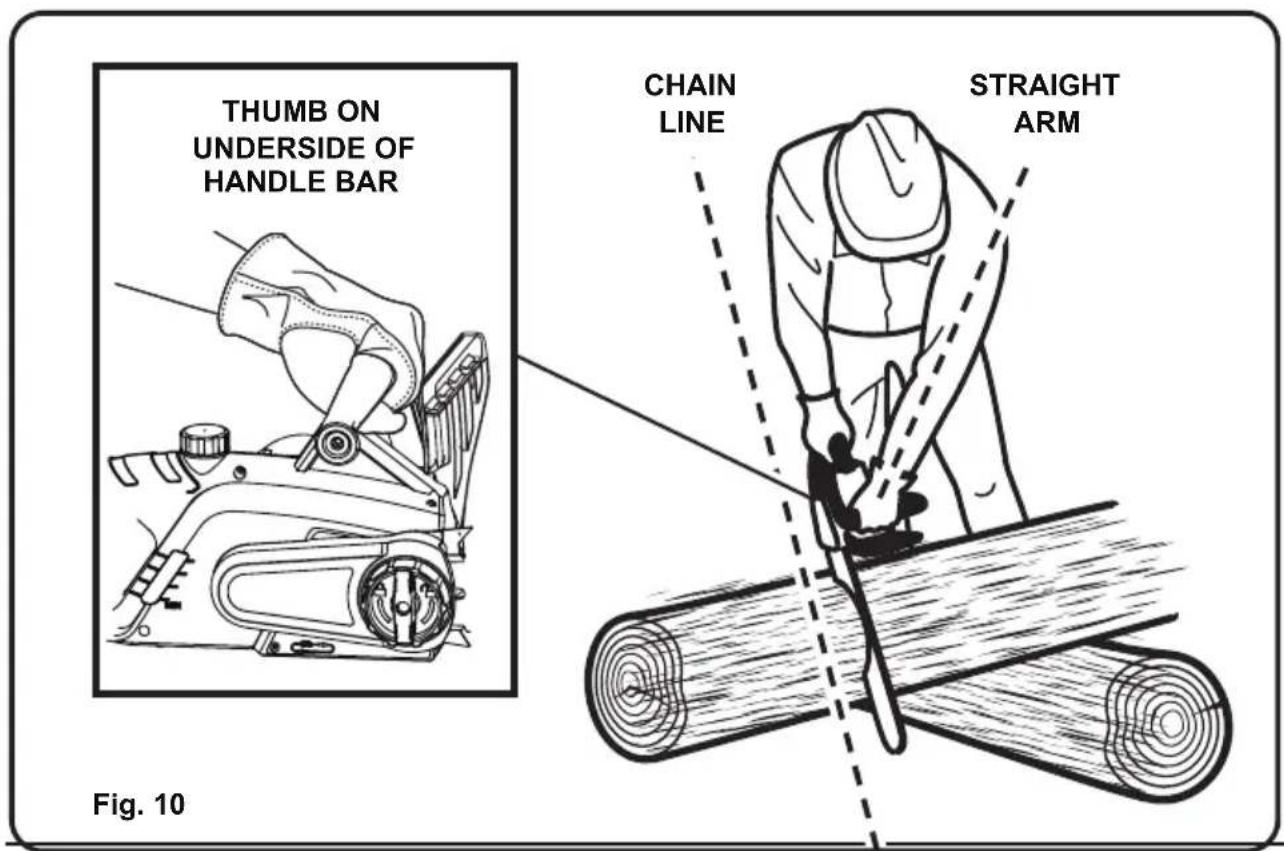
PROPER CUTTING STANCE (See Fig. 10)
Balance your weight with both feet on solid ground.
- Keepleftarmwithelbowlockedina “straightarm”positiontowithstandar
- Keep your body to the left of the chainline.
- Keep your thumb on underside of handlebar.
BASIC OPERATING/CUTTING PROCEDURES
Practice cutting a few small logs using the following technique to get the "feel" of using the saw before you begin a major sawing operation.
- Taketheproperstanceinfrontofthewoodwiththesawidling.
- Presstheswitchlockandsqueezezethetriggerswitch,thenreleaseswitch chain accelerate to full speed before entering the cut.
- Begin cutting with the saw against the log.
- Keep the unit running the entire time you are cutting, maintain a steady speed.
- Allow the chain out for you; exert only light downward pressure. Forcing the cut could result in damage to the bar, chain, or motor.
- Release the trigger switch as soon as the cut is completed, allowing the chain to stop. If you run the saw without a cutting load, unnecessary wear can occur to the chain, bar, and unit.
- Donotputpressureonthesawattheendofthecut.
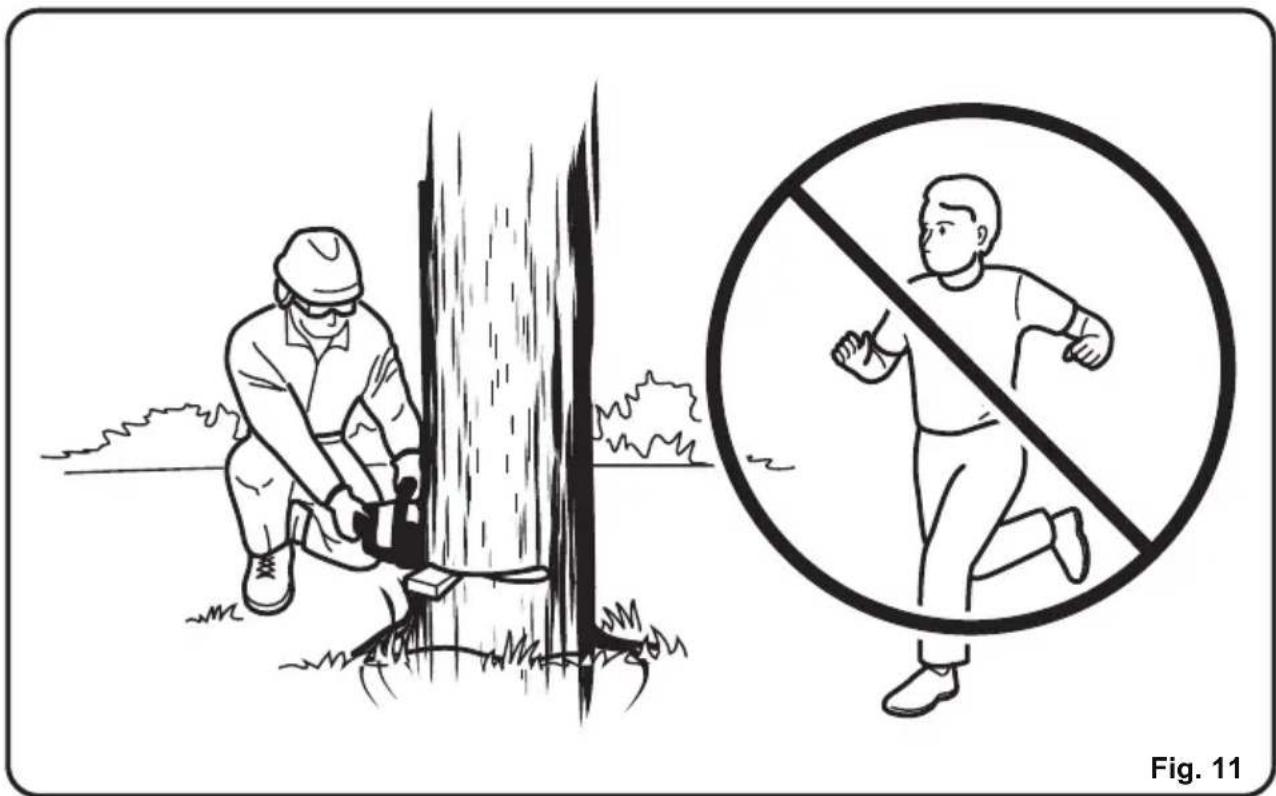
WORK AREA PRECAUTIONS (See Fig.11)
- Cutoonly wood or materials made from wood; nosheetmetal, no plastics, no wooden building materials.
- Never allow children to operate the saw. Allow no person to use this chains read this Owner's Manual or received adequate instructions for the safe and proper use of this chainsaw.
- Keep everyone - helpers, bystanders, children, and animals - a SAFE DISTANCE from the cutting area. During fellimgo phe saf distances should be a leasttwicethe h the largest trees in the felling area. During bucking operations, keep a minimum distance of 15' (4.6 m) between workers.
- Always cut with both feet on solid ground to prevent being pulled off balance.
- Do not cut above chest height, because a saw held higher is difficult to control against kickback forces.
- Do not fell trees near electrical wires or buildings. Leave this operation for professionals.
- Cutonlywhenvisibilityandlightareaadequateforyoutoseeclearly.
FELLING TREES
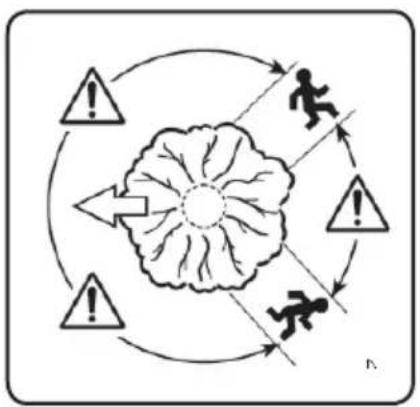
HAZARDOUS CONDITIONS (See Fig. 12)
When felling a tree, it is important that you heed the following warnings to prevent possible serious injury
TO AVOID KICKBACK
- Saw with guide bar at a flat angle.
- Never work with a loose, widely stretched or the heavily worn out chain.
- Ensure chain is sharpened correctly.
- Never saw above shoulder height.
- Never work with the tip of the guide bar.
- Always hold the product firmly with both hands.
Always use a low kickback chain. - Apply the steel bucking spikes for leverage.
- Ensure correct chain tension.
- Do only cut with the motor at high speeds.
- Do not let the nose of the guide bar contact a log, branch, or any other obstruction which could be hit while you are operating the product.
- Follow manufacturer's sharpening and maintenance instructions for the aw chain.
- Only use replacement guide bars and saw chains specified by the manufacturer or equivalent replacements.
When bucking and felling operations are being performed by two or more persons at the same time, the felling operations should be separated from the bucking operation by a distance of at least twice the height of the tree being felled.
Trees should not be felled in a manner that would endanger any
person, strike any utility line or cause any pro perty damage. If the tree does make contact with any utility line, the company should be notified immediately.
The product operator should keep on the uphill side of the terrain as the tree is likely to roll or slide downhill after it is felled.
- Donotcutdowntrees having anextremelean, orlargetreeswithrotten or hollow trunks. Have these trees pushed or dragged down with heavy equipment, then cut them up.
- Donotcuttreesnearelectricalwiresorbuildings
- Check the tree for damaged or dead branches that could fall and hit you during felling
Periodically glance at the top of the tree during the back cut to assure the fall in the desired direction
If the tree starts to fall in the snow, it will be saw gets caught or hung up during the fall, leaving the trees away from your feet!

WARNING
Do not fell trees during periods of high wind or heavy precipitation. Wait until the hazardous weather has ended.
PROPER PROCEDURE FOR TREE FELLING (See Fig. 13)
- Felling a tree — When bucking and felling operations are being performed by two or more persons at the same time, the falling operations should be separated from operation by a distance of at least twice the height of the tree being felled. be felled in a manner that would endanger any person, strike any utility line, or cause any property damage. If the tree does make contact with any utility line, the utility line be notified immediately.
- Operators should keep on the up hill side of terrain a stethreeis likely toroll felled.
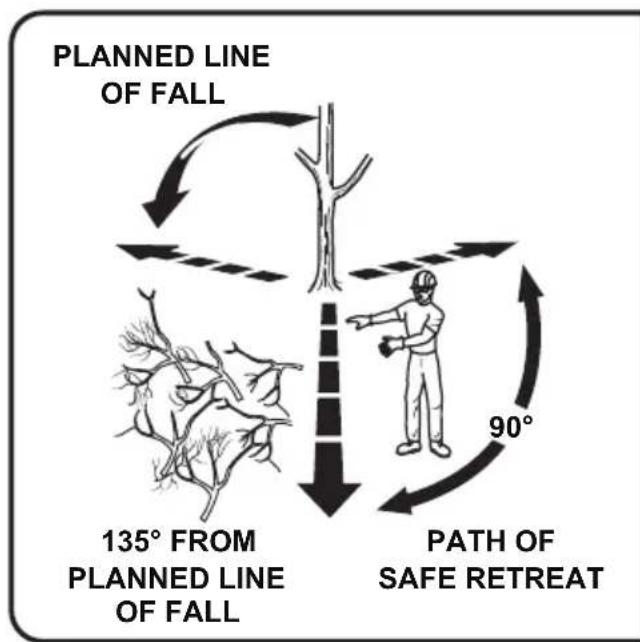
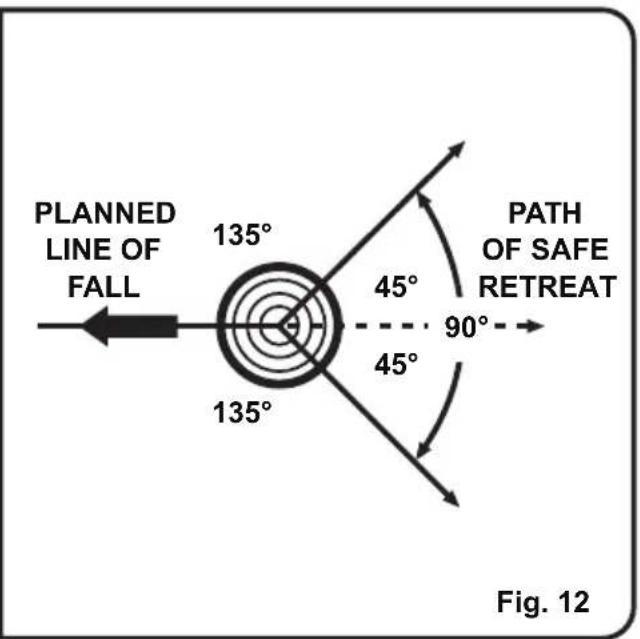
- Pick your escape route (or routes in case the intended route is blocked). Clear the immediate area around the tree and make sure there are no obstructions in your planned path of retreat. Clear the path of safe retreat approximately 135^ from the planned line of fall.
An escape path should be planned and cleared as necessary before cuts are started.
The escape path should extend back and diagonally to the rear of the expected line of fall (Fig. 26). Before felling is started, consider the natural lean of the tree, the location of larger branches and the wind direction to judge which way the tree will fall.
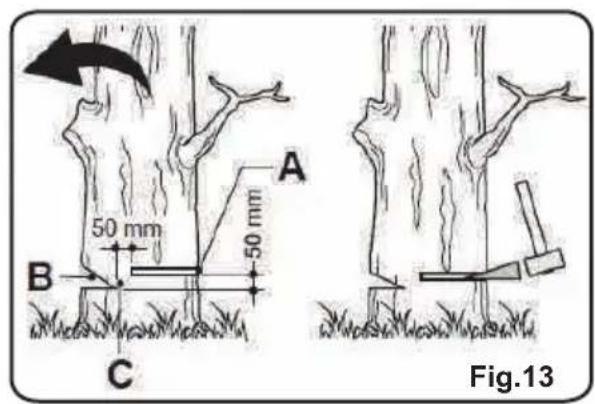
NOTCHING UNDERCUT
Make the notch (B) 1/3 the diameter of the tree, perpendicular to the direction of falls (Fig. 13).
Make the lower horizontal notching cut first. This will help to avoid pinching either the saw chain or the guide bar when the second notch is being made.
FELLING BACK CUT
Make the felling back cut (A) at least 50~mm higher than the horizontal notching cut (Fig. 13). Keep the felling back cut parallel to the horizontal notching cut. Make the felling back cut so enough wood is left to act as a hinge. The hinge wood keeps the tree from twisting and falling in the wrong direction. Do not cut through the hinge.
As the felling gets close to the hinge, the tree should begin to fall. If there is any chance that the tree may not fall in desired direction or it may rock back and bind the saw chain, stop cutting before the felling back cut is complete and use wedges of wood, plastic or aluminium to open the cut and drop the tree along the desired line of fall.
When the tree begins to fall remove the product from the cut, stop the motor, put the product down, then use the retreat path planned. Be alert for overhead limbs falling and watch your footing.
Limbing is removing the branches from a fallen tree. When limbing leave larger lower limbs to support the log off the ground. Remove the small limbs in one cut.
Branches under tension should be cut from the bottom up to avoid binding the product.
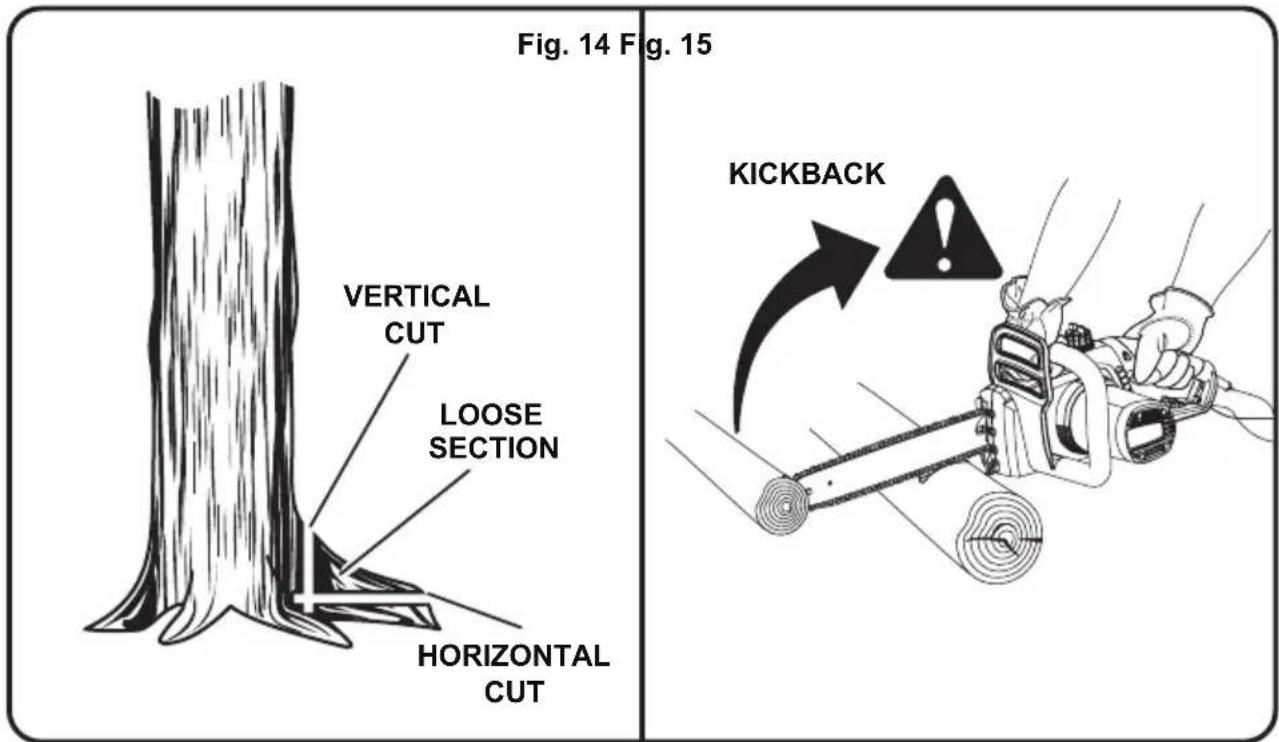
REMOVING BUTTRESS ROOTS (See Fig. 14)
A buttress root is a large root extending from the trunk of the tree above the ground. Remove large buttress roots prior to felling. Make the horizontal cut into the buttress first, followed by the vertical cut. Remove the resulting loose section from the work area. Follow the correct tree felling procedure as stated in Proper Procedure For Tree Felling after you have removed the large buttress roots.
BUCKING (See Fig. 15)
Bucking is the term used for cutting a fallen tree to the desired log length.
- Always makes sure your footing is secure and your weight is distributed evenly.
- Cutonlyoneologatatime.
- Support small logs on a saw horse or another log while bucking.
- Keep a clear cutting area. Makes sure no objects can contact the guideba during cutting, because this can cause kickback.
- When bucking on a slope, always stand on the uphill side of the log. To maintain complete control of the chainsaw when cutting the butt, presssure near the end of the cut without relaxing your grip on the chainsaw handles. Don't contact the ground. After completing the cut, wait for the saw to stop move the chainsaw. Always stop the motor before moving from tree to tree.
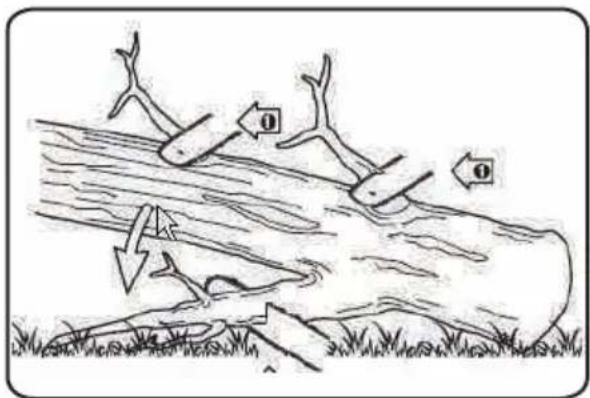
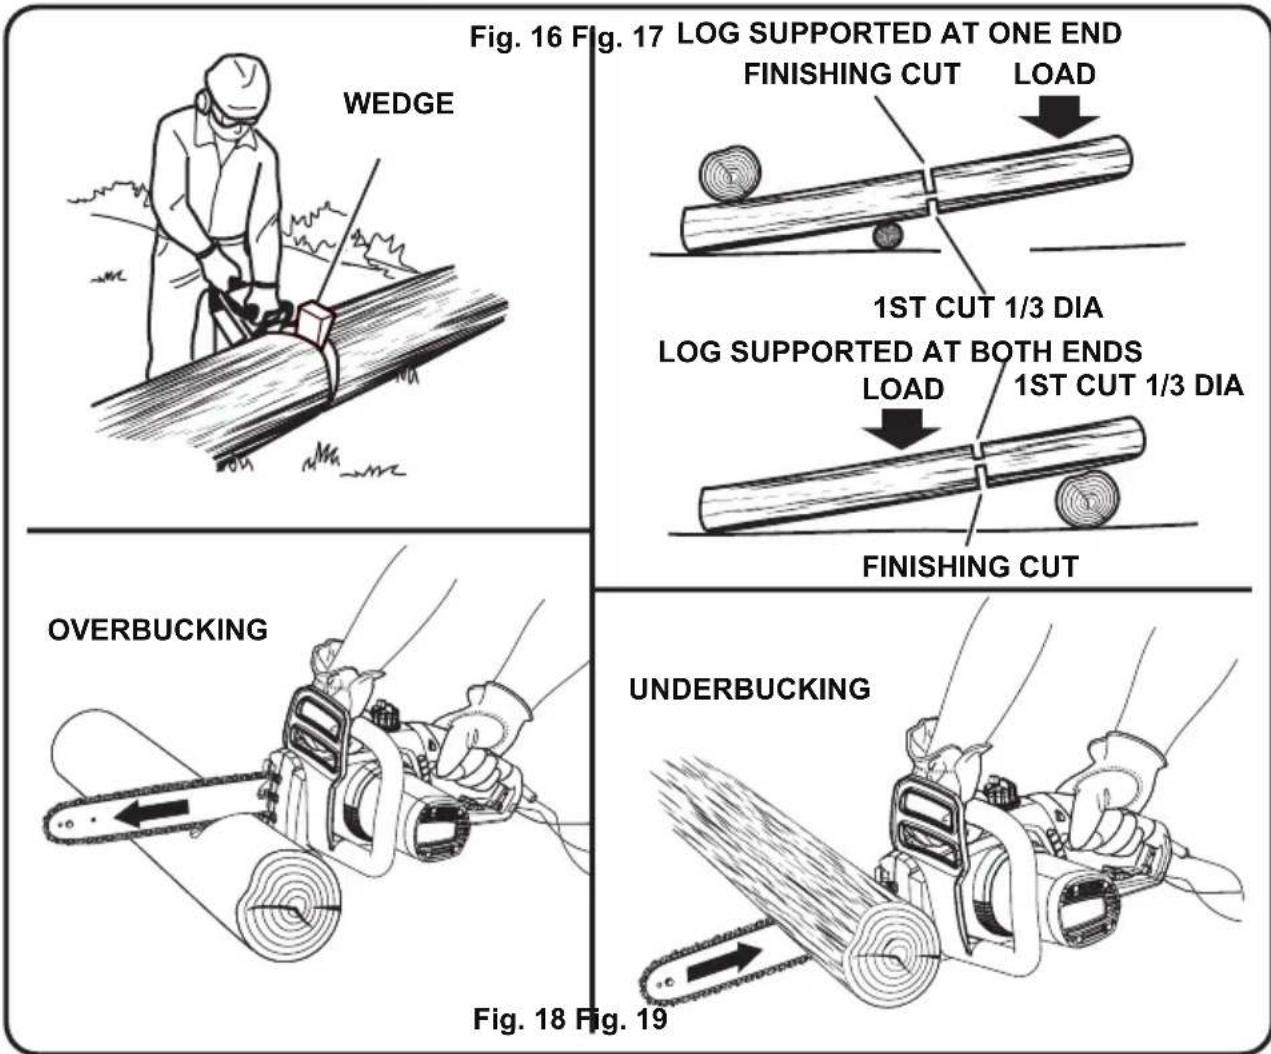
BUCKINGWITHAWE (Fig. 16)
If the wood diameter is large enough for you to insert a soft bucking wedge without touching the chain, you should use the wedge to hold the cut open to prevent pinching.
BUCKINGLOGSUNDERST (ReS17)
Make the first bucking cut 1/3 of the way through the log, and finish with a 2/3 cut on the opposite side. As you cut the log, it will tend to bend. The saw can become pinched or hung in the log if you make the first cut deeper than 1/3 of the diameter of the log. Give special attention to logs under stress to prevent the bar and chain from pinching.
OVERBUCKING (See Fig. 18)
Begin on the top side of the log with the bottom of the saw against the log; exert light pressure downward. Note that the saw will tend to pull away from you.
UNDERBUCKING (See Fig. 19)
Begin on the under side of the log with the top of the saw against the log; exert light pressure upward. During underbucking, the saw will tend to push back at you. Be prepared for this reaction, and hold the saw firmly to maintain control.
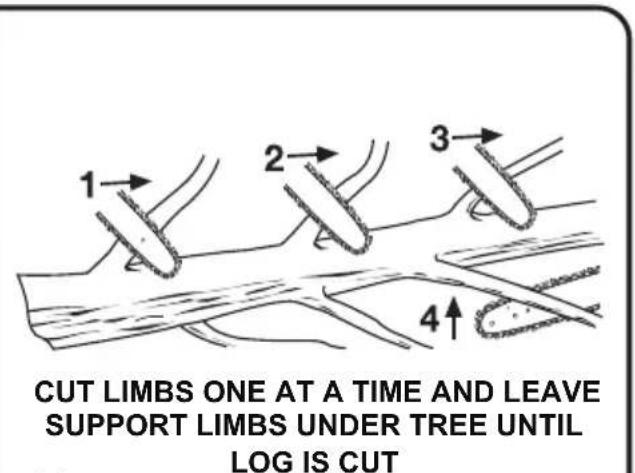
LIMBING (See Fig. 20)
Limbing is removing branches from a fallen tree.
- Work slowly, keeping both hands on the chainsaw with a firm grip. Always make sure your footing is secure and your weight is distributed evenly on both feet.
- Leavethelargersupportlimbsunderthetreetokeepthetreeofftheground
- Limbs should be cut one at a time. Remove the cut limbs from the work area often to help keep the work area clean and safe.
- Branches under tension should be cut from the bottom up to avoid binding the chainsaw.
- Keep the tree between you and the chains saw while climbing. Cut from the side opposite the branch you are cutting.
PRUNING (See Fig. 21)
Pruning is trimming limbs from a live tree.
- Work slowly, keeping both hands on the chainsaw with a firm grip. Always make sure your footing is secure and your weight is distributed evenly on both feet.
- Do not cut from a ladder. This is extremely dangerous. Leave this operation for professionals.
- Do not cut above chest height, because a saw held higher is difficult to control against kickback.
- When pruning trees, it is important not to make the finishing cut next to the main limb or trunk until you have cut off the limb further out to reduce the weight. This prevents stripping the bark from the main member.
- Underbuck the branch 1/3 through for your first cut.
- Your second cut should cover bucktodrop the branchoff.
- Now make your finishing cut smoothly and neatly against the main member so the bark will grow back to seal the wound.
WARNING
Never cut through to the notch when making a back cut. The hinge controls the fall of the tree. This is the section of wood between the notch and backcut.
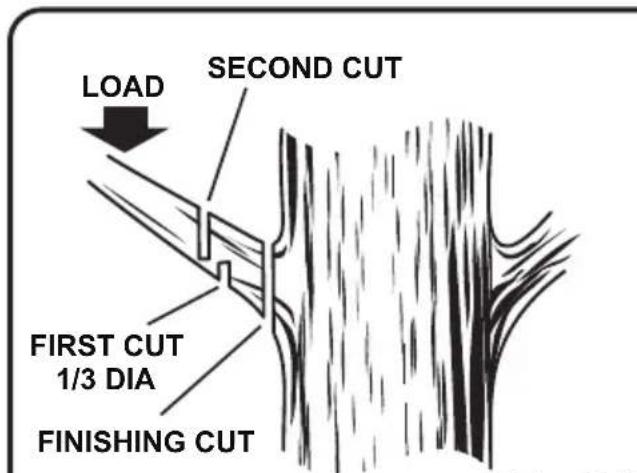
Fig. 20 Fig. 21
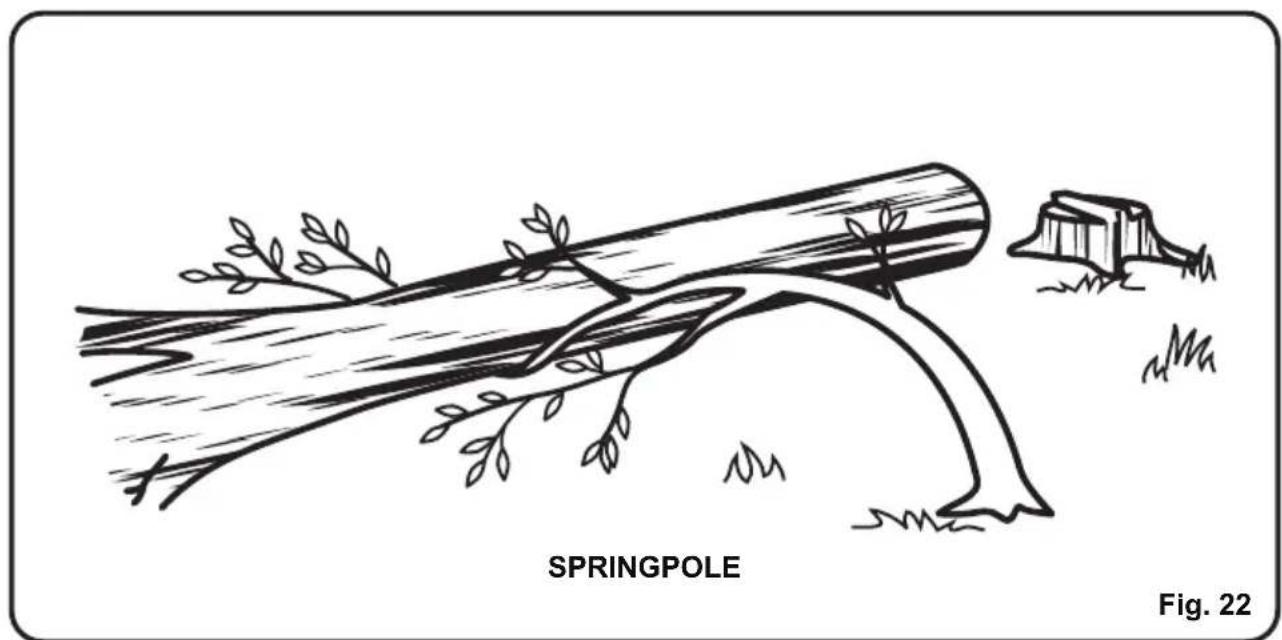
CUTTING SPRINGPOLES (See Fig. 22)
A springpole is any log, branch, rooted stump, or sapling that is bent under tension by other wood, so that it springs back if the wood holding it is cut or removed. On a fallen tree, a rooted stump has a high potential of springing back to the upright position during the bucking cut to separate the log from the stump. Watch out for springpoles — they are dangerous.

WARNING
Springpoles are dangerous, and could strike the operator, causing the operator to lose control of the chainsaw. This could result in severe or fatal injury to the operator.

WARNING
When servicing, use only identical LawnMaster replacement parts OR suggested replacement parts by LawnMaster. Use of any other parts may create a hazard or cause product damage.

WARNING
Always wear safety goggles or safety glasses with side shields during power tool operation or when blowing dust. If operation is dusty, also wear a dust mask.
GENERAL MAINTENANCE
Avoid using solvents when cleaning plastic parts. Most plastics are susceptible to damage from various types of commercial solvents. Use a clean cloth to remove dirt, dust, lubricant, grease, etc.

WARNING
Do not let brake fluids, gasoline, petroleum-based products, penetrating lubricants, etc., come into contact with plastic parts at any time. Chemicals can damage, weaken or destroy plastic, which may result in serious personal injury.
LUBRICATION
All of the bearings in this product are lubricated with a sufficient amount of high-grade lubricant for the life of the unit under normal operating conditions. Therefore, no further lubrication is required.
Switch the product off, remove the battery pack and let it cool down
Check, clean and store the product as described below
Keep the product clean. Remove debris from it after each use and before storage.
Regular and proper cleaning will help ensure safe use and prolong the life of the product.
Inspect the product before each use for worn and damaged parts.
Do not operate it if you find broken and worn parts.
GENERAL CLEANING
Clean the product with a slightly damp cloth and mild soap. Use a brush for areas that are hard to reach. In particular clean the air vents (4) after every use with a cloth and brush.
Remove stubborn dirt with high pressure air (max. 3 bar).
Check for any damage and wear. Repair damages in accordance with this instruction manual or take it to an authorised service centre before using the product again.
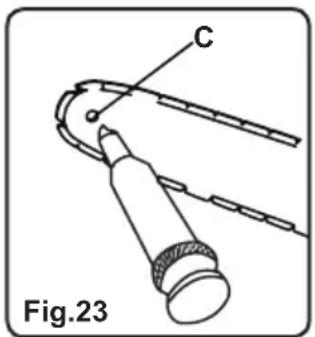
SPROCKET NOSE
Clean the sprocket nose (7). Using a disposable lube gun, insert the needle nose into the lubrication hole (C) and inject grease until it appears at the outside edge of the sprocket (Fig. 23).
Rotate the saw chain (5) by hand. Repeat the lubrication procedure until the entire sprocket has been greased.
GUIDE BAR AND SAW CHAIN MAINTENANCE
Most guide bar problems can be prevented merely by keeping the product well maintained. Incorrect filing and non-standard cutter and depth gauge settings are the causes of most guide bar problems, primarily resulting in uneven bar wear. As the bar wears unevenly, the rails widen, which may cause the chain to clatter and make it difficult to complete straight cuts. If the guide bar is insufficiently lubricated and the product is operated with a saw chain which is too tight, this will contribute to rapid bar wear. To help minimise bar wear, maintenance of the guide bar as well as the saw chain is recommended.
Disassemble the guide bar and saw chain in >>reversed order from assembly.
Check the oiling port (16) for clogging and clean >>if necessary to ensure proper lubrication of the guide bar and saw chain during operation. Use a soft wire small enough to insert into the oil discharge hole
REPLACING THE GUIDE BAR AND CHAIN(See Fig. 24 - 32.)

DANGER
Never start the motor before installing the guide bar, chain, chain cover, and chain cover lock knob. Without all these parts in place, the clutch can fly off or explode, exposing the user to possible serious injury.

WARNING
To avoid serious personal injury, read and understand all the safety instructions in this section.

WARNING
Before performing any maintenance, make sure the tool is unplugged from the power supply. Failure to heed this warning could result in serious personal injury.

CAUTION
Always wear gloves when handling the bar and chain. These components are sharp and may contain burrs.

WARNING
Never touch or adjust the chain while the motor is running. The saw chain is very sharp. Always wear protective gloves when performing maintenance involving the chain to avoid possible serious lacerations.
NOTE: When replacing the guide bar and chain, always use the specified bar and chain listed in the Bar and Chain Combinations section later in this manual.
WARNING
Keep all parts of the body away from the saw chain when the chain saw is operating. Before you start the chain saw, make sure the saw chain is not contacting anything. A moment of inattention while operating chain saws may cause entanglement of your clothing or body with the saw chain.
WARNING
Always hold the chain saw with your right hand on the rear handle and your left hand on the front handle. Holding the chain saw with a reversed hand configuration increases the risk of personal injury and should never be done.
WARNING
Always use a saw chain designed as "low-kickback" or a saw chain which meets the low-kickback requirements! A standard saw chain (a chain which does not have the kickback reducing guard links) should only be used by an experienced professional operator!
Nevertheless, a low-kickback saw chain does not completely eliminated kickback! A low-kickback or "safety" chain should never be regarded as complete protection against injury!
Therefore always use a low-kickback saw chain in conjunction with other kickback protection devices such as the front hand guard!
Use only the guide bar (6) and saw chain (5) according to the technical data of the product.
Place the product on a suitable flat surface.
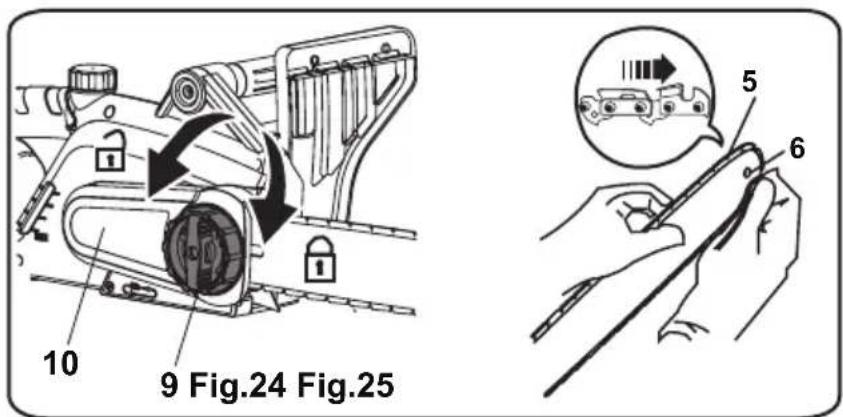
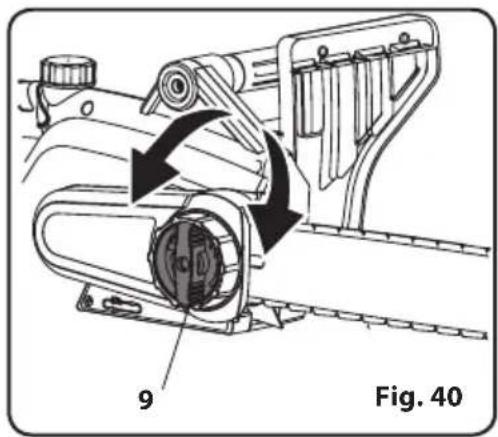
Loosen the locking wheel (9) and remove the side cover (10) (Fig. 24).
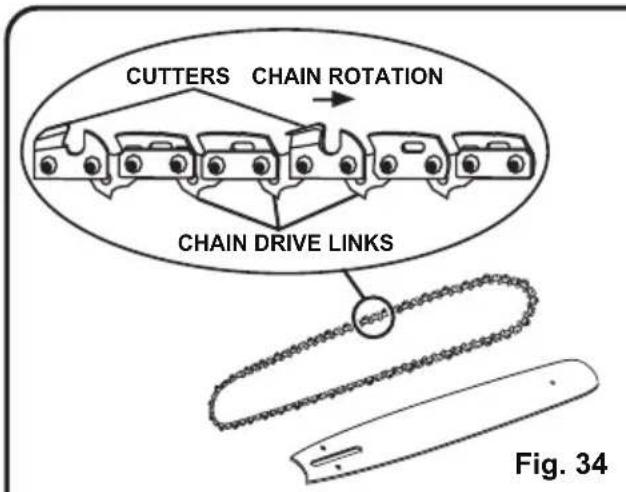
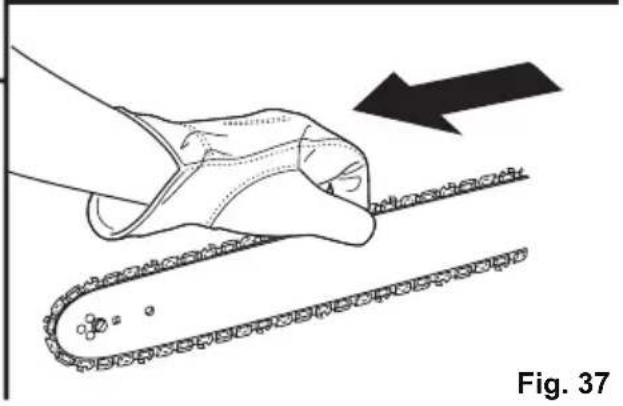
Spread the saw chain (5) out with the cutting edges of the chain pointing in the rotational direction
SAW CHAIN TENSIONING
Always check the saw chain tension before use and regularly during use approx. every five cuts. Upon initial operation, new chains can lengthen considerably. This is normal during the break-in period and the interval between future adjustments will lengthen quickly.
SET THE PRODUCT ON A SUITABLE FLAT SURFACE.
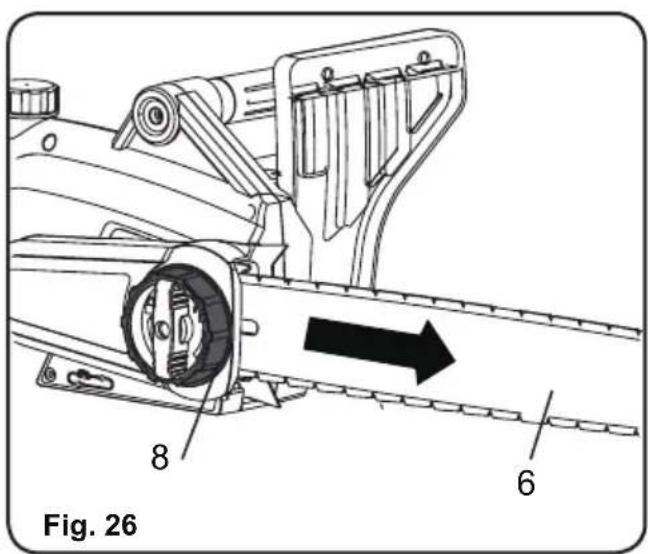
Turn the tension wheel (8) until the chain "tie straps" are just touching the bottom edge of the guide bar (6) (Fig. 26).
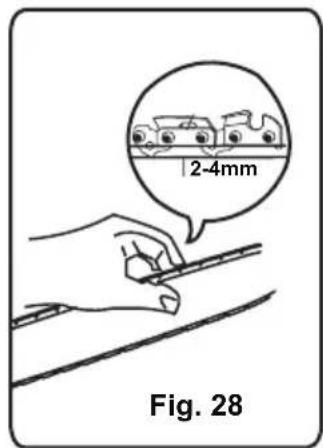
TENSION TEST
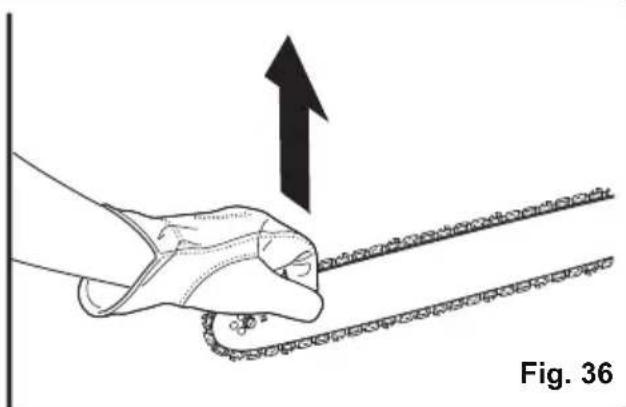
Check the chain tension using one hand to lift the saw chain (5) against the weight of the product. The correct chain tension is achieved when the saw chain can be lifted by approximately 2 - 4 mm from the guide bar (6) in the centre (Figs. 27-28).
Adjust the tension if you find that the chain saw is too loose or tight
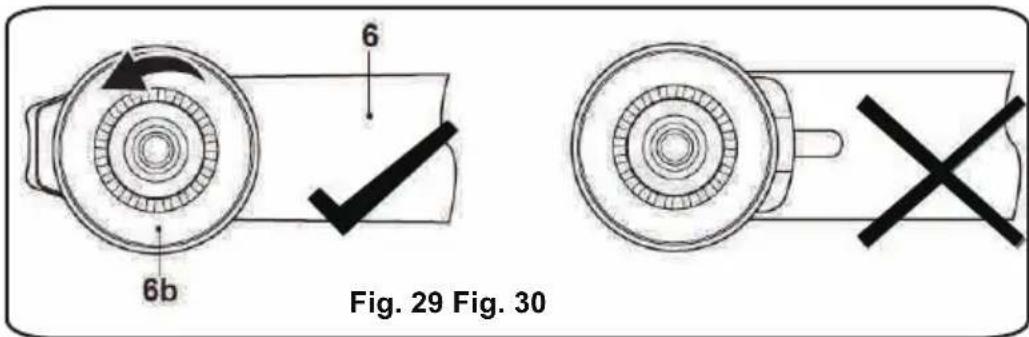
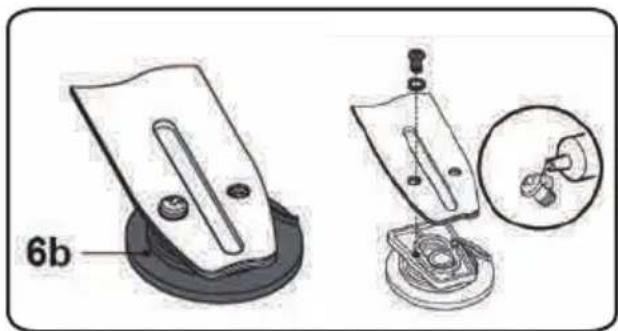
Ensure the tension disc (6b) is adjusted to outer right position, turn anticlockwise if required (Figs. 29-30).
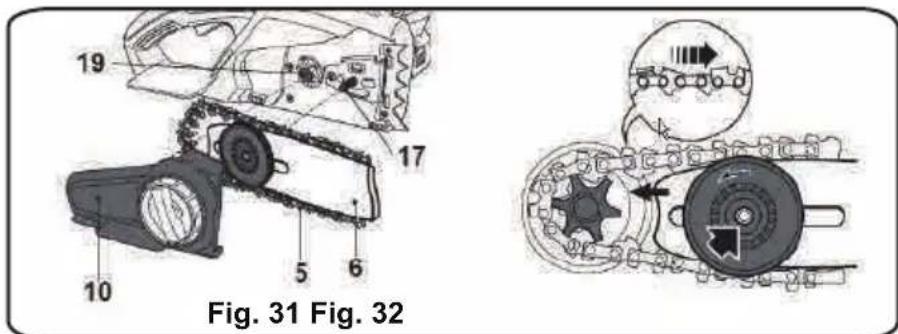
Align the guide bar (6) and saw chain (5) assembly with the drive sprocket (19) and support bolt (17). Lay the saw chain around the drive sprocket and then lower the guide bar to install it to the support bolt (Figs. 31-32).
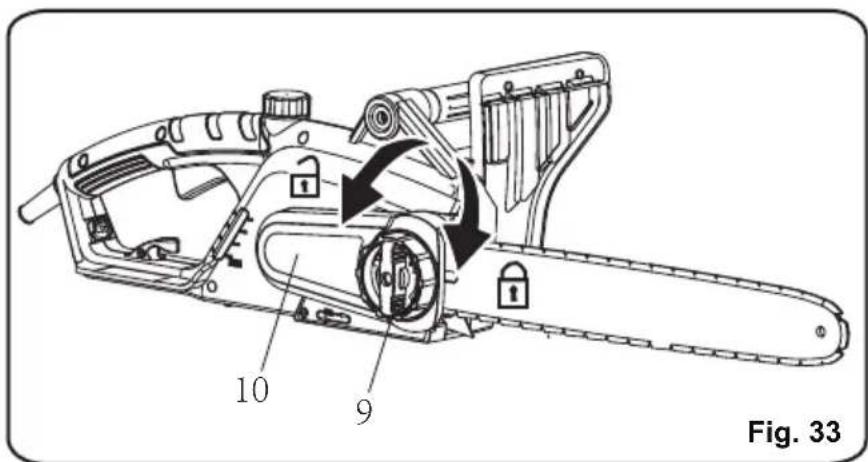
Replace the side cover (10) and slightly tighten the locking wheel (9) (Fig. 33). Do not tighten the locking wheel completely; saw chain tensioning is required first.
- Releasethetipoftheguidebar,andturnthechaintensioningknob1/2tur
- Holdthetipoftheguidebarupandtightenthechaincoverlockknob.
The chain is correctly tensioned when there is no sag on the underside of the guide bar, and when the chain is snug, but can be turned by hand without binding.
NOTE: If chain is too tight, it will not rotate. Loosen the chain cover lock knob slightly, and tensioning knob 1/4 turn counter-clockwise. Lift the tip of the guide bar up, and retight the knob. Ensure that the chain will rotate without binding.

WARNING
Never touch or adjust the chain while the motor is running. The saw chain is very sharp. Always wear protective gloves when performing maintenance involving the chain.
- Turnthechaintensioningknobclockwisetotensionthechain.
NOTE: A cold chain is correctly tensioned when there is no slack on the underside of the g is snug, and it can be turned by hand without binding.
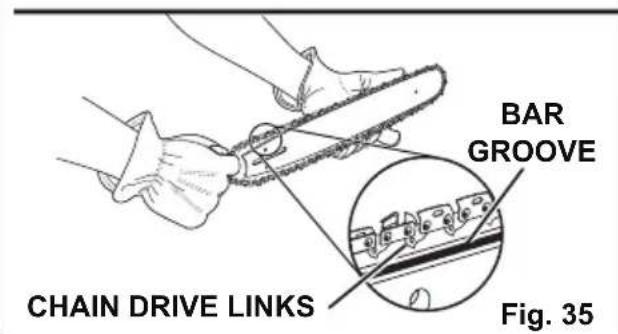
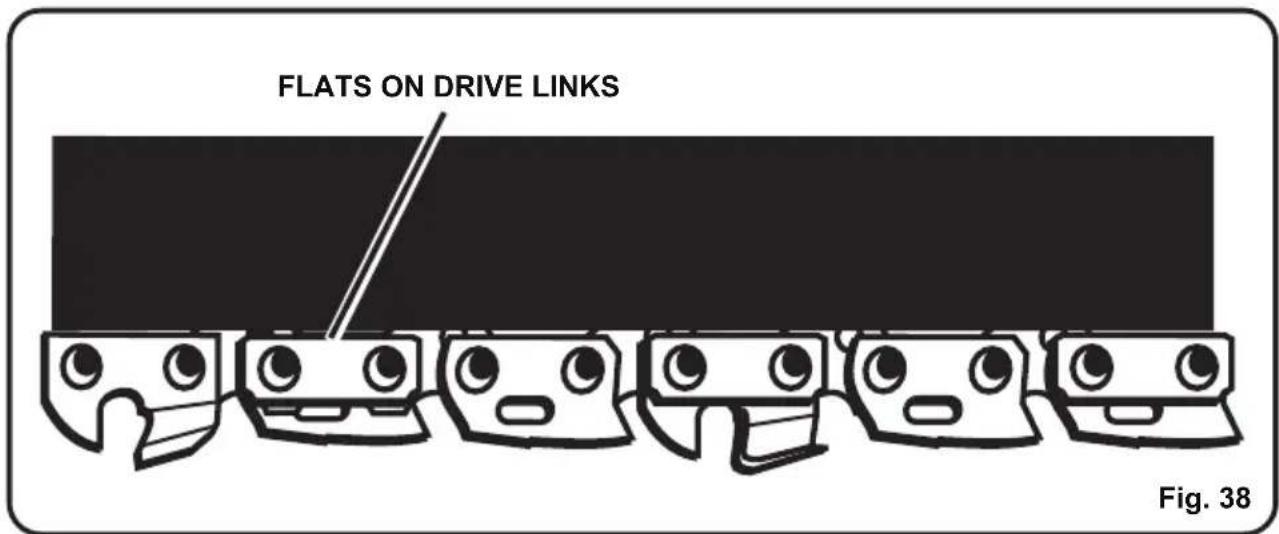
- Rotate the chain cover lock knob clockwise to secure. Retension the chain whenever the flats on the drivelink shang out of the bargroove.
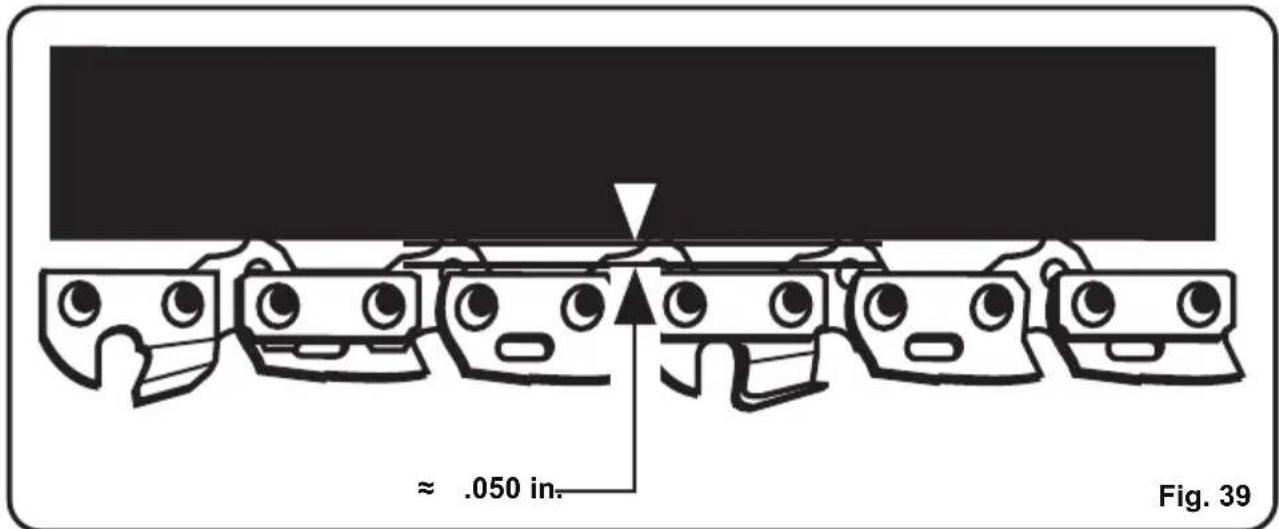
NOTE: During normal saw operation, the temperature of the chain increases. The drive links of a correctly tensioned warm chain will hang approximately 1/16" (1.3 mm) out of the bargroove.
NOTE: New chains tend to stretch. Check the chain tension frequently and tension as required.
CAUTION
A chain tensioned while warm may be too tight upon cooling.
Check the "cold tension" before next use.
Turn the locking wheel (9) to tighten the side >>cover (10) completely (Fig. 40).
Do not overfill. Leave approximately 5mm of space to the lower edge to allow the lubricant to expand (Fig. 41).
Check the oil level at the window of the oil tank (11) prior to switching on and regularly during operation. Refill oil when the oil level is lower than the "MIN" marking (Fig. 42).
Wipe up spilled lubricant with a soft cloth and refit the tank cap (11a).
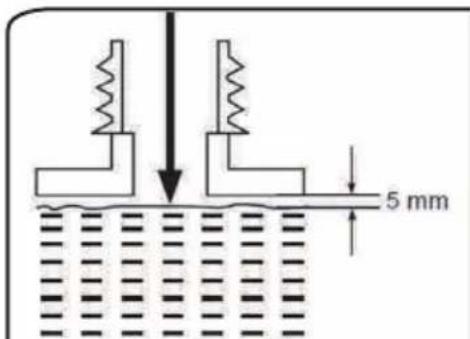
Fig. 41
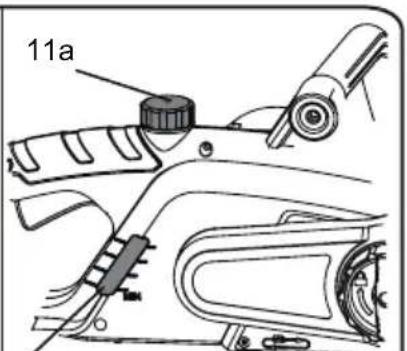
Fig. 42
ake sure the guide bar (6) and the saw chain (5) are in place when you check the oil delivery. Switch on the product (see section "on/off switch" below); keep pressing the on/off switch (13) and check if the chain oil is delivered as shown in the figure (Fig. 43)
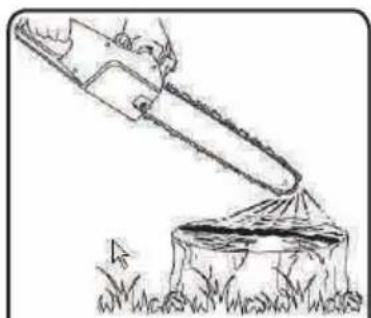
Fig. 43
CARE AND MAINTENANCE
Check the drive sprocket (19). If it is worn or damaged due to strain, have it replaced by an authorised service agent.
Clear residue from the rails on the guide bar (6) using a screwdriver, putty knife, wire brush or other similar tool. This will keep the oil passages open to provide proper lubrication to the bar (6) and chain (5).
Check the guide bar 'rail' for wear: Hold a ruler (straight edge) against the side of the guide bar and 'cutter side plates'. If there is a gap between the ruler and guide bar the guide bar 'rail' is normal. If there is no gap (ruler flush against the side of the guide bar) the guide bar 'rail' is worn and needs to be replaced with a new one of the same type.
Turn the guide bar 180^ to allow even wear, thereby extending the life span of the guide bar (6). Loosen the screw and remove the tension disc (6b) from the guide bar.
Ensure the rubber washer on the screw is free of wear. Turn the guide bar and fix the tension disc with the screw. Apply a drop of suitable glue to the screw to ensure its safe positioning when reassembly.

CAUTION
Make sure the chainsaw is disconnected from the power supply before you work on the saw.
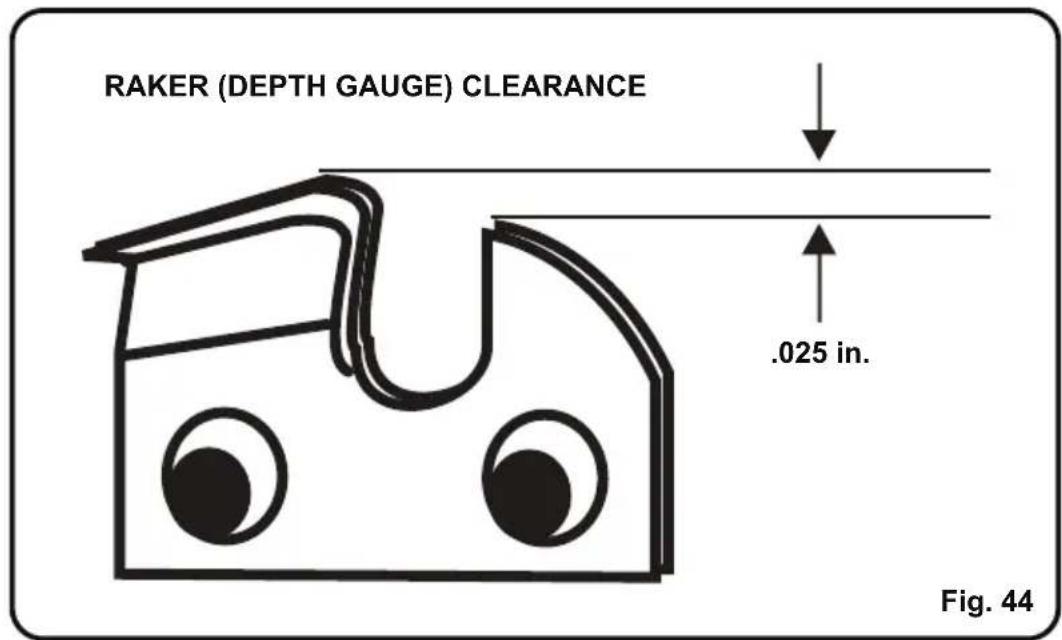
CHAIN MAINTENANCE (See Fig. 44)
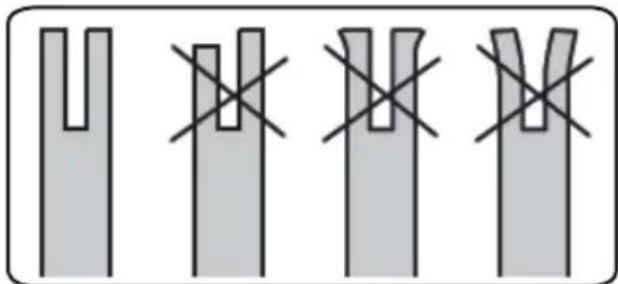
Use only a low-kickback chain on this saw. This fast-cutting chain provides kickback reduction when properly maintained. For smooth and fast cutting, maintain the chain properly. The chain requires sharpening when the wood chips are small and powdery, the chain must be forced through the wood during cutting, or the chain cuts to one side. During maintenance of the chain, consider the following:
- Improper filing angle of the side plate can increase the risk of severe kickback.
Raker (depth gauge) clearance. - Toolowincreaseesthepotentialforkickback.
- Not low enough decreases cutting ability.
- If the cutter teeth hithard objectssuchas nails sandstones, orare abrad sand on the wood, have an authorized service centre sharpen the chain.
NOTE: Inspect the drives sprocket for wear or damage when replacing the chain. If sign so are present in the areas indicated, have the drive sprocket replaced by an authorized service centre.
NOTE: If you don't fully understand the correct procedure for sharpening the chain after instructions that follow, have the saw chain sharpened by an authorized service centre or replace with a recommended low-kickback chain.
Check the saw chain for possible wear and damages. Replace it with a new one if required. Experienced user can sharpen a dull saw chain (see section "Saw chain sharpening" below). Refit the saw chain (5) and the guide bar (6) as described under "Assembly".
SAW CHAIN SHARPENING
Have your chain (5) sharpened professionally at an authorised service centre, or sharpen the chain yourself by using a proper sharpening kit. Also observe the sharpening instructions supplied with the sharpening kit.
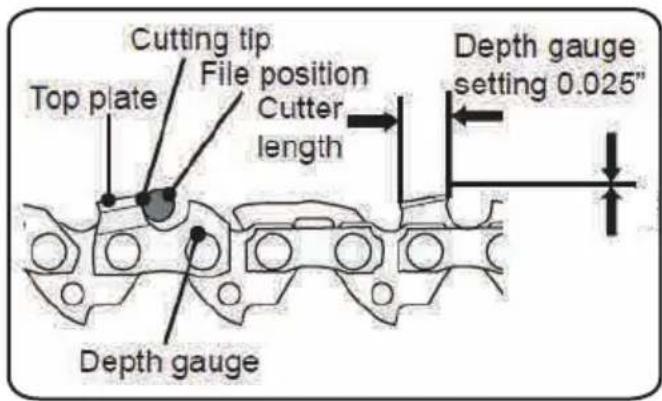
The height difference between the tooth and the ridge is the cutting depth.
When sharpening the saw chain (5) you have to consider the following points
File angle
Cutting angle
File position
- Diameter of round file
- File
To sharpen the chain proceed as follows:
- Use protective gloves.
- Ensure the chain is correctly tensioned.
- Engage the chain brake to lock the chain on the bar.
Use a round file, whose diameter is 1.1 times the cutting tooth depth. Make sure 20% of the file diameter is above the cutter's top plate.
A file guide is available from most reputable tool merchants and is the easiest way to hold the file at the correct position.
File at an angle perpendicular to the bar, and at an angle of 25^ to the direction of travel
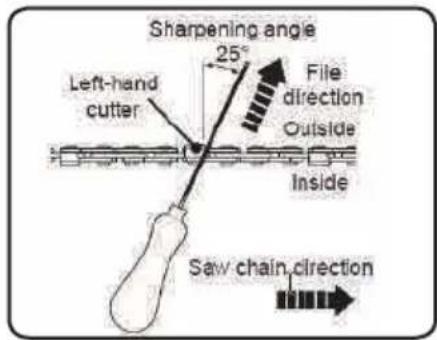
File each tooth from the inside towards outside only.
File one side of the chain first than turn the saw around and repeat the process.
Sharpen each tooth equally by using the same number of strokes.
Keep all cutter lengths equal. Check the safety depth gauge height every 5 sharpenings.
If the depth gauges are also trimmed it is essential that the original profile is restored.
Use a depth gauge measuring >>instrument to check the height of the depth gauge.
Depth gauge measuring jigs are available from most reputable tool merchants
This product does not contain any parts that can be repaired by the consumer.
Contact a qualified specialist to have it checked and repaired. lean the product as described above.
STORAGE
Store the product and its accessories in a dry, frost-free place.
Always store the product in a place that is inaccessible to children. The ideal storage temperature is between 10 and 30^ .
We recommend using the original package for storage or covering the product with a suitable cloth or enclosure to protect it against dust.
TRANSPORTATION
Switch the product off and remove the battery pack before transporting it anywhere.
Attach the blade cover to the saw blade. Attach other transportation guards, if applicable.
Always carry the product by its gripping handles (1, 2).
Protect the product from any heavy impact or strong vibrations which may occur during transportation in vehicles.
Secure the product to prevent it from slipping or falling over.
| PROBLEM | CAUSE | REMEDY |
| Bar and chain running hot and smoking. | Check chain tension for over-tight condition. Chain-oil tank empty. | Plug in the power cord. |
| Motor runs, but chain is not rotating. | Chain tension too tight. Check guide bar and chain assembly. Check guide bar and chain for damage. | Retension chain, Refer to Adjusting Chain Tension earlier in this manual. Refer to Replacing Bar and Chain earlier in this manual. Inspect guide bar and chain for damage. |
| Motor runs,chain rotates but does not cut. | Dull chain. Chain on backwards. | Sharpen chain. Reverse direction of chain. |
We take pride in producing a high quality, durable product. This Lawnmaster® product carries a limited two (2) year warranty against defects in workmanship and materials from date of purchase under normal household use. If product is to be used for commercial, industrial or rental use, a 30 day limited warranty will apply. Batteries carry a one-year warranty against defects in workmanship and materials. Batteries must be charged in accordance with the operator's manual directions and regulations in order to be valid. Warranty does not apply to defects due to direct or indirect abuse, negligence, misuse, accidents, repairs or alterations and lack of maintenance. Please keep your receipt/packing list as proof of purchase. This warranty gives you specific legal rights, and you may have other rights, which vary from state to state. For product service call Customer Service at (866) 384-8432.
Items not covered by warranty :
- Any part that has become inoperative due to misuse, commercial use, abuse, neglect, accident, improper maintenance, or alteration;
- The unit, if it has not been operated and/or maintained in accordance with the owner's manual;
- Normal wear, except as noted below;
- Routine maintenance items such as lubricants, blade sharpening;
- Normal deterioration of the exterior finish due to use or exposure.
Transportation Charges : Transportation charges for the movement of any power equipment unit or attachment are the responsibility of the purchaser. It is the purchaser's responsibility to pay transportation charges for any part submitted for replacement under this warranty unless such return is requested in writing by LawnMaster.
SAVE YOUR RECEIPTS. THIS WARRANTY IS VOID WITHOUT THEM.
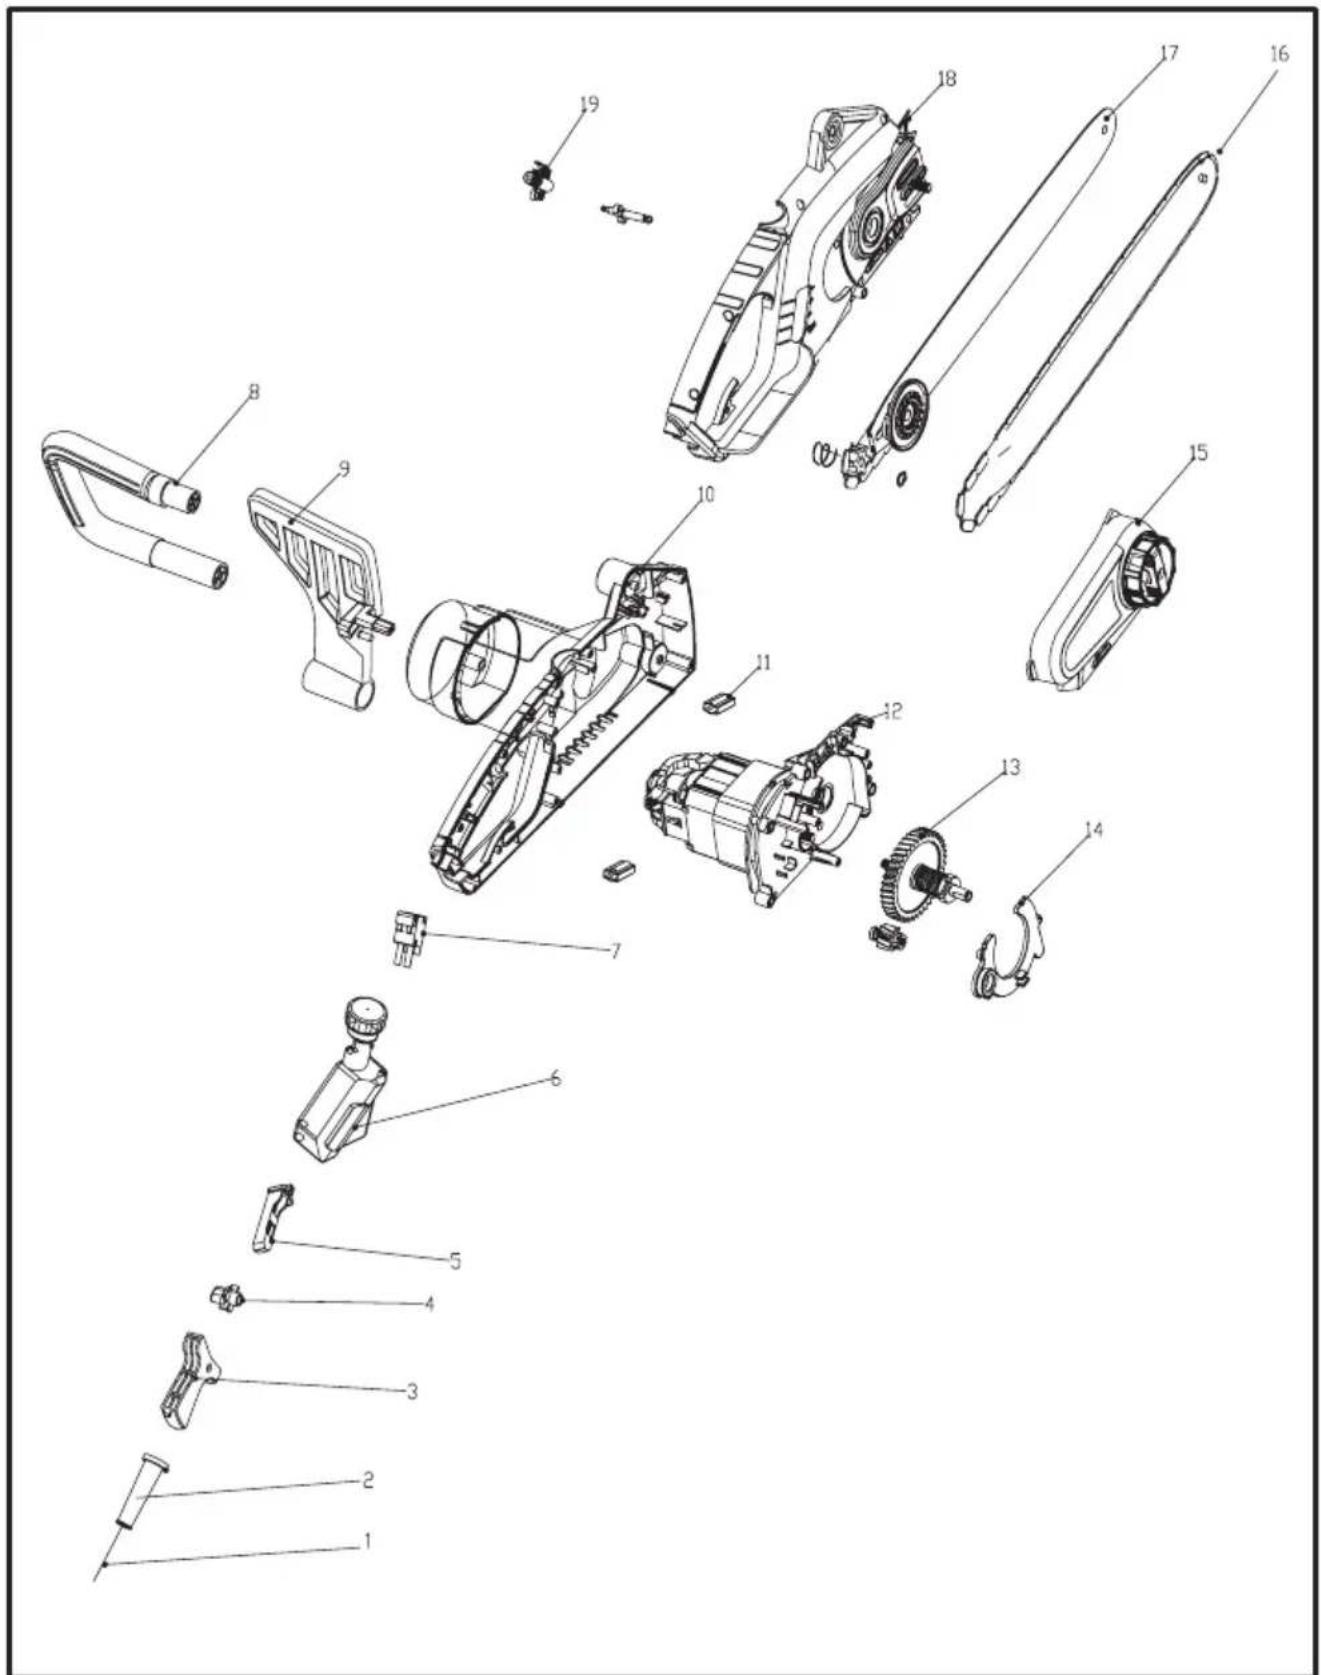
| CS1216 Manual Parts List | |||
| Key Number | Drawing Number | Description Quantity | |
| 1 | 171-7J13002 | Power Cord | 1 |
| 2 | 196-7J11601 | Shield Sleeve | 1 |
| 3 | 293-7J13001 | Switch Button | 1 |
| 4 | 293-7J13002 | Button Assy | 1 |
| 5 | 235-7J13001 | Push Button | 1 |
| 6 | 324-7J13001 | Oil Resevoir | 1 |
| 7 | 139-7J13001 | Swith Assembly | 1 |
| 8 | 297-7J13001 | Top Handle | 1 |
| 9 | 216-7J13001 | Front Handle Guard | 1 |
| 10 | 303-7J13001 | Left Motor Housing | 1 |
| 11 | 324-7J13002 | Electrical Carbon Component | 1 |
| 12 | 324-7J13003 | Motor Assembly | 1 |
| 13 | 324-7J13004 | Gear Assembly | 1 |
| 14 | 313-7J11203 | Dust Proof Cover | 1 |
| 15 | 324-7J13005 | Tensioner Housing | 1 |
| 16 | 372-1610 | Chain | 1 |
| 17 | 324-7J13006 | Bar | 1 |
| 18 | 303-7J13002 | Right Motor Housing | 1 |
| 19 | 324-7J13006 | Oil Pump Assembly | 1 |
NOTES
TABLE DES MATIÈRES
| CONTENU | 46 |
| 46DONNÉE | |
| CONSIGNES DE SECURITÉ IMPORTANTES | 47-49 |
| RÉGLES GÉNÉRALES DE SECURITÉ | 50-51 |
| SYMBOLES | 52-53 |
| ÉQUIPEMENT ÉLECTRIQUE | 54-55 |
| FAMILIARISEZ-VOUS AVEC VOTRE SCIE À CHÂINE 56-57 | |
| MONTAGE 58 | |
| UTILISATION | 59-71 |
| ENTRETIEN 72-84 | |
| DéPANNAGE | 85 |
| GARANTIE 86 | |
| VUE ÉCLATÉE/LISTE DES PIEÇES 87-88 | |
| REMARQUES 89 | |
DONNÉES TECHNIQUES