
CMEHTS822 - Hedge trimmers Craftsman - Free user manual and instructions
Find the device manual for free CMEHTS822 Craftsman in PDF.

| Product Type | Electric hedge trimmer with integrated chainsaw blade |
| Brand | Craftsman |
| Model | CMEHTS822 |
| Nominal Voltage | 120 V (Alternating Current) |
| Frequency | 60 Hz |
| Maximum Cutting Capacity (hedge trimmer) | 19 mm (3/4 in) |
| Maximum Cutting Capacity (chainsaw) | 38.1 mm (1.5 in) |
| Functions | Cutting hedges and branches with standard blade and chainsaw |
| Safety Lock System | Lock-off button to prevent accidental start |
| Auxiliary Handle and Hand Guard | Removable front handle and hand guard for enhanced safety |
| Extension Cord Retainer | Integrated in the handle to prevent accidental disconnection |
| Blade Lubrication | Recommended to prevent corrosion and slowdown |
| Cleaning | Dry compressed air on vents; no solvents |
| Recommended Accessories | Only Craftsman brand accessories, sold separately |
| Warranty | 3-year limited (material/workmanship defects) + 90-day refund |
| Repairs | By Craftsman authorized service center with identical parts |
| Safety Certifications | ANSI Z87.1 eye protection, ANSI S12.6 hearing protection |
| Intended Use | Residential only, do not use in wet or flammable environments |
Frequently Asked Questions - CMEHTS822 Craftsman
User questions about CMEHTS822 Craftsman
0 question about this device. Answer the ones you know or ask your own.
Ask a new question about this device
Download the instructions for your Hedge trimmers in PDF format for free! Find your manual CMEHTS822 - Craftsman and take your electronic device back in hand. On this page are published all the documents necessary for the use of your device. CMEHTS822 by Craftsman.
USER MANUAL CMEHTS822 Craftsman
INSTRUCTION MANUAL GUIDE D'UTILISATIONMANUAL DE INSTRUCTIONES
Hedge Trimmer
Taille-haie
Cortasetos
CMEHTS822
English (original instructions) 1
Definitions: Safety Alert Symbols and Words
This instruction manual uses the following safety alert symbols and words to alert you to hazardous situations and your risk of personal injury or property damage.
DANGER: Indicates an imminently hazardous situation which, if not avoided, will result in death or serious injury.
WARNING: Indicates a potentially hazardous situation which, if not avoided, could result in death or serious injury.
CAUTION: Indicates a potentially hazardous situation which, if not avoided, may result in minor or moderate injury.
without word) Indicates a safety related message.
NOTICE: Indicates a practice not related to personal injury which, if not avoided, may result in property damage.
Fig. A
1247
6
8
3
5
1 Blade
2 Guard
3 Bail handle
4 Lock off button
5 Trigger switch
6 Switch handle
7 Cord retainer
8 sawBLADE
WARNING: Read all safety warnings
and all instructions. Failure to follow the warnings and instructions may result in electric shock, fire and/or serious injury.
WARNING: To reduce the risk of injury, read the instruction manual.
If you have any questions or comments about this or any product, call CRAFTSMAN toll free at: 1-888-331-4569.
Hedge Trimmer CMEHTS822
GENERAL POWER TOOL SAFETY WARNINGS
WARNING: Read all safety warnings, instructions, illustrations and specifications provided with this power tool. Failure to follow all instructions listed below may result in electric shock, fire and/or serious injury.
SAVE ALL WARNING AND INSTRUCTIONS FOR FUTURE REFERENCE.
The term "power tool" in the warnings refers to your mains-operated (corded) power tool or battery-operated (cordless) power tool.
1) Work Area Safety
a) Keep work area clean and well lit. Cluttered or dark areas invite accidents.
b) Do not operate power tools in explosive atmospheres, such as in the presence of flammable liquids, gases or dust. Power tools create sparks which may ignite the dust or fumes.
c) Keep children and bystanders away while operating a power tool. Distractions can cause you to lose control.
2) Electrical Safety
a) Power tool plugs must match the outlet. Never modify the plug in any way. Do not use any adapter plugs with earthed (grounded) power tools. Unmodified plugs and matching outlets will reduce risk of electric shock.
b) Avoid body contact with earthed or grounded surfaces, such as pipes, radiators, ranges and refrigerators. There is an increased risk of electric shock if your body is earthed or grounded.
c) Do not expose power tools to rain or wet conditions. Water entering a power tool will increase the risk of electric shock.
d) Do not abuse the cord. Never use the cord for carrying, pulling or unplugging the power tool. Keep cord away from heat, oil, sharp edges or moving parts. Damaged or entangled cords increase the risk of electric shock.
e) When operating a power tool outdoors, use an extension cord suitable for outdoor use. Use of a cord suitable for outdoor use reduces the risk of electric shock.
f) If operating a power tool in a damp location is unavoidable, use a ground fault circuit interrupter (GFCI) protected supply. Use of a GFCI reduces the risk of electric shock.
3) Personal Safety
a) Stay alert, watch what you are doing and use common sense when operating a power tool. Do not use a power tool while you are tired or under
the influence of drugs, alcohol or medication. A moment of inattention while operating power tools may result in serious personal injury.
b) Use personal protective equipment. Always wear eye protection. Protective equipment such as a dust mask, non-skid safety shoes, hard hat, or hearing protection used for appropriate conditions will reduce personal injuries.
c) Prevent unintentional starting. Ensure the switch is in the off-position before connecting to power source and/or battery pack, picking up or carrying the tool. Carrying power tools with your finger on the switch or energizing power tools that have the switch on invites accidents.
d) Remove any adjusting key or wrench before turning the power tool on. A wrench or a key left attached to a rotating part of the power tool may result in personal injury.
e) Do not overreach. Keep proper footing and balance at all times. This enables better control of the power tool in unexpected situations.
f) Dress properly. Do not wear loose clothing or jewelry. Keep your hair, clothing and gloves away from moving parts. Loose clothes, jewelry or long hair can be caught in moving parts.
g) If devices are provided for the connection of dust extraction and collection facilities, ensure these are connected and properly used. Use of dust collection can reduce dust-related hazards.
h) Do not let familiarity gained from frequent use of tools allow you to become complacent and ignore tool safety principles. A careless action can cause severe injury within a fraction of a second.
4) Power Tool Use and Care
a) Do not force the power tool. Use the correct power tool for your application. The correct power tool will do the job better and safer at the rate for which it was designed.
b) Do not use the power tool if the switch does not turn it on and off. Any power tool that cannot be controlled with the switch is dangerous and must be repaired.
c) Disconnect the plug from the power source and/ or remove the battery pack, if detachable, from the power tool before making any adjustments, changing accessories, or storing power tools. Such preventive safety measures reduce the risk of starting the power tool accidentally.
d) Store idle power tools out of the reach of children and do not allow persons unfamiliar with the power tool or these instructions to operate the power tool. Power tools are dangerous in the hands of untrained users.
e) Maintain power tools and accessories. Check for misalignment or binding of moving parts, breakage of parts and any other condition
that may affect the power tool's operation. If damaged, have the power tool repaired before use. Many accidents are caused by poorly maintained power tools.
f) Keep cutting tools sharp and clean. Properly maintained cutting tools with sharp cutting edges are less likely to bind and are easier to control.
g) Use the power tool, accessories and tool bits etc. in accordance with these instructions, taking into account the working conditions and the work to be performed. Use of the power tool for operations different from those intended could result in a hazardous situation.
h) Keep handles and grasping surfaces dry, clean and free from oil and grease. Slippery handles and grasping surfaces do not allow for safe handling and control of the tool in unexpected situations.
5) Service
a) Have your power tool serviced by a qualified repair person using only identical replacement parts. This will ensure that the safety of the power tool is maintained.
Hedge Trimmer SafetyWarnings
- Use both hands when operating the hedge trimmer. Using one hand could cause loss of control and result in serious personal injury.
- Keep all parts of the body away from the cutter blade. Do not remove cut material or hold material to be cut when blades are moving. Make sure the switch is off when clearing jammed material. Blades coast after turn off. A moment of inattention while operating the hedge trimmer may result in serious personal injury.
- Carry the hedge trimmer by the switch handle with the cutter blade stopped. Proper handling of the hedge trimmer will reduce possible personal injury from the cutter blades.
- Hold the power tool by insulated gripping surfaces only, because the cutter blade may contact hidden wiring or its own cord. Cutter blades contacting a "live" wire may make exposed metal parts of the power tool "live" and could give the operator an electric shock.
- Keep cable away from cutting area. During operation the cable may be hidden in shrubs and can be accidentally cut by the blade
- Keep extension cord away from cutting area. During operation the extension cord may be hidden in shrubs and can be accidentally cut by the blade.
- Check the hedge for foreign objects, e.g. wire fences.
DANGER:Keep hands away from blade. Contact with blade will result in serious personal injury
WARNING: Wear eye protection.
WARNING: Do not expose to rain.
WARNING: Only use with bail handle and blade guard properly assembled to hedge trimmer. The use of the hedge trimmer without the proper guard or handle provided may result in serious personal injury.
WARNING: Remove plug from the outlet immediately if the extension cord becomes damaged or cut.
Additional Safety Information
WARNING: Never modify the power tool or any part of it. Damage or personal injury could result.
WARNING: ALWAYS use safety glasses.
Everyday eyeglasses are NOT safety glasses. Also use face or dust mask if operation is dusty. ALWAYS WEAR CERTIFIED SAFETY EQUIPMENT:
ANSI Z87.1 eye protection (CAN/CSA Z94.3)
ANSI S12.6 (S3.19) hearing protection,
- NIOSH/OSHA/MSHA respiratory protection.
WARNING: Some dust contains chemicals known to State of California to cause cancer, birth defects or other reproductive harm. Some examples of these chemicals are:
- compounds in fertilizers,
- compounds in insecticides, herbicides and pesticides,
- arsenic and chromium from chemically treated lumber.
To reduce your exposure to these chemicals, wear approved safety equipment such as dust masks that are specially designed to filter out microscopic particles.
WARNING: Use of this tool can generate and/or disperse dust, which may cause serious and permanent respiratory or other injury. Always use NIOSH/OSHA approved respiratory protection appropriate for the dust exposure. Direct particles away from face and body.
WARNING: Always wear proper
personal hearing protection that conforms to ANSI S12.6 (S3.19) during use. Under some conditions and duration of use, noise from this product may contribute to hearing loss.
CAUTION: When not in use, place tool on its side on a stable surface where it will not cause a tripping or falling hazard. Some tools will stand upright but may be easily knocked over.
Air vents often cover moving parts and should be avoided. Loose clothes, jewelry or long hair can be caught in moving parts.
- An extension cord must have adequate wire size (AWG or American Wire Gauge) for safety. The smaller the gauge number of the wire, the greater the capacity of the cable, that is, 16 gauge has more capacity than 18 gauge. An undersized cord will cause a drop in line voltage resulting in loss of power and overheating. When using more than one extension to make up the total length, be sure each individual extension contains at least the minimum wire size. The following table shows the correct size to use depending on cord length and nameplate ampere rating. If in doubt, use the next heavier gauge. The lower the gauge number, the heavier the cord.
Minimum Gauge for Cord Sets
| Volts | Total Length of Cord in Feet(meters) | ||||
| 120 V 25 (7.6) | 50 (15.2) | 100 (30.5) | 150 (45.7) | ||
| 240 V 50 (15.2) | 100 (30.5) | 200 (61.0) | 300 (91.4) | ||
| Ampere Rating | American Wire Gauge | ||||
| More Than | Not More Than | ||||
| 0 6 18 | 16 16 14 | ||||
| 6 10 18 | 16 14 12 | ||||
| 10 12 | 16 16 14 12 | ||||
| 12 16 | 14 12 Not Recommended | ||||
The label on your tool may include the following symbols. The symbols and their definitions are as follows:
V.....volts
Hz.....hertz
min.........minutes
= or DC....direct current
Class I Construction (grounded)
../min...per minute
BPM... .beats per minute
IPM .impacts per minute
RPM.......revolutionsper minute
sfpm surface feet per minute
SPM.........strokes per minute
OPM........oscillationsper minute
A. amperes
W.....watts
or AC......alternating current
or AC/DC....alternatingordirect current
ClassII
Construction (double insulated)
n_0 . no load speed
n .rated speed
..earthing terminal
A .safety alert symbol
A visible radiation
avoid staring at light
wearrespiratory protection
weareye protection
...wearhearing protection
...readall documentation
IPXX .IPsymbol
Motor
Be sure your power supply agrees with the nameplate marking. Voltage decrease of more than 10% will cause loss of power and overheating. These tools are factory tested; if this tool does not operate, check power supply.
Intended Use
This hedge trimmer is designed for residential use.
DO NOT use under wet conditions or in presence of flammable liquids or gases.
DO NOT let children come into contact with the tool. Supervision is required when inexperienced operators use this tool.
ASSEMBLY AND ADJUSTMENTS
WARNING: To reduce the risk of serious personal injury, turn unit off and disconnect it from power source before making any adjustments or removing/installing attachments or accessories. An accidental start-up can cause injury.
Assembly Tools Required
Crosshead Screwdriver
Attaching Guard and Bail Handle to Trimmer (Fig. B, C, D)
WARNING: Only use with handle and guard properly assembled to hedge trimmer. The use of the hedge trimmer without the proper guard or handle provided may result in serious personal injury.
The trimmer is shipped with the guard and bail handle attached to the trimmer with a plastic zip tie.
To Assemble to Trimmer
- Cut the plastic zip tie.
- Remove the six screws that are partially run into the trimmer housing (Figure B).
- Slide the guard onto the front of the trimmer housing.
- Insert two of the six screws into the openings on the side of the guard and tighten securely as shown in Figure C.
- Slide the bail handle onto the front of the trimmer housing behind the guard.
- Insert the remaining four screws into the openings on the side of the bail handle and tighten securely as shown in Figure D.
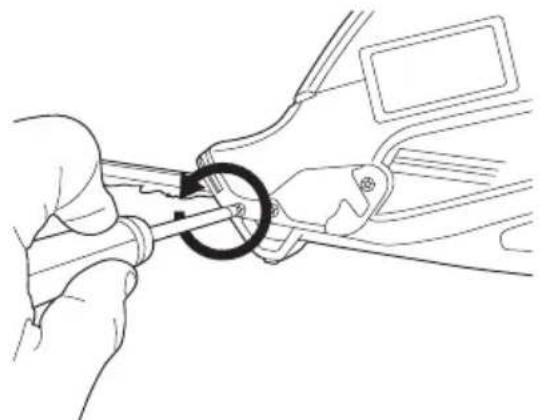
Fig.B
Fig.C
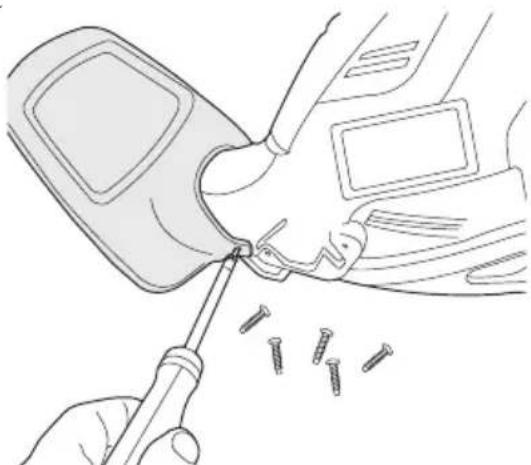

Fig. D
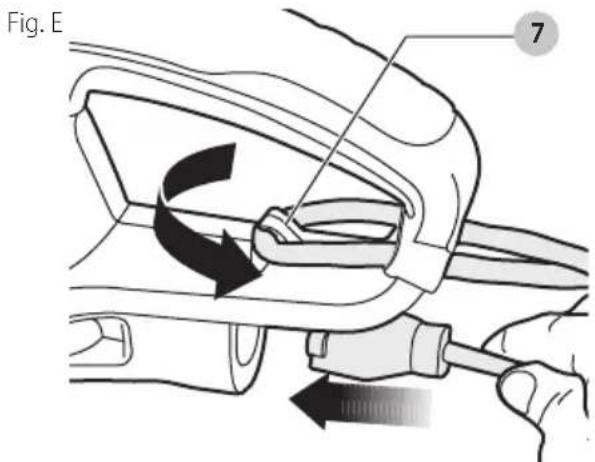
Attaching Extension Cord to Trimmer (Fig. A, E)
- An extension cord retainer 7 is built into the switch handle that prevents the tool from coming unplugged.
- To use this feature, double the extension cord about 8^ (203 mm) from the end, and insert it into the slot in the back of the handle area. Hook the loop formed by doubling the cord, over the cord retainer tab, as shown in Figure E. Gently tug on the cord to insure that it is firmly retained in the trimmer's housing.
- Plug the receptacle end of the extension cord into the plug blades in the trimmer.
English
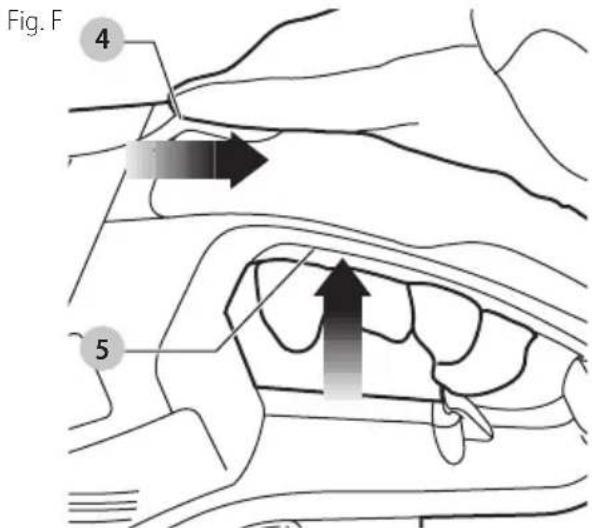
To Turn the Tool ON (Fig. F)
WARNING: Never attempt to lock a switch in the ON position.
CAUTION: Do not use blade to cut stems greater than 3 / 4'' (19 mm). Use the trimmer only for cutting normal shrubbery around houses and buildings. NOTE: sawBLADE™ can cut stems and branches up to 1.5'' (38.1 mm).
To turn the tool "ON", slide the lock off button 4, shown in Figure F, backward and, squeeze the trigger switch 5. Once the unit is running, you may release the lock off button. In order to keep the unit running you must continue to squeeze the trigger. To turn the tool "OFF", release the trigger.
OPERATION
WARNING: To reduce the risk of serious personal injury, turn unit off and disconnect it from power source before making any adjustments or removing/installing attachments or accessories. An accidental start-up can cause injury.
English
Proper Hand Position (Fig. G)
WARNING: To reduce the risk of serious personal injury, ALWAYS use proper hand position as shown.
WARNING: To reduce the risk of serious personal injury, ALWAYS hold securely in anticipation of a sudden reaction.
Proper hand position requires one hand on the switch handle 6 and one hand on the bail handle 3. Never hold the unit by the blade guard 2.
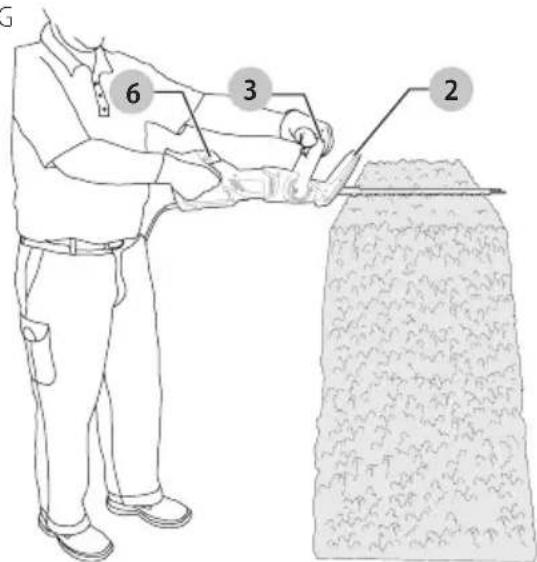
Fig. G
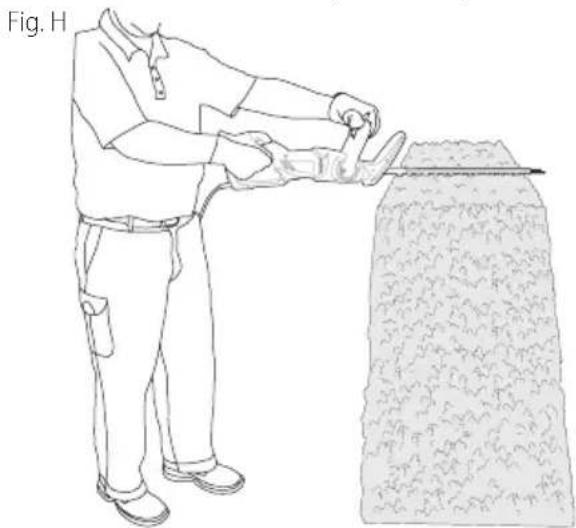
Trimming Instructions (Fig. H-L)
DANGER: Keep hands away from blade and powersaw.
WARNING: To guard against injury, observe the following:
- Read instruction manual before using. Save instruction manual.
- Check the hedge for foreign objects such as wires or fences before each use.
- Keep hands on handles. Don't overreach.
- Do not use under wet conditions.
CAUTION: Blade may coast after turn off.
Extension Cord (Fig. H)
Always keep extension cord behind trimmer and away from the trimming operation. Never drape it over a hedge being trimmed. If you cut or damage the cord, unplug it at the electrical outlet immediately, before inspecting or repairing cord.
Working Position (Fig. H)
Maintain proper footing and balance and do not overreach. Wear safety goggles, non-skid footwear and rubber gloves when trimming. Hold the tool firmly in both hands and turn
the tool ON. Always hold the trimmer, as shown in Fig. H, with one hand on the switch handle and one hand on the bail handle. Never hold the tool by the blade guard.
Trimming New Growth (Fig. I)
Using a wide, sweeping motion and feeding the blade teeth through the twigs, is most effective. A slight downward tilt of the blade in the direction of motion gives the best cutting.
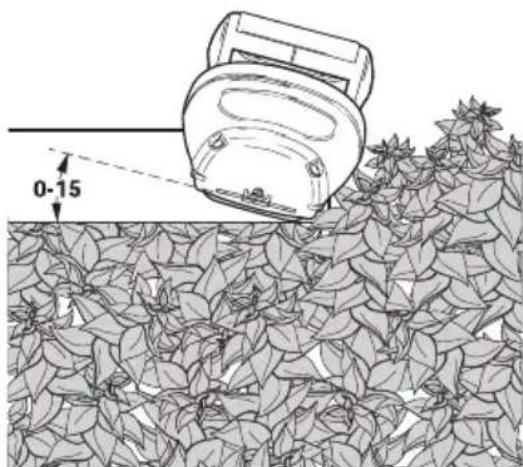
Fig.1
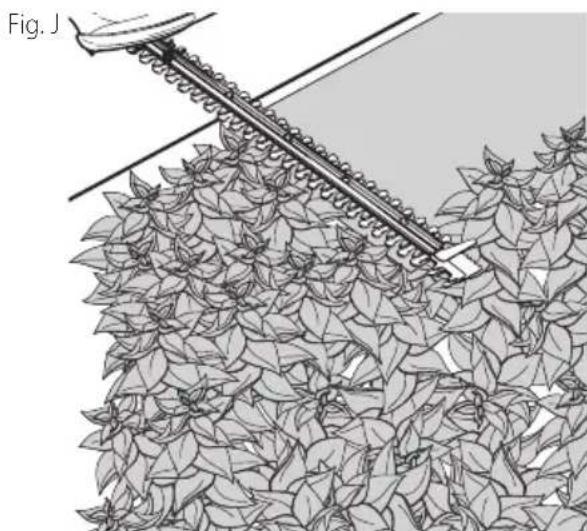
Level Hedges (Fig. J)
To obtain exceptionally level hedges a piece of string can be stretched along the length of the hedge as a guide.
English
Side Trimming Hedges (Fig. K)
Orient the trimmer as shown and begin at the bottom and sweep up.
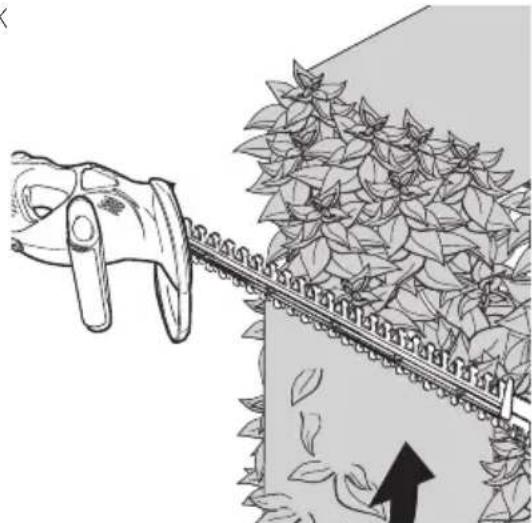
Fig. K
sawBLADETM (Fig. L)
For branches too large for the blade 1 to cut, use the sawBLADETM 8. Position the sawBLADETM as close to the bottom of the branch as possible. Place the sawBLADETM shoe against the branch. Turn the hedge trimmer on as described above, allowing the tool to work at its own pace until the branch is fully cut.
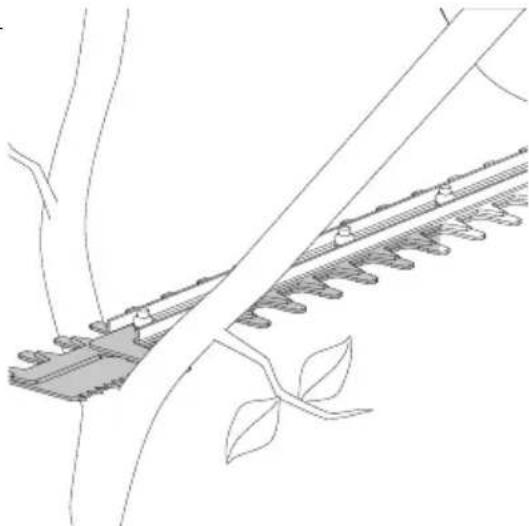
Fig. L
MAINTENANCE
WARNING: To reduce the risk of serious personal injury, turn unit off and disconnect it from power source before making any adjustments or removing/installing attachments or accessories. An accidental start-up can cause injury.
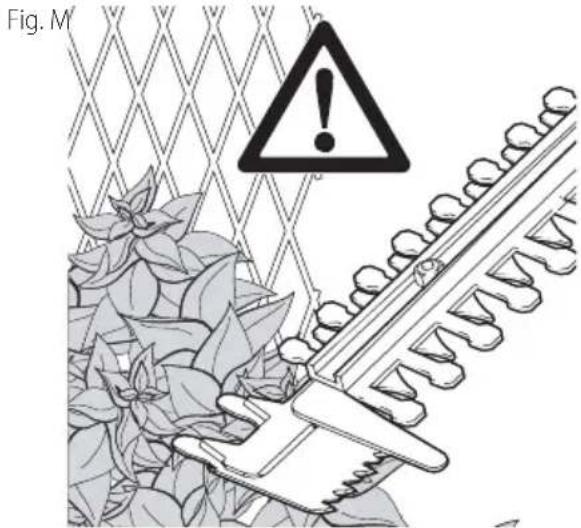
Blade Maintenance (Fig. M)
The cutting blades are made from high quality, hardened steel and with normal usage, they will not require sharpening. However, if you accidentally hit a wire fence (Fig. M), stones, glass, or other hard objects, you may put a nick in the blade. There is no need to remove this nick
as long as it does not interfere with the movement of the blade. If it does interfere, disconnect the power source and use a fine toothed file or sharpening stone to remove the nick. If you drop the trimmer, carefully inspect it for damage. If the blade is bent, housing cracked, handles broken or if you see any other condition that may affect the trimmer's operation contact your local authorized service center for repairs before putting it back into use.
Cleaning
WARNING: Blow dirt and dust out of all air vents with clean, dry air at least once a week. To minimize the risk of eye injury, always wear ANSI Z87.1 approved eye protection when performing this procedure.
WARNING: Never use solvents or other harsh chemicals for cleaning the non-metallic parts of the tool. These chemicals may weaken the plastic materials used in these parts. Use a cloth dampened only with water and mild soap. Never let any liquid get inside the tool; never immerse any part of the tool into a liquid.
Accessories
WARNING: Since accessories, other than those offered by CRAFTSMAN, have not been tested with this product, use of such accessories with this tool could be hazardous. To reduce the risk of injury, only CRAFTSMAN recommended accessories should be used with this product.
Recommended accessories for use with your tool are available at extra cost from your local dealer or authorized service center. If you need assistance in locating any accessory, please contact CRAFTSMAN call 1-888-331-4569.
ENGLISH
Repairs
WARNING: To assure product SAFETY and RELIABILITY, repairs, maintenance and adjustment (including power cord repairs, and brush inspection and replacement, when applicable) should be performed by a CRAFTSMAN factory service center or a CRAFTSMAN authorized service center. Always use identical replacement parts.
Register Online
Thank you for your purchase. Register your product now for:
- WARRANTY SERVICE: Registering your product will help you obtain more efficient warranty service in case there is a problem with your product.
CONFIRMATION OF OWNERSHIP: In case of an insurance loss, such as fire, flood or theft, your registration of ownership will serve as your proof of purchase.
FOR YOUR SAFETY: Registering your product will allow us to contact you in the unlikely event a safety notification is required under the Federal Consumer Safety Act. - Register online at www.craftsman.com/registration
Three Year Limited Warranty
CRAFTSMAN will repair or replace, without charge, any defects due to faulty materials or workmanship for three years from the date of purchase. This warranty does not cover part failure due to normal wear or tool abuse. For further detail of warranty coverage and warranty repair information, visit www.craftsman.com or call
1-888-331-4569. This warranty does not apply to
accessories or damage caused where repairs have been made or attempted by others. THIS LIMITED WARRANTY IS GIVEN IN LIEU OF ALL OTHERS, INCLUDING THE IMPLIED WARRANTY OF MERCHANTABILITY AND FITNESS FOR A PARTICULAR PURPOSE, AND EXCLUDING ALL INCIDENTAL OR CONSEQUENTIAL DAMAGES. Some states do not allow limitations on how long an implied warranty lasts or the exclusion or limitation of incidental or consequential damages, so these limitations may not apply to you. This warranty gives you specific legal rights and you may have other rights which vary in certain states or provinces.
90 DAY MONEY BACK GUARANTEE
If you are not completely satisfied with the performance of your CRAFTSMAN Power Tool or Nailer for any reason, you can return it within 90 days from the date of purchase with a receipt for a full refund - no questions asked.
LATIN AMERICA: This warranty does not apply to products sold in Latin America. For products sold in Latin America, see country specific warranty information contained in the packaging, call the local company or see website for warranty information.
FREE WARNING LABEL REPLACEMENT: If your warning labels become illegible or are missing, call 1-888-331-4569 for a free replacement.
TROUBLESHOOTING GUIDE
BE SURE TO FOLLOW SAFETY RULES AND INSTRUCTIONS
For assistance with your product, visit our website at www.craftsman.com for a list of service centers, or call CRAFTSMAN at 1-888-331-4569.
PROBLEM CAUSE CORRECTION
| Slow running, noisy or hot blades. Dry, corroded blades. Lubricate blades. |
| Blades or blade support bent. Straighten blade or blade support. |
| Bent or damaged teeth. Straighten teeth. |
| Loose blade bolts. Tighten blade bolts. |
| Unit will not start. Lock off not fully operated Check that lock off is fully pulled back prior to moving main trigger. |
| Cord not plugged in. Plug tool into a working outlet. |
| Circuit fuse is blown. Replace circuit fuse. (If the product repeatedly causes the circuit fuse to blow, discontinue use immediately and have it serviced at an authorized service center.) |
| Circuit breaker is tripped. Reset circuit breaker. (If the product repeatedly causes the circuit fuse to blow, discontinue use immediately and have it serviced at an authorized service center.) |
| Cord or switch is damaged. Have cord or switch replaced at an authorized service center. |
IPXX............symbole IP
A. _____symbole d'avertissement
A radiation visible
protection respiratoire
念 . protection oculaire
O protection auditive
......lire tout la documentation
Moteur
PROBLEM CAUSE POSSIBLE SOLUTION POSSIBLE
h) No permitted that the family should be allowed to travel.
No permitted that the family should be allowed to travel.
No permitted that the family should be allowed to travel.
=or DC....directcurrent
modulo
Construccione Clase I (tierra)
A. amperios
W.......vatios
...min........porminuto
or AC.....corrientealterna
BPM............golpes por minuto
or AC/DC....corrientealterna
IPM............impactospor minuto
o directa
PROBLEMA CAUSA POSIBLE SOLUCION POSIBLE


- Definitions: Safety Alert Symbols and Words
- WARNING: Read all safety warnings
- Hedge Trimmer CMEHTS822
- GENERAL POWER TOOL SAFETY WARNINGS
- SAVE ALL WARNING AND INSTRUCTIONS FOR FUTURE REFERENCE.
- 1) Work Area Safety
- 2) Electrical Safety
- 3) Personal Safety
- 4) Power Tool Use and Care
- 5) Service
- Hedge Trimmer SafetyWarnings
- Additional Safety Information
- Motor
- Intended Use
- ASSEMBLY AND ADJUSTMENTS
- Assembly Tools Required
- Attaching Guard and Bail Handle to Trimmer (Fig. B, C, D)
- To Assemble to Trimmer
- Attaching Extension Cord to Trimmer (Fig. A, E)
- To Turn the Tool ON (Fig. F)
- OPERATION
- English
- Proper Hand Position (Fig. G)
- Trimming Instructions (Fig. H-L)
- Extension Cord (Fig. H)
- Working Position (Fig. H)
- Trimming New Growth (Fig. I)
- Level Hedges (Fig. J)
- Side Trimming Hedges (Fig. K)
- sawBLADETM (Fig. L)
- MAINTENANCE
- Blade Maintenance (Fig. M)
- Cleaning
- Accessories
- Repairs
- Register Online
- Three Year Limited Warranty
- DAY MONEY BACK GUARANTEE
- TROUBLESHOOTING GUIDE
- BE SURE TO FOLLOW SAFETY RULES AND INSTRUCTIONS
- Moteur
Brand : Craftsman
Model : CMEHTS822
Category : Hedge trimmers