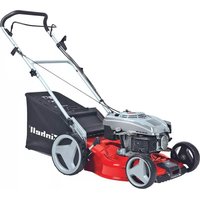
GCPM 402 S - Electric mower EINHELL - Free user manual and instructions
Find the device manual for free GCPM 402 S EINHELL in PDF.
| Product type | Petrol lawn mower |
| Brand | Einhell |
| Model | GCPM 402 S |
| Engine | 4-stroke engine, 1 cylinder, 132 cm³ |
| Power input | 2 kW |
| Working speed | 2900 rpm |
| Fuel | Unleaded petrol (E10), tank 0.9 l |
| Engine oil | Approx. 0.4 l |
| Spark plug | F5RTC, electrode gap 0.6-0.8 mm |
| Cutting height adjustment | Central, 25-75 mm (7 positions) |
| Cutting width | 400 mm |
| Weight | 22.5 kg |
| Guaranteed sound power level | 96 dB(A) |
| Grass catcher bag | With fill level indicator, capacity not specified |
| Wheel drive | Yes, with clutch lever |
| Safety | Engine start/stop lever (engine brake), restart protection |
| Maintenance and cleaning | Clean after each use, regular oil change, check air filter and spark plug |
| Spare parts and repairability | Wear parts: blade, air filter, belt, spark plug; after-sales service via Einhell |
| Warranty | 24 months for manufacturing defects, excluding professional use |
Frequently Asked Questions - GCPM 402 S EINHELL
User questions about GCPM 402 S EINHELL
0 question about this device. Answer the ones you know or ask your own.
Ask a new question about this device
Download the instructions for your Electric mower in PDF format for free! Find your manual GCPM 402 S - EINHELL and take your electronic device back in hand. On this page are published all the documents necessary for the use of your device. GCPM 402 S by EINHELL.
USER MANUAL GCPM 402 S EINHELL
GB Original operating instructions Petrol Lawn Mower
natural_image
Close-up of a black cable with a 10-pin connector (no text or symbols visible)
natural_image
Close-up of a black plastic bag labeled 'ell®' next to a wheeled vehicle with wheels and a tire (no visible text or symbols)

natural_image
Hand holding a black metal jacket, no visible text or symbols
natural_image
Hand holding a bundle of black cable or wires against white background (no text or symbols visible)
natural_image
Close-up of a mechanical engine component with labeled parts (no readable text or symbols)
natural_image
Mechanical assembly diagram showing gear and lever components with numbered callouts (7 and 8), no readable text or symbols beyond labels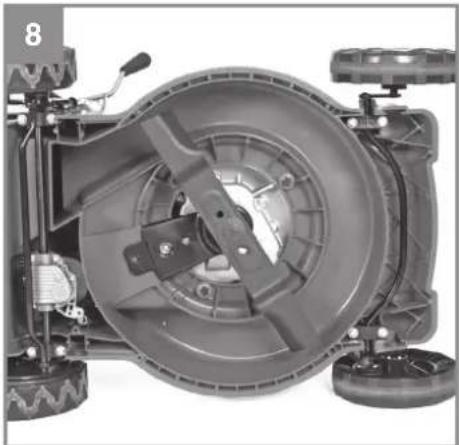
natural_image
Cutaway view of a mechanical vehicle showing internal components like wheels, gears, and a central wheel (no text or symbols visible)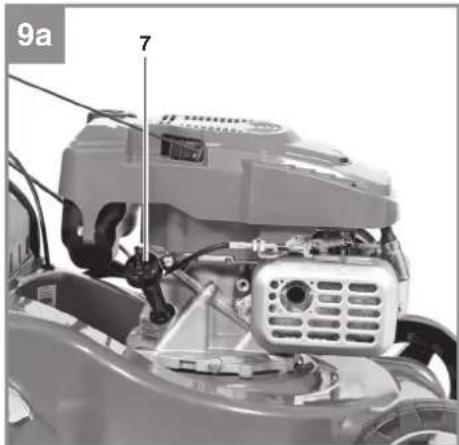
natural_image
Close-up of a mechanical engine bay with visible components and wiring (no text or symbols)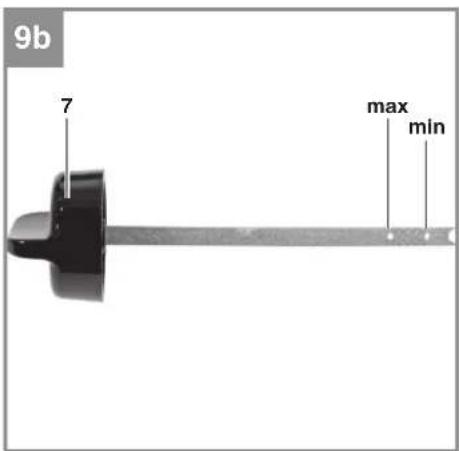
natural_image
Close-up of a mechanical device with visible gears and housing (no text or symbols)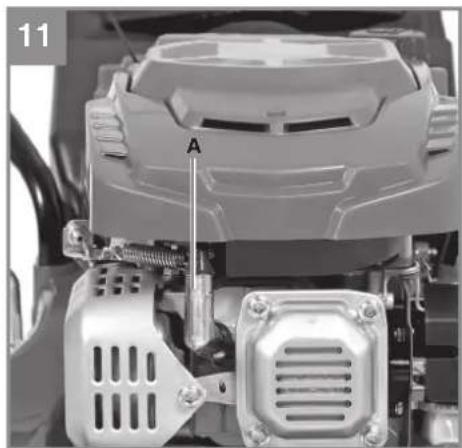
natural_image
Close-up of a mechanical assembly with labeled component A, showing internal components and mounting brackets (no readable text or symbols)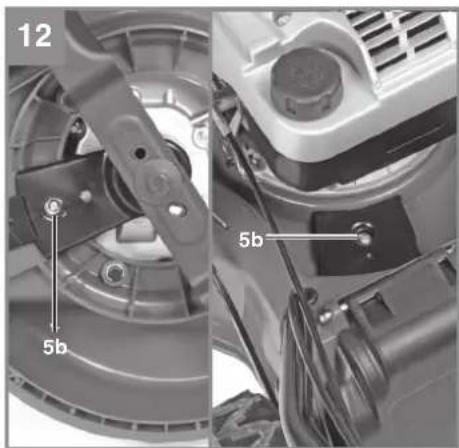
natural_image
Diagram of a rectangular block with granular texture and two downward arrows indicating flow or movement (no text or symbols)-5-
14

D
Gefahr!
When using the equipment, a few safety precautions must be observed to avoid injuries and damage. Please read the complete operating instructions and safety regulations with due care. Keep this manual in a safe place, so that the information is available at all times. If you give the equipment to any other person, hand over these operating instructions and safety regulations as well. We cannot accept any liability for damage or accidents which arise due to a failure to follow these instructions and the safety instructions.
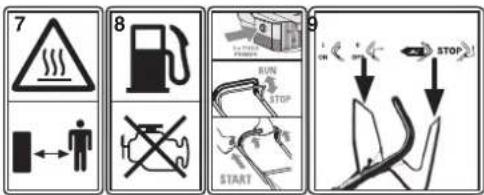
Explanation of the warning signs on the equipment (see Fig. 14)
1) Read the operating instructions.
2) Take care of the danger from catapulted parts. Keep a safe distance.
3) Danger! Sharp blades - Switch off the engine and pull the spark plug boot before doing any maintenance, repair, cleaning or adjustment work.
4) Fill with oil and fuel before starting the mower.
5) Caution: Wear ear protection and safety goggles.
6) Guaranteed sound power level.
7) Caution! Hot parts. Keep your distance.
8) Fill in fuel only when the engine is switched off.
9) Starting procedure
10) Engine start/stop lever (I=Engine on; 0=Engine off)
11) Drive lever (clutch lever)
1. Safety regulations
The corresponding safety information can be found in the enclosed booklet.
Warning!
Read all the safety information, instructions, illustrations and technical data provided on or with this power tool. Failure to adhere to the following instructions may result in electric shock, fi re and/or serious injury.
Keep all the safety information and instructions in a safe place for future use.
2. Layout and items supplied
2.1 Layout (Fig. 1-12)
1a. Engine start/stop lever (engine brake)
1b. Drive lever (clutch lever)
-
Fuel pump (primer)
-
Top and bottom push bar
4a. Debris bag
4b. Level indicator
5a. Ejector fl ap
5b. V-belt
-
Tank fi ller cap
-
Oil filler screw
-
Cutting height adjustment
-
Starter cable
-
cable clip
-
Star nut (2x)
-
Long screw (2x)
-
Spark plug wrench
-
2x screws (bottom push bar)
-
Eyelet
2.2 Items supplied
Please check that the article is complete as specified in the scope of delivery. If parts are missing, please contact our service center or the sales outlet where you made your purchase at the latest within 5 working days after purchasing the product and upon presentation of a valid bill of purchase. Also, refer to the warranty table in the service information at the end of the operating instructions.
- Open the packaging and take out the equipment with care.
- Remove the packaging material and any packaging and/or transportation braces (if available).
- Check to see if all items are supplied.
- Inspect the equipment and accessories for transport damage.
- If possible, please keep the packaging until the end of the guarantee period.
GB
Danger!
The equipment and packaging material are not toys. Do not let children play with plastic bags, foils or small parts. There is a danger of swallowing or suff ocating!
• Petrol lawn mower
• Top and bottom push bar
- Debris bag
- Cable clip
Star nut (2x)
- Long screw (2x)
• Spark plug wrench
• Screws (bottom push bar) (2x)
- Eyelet
• Petrol service manual
• Original operating instructions
- Safetyinstructions
3. Proper use
The equipment may only be used for the tasks it is designed to handle. Any other use is deemed to be a case of misuse. The user/operator and not the manufacturer will be liable for any damage or injuries of any kind caused as a result of this.
The petrol lawn mower is intended for private use i.e. for use in home and gardening environments.
Private use of the lawn mower refers an annual operating time generally not exceeding that of 50 hours, during which time the machine is primarily used to maintain small-scale, residential lawns and home/hobby gardens. Public facilities, sporting halls, and agricultural/forestry applications are excluded.
Please note that our equipment has not been designed for use in commercial, trade or industrial applications. Our warranty will be voided if the equipment is used in commercial, trade or industrial businesses or for equivalent purposes.
The operating instructions as supplied by the manufacturer must be kept and referred to in order to ensure that the lawn mower is properly used and maintained. The instructions contain valuable information on operating, maintenance and servicing conditions.
Warning! Due to the high risk of bodily injury to the user, the petrol lawn mower must not be used to carry out the following work: Trim bushes, hedges or shrubs, to cut scaling vegetation, planted roofs, or balcony-grown grass, to clean (suck up) dirt and debris off walkways, or to chop up tree or hedge clippings. Moreover, the lawn mower may not be used as a power cultivator to level out high areas such as molehills.
For safety reasons, the lawn mower may not be used as a drive unit for other work tools or toolkits of any kind.
4. Technical data
Engine type
..... One-cylinder four-stroke engine, 132 cc
Power input: 1.2 kw
Working speed n_0 : 2900min ^-1
Fuel: Petrol (E10)
Tank capacity: .... approx. 0,9 l
Engine oil: .... approx. 0.4 l
Spark plug: F5RTC
Electrode gap (spark plug): 0.6 - 0.8 mm
Cutting height adjustment: ... Central, (25-75 mm)
Cutting width: 400 mm
Weight: 22.5kg
Danger!
Sound and vibration
L_pA sound pressure level ..... 82.6 dB(A)
K_pA uncertainty 3.0 dB
L_WA sound power level 96 dB(A)
K_WA uncertainty 2.01 dB
Wear ear-muff s.
The impact of noise can cause damage to hearing.
Vibration emission value a_n=2.825 m/s^2
K uncertainty = 1.5 m/s ^4
Long work periods should be avoided due to the development of high noise and vibration levels.
GB
Keep the noise emissions and vibrations to a minimum.
- Only use appliances which are in perfect working order.
• Service and clean the appliance regularly.
• Adapt your working style to suit the appliance.
• Do not overload the appliance. - Have the appliance serviced whenever necessary.
- Switch the appliance off when it is not in use.
Caution!
Residual risks
Even if you use this electric power tool in accordance with instructions, certain residual risks cannot be rules out. The following hazards may arise in connection with the equipment's construction and layout:
- Damage to hearing if no suitable ear protection is used.
- Health damage caused by hand-arm vibrations if the equipment is used over a prolonged period or is not properly guided and maintained.
5. Before starting the equipment
5.1 Assembling the components
Some parts of the equipment come disassembled. For quick and easy assembly, read and follow the instructions below.
Note! You will need the following additional tools (not supplied) for assembly, and also for maintenance work:
• One flat oil drip tray (for changing the oil)
• One 1 liter measuring jug (oil/petrol resistant)
• One petrol can
One funnel (suitable for the tank's petrol filler neck)
• Household wipes (to wipe up oil/petrol residue; dispose of these at a filling station)
• One petrol suction pump (plastic, available from DIY stores)
• One oil can with hand pump (available from DIY stores)
- Engine oil
Assembly
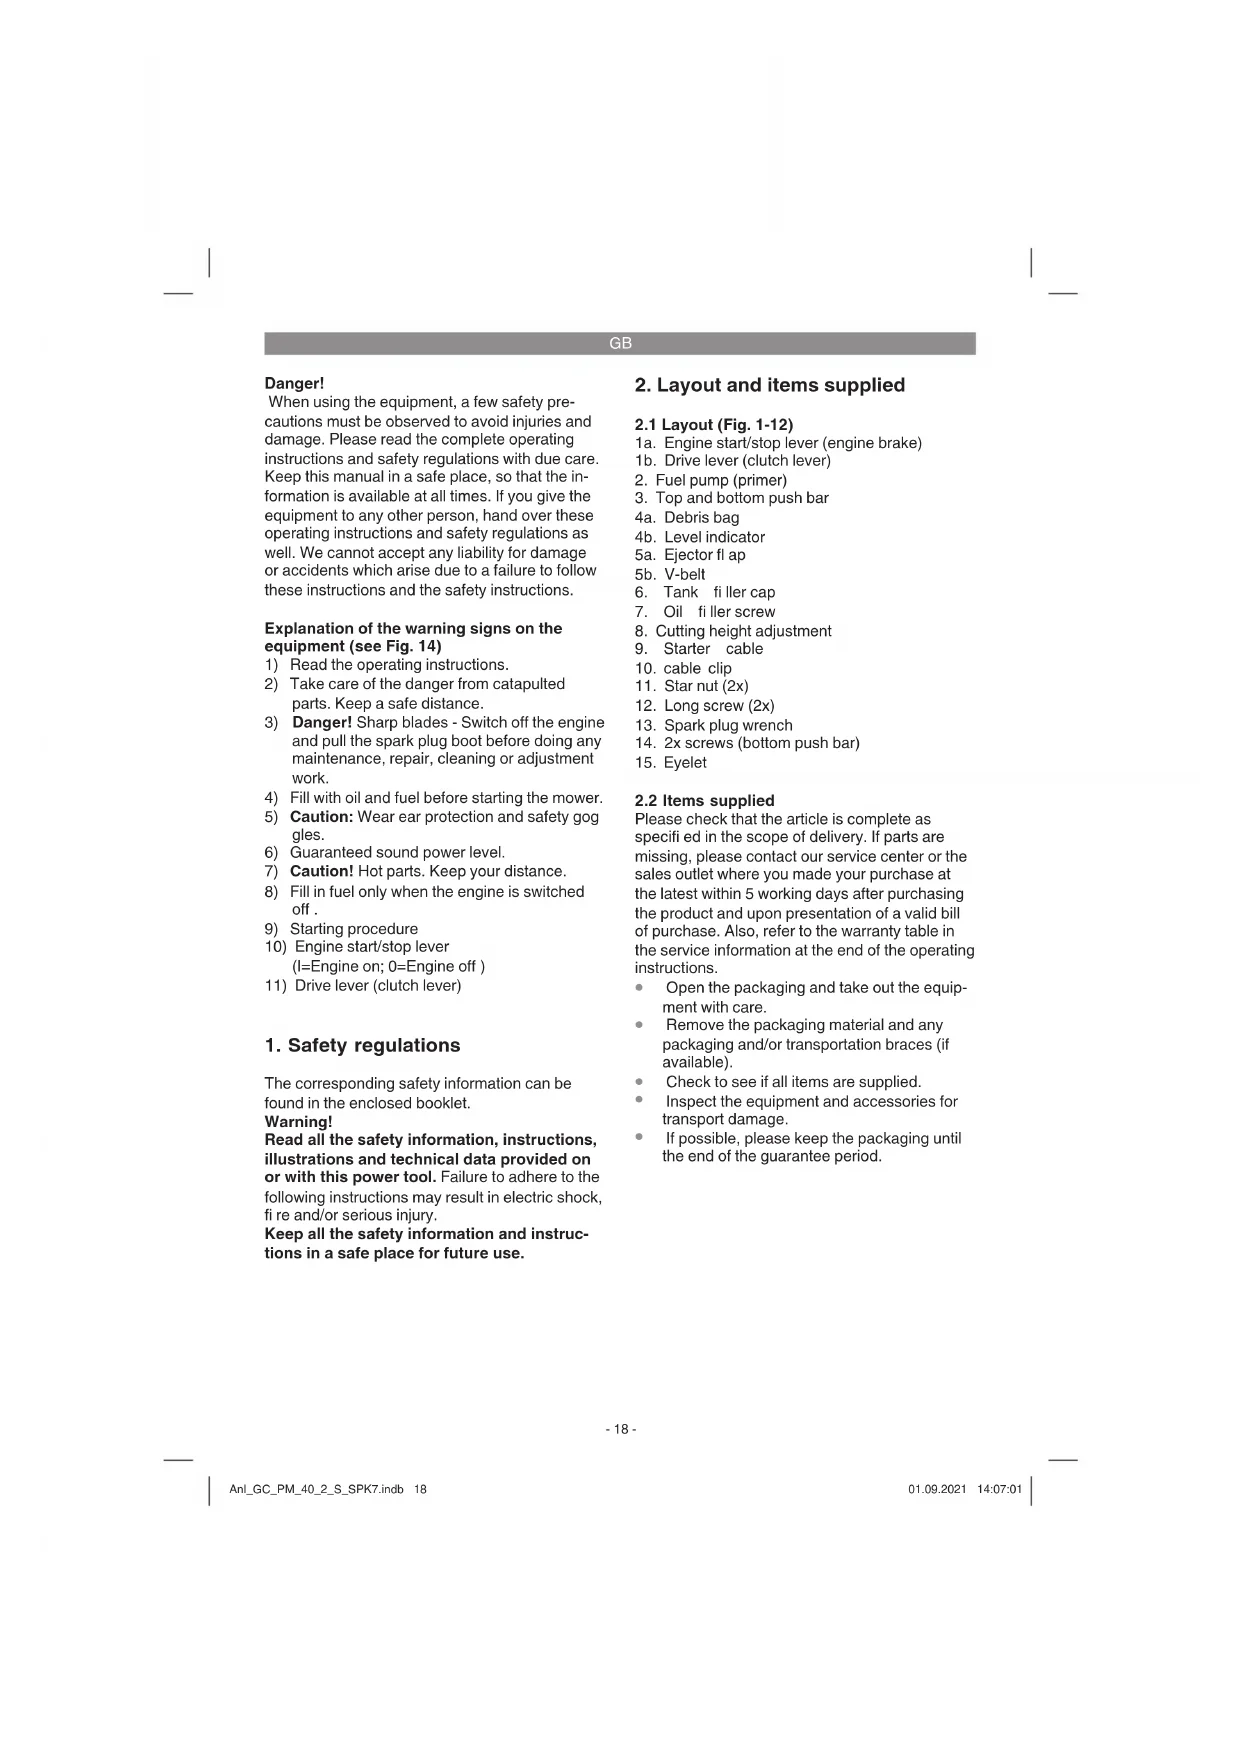
- Fit the lower and upper push bar (Item. 3) as shown in Fig. 3a-3b.
-
Insert the grip of the starter cable (Item 9) into the hook provided for that purpose as shown in Fig. 3c.
-
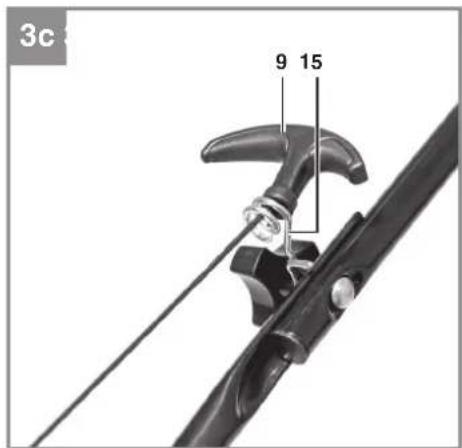
Fasten the actuator cables to the push bar with the supplied cable clips (Item 10) as shown in Fig. 3d.
- Lift the ejector flap (Item 5a) with one hand and hook in the grass bag (Item 4a) as shown in Fig. 4.
5.2 Adjusting the cutting height
Warning! Adjust the cutting height only when the engine has been switched off.
- The cutting height is centrally adjusted with the cutting height adjustor lever (Fig. 7/Item 8). Different cutting heights can be selected.
- Actuate the adjustor lever and pull it to the required position. Let the lever click into position.
6. Operation
Note!
The engine comes without oil and petrol. Therefore, be sure to add oil and petrol before starting the engine.
- Check the oil level (see 7.2.1).
- Use a funnel and measuring jug to fill the tank with petrol. Make sure that the petrol is clean.
Warning: Never use more than one safety petrol can. Do not smoke when refueling. Switch off the engine before refueling and allow the engine to cool down for a few minutes.
- Ensure that the ignition cable is connected to the spark plug.
Carrying out a safety test on the engine start/stop lever
The lawn mower comes equipped with an engine start/stop lever (Fig. 5a/Item 1a) in order to prevent it from starting up unintentionally and to ensure that the engine and blade stop quickly in case of danger. The lever must be actuated (Fig. 5b) before the lawn mower is started. When the engine start/stop lever is released, it must return to its initial position (Fig. 5a).
Before you start mowing, you should run through this process several times in order to ensure that the lever and actuator cables are working properly.
GB
Repeat the test several times after the engine has started up. When the engine start/stop lever is released, the engine must stop within a few seconds. If not, contact Customer Service.
Danger: The blade begins to rotate as soon as the engine is started.
6.1 Starting the engine
- Ensure that the ignition cable is connected to the spark plug.
- Press the fuel pump (primer) (Fig. 6/Item 2) three times. You can skip this point if the engine has already warmed up.
- Stand behind the lawn mower. Actuate the engine start/stop lever (Fig. 5b) with one hand. The other hand must be on the starter handle.
- Start the engine using the reversing starter (Fig. 1/Item 9). To do this pull out the handle approx. 10–15 cm (until you feel a resistance) and then start the engine with a sharp tug. If the engine does not start, tug the handle again.
Note! Never allow the actuator cable to snap back.
Note! In cold weather, it may be necessary to repeat the starting process several times.
Drive unit
Drive lever/clutch lever (Fig. 5a/Item 1b): If you press this (Fig. 5c) the clutch for the drive will be closed and the lawnmower will start to move with the engine running. Release the drive lever in good time to stop the moving lawnmower. Practice starting and stopping before you use the mower for the first time until you are familiar with controlling the mower.
6.2 Tips on mowing properly
Danger!
Never open the chute flap when the grass bag has been detached (to be emptied) and the engine is still running. The rotating blade can cause serious injuries!
Always carefully fasten the chute fl ap and debris bag. Switch off the engine before you remove them.
Whenever you need to perform any kind of adjustment, maintenance or repair work, switch off the engine and wait until the blade no longer rotates. Pull off the spark plug connector.
Mowing
The engine is configured for an optimal grass cutting speed, for ejecting grass into the debris bag, and for many years of use.
Only use a sharp blade that is in good condition. This will prevent the grass blades from fraying and the lawn from turning yellow.
Try to mow in straight lines for a nice, clean look. The swaths should overlap each other by a few centimeters in order to avoid stripes.
Keep the underside of the mower housing clean and remove grass build-up. Deposits not only make it more difficult to start the mower; they decrease the quality of the cut and make it harder for the equipment to bag the grass.
Always mow along inclines (not up and down). You can prevent the lawn mower from slipping down by holding a position at an angle upwards. Select the cutting height according to the length of the grass. If necessary, mow a number of times so that you never cut more than 4cm of grass in one go.
Switch off the engine before doing any checks on the blade. Keep in mind that the blade continues to rotate for a few seconds after the engine has been switched off. Never attempt to manually stop the blade. Regularly check to see if the blade is securely attached, is in good condition and is sharp. If the contrary is the case, sharpen the blade or replace it. In the event that the blade strikes an object, immediately switch off the lawn mower and wait for the blade to come to a complete stop. Then inspect the condition of the blade and the blade mount. Replace any parts that are damaged.
6.3 Switching off the engine
All you have to do to switch off the engine is release the engine start/stop lever (Fig. 5a/Item 1a). Pull off the spark plug connector from the spark plug in order to prevent the engine from starting. Before you start the engine again, check the cable of the engine brake. Check that the actuator cable is correctly fitted. If the switch-off cable is kinked or damaged, it must be replaced.
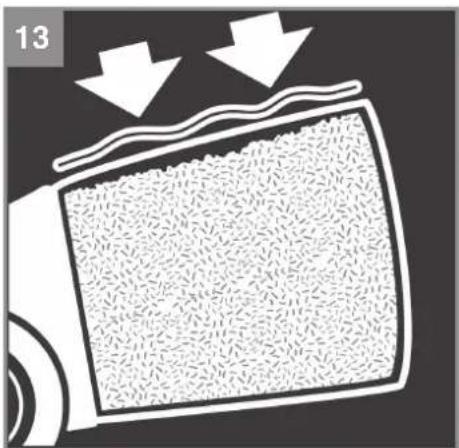
6.4 Emptying the debris bag
When the debris bag is full, the air throughput will be low and the level indicator (4b) will be up close against the debris bag (Fig. 13). Empty the debris
GB
bag and clear out the ejector chute. Danger! Before taking off the debris bag, switch off the engine and wait until the blade has come to a stop.
To take off the grass basket, use one hand to lift up the chute fl ap and the other to grab onto the basket carry-handle. Remove the basket (Fig. 4). For safety reasons, the chute fl ap automatically falls down after removing the grass basket and closes off the rear chute opening. If any grass remains in the opening, it will be easier to restart the engine if you pull the mower back approximately 1m.
Do not use your hands or feet to remove clippings in or on the mower housing, but instead use suitable tools such as a brush or a hand broom.
In order to ensure that the majority of grass clippings are picked up, the inside of both the grass bag and especially the air grill must be cleaned after each use.
Reattach the grass bag only when the engine is switched off and the blade is stopped.
Using one hand, lift up the chute flap, while grabbing onto the basket handle with the other. Hang in the basket from the top.
7. Cleaning, maintenance, storage, transport and ordering of spare parts
Danger!
Never work on or touch any current-conducting parts of the ignition system while the engine is running. Pull the spark plug boot from the spark boot before doing any maintenance or assembly work. Never carry out any work on the equipment while the engine is running. Work that is not described in these operating instructions, should only be carried out by authorized workshops.
7.1 Cleaning
The lawn mower should be cleaned thoroughly every time after it has been used. This applies in particular to its underside and the blade mount. Tilt the lawn mower to the rear by pressing down the push bar.
Note: Before tilting the lawn mower, use a petrol extraction pump to drain all the fuel out of the
fuel tank. Do not tilt the lawn mower by more than 90 degrees. It is easiest to remove dirt and grass immediately after mowing. Dried grass remnants and dirt may impair the mowing operation. Check whether the grass ejector chute is free of grass residues and clear out as required. Never clean the lawn mower using a water jet or a high-pressure cleaner. Ensure that no water can get into the interior of the equipment. Do not use aggressive cleaning agents such as cold cleaners or petroleum ether.
7.2 Maintenance
Please refer to the supplied petrol service manual for information on the maintenance intervals.
Note: Dispose of soiled maintenance material and operating materials at the appropriate collection point.
7.2.1 Petrol engine
Note! Never run the engine with no or too little oil. This can cause serious damage to the engine.
Checking the oil level
Place the lawn mower so that it stands level. Un-screw the oil dipstick (Fig. 9a/Item 7) by turning it counter-clockwise and wipe the dipstick. Re-insert the dipstick into the filler opening as far as it will go but do not screw it in. Pull out the dipstick, hold it horizontally and read off the oil level. The oil level must be between the two marks min. and max. on the oil dipstick (Fig. 9b).
Changing the oil
The engine oil is best changed when the engine has been switched off but is still warm.
- Make sure that the debris bag has been removed.
- Empty the petrol tank with a petrol suction pump and run the engine until the remaining fuel is fully consumed.
- Place an oil drip tray alongside the mower.
- Open the oil fi ller plug (Item 7) and tilt the mo-wer 90° sideways.
- The hot oil will flow through the open oil filler opening into the oil drip tray.
- After the old oil has drained out, set the mower upright again.
- Fill in engine oil up to the top mark on the oil dip stick.
- Important! Do not screw in the oil dipstick to check the oil level – only insert it as far as the thread.
GB
- Dispose of the used oil in accordance with applicable regulations.
7.2.2 Blades
For safety reasons, have all blade sharpening, balancing and mounting work carried out by an authorized service center. To achieve optimal results, we recommend having the blades checked once a year.
Changing the blades (Fig. 8)
When changing the cutting unit, be sure to use only genuine replacement parts. The identification mark on the blade must correspond with the number specified in the spare parts list.
Never install a blade from a different manufacturer.
Damaged blades
If, in spite of all caution, the blade comes into contact with an obstacle, switch off the engine immediately and pull off the spark plug connector.
Tilt the lawn mower to the rear and check the blade for damage. Damaged or bent blades must be replaced. Never straighten a bent blade. Never work with bent or heavily worn blades as this will result in vibrations, causing further damage to the mower.
Warning! Risk of injury when working with a damaged blade.
7.2.3 Axles and wheel hubs
Grease should be applied to the axles and wheel hubs once per season.
To do so, remove the wheel caps with a screwdriver and loosen the fastening screws on the wheels.
7.2.4 Care and adjustment of the actuator cables
Oil the actuator cables at regular intervals and check that they move easily.
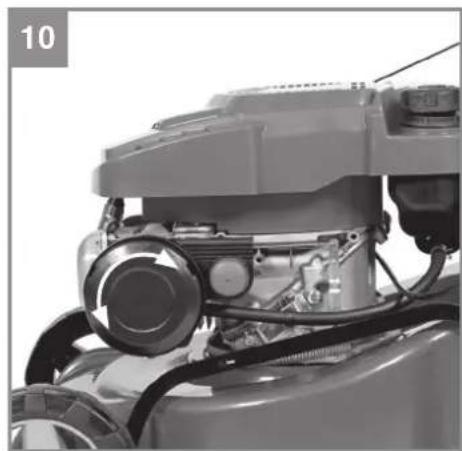
7.2.5 Maintenance of the air fi Iter (Fig. 10)
Soiled air fi Iters reduce the engine output by supplying too little air to the carburetor. If the air contains a lot of dust, the air fi Iter must be checked more frequently.
Never clean the air filter with petrol or inflammable solvents. Clean the air filter only with compressed air or by tapping it.
7.2.6 Maintenance of the spark plug
Clean the spark plug with a copper wire brush.
- Pull off the spark plug connector (Fig. 11/Item A).
- Remove the spark plug using a spark plug wrench.
- Assemble in reverse order.
7.2.7 Inspecting the V-belt
Remove the blade as described in 7.2.2.
To inspect the V-belt you must remove the V-belt cover (Fig. 12/Item 5b).
7.2.8 Repairs
After carrying out any repair or maintenance work, ensure that all safety parts are installed and in perfect condition.
Keep potentially hazardous parts out of reach of other persons and children.
Note! In accordance with the German Product Liability Act, we are not liable for any damages if they result from improper repairs to the product or if parts are replaced by items other than genuine parts or parts approved by us. Furthermore, we are not liable for any damages if they result from improper repairs to the product. Arrange for your customer service or an authorized workshop to do the work. The same applies to accessory parts.
7.2.9 Operating times
Please observe the regulations concerning lawn mower operating times, which may differ from town to town.
7.3 Preparing the mower for long-term storage
Warning! Do not empty the petrol tank in enclosed areas, near fire or when smoking. Petrol fumes can cause explosions and fire.
- Drain the petrol tank using a petrol extraction pump.
- Start the engine and run it until the tank and fuel line are completely empty and the engine stalls.
- Change the oil after each season.
- Remove the spark plug. Use an oil-can to fill the cylinder with approx. 20 ml of oil. Slowly pull back the starter handle, which will bathe the cylinder wall with oil. Screw the spark plug back in.
- Clean the cooling fins of the cylinder and the housing.
GB
- Be sure to clean the entire equipment to protect the paint.
- Store the equipment in a well-ventilated place.
7.4 Preparing the mower for transport
Warning! Do not empty the petrol tank in enclosed areas, near fire or when smoking. Petrol fumes can cause explosions and fire.
- Drain the petrol tank using a petrol extraction pump.
- Always let the engine run until it has used up the remainder of petrol in the tank.
- Empty the engine oil from the warm engine.
- Remove the spark plug connector from the spark plug.
- Clean the cooling fins of the cylinder and the housing.
- Unhook the starter cable from the hook (Fig. 3c). Slacken the connection shown in Fig. 3a on the left and right of the push bar and swing down the upper push bar. Make sure that the actuator cables do not get kinked when the bar is pulled up.
- Wedge a few layers of corrugated cardboard between the upper and lower push bars and the engine in order to prevent any chafing.
- Secure the load sufficiently so that it cannot slip and cause damage or injuries during transportation.
7.5 Consumables, wear materials and spare parts
Spare parts, consumables and wear materials such as engine oil, V-belts, spark plugs, air fi lter inserts, petrol fi lters, batteries and blades are not covered by the warranty.
7.6 Ordering replacement parts:
Please quote the following data when ordering replacement parts:
• Type of machine
• Article number of the machine
• Identification number of the machine
• Replacement part number of the part required
For our latest prices and information please go to www.Einhell-Service.com
8. Disposal and recycling
The equipment is supplied in packaging to prevent it from being damaged in transit. The raw materials in this packaging can be reused or recycled. The equipment and its accessories are made of various types of material, such as metal and plastic. Never place defective equipment in your household refuse. The equipment should be taken to a suitable collection center for proper disposal. If you do not know the whereabouts of such a collection point, you should ask in your local council offices.
GB
9. Troubleshooting guide
Warning: Switch off the engine and pull out the spark plug boot before making any checks or adjustments.
Warning: If, after making an adjustment or repair to the engine, you let it run for a few minutes, remember that the exhaust and other parts will get hot. Do not touch these parts as they may burn you.
| Fault Possible cause Remedy | ||
| The equipment does not operate smoothly and vibrates intensively | - Bolts loose- Blade attachment is loose- Blade imbalanced | - Check bolts- Check blade attachment- Replace blade |
| The engine does not start | - Engine start/stop lever is not pressed- Throttle lever in wrong position (if provided)- Spark plug defective- Fuel tank empty- Fuel pump (primer) not actuated (if provided) | - Press the engine start/stop lever- Check setting (if provided)- Replace spark plug- Top up fuel- Actuate the fuel pump (primer) (if provided) |
| Engine does not run smoothly | - Air fi lter dirty- Spark plug dirty | - Clean the air fi lter- Clean the spark plug |
| Lawn turns yellow, uneven cut | - Blade is not sharp- Cutting height too small- Engine speed too low | - Sharpen blade- Adjust to the proper height- Set the throttle lever to max. (if provided) |
| Grass chute is not clean | - Engine speed too low- Cutting height too small- Blade is worn- Grass bag is clogged | - Set the throttle lever to max.- Set properly- Replace the blade- Empty the grass bag |
The reprinting or reproduction by any other means, in whole or in part, of documentation and papers accompanying products is permitted only with the express consent of the Einhell Germany AG.
Subject to technical changes
GB
Service information
We have competent service partners in all countries named on the guarantee certificate whose contact details can also be found on the guarantee certificate. These partners will help you with all service requests such as repairs, spare and wearing part orders or the purchase of consumables.
Please note that the following parts of this product are subject to normal or natural wear and that the following parts are therefore also required for use as consumables.
| Category Example | |
| Wear parts* | Air filter, Bowden cables, grass basket, tires, drive clutch |
| Consumables* Blades | |
| Missing parts |
* Not necessarily included in the scope of delivery!
In the effect of defects or faults, please register the problem on the internet at www.Einhell-Service.com. Please ensure that you provide a precise description of the problem and answer the following questions in all cases:
• Did the equipment work at all or was it defective from the beginning?
• Did you notice anything (symptom or defect) prior to the failure?
• What malfunction does the equipment have in your opinion (main symptom)?
Describe this malfunction.
GB
Warranty certifi cate
Dear Customer,
All of our products undergo strict quality checks to ensure that they reach you in perfect condition. In the unlikely event that your device develops a fault, please contact our service department at the address shown on this guarantee card. You can also contact us by telephone using the service number shown. Please note the following terms under which guarantee claims can be made:
- These guarantee terms apply to consumers only, i.e. natural persons intending to use this product neither for their commercial activities nor for any other self-employed activities. These warranty terms regulate additional warranty services, which the manufacturer mentioned below promises to buyers of its new products in addition to their statutory rights of guarantee. Your statutory guarantee claims are not affected by this guarantee. Our guarantee is free of charge to you.
- The warranty services cover only defects due to material or manufacturing faults on a product which you have bought from the manufacturer mentioned below and are limited to either the rectification of said defects on the product or the replacement of the product, whichever we prefer. Please note that our devices are not designed for use in commercial, trade or professional applications. A guarantee contract will not be created if the device has been used by commercial, trade or industrial business or has been exposed to similar stresses during the guarantee period.
-
The following are not covered by our guarantee:
-
Damage to the device caused by a failure to follow the assembly instructions or due to incorrect installation, a failure to follow the operating instructions (for example connecting it to an incorrect mains voltage or current type) or a failure to follow the maintenance and safety instructions or by exposing the device to abnormal environmental conditions or by lack of care and maintenance.
- Damage to the device caused by abuse or incorrect use (for example overloading the device or the use or unapproved tools or accessories), ingress of foreign bodies into the device (such as sand, stones or dust, transport damage), the use of force or damage caused by external forces (for example by dropping it).
-
Damage to the device or parts of the device caused by normal or natural wear or tear or by normal use of the device.
-
The guarantee is valid for a period of 24 months starting from the purchase date of the device. Guarantee claims should be submitted before the end of the guarantee period within two weeks of the defect being noticed. No guarantee claims will be accepted after the end of the guarantee period. The original guarantee period remains applicable to the device even if repairs are carried out or parts are replaced. In such cases, the work performed or parts fitted will not result in an extension of the guarantee period, and no new guarantee will become active for the work performed or parts fitted. This also applies if an on-site service is used.
-
To make a claim under the guarantee, please register the defective device at: www.Einhell-Service.com. Please keep your bill of purchase or other proof of purchase for the new device. Devices that are returned without proof of purchase or without a rating plate shall not be covered by the guarantee, because appropriate identification will not be possible. If the defect is covered by our guarantee, then the item in question will either be repaired immediately and returned to you or we will send you a new replacement.
Of course, we are also happy offer a chargeable repair service for any defects which are not covered by the scope of this guarantee or for units which are no longer covered. To take advantage of this service, please send the device to our service address.
Also refer to the restrictions of this warranty concerning wear parts, consumables and missing parts as set out in the service information in these operating instructions.
F
Danger!
Incertezza K_pA 3,0 dB
Incerteza K _D4 3,0 dB
X 2006/42/EC
□ Annex IV
Notified Body:
Reg. No.:
X 2000/14/EC_2005/88/EC
□ Annex V
X Annex VI
Noise: measured L_WA = 93,12 dB (A); guaranteed L_FAA = 96 dB (A) P = 2.0 kW; L/∅ = cm
Notified Body: TÜV Rheinland LGA Products GmbH (NB 0197)
X 2012/46/EU_(EU)2016/1628
Emission No.: e9*2016/1628*2016/1628SYA1/P*31018*00 (V)
Standard references: EN ISO 53951-1, EN ISO 53951-2, EN ISO 14982
Subject to change without notice
Archive-File/Record: NAPR026282
Documents registrar: Markus Jehl
Wiesenweg 22, D-94405 Landau/Isar
SB Petrol Lawman - F Tonsiaise a gezona e assena - T oaseae e berindra - DVN Bezirndirovun grossasimakosine - S Bensinshain grädtikopare - CZ Benzinska selokoske - SK Benzinovi kosakse. AL Benzinoimaakor - E Cortactosed con motor de gasolina - FM Beniniskitykölnon nuomieskiel - SLO Benzinska kositica za trava - H Benzini-Kinyntogrel - RO Magrité de tuns gezona pe zumnär - GB Revicinkynj ölookompo - P Cora relvas e gasolina - ARBIB Benzinska kositica za trava - PS Benzinska kositica za trava - FL Kosanaka spalmazna - TR Benzil Mototu Cira Bärne Makanen: RUS 1000-2000-0000000000000000000000000000000000000000000000000000000000000000000000000000


EH 09/2021 (01)