BM4381EG - Dishwasher Profilo - Free user manual and instructions
Find the device manual for free BM4381EG Profilo in PDF.



| Brand | Profilo |
| Model | BM4381EG |
| Product Type | Built-in dishwasher (integrated or fully integrated) |
| Height | 81 cm or 86 cm (depending on model) |
| Width | 60 cm (standard) |
| Depth | 55 cm (approx) |
| Weight | Approximately 45 kg |
| Power Supply | 220-240 V ~ 50 Hz |
| Maximum Power | 2100 W |
| Capacity | 13 place settings |
| Wash Programs | Eco, Intensive, Quick, Glass, etc. |
| Options | Delay start, Extra Dry, VarioSpeed |
| Noise Level | 44-48 dB (depending on program) |
| Water Consumption (Eco program) | 9 liters |
| Energy Consumption (Eco program) | 0.9 kWh |
| Filtration System | Coarse filter + micro filter, self-cleaning |
| Spray Arms | 2 rotating upper and lower arms |
| Safety | Child lock, anti-flood protection, electrical safety |
| Repairability | Spare parts available, repair manual included |
| Special Features | Vario drawer, EmotionLight, TimeLight (depending on version) |
Frequently Asked Questions - BM4381EG Profilo
User questions about BM4381EG Profilo
0 question about this device. Answer the ones you know or ask your own.
Ask a new question about this device
Download the instructions for your Dishwasher in PDF format for free! Find your manual BM4381EG - Profilo and take your electronic device back in hand. On this page are published all the documents necessary for the use of your device. BM4381EG by Profilo.
USER MANUAL BM4381EG Profilo
4.15 CMHa Ha nnoyata Ha rnaBHnKoHTaKT 27
4.15.1 CbIaHHe Ha IIOuTaHa IINaBnKoHTaKT 27
4.15.2 MoHTnpaHe Ha nnoyata Ha rnaBnKoHTAKT 27
4.16 CMrHa Ha Tpb6oPbOda 3a npenbnaHe 28
4.16.1 CbannHe Ha KaHana 3a npenbIbaHe 28
4.16.2 MoHTnpaHe Ha TpbOboBa 3a npemblbHe 29
4.17 CMHa Ha BbTpewHata Bpata 31
4.17.1 CbajHe Ha BbTpewHaTbPata 31
4.17.2 MoHTIpaHe Ha BbTpewHaTa BpTa 31
4.18 CMHa Ha naHTata Ha BpaTata 32
4.18.1 CbajHe Ha naHTaHa BpaTaTa 32
4.18.2 MoHTpaHe Ha naHTaTa Ha BpaTata 32
4.19 CmHa Ha ynTbTHHeHrTo (DOnHo) Ha BpaTaTa 34
4.19.1 CbAJIHe Ha yIINbTHHeHTo Ha BpaTaTa 34
4.19.2 MoHTupaHe Ha yNtBTHHeNo Ha BpaTaTa 35
4.20 CmHa Ha ynnbTHHeHneTo (ropHo) Ha BpaTaTa 36
4.20.1 CbAHa He yNtBHeHHeTo Ha BpaTaTa 36
4.20.2 MoHTnpaHe Ha ynnbTHHeHMeTo Ha BpaTaTa... 36
CbBETn 3a peMOHT - CbDOMnJaHa MaunHa
4.21 CmHa Ha EmotionLight 37
4.21.1 CbAHe Ha EmotionLight 37
4.21.2 MoHTIpaHe Ha EmotionLight 37
4.22 CmHa Ha TimeLight 40
4.22.1 Cbajhe Ha TimeLight 40
4.22.2 MoHTupaHe Ha TimeLight 40
4.23 CmHa Ha Gap illumination (OcbetraBe Ha npolykn) 41
4.23.1 CbIaHe Ha Gap illumination 41
4.23.2 MoHTipaHe Ha Gap illumination 42
OTHOCHO To3n DokyMeHT
1.1 Baxha nHΦopMaζη
1.1.1 Uen
TeHc cBbETn 3a pEmOH T NOMarat Ha Ntpe6nTEnla DpemOHtnpa Cam ypeiB C bOeTBeCTBnC pernameHTa 3a ekONOrOcb6paHO npoeKtnpaHe Ha ypeiNe (OT 03.2021 r.).
Te cbIbpxk HnHOpMaunKa Ka Da CMeHrTe ONpeDeneHn pe3epBn YactN, BKIOHTENHO npdynpckdHn n PNCKOBe.
Ako IMATE HRAKAKINBbNPoC,MOJIa CbPjKeTe Ce c HAUNO OTDeN 3a OBCNYKBHe Ha KIMENTH. Hne HOCIM OTBOBOPHOCT 3a UeTH, CAMO AKO CbBETHe 3a peMOHT ca cna3eHN npabInHo.
1.2 06aCHeHne Ha cHMBOJInTe
1.2.1 HbHa onaCHOCT
IpeynpeintenHnBaCe cBcTOrT OT CmBOJ nCnHaHa Dyma.CnrHaHaTa yMa noka3Ba cepno3HOCTTA Ha onaCHOCTTA.
| Ниво на п dedурждени 3начени | |
| ОПАСHОCT | Еспаразы新股у на п dedурждени.TО сбоб Shedени по Смьт ини сернони наразяваим. |
| ПРEDУПЕЖДЕНЕ | Еспаразы新股у на п dedурждени.TOT сбob Shedени по Смьт ини сернони наразяваим. |
| ВИМATEЛНО | Еспаразы新股у на п dedурждени.TOT сбob Shedени по Смьт ини наразяваим. |
| ВИМАМЕЛ | Еспаразы新股у на п dedурждени.TOT сбob Shedени по Смьт ини onMy-шостевни.$etп. |
Tabnua 1: Hua Ha onachocm
1.2.2 Cnmbon3a onachoct
CIMBOHTE3aONACHOCTCa CIMBOHNUH N3o6paXeHNA, KOHTO DaBaT INDINKAUHA 3a Bnda ONACHOCT.
BTo3n DOKyMeHCTe H3N013BaT CNEdHInTe CMBOIN 3a OnaCHOCT:
| Симboл за орасост за чужения | |
| ! | ОьтоPre dedупраздітелно сьобсятои Орасост от[elekntrческо habржтои Рись от[eк科研院所 |
| Орасost от[nорязвany | |
OTHOCHO To3n DokyMeHT
| Симbol 3a onachoct 3начени | Опachoct ot пемарази Опachoct ot горец поьрхости |
| Опachoct ot симно магнисто полес | |
| Опachoct ot неонисяцу льчени |
Ta5nuu2: CumbOnu 3a onachocm
1.2.3 CtpyKtpa Ha npéDynpexkdeHnra
PepynpexdHnraT BTO3N DOKMeHT MMAT CTAHapTN3nPAH BbHwEN BID NCTaHdAPTN3nPAH CTpykTypa.


ONACHOCT
BnHn3ToyHKn Ha onaCHOCTTla!
Bb3mOHHnocpeHnO tNfHopapaHeHa onaHocTt/npedynpckdHeHe
Mepkn 3a6paHn 3a npDoTbpaTbaHe Ha onaChocTta.
CneHnIy nPmep NOKaBA npEynpEKeHHe, KoTo yBcOMaBA 3a TOKOB Yapd, npEeIN3BnKAn OH tAcTn NoD HanpeKeHHe. CnOmeHabe Ce MApkata 3a N36RbAbe Ha onacHOCTA.


ONACHOCT
Pnck OT TokOB yap npaH nuactn noH anpekeHne!
CmbptOT TOKOB ynap
K3NkhOteyepeHtE OeNEKTPUeCKTO 3aXpaHbAne NOE 60 ceHynnpdE 3aONuBaHaNe hApMOHTA.
1.2.4 06uCNMBOJI
BTO3NIOKYMENTceH3NON3BATcNEdHNTeO6UINCNMBONI:
| Оьш симвов Зачени | |
| I | Иденихицаре на спесиален сьвет (Текст w/ллграфика) |
| I | Иденихицаре на постс сьвет (самоTekст) |
| I | Иденихицаре на врьзka Кьм Вideоурок |
| I | Иденихицаре на необхочимite ИСТрумени |
| I | Иденихицаре на необхочимiteпраздарителни ус自主创新 |
| I | Иденихицаре на ус自主创新 (ako ...,Тогава ... ) |
| I | Иденихицаре на рezуntат |
| [Стар] | Иденихицаре на Клиочни 6ытуон |
| [00123456] | Иденихицаре на Кatableожен Homep |
| [Статус] | Иденихицаре на по��аизяп Текст/ празорец (надиспега на урEDA) |
Ta6nua3:06u cumeonu

Be3onachocT
2.1 06uHnHCTpyKu3a6e3onacHOCT
2.1.1 BcHKn DoMaunHn ypeiN
Puck OT TOKOB yap nopadn qactn noh HanpexeHne!
- PrguKPi pR eMOHTN, BKNIOHbAaN eNEKTPnEeCKN KOMHOHeHtN, MOrat Da doBedeAt Do TOKOB yad?
- Pankachate yepda oTe eneKtpueckaTa mpeka 3a nohe 60 cekyHdi, npeDi da 3a-noCHte pabOta.
Cnepe moHHTA TpRABa da ce HbPnpoBepeka 3a 6beonacOCT bcrnacho VDE 0701 nn B cToBTcTBNe Cbc cneuHmHNTe 3a cTpanaHs panaOpE6b
Puck OT HapaHbAbe OTOCTPNp b6oBe!
Hocete npedn3n pbkabn
PCK OT pme3A8Na BO peme HA pMeOH, NOpIbJbKHa,OTcPraBaBA Ha HnE3PbABHOCTN andepBn3npaIe TkHn DBeWKeu CE KOMNoHEHTn
Hocete3aunTHn06yBKn.
3akpeneteTexknteKOMnoHeHTn,taKaYeHaHe NaHaT.
He no3BONRABaTe KOHTaKT Ha YAcTn OT TAnOTo C DmXeUc Ce KOMNoHEHTN.
Pnck 3a 6e3oanacocTtA/foHKuHraTa h ypeDa!
- 13no3BaIte cmo opunHaJIH pe3epBHN qactN.
Pnck OT nobpeHa eNektpocTaTuHc YbCTBtENH KOMnoHeHTN (ESD)
HeDOKOcBaTeMoDyInTe,BKNIOHTeHnHO Bp3Kn IN PNOBOHNKOBNbTtua.

IhctpymEnTu n NOMOuHcpeDCTBa
| посочано Побразости Избражени | |
| ОТberтka Torx T20 С OTВОр [00340764] | 100 MM, за ВИNTOBе с преда- зен удифт |
| ОТberтka Torx T15 | Дылжина 80 MM |
| Плеска OTberтka Бух 10 MM x 1,6 MM x 200 MM | |
| Кleineци с Истови- ни челковsts [00340871] | Дылжина: 200 MM, пави |

PemOH
4.1CMHaHa pa60THnI NIO
N3nCKBaHe:
YpeBte n3KNIOueHOT 3aXpaHBaHeTo.
YpeBt cBO6OHOIOCTbneH.
4.1.1 CbAJIHe Ha pa6OTHnI nnT
1.CBaIeTe DbTa BnHTa O3aI (1) (onu).
2. HatncheTe Dbata 3axBaauu npocTa npa6oTHn nnot Harope (2).
- NoburHete neko paobTHnT OTnped. (3).
4.N36yTaIe pa60THnN nNot Ha3aD(4).
5.CaJIePe pa6OTHnI IIOI.
4.1.2 MoHTnpaHe Ha pa6oTHnI IIO
1.3aknHcTe 3aHaTataact Ha pa6oTHnI Nnot BbB BOaHTe C NOMOHTa Ha 3aDbpKaaNTe Btynk (1).
- Hatnche pa60nHnnT Hanpei (2).
- HataHETe npHdHa THT ha paOthm nnoT haoNy,doKATO yte TaBATAaauu noCTa da pukBat Ha mCTo (3).
4.3aBnTe OTHOBO DbTa BnHTa (4) (ONU).

PemOH
4.2 MoHTnpaHe Ha cncTeMaTa OT KOUHnIu
M3nCKBaHe:
CbOTBeTHATA KOUHnua e n3BaDena oT ypea.
4.2.1 MoHTnpaHe Ha nIb3raH a naeua 3a 86-cM moDen
CneuaJIHHHnCTpyMeHTH:
Bodayha nanea [00614935]
ΦнксаТОрЗачИN[00618565]
- NocTabete nIb3raHa Ha naneua no dnaarOHa B npedHata qact Ha KOUHNuTa.
2.LeHTpnpaTe n pakHeTe yneHa naeua Ha mrcTo.
4.2.2 MoThnpaHe HaФнкCaTopa 3aЧаш
CneuannHnHcTpymEnTH:
Boday hanaeta [00614935]
Φнкcatop 3a淘汰[00618565]

Korato MHeTe qaHn, fHKCaTOPbT 3a qauH MoKe Ja 6bNe cBbHt. D0
bNHTENHTNBT bNn HAmAraBa CbBuPaHETo HA BoHa DA bHbHO To HA
uHtne. PnMHe H BcOKn TaaHn PpEnOpbHbAme Da OCTABrTe fHKCa
Topa CbHt HANOy.
Ako RopHnTE KOHNm HMaT DoIbNHnTeHa IuaCTMacOBa BIOKKa, T
nbPo TRbBA da Ce 13BaDn.
1.ИЗБаДeTe nIaCTMaCObATo BnOxKa.
2.ⅢpaKHTeΦmKcTOpa3aHaMHaMCTO.
3.CrbHeteΦKcaTopa.

PemOH
- NocTabeTe npedMeTne 3a MHe.
4.2.3 MoHTnpaHe Ha BLOKKaTa Ha naporehepaTopa
CneuaHn HcTpymeHTn:

Bodau ha naneua [00614935]

4.10.2 MoHTnpaHe Ha cTpaHnHnHa nHaen
- Noctabete cTpaHnHH naHEn B yner Ha OCHOBata (1).
Due. 2: Hantbno uHmeepupan
2. HATNCHeTe CtpaHnHnnaHnBbpxy ypeJa (2).
3.3akpenete ctpaHHHnnaHc BnHTOBete (3).

PemOH
4.11 CmHa Ha BbHnHaTa BpTa
M3nCKBaHe:
YpeBbTe H3KnIOueHOT 3axpaHBAHeTo.
YpeBtE n3KNIOueH OT BOOCHa6nTENHa TpeKa.
4.11.1 N3BaXdaHe Na BbHHaTa BpTa

PpOCTo n3BaTe BnHTOBeTe, KaKTo e OnHaB CneHnTe CTbKn.
- OTBOpTe BpaTaTa.
2.CbaneTe yeTnpTE BnHTa.
3.

3aKpeneBpaTata, kato JbpxnTe OeHnata CTpaHa.
CbaTe DbTa BnHTa.
4.11.2 MoThIpaHHe Na BbHnHaTa BpTa
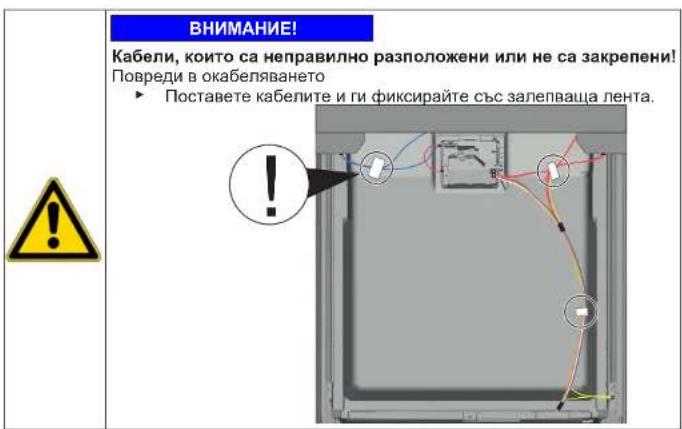

PemOH
N3NCBaHe:
N30aIauHNNHT KOKyX e npabnHO N03MIOHnpaH INKpA H OT BbTpewHaT aCTpHa Ha BbHHaTa BpTa.
BbB bHHaTa BpaTa Ca BKapaHn naHTN.
1.3aTbOpTe BbTpewHaTa Bpata,6e3 Da r 3aTpBwBaTe p3ko.
- HataChTe BbHnHaTa BpaTa Harope NoKoHTpOHHa NaHen (1).
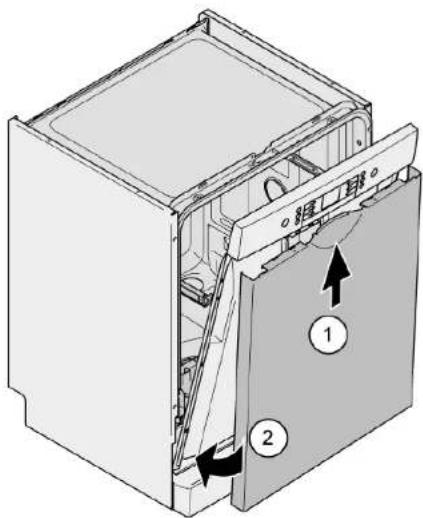
- HATNCHETe BBHUNHaTa BpaTa KbM BbTpEuHnTa N 3aDpBxTe (2).
4.

3aKpeneTe BpaTaTa, KaTo RaBpXnTe OeHnTa CtpaHa.
OTbopete Bpatata n 3akpenete C daB bHHTa (MeTANH 4 x 11 MM BNHTOBe).
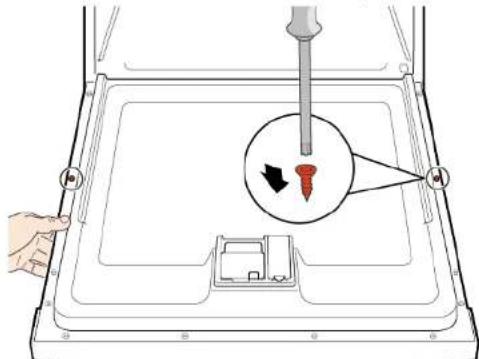
5.3akpenete BbHHTAtpaTc CHTnBHTa (MeTAnH4x11MMBHTOBe).
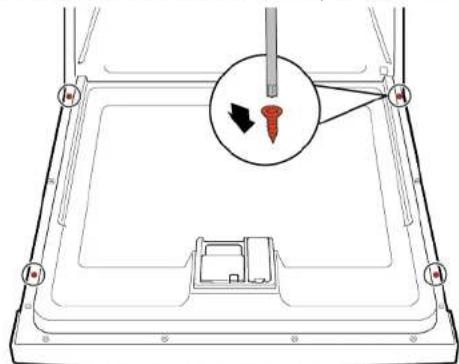

PemOH
4.12 CmHa Ha KOHTPOHnnaHeI

Ako dahen onepaunohm moyn e defekehen, cennrKoHTponen nanei Tpa6ba da 6bde CmeHEN.
N3NCKBaHe:
YpeBt E n3KIOUeH OT 3aXpaHbAHeTo.
YpeBTe N3KJIOUeH OT BOOChA6DnTeNHaTa MPexa.
BbHnHaTa BpaTa e CbaNeHa.
BbHuaTa BpaTa e CbaNeHa (HanbHnHO HnterPpapa/HnterPpapa).
4.12.1 CbAJaHe Ha KOHTpOJIHHaHaH
- INKIOHETE ENEKTPNHECKITE Bp3kN IOT KOHTPOINHA PAHENI IOHNIA CEH3OP 3a npenapat 3a INNAKBAHAE (1,2).
2.ИЗкlioуete 3a3eMBAUJIЯ Ka6eN(3)(onuIY)
3. OTBOpTe BpaTata Ha ypea.
4. 3akpenete KOHTponnnaHn, 3aJa npeoTapatnte Naaheto My (3adpbjxte ro).
5.CBaIeTe WecTTE BHTA.
6.CBaJIeTe KOHTponHnnaHn.
4.12.2 MoHTnpaHe Ha KOHTpONHnnaHn

H3non3BaHTe BHTOBe 4 x 16 MM.
MoHTnpaIteB06paTeH peI.

PemOH
4.13ФИКСИРанеHa npуЖинITEHa BpaTaTa
1.ⅠaandeTe kanaKaTaHa BodaHa Ka6eNa
2.1. OTBopete neko BpaTata (1).
2.ФИКСИРАТЕВБВДЛБОHAHATAHaунЯHA OCHOBATA(2).
- BABHO 3aTBOpTe BpaTata (3).
CnCTeMaTc Ka6enIe npKpeHn ABOMaTHNO KbM nHTaHa BpaTaTa.

PemOH
3.1.3aTbOpTe JeKO BpTaTata (4).
- PnemecTe Xne6a 0T3ad nOCBO6oTe naHTata Ha BpTaTata (5).
- Otbopete Bpatata (6).
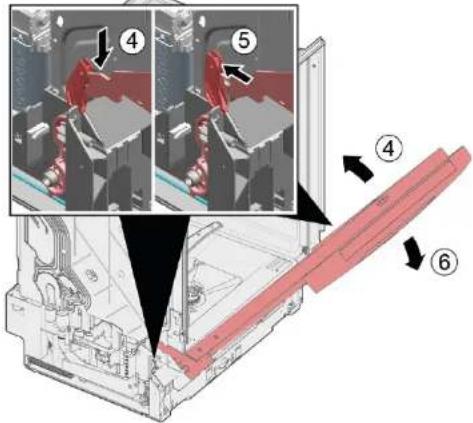
- Nobtopete npoueypata oTHBOO ot npyraTcTpHa Ha ypeda.
MoHTnpaTne IIOHATA Ha IINABHHKoHTaK T O6pateH pe.

PemOH
4.16 CmHa Ha Tpb6oPbOda 3a npenbIbaHe

TpboPBOBbT 3a npenbnahe ce HAMpa B npednata doHa qact Ha ypeda.
N3nckBaHe:
YpeBt E n3KIOUeH OT 3aXpaHbAHeTo.
YpeBTe N3KJIIOUeH OT BOOChA6DnTeNHaTa MPexa.
Me6enHnT nAHen e cBaneH (onzna).
BbHuiHaTa BpaTa e cBaNeHa.
DonnHnT naHEn eCBaneH (onua).→26
Nochata Ha IaBHMaKoHTaK e CBAeHa.→27
4.16.1 CbajnHe Ha KaHaHa 3a npenBlaBe

OctaTbUHa BOna
PnO tCpTaHbAHa He A DpeHaxHmApKyH MoKe Da n3Tee octaTbH H BA.
Cnpete BOATA INI INPemaxHEOTOCOBHINCBCMYKATEHNA CnPHIOBKA.
- OtnycheTe MexaHn3Ma 3a 3axBaUaHe oTrope (1,2).
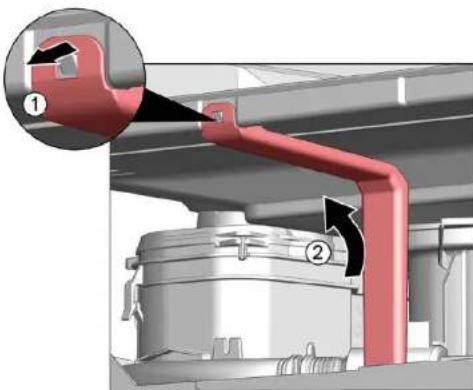
- Ocbobodete KpeneKHN enemt otrope
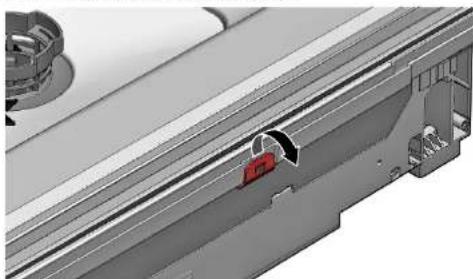

PemOH
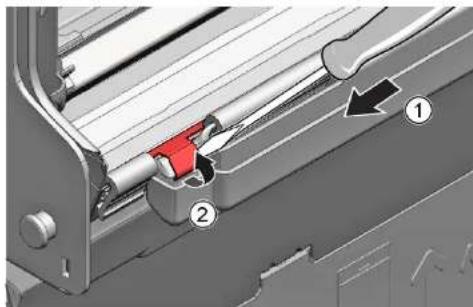
3.1.NoctabeTe OTBepkata Noi MetaHnHCTonep(1). 2.BHHMaTeHNO OcBO6oDeTe MeTaHnHaCko6a(2)
- NOBHHeTe Tp6bonpoB0da 3a npenbnahe.
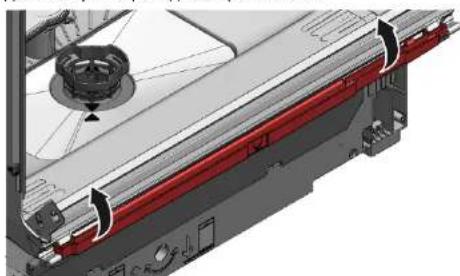
4.16.2 MoHTIpaHHe Ha Tpb6oPbOBoJa 3a npenbIbaHe

IopoeiOn OT BODa NopAei HENpABINeH MOHTaX Na TpBcONpOBOda 3a nppebNaBe!
Bkaparape npabnnpbbonpoBa 3a npenbbahe ot dony bB BODaHa H na yhen a OCHOBATA.
4.20.2 MoHTnpaHe Ha ynblTHeHneTo Ha BpTaTa
PpeMIOMOHTAka yIbTHHeHTo HA BpataTApB8Ba Da bIe OtpraHO Ha npABINHATA IbIKHa. Ta e 1750 MM 3a ypeDn C BucOuHn 81 cm n 1850 MM 3a ypeDn C BucOuHn 86 cm.
- PnroTBete noxodya ynnbTHHe 3a BpaTata.
2.Ocnypere npabunHata n03nna 3a moHTax Ha ynnbTHMeHHnnpoHn.
- 5aata toka tpa6ba da e HNBOto Ha ynblntHnHaTaJeHTA.
4

YnIbTHHeHrTO He TpRbBa Da e BnHIOoBpa3HO INN ONbHATO B bIInTe. YnIbTHHeHrTO Ce OTrp3Ba DnaorOAnHO B kpanaTa n Ce TceHBA BbHOTAO HA KOHTeHMeOPA OtnPeD.
Nocabete kpaH y NtBTHEHneto Hapabo ENpoI NOB TEpuHHTA Bpata. YNbTHEHnTO TpBbA Ja Nexk Bb3MOxHO HAI-OtPCTAHN HA KOHTeHepa.

Ppabnno noctabeHo ynnbTHHeHne Ha Bpata:

PemOH
4.21 CmHa Ha EmotionLight

EmotionLight e paoNIOXeHBA RopHATA npEHa BbHnHa cHt Ha pe3epoBaRa 03aIINKBAHe.
N3nCKBaHe:
YpeBt E n3KJIOueH OT 3axpaHbHaHeTO.
YpeBt E N3KJIIOUeH OT BOOChA6DNTENHaT MpeXa.
YpeDnTe ca CBO6OHO DocTbNH.
Pa6oTHnT nnot e cBAneH (onu).
DeCHnT naHEn eCBaneH (onu),→19
4.21.1 CBaJIaHe Ha EmotionLight
- Otdenete Kykata HaФнкcatopa ot3an(1).
- NabaTe TaBpaHa Harope (2).
- N3bPnaiTe uencena ot KOHeKTopa (dony BnACHO OT npEHaTcPaHa Ha ype- da).
4.Cbanete enektpnueckata Bpb3ka OT 3axpaHbaunrMoyn.
- Cbane EmotionLight orypeda.
4.21.2 MoThIpaHe Ha EmotionLight
- NocTaBete DbPkaA Ba pAmKaTHa Nape3epBoa4 3nNaKBAHe (1).

PemOH
2.3axBaHETe Kykata Ha dmKcatopa (2).
3

BHMAHNEI
HenpaBunEn MoHTax!
OBpda Ha Kabena B 30Hata Ha naHTata Ha BpaTata.
MOnTHPnAte KAbena B OHa HaNtTa HApata (MeKJy NaHTa HNaHOTa Hne3epBOapa 3a HnPAkBAHe), Taka He Da He MoKe Da 6bJe NOBpeDeh DT BmKekCe Ce Actn.
MOHTnpaIe KaBenaOT TaChata DonHa cTpaHa.

PemOH
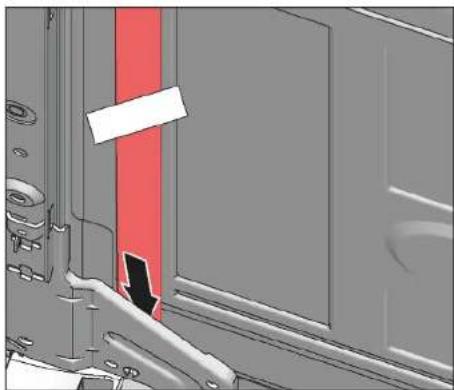
Φue.3:Πnocbk ka6en
4.BknioueTe uencena.
4.23 CMHa Ha Gap illumination (OcbetBaHe Ha npolykn)
N3nCKBaHe:
YpeBTe n3KNIOueH OT 3aXpaHBAHeTO.
YpeIbTe n3KIOueH OT BOOChA6DITeNHaTAt MPexa.
BbHnHaTa BpaTa e pa3rNo6eHa.
OnepaounHHnT naHEn eCBaneH.
4.23.1 CbAHe Ha Gap illumination
1.1.OTdeneTeΦκκatopa(1).
2.Cbanete eeneKtpnueckata Bpb3ka ot onepaunnoHHM Moyn (2).
2.1. OTdeneTe Kykata Ha fKcTaOpa O3ad (1).
2.CBaIeTe ONmHHTO BnakHO (2).

PemOH
3.1. OTeJeTe Kykata Ha fKcatopa (1).
- NOBdHnHTe NcHATa NpTaK cIbPkaHa N I H3BaTe OT pAMKaTHa NoepaOHNOHNyU(2).
4.23.2 MoHTIpaHc Ha Gap Illumination
- NocTabeteNbpxaHa Na neaTHaTaNnATKa B paMKaTa Ha onepaHNOHHM Moyn.
- MoHTnpaTte onTNUHOTo BnAkhno I rO 3aTeHHeTe, DOKaTO yyeTe UpaKaBaHe.
4.CBbpkeTe npoBOHnKa KbM OepaUMOHnMoyn.
4.23 Vymena Gap Illumination
Požadavek:
4.22.1 Fjernelse at timeLight 163
4.22.2 Montering at timeLight 163
4.23 Udskiftnig af Gap illumination 164
4.23.1 Fjernelse at Gap illumination 164
4.23.2 Montering of Gap illumination 165
4.21.2 Montering of emotionLight
- Sæt holderen i skylletankens ramme (1).

Reparation
- Aktivér lasekrogen (2).
3.

BEMERKI
Ukorrekt montering!
4.22 Udskifting at timeLight

4.22.1 Fjernelse at timeLight
4.22.2 Montering at timeLight
4.23 Udskifting at Gap illumination
Preindstilling:
4.23.2 Montering of Gap illumination
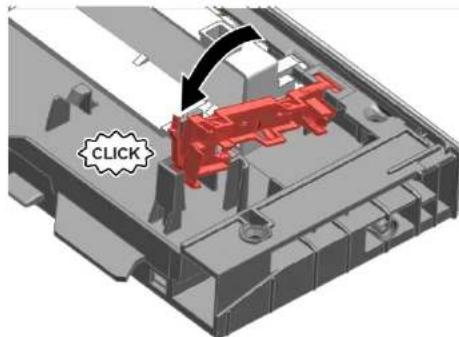
- Saet printkortholderen i betjeningsmodulets ramme.
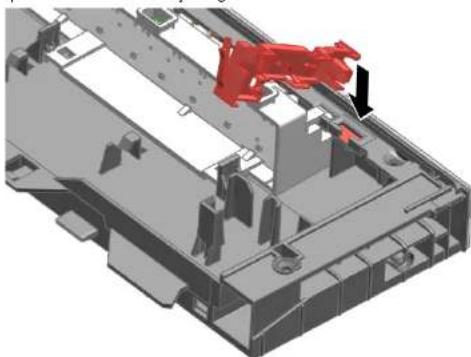
- Fastspaend den med en "klik"-lyd.
2.1 General Safety instructions 212
2.1.1 All domestic appliances 212
Tools and aids. 213
Repair 214
4.1 Replacing worktop 214
4.1.1 Removing worktop 214
4.1.2 Installing worktop 214
4.2 Installing basket system 215
4.2.1 Installing a tab slide for the 86 cm model 215
4.2.2 Installing cup support clip 215
4.2.3 Installing steamer insert 216
4.3 Replacing varioDrawer 217
4.3.1 Removing varioDrawer 217
4.3.2 Installing varioDrawer 218
4.4 Replacing spray arms 219
4.4.1 Removing spray arm 219
4.4.2 Installing spray arm 219
4.5 Replacing filters 220
4.5.1 Removing filter 220
4.5.2 Installing filters 220
4.6 Installing baking sheet spray head 221
4.7 Replacing power cord 222
4.7.1 Unplugging power cord 222
4.7.2 Plugging in power cord 222
4.8 Replacing detergent cover 223
4.8.1 Removing detergent cover 223
4.8.2 Inserting spring 223
4.8.3 Installing detergent cover 223
4.9 Replacing wastewater pump cover 224
4.9.1 Removing wastewater pump cover 224
4.9.2 Installing wastewater pump cover 224
4.10 Replacing side panel 225
4.10.1 Removing side panel 225
4.10.2 Installing side panel 226
4.11 Replacing outer door 227
4.12 Replacing control panel 229
4.12.1 Removing control panel 229
4.12.2 Installing control panel 229
4.19 Replacing (lower) door seal 240
4.19.1 Removing the door seal 240
4.19.2 Installing the door seal 241
4.20 Replacing (upper) door seal 242
4.20.1 Removing door seal 242
4.20.2 Installing door seal.. 242
Repair hints - Dishwasher
4.21 Replacing EmotionLight 243
4.21.1 Removing EmotionLight 243
4.21.2 Installing EmotionLight 243
4.22 Replacing TimeLight 246
4.22.1 Removing TimeLight 246
4.22.2 Installing TimeLight 246
4.23 Replacing Gap illumination 247
4.23.1 Removing Gap illumination 247
4.23.2 Installing Gap illumination 248
Concerning this document
1.1 Important information
1.1.1 Purpose
These repair hints support consumer to repair appliances by himself according to the applicable eco-design regulation (as of 03/2021).
They contain information how to exchange defined spare parts including warnings and risks.
In case of questions, please contact our customer service. We will only be liable for damages if the repair hints have been followed properly.
1.2 Explanation of symbols
1.2.1 Danger levels
The warning levels consist of a symbol and a signal word. The signal word indicates the severity of the danger.
Table 1: Danger levels
| Warning level Meaning | |
| Danger | Non-observation of the warning message will result in death or serious injuries. |
| Warning | Non-observation of the warning message could result in death or serious injuries. |
| Caution | Non-observation of the warning message could result in minor injuries. |
| Notice | Non-observation of the warning message could result in damage to property. |
1.2.2 Hazard symbols
Hazard symbols are symbolic representations which give an indication of the kind of danger.
The following hazard symbols are used in this document:
| Hazard symbol Meaning | |
| ! | General warning message |
| Danger from electrical voltage | |
| Risk of explosion | |
| Danger of cuts | |
| Danger of crushing |
Concerning this document
| Hazard symbol Meaning | |
| Danger from hot surfaces | |
| Danger from strong magnetic field | |
| Danger from non-ionizing radiation |
Table 2: Hazard symbols
1.2.3 Structure of the warnings
Warnings in this document have a standardised appearance and a standardised structure.

Danger
Type and source of danger!
Possible consequences of ignoring the danger / warning.
Measures and prohibitions for preventing the danger.
The following example shows a warning that warns against electric shock due to live parts. The measure for avoiding the danger is mentioned.

Danger
Risk of electric shock due to live parts!
Death by electrocution
- Disconnect appliances from electrical supply at least 60 seconds before starting repairs.
1.2.4 General symbols
The following general symbols are used in this document:
| Gen. symbol Meaning | |
| 1 | Identification of a special tip (text and/or graphic) |
| i | Identification of a simple tip (only text) |
| Identification of a link to a video tutorial |
Table 3: General symbols
| Gen. symbol Meaning | |
| Identification of required tools | |
| Identification of required preconditions | |
| Identification of a condition (if ..., then ...) | |
| Identification of a result | |
| [Start] Identification of a key or button | |
| [00123456] Identification of a material number | |
| Status Identification of displayed text / window(in the appliance's display) | |
Safety
2.1 General Safety instructions
2.1.1 All domestic appliances
Risk of electric shock due to live parts!
Errors by repairs involving electrical components can lead to electrical shock!
- Disconnect the appliance from the mains for at least 60 seconds before starting work.
After the repair have a safety test according VDE 0701 or country-specific regulations performed.
Risk of injury from sharp edges!
Wear protective gloves.
Risk of crushing during repair, maintenance, troubleshooting and service due to heavy and moving components
Wear protective shoes.
- Secure heavy components from falling down.
- Do not stick body parts into moving components.
Risk to the appliance's safety / function!
Only use original spare parts.
Risk of damage to electrostatically sensitive components (ESDs)!
- Do not touch the modules, including connections and conductor paths.

Tools and aids
| Designation Details Images | ||
| Screwdriver Torx T20 with bore hole [00340764] | 100 mm, for screws with safety pin | |
| Insulated Screw- driver Torx T15 with bore hole [15000626] | Blade length 125 mm, for screws with safety pin | |
| Slotted screwdriver | Blade 10 mm x 1.6 mm x 200 mm | |
| Needle nose pliers [00340871] | Length: 200 mm, straight | |
4.1 Replacing worktop
Prerequisite:
Appliance is disconnected from the power supply.
Appliance is freely accessible.
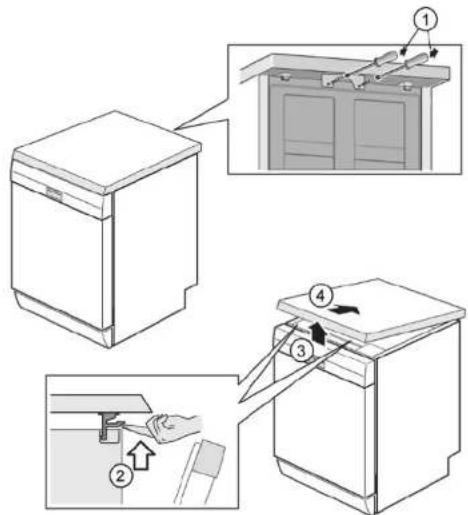
4.1.1 Removing worktop
- Remove the two screws at the back (1) (optional).
- Press both catch levers under the worktop upwards (2).
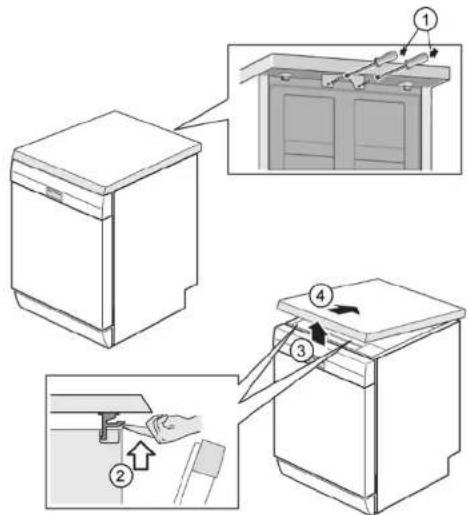
- Lift the worktop slightly at the front (3).
- Push worktop away towards the rear (4).
- Remove worktop.
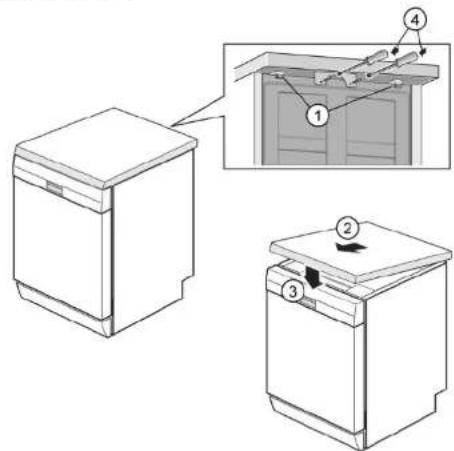
4.1.2 Installing worktop
- Lock the rear of the worktop into the guides using the retaining collars (1).
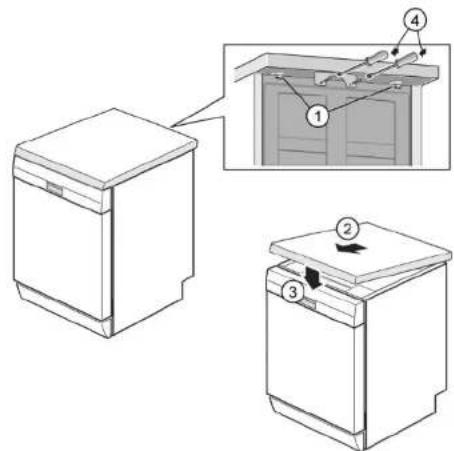
- Push worktop forwards (2).
- Press the front of the worktop downwards until both catch levers click audibly into place (3).
- Screw in the two screws again (4) (optional).

Repair
4.2 Installing basket system
Prerequisite:
The relevant basket has been removed from the appliance.
4.2.1 Installing a tab slide for the 86 cm model
Required tools:
Tabguide [00614935]
Cup support clip [00618565]
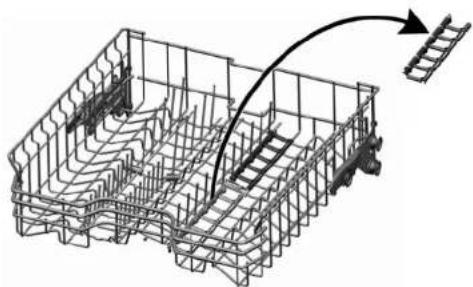
- Insert the tab slide diagonally at the front of the basket.
- Centre and click the tab chute into place.
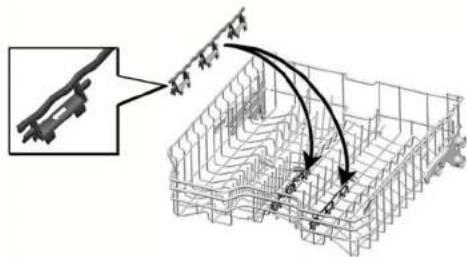
4.2.2 Installing cup support clip
Required tools:
Tabguide [00614935]
Cup support clip [00618565]

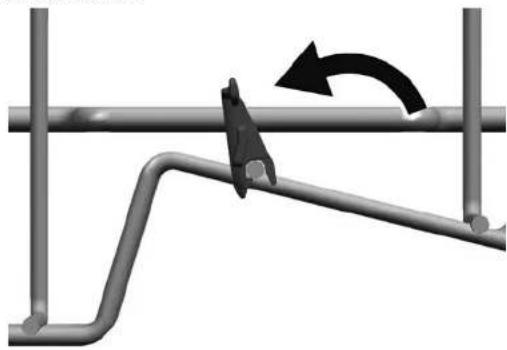
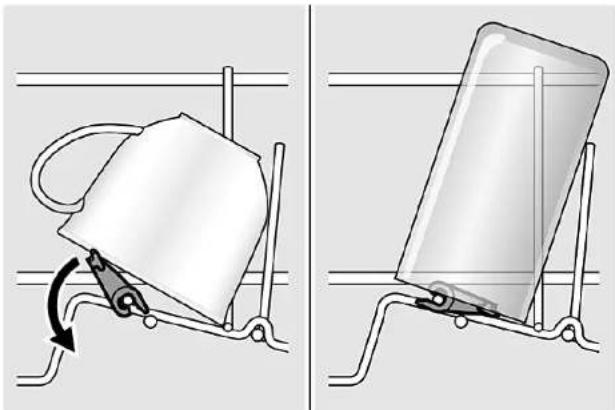
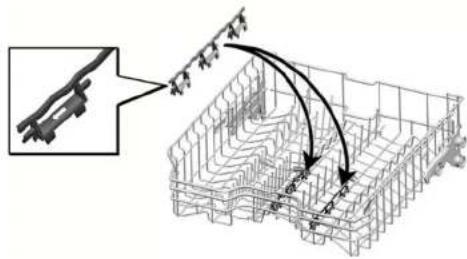
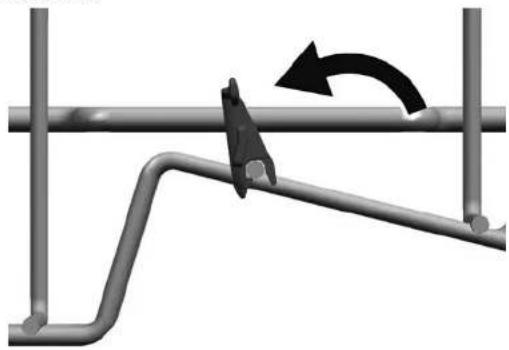
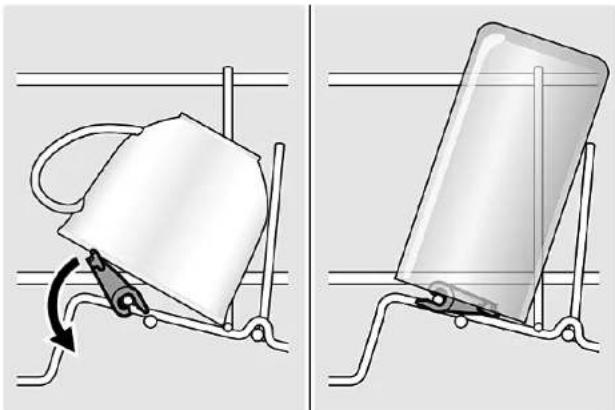
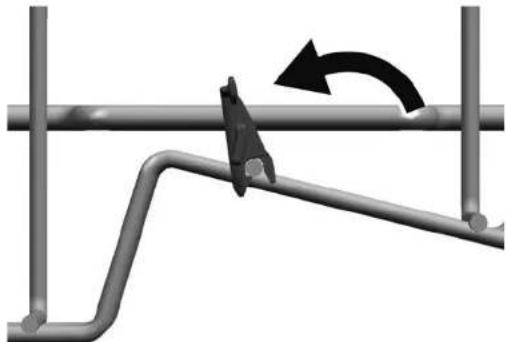
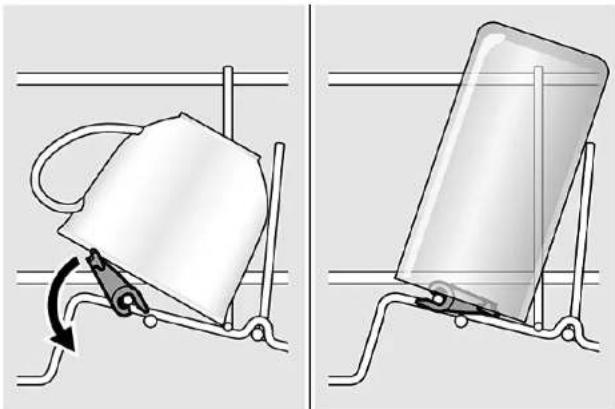
When washing cups, the cup support clip can be folded up. The additional angle reduces the collection of water on the bottom of cups. In the case of tall glasses we recommended leaving the cup support clip folded down. If upper baskets have an optional plastic insert, they must first be removed.
- Remove the plastic insert.
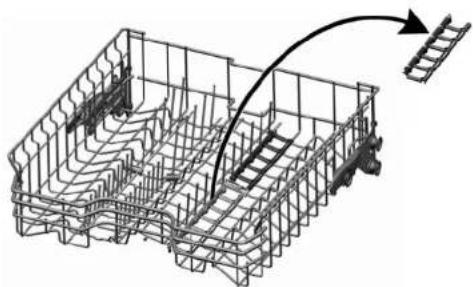
- Click the cup support clip into place.
- Fold up the clip.

Repair
- Position the items to be washed.
4.2.3 Installing steamer insert
Required tools:
Tabguide [00614935]
Cup support clip [00618565]
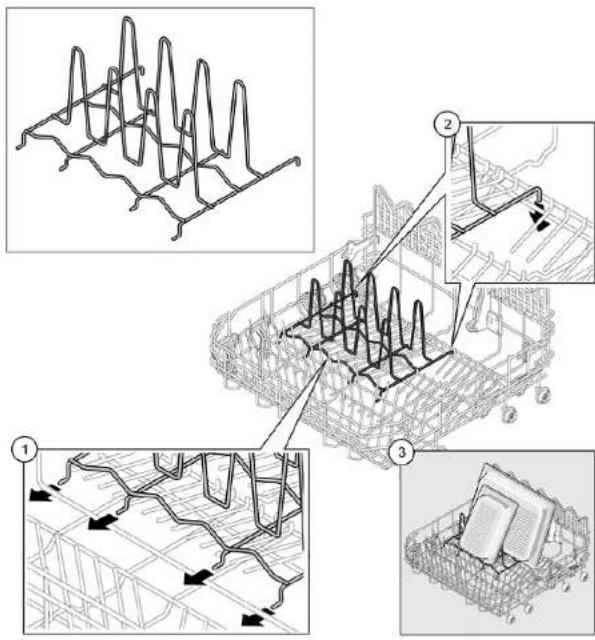
- Wedge the steamer insert with the end pieces under the basket system.
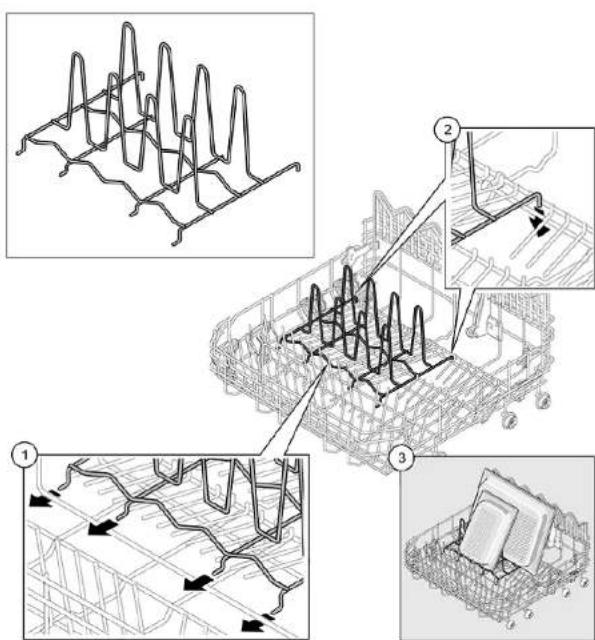

Repair
4.3 Replacing varioDrawer
4.3.1 Removing varioDrawer
- Bend the handle flaps inwards.
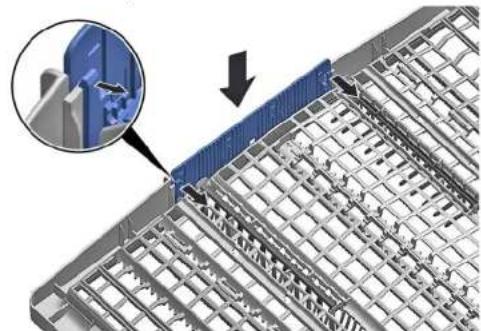
-
Remove the handle upwards.
-
Press plastic side inserts outwards and press them upwards out of the frame.
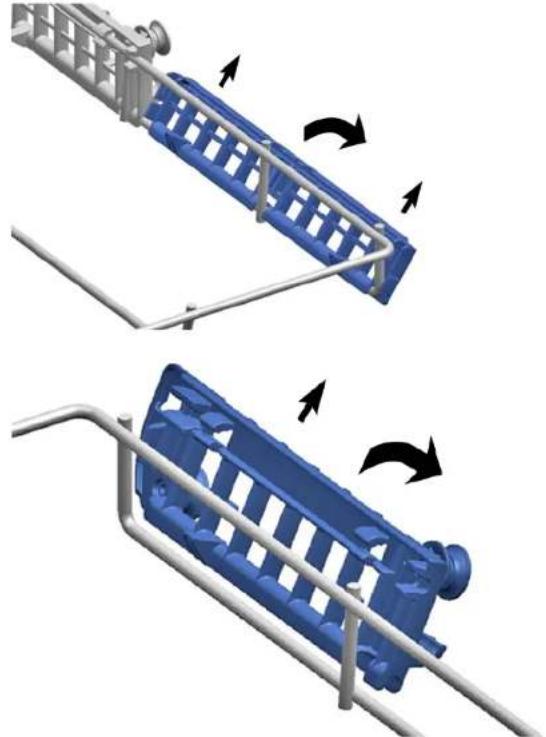

Repair
- Carefully bend the guide tabs outwards.
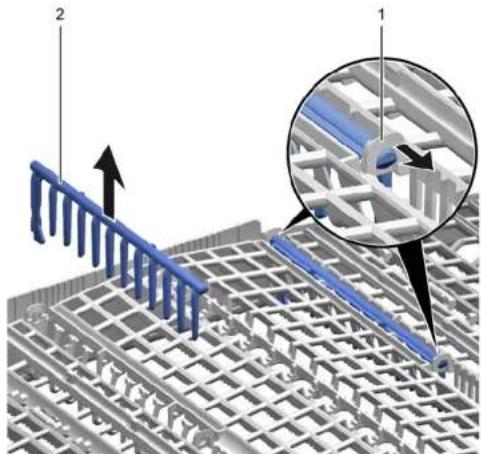
-
Pull the folding spines out of the tabs.
-
Press metal frame at the front out of the holders.
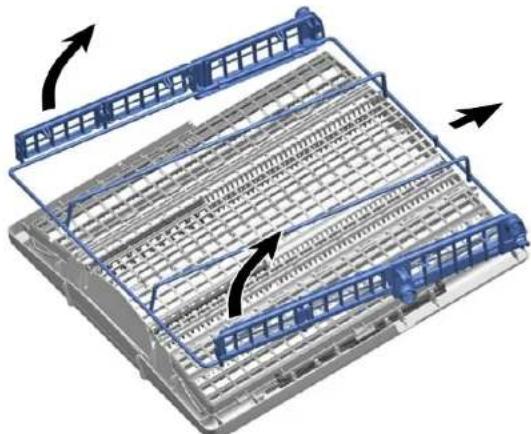
- Push metal frame back out of the guide.
4.3.2 Installing varioDrawer
Install in reverse order.

Repair
4.4 Replacing spray arms
4.4.1 Removing spray arm
- Unscrew the upper spray arm (1) and pull down to remove (2).
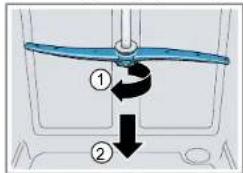
- Pull down the lower spray arm to remove.
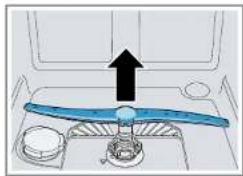
4.4.2 Installing spray arm
- Insert the lower spray arm.
The spray arm clicks into position. - Insert the upper spray arm and screw it firmly in place.

Repair
4.5 Replacing filters
4.5.1 Removing filter
- Turn the coarse filter anticlockwise (1) and remove the filter system (2).
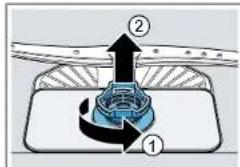
Check that no foreign objects fall into the sump.
- Pull down the micro filter to remove.
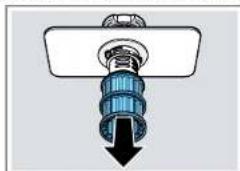
4.5.2 Installing filters
- Re-assemble the filter system.
Make sure that the locking catches on the coarse filter click into position. - Insert the filter system into the appliance and turn the coarse filter clockwise.
Make sure that the arrow markings match up.

Repair
4.6 Installing baking sheet spray head
- Remove top basket.
- Insert the baking sheet spray head in the holder (1) and turn to the right (2).
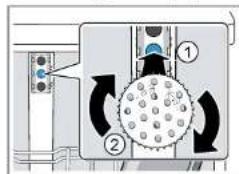

The baking sheet spray head clicks into position.

Repair
4.7 Replacing power cord
Prerequisite:
Appliance is disconnected from power supply.
Appliance is disconnected from water supply.
Appliances is freely accessible
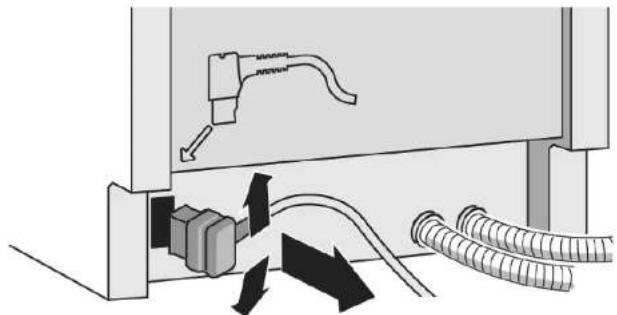
4.7.1 Unplugging power cord
- Move the plug of the power cord carefully up and down and pull it out of the mains socket.
4.7.2 Plugging in power cord

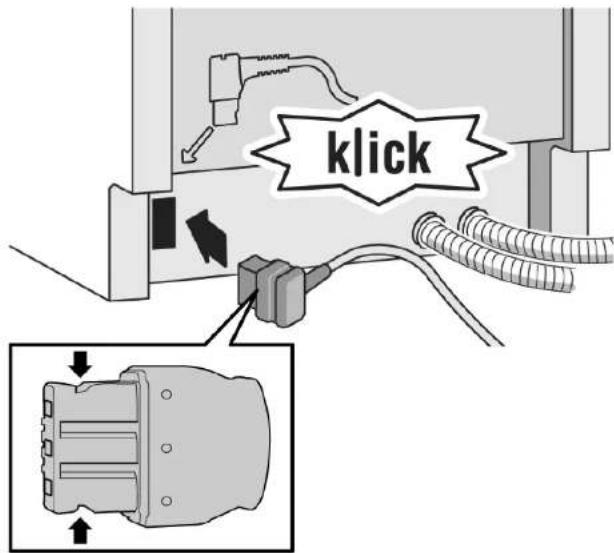
Notice
Overheating of main connection!
Risk of fire
Firmly insert the power cord until it clicks.
- Insert the plug of the power cord into the mains socket until the plug clicks audibly into place.

Repair
4.8 Replacing detergent cover

A small screwdriver can be used as a levering tool.
Prerequisite:
Appliance is disconnected from power supply.
Appliance is disconnected from water supply.
Door has been opened.
Detergent cover has been opened.
4.8.1 Removing detergent cover
- Slide the detergent cover in 5mm
- Lever the detergent cover on the lower side out of the guide rails and take the detergent cover on the upper side out of the guide rails.
- Remove the spring.
4.8.2 Inserting spring
- Insert the long end of the spring into the mounting hole of the dispenser device (1).
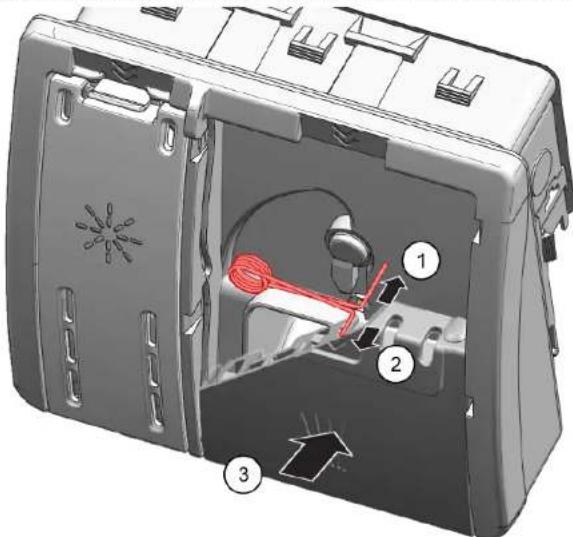
- Insert the short end of the spring into the mounting hole of the detergent cover (2).
- Press cover into the dispenser device (3).
4.8.3 Installing detergent cover
- Insert the detergent cover 5mm before the completely open position into the guide rails on one side. Applying gentle force, press the opposite side into the guide rails.
- Check the function of the detergent cover.

Repair
4.9 Replacing wastewater pump cover
Prerequisite:
Basket has been removed.
Filters has been removed. → Page 220
4.9.1 Removing wastewater pump cover
- Scoop out any water.
Use a sponge if necessary.
- Prise off the pump cover using a spoon and grip it by the crosspiece.
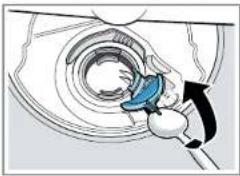
- Lift the pump cover inwards at an angle and remove.
4.9.2 Installing wastewater pump cover
Insert the pump cover (1) and press down (2).
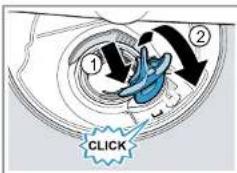
The pump cover clicks into position.

Repair
4.10 Replacing side panel
Prerequisite:
Appliance is disconnected from power supply.
Appliance is disconnected from water supply.
Appliances is freely accessible.
Free-standing appliances: Worktop has been removed. → Page 214
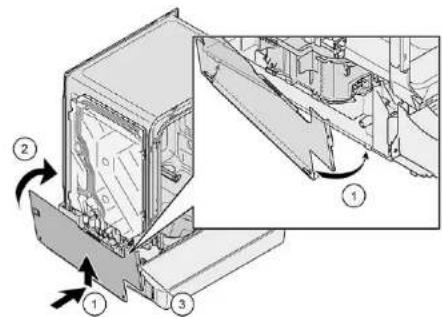
4.10.1 Removing side panel
- Remove screws from the side panel (1).
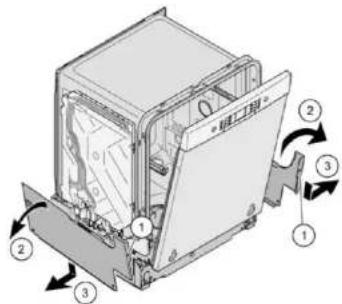
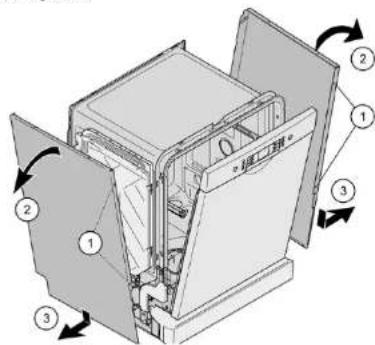
Fig. 1: Fully integrated
- Tilt the side panel slightly outwards at the top (2).
- Lower the side panel and pull it out of the base trough (3).

Repair
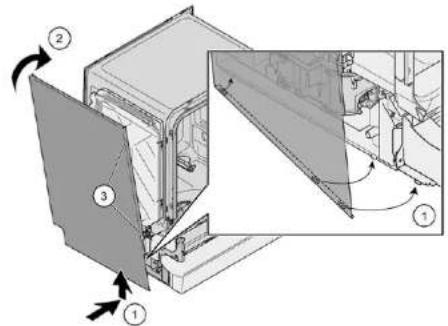
4.10.2 Installing side panel
- Insert the side panel into the base trough (1).
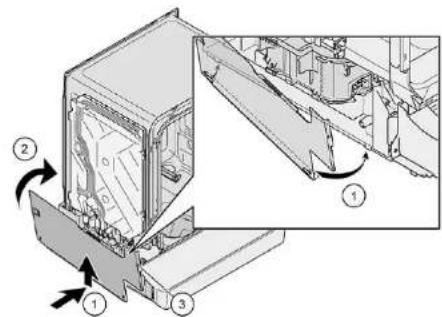
Fig. 2: Fully integrated
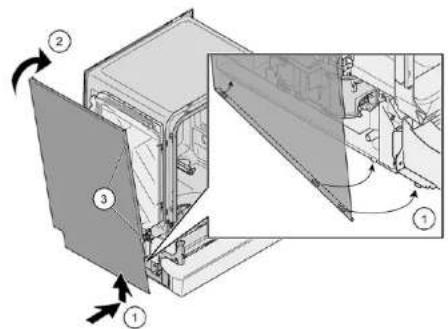
- Press the side panel onto the appliance (2).
- Secure the side panel with screws (3).

Repair
4.11 Replacing outer door
Prerequisite:
Appliance is disconnected from power supply.
Appliance is disconnected from water supply.
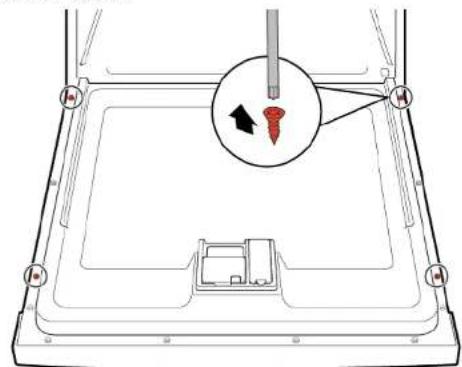
Just remove the screws which are described in the following steps.
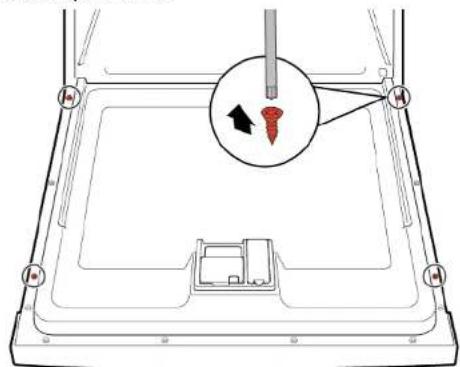
- Open door.
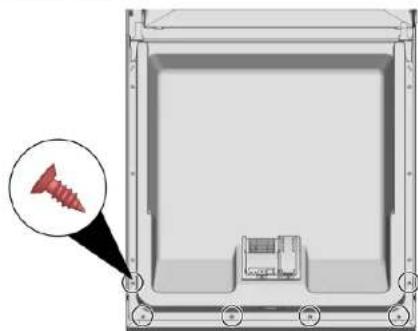
- Remove four screws.
3

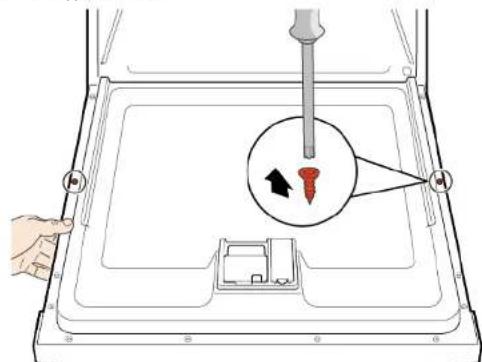
Secure the door by holding it on one side.
Remove two screws.
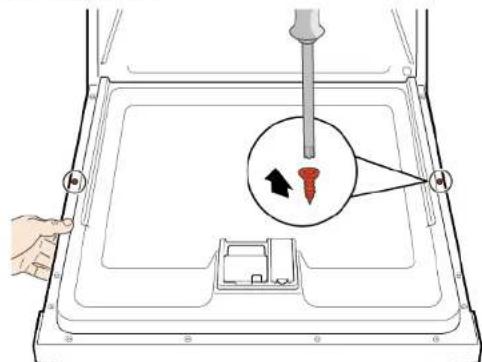
Insulating fleece has been correctly positioned and fixed on the inside of the outer door.
Hinges are inserted into the outer door.
-
Close the inner door without snapping it shut.
-
Push the outer door upwards underneath the control panel (1).
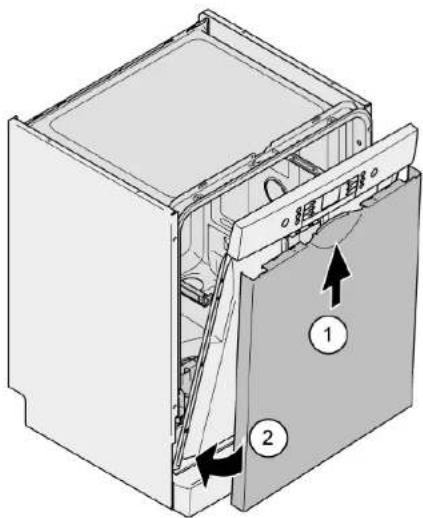
- Press the outer door against the inner door and hold (2).
4.

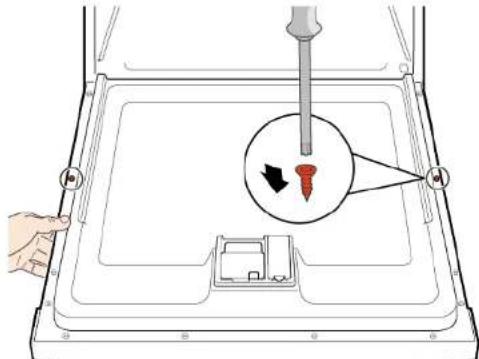
Secure the door by holding it on one side.
Open the door and secure it with two screws (4 x 11 mm metal screws).
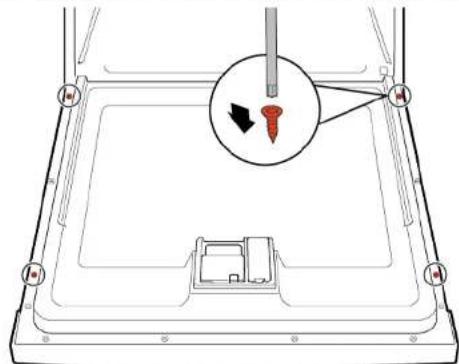
- Secure the outer door with four screws (4 x 11 mm metal screws).

Repair
4.12 Replacing control panel

If an operating module is defective, the entire control panel must be replaced.
Prerequisite:
Appliance is disconnected from power supply.
Appliance is disconnected from water supply.
Outer door has been removed.
Outer door has been removed (fully integrated/integrated).
4.12.1 Removing control panel
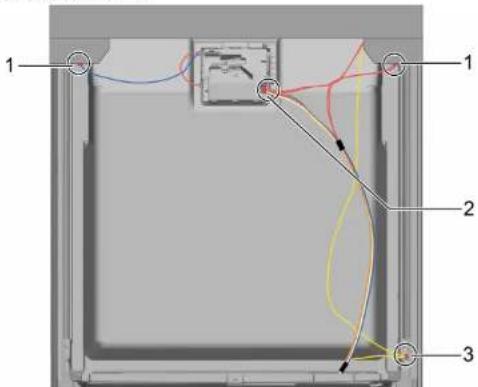
- Disconnect electrical connections from the control panel and the low rinse-aid sensor (1, 2).
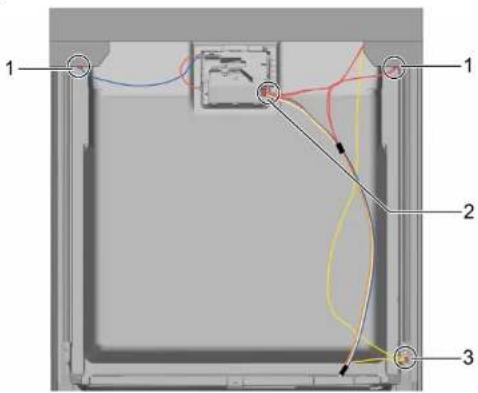
- Disconnect the earth cable (3) (optional).
- Open the appliance door.
-
Secure the control panel to prevent it from falling down (hold on to it).
-
Remove six screws.
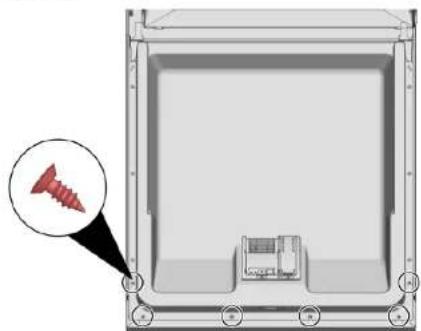
- Remove the control panel.
4.12.2 Installing control panel

Use screws 4 × 16 mm .
Install in reverse order.

Repair
- Remove cord guide cover out.
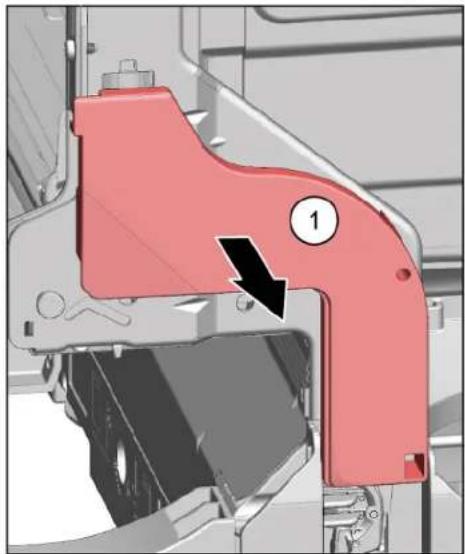
2.1.Open door slightly (1).
- Fix in the groove of the base trough (2).
- Slowly close the door (3).
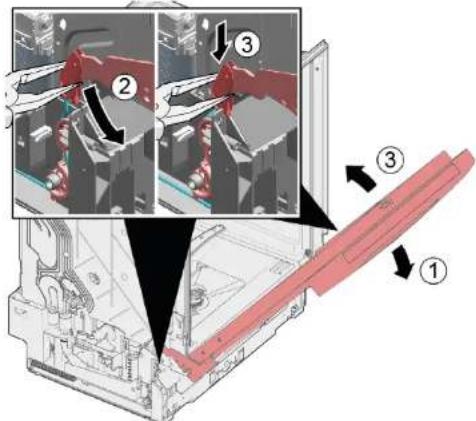
The cord system attaches itself automatically to the door hinge.

Repair
3.1. Slightly close the door (4).
- Move the groove to the back and release the door hinge (5).
- Open the door (6).
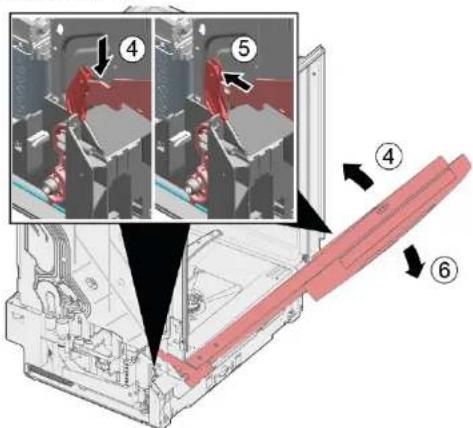
- Repeat the process again on other side of appliance.

Repair
4.14 Replacing toe panel

The feet are identical and can be swapped over.
Prerequisite:
Appliance is disconnected from power supply.
Appliance is disconnected from water supply.
Outer door has been removed.
Outer door has been removed (fully integrated/integrated).
4.14.1 Removing toe panel
1.

Incorrect removal. If the toe panel is loosened at the side and removed, the two brackets may break away. If only one bracket is damaged, the side can be changed as the brackets are identical. It is advisable to place something under the appliance at the front on the side to relieve the load on the toe panel with the feet.
- Reach into the guides (1) with a screwdriver and release the catch by pushing downwards.
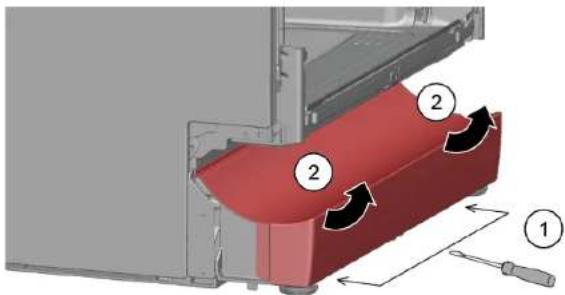
-
Lift the panel off.
-
Remove the feet forwards (1).
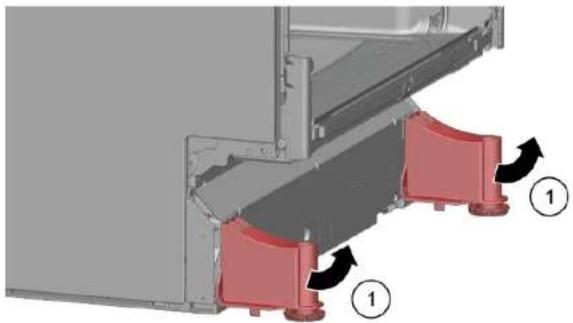
4.14.2 Installing toe panel
- Insert the feet.
- Attach the toe panel at the top (1) and press it down until it audibly clicks into place (2).
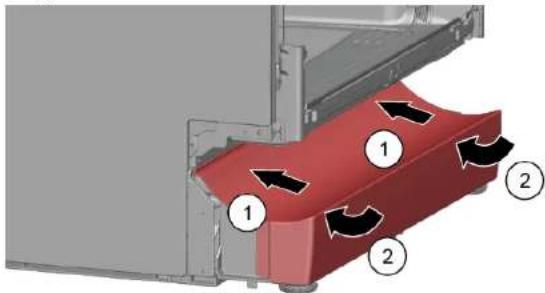

Repair
4.15 Replacing base socket plate

The base socket plate is located in the lower area at the front.
Prerequisite:
Appliance is disconnected from power supply.
Appliance is disconnected from water supply.
Furniture panel (optional) has been removed.
Outer door has been removed.
Outer door has been removed (fully integrated/integrated).
Toe panel has been removed (optional). → Page 232
4.15.1 Removing base socket plate
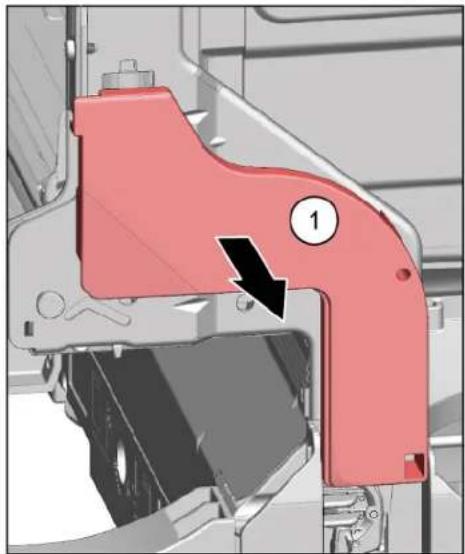
- Remove two screws (1).
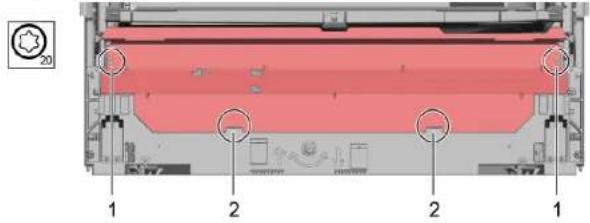
-
Disengage catch elements (2).
-
Tilt the base socket plate carefully forwards (1).
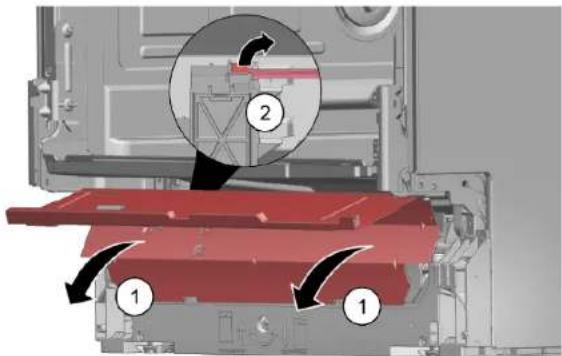
4.

Depending on the model series, the plug to the EmotionLight is still secured to the base.
Unlock the plug on the catch tappet and pull to the rear (optional) (2).
4.15.2 Installing base socket plate
Install the base socket plate in reverse order.

Repair
4.16 Replacing overflow conduit

The overflow conduit is located in the front lower area of the appliance.
Prerequisite:
Appliance is disconnected from power supply.
Appliance is disconnected from water supply.
Furniture panel has been removed (optional).
Outer door has been removed.
Toe panel has been removed (optional).→Page 232
Base socket plate has been removed. → Page 233
4.16.1 Removing overflow channel

Residual water
-
When the drainage hose is removed, residual water may run out.
Catch water or remove from the base pan with suction syringe. -
Lever out of the catch mechanism at the top (1, 2).
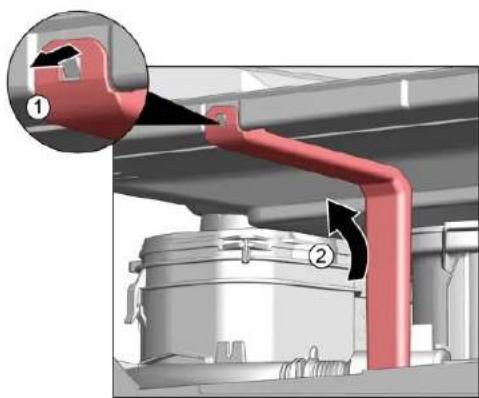
- Release catch element at top.
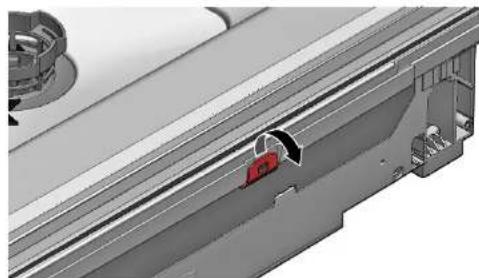
3.1. Insert screwdriver below metal brake (1).
- Gently release metal clip (2).
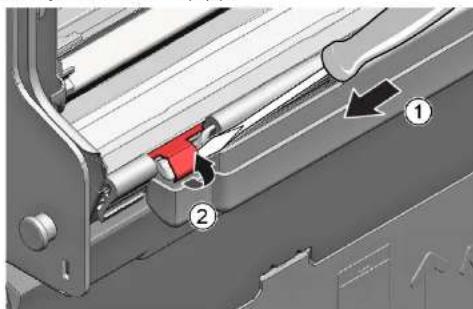

Repair
- Lift overflow conduit off.
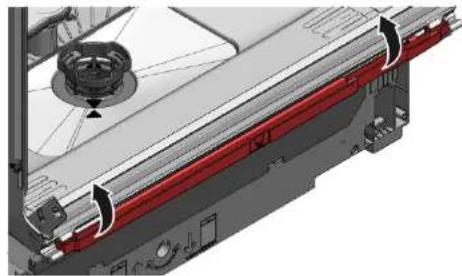
4.16.2 Installing overflow conduit

Water damage due to incorrect installation of the overflow conduit!
Correctly insert the overflow conduit at the bottom into the guide of the base trough.
Click the overflow conduit correctly into place at the top.
-
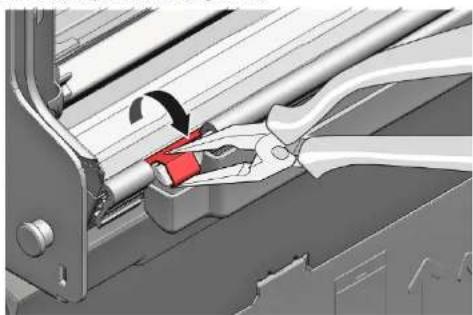
- Place overflow conduit (1).
-
Move overflow conduit into seal (2).
- Press overflow conduit in guide of seal (3).
- Insert overflow conduit concisely (4).
- Clip in overflow conduit (5).


Repair
- Check installation left and right. 3. Check firm seat.
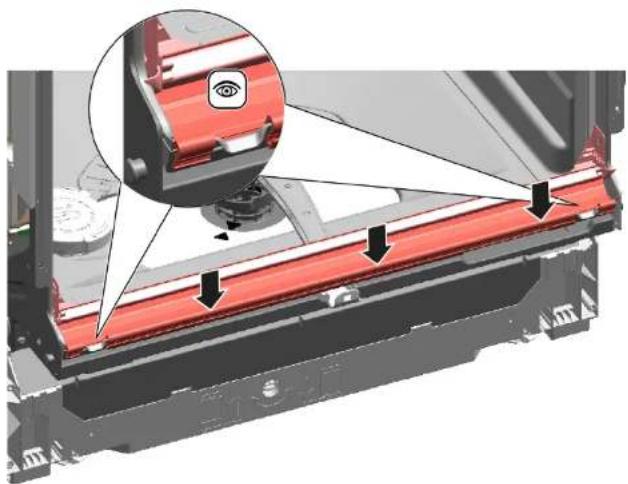
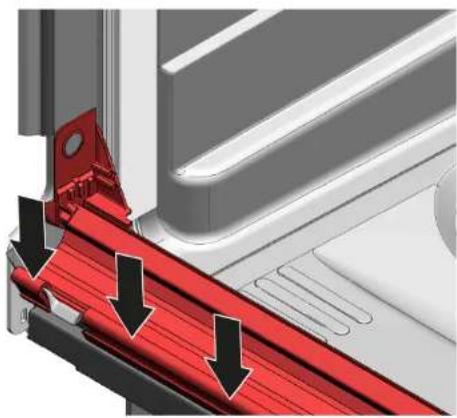
- Clip in metal clip on left and right side.

Repair
4.17 Replacing inner door
Prerequisite:
Appliance is disconnected from power supply.
Appliance is disconnected from water supply.
4.17.1 Removing inner door
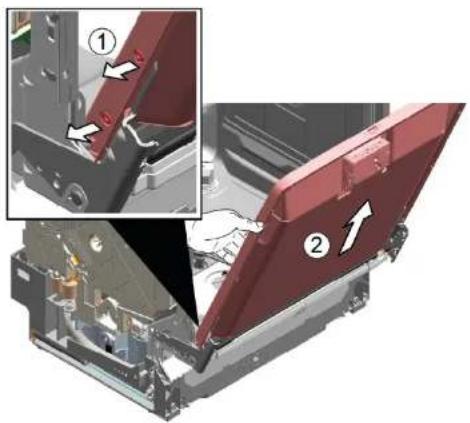
- Remove screws (1).
- Remove inner door upwards (2).
4.17.2 Installing inner door
- Flap door seal to front.
- Move inner door behind door seal.
- Close inner door.
- Flap door seal upwards. Sideparts show up
-
Move door hinge upwards.
-
Secure door hinge with screws.
- Place inner door on door hinge.
- Secure inner door with screws.

Repair
4.18 Replacing door hinge
Prerequisite:
Appliance is disconnected from power supply.
Appliance is disconnected from water supply.
Appliances is freely accessible
Side panel has been removed. → Page 225
Outer door has been removed.
Inner door has been removed.
Control panel has been removed. → Page 229
Door spings has been fixed. → Page 230
Toe panel has been removed. → Page 232
Base socket plate has been removed. → Page 233
Overflow channel has been removed. → Page 234
-
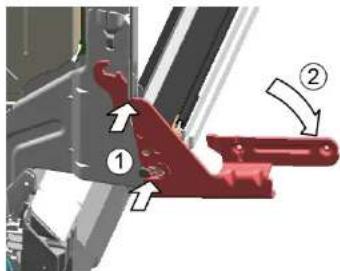
- Release catch hook with a screwdriver(1).
- Release ground connection on door hinge.

-
- Place hinge on appliance (1)
-
Move hinge downwards (2) till it is latched to the appliance.
2.

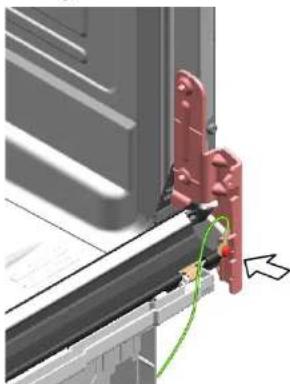
A missing ground connection can lead to mains potential on door.
Establish ground connection.

Repair
4.19 Replacing (lower) door seal
Prerequisite:
Appliance is disconnected from power supply.
Appliance is disconnected from water supply.
Outer door has been removed.
Base socket plate has been removed. → Page 233
Toe panel has been removed (optional). → Page 232
Door springs have been removed.
Control panel has been removed.
Cable harness holder on bottom right has been removed.
4.19.1 Removing the door seal
- Remove the two retaining clips on the lower door seal (1, 2).
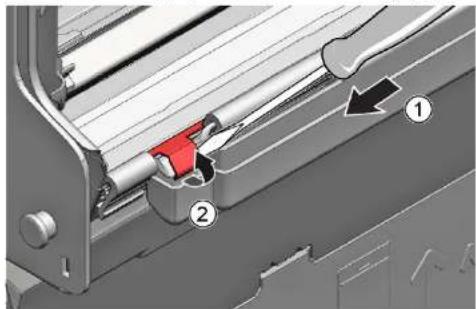
- Detach the overflow channel.
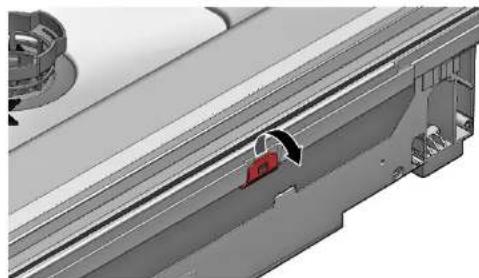
- Lift the overflow gutter off.
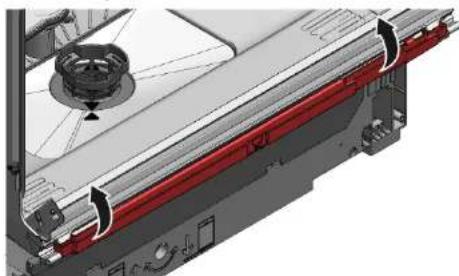

Repair
- Remove the lower door seal from the inner door.
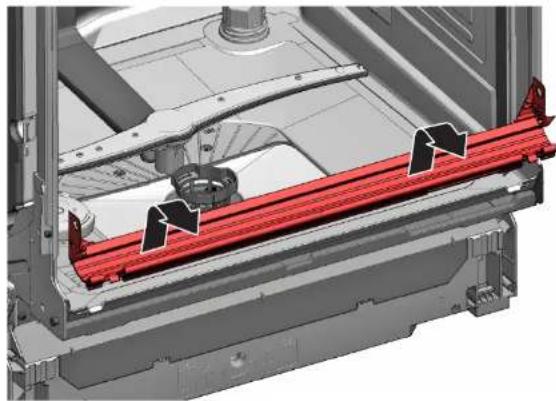
4.19.2 Installing the door seal
- Fit the sealing caps on the left and right to the sealing rail with the door seal.
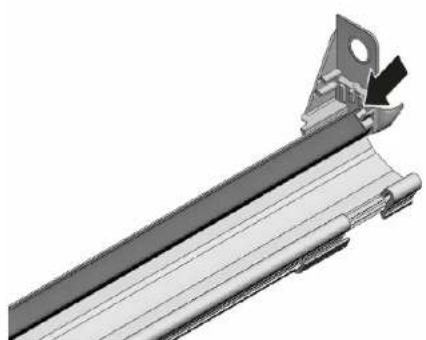
- Insert the door seal with the sealing flap in the inner door.
- Secure the door seal with two retaining clips.

Repair
4.20 Replacing (upper) door seal
Prerequisite:
Appliance is disconnected from power supply.
Appliance is disconnected from water supply.
4.20.1 Removing door seal
Remove door seal from inner frame.
4.20.2 Installing door seal
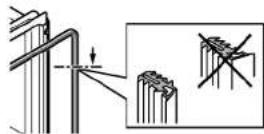
The door seal must be cut to the correct length before installation. This is 1750mm for appliances of 81cm in height and 1850mm for appliances of 86cm in height.
- Prepare appropriate door seal.
- Ensure correct installation position of sealing profile.
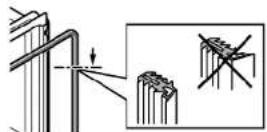
- White dot must be on level with sealing bed strip.
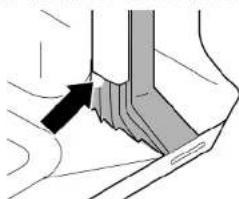
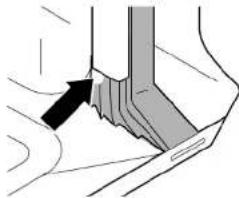
4

Sealing must not be wavy or stretched at corners. Seal is cut off diagonally at ends and tapers away into bottom of container at front.
Position end of seal straight to front underneath inner door. Seal should lie against side of container as far as possible.

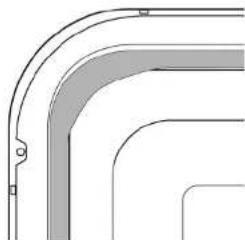
Correctly installed door seal:
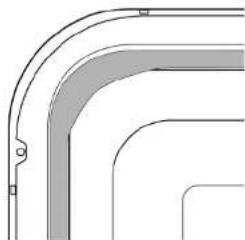

Repair
4.21 Replacing EmotionLight

The EmotionLight is situated in the upper front exterior area of the rinsing tank.
Prerequisite:
Appliance is disconnected from power supply.
Appliance is disconnected from water supply.
Appliances is freely accessible.
Worktop has been removed (optional).
The right-hand side panel has been removed (optional). → Page 225
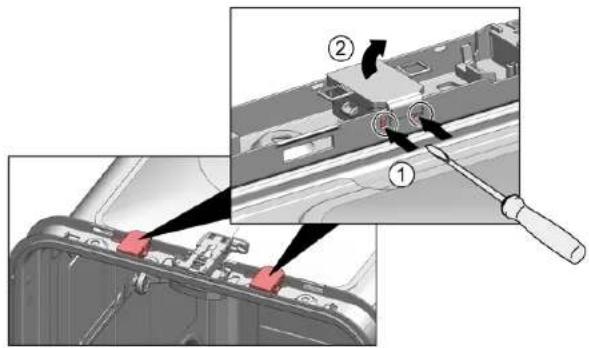
4.21.1 Removing EmotionLight
- Detach catch hook at the rear (1).

- Remove the holder upwards (2).
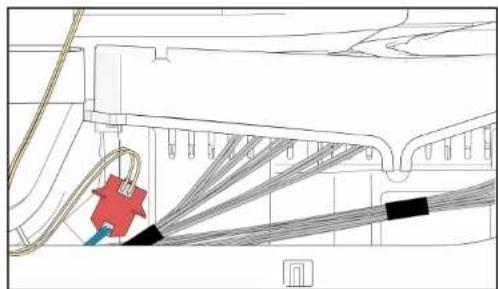
-
Pull plug out of connector (bottom right at front of appliance).
-
Remove electrical connection from the power module.
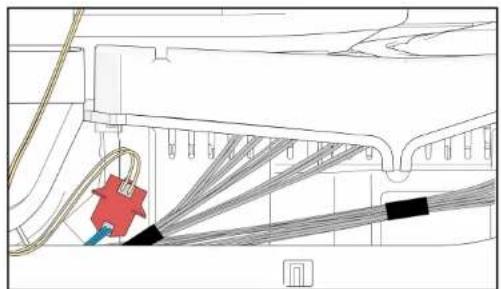
- Remove EmotionLight from the appliance.
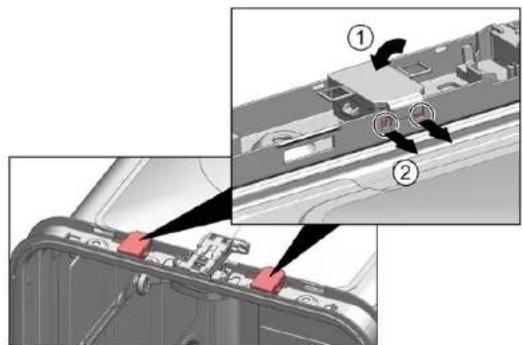
4.21.2 Installing EmotionLight
- Insert the holder into the rinsing tank frame (1).
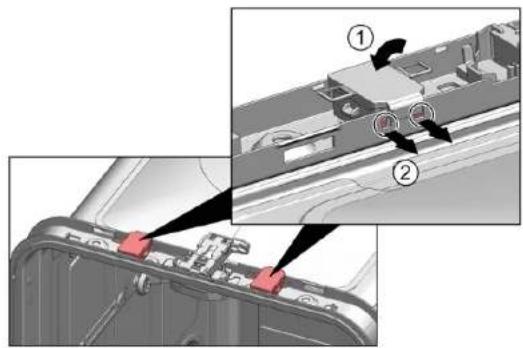

Repair
- Engage the catch hook (2).
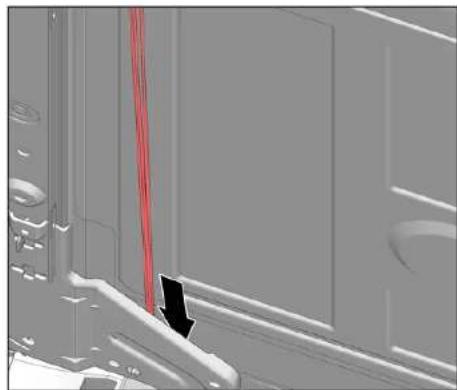
3.
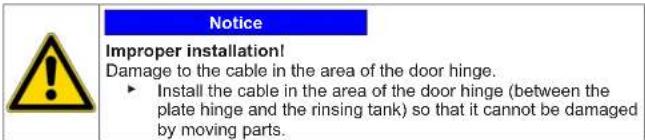
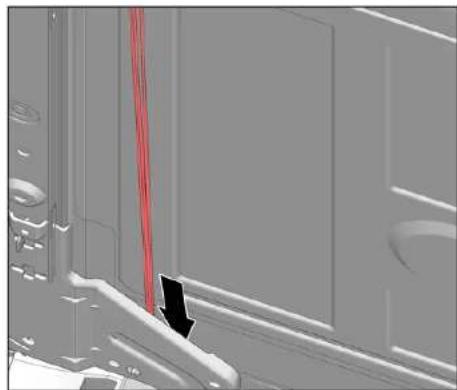
Install the cable on the right lower side.

Repair
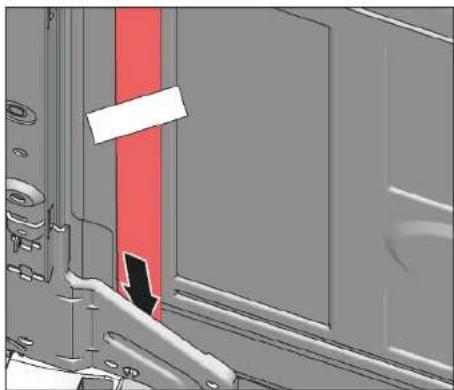
Fig. 3: Flat cable
- Insert the plug.

Repair
4.22 Replacing TimeLight

Replace the TimeLight only as a complete part. The TimeLight module is fixed to the rear of the base socket plate.
Prerequisite:
Appliance is disconnected from power supply.
Appliance is disconnected from water supply.
Toe panel has been removed. → Page 232
Base socket plate has been removed and turned. → Page 233
4.22.1 Removing TimeLight
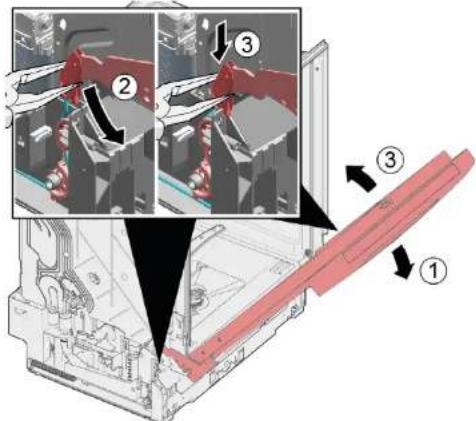
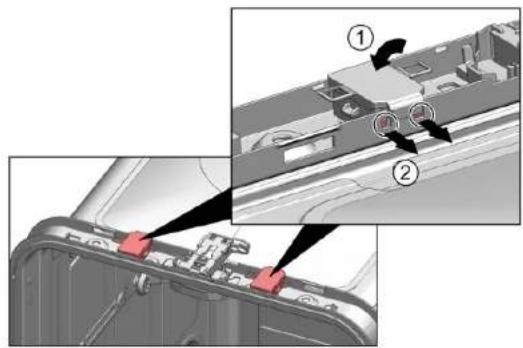
- Bend the catch elements (1) slightly outwards.
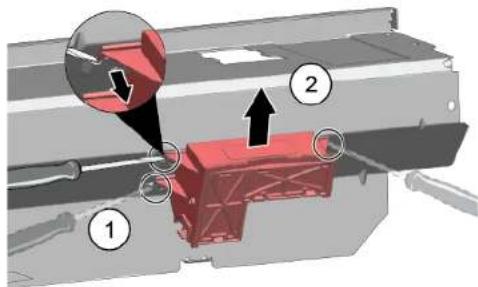
- Pull the TimeLight module upwards out of the guide (2).
4.22.2 Installing TimeLight
- Bend the catch elements (1) back again.
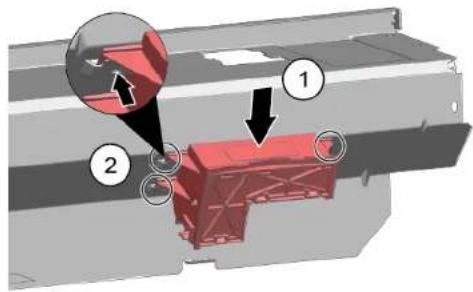
- Push the TimeLight module into the guide (2).
- Connect the electrical connection.

Repair
4.23 Replacing Gap illumination
Prerequisite:
Appliance is disconnected from power supply.
Appliance is disconnected from water supply.
Outer door is disassembled.
Operation panel has been removed.
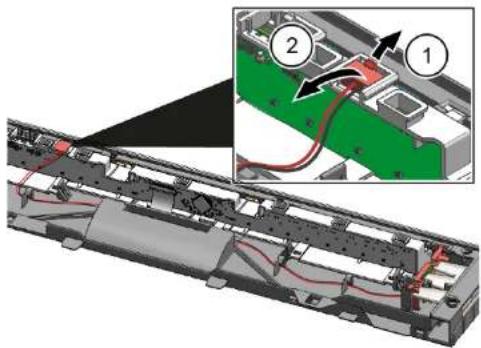
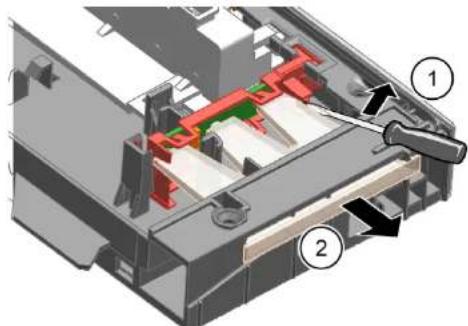
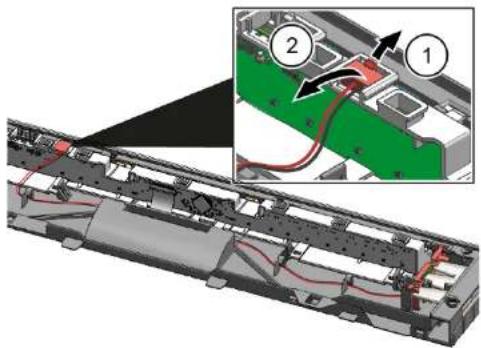
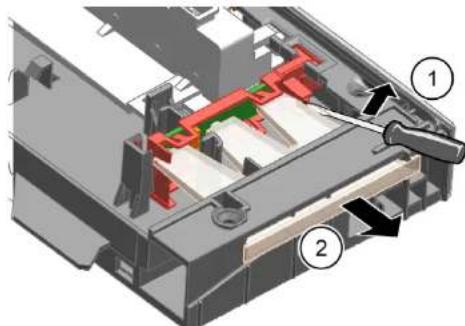
4.23.1 Removing Gap illumination
-
- Detach catch (1).
-
Remove electrical connection from the operation module (2).
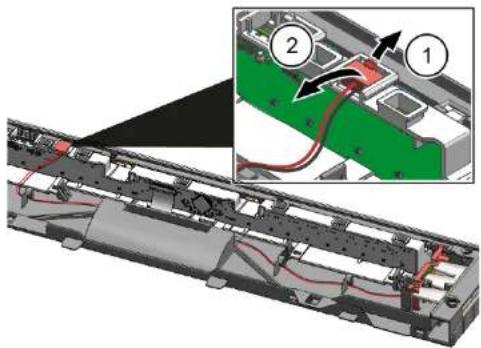
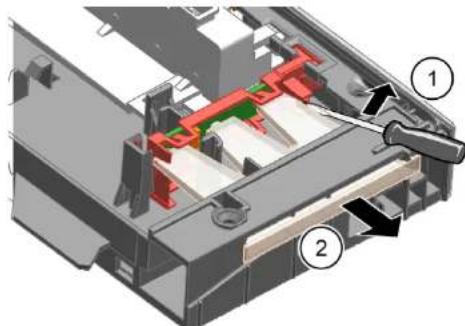
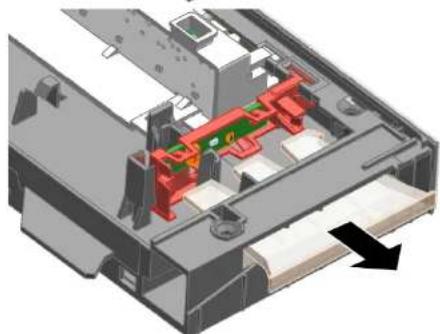
-
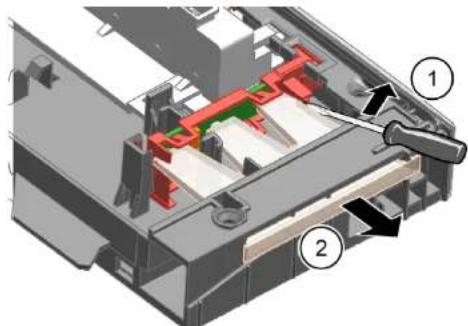
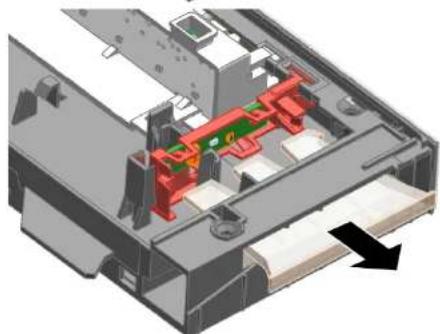
- Detach catch hook at rear (1).
-
Remove light fibre (2).

Repair
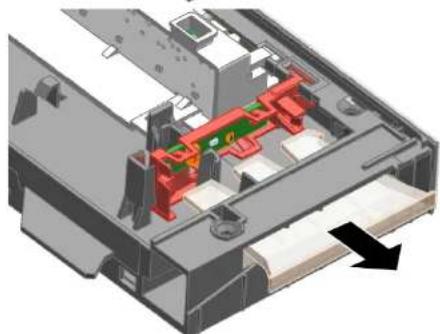
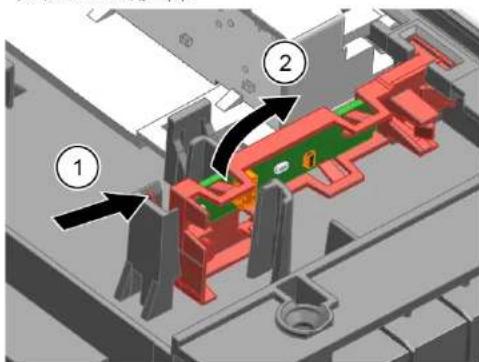
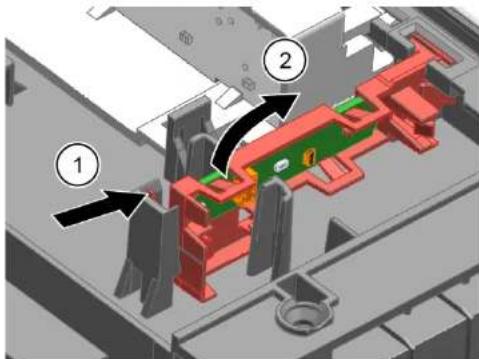
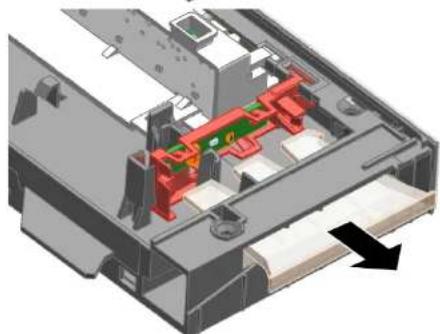
3.1.Detach catch hook (1).
- Lift up PCB with holder and remove it from operation module frame (2).
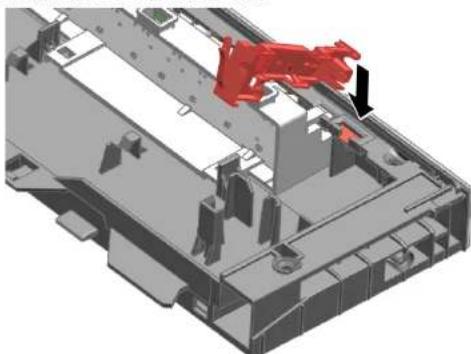
4.23.2 Installing Gap illumination
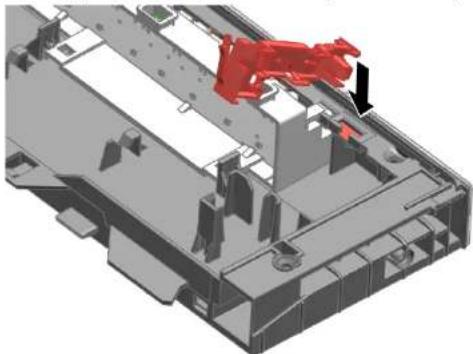
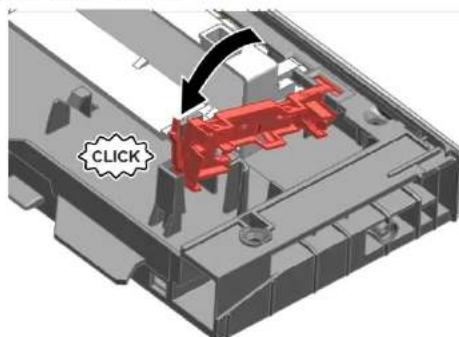
- Insert PCB holder to operation module frame.
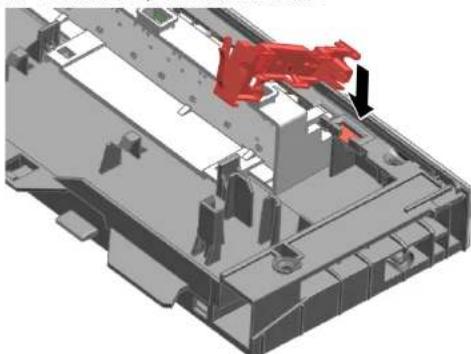
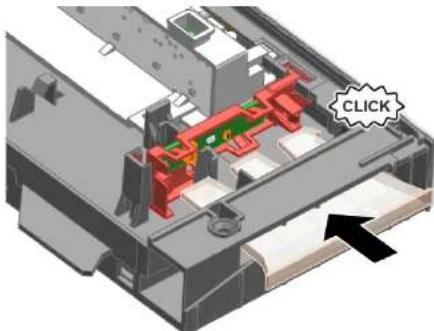
- Tighten it with a "click" sound.
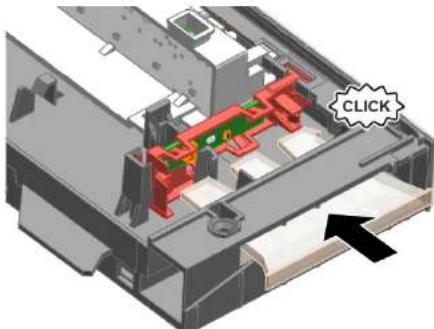
- Install light fibre and tighten it with a "click" sound.
- Connect wire to operation module.
Remonditeave - Nõudepesumasin
1 Selle dokumendiga seoses 251
1.1 Tahtis teave 251
1.1.1 Eesmärk 251
1.2 Sumbolite selgitus 251
1.2.1 Ohutased 251
1.2.2 Ohusumbolid 251
1.2.3 Hoiatuste struktuur 252
1.2.4 Üldised sumbolid 252
Ohutus 253
2.1 Uldised ohutusjuhised 253
2.1.1 Koki kodumasinad 253
Tabel 1: Ohutasedmed
1.2.2 Ohusumbolid
4.6 ToTtOeTtnn KeepaHns yekaoou Aauapivaac yoiipatoos 426
4.7 Avikataaon kalwbiou puaotc 427
4.7.1 ATOOUVoan kALWoiou pEuatoos 427
4.7.2 ν δ σ η λ ω δi o u pµ αt o s 427
4.8 Avikataoan kalumuatoc atoppuvavtkou 428
4.8.1 AqapeoK kalumuatc atoppuvavtkou 428
4.8.2 Eioaywyj 428
4.8.3 ToToeTtoJ KaUmuToC aToppuavTKou 428
4.9 Avtakataon kalmuatcavtaiaa atovepwv 429
4.9.1 AqaipeoK kalumuToc avTlaC aTovepwv 429
4.9.2 ToToBttnK kaluupatoC avTlAic atovepwv 429
4.10 Avikataaon TaeupikoivaveA 430
4.10.1 AqaiepoT PLeupikou TavEa 430
4.10.2 ToTOnTeTnO n TnEupikou naveA 431
4.11 Avikataoan Ewepikns Tóptas 432
4.11.1 Aqaipeoen EeWTeepiKnc Tioptac 432
4.11.2 ToTbeTnAn EeWtePiknS Tóptas 433
4.12 Avikatodotaon Xepiopnpiou 435
4.12.1 Aqaipeon xepiopniou 435
4.12.2 TomoEtnon xepiopniou 435
4.13 Tepewan Ealntpiw npotac 436
4.14 AvtikataoTaon TioiaC 438
4.14.1 Aopaeon Toidias 438
4.14.2 ToTtBETnAn TnDiac 438
4.15 Avitakataoan Tlakac Uto doxns faon 439
4.15.1 Apaipocn Tlakac utofoxns baoons 439
4.15.2 ToTOnTeTnO nIaKaC UIToDoxNc BaAnS 439
4.16 Avikataoan aywyou utepxieianis 440
4.16.1 Aqalpeon kavaiou utepxieions 440
4.16.2 ToTeTnAn aywou uTepxelianc 441
4.17 Avikataoan eowepikns npia 443
4.17.1 Aepaeon eowtepiikns troptac 443
4.17.2 ToTOnTeTnON eoWTePikns TOpTa 443
4.18 Avikataoan evtoe troptac 444
4.18.1 Aqaipeon µ ντσ npraac 444
4.18.2 ToTOnTeTnON mEvTeOe TnpTaC 444
4.19 Avikataaon (kaw) oTeyavotoinikoou Topac 446
4.19.1 Apalpeon steyavotioinkou Tóptac 446
4.19.2 ToTOnTeTnO tEYavOTIOINIKOU TOpTaC 447
4.20 Avikataoan (Tdvw) OeyavotoinIKOU Topac 448
4.20.1 Aqalpeo an oEvavotoinikou T6ptac 448
4.20.2 Tomoetnon ateyavonntikou npia 448
YtOBeiEic Etiokeunc -Iauvtnpio Tiatowv
4.21 Avikataaon EmotionLight 449
4.21.1 ApaipEon EmotionLight 449
4.21.2 TomoEtnEmotionLight 449
4.22 AvtikataaTn TimeLight 452
4.22.1 Aqapipεση TimeLight 452
4.22.2 TomoEtnan TimeLight 452
4.23 Avikatdaon Gap Illumination 453
4.23.1 Agapεση Gap Illumination 453
4.23.2 TomoEtnn Gap Illumination 454
3.Avainwote to kain.
- TOnToeTeHToTe Ta AvtiKeIeVv ia TAnoIpo
4.2.3 ToTToeTeTOn eVeToU atOpayepa EIOKα Bontntika μεσα:
∑upóevnθηkn taμπλετac [00614935]
KAIITOTnpiEIGPANZAVW[00618565]
- 2pynwote To EvTeo atmuayepa e Ta akpa kTuTo ooutnka KaalaiiWv.

EMIOKEUN
4.3 Avtikataoan varioDrawer
- Isimkite,EmotionLight" is prietaio.
4.2.1.2 „EmotionLight" jdéjimas
4.23.2 Montaz Gap illumination
4.17.1 Remove a porta interior 731
4.17.2 Instalar a porta interior 731
4.18 Substitui a dobradiça da porta 732
4.18.1 Remover a dobradiça da porta 732
4.18.2 Instalaradobradiaca da porta 732
4.19 Substituir a vedao (inferior) da porta 734
4.19.1 Remover aVEDa da porta 734
4.19.2 Instalar a vedao da porta 735
4.20 Substituir a vedao (superior) da porta 736
4.20.1 Remove aVEDA da porta 736
4.20.2 Instalar a vedao da porta 736
Dicas de resolution - Maquina de lavar loça
4.21 Substituir o EmotionLight 737
4.21.1 Remover o EmotionLight 737
4.21.2 Instalar o EmotionLight. 737
4.22 Substitui o TimeLight 740
4.22.1 Remover o TimeLight 740
4.22.2Instalar o TimeLight 740
4.23 Substitui r a Gap Illumination 741
4.23.1 Remove a Gap Illumination 741
4.23.2 Instalar a Gap Illumination 742
∴ m = 3/11 ;
PERIGO
∴ m = 3/11 ;
Risco deCHOque eltrico devidao a partes sob tensao!
4.17.1 Remover a porta interior
4.17.2 Instalar a porta interior
4.23.1 Remove a Gap Illumination
-
- Desprésdo encaixe (1).
-
Remova a ligaçao eletrica do modulo de operacao (2).
-
- Despenda o gancho de encaixe aftas (1). 2. Remova a fibra otica (2).

Reparacao
3. 1. Despendra o gancho de encaixe (1).
4.23 Vymena Gap illumination 823
4.23.1 Odstranenie Gap illumination 823
4.23.2 Montaz Gap illumination 824
O toto dokunte
4.23 Vymena Gap illumination
Požiadavka:
4.23 Byta Gap illumination
Forutsattning:
Apparaten ar bortkopplad fran stromforsorjning.
Apparaten ar bortkopplad fran vattenforsorjning.
Den yttre luckan har demonterats.
Driftpanelen har tagits bort.
4.23.1 Ta bort Gap illumination
-
- Lossa spärren (1).
-
Ta bort elanslutningen fran driftmodulen (2).

2.1.Lossa faskroken baktill (1).
- Ta bort lusfibern (2).

Reparation
3.1.Lossa faskroken (1).
4.23.2 Montera Gap illumination
- Satt in kretskortet i driftmodulens ram.
Özel yardymcy ekipman:
Sekme Klavuzu [00614935]
Geçme parca [00618565]

- CBBETN 3A PEMOHT - CBDOMNJAHA MAUNHA
- OTHOCHO TO3N DOKYMEHT
- 1.1 BAXHA NHΦOPMAΖΗ
- 1.1.1 UEN
- 1.2 06ACHEHNE HA CHMBOJINTE
- 1.2.1 HBHA ONACHOCT
- 1.2.2 CNMBON3A ONACHOCT
- 1.2.3 CTPYKTPA HA NPÉDYNPEXKDEHNRA
- ONACHOCT
- 1.2.4 06UCNMBOJI
- BE3ONACHOCT
- 2.1 06UHNHCTPYKU3A6E3ONACHOCT
- 2.1.1 BCHKN DOMAUNHN YPEIN
- IHCTPYMENTU N NOMOUHCPEDCTBA
- PEMOH
- 4.1CMHAHA PA60THNI NIO
- 4.1.1 CBAJIHE HA PA6OTHNI NNT
- 4.1.2 MOHTNPAHE HA PA6OTHNI IIO
- 4.2 MOHTNPAHE HA CNCTEMATA OT KOUHNIU
- 4.2.1 MOHTNPAHE HA NIB3RAH A NAEUA 3A 86-CM MODEN
- 4.2.2 MOTHNPAHE HAФНКCATOPA 3AЧАШ
- 4.2.3 MOHTNPAHE HA BLOKKATA HA NAPOREHEPATOPA
- 4.10.2 MOHTNPAHE HA CTPAHNHNHA NHAEN
- 4.11 CMHA HA BBHNHATA BPTA
- 4.11.1 N3BAXDAHE NA BBHHATA BPTA
- 4.11.2 MOTHIPAHHE NA BBHNHATA BPTA
- N3NCBAHE
- 4.12 CMHA HA KOHTPOHNNAHEI
- N3NCKBAHE
- 4.12.1 CBAJAHE HA KOHTPOJIHHAHAH
- 4.12.2 MOHTNPAHE HA KOHTPONHNNAHN
- 4.13ФИКСИРАНЕHA NPУЖИНITEHA BPATATA
- 4.16 CMHA HA TPB6OPBODA 3A NPENBIBAHE
- 4.16.1 CBAJNHE HA KAHAHA 3A NPENBLABE
- OCTATBUHA BONA
- 4.16.2 MOHTIPAHHE HA TPB6OPBOBOJA 3A NPENBIBAHE
- 4.20.2 MOHTNPAHE HA YNBLTHEHNETO HA BPTATA
- 4.21 CMHA HA EMOTIONLIGHT
- 4.21.1 CBAJIAHE HA EMOTIONLIGHT
- 4.21.2 MOTHIPAHE HA EMOTIONLIGHT
- BHMAHNEI
- HENPABUNEN MOHTAX
- 4.23 CMHA HA GAP ILLUMINATION (OCBETBAHE HA NPOLYKN)
- 4.23.1 CBAHE HA GAP ILLUMINATION
- OTEJETE KYKATA HA FKCATOPA (1)
- 4.23.2 MOHTIPAHC HA GAP ILLUMINATION
- 4.23 VYMENA GAP ILLUMINATION
- 4.21.2 MONTERING OF EMOTIONLIGHT
- REPARATION
- BEMERKI
- UKORREKT MONTERING
- 4.22 UDSKIFTING AT TIMELIGHT
- 4.22.1 FJERNELSE AT TIMELIGHT
- 4.22.2 MONTERING AT TIMELIGHT
- 4.23 UDSKIFTING AT GAP ILLUMINATION
- 4.23.2 MONTERING OF GAP ILLUMINATION
- REPAIR HINTS - DISHWASHER
- CONCERNING THIS DOCUMENT
- 1.1 IMPORTANT INFORMATION
- 1.1.1 PURPOSE
- 1.2 EXPLANATION OF SYMBOLS
- 1.2.1 DANGER LEVELS
- 1.2.2 HAZARD SYMBOLS
- 1.2.3 STRUCTURE OF THE WARNINGS
- DANGER
- 1.2.4 GENERAL SYMBOLS
- SAFETY
- 2.1 GENERAL SAFETY INSTRUCTIONS
- 2.1.1 ALL DOMESTIC APPLIANCES
- TOOLS AND AIDS
- 4.1 REPLACING WORKTOP
- 4.1.1 REMOVING WORKTOP
- 4.1.2 INSTALLING WORKTOP
- REPAIR
- 4.2 INSTALLING BASKET SYSTEM
- 4.2.1 INSTALLING A TAB SLIDE FOR THE 86 CM MODEL
- 4.2.2 INSTALLING CUP SUPPORT CLIP
- 4.2.3 INSTALLING STEAMER INSERT
- 4.3 REPLACING VARIODRAWER
- 4.3.1 REMOVING VARIODRAWER
- 4.3.2 INSTALLING VARIODRAWER
- 4.4 REPLACING SPRAY ARMS
- 4.4.1 REMOVING SPRAY ARM
- 4.4.2 INSTALLING SPRAY ARM
- 4.5 REPLACING FILTERS
- 4.5.1 REMOVING FILTER
- 4.5.2 INSTALLING FILTERS
- 4.6 INSTALLING BAKING SHEET SPRAY HEAD
- 4.7 REPLACING POWER CORD
- 4.7.1 UNPLUGGING POWER CORD
- 4.7.2 PLUGGING IN POWER CORD
- NOTICE
- 4.8 REPLACING DETERGENT COVER
- PREREQUISITE
- 4.8.1 REMOVING DETERGENT COVER
- 4.8.2 INSERTING SPRING
- 4.8.3 INSTALLING DETERGENT COVER
- 4.9 REPLACING WASTEWATER PUMP COVER
- 4.9.1 REMOVING WASTEWATER PUMP COVER
- 4.9.2 INSTALLING WASTEWATER PUMP COVER
- 4.10 REPLACING SIDE PANEL
- 4.10.1 REMOVING SIDE PANEL
- 4.10.2 INSTALLING SIDE PANEL
- 4.11 REPLACING OUTER DOOR
- 4.12 REPLACING CONTROL PANEL
- 4.12.1 REMOVING CONTROL PANEL
- 4.12.2 INSTALLING CONTROL PANEL
- 4.14 REPLACING TOE PANEL
- 4.14.1 REMOVING TOE PANEL
- 4.14.2 INSTALLING TOE PANEL
- 4.15 REPLACING BASE SOCKET PLATE
- 4.15.1 REMOVING BASE SOCKET PLATE
- 4.15.2 INSTALLING BASE SOCKET PLATE
- 4.16 REPLACING OVERFLOW CONDUIT
- 4.16.1 REMOVING OVERFLOW CHANNEL
- RESIDUAL WATER
- 4.16.2 INSTALLING OVERFLOW CONDUIT
- 4.17 REPLACING INNER DOOR
- 4.17.1 REMOVING INNER DOOR
- 4.17.2 INSTALLING INNER DOOR
- 4.18 REPLACING DOOR HINGE
- 4.19 REPLACING (LOWER) DOOR SEAL
- 4.19.1 REMOVING THE DOOR SEAL
- 4.19.2 INSTALLING THE DOOR SEAL
- 4.20 REPLACING (UPPER) DOOR SEAL
- 4.20.1 REMOVING DOOR SEAL
- 4.20.2 INSTALLING DOOR SEAL
- 4.21 REPLACING EMOTIONLIGHT
- 4.21.1 REMOVING EMOTIONLIGHT
- 4.21.2 INSTALLING EMOTIONLIGHT
- 4.22 REPLACING TIMELIGHT
- 4.22.1 REMOVING TIMELIGHT
- 4.22.2 INSTALLING TIMELIGHT
- 4.23 REPLACING GAP ILLUMINATION
- 4.23.1 REMOVING GAP ILLUMINATION
- 3.1.DETACH CATCH HOOK (1)
- 4.23.2 INSTALLING GAP ILLUMINATION
- REMONDITEAVE - NÕUDEPESUMASIN
- 1.2.2 OHUSUMBOLID
- YTOBEIEIC ETIOKEUNC -IAUVTNPIO TIATOWV
- 4.2.3 TOTTOETETON EVETOU ATOPAYEPA EIOKΑ BONTNTIKA ΜΕΣΑ
- EMIOKEUN
- 4.3 AVTIKATAOAN VARIODRAWER
- 4.2.1.2 „EMOTIONLIGHT" JDÉJIMAS
- 4.23.2 MONTAZ GAP ILLUMINATION
- DICAS DE RESOLUTION - MAQUINA DE LAVAR LOÇA
- 4.17.1 REMOVER A PORTA INTERIOR
- 4.17.2 INSTALAR A PORTA INTERIOR
- 4.23.1 REMOVE A GAP ILLUMINATION
- REPARACAO
- DESPENDRA O GANCHO DE ENCAIXE (1)
- O TOTO DOKUNTE
- 4.23 BYTA GAP ILLUMINATION
- 4.23.1 TA BORT GAP ILLUMINATION
- 3.1.LOSSA FASKROKEN (1)
- 4.23.2 MONTERA GAP ILLUMINATION
Brand : Profilo
Model : BM4381EG
Category : Dishwasher