GWS 400 HM2 - Saw Güde - Free user manual and instructions
Find the device manual for free GWS 400 HM2 Güde in PDF.
User questions about GWS 400 HM2 Güde
0 question about this device. Answer the ones you know or ask your own.
Ask a new question about this device
Download the instructions for your Saw in PDF format for free! Find your manual GWS 400 HM2 - Güde and take your electronic device back in hand. On this page are published all the documents necessary for the use of your device. GWS 400 HM2 by Güde.
USER MANUAL GWS 400 HM2 Güde
natural_image
Blue industrial machine with mechanical components, no visible text or symbols on the device itself
GÜDE GmbH & Co. KG
Birkichstrasse 6
74549 Wolpertshausen
Deutschland

ENGLISH Please read the instructions carefully before starting the machine.
natural_image
3D rendering of a blue industrial machine with mechanical components and mounting base (no text or symbols visible)2

natural_image
Two gray wrench-style tools with circular holes and a fork-shaped handle (no text or symbols)3

natural_image
Simple black 3D geometric shape resembling a bent pipe or support structure (no text or symbols)DE Montage
EN Assembly
FR Assemblage
IT Montaggio
ES Montaje
NL Montage
CZ Montáž
SK Montáž
PL Montaż
HU Szerelés
1
DE Inbetriebnahme
EN Starting-up the device
FR Mise en service
EN Maintenance / Cleaning
FR Entretien / Nettoyage
EN transport / storage
FR Transport / Stockage
NL Transport / Bewaring
natural_image
Simple illustration of an open box with a white upward arrow (no text or symbols)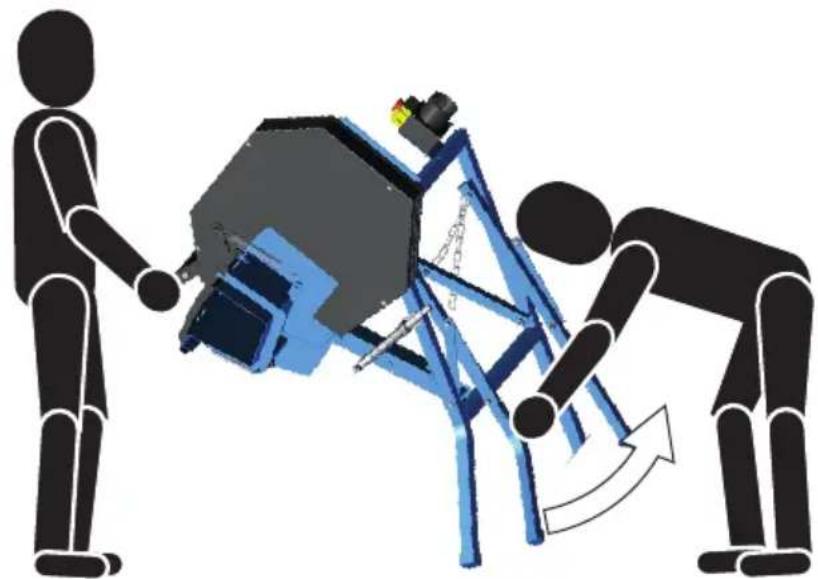
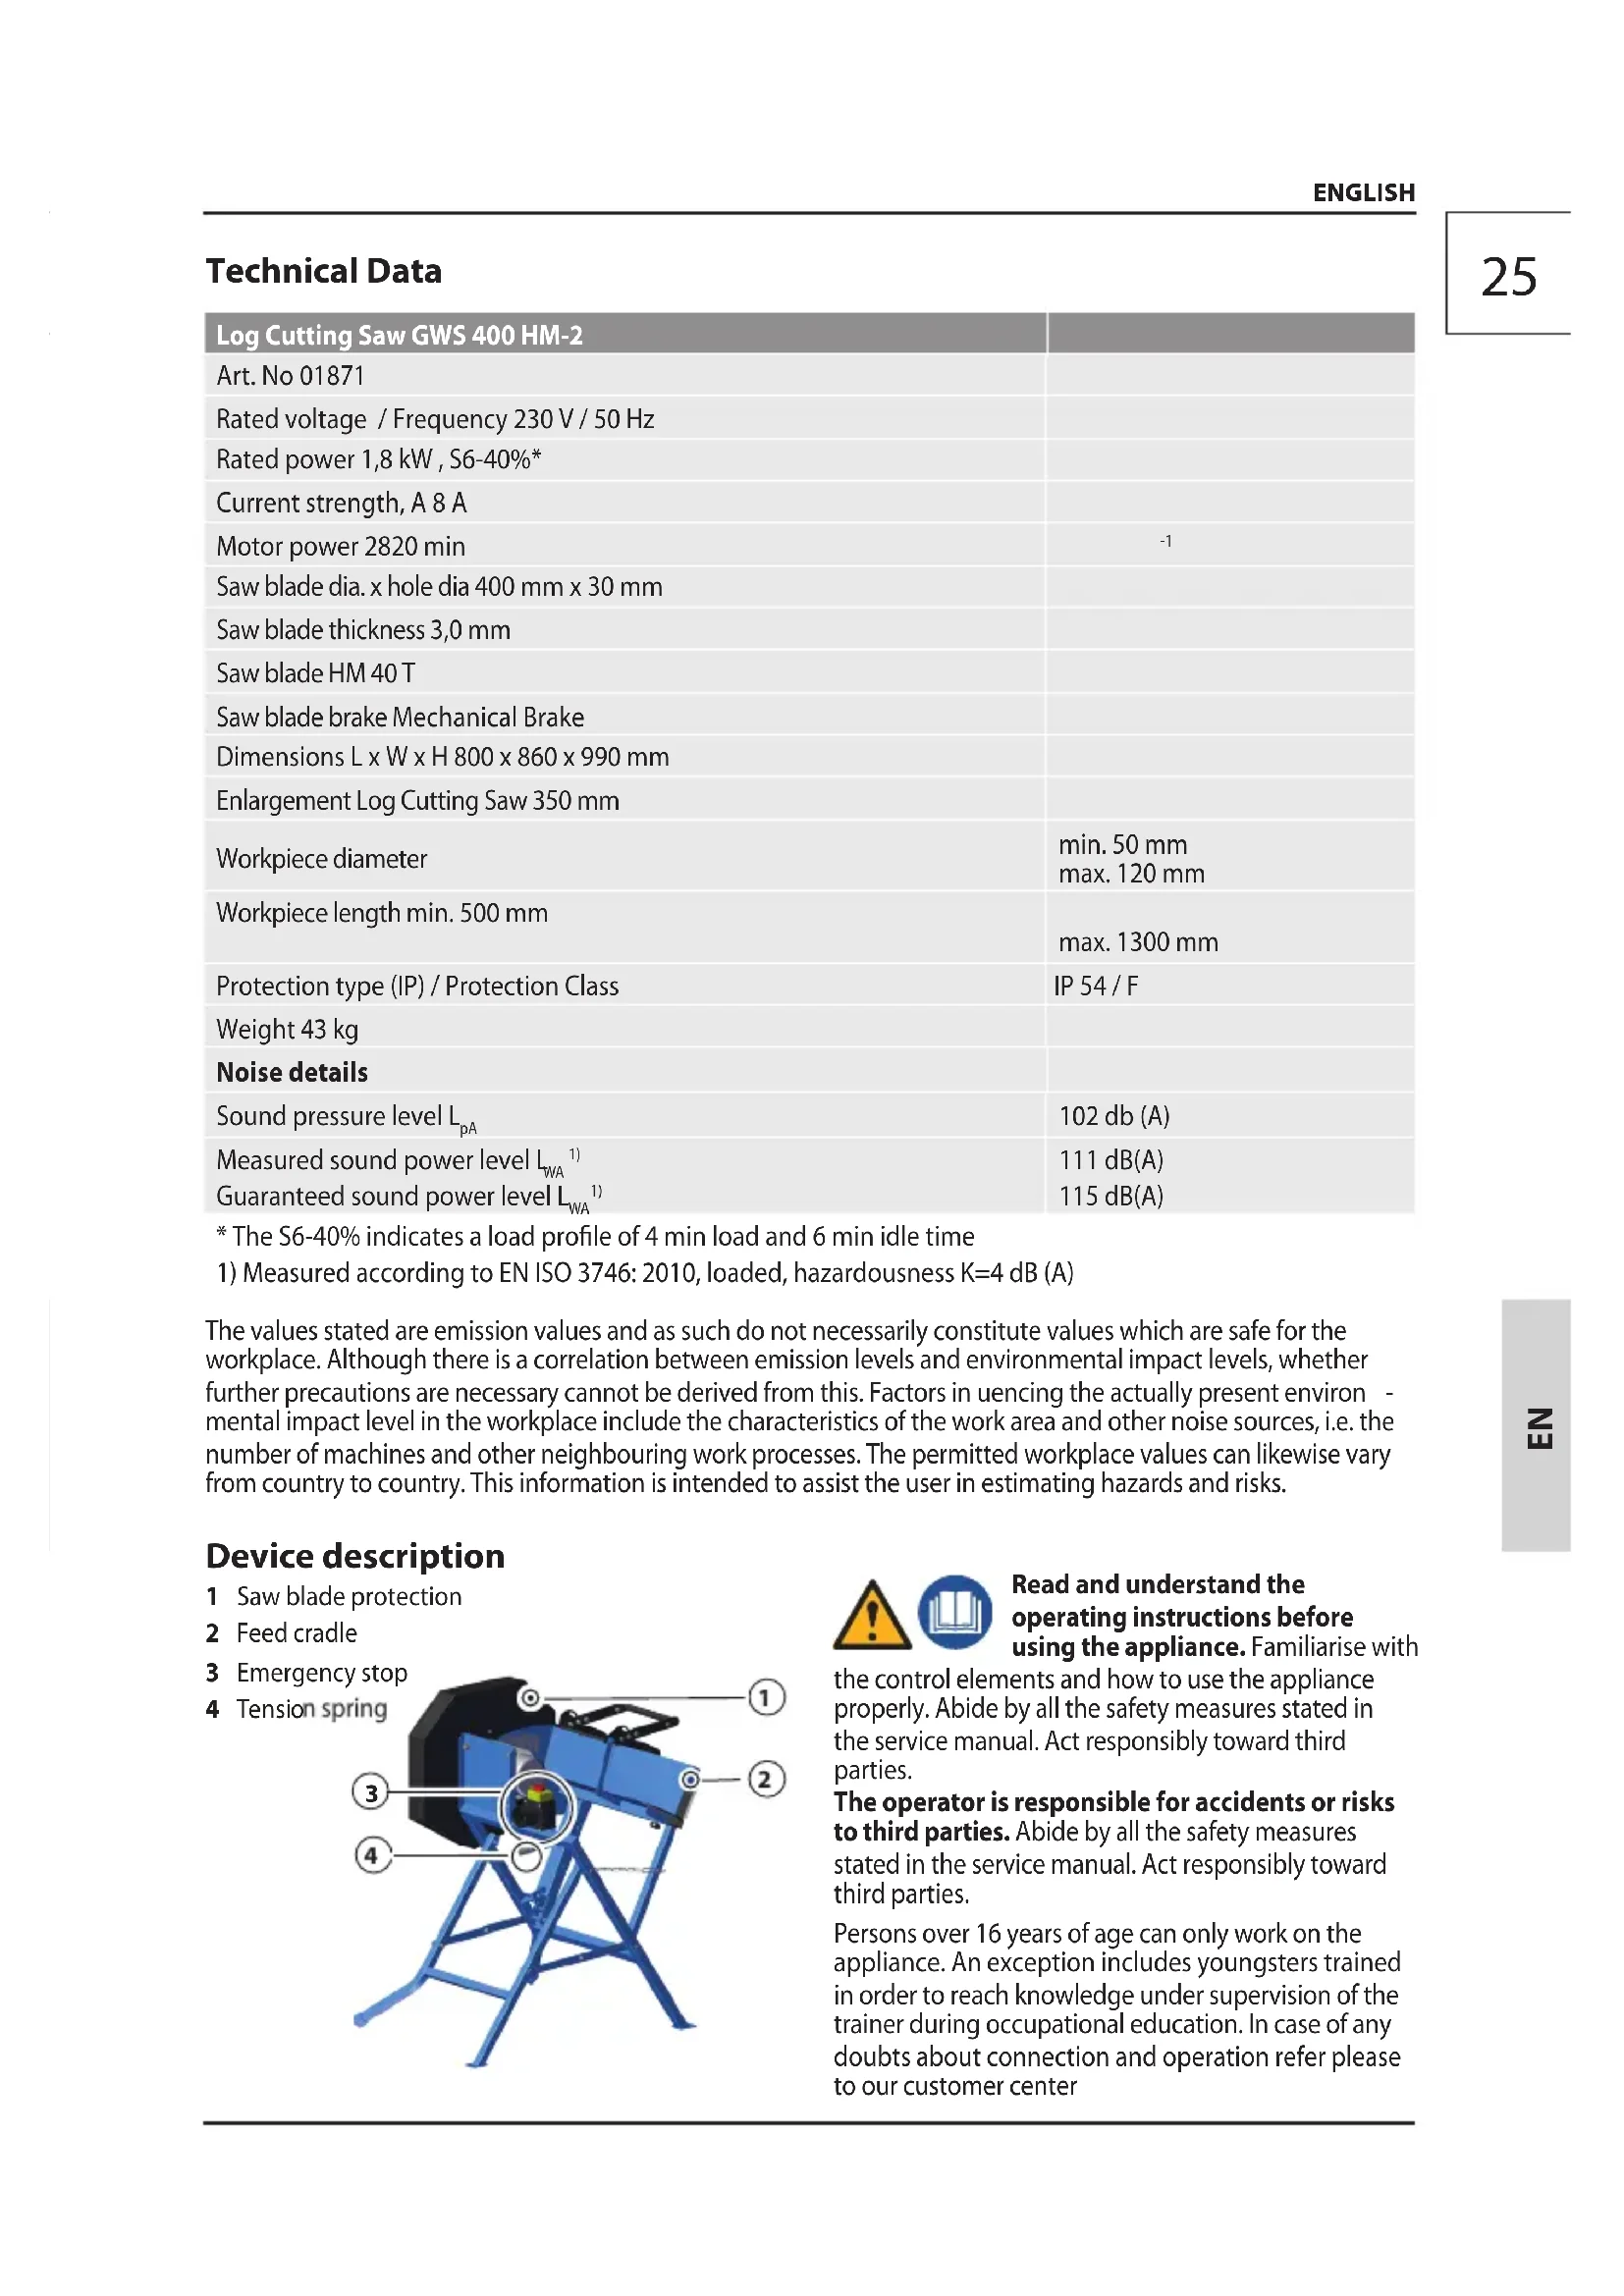
natural_image
Illustration of two robotic figures interacting with a mechanical device, one lifting the other (no text or symbols present)2
text_image
2x C 4x CDE Montage
CZ Montáž
EN Assembly
SK Montáž
FR Assemblage
PL Montaż
IT Montaggio
HU Szerelés
ES Montaje
NL Montage


3
text_image
3 1 24
text_image
4 1 2 C
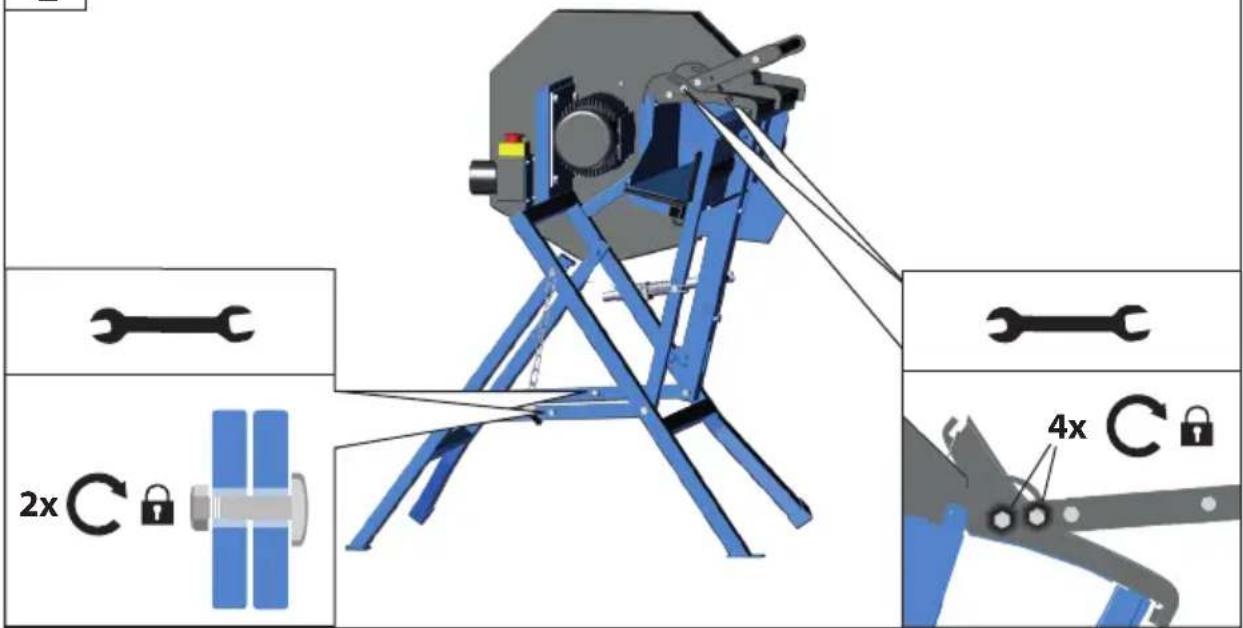
text_image
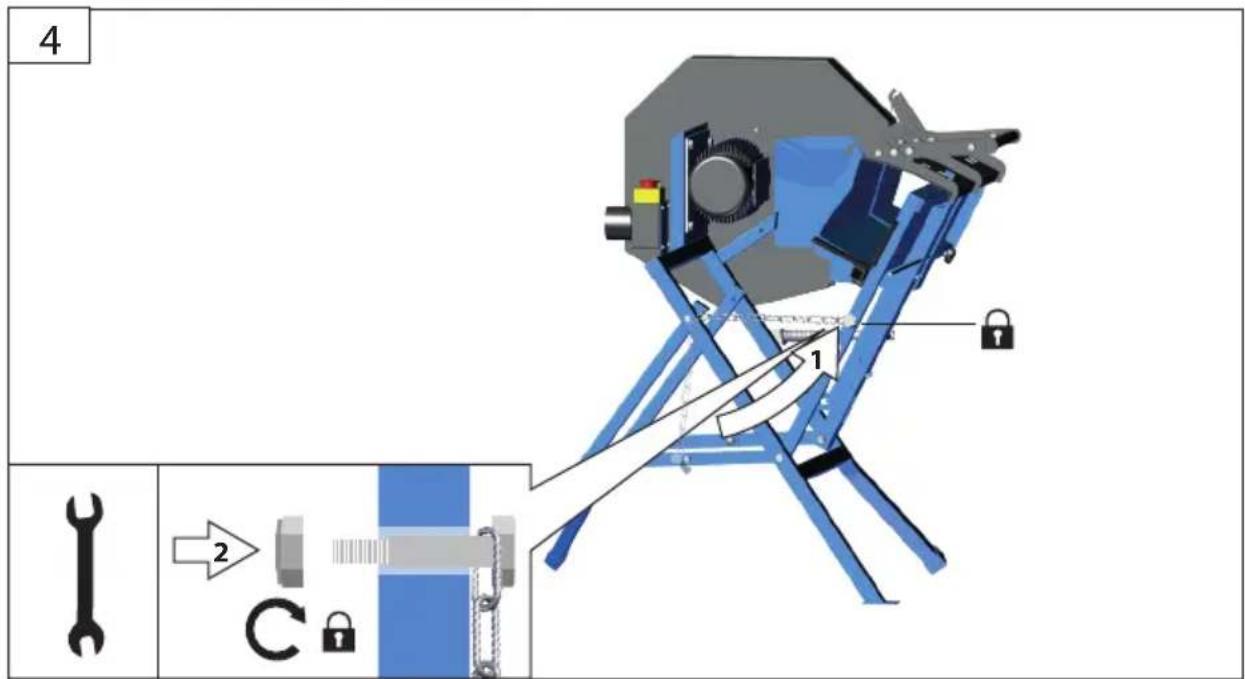
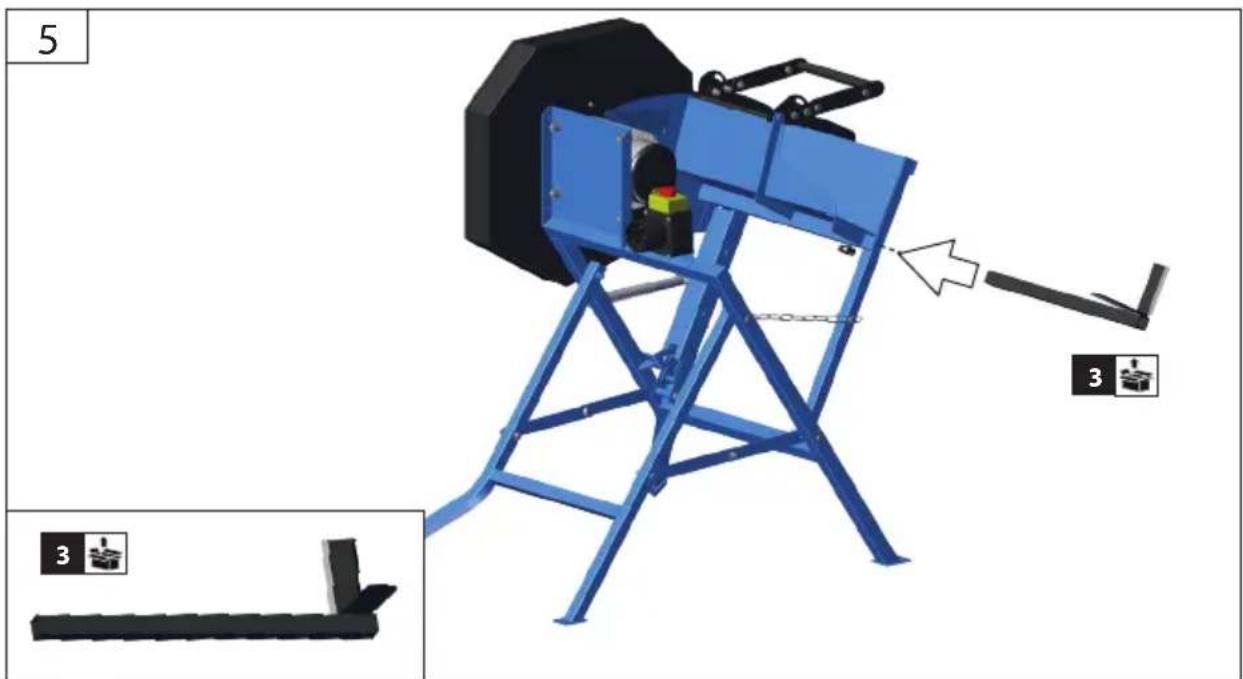
1DE Montage
EN Assembly
FR Assemblage
IT Montaggio
ES Montaje
NL Montage
CZ Montáž
SK Montáž
PL Montaż
HU Szerelés


5
text_image
5 36
text_image
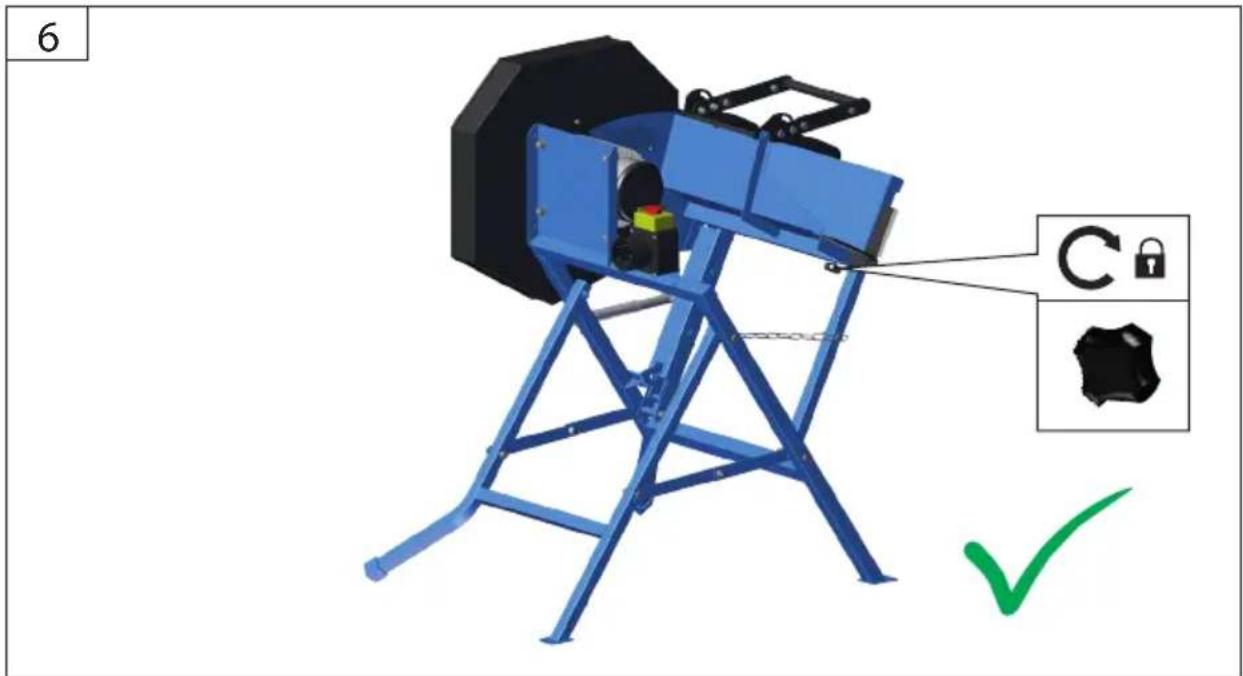
6 C ✓DE Inbetriebnahme
EN Starting-up the device
FR Mise en service
natural_image
Two technical diagrams showing a blue industrial machine with a downward arrow and a red X mark, no text or symbols present.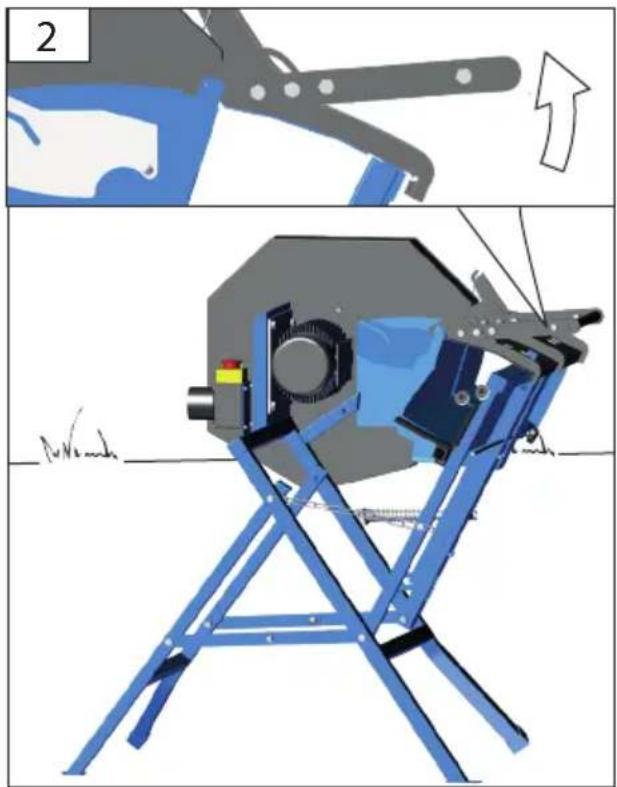
natural_image
Technical illustration of a mechanical device with blue frame and mechanical components, showing assembly steps (no text or symbols)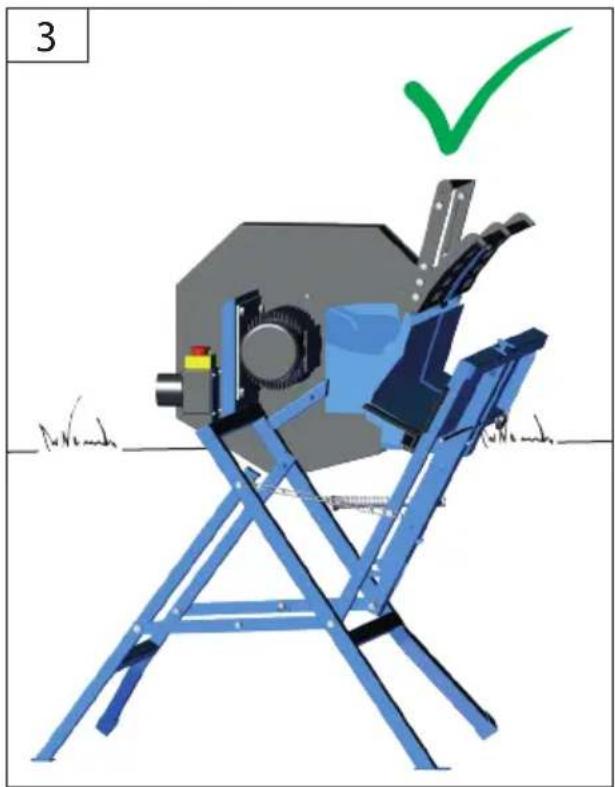
natural_image
Illustration of a blue folding chair with a mechanical device and a green checkmark above it (no text or symbols)| 2 | DE InbetriebnahmeEN Starting-up the deviceFR Mise en serviceIT Messa in funzioneES Puesta en marchaNL Inbedrijfstelling | CZ Uvedení do provozuSK Uvedenie do prevádzkyPL UruchomienieHU Üzembe helyezés |
2

text_image
Four safety symbols: warning triangle, circuit breaker, house, and trash bin with corresponding icons.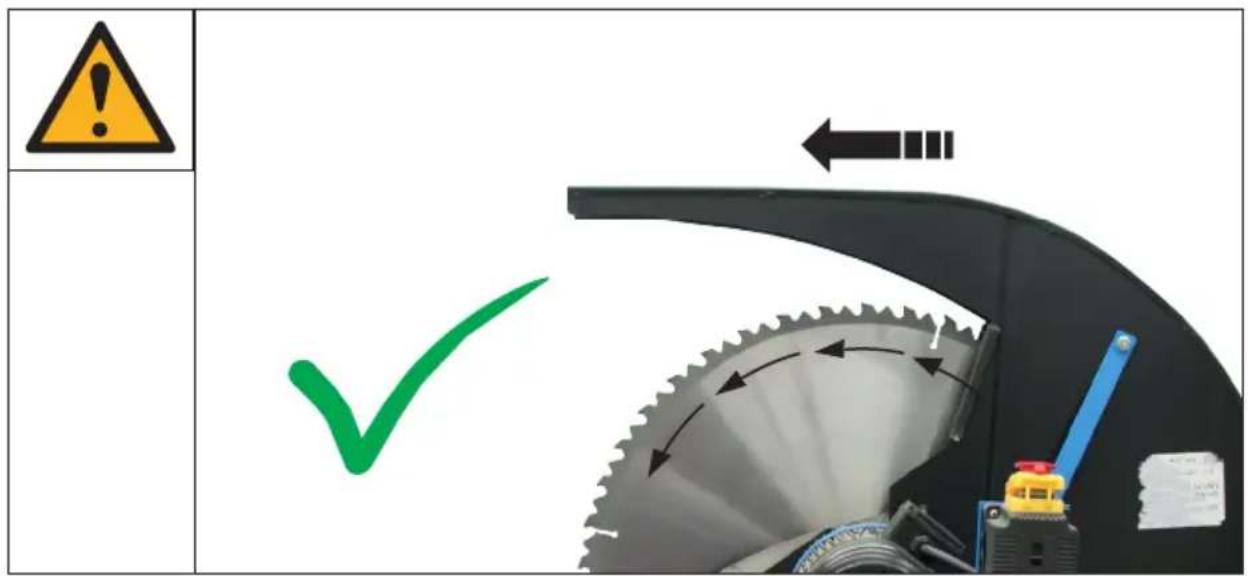
text_image
Diagram showing a warning sign, checkmark, and mechanical components with directional arrows indicating motion or flow.DE Sägeanweisung
EN Instructions for cutting
FR Consignes de sciage
SK Pokyny pre rezanie
text_image
Safety warning illustration showing a worker operating machinery with no visible text, symbols, and labels like 'no house' and 'no wood'.
min. ∅ 50 mm
max. ∅ 120 mm
min. 500 mm
max. 1300 mm
| 3 | DE SägeanweisungEN Instructions for cuttingFR Consignes de sciageIT Istruzioni per taglioES Instrucciones para aserrarNL Zaagaanwijzingen | CZ Pokyny pro řezáníSK Pokyny pre rezaniePL Instrukcja piłowaniaHU Vágási utasítások |
3


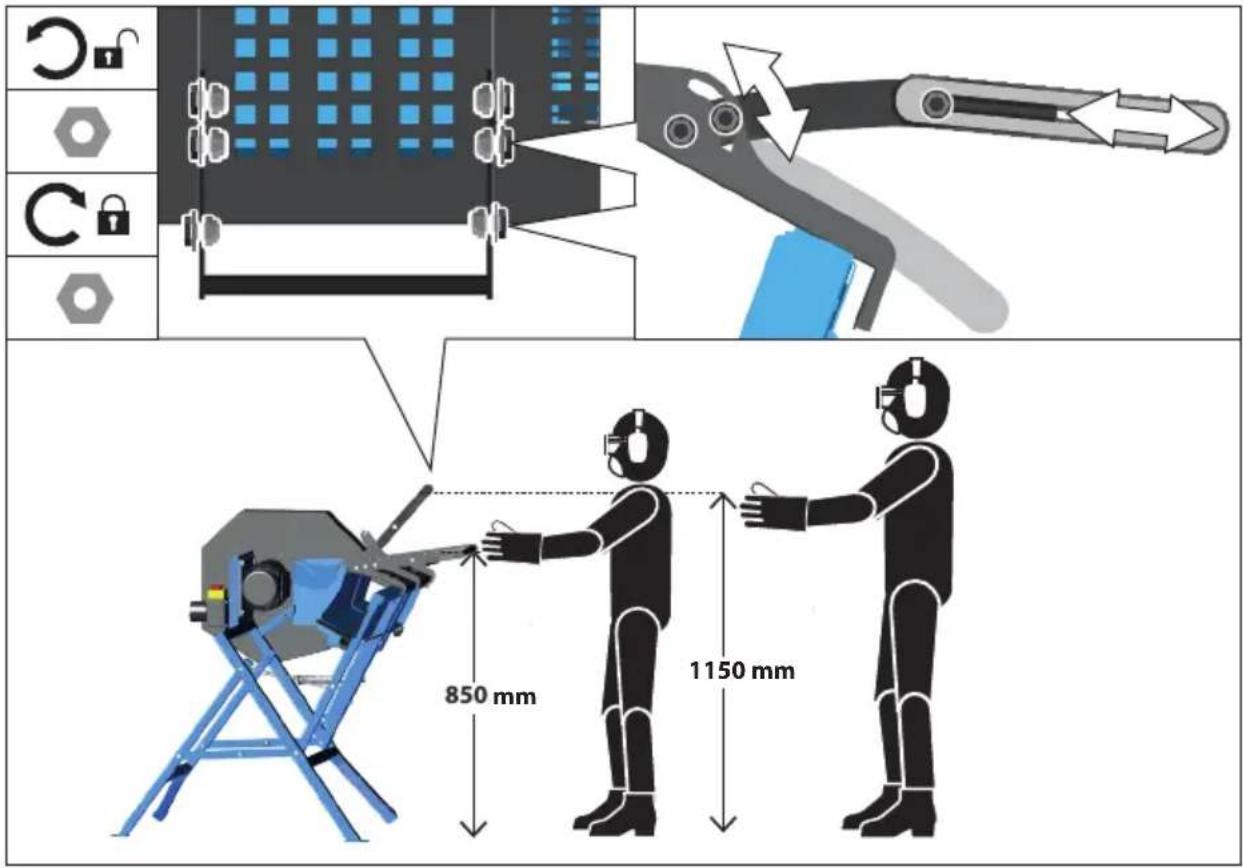
text_image
850 mm 1150 mm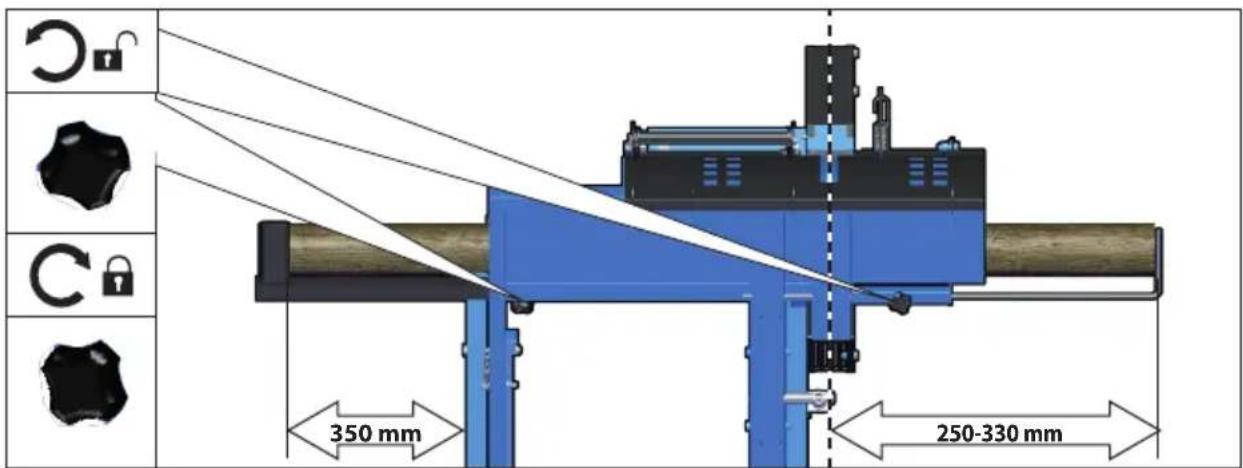
text_image
350 mm 250-330 mmDE Sägeanweisung
EN Instructions for cutting
FR Consignes de sciage
SK Pokyny pre rezanie
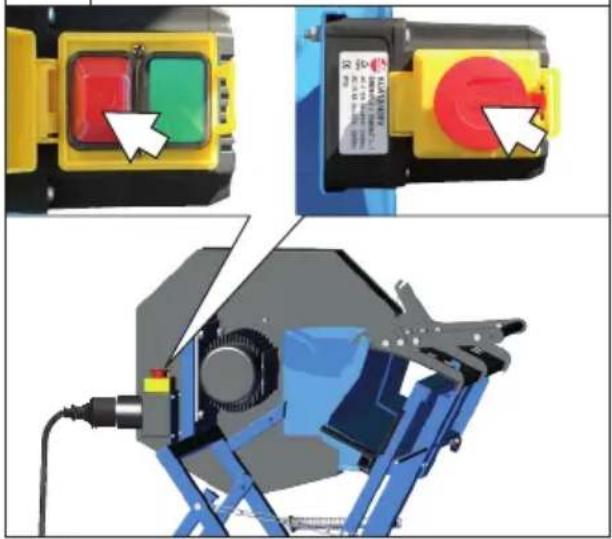
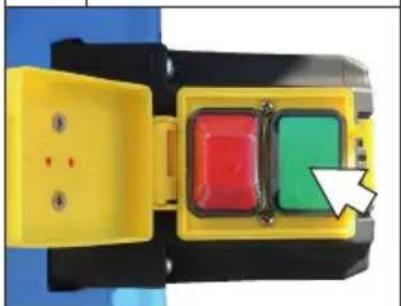
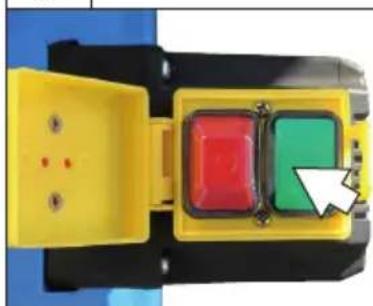
natural_image
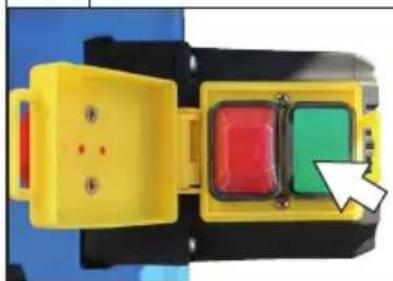
Close-up of a yellow industrial control box with red and green buttons, showing no text or symbols on the main components.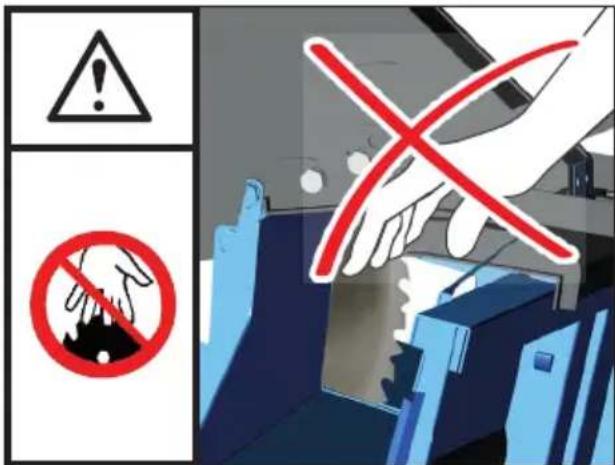
text_image
Safety warning sign with warning symbol and prohibition sign, indicating no protection or disapproval of a device
EN The use of dust collection can reduce dust-related hazards. Dust produced during work is often harmful and must not get in your body. Use the exhauster and wear an appropriate respirator, too. Remove thoroughly any deposited dust, e.g. by vacuuming.
text_image
START STOPDE Sägeanweisung
EN Instructions for cutting
FR Consignes de sciage
SK Pokyny pre rezanie
natural_image
Industrial machine with conveyor belt and pile of yellow sacks, no visible text or symbols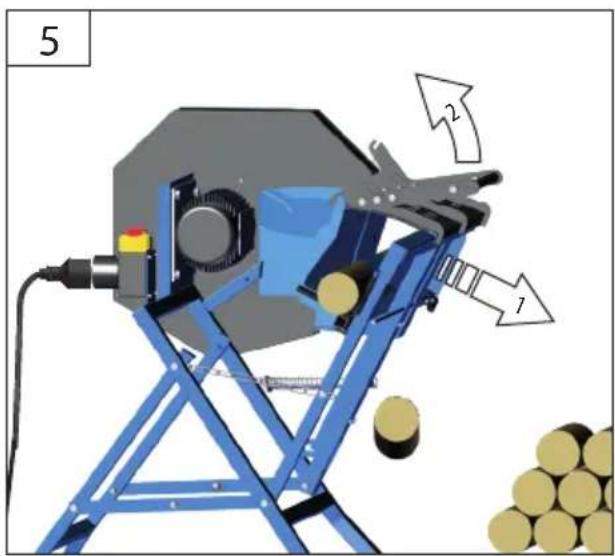
text_image
5 2 1DE Sägeanweisung
EN Instructions for cutting
FR Consignes de sciage
SK Pokyny pre rezanie
natural_image
Industrial machine with conveyor belt and cylindrical components, no visible text or symbols7
natural_image
Technical illustration of a mechanical device with labeled components and a close-up view of its internal structure (no readable text or symbols)STOP

text_image
8 ←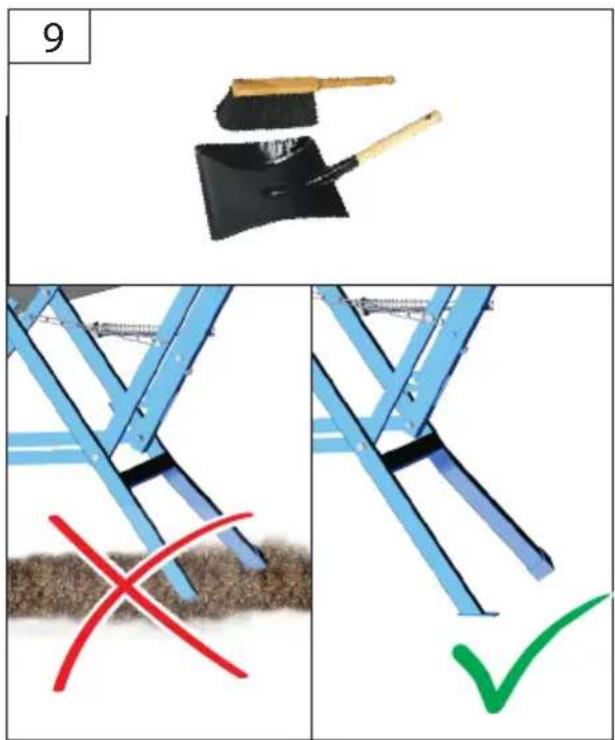
text_image
9 X
natural_image
Two black metal tools with wooden handles, one lying flat and the other tilted upward (no text or symbols visible)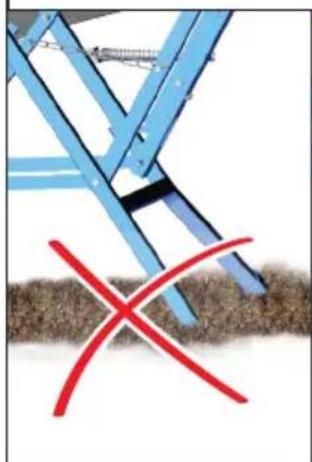
natural_image
Illustration of a blue metal structure with a red X mark on a textured surface (no text or symbols)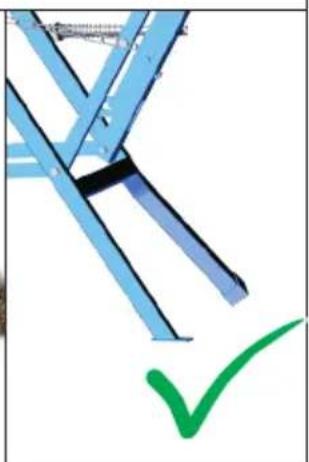
natural_image
Abstract graphic with blue lines and a green checkmark (no text or symbols)
text_image
START STOPDE Betrieb
EN Operation
FR Fonctionnement
IT Esercizio
ES Operação
NL Gebruik
CZ Provoz
SK Prevádzka
PL Operacja
HU Üzemeltetés


1 | STARTST02P
natural_image
Close-up of a yellow plastic electrical contact box with red and green buttons, no visible text or symbols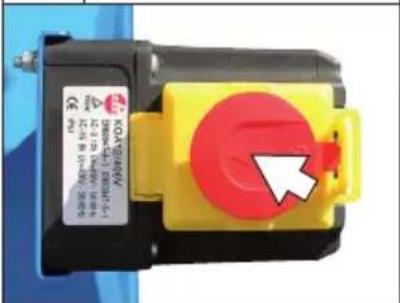
text_image
HOT-SPA R3 | RESTART
natural_image
Close-up of a yellow and black electronic device with red and green buttons, featuring a white arrow pointing to one (no text or symbols visible)m a x. 6 x / h

STOP
natural_image
Circular mechanical component with gear-like teeth and concentric rings, surrounded by directional arrows (no text or symbols)max. 10 sec.
EN The saw blade runs down for app. 10 seconds.
The saw blade must not be braked by side back pressure.
The engine makes a grumbling noise when braking and shortly after breaking. The switch must not be pressed (on or off) in any case in this phase.
The engine may be started again only after there is no more grumble.
natural_image
Circular mechanical component with radial grooves and central hub, surrounded by clockwise arrows (no text or symbols)max. 10 sec.
ES La hoja de sierra sigue funcionando durante unos 10 segundos. ¡No detenga la hoja de sierra presionándola por el lado! Durante y poco después del tiempo de frenado el motor emite un zumbido. En esta fase, nunca debe accionarse el interruptor (ni para encender ni para apagar). El motor solo puede encenderse de nuevo después de que el zumbido haya cesado.
NL Het zaagblad loopt noch ca. 10 seconden na Zaagblad niet door zijdelings te drukken stoppen! Tijdens en kort na de remtijd bromt de motor. In deze fase mag de schakelaar in geen geval geactiveerd worden (niet in- of uitschakelen). Pas na het stoppen van het bromgeluid mag de motor opnieuw ingeschakeld worden.
CZ Pilový kotouč ještě cca 10 sekund dobíhá. Pilový kotouč nesmí být brzděn bočním protitlakem! Během brzdění a krátce poté vydává motor bručivý zvuk. V této fázi nesmí být v žádném případě stisknut spínač. (ani zapnut, ani vypnut). Až po vymizení bručivého zvuku lze motor opět zapnout.
SK Pílový kotúč ešte cca 10 sekúnd dobieha. Pílový kotúč nesmie byť brzdený bočným protitlakom! Počas brzdenia a krátko potom vydáva motor bručivý zvuk. V tejto fáze sa nesmie v žiadnom prípade stlačit spínač (ani zapnút, ani vypnút). Až po vymiznutí bručivého zvuku je možné motor opät zapnút.
PL La hoja de sierra sigue funcionando durante unos 10 segundos. ¡No detenga la hoja de sierra presionándola por el lado! Durante y poco después del tiempo de frenado el motor emite un zumbido. En esta fase, nunca debe accionarse el interruptor (ni para encender ni para apagar). El motor solo puede encenderse de nuevo después de que el zumbido haya cesado.
HU A fürésztárcsa még kb. 10 másodpercig forog. Tilos a fürésztárcsát oldalnyomással fékezni! A fékezés alatt és közvetlen utána, a motor zúgó hangot ad ki. Ebben a fázisban tilos a kapcsolót lenyomni! (be, vagy kikapcsolni) A motort, a zúgó hang megszünése után, ismét be lehet kapcsolni!
1 AUTOSTOP

2 AUTOSTOP

10 - 20 min.
3 | RESTART
natural_image
Yellow and black electronic device with two labeled buttons (red and green) and a white arrow pointing to one button (no text or symbols visible)4
DE Sägeblattwechsel
EN Sawblade Change
FR Changement de lame
natural_image
Technical illustration of a blue industrial machine with gear and control components, shown from two views (no text or symbols)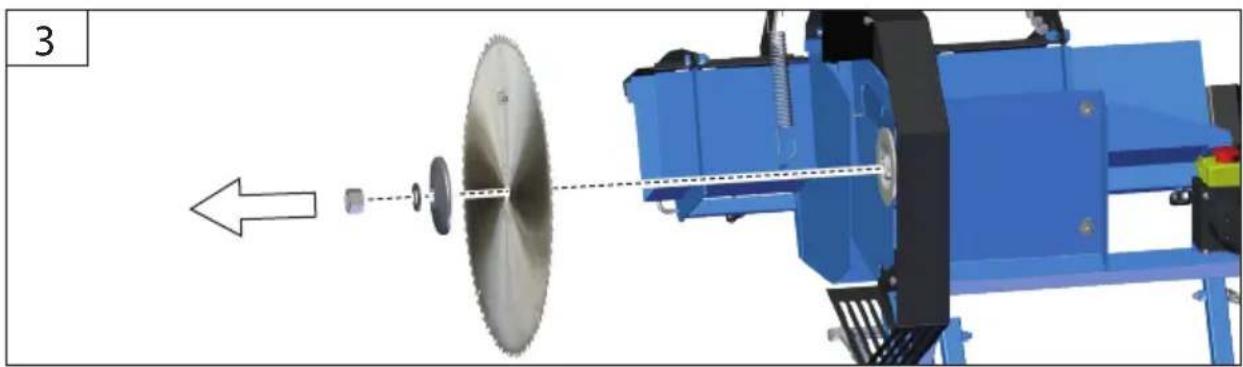
natural_image
3D mechanical assembly diagram showing a blue industrial machine with a rotating wheel and shaft, connected by a dashed line (no text or symbols)DE Sägeblattwechsel
EN Sawblade Change
FR Changement de lame
natural_image
Mechanical gear and motor assembly diagram showing gear meshing and directional warning symbols (no text or labels)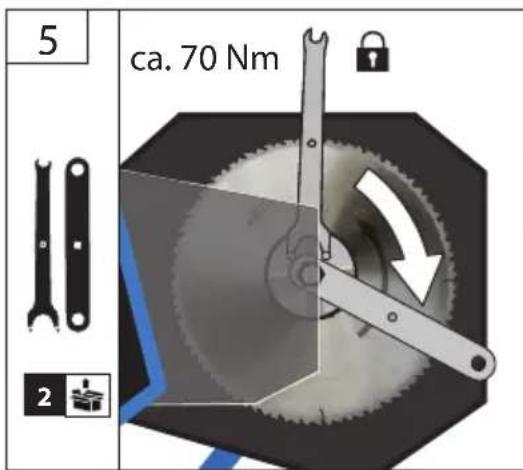
text_image
5 ca. 70 Nm 2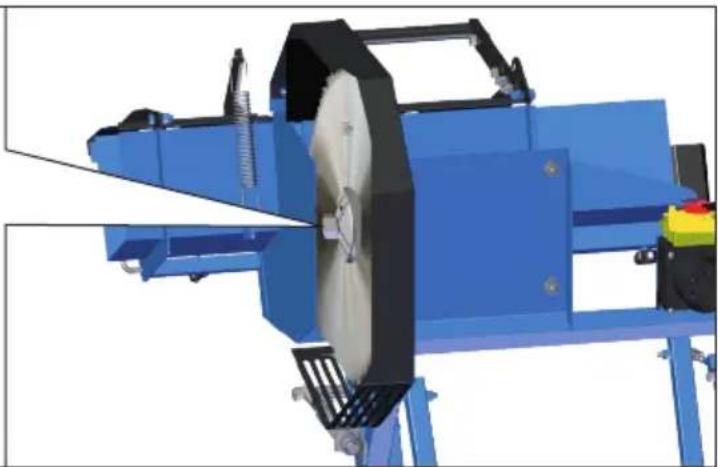
natural_image
3D rendering of a blue industrial machine with a circular drive and mechanical components (no visible text or symbols)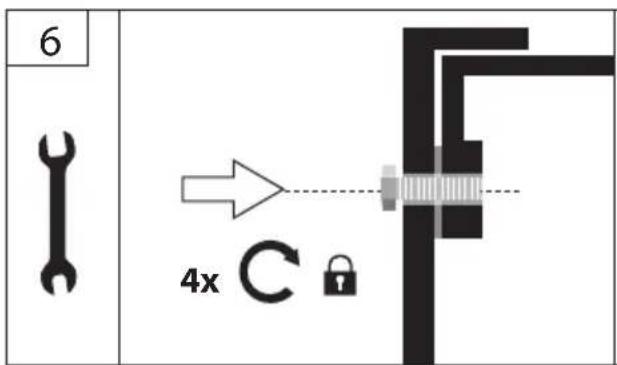
text_image
6 4x C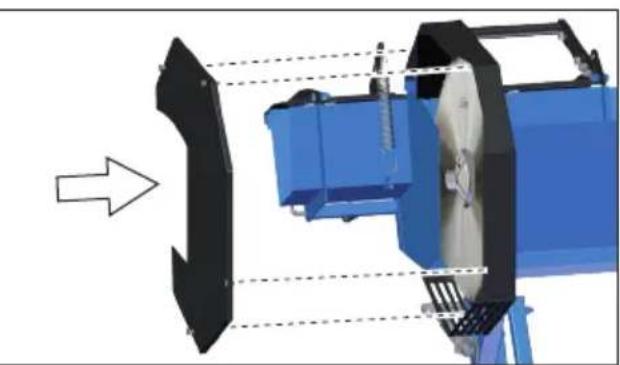
natural_image
3D mechanical assembly diagram showing a blue component with black structural elements and an arrow indicating direction (no text or symbols)
EN Maintenance / Cleaning
FR Entretien / Nettoyage
natural_image
Abstract geometric line drawing with black and gray shapes, no text or symbols present
Open the machine as specified in Changing the saw blade.
natural_image
Industrial machine with mechanical components and a close-up of a tool inside, showing no visible text or symbols.2
4x

[NO TEXT]

natural_image
Pure mechanical diagram showing a shaft and housing with an arrow indicating direction (no text or symbols)
Close the machine as specified in Changing the saw blade.
EN transport / storage
FR Transport / Stockage
NL Transport / Bewaring
natural_image
Industrial machine setup with blue frame, motor, and power outlet (no visible text or symbols)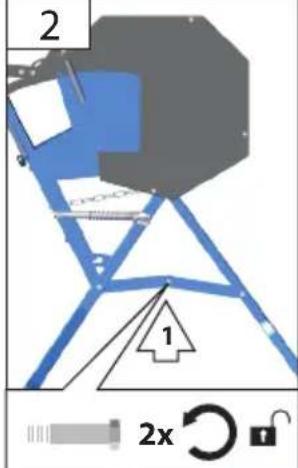
text_image
2 1 2x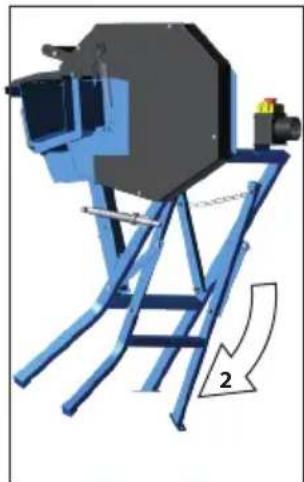
natural_image
Illustration of a blue industrial machine with a lever and directional arrow labeled '2' (no text or symbols on the machine itself)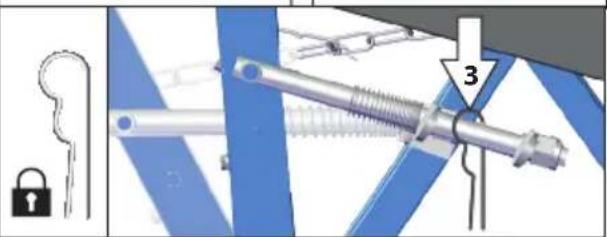
natural_image
Mechanical assembly diagram showing a lock and pin assembly with a numbered component (no text or symbols)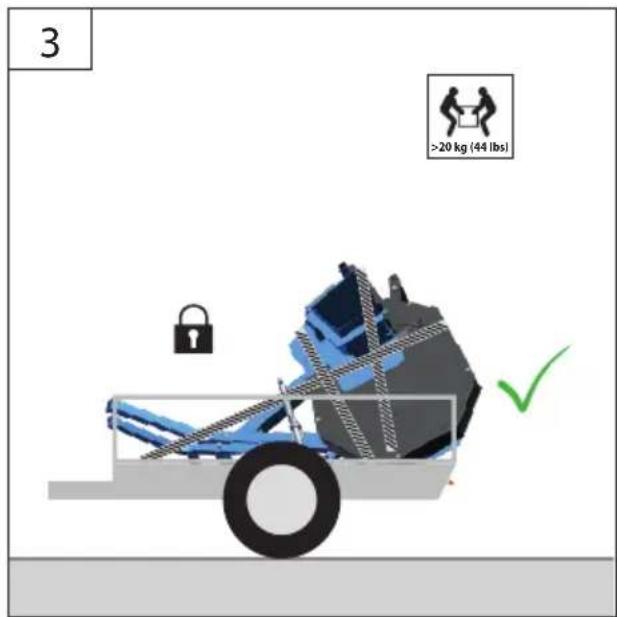
text_image
3 >20 kg (44 lbs)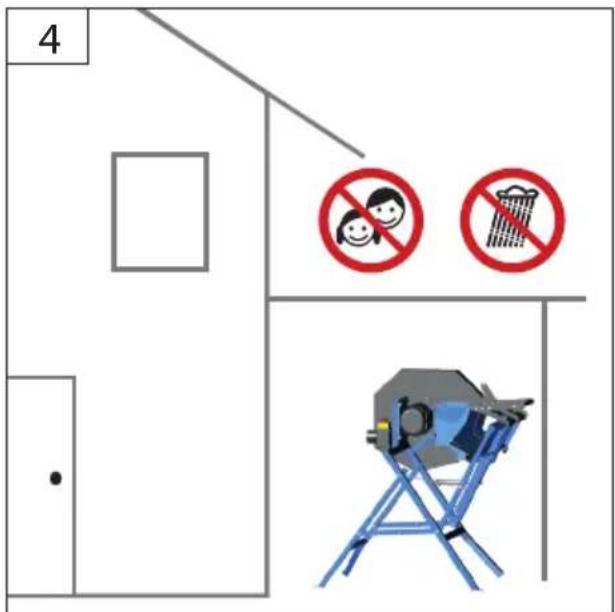
text_image
4 No litter No litter

natural_image
Illustration of a blue folding chair with a gray mechanical component on top (no text or symbols)Technische Daten
* The S6-40% indicates a load profile of 4 min load and 6 min idle time
1) Measured according to EN ISO 3746: 2010, loaded, hazardousness K=4 dB (A)
The values stated are emission values and as such do not necessarily constitute values which are safe for the workplace. Although there is a correlation between emission levels and environmental impact levels, whether further precautions are necessary cannot be derived from this. Factors in uencing the actually present environmental impact level in the workplace include the characteristics of the work area and other noise sources, i.e. the number of machines and other neighbouring work processes. The permitted workplace values can likewise vary from country to country. This information is intended to assist the user in estimating hazards and risks.
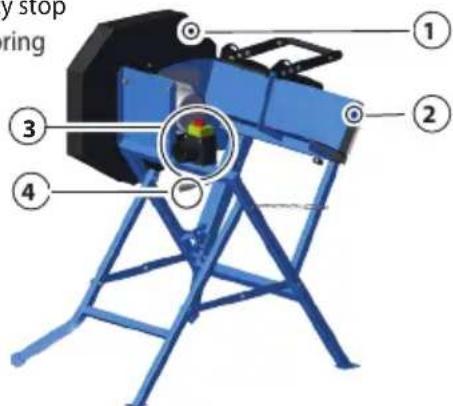
Device description
1 Saw blade protection
2 Feed cradle
3 Emergency stop
4 Tension spring
text_image
stop ring ① ② ③ ④

Read and understand the operating instructions before using the appliance. Familiarise with
the control elements and how to use the appliance properly. Abide by all the safety measures stated in the service manual. Act responsibly toward third parties.
The operator is responsible for accidents or risks to third parties. Abide by all the safety measures stated in the service manual. Act responsibly toward third parties.
Persons over 16 years of age can only work on the appliance. An exception includes youngsters trained in order to reach knowledge under supervision of the trainer during occupational education. In case of any doubts about connection and operation refer please to our customer center
The operating personnel must have received sufficient training in use, setup and maintenance.
Specified Conditions of Use
To be used outdoors only. The circular saw for firewood is used for cross cutting of firewood. It is necessary to follow all technical specifications and safety instructions.
Pieces of wood that are too short, too light or too thin to get caught by the barbs in the feed cradle must not be processed by the machine.
The machine may only be used if it is fully assembled.
Operation of a machine that is not fully assembled is strictly prohibited.

The machine may only be operated by one person.
Make sure there is nobody present in the dangerous area. The minimum distance is 2 m.
Residual Risk
Risk of injury
In spite of compliance with all relevant design regulations, dangers may still present themselves when the machine is operated, e.g.:
- Risk of injury to fingers and hands. Never put your hands in the saw blade area.
- Parts of workpieces and tools fly off from damaged tools. Wear eye protectors.
- Noise emission: It is necessary to wear ear protectors.
- Wood dust emission: Wear a respirator.
Despite the observance of the operating instructions there still may be some hidden residual risks.
Residual risks may be minimised by following the safety instructions and use as designated provisions and the Operating Instructions.
The exposure to dust is influenced by the type of the material processed. It is important to use local exhaust (catching near the source) and adjust well the exhaust covers, guide elements and the grab channels.
Dust produced during work is often harmful and must not get in your body. Use the exhauster and wear an appropriate respirator, too. Remove thoroughly any deposited dust, e.g. by vacuuming.
Use saw blades designed to reduce emitted noise. Keep the machine and saw blade running.
To minimise noise production, the tool must be sharpened and all elements for noise minimisation (covers, etc.) must be properly adjusted.
Emergency procedure
Conduct a first-aid procedure adequate to the injury and summon qualified medical attendance as quickly as possible. Protect the injured person from further harm and calm them down. If you seek help, state the following pieces of information
- Accident site
- Accident type
- Number of injured persons
- Injury type(s)
Mains Connection

Operation is only allowed with a safety switch against stray current (RCD max. stray current of nA).
Before putting into operation, a qualified electrician must check whether electric safety measures required are in place. Any national regulations in this regard must be complied with.
Electric connection to a socket.
It is necessary to make sure the connecting socket was not near water and humidity and the plug was protected against humidity. Check the voltage. Technical data given on the type label must correspond with electric network voltage.
Only use splash proof extension cables approved for outdoor purposes.
Check the cable and/or socket for damages before the appliance putting into operation. In case damage let repaired in authorized workshop
To avoid danger, a damaged mains supply pipe must be replaced by the manufacturer. Do not under any circumstances attempt any repair yourself.
Cable connections to be separated by pulling the plug only. Pulling the cable could damage both the cable and plug. As a result, electric safety would no longer be guaranteed.
Symbols

Caution! Warning!

Caution! Read the operating instructions to reduce the risk of injury.

Caution! Unplug the machine before any servicing or repair!

Always wear goggles when using the machine.

Wear ear protectors!

Wear protective clothing

Wear safety shoes with steel reinforcement.

Wear protective gloves

Wear dust mask

To be used outdoors only.

Keep dry at all times. Never expose tool to rain.

Always keep hands away from the path of the saw blade.

Keep the machine out of reach of children.

Keep distance of persons. Observe to keep out of dangerous zone

Warning against thrown-off items

Warning against rotating parts. Never put your hands and feet near the rotating parts.

Warning against dangerous voltage

Warning against cutting injuries

Rotation direction
Any damaged or disposed electric or electronic devices must be delivered to appropriate collection centres.

Remove all undesirable items, e.g. nails and wire, before working.

Strong

Slow

CE marking

Sound power level L_WA

Saw blade ø

Workpiece diameter


TÜV / GS conformity mark

Two persons are required for implementation.
General Power Tool Safety Warnings

WARNING Read all safety warnings and all
instructions. Failure to follow the warnings and instructions may result in electric shock, fire and/or serious injury.
Save all warnings and instructions for future reference.
The term "power tool" in the warnings refers to your mains-operated (corded) power tool and battery-operated (cordless) power tool.
1) Work area safety
a) Keep work area clean and well lit. Cluttered or dark areas invite accidents.
b) Do not operate power tools in explosive atmospheres, such as in the presence of flammable liquids, gases or dust. Power tools create sparks which may ignite the dust or fumes.
c) Keep children and bystanders away while operating a power tool. Distractions can cause you to lose control.
2) Electrical safety
a) Power tool plugs must match the outlet. Never modify the plug in any way. Do not use any adapter plugs with earthed (grounded) power tools. Unmodified plugs and matching outlets will reduce risk of electric shock.
b) Avoid body contact with earthed or grounded surfaces, such as pipes, radiators, ranges and refrigerators. There is an increased risk of electric shock if your body is earthed or grounded.
c) Do not expose power tools to rain or wet conditions. Water entering a power tool will increase the risk of electric shock.
d) Do not abuse the cord. Never use the cord for carrying, pulling or unplugging the power tool. Keep cord away from heat, oil, sharp edges or moving parts. Damaged or entangled cords increase the risk of electric shock.
e) When operating a power tool outdoors, use an extension cord suitable for outdoor use. Use of a cord suitable for outdoor use reduces the risk of electric shock.
f) If operating a power tool in a damp location is unavoidable, use a residual current device (RCD) protected supply. Use of an RCD reduces the risk of electric shock.
3) Personal safety
a) Seien Sie aufmerksam, achten Sie darauf, was Stay alert, watch what you are doing and use common sense when operating a power tool. Do not use a power tool while you are tired or under the influence of drugs, alcohol or medication. A moment of inattention while operating power tools may result in serious personal injury.
b) Use personal protective equipment. Always wear eye protection. Protective equipment such as dust mask, non-skid safety shoes, hard hat, or hearing protection used for appropriate conditions will reduce personal injuries.
c) Prevent unintentional starting. Ensure the switch is in the off-position before connecting to power source and/or battery pack, picking up or carrying the tool. Carrying power tools with your finger on the switch or energising power tools that have the switch on invites accidents.
d) Remove any adjusting key or wrench before turning the power tool on. A wrench or a key left attached to a rotating part of the power tool may result in personal injury.
e) Do not overreach. Keep proper footing and balance at all times. This enables better control of the power tool in unexpected situations.
f) Dress properly. Do not wear loose clothing or jewellery. Keep your hair, clothing and gloves away from moving parts. Loose clothes, jewellery or long hair can be caught in moving parts.
g) If devices are provided for the connection of dust extraction and collection facilities, ensure these are connected and properly used. Use of dust collection can reduce dust-related hazards.
4) Power tool use and care
a) Do not force the power tool. Use the correct power tool for your application. The correct power tool will do the job better and safer at the rate for which it was designed.
b) Do not use the power tool if the switch does not turn it on and off. Any power tool that cannot be controlled with the switch is dangerous and must be repaired.
c) Disconnect the plug from the power source and/or the battery pack from the power tool before making any adjustments, changing accessories, or storing power tools. Such preventive safety measures reduce the risk of starting the power tool accidentally.
d) Store idle power tools out of the reach of children and do not allow persons unfamiliar with the power tool or these instructions to operate the power tool. Power tools are dangerous in the hands of untrained users.
e) Maintain power tools. Check for misalignment or binding of moving parts, breakage of parts and any other condition that may affect the power tool's operation. If damaged, have the power tool repaired before use. Many accidents are caused by poorly maintained power tools.
f) Keep cutting tools sharp and clean. Properly maintained cutting tools with sharp cutting edges are less likely to bind and are easier to control.
g) Use the power tool, accessories and tool bits etc. in accordance with these instructions, taking into account the working conditions and the work to be performed. Use of the power tool for operations different from those intended could result in a hazardous situation.
5) Service
a) Have your power tool serviced by a qualified repair person using only identical replacement parts. This will ensure that the safety of the power tool is maintained.
Safety instructions for circular saws for firewood
Operation is only allowed with a safety switch against stray current (RCD max. stray current of 30mA).
The machine must be plugged to 230 V with 16 A fuse.
Wear ear protectors. Exposure to noise can cause hearing loss.
Wear gloves when handling saw blades and rough materials.
When being operated, the machine must stand on a horizontal and flat surface and the floor around the machine must be flat, well-maintained and with no waste, such as sawdust and cuttings.
The processed bundle of workpieces and finished workpieces should be placed near the standard place of work of the operator.
Switch the machine off and unplug it when unattended.
⚠️ Check all screw and plug-in connections and protective equipment if firm and tightened properly and whether all moving parts are running smooth whenever the appliance is to be put into operation.
⚠ Ensure that the separating safety equipment and other safety equipment which is necessary for operating the machine is fitted, is in a good operating condition and is properly serviced.
The protective equipment on the appliance is strictly prohibited to be disassembled, changed, used in conflict with the designation and it is prohibited to attach any protective equipment of other manufacturers.
For cleaning and maintenance, the following safety guards must be removed: Additional safety device for saw blade protection After carrying out the work, all safety guards must be reinstalled again correctly! See image description.
The machine must not be used under any circumstances if the machine or the safety devices are damaged. Replace any worn and damaged parts.
The blade is very hot after use, wear gloves or allow to cool before maintenance or cleaning procedures.
Before use check appliance, cable, extension cord and plug for any damages or material fatigue.
The operating personnel must have received sufficient training in use, setup and maintenance. Errors in the machine, including the guard or the blade shafts, must be reported to the person responsible for safety as soon as they are discovered.
Before pressing On/Off, make sure the saw blade has been fitted properly.
The saw must not be used any longer if the cradle fails to automatically return to the rest position.
The saw must not be used any longer if the saw blade fails to stop in 10 seconds after switching the machine off.
For security, use devices such as safety- and pressure device, guide slide, rip fence, etc.
Removing sawdust and chippings from the machine when running is strictly prohibited.
It is necessary to refrain from removing any cuttings and parts of workpieces from the cutting area.
Do not use saw blades which are damaged or deformed
Properly sharpened saw blades to be used only.
Observe the maximum speed indicated on the saw blades.
Follow instructions for use, adjustment and repair of saw blades of manufacturers.
Do not use saw blades not corresponding to the key data given in these instructions for use.
The rated speed of the accessory must be at least equal to the maximum speed marked on the power tool.
Only use tools that meet standard EN 847-1.
Transport and store the tools in a suitable receptacle; To minimise noise production, the tool must be sharpened and all elements for noise minimisation (covers, etc.) must be properly adjusted.
Replace the table insert when worn
Familiarise with the safety procedures for cleaning, maintenance and regular removal of sawdust and dust to reduce the risk of fire.
Make sure the flange used is suitable for the given purpose of use, as specified by the manufacturer. Use only original accessories and original spare parts. Installation and larger-scale repair work may only be carried out by personnel who have received special training.
Keep the Log Cutting Saw, the mains plug and the power cable away from open flames and hot surfaces. Switch the machine immediately off when blocked. Unplug the machine and remove the stuck piece of wood.
Ensure the working space has sufficient general or targeted lighting.
Ensure that the separating safety equipment and other safety equipment which is necessary for operating the machine is fitted, is in a good operating condition and is properly serviced.
The operating personnel must have received sufficient training in use, setup and maintenance.
Notices relating to restrictions on use in places where the fire risk may be high.
Transportation and Storage
The machine may only be lifted and transported by qualified staff with adequate equipment.
Safe position and balance to be provided for transport. Make sure the device cannot roll away, fall over or tip over with suitable fastening devices.
Machine to be stored in locked spaces, out of reach of children.
Disposal

Any damaged or disposed electric or electronic devices must be delivered to appropriate collection centres.
Transport packaging disposal
The packaging protects the machine against damage during transport. Packaging materials are usually chosen based on environment aspects and waste treatment principles and are therefore recyclable. Returning the packaging into material circulation saves raw materials and reduces waste production. Parts of packagings (e.g. foils, styropor®) can be dangerous for children.
Risk of suffocation!
Keep parts of the packagings out of reach of children and dispose them as soon as possible.
Maintenance

Unplug the machine before any work on it.
There is a risk of injury in the event of unintentional activation of the on/off switch.
Carry out a visual inspection before switching the appliance on. Check especially the safety equipment, electrical control elements, power lines and screw couplings for any damage and if they are tightened appropriately.
The machine must not be used under any circumstances if the machine or the safety devices are damaged.
Repairs and works specified in these Instructions may only be performed by qualified authorised staff.
If the device is defective, the repair has to be made exclusively by the customer service.
Use only original accessories and original spare parts. Components for which there are no instructions for exchanging should be replaced by the manufacturer only.
At all times, keep the machine, ventilation slots, in particular, clean. The sawdust ejection and/or dust ex-hauster should be cleaned at regular intervals. Never spray water on the machine!
Only a regularly maintained and treated appliance can serve as a satisfactory aid. Insufficient maintenance and care can lead to unforeseen accidents and injuries.
Never clean the machine and its components with solvents, flammable or toxic liquids. Us only a damp cloth making.
All moving parts should be treated with environmental-friendly oil. Never use any grease!
The ball bearings of the saw shaft are protected against dust and are therefore service-free, i.e. the bearings need not be lubricated.
If necessary, a list of spare parts can be found at www.guede.com.
Guarantee
Warranty period of 12 months applies to commercial use and 24 months applies to private use and commences on the day of purchase of the device.
The guarantee solely covers inadequacies caused by material defect or manufacturing defect. Original payment voucher with the sales date needs to be submitted for any claim in the guarantee period.
The guarantee does not cover any unauthorised use such as appliance overloading, use of violence, damage as a result of any unauthorised interference or caused by foreign items. Failing to follow the operating and assembly instructions and common wear are also not included in the guarantee.
Important information for the customer
Please note that returns within or outside the warranty period should always be in the original packaging. This measure effectively avoids unnecessary transport damage and any associated disputed ruling. Your equipment is optimally protected only in the original box, and keeping it in that box will ensure smooth processing.
Service
Do you have any technical questions? Any claim? Do you need any spare parts or operating instructions? We will quickly help you and without needles bureaucracy at our web pages at www.guede.com in the Servicing part. Please help us be able to help you. In order to identify your device in case of claim we need the serial No., product No. and year of production. All this data can be found on the type label.
Serial No.:
Art. No:
Year of production:
Failure removal
| FAILURES POSSIBLE CAUSES RECOMMENDED SOLUTION | ||
| Not working when pressing the on-off switch. | No electricity Check the electricity supply | |
| On-off switch defective Have on-off switch replaced by an approved after-sales service team. | ||
| Device is not running at full speed or unusual sounds from motor. | Motor is overheating Turn off device and leave to cool for 30 minutes. | |
| Motor defective Have on-off switch replaced by an approved after-sales service team. | ||
| The saw blade brake does not bring the saw blade to a standstill within 10 seconds. | There may be a defective fuse in the switch. | Consult a qualified electrician or inform the Güde service team. |
text_image
Labeled diagram of a mechanical device with numbered components, likely for engineering or manufacturing purposes.

WAARSCHUWING Lees alle
text_image
Labeled diagram of a mechanical device with numbered components for identification

by declare the conception and construction of the below ned appliances correspond - at the type of construction being d - to appropriate basic safety and hygienic requirements of tives.
of any change to the appliance not discussed with us the tion expires.