GADH 200 - Plane Güde - Free user manual and instructions
Find the device manual for free GADH 200 Güde in PDF.

User questions about GADH 200 Güde
0 question about this device. Answer the ones you know or ask your own.
Ask a new question about this device
Download the instructions for your Plane in PDF format for free! Find your manual GADH 200 - Güde and take your electronic device back in hand. On this page are published all the documents necessary for the use of your device. GADH 200 by Güde.
USER MANUAL GADH 200 Güde
ENGLISH Please read the instructions carefully before starting the machine.
text_image
CHINESE DRAGON CHINESE DRAGON CHINESE DRAGON CHINESE DRAGON CHINESE DRAGON CHINESE DRAGON CHINESE DRAGON CHINESE DRAGON CHINESE DRAGON CHINESE DRAGON CHINESE DRAGON CHINESE DRAGON CHINESE DRAGON CHINESE DRAGON CHINESE DRAGON CHINESE DRAGON CHINESE DRAGON CHINESE DRY CHINESE DRY CHINESE DRY CHINESE DRY CHINESE DRY CHINESE DRY CHINESE DRY CHINESE DRY CHINESE DRY CHINESE DRY CHINESE DRY CHINESE DRY CHINESE DRY CHINESE DRY CHINESE DRY CHINESE DRY CHINESE DRY CHINESEN CHINESEN CHINESEN CHINESEN CHINESEN CHINESEN CHINESEN CHINESEN CHINESEN CHINESEN CHINESEN CHINESEN CHINESEN CHINESEN CHINESEN CHINESEN CHINESEN CHINESEN CHINESEN CHINESEN CHINESEN CHINESEN CHINESEN CHINESEN CHINESEN CHINESEGADH 200 55440
natural_image
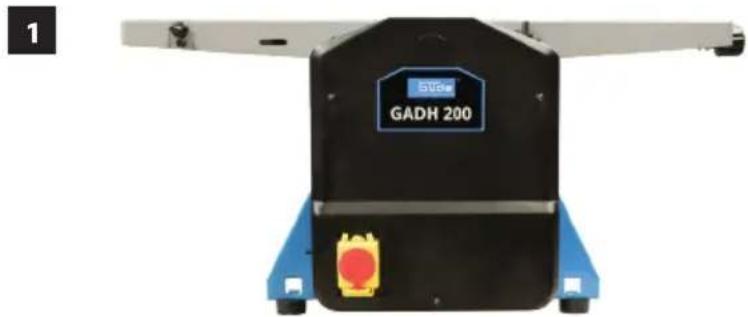
Exterior view of a GADH 200 industrial machine (no visible text or symbols beyond branding)2
natural_image
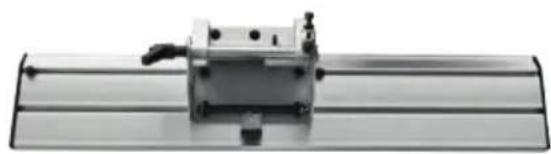
Mechanical assembly with a metallic component mounted on a flat base (no visible text or symbols)3
natural_image
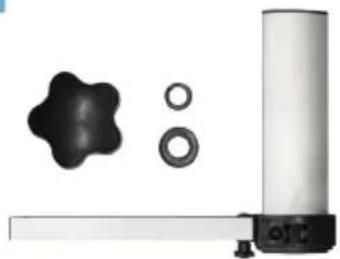
Product display showing a star-shaped object, four circular rings, and a cylindrical tube (no text or symbols visible)
4

natural_image
Black metal tool blade with serrated edges, no visible text or symbols5

natural_image
Black plastic mechanical component with a cylindrical shaft and label (no visible text or symbols)7
natural_image
Simple black oval shape on white background (no text or symbols)GADH 254 55441
8
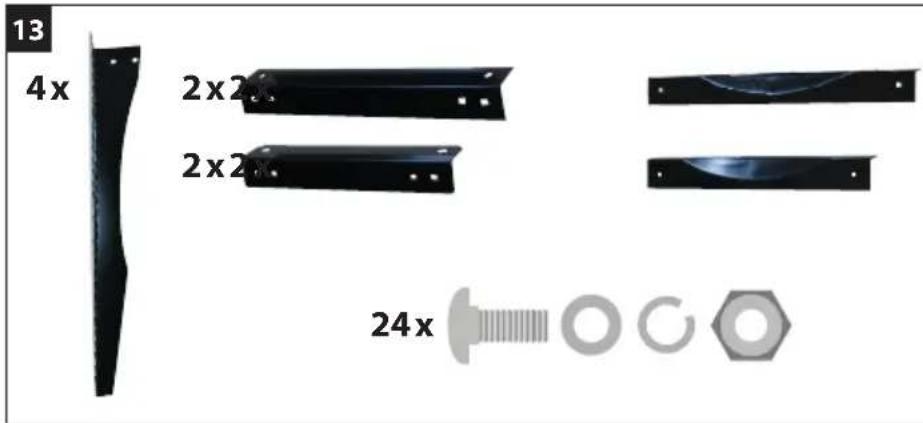
4x


24x

LIEFERUMFANG | DELIVERED ITEMS | ARTICLES DÉLIVRÉS | VOLUME DELLA FORNITURA | LEVERINGSOMVANG | OBJEM DODÁVKY | ROZSAH DODÁVKY | SZÁLLÍTÁSI TERJEDELEM | ZAKRES DOSTAWY

text_image
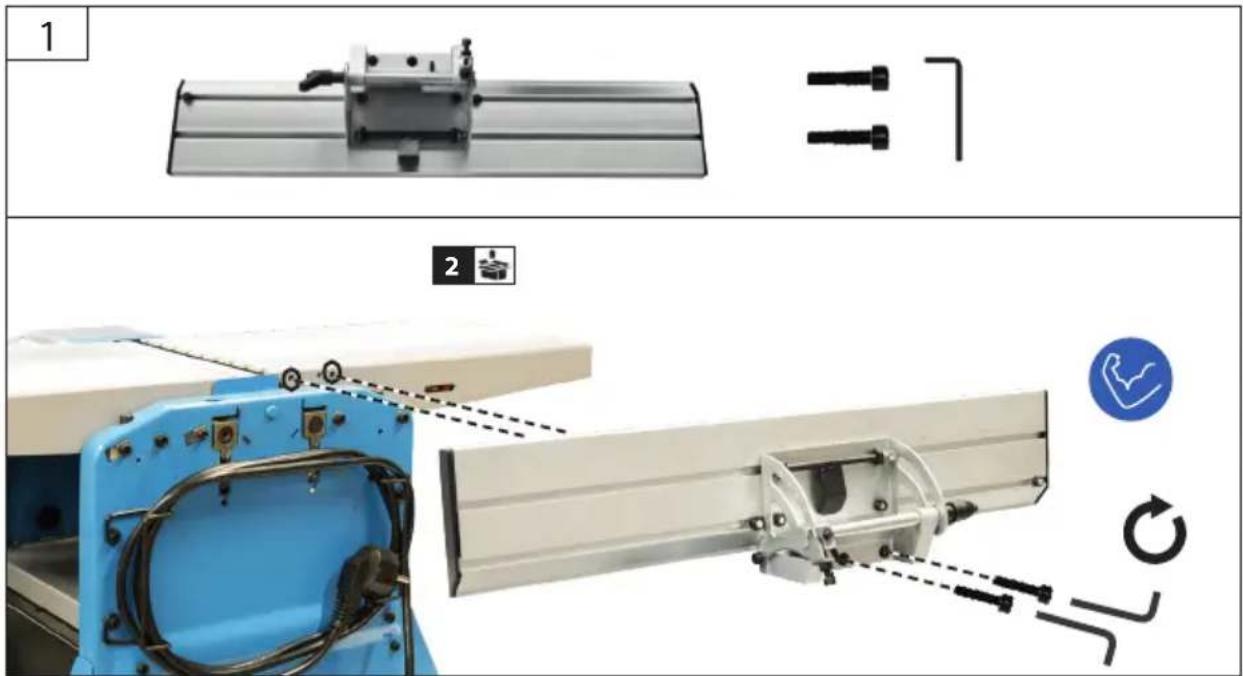
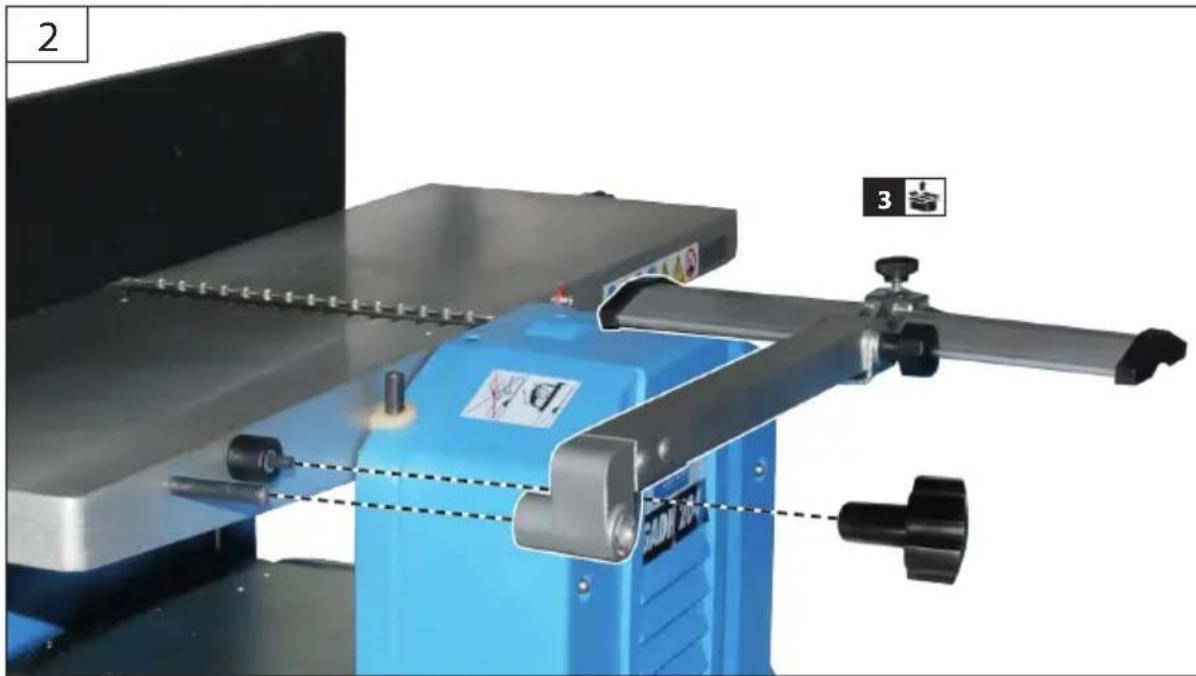
13 4x 2x2x 2x2x 24x| 1 | DE | Montage | PL | Montaž |
| EN | Assembly | |||
| FR | Assemblage | |||
| IT | Montaggio | |||
| NL | Montage | |||
| CZ | Montáž | |||
| SK | Montáž | |||
| HU | Szerelés |
8-11
| 2 | DE | Betrieb | PL | Eksploatacja |
| EN | Operation | |||
| FR | Fonctionnement | |||
| IT | Esercizio | |||
| NL | Gebruik | |||
| CZ | Provoz | |||
| SK | Prevádzka | |||
| HU | Üzemeltetés |
12-24
| 3 | DE | Reinigung / Wartung | PL | Czyszczenie / konserwacja |
| EN | Cleaning / Maintenance | |||
| FR | Nettoyage / Entretien | |||
| IT | Pulizia / Manutenzione | |||
| NL | Schoonmaken / Onderhoud | |||
| CZ | Čištění / Údržba | |||
| SK | Čistenie / Údrzba | |||
| HU | Tisztítás / Karbantartás |
25-31
| 4 | DE | Transport / Lagerung | PL | Transport / przechowywanie |
| EN | transport / storage | |||
| FR | Transport / Stockage | |||
| IT | Trasporto / Stoccaggio | |||
| NL | Transport / Bewaring | |||
| CZ | Přeprava / Uložení | |||
| SK | Transport / Uloženie | |||
| HU | Szállítás / Tárolás |
32
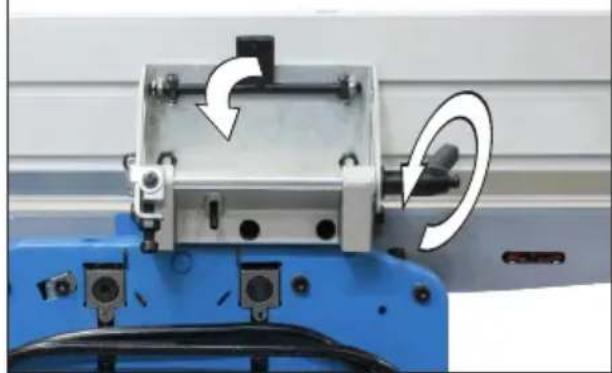
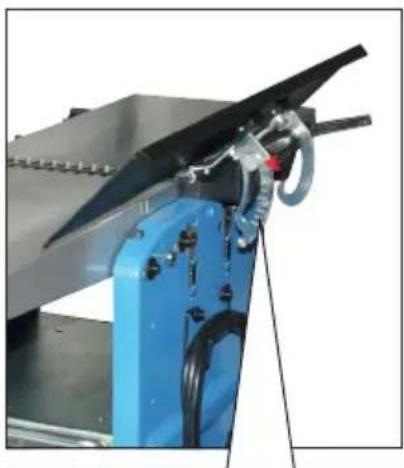
DE Mikroschalter
EN Microswitch
EN The microswitch must be activated in order to start the machine.
text_image
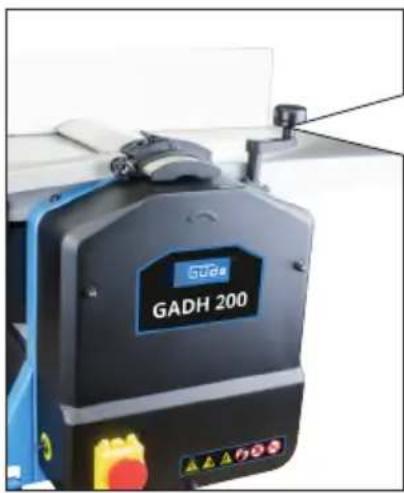
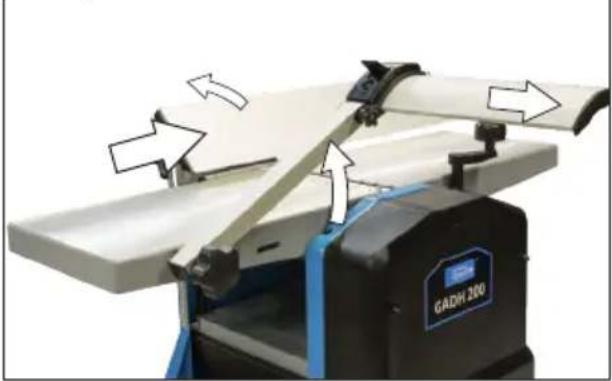
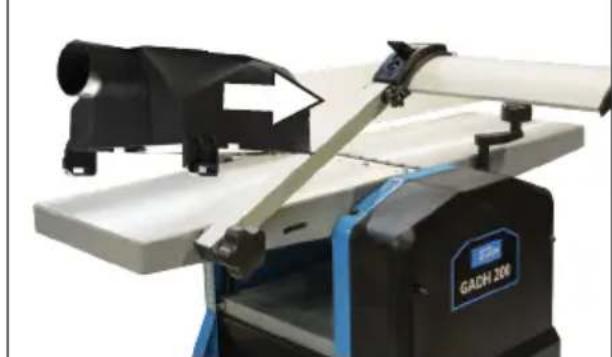
Safety warning diagram showing a blue industrial machine with warning symbols and a red X mark indicating failure or failure.DE Dickenhobeln
EN Thicknessing
FR Raboter
natural_image
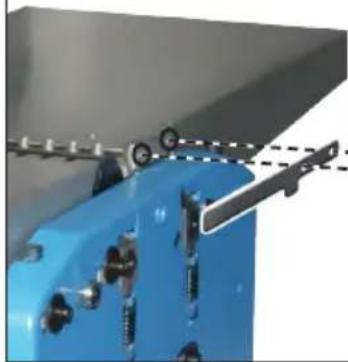
Diagram of a blue industrial machine with a conveyor belt and checkmark indicators (no text or symbols)| 1 | DE | Montage | PL | Montaž |
| EN | Assembly | |||
| FR | Assemblage | |||
| IT | Montaggio | |||
| NL | Montage | |||
| CZ | Montáž | |||
| SK | Montáž | |||
| HU | Szerelés |


A
natural_image
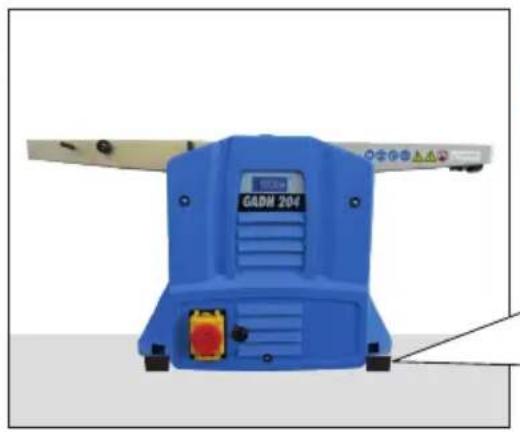
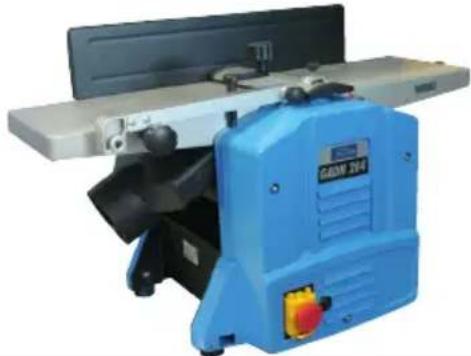
Blue industrial machine labeled 'GADM 204' with control panel and warning symbols (no readable text beyond label)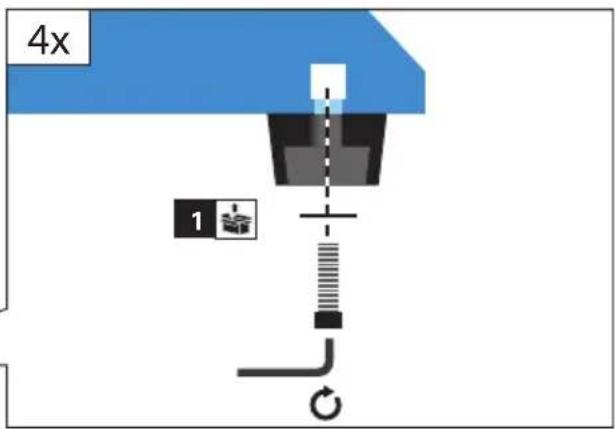
text_image
4x 1
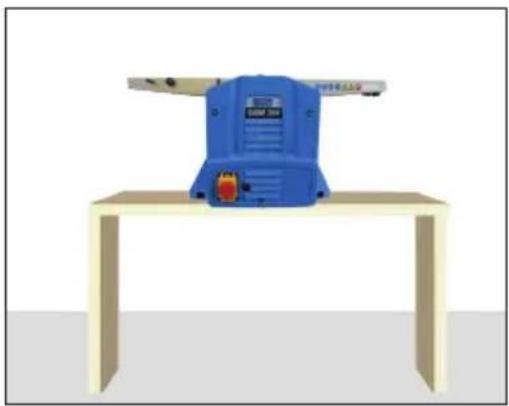
natural_image
3D rendering of a blue industrial machine on a wooden table (no text or symbols visible)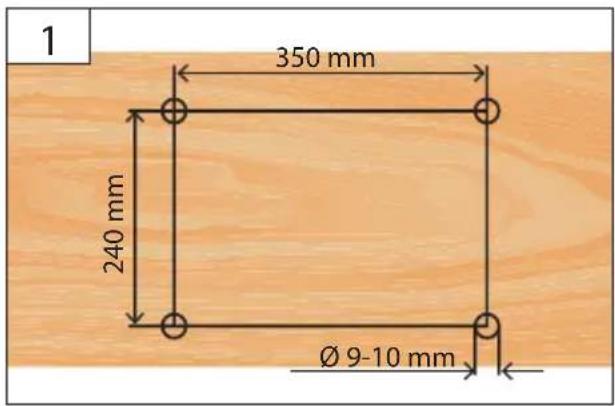
text_image
1 350 mm 240 mm Ø 9-10 mm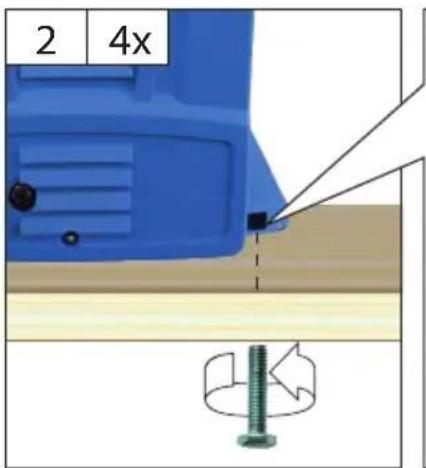
text_image
2 4x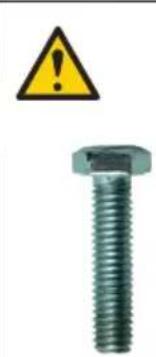
natural_image
Close-up of a metallic bolt with a yellow warning symbol (no text or labels)natural_image
Blue and black industrial machine with metal frame and wooden base (no visible text or symbols)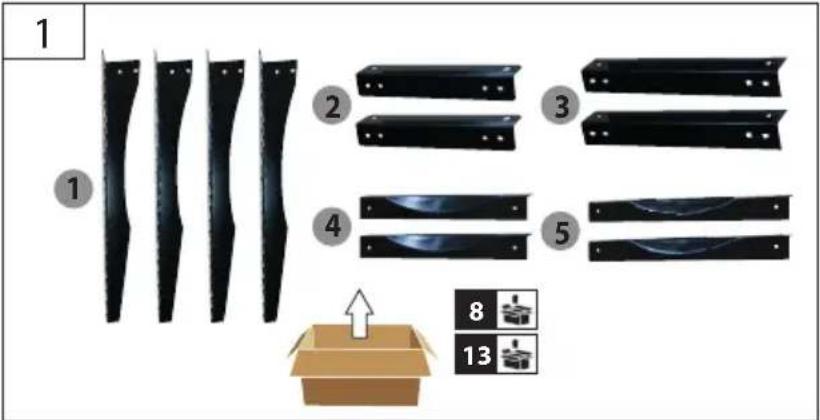
text_image
1 ① ② ③ ④ ⑤ 8 13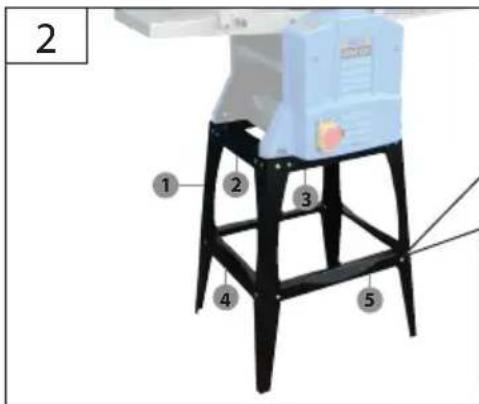
text_image
2 1 2 3 4 5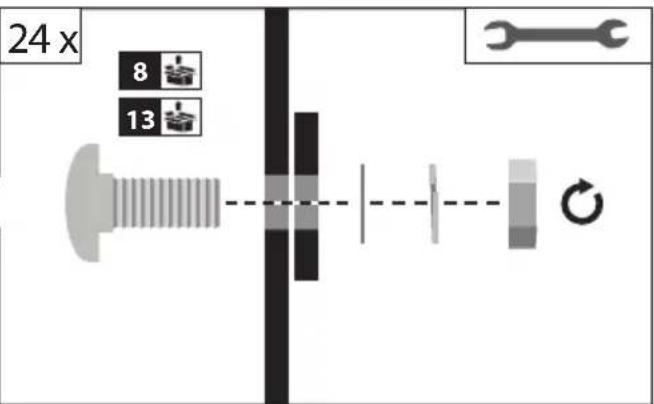
text_image
24 x 8 13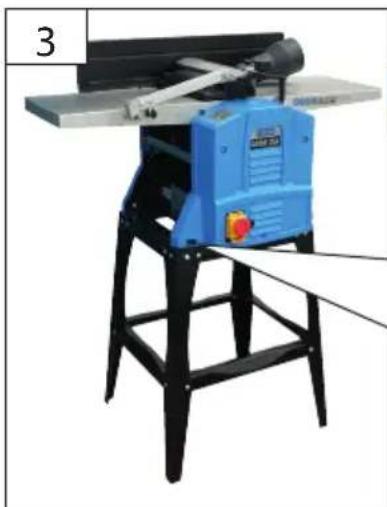
natural_image
Blue manual machine with black frame and metal tray, no visible text or symbols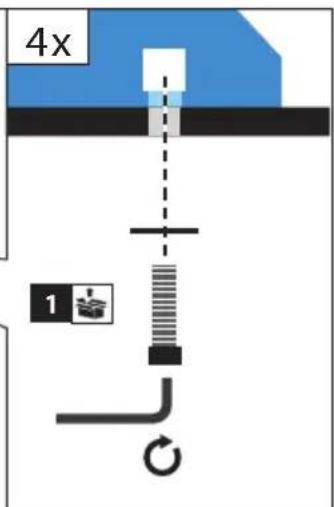
text_image
4x 1
natural_image
Illustration of a blue machine with a green checkmark above it, showing alignment and angle measurement (no text or symbols)| 1 | DE | Montage | PL | Montaž |
| EN | Assembly | |||
| FR | Assemblage | |||
| IT | Montaggio | |||
| NL | Montage | |||
| CZ | Montáž | |||
| SK | Montáž | |||
| HU | Szerelés |

GADH 200 55440
GADH 254 55441
text_image
1 2
text_image
2 3 GADH 200DE Montage
PL Montaż
EN Assembly
FR Assemblage
IT Montaggio
NL Montage
CZ Montáž
SK Montáž
HU Szerelés

GADH 204 55098
GADH 254 P 55056
1


natural_image
Black and white photo of a mechanical device with a handle and lever (no visible text or symbols)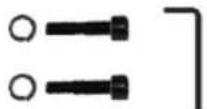
natural_image
Close-up of a blue industrial machine with mechanical components and a dashed line indicating alignment or assembly (no visible text or symbols)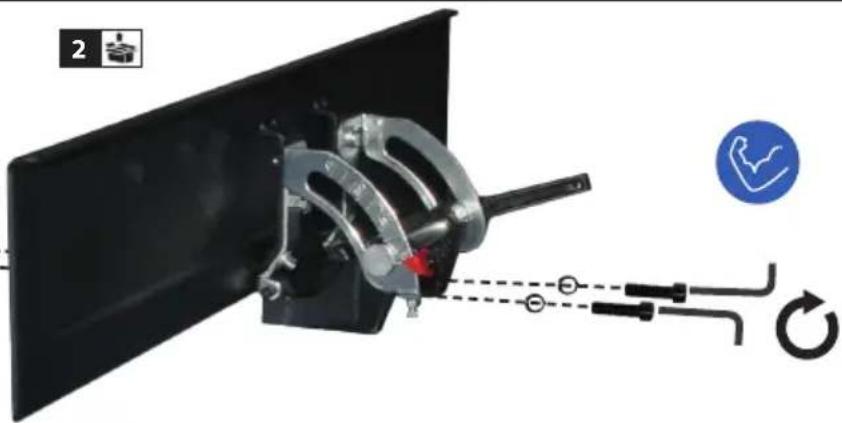
text_image
22
natural_image
Mechanical machine with blue base and metal frame, showing tool path and component details (no readable text or symbols) | DE | Betrieb | PL | Eksploatacja |
| EN | Operation | |||
| FR | Fonctionnement | |||
| IT | Esercizio | |||
| NL | Gebruik | |||
| CZ | Provoz | |||
| SK | Prevádzka | |||
| HU | Üzemeltetés |

GADH 204 55098 GADH 254 P 55056

DE Mikroschalter
EN Microswitch
natural_image
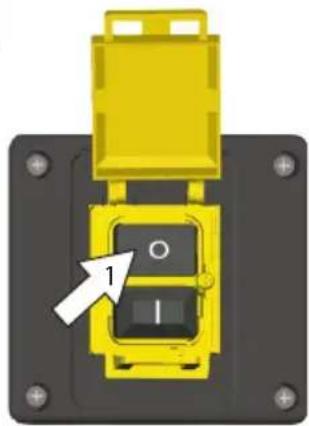
Yellow mechanical device with black button labeled 'I' and white arrow pointing to the button (no text or symbols beyond basic labels)STOP1

natural_image
Yellow electrical switch with black panel and white arrow pointing to 'O' (no text or symbols beyond basic symbols)STOP2

natural_image
Simple illustration of a red circular button with a white arrow, mounted on a yellow rectangular base (no text or symbols)
text_image
1 ←□□2
text_image
3 ↑ ↓ ↑ ↓ ↓ ↓text_image
START 2 STOP
AUTO-STOP

natural_image
Blue GASM 204 industrial machine with blade and fan assembly (no visible text or symbols)1

10 min

2
natural_image
Close-up of a yellow mechanical component with a black base and circular ports, no visible text or symbols
3
START
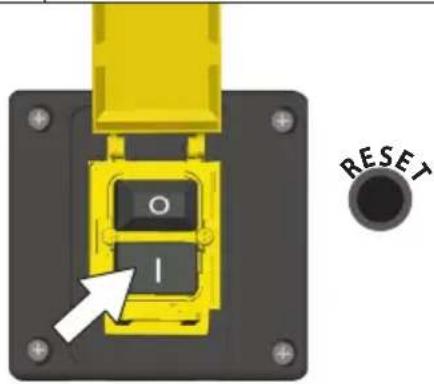
text_image
I RESET | DE | Abrichthobeln | PL | Struganie wyrównujące |
| EN | Surfacing | |||
| FR | Dégauchir | |||
| IT | Piallare a filo | |||
| NL | Vlakschaven | |||
| CZ | Srovnávání | |||
| SK | Zrovnávanie | |||
| HU | Egyengető gyalulás |

GADH 200 55440 GADH 254 55441
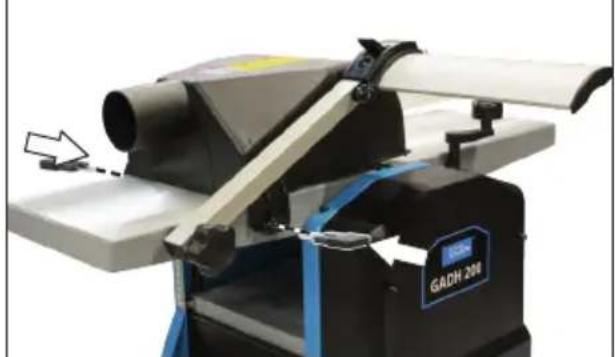
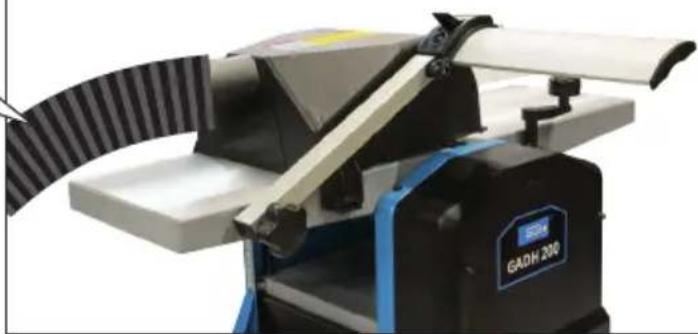
natural_image
Close-up of a GADH 200 industrial drone with control panel and warning symbols (no readable text beyond branding)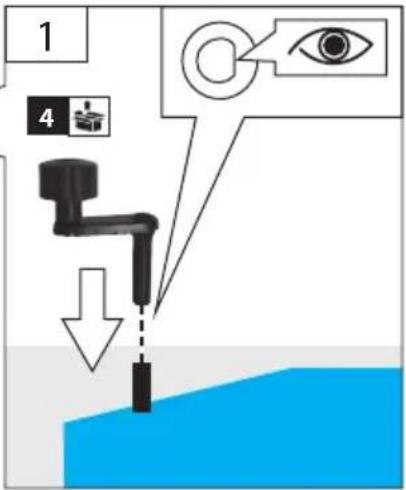
text_image
1 4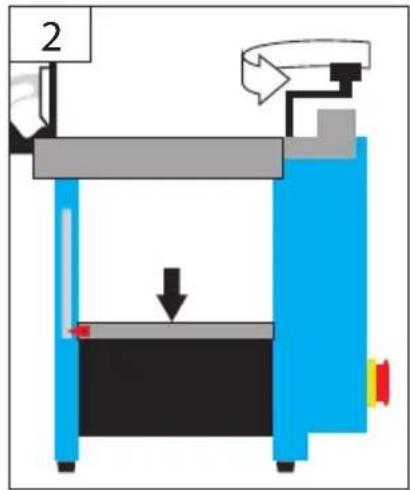
text_image
2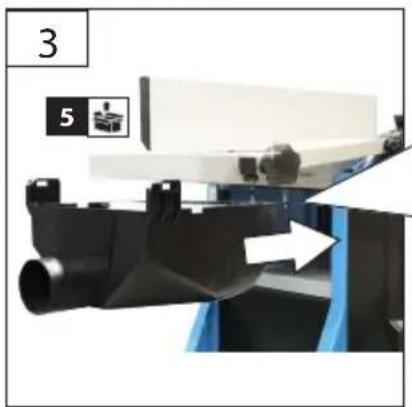
natural_image
Mechanical assembly diagram showing a pipe connection with a white arrow indicating direction (no text or symbols)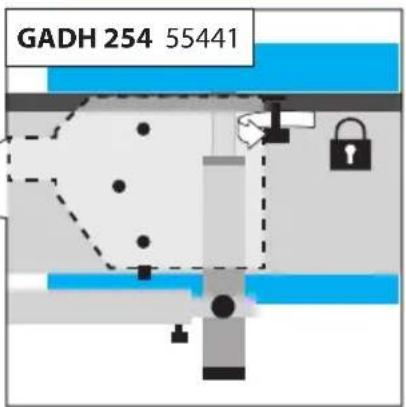
text_image
GADH 254 55441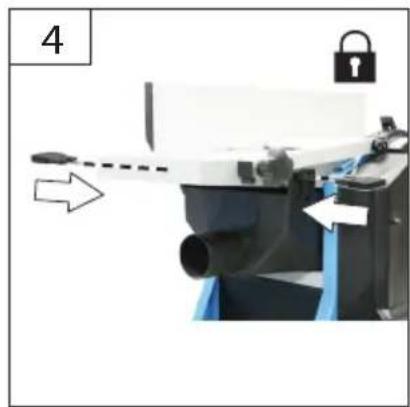
natural_image
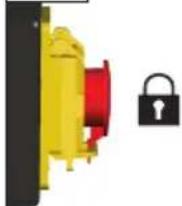
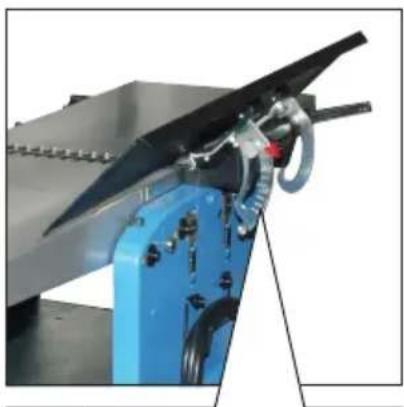
Mechanical device with a lock and directional arrow, no visible text or symbols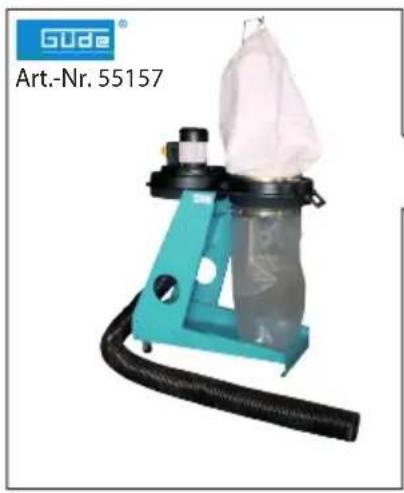
natural_image
Product photo of a blue and black industrial machine with hoses and a white cloth cover (no visible text or symbols)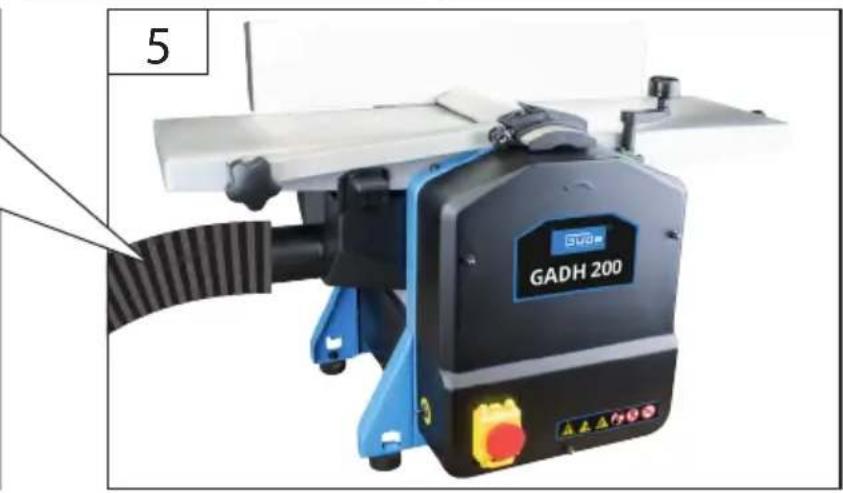
natural_image
Industrial machine labeled 'GADH 200' with control panel and belt, shown without any readable text or symbols.DE Abrichthobeln
EN Surfacing
FR Dégauchir
IT Piallare a filo
NL Vlakschaven
CZ Srovnávání
SK Zrovnávanie
text_image
START 2 STOP

GADH 204 55098
GADH 254 P 55056
natural_image
Blue industrial machine labeled 'GADI 204' with mechanical components visible (no readable text beyond label)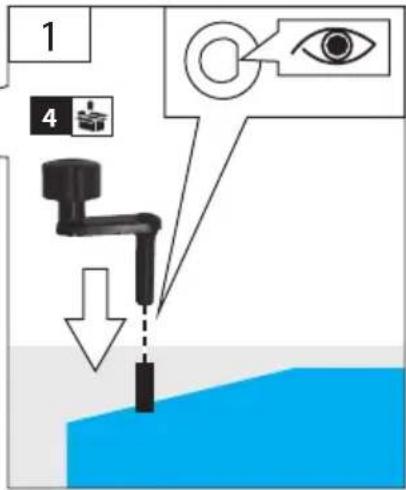
text_image
1 4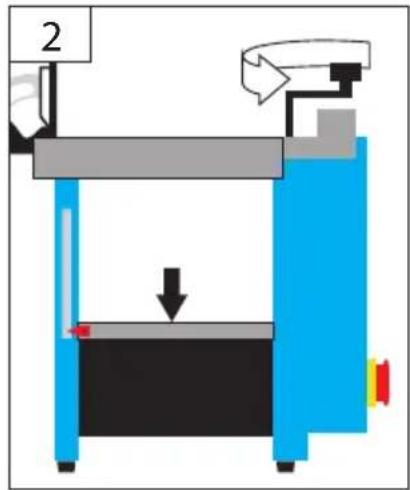
text_image
2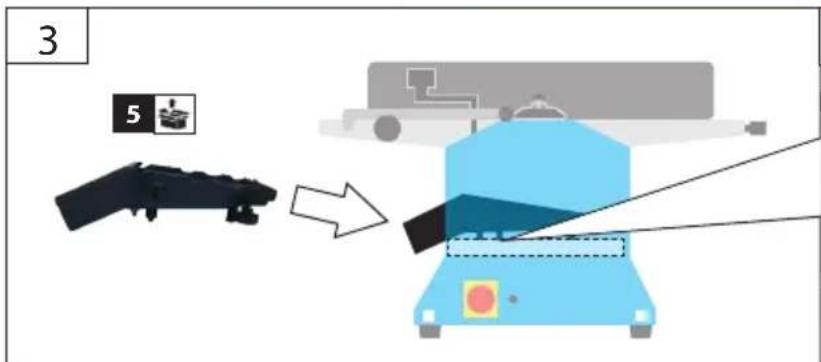
text_image
3 5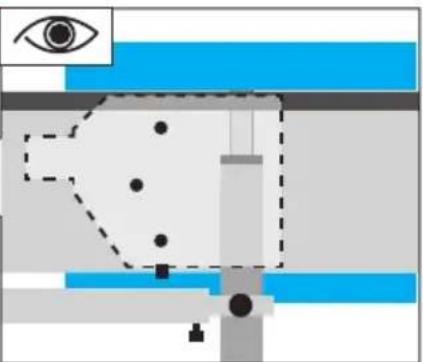
natural_image
Pure mechanical diagram showing eye, shaft, and housing components without any text or symbols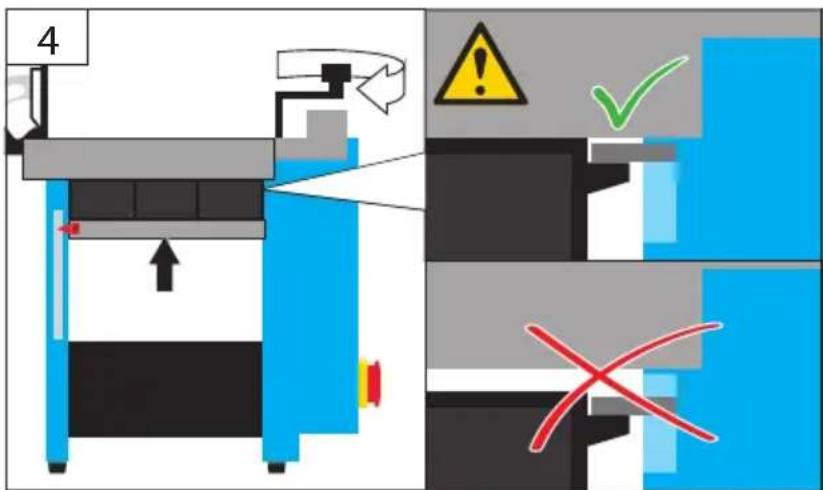
text_image
4 ! ✓ XDE Mikroschalter
EN Microswitch
natural_image
Diagram showing a pipe fitting with an upward arrow and a blue base, no text or symbols present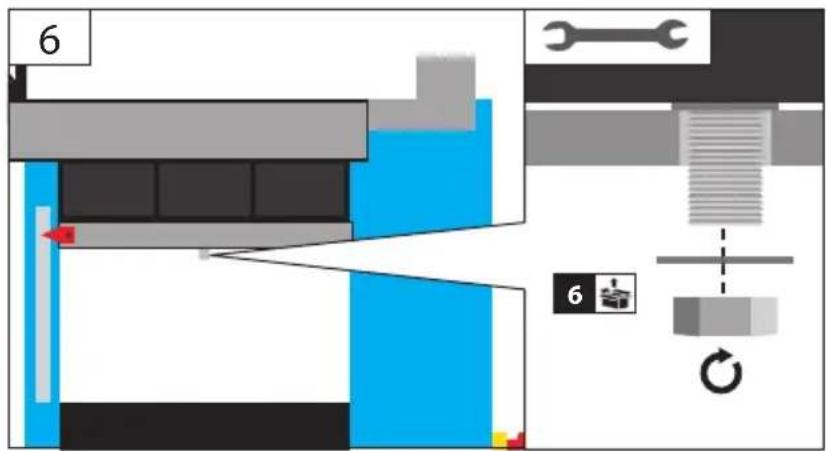
text_image
6 6
natural_image
Product photo of a blue and black manual pump device with a white cloth cover, no visible text or symbols on the device itself.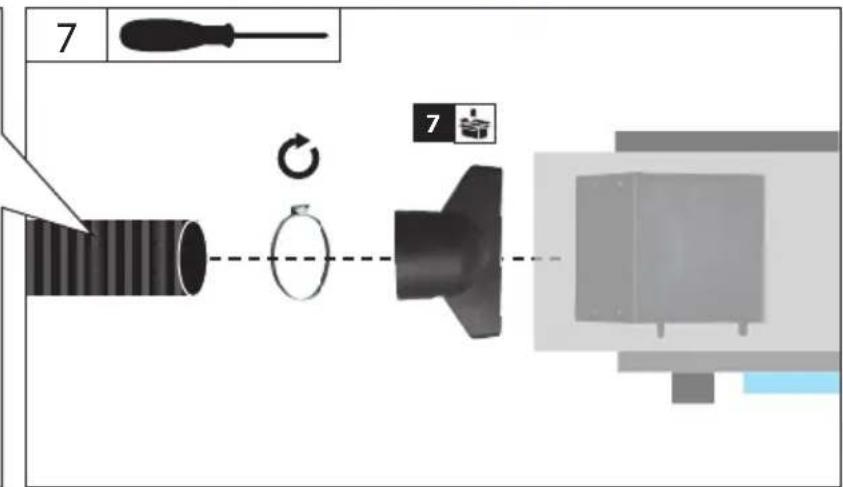
text_image
7 7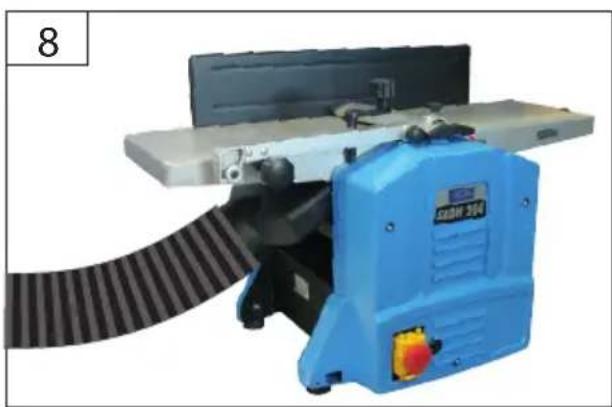
natural_image
Blue industrial machine with a coiled belt and control panel, no visible text or symbolsDE Abrichthobeln
EN Surfacing
FR Dégauchir
IT Piallare a filo
NL Vlakschaven
CZ Srovnávání
SK Zrovnávanie
text_image
START 2 STOP
natural_image
Industrial machine component with blue frame and black handle (no visible text or symbols)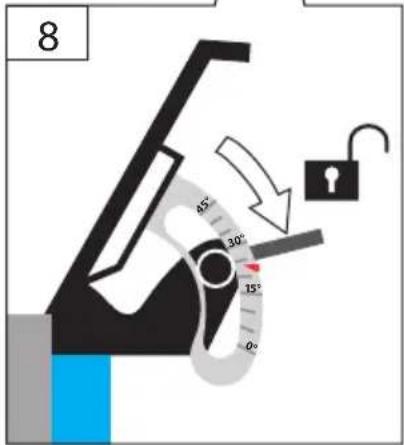
text_image
8 45° 30° 15° 0°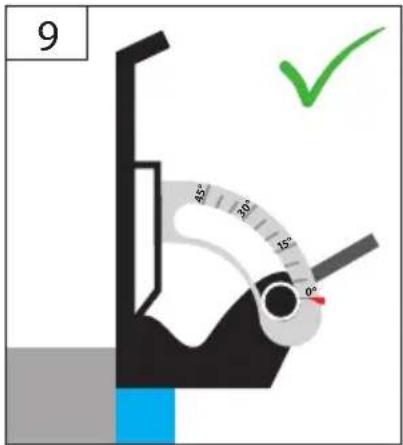
text_image
9 45° 30° 15° 0°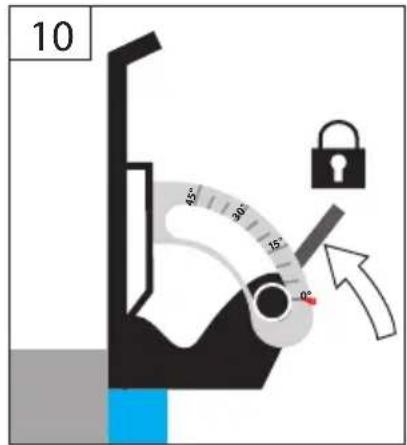
text_image
10 45° 30° 15° 90° ↓
text_image
11 内径EN Adjusting the plane thickness
text_image
A < 75 mm
text_image
Diagram showing a person using a lever with labeled parts and directional arrows, likely illustrating a mechanical or safety concept.
text_image
2 1 2
text_image
3 START 8DE Abrichthobeln
EN Surfacing
FR Dégauchir
IT Piallare a filo
NL Vlakschaven
CZ Srovnávání
SK Zrovnávanie
text_image
START 2 STOP


text_image
B > 75 mm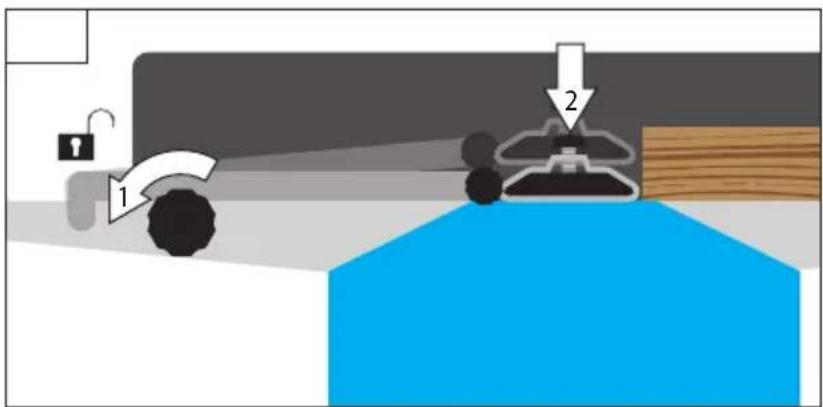
text_image
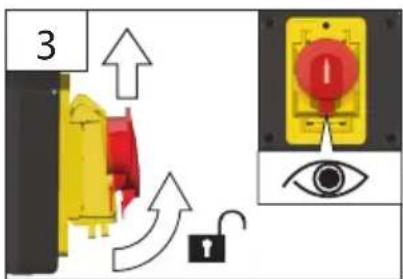
Diagram showing a person using a lock to lock another, with numbered arrows indicating sequence of actions.
text_image
2 2 1 3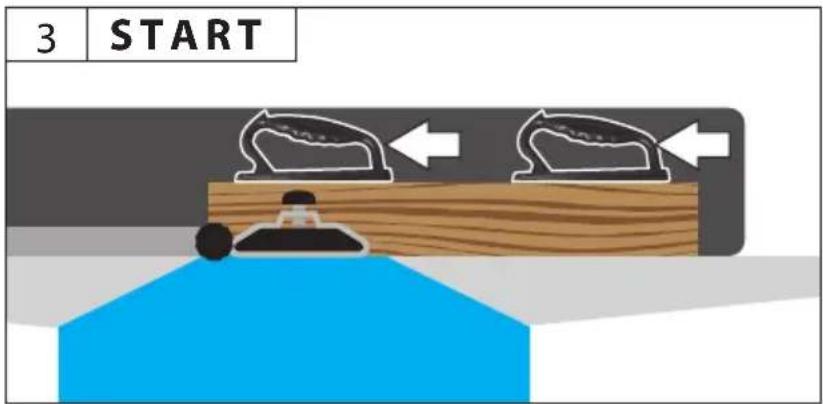
text_image
3 START | DE | Montage | PL | Montaž |
| EN | Assembly | |||
| FR | Assemblage | |||
| IT | Montaggio | |||
| NL | Montage | |||
| CZ | Montáž | |||
| SK | Montáž | |||
| HU | Szerelés |


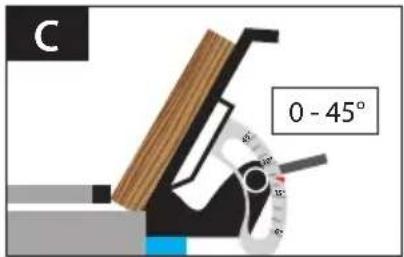
text_image
C 0 - 45°
text_image
1 2 0 - 45° 3
text_image
4 2 1 3
text_image
5 STARTDE Dickenhobeln
EN Thicknessing
FR Raboter
text_image
START 2 STOP


GADH 200 55440
GADH 254 55441
1
natural_image
Close-up of a mechanical assembly with blue base and white circular arrows indicating motion or rotation (no text or symbols)2
natural_image
Industrial machine with directional arrows indicating movement or force, no visible text or symbols on the machine itself.3
natural_image
Industrial machine with mechanical components and a blue base labeled 'GADH 300' (no readable text beyond label)4
natural_image
Industrial machine with mechanical components and a blue tag labeled 'GADH 201' (no readable text beyond label)Gude
Art.-Nr. 55157
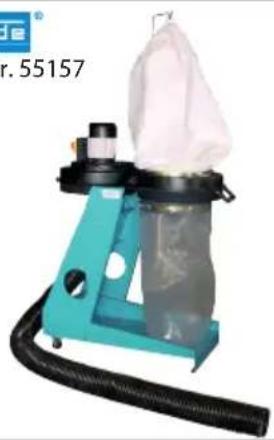
natural_image
Exterior view of a blue industrial vacuum cleaner with black components and hose (no visible text or symbols)5
natural_image
Industrial machine with black and blue components, no visible text or symbols on the machinery body| [SZTART] | DE | Dickenhobeln | PL | Struganie grubościowe |
| EN | Thicknessing | |||
| FR | Raboter | |||
| IT | Piallare a spessore | |||
| NL | Vandikteschaven | |||
| CZ | Tlouštkování | |||
| SK | Hrúbkovanie | |||
| HU | Vastagoló gyalulás |


GADH 204 55098 GADH 254 P 55056
natural_image
Industrial machine component with blue frame and black handle (no visible text or symbols)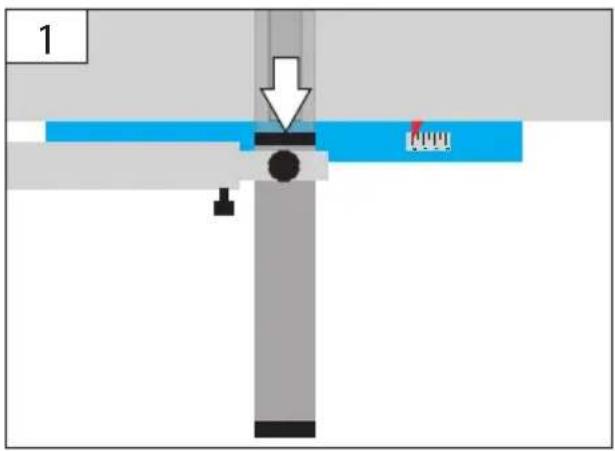
text_image
1 A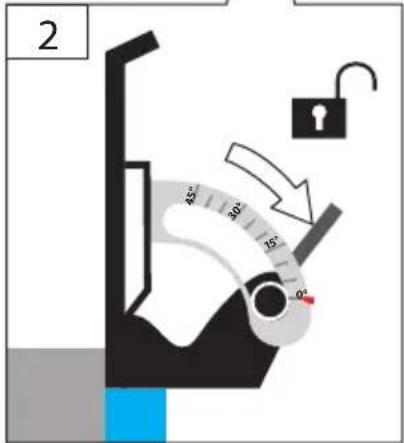
text_image
2 45° 30° 15° 0°
text_image
3 45° ✓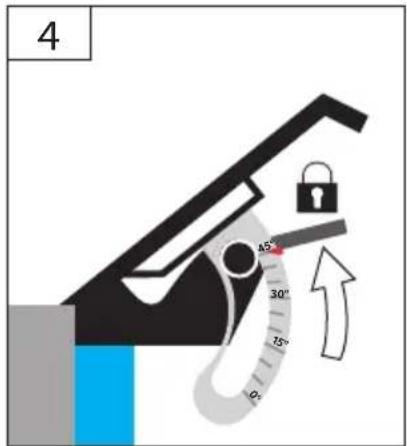
text_image
4 45° 30° 75° 0°DE Dickenhobeln
EN Thicknessing
FR Raboter
text_image
START 2 STOP


GADH 204 55098 GADH 254 P 55056

text_image
5 5 RANKING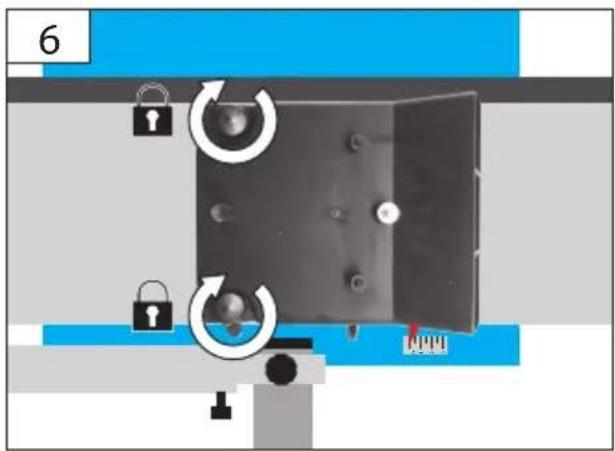
text_image
6DE Mikroschalter
EN Microswitch
natural_image
Product photo of a blue and black manual pushper with a white bag, no visible text or symbols on the device itself. | DE | Dickenhobeln | PL | Struganie grubościowe |
| EN | Thicknessing | |||
| FR | Raboter | |||
| IT | Piallare a spessore | |||
| NL | Vandikteschaven | |||
| CZ | Tlouštkování | |||
| SK | Hrúbkovanie | |||
| HU | Vastagoló gyalulás |


EN Adjusting the plane thickness
natural_image
Diagram of a blue industrial machine with a conveyor belt and directional arrow (no text or symbols)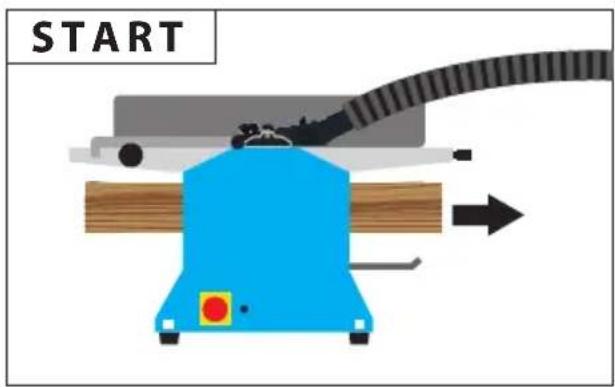
text_image
START| 3 | DE Reinigung PL Czyszczenie |
| EN Cleaning | |
| FR Nettoyage | |
| IT Pulizia | |
| NL Schoonmaken | |
| CZ Čištění | |
| SK Čistenie | |
| HU Tisztítás |

natural_image
Illustration of a hand holding a cylindrical object with red X-shaped markings, surrounded by arrows indicating flow or movement (no text or symbols)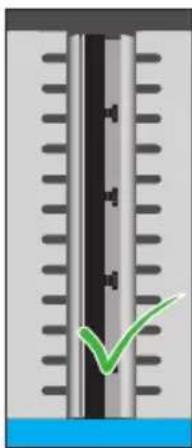
natural_image
Diagram of a thermometer with a green checkmark indicating the measurement point (no text or symbols present)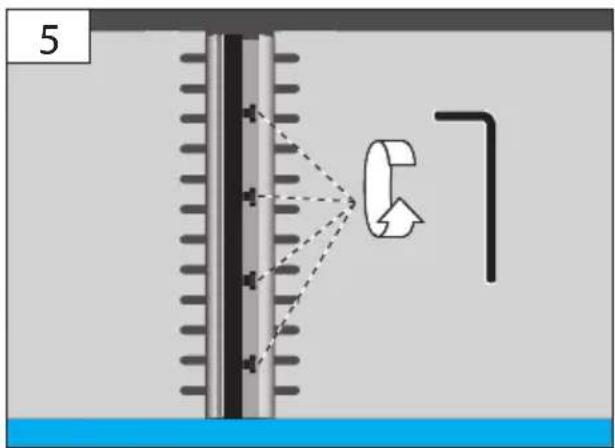
text_image
5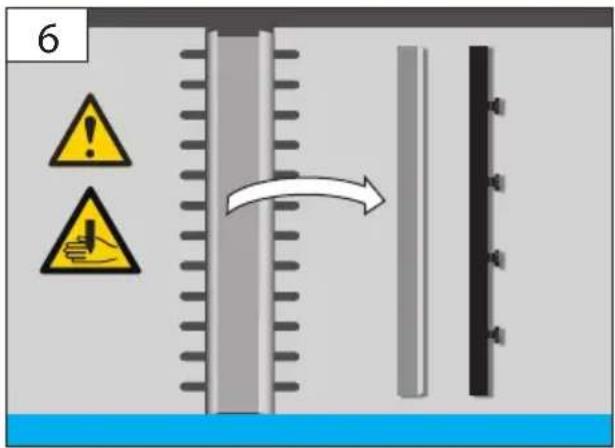
text_image
6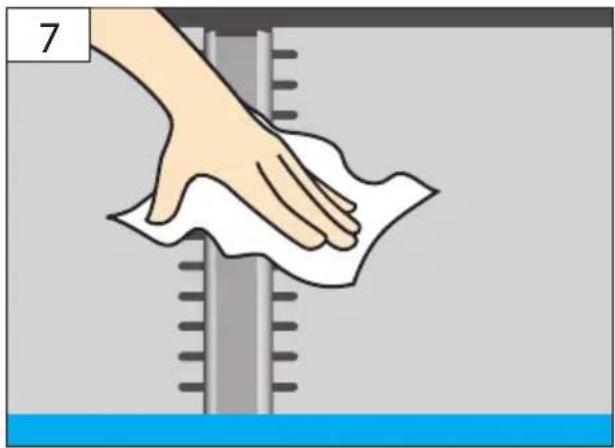
natural_image
Illustration of a hand cleaning a white cloth over a surface with a thermometer and blue liquid (no text or symbols)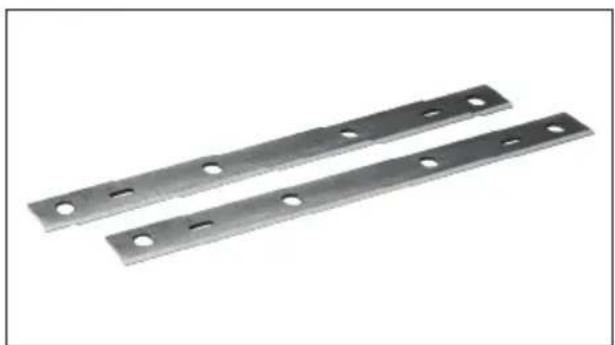
natural_image
Two metallic metal plates with circular holes, shown against a plain white background (no text or symbols)
GADH 200
Art.-Nr. 55089
GADH 254
Art.-Nr. 55055
| 3 | DE Messer wechseln und einstellen PL Wymiana i regulacja noży |
| EN Replacing and adjusting the blades | |
| FR Remplacer et régler les couteaux | |
| IT Sostituire e regolare i coltelli | |
| NL Messen vervangen en instellen | |
| CZ Výměna a nastavení nože | |
| SK Výmena a nastavenie noža | |
| HU A kések cseréje és beállítása |


GADH 200
55440
GADH 254
55441
text_image
10
text_image
11 11
natural_image
Close-up of a mechanical component with a vertical spring-like structure and an arrow pointing to it, no visible text or symbols.
natural_image
Abstract illustration of a ruler and stylus interacting with a geometric shape (no text or symbols)
text_image
14 7-8 Nm| 3 | DE | Messer wechseln und einstellen | PL | Wymiana i regulacja noży |
| EN | Replacing and adjusting the blades | |||
| FR | Remplacer et régler les couteaux | |||
| IT | Sostituire e regolare i coltelli | |||
| NL | Messen vervangen en instellen | |||
| CZ | Výměna a nastavení nože | |||
| SK | Výmena a nastavenie noža | |||
| HU | A kések cseréje és beállítása |


GADH 204 55098
GADH 254 P 55056
text_image
Technical diagram illustrating mechanical assembly and cross-sections with labeled components and directional indicators
text_image
1 2 3 45° 30° 15° 0°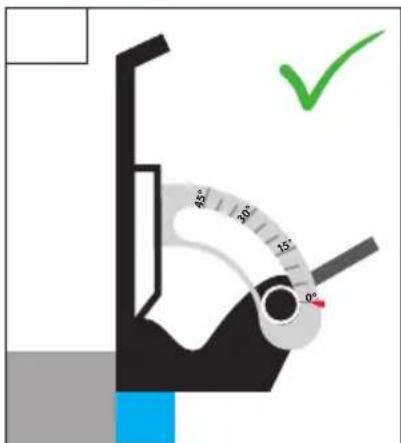
text_image
45° 30° 15° 0°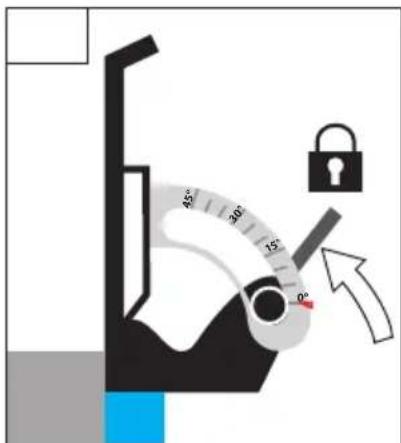
text_image
Diagram showing a hand valve mechanism with a lock and directional arrow, indicating process flow or safety instructions.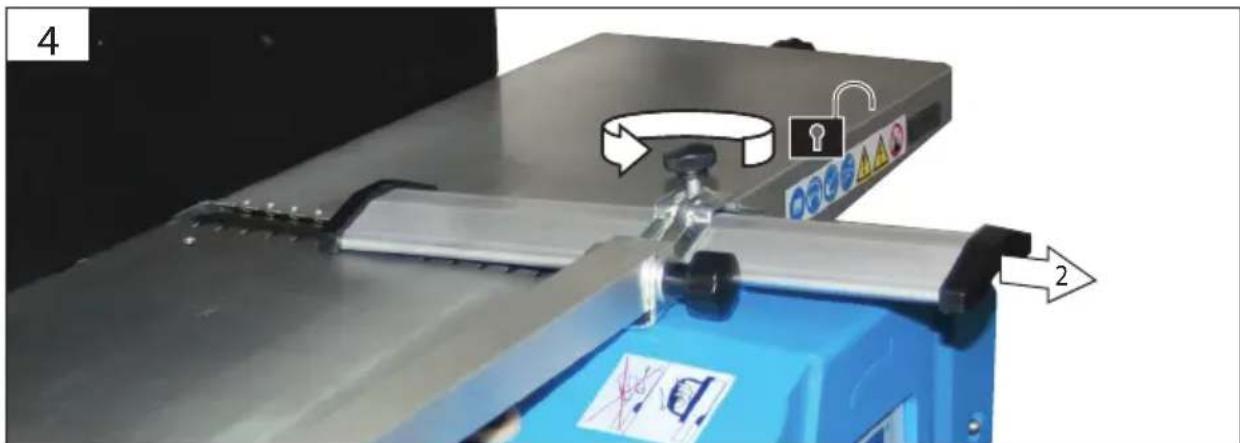
text_image
4 2| 3 | DE | Messer wechseln und einstellen | PL | Wymiana i regulacja noży |
| EN | Replacing and adjusting the blades | |||
| FR | Remplacer et régler les couteaux | |||
| IT | Sostituire e regolare i coltelli | |||
| NL | Messen vervangen en instellen | |||
| CZ | Výměna a nastavení nože | |||
| SK | Výmena a nastavenie noža | |||
| HU | A kések cseréje és beállítása |


GADH 204 55098
GADH 254 P 55056
text_image
5 ✓ ✓ ✓ ✓ ✓ ✓ ✓ ✓ ✓ ✓ ✓ ✓ ✓ ✓ ✓ ✓ ✓ ✓ ✓ ✓ ✓ ✓ ✓ ✓ ✓ ✓ ✓ ✓ ✓ ✓ ✓ ✓ ✓ ✓ ✓ ✓ ✓ ✓ ✓ ✓ ✓ ✓ ✓ ✓ ✓ ✓ ✓ ✓ ✓ ✓ ✓ ✓ ✓ ✓ ✓ ✓ ✓ ✓ ✓ ✓ ✓ ✓ ✓ ✓ ✓ ✓ ✓ ✓ ✓ ✓ ✓ ✓ ✓ ✓ ✓ ✓ ✓ ✓ ✓ ✓ ✓ ✓ ✓ ✓ ✓ ✓ ✓ ✓ ✓ ✓ ✓ ✓ ✓ ✓ ✓ ✓ ✓ ✓ ✓ ✓ #
text_image
6 10
text_image
7
natural_image
Illustration of a hand cleaning a white cloth over a surface with a ruler and blue liquid at the bottom (no text or symbols)
text_image
11 ! ✓ 16 15 X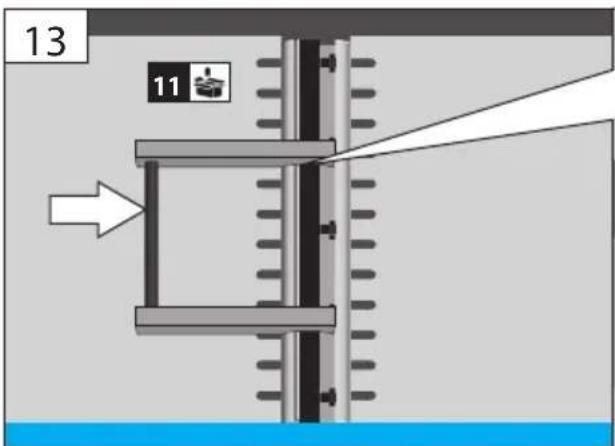
text_image
13 11
natural_image
Diagram showing a mechanical assembly with a blue circular icon above and a downward arrow pointing to it (no text or symbols present)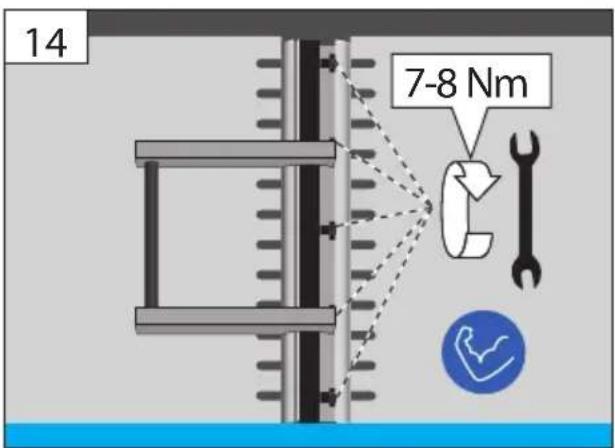
text_image
14 7-8 Nm| 4 | DE | Transport | PL | Transport |
| EN | transport | |||
| FR | Transport | |||
| IT | Trasporto | |||
| NL | Transport | |||
| CZ | Přeprava | |||
| SK | Transport | |||
| HU | Szállítás |

natural_image
Two blue circular icons: one with a battery symbol and arrow, the other with two human figures carrying boxes (no text or symbols)
natural_image
Diagram of a blue industrial machine with a tool and a blade, showing a cutting process (no text or symbols)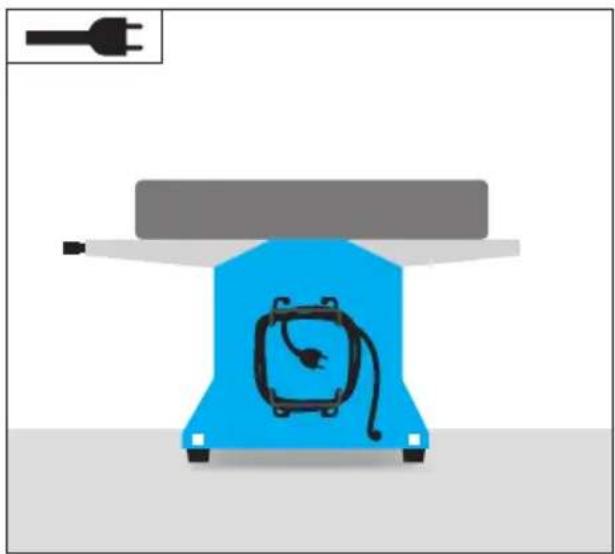
natural_image
Illustration of a blue electric motor with a black cable inside, mounted on a gray base (no text or symbols)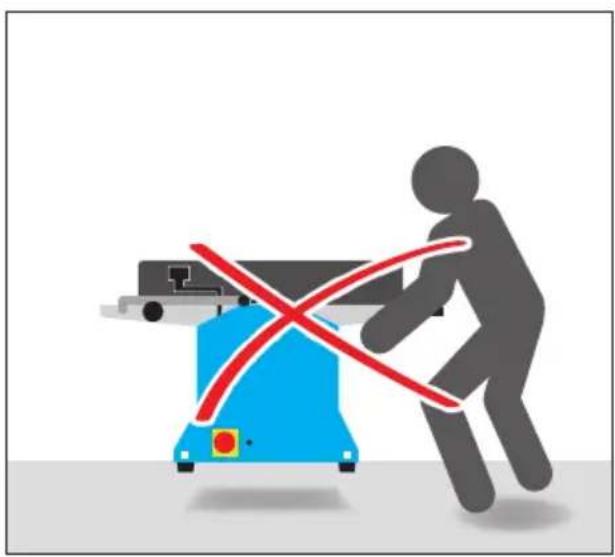
natural_image
Silhouette of a person using a blue robotic device with red X marks, no text or symbols present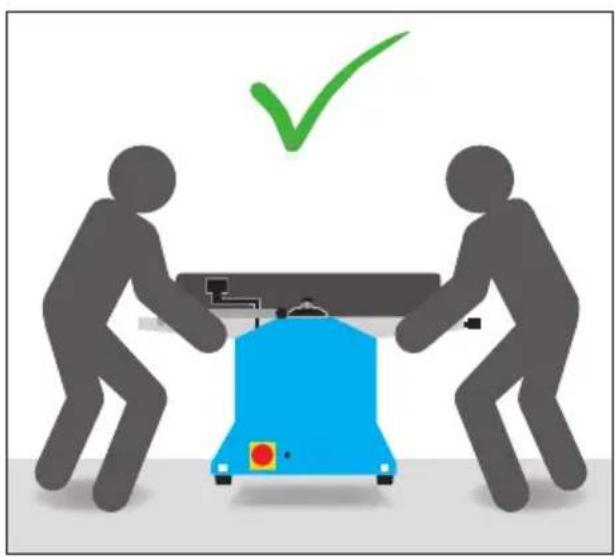
natural_image
Two figures handling a blue robotic device with a checkmark above (no text or symbols)Technische Daten
| Abricht-und Dickenhobel | GADH 200 | GADH 254 | GADH 204 | GADH 254 P |
| Artikel-Nr. | 55440 | 55441 | 55098 55056 | |
| Anschluss | 230 V ~50 Hz | 230 V ~ 50 Hz | 230 V ~ 50 Hz | 230 V ~ 50 Hz |
| Max. Leistung | 1250 W | 1500 W | 1500 W | 1500 W |
| Max. Vorschubgeschwindigkeit | 6m/min | 6 m/min | 6 m/min | 6 m/min |
| Leerlaufdrehzahl | 8000 min ^-1 | 8500 min ^-1 | 9000 min ^-1 | 9000 min ^-1 |
| Max. Hobelbreite | 204 mm | 254 mm | 204 mm | 254 mm |
| Hobeldicke | 6 - 120 mm | 6 - 120 mm | 5 - 120 mm | 5 - 120 mm |
| Spanabnahme Dickenhobeln | 0 - 2 mm | 0 - 2 mm | 0 - 2 mm | 0 - 2 mm |
| Spanabnahme Abrichthobeln | 0 - 2 mm | 0 - 2 mm | 0 - 3 mm | 0 - 3 mm |
| Messer Anzahl | 2 | 2 | 2 | 2 |
| Messer Typ | HSS | HSS | HSS | HSS |
| Messer Abmessung | 210x16x1,5 mm | 261x16x1,5 mm | 210x16x1,5 mm | 261x16x1,5 mm |
| Größe Abrichttisch | 737x210 mm | 920x264 mm | 745x210 mm | 964x263 mm |
| Größe Dickenhobeltisch | 255x204 mm | 380x264 mm | 270x200 mm | 270x303 mm |
| Anschlagneigung | 0° - 45° | 0° - 45° | 0° - 45° | 0° - 45° |
| Gewicht | 23 kg | 34 kg | 26,4 kg | 34,3 kg |
| Schutzklasse | ||||
| Schutzart | IP 20 | IP 20 | IP 20 | IP 20 |
Geräuschangaben
Schalldruckpegel L_PA^ .....92,9 dB (A) .....92,9 dB (A) .....92,9 dB (A) .....92,9 dB (A) Unsicherheit K = .....3 dB (A) .....3 dB (A) .....3 dB (A) .....3 dB (A) Schalleistungspegel L_WA^ .....106 dB (A) .....106 dB (A) .....106 dB (A) .....106 dB (A) Unsicherheit K = .....3 dB (A) .....3 dB (A) .....3 dB (A) .....3 dB (A)
Gehörschutz tragen!
Sound pressure level L_PA^ .....92,9 dB (A) .....92,9 dB (A) .....92,9 dB (A) .....92,9 dB (A) Uncertainty K = ..... 3 dB (A) .....3 dB (A) .....3 dB (A) .....3 dB (A) Sound power level L_WA^ .....106 dB (A) .....106 dB (A) .....106 dB (A) .....106 dB (A) Uncertainty K = ..... 3 dB (A) .....3 dB (A) .....3 dB (A) .....3 dB (A)
Wear ear protectors!
* Measured according to EN 61029-1
WARNING The vibration emission level will vary because of the ways in which a power tool can be used and may increase above the level given in this information sheet.
The vibration emission level may be used to compare one tool with another.
It may be used for a preliminary assessment of exposure.
An accurate estimate of the vibratory load should also take into account the times when the tool is shut down or when it is running but not actually in use. This may significantly reduce the vibratory load over the total working period.


Read and understand the operating instructions before using the appliance. Familiarise with the
control elements and how to use the appliance properly. Abide by all the safety measures stated in the service manual. Act responsibly toward third parties.
The operator is responsible for accidents or risks to third parties.
In case of any doubts about connection and operation refer please to our customer center
Specified Conditions Of Use
The surfacer and thicknesser is only designed for DIY and hobby use.
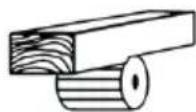
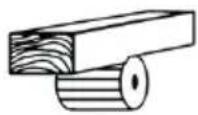
The machine is only designed for planing wooden materials. The wooden materials must be free of foreign substances (nails, other metal parts, cables, ropes, cords and the like).
The protective equipment on the appliance is strictly prohibited to be disassembled, changed, used in conflict with the designation and it is prohibited to attach any protective equipment of other manufacturers.
The bridge guard must not be removed during machining. The unused part of the blade shaft must be covered.
Not observing general regulations in force and instructions from this manual does not make the manufacturer liable for damages.
The current accident prevention rules and regulations must be obeyed.
Requirements for operating staff
The appliance may only be operated and maintained by persons familiarised with it and informed about possible risks.
Never let children work with the appliance. Never let adults work with the appliance unless they have been properly trained.
The operating staff must carefully read the Operating Instructions before using the appliance.
Qualification: : Apart from the detailed instructions by a professional, no special qualification is necessary for appliance using.
Minimum age: : Persons over 18 years of age can only work on the appliance. An exception includes youngsters trained in order to reach knowledge under supervision of the trainer during occupational education.
Local regulations may stipulate the minimum age of the user.
Training: : Using the appliance only requires corresponding training by a professional or the Operating Instructions. No special training is necessary.
Residual risks
Even when the device is used properly and all safety regulations are complied with, there still may be some residual risks.

Danger of injury!
- of fingers and hands by contact with the blade shaft at uncovered areas when changing tools. These can also be crushed by opening the guard.
• on the infeed and discharge opening
• by dangerous recoil - Danger from current if the electric cables have not been connected correctly.
- harmful wood duct may be generated if operated without an extractor or chip bag.
• by catapulted parts - Metal parts in the workpiece can blunt or destroy the blades.

Hearing damage
A longer stay in the immediate vicinity of the running unit may cause hearing damage. Wear ear protectors!
Despite the observance of the operating instructions there still may be some hidden residual risks.
Emergency procedure
Conduct a first-aid procedure adequate to the injury and summon qualified medical attendance as quickly as possible. Protect the injured person from further harm and calm them down. For the sake of eventual accident, in accordance with DIN 13164, a workplace has to be fitted with a first-aid kit. It is essential to replace any used material in the first-aid kit immediately after it has been used. If you seek help, state the following pieces of information:
- Accident site
- Accident type
- Number of injured persons
- Injury type(s)
Symbols

Read the Operating Instructions

Unplug the machine before any work on it.

Safety gloves to be used!

Wear a respirator!

Wear eye protective goggles! Wear ear protectors!

Safety shoes to be used

Warning/caution!

Warning against dangerous electric voltage
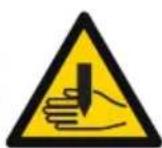
Caution! Danger of injury from planing blades.

Warning against thrown-off items

Remove all undesirable items, e.g. nails and wire, before working

Do not reach into the danger area of the moving blades.

Always keep children and unauthorised persons out of reach of the appliance.


Do not expose the appliance to rain and do not use it in wet or moisture conditions.

CE marking
Any damaged or disposed electric or electronic devices must be delivered to appropriate collection centres. Batteries, oil, and similar substances must not enter the environment.

Protect against humidity

This side up
Safety Instructions

WARNING!
When using electric tools the following general safety instructions must be obeyed to protect yourself from electric shocks, injury and fire risks.
Read all these instructions before using this electric tool and keep the safety instruction in a safe place.
Keep your work area clean and tidy. Untidy workplaces and workbenches increase the risk of accidents and injuries.
Do not expose the appliance to rain and do not use it in wet or moisture conditions.
Provide adequate lighting or good lighting conditions when working with the machine.
Do not work with electric tools in conditions with flammable liquids, gases or dust. Electric tools produce sparks able to ignite dust or fumes.
Protect yourself from electric shock.
Avoid body contact with earthed objects (for example pipes, radiators, electric stoves and cooling units). There is an increased risk of electric shock if your body is earthed.
Keep children and bystanders away while operating a power tool. Do not touch the electric tool or the cable. When not concentrated, you may lose control over the machine.
Ensure that you store electric tools in a safe place.
Tools which are not in used must be stored in a dry place as high as possible out of the reach of children or in an inaccessible place.
Do not overload the machine. Use appropriate electric tools for your work. Working with appropriate electric tools is better and safer when within the specified power range. They will work better and more safely in the specified power range.
Do not use the electric tool for purposes for which
it is not designed. For example, do not use a manual circular saw for cutting branches or logs.
Dress properly. Do not wear loose clothing or jewellery. Keep your hair, clothing and gloves away from moving parts. We recommend that you wear non-slip shoes when working outdoors. Wear a hairnet if you have long hair.
Use protective equipment which fit you. Wear safety goggles and ear protection at all times. A dust mask or respirator is also required. Wear tight-fitting gloves at all times when handling sharp blades and saw blades,
If dust exhausters and catchers are to be installed, make sure they are fitted and used properly. Using a dust exhauster may reduce the exposure to dust.
Do not use the cable in conflict with its designation, to carry or hang electric tools or to pull the plug out of socket. Protect the cable against high temperatures, oil, sharp edges or moving parts of the machine. Damaged or entangled cables increase the risk of electric shock.
Secure the workpiece. Use clamping equipment or a vice to secure the workpiece. This will be safer than holding it in your hand.
Avoid any abnormal body posture. Provide good stability and keep balance at all times. By this, electric tools are better controlled in unexpected situations.
Treat electric tools carefully. Check whether the moving parts work perfectly and do not drag, whether not broken or damaged to such an extent that functioning of electric tools could be affected. Have any damaged parts repaired before using the machine. Poor maintenance of electric tools is a cause of many injuries.
Keep the cutting tools sharp and clean. Carefully treated cutting tools with sharp edges get stuck less often and are easier to guide.
Follow the instructions for lubricating and changing tools.
Check the connection cable on the electric tool at regular intervals and have it replaced by an expert if it is damaged.
Check the extension cables at regular intervals and replace them if they are damaged.
Keep the handles dry, clean and free of oil and grease.
Pull the plug out of the socket and/or remove the battery when the tool is not in use before you make machine settings or change accessories, such as the saw blade, drill bit or cutter. This safety measure prevents unintentional starting of the electric tool.
Before starting any electric tool, remove any adjusting wrenches and screwdrivers. A tool or a wrench present in the rotating part of the machine may lead to injuries.
Prevent the machine from unintentional starting. Before plugging and/or connecting the machine
to battery, handling or carrying, make sure the electric tools are switched off. Having a finger on the switch when carrying the electric tool or when the machine is on when plugging it may lead to injuries.
If you wish to work outdoors with an electric tool, only use extension cables which are approved for outdoor use and are marked accordingly. Using an extension cable suitable for outdoor use reduces the risk of electric shock.
Be careful, pay attention to what you are doing and use common sense when working with electric tools. Do not use electric tools when you are tired or under the influence of drugs, alcohol or pharmaceuticals. A moment if inattention when using electric tools may lead to serious injuries.
Check the machine for any damage:. Before using the equipment again, the protective equipment must carefully be checked if safe and working as designated.
Check the moving parts for perfect functioning, if working smoothly and if no parts are damaged. To provide safe operation of the equipment, all parts must be installed properly and meet all conditions.
Damaged protective equipment and parts must be professionally repaired or replaced by a recognised professional workshop, unless otherwise specified in the Operating Instructions.
Do not use electric tools with a defective switch.
An electric tool that cannot be switched on or off is dangerous and must be repaired.

WARNING!
The use of other tools and other accessories may pose an injury risk for you.
Have your electric tool repaired by an electrician.
This electric tools complies with the relevant safety regulations. Repairs may only be carried out by an electrician using genuine spare parts; otherwise the user may suffer accidents.

Caution!
The machine must be secured to the floor using suitable screws since otherwise there is a risk that it will tip over.
Errors in the machine, including the guard or the blade shafts, must be reported to the person responsible for safety as soon as they are discovered.
Electrical connection

WARNING! Electric shock! There is a risk of injury caused by electric shock!
Defective cable or plug may cause electric shock.
Avoid body contact with earth parts to protect yourself from electric shocks.
Operation is only allowed with a safety switch against stray current (RCD max. stray current of 30mA).
Insert the plug of the electrical cable in a socket of suitable shape, voltage and frequency complying with current regulations.
Do not pull the service cable to pull the plug out of socket.
The machine meets the EN 61000-3-11 requirements and is subject to special connection conditions. That means that a use on optional points of connection is not allowed.
- The machine may cause temporary voltage fluctuation in adverse conditions.
- The machine has only been designed to be used on points of connection not exceeding the maximum allowable network impedance Z_ = 0.233 .
- As a user, you must make sure, after consultation with your energy provider, if necessary, that your point of connection on which the machine is to be operated meets the requirements above.
Work preparation / operation
Before each use, check the following:
- Proper function of the on and off button, incl. the emergency switch.
- Locked disconnected protective equipment by gradual opening of every separating protective equipment to be able to turn the machine off and checking that the machine cannot be turned on whenever the protective equipment is open.
- Brake
by means of a function test to establish whether the braking process takes place within the specified braking time and, if the machine is fitted with a mechanical brake, that the brake must be tested each time the overload guard is tripped.
- Recoil risk
at least once per shift by a visual inspection to establish that they are in good working order, for example, that the contact surface has not been damaged by impacts and that the grabs fall back without hindrance due to their own weight.
- Planing blades
for signs of damage and to ensure they are posi- toned correctly.
The machine may only be used if all these conditions are satisfied.
Use only well sharpened and maintained blades. Use only blades that are designed for the machine.
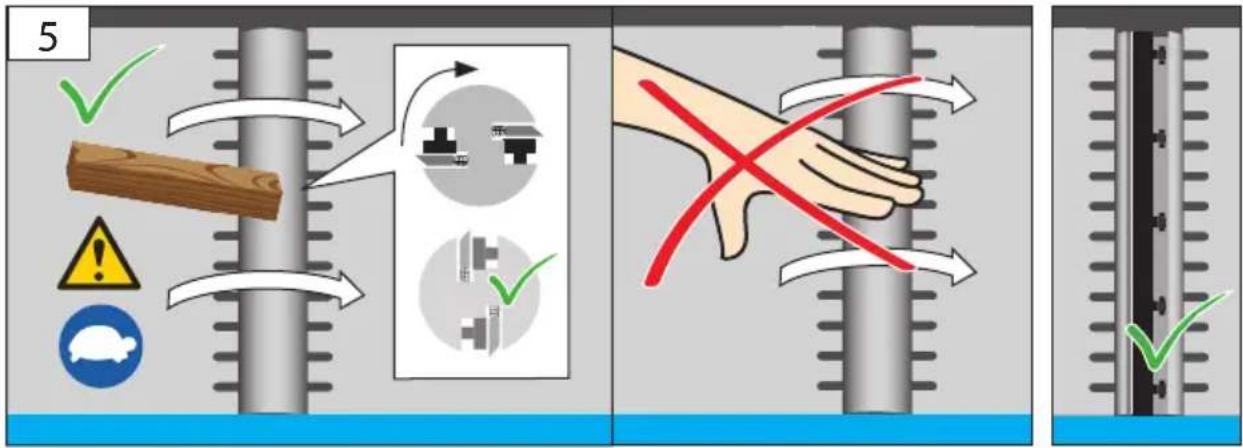
Use pusher wood or sticks which are in perfect condition for machining short workpieces.
Connect the machine to a dust and chip extractor.
Check that the stop is secure before starting the machining work.
Ensure that you can maintain your balance at all times. Stand to the side of the machine. Whilst the machine is running keep your hands at a safe distance from the cutting roller and from the point at which the chips are discharged.
Do not start the planing work until the cutting roller has reached the required speed.
Also ensure that the workpiece does not contain any cables, wires, cords or the like. Do not machine any wood which has lots of knots or knot holes.
Secure long workpieces to prevent them tipping over at the end of the planing process. Use roller stands, for example, or similar devices for this purpose.
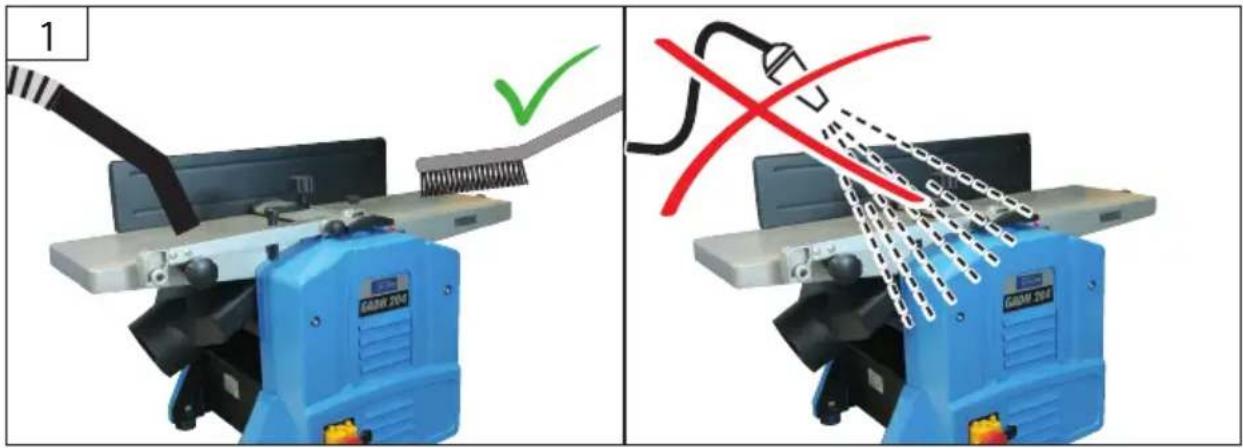
Removing sawdust and chippings from the machine when running is strictly prohibited.
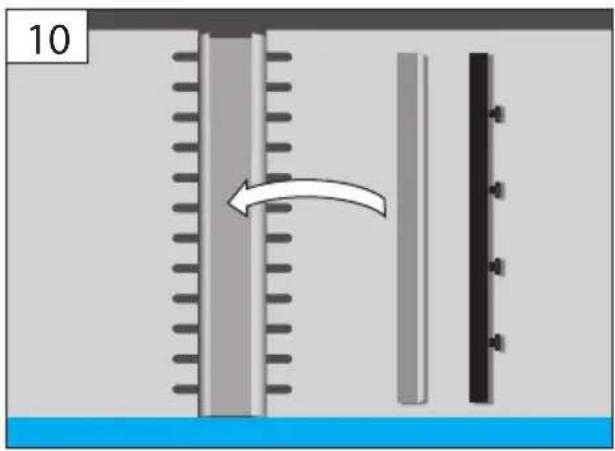
Switch off the machine immediately it is jams. Pull out the mains plug and remove the jammed workpiece.
Set the smallest cutting size after use to prevent the risk of injury.
Maintenance

Unplug the machine before any work on it.
Prior to every use, visually check the machine to rule out any defects, in particular on the power cable and the plug.
The machine must not be used under any circumstances if the machine or the safety devices are damaged.
Repairs and works specified in these Instructions may only be performed by qualified authorised staff.
Use only original accessories and original spare parts.
At all times, keep the machine, ventilation slots, in particular, clean. The sawdust ejection and/or dust ex-hauster should be cleaned at regular intervals. Never spray water on the machine!
Only a regularly maintained and treated appliance can serve as a satisfactory aid. Insufficient maintenance and care can lead to unforeseen accidents and injuries.
Never clean the machine and its components with solvents, flammable or toxic liquids. Us only a damp cloth making.
Apply environment-friendly oil to all moving parts.
If necessary, a list of spare parts can be found at www.guede.com.
Disposal

Any damaged or disposed devices must be delivered to appropriate collection centres.
Transport packaging disposal
The packaging protects the machine against damage during transport. Packaging materials are usually chosen based on environment aspects and waste treatment principles and are therefore recyclable. Returning the packaging into material circulation saves raw materials and reduces waste production. Parts of packagings (e.g. foils, styropor®) can be dangerous for children.
Risk of suffocation!
Keep parts of the packagings out of reach of children and dispose them as soon as possible..
Guarantee
Warranty period of 12 months applies to commercial use and 24 months applies to private use and commences on the day of purchase of the device.
The guarantee solely covers inadequacies caused by material defect or manufacturing defect. Original payment voucher with the sales date needs to be submitted for any claim in the guarantee period..
The guarantee does not cover any unauthorised use such as appliance overloading, use of violence, damage as a result of any unauthorised interference or caused by foreign items. Failing to follow the operating and assembly instructions and common wear are also not included in the guarantee.
Important information for the customer
Please be sure to know that returning the product in or after the warranty period must be made in the original packaging.
Service
Do you have any technical questions? Any claim? Do you need any spare parts or operating instructions? We will quickly help you and without needles bureaucracy at our web pages at www.guede.com in the Servicing part. Please help us be able to help you. In order to identify your device in case of claim we need the serial No., product No. and year of production. All this data can be found on the type label. Please enter it here for future reference:
Serial No.:
Art. No::
Year of production::
Tel.: +49 (0) 79 04 / 700-360
Fax: +49 (0) 79 04 / 700-51999
E-Mail: support@ts.guede.com
Failure removal
Before rectifying a fault on the machine, switch off the machine and pull out the mains plug.
| Failures | Causes | Removal |
| Machine does not work or stops suddenly | Power cutMotor or switch defectiveCheck microswitch | Check fuse, check overload switch on machine.Have the motor or switch checked by an electrician.Fit the chip extractor hood so that the microswitch is pressed.→6 |
| Machine stops during planing | Planing blade blunt/wornOverload switch has trippedCheck microswitch | Replace or sharpen bladeSwitch on the motor again once it has cooledFit the chip extractor hood or bench lock so that the microswitch is pressed.→6 |
| Workpiece jams during thicknessing | Cutting depth too greatReduce cutting | depth and machine the workpiece in several passes |
| Unsatisfactory surface finish | Planing blade blunt/wornPlaning blade filled with chipsUneven feed | Replace or sharpen bladeRemove chipsFeed the workpiece with constant pressure and at reduced speed |
| Machined surface too rough | Workpiece contains too much moisture | Dry workpiece |
| Machined surface cracked | Workpiece was machined against the grainToo much material planned at one pass | Machine the workpiece from the opposite directionMachine the workpiece in several passes |
| Workpiece speed too low during thicknessing | Workpiece was machined against the grainToo much material planned at one pass | Clean bench top and apply a thin coating of lubricant waxRepair transport rollersSet the lever for the thicknessing setting to the top position |
Enable and check all safety equipment after all troubleshooting work.
Inspection and maintenance plan
| Regular servicing period Before any | start-up | If necessary | Once a week | After 6 months | |
| Check that the planing blade is in perfect condition | Inspection | √ | |||
| Change | √ | √ | |||
| Check the function of the safety equipment | Inspection | √ | |||
| Change | √ | ||||
| Clean dust and chips off the machine | Clean | √ | |||
| Check the drive belt to ensure it has the correct tension and is in good condition or not worn | Inspection | √ | |||
| Change | |||||
| Oil or grease all moving connecting parts | √ | √ | |||
Translation of the EC-Declaration of Conformity
We, hereby declare the conception and construction of the below mentioned appliances correspond - at the type of construction being launched - to appropriate basic safety and hygienic requirements of EC Directives.
In case of any change to the appliance not discussed with us the Declaration expires.
Notified Body Name: Adress:No:
Type Ex. Cert.-No.:
□97/68/EC_
Emission No.:
2000/14/EC_2005/88/EC
2006/95/EC 2004/108/
□2009/105/EC 1907/2006/EC
2011/65/EC ROHS 2009/142/EC
☐ 89/686/EEC (PPE) 1935/2004/EC
2006/42/EC
Annex IV
Notified Body: No:0123 Name:TÜV SÜD Product service GmbH
2006/95/EC 2004/108/
□2009/105/EC 1907/2006/EC
2011/65/EC ROHS 2009/142/EC
□ 89/686/EEC (PPE) 1935/2004/EC
2006/42/EC
Annex IV
Notified Body: No:0123 Name:TÜV SÜD Product service GmbH