AC12BQ - Air-conditioner LG - Free user manual and instructions
Find the device manual for free AC12BQ LG in PDF.
User questions about AC12BQ LG
0 question about this device. Answer the ones you know or ask your own.
Ask a new question about this device
Download the instructions for your Air-conditioner in PDF format for free! Find your manual AC12BQ - LG and take your electronic device back in hand. On this page are published all the documents necessary for the use of your device. AC12BQ by LG.
USER MANUAL AC12BQ LG
Read this owner's manual thoroughly before operating the appliance and keep it handy for reference at all times.
TYPE: WALL MOUNTED
Original instruction
EN ENGLISH
FR FRANÇAIS
EL EAAHNIKA
NL NEDERLANDS
PL POLSKI
HU MAGYAR
BG BbIgAPCKN
HR HRVATSKI
CZ CESTINA
ET EESTI
MT MALTI
RO ROMÁNA
SK SLOVENCINA
SL SLOVENsCINA
LV LATVIEŠU
LT LIETUVIU
GA GAEILGE
SR SRPSKI
MKMAKEIOHCKN
SQ SHQIP
BS BOSANSKI
TABLE OF CONTENTS
This manual may contain images or content different from the model you purchased.
This manual is subject to revision by the manufacturer.
SAFETYINSTRUCTIONS 3
IMPORTANT SAFETY INSTRUCTIONS 4
OPERATION 11
Notes for Operation 11
Parts and Functions 11
Wireless Remote Control. 12
Restarting the Air Conditioner Automatically 17
Using the Mode Function 17
Using the Jet Mode Function 20
Using the Fan Speed Function 21
Using the Air Flow Direction Function. 21
Setting the On/Off Timer 22
Using the Sleep Function (Optional) 23
Using the Simple Timer Function (Optional) 23
Using the Energy Display Function (Optional) 24
Using the Light Off Function (Optional) 24
Using the Comfort Air Function (Optional) 24
Using the Energy Control Function (Optional) 25
Using Special Functions 25
SMART FUNCTIONS 27
LG ThinQ Application 27
Smart Diagnosis 29
MAINTENANCE 30
Clean the Air Filter 32
TROUBLESHOOTING 33
The following safety guidelines are intended to prevent unforeseen risks or damage from unsafe or incorrect operation of the appliance.
The guidelines are separated into 'WARNING' and 'CAUTION' as described below.

This symbol is displayed to indicate matters and operations that can cause risk. Read the part with this symbol carefully and follow the instructions in order to avoid risk.

WARNING
This indicates that the failure to follow the instructions can cause serious injury or death.

CAUTION
This indicates that the failure to follow the instructions can cause the minor injury or damage to the product.
The following symbols are displayed on indoor and outdoor units. (for R32)

This symbol indicates that this appliance uses a flammable refrigerant. If the refrigerant is leaked and exposure to an external ignition source, there is a risk of fire.

This symbol indicates that the Operation Manual should be read carefully.

This symbol indicates that a service personnel should be handling this equipment with reference to the Installation Manual.

This symbol indicates that information is available such as the Operating Manual or Installation Manual.
IMPORTANT SAFETY INSTRUCTIONS

WARNING
To reduce the risk of explosion, fire, death, electric shock, injury or scalding to persons when using this product, follow basic precautions, including the following:
Children in the Household
This appliance is not intended for use by persons (including children) with reduced physical, sensory or mental capabilities, or lack of experience and knowledge, unless they have been given supervision or instruction concerning use of the appliance by a person responsible for their safety. Children should be supervised to ensure that they do not play with the appliance.
For use in Europe:
This appliance can be used by children aged from 8 years and above and persons with reduced physical, sensory or mental capabilities or lack of experience and knowledge if they have been given supervision or instruction concerning use of the appliance in a safe way and understand the hazards involved. Children shall not play with the appliance. Cleaning and user maintenance shall not be made by children without supervision.
Installation
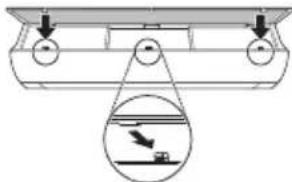
- Do not install the air conditioner on an unstable surface or in a place where there is danger of it falling.
-
Contact an authorized service center when installing or relocating the air conditioner.
-
Install the panel and the cover of the control box safely.
-
Do not install the air conditioner in a place where flammable liquids or gases such as gasoline, propane, paint thinner, etc., are stored.
-
Make sure that the pipe and the power cable connecting the indoor and outdoor units are not pulled too tight when installing the air conditioner.
-
Use standard circuit breaker and fuse that conform to the rating of the air conditioner.
-
Do not input air or gas into the system except with the specific refrigerant.
-
Use non-flammable gas (nitrogen) to check for leak and to purge air; using compressed air or flammable gas may cause fire or explosion.
- The indoor/outdoor wiring connections must be secured tightly, and the cable should be routed properly so that there is no force pulling the cable from the connection terminals. Improper or loose connections can cause heat generation or fire.
- Install dedicated electric outlet and circuit breaker before using the air conditioner.
- Do not connect the ground wire to a gas pipe, a lightning rod, or a telephone ground wire.
- Keep any required ventilation openings clear of obstruction. (for R32)
- Means for disconnection must be incorporated in the fixed wiring in accordance with the wiring rules.
Operation
-
Be sure to use only those parts listed in the service parts list. Never attempt to modify the equipment.
-
Make sure that children do not climb on or hit the outdoor unit.
- Dispose of the batteries in a place where there is no danger of fire.
-
Use only the refrigerant specified on the air conditioner label.
-
Cut off the power supply if there is any noise, smell, or smoke coming from the air conditioner.
-
Do not leave flammable substances such as gasoline, benzene, or thinner near the air conditioner.
-
Contact an authorized service center when the air conditioner is submerged by flood waters.
-
Do not use the air conditioner for an extended period of time in a small place without proper ventilation.
-
In the event of a gas leak (such as Freon, propane gas, LP gas, etc.) ventilate sufficiently before using the air conditioner again.
-
To clean the interior, contact an authorized service center or dealer. Using harsh detergents may cause corrosion or damage to the unit.
-
Be sure to ventilate sufficiently when the air conditioner and a heating appliance such as a heater are used simultaneously.
-
Do not block the inlet or outlet of air flow.
-
Do not insert hands or other objects through the air inlet or outlet while the air conditioner is operating.
-
Make sure that the power cable is neither dirty, loose, nor broken.
-
Never touch, operate, or repair the air conditioner with wet hands.
-
Do not place any objects on the power cable.
-
Do not place a heater or other heating appliances near the power cable.
-
Do not modify or extend the power cable. Scratches or peeling insulation on the power cables may result in fire or electric shock, and should be replaced.
-
Cut off the power supply immediately in the event of a blackout or a thunderstorm.
-
Take care to ensure that power cable could not be pulled out or damaged during operation.
- Do not touch refrigerant pipe, water pipe and any internal parts while the unit is operating or immediately after operation.
Maintenance
- Do not clean the appliance by spraying water directly onto the product.
- Before cleaning or performing maintenance, disconnect the power supply and wait until the fan stops.
Technical Safety
- Installation or repairs made by unauthorized persons can pose hazards to you and others.
-
Any person who is involved with working on or breaking into a refrigerant circuit should hold a current valid certificate from an industry-accredited assessment authority, which authorizes their competence to handle refrigerants safely in accordance with an industry recognized assessment specification. (for R32)
Servicing shall only be performed as recommended by the equipment manufacturer. Maintenance and repair requiring the assistance of other skilled personnel shall be carried out under the supervision of the person competent in the use of flammable refrigerants. (for R32) -
The information contained in the manual is intended for use by a qualified service technician who is familiar with the safety procedures and equipped with the proper tools and test instruments.
-
Failure to read and follow all instructions in this manual can result in equipment malfunction, property damage, personal injury and/or death.
-
The appliance shall be installed in accordance with national wiring regulations.
-
When the power cord is to be replaced, the replacement work shall be performed by authorized personnel using only genuine replacement parts.
- This appliance must be properly grounded to minimize risk of electric shock.
-
Do not cut or remove the grounding prong from the power plug.
-
Attaching the earth wire to the power outlet cover screw does not ground the appliance unless the cover screw is metal, uninsulated, and the power outlet is grounded through house wiring.
- If you have any doubt whether the air conditioner is properly grounded, have the power outlet and circuit checked by a qualified electrician.
- The refrigerant and insulation blowing gas used in the appliance require special disposal procedures. Consult a service agent or a similarly qualified person before disposing of them.
- If the supply cord is damaged, it must be replaced by the manufacturer, its service agent or similarly qualified person in order to avoid a hazard.
- The appliance shall be stored in a well-ventilated area where the room size corresponds to the room area as specified for operation. (for R32)
- The appliance shall be stored in a room without continuously operating open flames (for example an operating gas appliance) and ignition sources (for example an operating electric heater). (for R32)
- The appliance shall be stored so as to prevent mechanical damage from occurring. (for R32)

CAUTION
To reduce the risk of minor injury to persons, malfunction, or damage to the product or property when using this product, follow basic precautions, including the following:
Installation
- Do not install the air conditioner in an area where it is directly exposed to sea wind (salt spray).
- Install the drain hose properly for the smooth drainage of water condensation.
Exercise caution when unpacking or installing the air conditioner. -
Do not touch the leaking refrigerant during installation or repair.
-
Transport the air conditioner with two or more people or use a forklift.
- Install the outdoor unit such that it is protected from direct sunlight. Do not place the indoor unit in a place where it is directly exposed to sunlight via the windows.
- Safely dispose of packing materials such as screws, nails or batteries using proper packaging after installation or repair.
- Install the air conditioner in a place where the noise from the outdoor unit or the exhaust fumes will not inconvenience the neighbors. Failure to do so may result in conflict with the neighbors.
Operation
-
Remove the batteries if the remote control is not to be used for an extended period of time.
-
Make sure that the filter is installed before operating the air conditioner.
- Be sure to check if there is a refrigerant leak after installing or repairing the air conditioner.
- Do not place any object on the air conditioner.
- Never mix different types of batteries, or old and new batteries for the remote control.
- Do not let the air conditioner run for a long time when humidity is very high or when a door or a window has been left open.
- Stop using the remote control if there is a fluid leak in the battery. If your clothes or skin are exposed to the leaking battery fluid, wash off with clean water.
- Do not expose people, animals, or plants to the cold or hot wind from the air conditioner for extended periods of time.
- If the leaking battery fluid has been swallowed, rinse the inside of the mouth thoroughly and consult a doctor.
- Do not drink the water drained from the air conditioner.
- Do not use the product for special purposes, such as preserving foods, works of art, and etc. It is an air conditioner for consumer purposes, not a precision refrigeration system. There is risk of damage or loss of property.
- Do not recharge or disassemble the batteries.
Maintenance
-
Never touch the metal parts of the air conditioner when removing the air filter.
-
Use a sturdy stool or ladder when cleaning, maintaining, or repairing the air conditioner at a height.
- Never use strong cleaning agents or solvents when cleaning the air conditioner or spray water. Use a smooth cloth.
OPERATION
Notes for Operation
Suggestion for Energy Saving
- Do not over-cool the space. This may be harmful for your health and may consume more electricity.
- Block sunlight with blinds or curtains while you are operating the air conditioner.
- Keep doors or windows closed tightly while you are operating the air conditioner.
- Adjust the direction of the air flow vertically or horizontally to circulate indoor air.
- Speed up the fan to cool or warm indoor air quickly, within a short period of time.
- Open windows regularly for ventilation. The indoor air quality may deteriorate if the air conditioner is used for long durations.
- Clean the air filter once every 2 weeks. Dust and impurities collected in the air filter may block the air flow or reduce the unit performance.
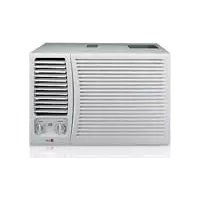
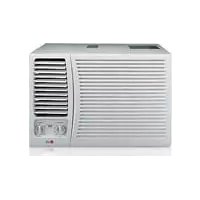
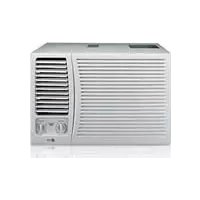
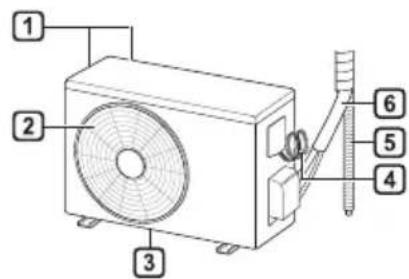
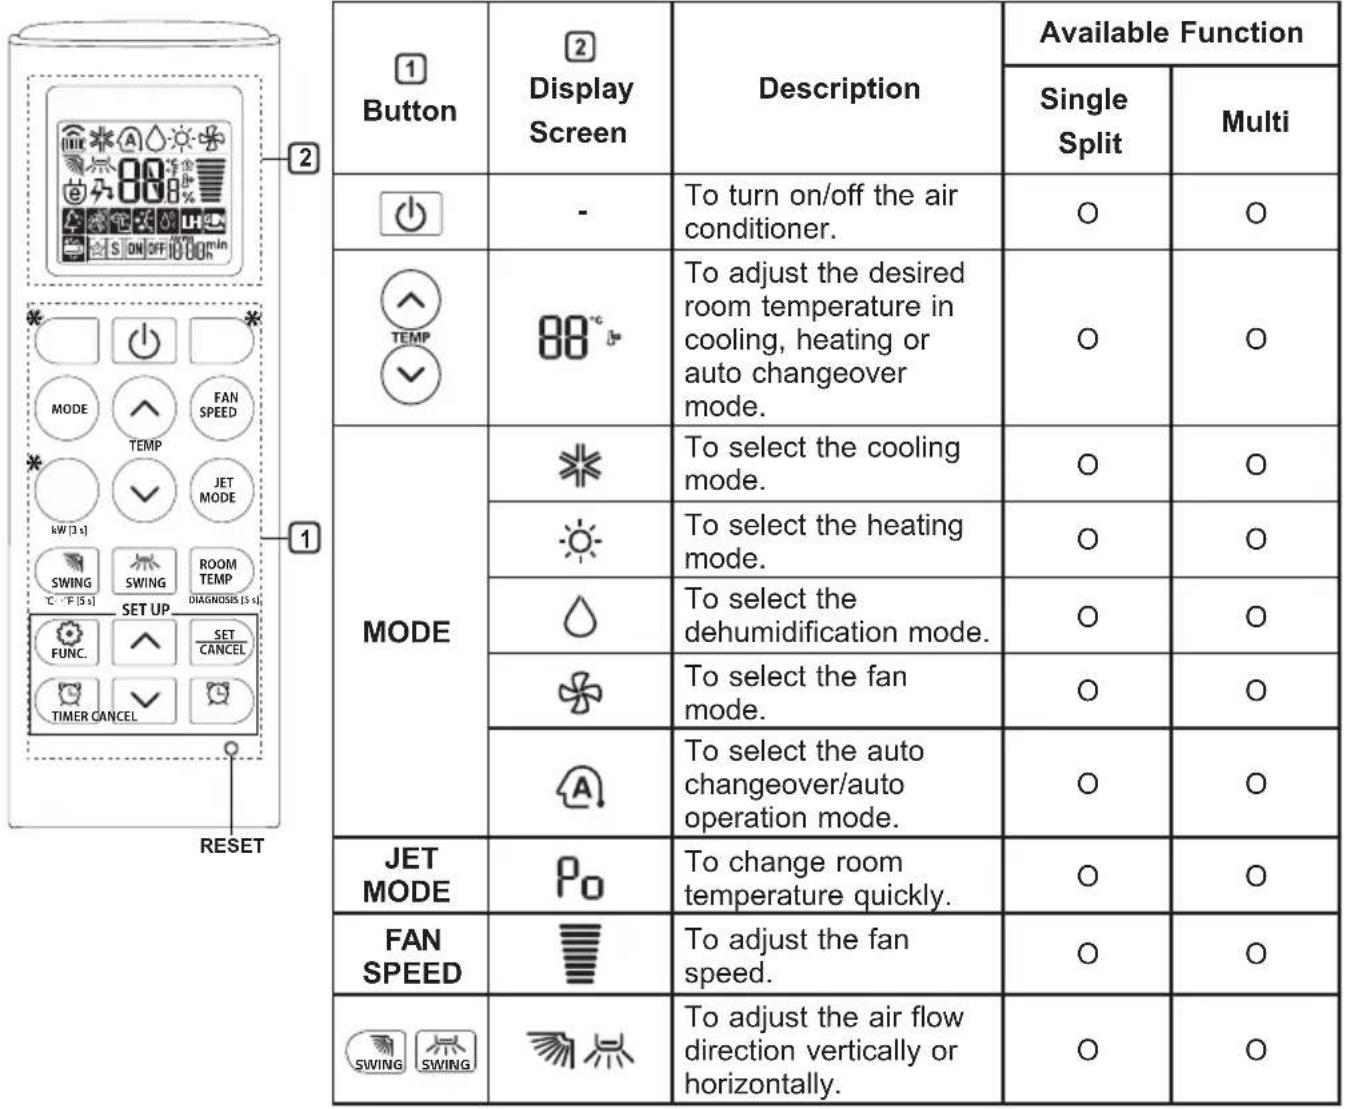
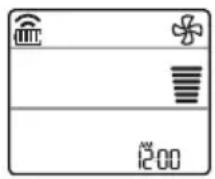
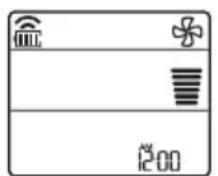
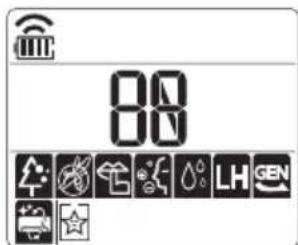
Parts and Functions Indoor Unit Outdoor Unit
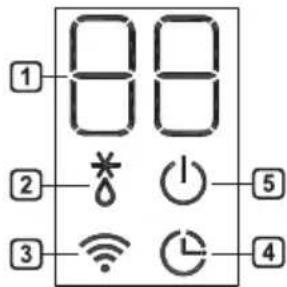
Indoor Unit Display

1 Air Filter
2 Air Intake
3 Front Cover
4 Air Outlet
5 Air Deflector (Horizontal Vane)
6 Air Deflector (Vertical Louver)
7 On/Off Button
8 Display
9 Signal Receiver
Air Intake Vents
Air Outlet Vents
3 Base Plate
4 Power Supply Cable
5 Drain Hose
6 Refrigerant Pipes
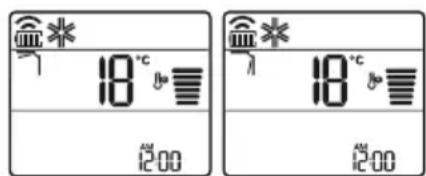
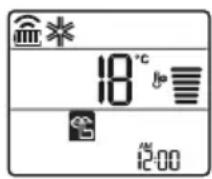
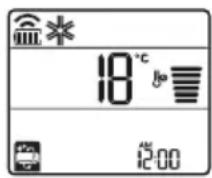
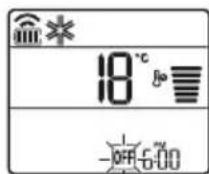
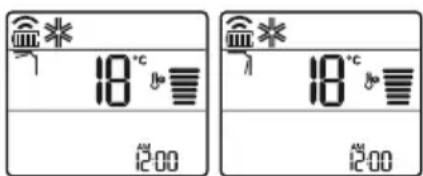
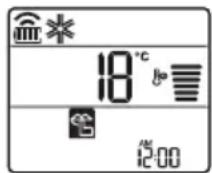
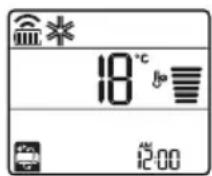
1 Set-Point / Room Temperature
2 Defrost / Pre-Heat Operation
3 Wi-Fi
4 Timer
5 On/Off
NOTE
- The number and location of operation lamps may vary according to the model of the air conditioner.
The feature may be changed according to the type of model.
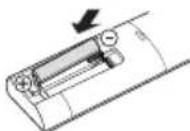
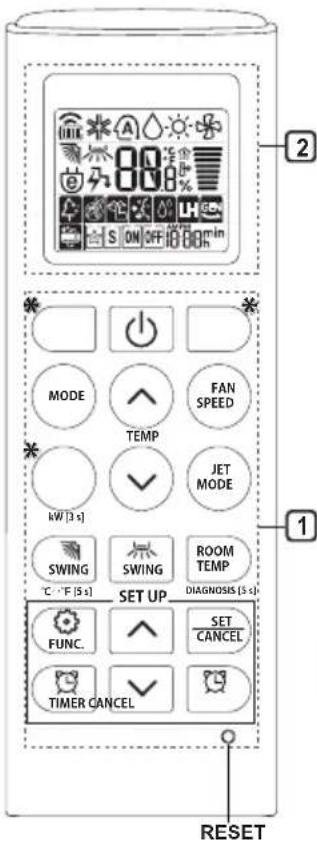
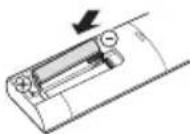
Wireless Remote Control Inserting Batteries
If the display screen of the remote control begins to fade, replace the batteries. Insert AAA (1.5 V) batteries before using the remote control.
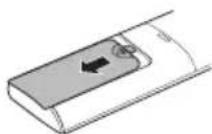
1 Remove the battery cover.

2 Insert the new batteries and make sure that the + and - terminals of the batteries are installed correctly.
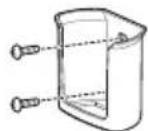
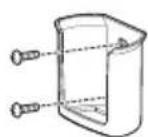
Installing the Remote Control Holder
To protect the remote control, install the holder where there is no direct sunlight.
1 Choose a safe and easily accessible location.
Fix the holder by fastening 2 screws firmly with a screwdriver.
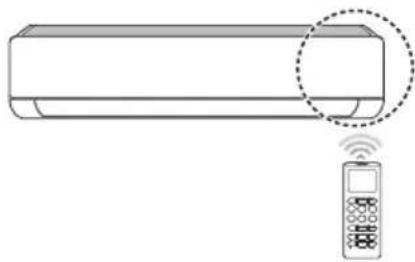
Operating Method
Point the remote control towards the signal receiver at the right side of the air conditioner to operate it.

NOTE
- The remote control may operate other electronic devices if it is directed towards them. Make sure to point the remote control towards the air conditioner signal receiver.
- For proper operation, use a soft cloth to clean the signal transmitter and receiver.
In case of a function not provided in the product, no buzzer sound occurs from the product when a button for such function on the remote control is pressed except for Air Flow Direction (SWING), Energy Display (kW[3s]), Air Purification function
Setting the Current Time
1 Insert batteries.
- The icon below blinks at the bottom of the display screen.

2 Press or button to select the minutes.
3 Press SET/CANCEL button to finish.
NOTE
- The On/Off Timer is available after setting the current time.
Using the ^ C / ^ Conversion Function (Optional)
This function changes unit between ^ C and ^ F
Press and hold button about 5 seconds.
Operating the Air Conditioner without the Remote Control
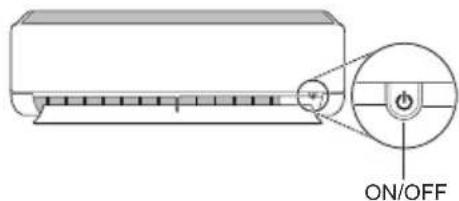
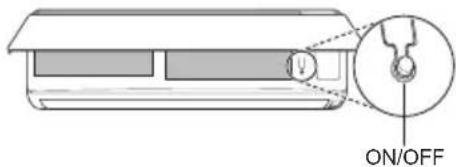
You can use the ON/OFF button of the indoor unit to operate the air conditioner when the remote control is unavailable.
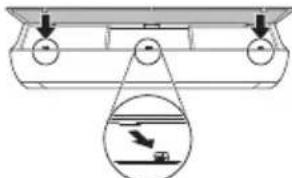
1 Open the front cover (Type2) or horizontal vane (Type1).
2 Press the ON/OFF button.
Type1
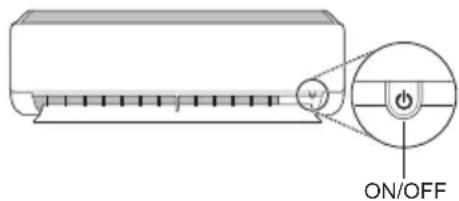
Type2
NOTE
- The stepping motor may be broken, if the horizontal vane opens rapidly.
The fan speed is set to high.
The feature may be changed according to the type of model.
The temperature cannot be altered when using this emergency ON/OFF button. - For cooling & heating models, the temperature is set from 22^ to 24^
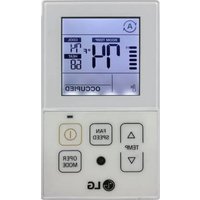
Using Wireless Remote Control
You can operate the air conditioner more conveniently with the remote control.
NOTE
-
- buttons may be changed according to the type of model.
-
When connected to the Multi Outdoor unit, the Energy Display, Energy Control, Silent and Smart Diagnosis function may not be supported.
| 1Button | 2DisplayScreen | Description | Available Function | |
| SingleSplit | Multi | |||
| TIMER | ON OFF | To turn on/off air conditioner automatically at desired time. | ○ | ○ |
| SET/CANCEL | - | To set/cancel the special functions and timer. | ○ | ○ |
| CANCEL | - | To cancel the timer settings. | ○ | ○ |
| - To adjust time. ○○ | ||||
| *LIGHTOFF | - | To set the brightness of the display on the indoor unit. | ○ | ○ |
| ROOMTEMP | To display the room temperature. | ○ | ○ | |
| °C←°F[5 s] | °C°F | To change unit between °C and °F | ○ | ○ |
| *COMFORTAIR | To adjust the air flow to deflect wind. | ○ | ○ | |
| kW[3 s] | - | To set whether or not to display information regarding energy. | ○ | × |
| *ENERGYCTRL | 88 x | To bring the effect of the power saving. | ○ | × |
| DIAGNOSIS[5 s] | - | To conveniently check maintenance information of a product. | ○ | × |

| 1 Button | 2 Display Screen | Description | Available Function | |
| Single Split | Multi | |||
| FUNC. | 4 | The Ion generator uses millions of ions to help improve indoor air quality. | O (Optional) | O (Optional) |
| 5 | To reduce noise from outdoor units. | O | X | |
| 6 | To remove moisture generated inside the indoor unit. | O | O | |
| RESET - | To initialize the remote control settings. | O | O | |
NOTE
- Some functions may not be supported, depending on the model.
-
- buttons may be changed according to the type of model.
- Press the SET/CANCEL button to operate the selected FUNC.
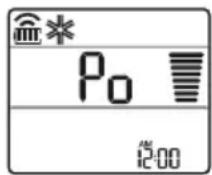
Restarting the Air Conditioner Automatically
When the air conditioner is turned on again after a power failure, this function restores the previous settings.
Disabling Auto Restart
1 Open the front cover (Type2) or horizontal vane (Type1).
2 Press the ON/OFF button and hold it for 6 seconds, then the unit will beep twice and the lamp will blink twice 4 times.
To re-enable the function, press the ON/OFF button and hold it for 6 seconds. The unit will beep twice and the lamp will blink 4 times.
Type1
Type2
NOTE
The feature may be changed according to the type of model.
- If you press and hold the ON/OFF button for 3 - 5 seconds, instead of 6 seconds, the unit will switch to the test operation. In the test operation, the unit blows out strong cooling air for 18 minutes and then returns to factory default settings.
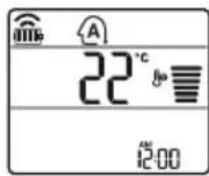
Using the Mode Function
This function allows you to select the desired function.
| * | Cooling Mode |
| ↓ | |
| A | Auto Changeover Mode / Auto Operation(AI) Mode |
| ↓ | |
| ○ | Dehumidification Mode |
| ↓ | |
| - | Heating Mode |
| ↓ | |
| * | Fan Mode |
Cooling Mode
1 Turn the appliance on.
2 Press MODE button repeatedly to select the Cooling Mode.
- is displayed on the display screen.

3 Press or button to set the desired temperature.
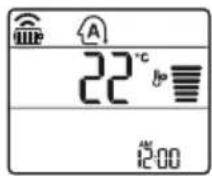
Auto Operation (Artificial Intelligence)
Multi Model
In this operation mode, the system is automatically operated by the electronic controls.
1 Turn the appliance on.
2 Press MODE button repeatedly to select the Auto Operation.
A is displayed on the display screen.
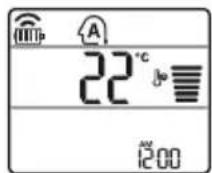
3 Press or button to set the desired temperature.
4 Press FAN SPEED button to adjust the fan speed.
Auto Changeover Mode
Single Split Model
This mode changes the mode automatically to maintain the set temperature at ± 2^
1 Turn the appliance on.
2 Press MODE button repeatedly to select the Auto Changeover Mode.
A is displayed on the display screen.
3 Press or button to set the desired temperature.
4 Press FAN SPEED button to adjust the fan speed.
Dehumidification Mode
This mode removes excess moisture from a highly humid environment or during the rainy season, in order to prevent mildew from setting in. This mode adjusts the room temperature and the fan speed automatically to maintain the optimal level of humidity.
1 Turn the appliance on.
2 Press MODE button repeatedly to select the Dehumidification Mode.
is displayed on the display screen.
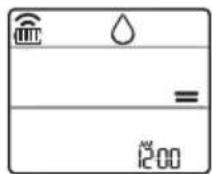
NOTE
- In this mode you cannot adjust the room temperature, it is adjusted automatically.
- The room temperature is not displayed on the display screen.
- In the dehumidification mode, compressor and indoor fan may not operate when the room temperature is below 24^
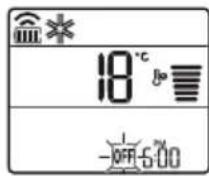
Heating Mode
1 Turn the appliance on.
2 Press MODE button repeatedly to select the Heating Mode.
is displayed on the display screen.
3 Press or button to set the desired temperature.
NOTE
will be displayed on the indoor unit when defrosting is operating.
-
Furthermore, this indication will be displayed on the indoor unit:
-
When preheating is operating.
- When the room temperature has been reached to the set temperature.
Fan Mode
This mode only circulates the indoor air without changing the room temperature.
1 Turn the appliance on.
2 Press MODE button repeatedly to select the Fan Mode.
is displayed on the display screen.
3 Press FAN SPEED button to adjust the fan speed.
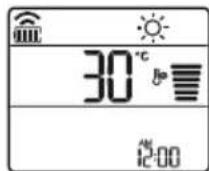
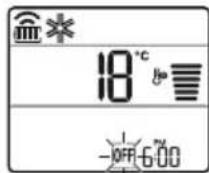
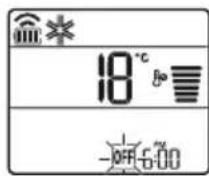
Using the Jet Mode Function Changing Room Temperature Quickly
This function allows you to cool indoor air quickly during the summer or warm it quickly during winter.
- The Jet Mode function is available with Cooling, Heating and Dehumidification Mode.
1 Turn the appliance on.
2 Press MODE button repeatedly to select the desired mode.
3 Press JET MODE button.
_0 is displayed on the display screen.
NOTE
- Jet Heating Mode is not available on some models.
- In Jet Cooling Mode, strong air blows out for 30 minutes.
After 30 minutes later, setting temperature is maintaining 18^ If you want to change the temperature, Press
or button to set the desired temperature.
- In Jet Heating Mode, strong air blows out for 30 minutes.
After 30 minutes later, setting temperature is maintaining 30^ If you want to change the temperature, Press
or button to set the desired temperature.
- This function may operate differently from the remote control display.
Using the Fan Speed Function
Adjusting the Fan Speed
- Press FAN SPEED button repeatedly to adjust the fan speed.
| Display Screen Speed | |
| High | |
| Medium - High | |
| Medium | |
| Medium - Low | |
| Low | |
| - Natural Wind | |
NOTE
- The fan speed of Natural Wind adjusts automatically.

- The fan speed icons are displayed on some indoor units.

- Indoor unit display is displayed only 5 seconds and return to the setting temperature on some models.
Using the Air Flow Direction Function
This function adjusts the direction of the air flow vertically (horizontally).
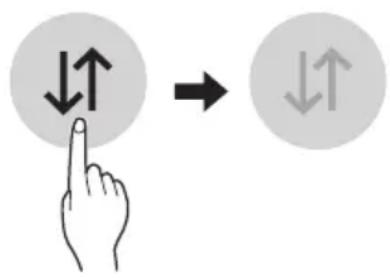
- Press SWING (SWING) button repeatedly and select the desired direction.
-Select () to adjust the direction of the air flow automatically.
NOTE
- Adjusting the air flow direction horizontally may not be supported, depending on the model.
- Adjusting the air deflector arbitrarily may cause product failure.
- If you restart the air conditioner, it starts to operate with the previously set direction of air flow, so the air deflector may not match the icon displayed on the remote control. When this occurs, press SWING or SWING button to adjust the direction of the air flow again.
- This function may operate differently from the remote control display.
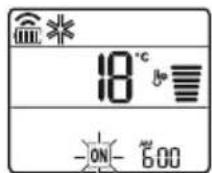
Setting the On/Off Timer
This function sets the air conditioner to turn on/ off automatically at desired time.
On/Off Timer can be set together.
Setting the On Timer
1 Press button repeatedly.
- The icon below blinks at the bottom of the display screen.

2 Press Yr button to select the minutes.
3 Press SET/CANCEL button to finish.
After setting the timer, current time and ON icon are displayed on the display screen indicating that the desired time is set.
Canceling the On Timer
1 Press button repeatedly.
The icon below blinks at the bottom of the display screen.

2 Press SET/CANCEL button to cancel the setting.
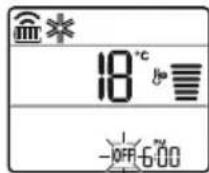
Setting the Off Timer
1 Press button repeatedly.
- The icon below blinks at the bottom of the display screen.
2 Press or button to select the minutes.
3 Press SET/CANCEL button to finish.
After setting the timer, current time and OFF icon are displayed on the display screen indicating that the desired time is set.
NOTE
- This function is disabled when you set Simple Timer.
Canceling the Off Timer
1 Press button repeatedly.
- The icon below blinks at the bottom of the display screen.
2 Press SET/CANCEL button to cancel the setting.
Canceling the Timer Setting
- Press button to cancel all timer settings.
Using the Sleep Function (Optional)
This function turns off the air conditioner automatically when you go to sleep.
1 Turn the appliance on.
2 Press button repeatedly.
The icon below blinks at the bottom of the display screen.
3 Press Yr button to select the hour (up to 7 hours).
4 Press SET/CANCEL button to finish.
is displayed on the display screen.
NOTE
is displayed on some indoor units.
- Indoor unit display is displayed from 1H to 7H which is displayed only 5 seconds and then return to the setting temperature.
- In the Cooling and Dehumidification Mode, the temperature increases by 1^ after 30 minutes and additional 1^ after another 30 minutes for a more comfortable sleep.
- The temperature increases up to 2^ from the preset temperature.
- Although the remark for fan speed on the display screen may be changed, the fan speed is adjusted automatically.
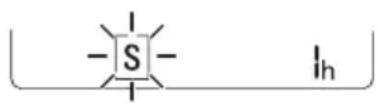
Using the Simple Timer Function (Optional)
This function turns off the air conditioner automatically when you go to sleep.
1 Turn the appliance on.
2 Press button repeatedly.
- The icon below blinks at the bottom of the display screen.
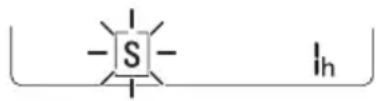
3 Press or button to select the hour (up to 7 hours).
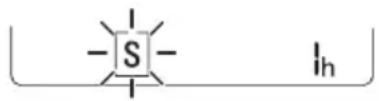
4 Press SET/CANCEL button to finish. S is displayed on the display screen.
NOTE
- This function is disabled when you set Off Timer.
Using the Energy Display Function (Optional)
This function displays the amount of electricity generated on the indoor display as the product operates.
Display the Current Energy Usage
1 Turn the appliance on.
2 Press button and hold it about 3 seconds.
The instantaneous power consumption (BB) is displayed for a while on some indoor units.
NOTE
- It is not displayed on the wireless remote control.
The unit of the displayed value is kW.
If it is more than 99kW which is the range of expression, maintain it as 99kW . - Display wattage under 10kW with 0.1kW unit, and display one over 10kW with 1kW unit.
- The actual power may differ from the power displayed.
- When connected to the Multi Outdoor unit, this function may not be supported.
Using the Light Off Function (Optional)
Display Screen Brightness
You can set the brightness of the indoor unit display screen.
- Press LIGHT OFF button.
NOTE
- Turn on/off the Display screen.
Using the Comfort Air Function (Optional)
Comfort Vane Operation
This function conveniently sets the vane to a preset position to deflect the supply air away from blowing directly onto the occupants in the room.
1 Turn the appliance on.
2 Press COMFORT AIR button repeatedly and select the desired direction.
or is displayed on the display screen.
NOTE
or Lis displayed on some indoor units.
- This function is disabled when you press MODE or JET MODE button.
- This function is disabled and auto swing of vertical direction is set up when you press
SWING button.
- When this function is off, the horizontal vane operates automatically depending on the set mode.
Using the Energy Control Function (Optional)
1 Turn the appliance on.
2 Press ENERGY CTRL button.
- Press ENERGY CTRL button repeatedly to select each step.
- 1 step : The power Input is decreased by 20% compared to rated power input.
80 is displayed on the display screen. - 2 step : The power Input is decreased by 40 % compared to rated power input.
60 is displayed on the display screen. - 3 step (Optional): The power Input is decreased by 60% compared to rated power input.
40 is displayed on the display screen.
80 (1 step), 62 step), (3 step) is displayed on some indoor units.
(1 step), (2 step) is displayed on some indoor units.) - This function is available with Cooling Mode.
- Capacity may decrease when Energy Control mode is selected.
- Desired temperature is displayed about 5 seconds if you press FAN SPEED, or button.
- Room temperature is displayed about 5 seconds if you press ROOM TEMP button.
- When connected to the Multi Outdoor unit, this function may not be supported.
Using Special Functions
1 Turn the appliance on.
2 Press FUNC button repeatedly to select the desired function.
3 Press SET/CANCEL button to finish.
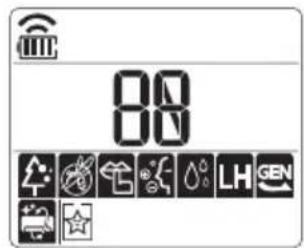
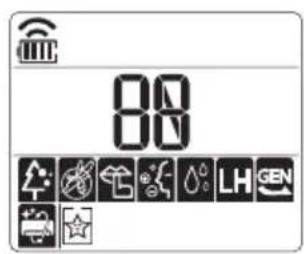
| Display Screen | Description |
| The Ion generator uses millions of ions to help improve indoor air quality. | |
| To reduce noise from outdoor units. | |
| To remove moisture generated inside the indoor unit. |
NOTE
Some functions may not be supported, depending on the model.
Some functions may operate differently from the remote control display.
Canceling Special Functions
1 Press FUNC button repeatedly to select the desired function.
2 Press SET/CANCEL button to cancel the function.
Using the Air Purification Function
These functions supply clean and fresh air by ion particles and the filter.
| Function Display Description | |
| Ionizer | Ion particles from lonizer sterilize the aerial bacteria and other harmful substances. |
| Plasma | It removes microscopic contaminants from the intake air completely to supply clean and fresh air. |
NOTE
- You can use this function without turning the air conditioner on.
- Both the plasma lamp and the cooling lamp light up while Smoke Away/Plasma is in operation on some models.
- Do not touch ionizer during operation.
- This function may operate differently from the remote control display.
Using the Silent Function
This function prevents potential claims by neighbors, reducing noise from outdoor units.

is displayed on the display screen.
NOTE
- This function is disabled when you press MODE or ENERGY CTRL or JET MODE button.
- This function is available with Cooling, Heating, Auto Changeover, Auto Operation Mode.
- When connected to the Multi Outdoor unit, this function may not be supported.
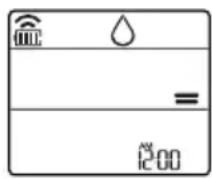
Using the Auto Clean Function
In the Cooling and Dehumidification Mode, moisture is generated inside the indoor unit. This function removes such moisture.

is displayed on the display screen.
NOTE
- Some functions cannot be used while the Auto Clean function is in operation.
- If you turn off the unit, the fan continues to run for 30 minutes and cleans the inside of the indoor unit.
LG ThinQ Application
This feature is only available on models with the or ThinQ logo.
The LG ThinQ application allows you to communicate with the appliance using a smartphone.
LG ThinQ Application Features
Communicate with the appliance from a smartphone using the convenient smart features.
Smart Diagnosis
- If you experience a problem while using the appliance, this smart diagnosis feature will help you diagnose the problem.
Settings
- Allows you to set various options on the appliance and in the application.
NOTE
- If you change your wireless router, internet service provider, or password, delete the registered appliance from the LG ThinQ application and register it again.
The application is subject to change for appliance improvement purposes without notice to users. - Functions may vary by model.
Before Using LG ThinQ Application
1 Check the distance between the appliance and the wireless router (Wi-Fi network).
- If the distance between the appliance and the wireless router is too far, the signal strength becomes weak. It may take a long time to register or installation may fail.
2 Turn off the Mobile data or Cellular Data on your smartphone.
3 Connect your smartphone to the wireless router.
NOTE
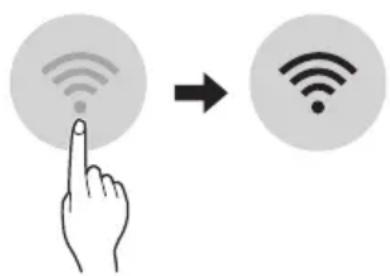
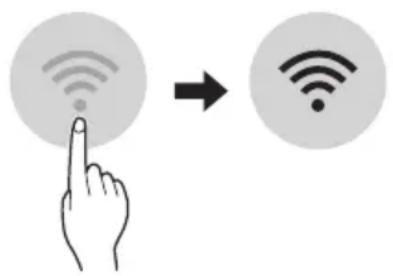
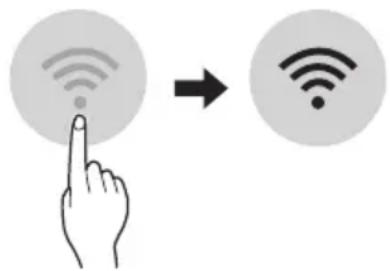
To verify the Wi-Fi connection, check that icon on the control panel is lit.
-
The appliance supports 2.4 GHz Wi-Fi networks only. To check your network frequency, contact your Internet service provider or refer to your wireless router manual.
-
LG ThinQ is not responsible for any network connection problems or any faults, malfunctions, or errors caused by network connection.
-
If the appliance is having trouble connecting to the Wi-Fi network, it may be too far from the router. Purchase a Wi-Fi repeater (range extender) to improve the Wi-Fi signal strength.
- The Wi-Fi connection may not connect or may be interrupted because of the home network environment.
- The network connection may not work properly depending on the Internet service provider.
-
The surrounding wireless environment can make the wireless network service run slowly.
-
The appliance cannot be registered due to problems with the wireless signal transmission. Unplug the appliance and wait about a minute before trying again.
- If the firewall on your wireless router is enabled, disable the firewall or add an exception to it.
- The wireless network name (SSID) should be a combination of English letters and numbers. (Do not use special characters.)
- Smartphone user interface (UI) may vary depending on the mobile operating system (OS) and the manufacturer.
- If the security protocol of the router is set to WEP, you may fail to set up the network. Please change it to other security protocols (WPA2 is recommended) and register the product again.
Installing the LG ThinQ Application
Search for the LG ThinQ application from the Google Play Store or Apple App Store on a smartphone. Follow instructions to download and install the application.
Open Source Software Notice Information
To obtain the source code under GPL, LGPL, MPL, and other open source licenses, that is contained in this product, please visit http:// opensource.lge.com.
In addition to the source code, all referred license terms, warranty disclaimers and copyright notices are available for download.
LG Electronics will also provide open source code to you on CD-ROM for a charge covering the cost of performing such distribution (such as the cost of media, shipping, and handling) upon email request to opensource@lge.com. This offer is valid for a period of three years after our last shipment of this product. This offer is valid to anyone in receipt of this information.
Smart Diagnosis
This feature is only available on models with the or logo.
Use this feature to help you diagnose and solve problems with your appliance.
NOTE
- For reasons not attributable to LGE's negligence, the service may not operate due to external factors such as, but not limited to, Wi-Fi unavailability, Wi-Fi disconnection, local app store policy, or app unavailability.
- The feature may be subject to change without prior notice and may have a different form depending on where you are located.
Using LG ThinQ to Diagnose Issues
If you experience a problem with your Wi-Fi equipped appliance, it can transmit troubleshooting data to a smartphone using the LG ThinQ application.
- Launch the LG ThinQ application and select the Smart Diagnosis feature in the menu. Follow the instructions provided in the LG ThinQ application.
Using Audible Diagnosis to Diagnose Issues
Follow the instructions below to use the audible diagnosis method.
-
Launch the LG ThinQ application and select the Smart Diagnosis feature in the menu. Follow the instructions for audible diagnosis provided in the LG ThinQ application.
Plug the power plug in the outlet properly.
2 Place the mouthpiece of your smartphone close to the or logo.
3 Press and hold the DIAGNOSIS [5 s] button for 5 seconds or longer while holding the smartphone mouthpiece to the logo until the data transfer is complete. -
Keep the smartphone in place until the data transfer has finished. Time remaining for data transfer is displayed.
4 After the data transfer is complete, the diagnosis will be displayed in the application.
NOTE
- For best results, do not move the phone while the tones are being transmitted.
- Be sure to keep ambient noise to a minimum or the phone may not correctly receive the buzzer beeps from the indoor unit.

WARNING
- Before cleaning or performing maintenance, disconnect the power supply and wait until the fan stops.
If the air conditioner will not be used for an extended period of time, dry the air conditioner to maintain it in best condition. Clean the product regularly to maintain optimal performance and to prevent possible breakdown.
- Dry the air conditioner in Fan mode for 3 to 4 hours and disconnect the power. There may be internal damage if moisture is left in its components.
- Before using the air conditioner again, dry the inner components of the air conditioner in Fan mode for 3 to 4 hours. This will help to remove the odor generated from moisture.
The feature may be changed according to the type of model.
| Type Description Interval | ||
| Air filter Clean with a vacuum or hand wash. 2 weeks | ||
| Ionizer (Optional) | Use dry cotton bud to remove any dust. Every 6 months | |
| Indoor unit | Clean the Indoor unit surface by using a soft, dry cloth. Regularly | |
| Have a professional clean the condensate drain pan. Once a year | ||
| Have a professional clean the condensate drain pipe. Every 4 months | ||
| Replace the remote control batteries. Once a year | ||
| Outdoor unit | Have a professional clean the heat exchanger coils and the panel vents. (Consult with technician.) | Once a year |
| Have a professional clean the fan. Once a year | ||
| Have a professional clean the condensate drain pan. Once a year | ||
| Have a professional verify that all the fan assembly is firmly tightened. | Once a year | |
| Clean the electric components with air. Once a year | ||
NOTE
- Never use water that is higher than 40^ when you clean the filters. It may cause deformation or discoloration.
- Never use volatile substances when you clean the filters. They may damage the surface of the product.
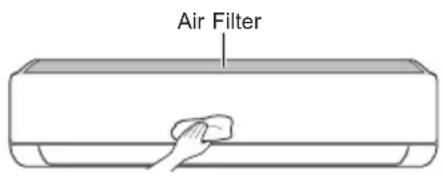
Clean the Air Filter
Clean the air filters once every 2 weeks, or more, if necessary.
NOTE
The air filter can be broken when it is bent.
- When the air filter is not assembled correctly, dust and other substances can enter into the indoor unit.
Type1
If you look at the indoor unit from above it, can assemble the top filter easily.
1 Turn off the power to the unit.
2 Hold the knobs of the air filter, lift it up slightly.
3 Remove it from the indoor unit.
4 Clean the filter with a vacuum cleaner or with lukewarm water with neutral detergent.
5 Dry the filter in the shade.
6 Insert the hooks of the air filter into the front cover.
7 Push down hooks to assemble the air filter.
8 Check the side of the front cover for correct assembly of the air filter.
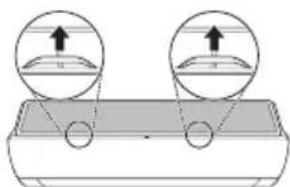
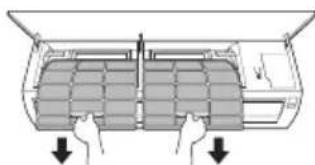
Type2
1 Turn off the power to the unit.
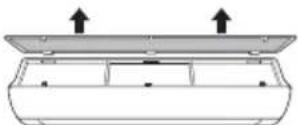
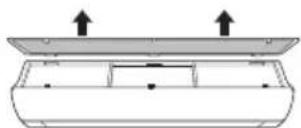
2 Open the front cover.
- Lift up both sides of the cover slightly.
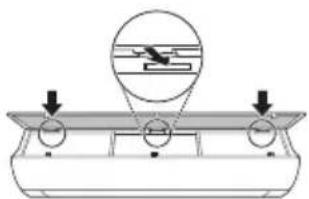
3 Hold the knobs of the air filters, pull them down slightly and remove them from the indoor unit.
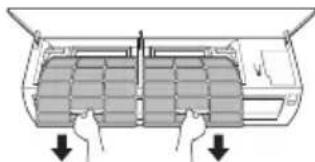
4 Clean the filters with a vacuum cleaner or with lukewarm water with neutral detergent.
5 Dry the filters in the shade.
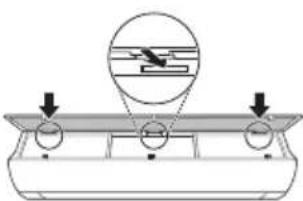
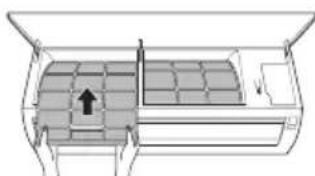
6 Insert the hooks of the air filters into the front cover.

7 Check the side of the front cover for correct assembly of the air filters.
Self-diagnosis Function
This product has a built-in self-diagnosis function. If an error occurs, the lamp of the indoor unit will blink in 2 second intervals. If this occurs, contact your local dealer or service center.
Before Calling for Service
Please check the following before you contact the service center. If the problem persists, contact your local service center.
| Symptoms Possible Causes & Solution | |
| The air conditioner does not work normally. | Burning smell and strange sounds are coming from the unit. ·Turn off the air conditioner, switch OFF, or disconnect the power supply, and contact the service center. |
| Water leaks from the indoor unit even when the humidity level is low. ·Turn off the air conditioner, switch OFF, or disconnect the power supply, and contact the service center. | |
| The power cable is damaged or it is generating excessive heat. ·Turn off the air conditioner, switch OFF, or disconnect the power supply, and contact the service center. | |
| A switch, a circuit breaker (safety, ground), or a fuse is not operated properly. ·Turn off the air conditioner, switch OFF, or disconnect the power supply, and contact the service center. | |
| The unit generates an error code from its self-diagnosis. ·Turn off the air conditioner, switch OFF, or disconnect the power supply, and contact the service center. | |
| The air conditioner does not work. | The air conditioner is unplugged. ·Check whether the power cord is plugged into the outlet or the power isolators are switched on. |
| A fuse exploded, or the power supply is blocked. ·Replace the fuse or check if the circuit breaker has tripped. | |
| A power failure has occurred. ·Turn off the air conditioner when a power failure occurs. ·When the power is restored, wait 3 minutes, and then turn on the air conditioner. | |
| The voltage is too high or too low. ·Check if the circuit breaker has tripped. | |
| The air conditioner was turned off automatically at a preset time. ·Turn the air conditioner on. | |
| The battery setting in the remote controller is incorrect. ·Make sure that the batteries are inserted correctly in your remote controller. ·If the batteries are placed correctly, but the air conditioner still does not operate, replace the batteries and try again. | |
| Symptoms Poss | ble Causes & Solution |
| The air conditioner does not emit cool air. | Air is not circulating properly. • Make sure that there are no curtains, blinds, or pieces of furniture blocking the front of the air conditioner. |
| The air filter is dirty. • Clean the air filter once every 2 weeks. • See “Clean the Air Filter” for more information. | |
| The room temperature is too high. • In summer, cooling the indoor air fully may take some time. In this case, select the Jet Mode to cool the indoor air quickly. | |
| Cold air is escaping from the room. • Make sure that no cold air is escaping through the ventilation points in the room. | |
| The desired temperature is higher than the current temperature. • Set the desired temperature to a level lower than the current temperature. | |
| There is a heating source nearby. • Avoid using heat generators like electric ovens or gas burners while the air conditioner is in operation. | |
| Fan Mode is selected. • During Fan Mode, air blows from the air conditioner without cooling or heating the indoor air. • Switch the operation mode to cooling operation. | |
| Outside temperature is too high. • The cooling effect may not be sufficient. | |
| The fan speed cannot be adjusted. | The Jet Mode, or Auto Operation Mode is selected. • In some operation modes, you cannot adjust the fan speed. Select an operation mode in which you can adjust the fan speed. |
| The temperature cannot be adjusted. | The Fan Mode or Jet Mode is selected. • In some operation modes, you cannot adjust the temperature. Select an operation mode in which you can adjust the temperature. |
| The air conditioner stops during operation. | The air conditioner is suddenly turned off. • The Timer Function may have timed out, which turns the unit off. Check the timer settings. |
| A power failure has occurred during operation. • Wait for the power to come back. If you have the Auto Restart function enabled, your unit will resume its last operation several minutes after power is restored. | |
| Symptoms Possible Causes & Solution | |
| The indoor unit is still operating even when the unit has been turned off. | The Auto Clean function is being operated. ·Allow the Auto Clean function to continue since it removes any remaining moisture inside the indoor unit. If you do not want this feature, you can turn the unit off. |
| The air outlet on the indoor unit is discharging mist. | The cooled air from the air conditioner makes mist. ·When the room temperature decreases, this phenomenon will disappear. |
| Water leaks from the outdoor unit. | In the heating operations, condensed water drops from the heat exchanger. ·This symptom requires installing a drain hose under the base pan. Contact the installer. |
| There is noise or vibration. | A clicking sound can be heard when the unit starts or stops due to movement of the reversing valve. Creaking sound: The plastic parts of the indoor unit creak when they shrink or expand due to sudden temperature changes. Flowing or Blowing sound: This is the flow of refrigerant through the air conditioner. ·These are normal symptoms. The noise will stop. |
| The indoor unit gives off an odor. | Odors (such as cigarette smoke) may be absorbed into the indoor unit and discharged with airflow. ·If the smell does not disappear, you need to wash the filter. If this does not work, contact the service center to clean your heat exchanger. |
| The air conditioner does not emit warm air. | When Heating Mode starts, the vane is almost closed, and no air comes out, even though the outdoor unit is operating. ·This symptom is normal. Please wait until the unit has generated enough warm air to blow through the indoor unit. |
| The outdoor unit is in Defrosting Mode. ·In Heating Mode, ice/frost is built up on the coils when the outside temperature falls. This function removes a layer of frost on the coil, and it should finish in approximately 15 minutes. | |
| Outside temperature is too low. ·The heating effect may not be sufficient. | |
| Your home appliance and smartphone is not connected to the Wi-Fi network. | The password for the Wi-Fi that you are trying to connect to is incorrect. ·Find the Wi-Fi network connected to your smartphone and remove it, then register your appliance on LG ThinQ. |
| Mobile data for your smartphone is turned on. ·Turn off the Mobile data of your smartphone and register the appliance using the Wi-Fi network. | |
| The wireless network name (SSID) is set incorrectly. ·The wireless network name (SSID) should be a combination of English letters and numbers. (Do not use special characters.) | |
| The router frequency is not 2.4 GHz. ·Only a 2.4 GHz router frequency is supported. Set the wireless router to 2.4 GHz and connect the appliance to the wireless router. To check the router frequency, check with your Internet service provider or the router manufacturer. | |
| The distance between the appliance and the router is too far. ·If the distance between the appliance and the router is too far, the signal may be weak and the connection may not be configured correctly. Move the location of the router so that it is closer to the appliance. | |
NOTE
- Some functions may not be supported, depending on the model.
MANUEL DU PROPRIÉTAIRE
CLIMATISATION

Smart Diagnosis (Diagnostic intelligent) 29
MAINTENANCE 30
Application LG ThinQ
Smart Diagnosis (Diagnostic intelligent)
Smart Diagnosis (Diagnostic intelligent)
IpeBOD Ha opnHnHaHnHOTo pKOBoDCTBO
Toba pkoBOcTO BO MOKe Da cbDbpKa
H3o6paKHeNn cBdbpKaHne, pa3nUHO OT
MoEJa, KOITO CTe 3aKyNil.
PbKOBOIDCTBOTO NOJIeKHa peJaKUa O T npOn3BOIDNTeJIa.
INHCTPYKlIM 3A BE3OJACHOCT. 3
BakHHn HnctpykLm 3a 6e3oNaChocT. 4
EKCPIIHOATAU 11
Baxnn nHctpyKu nn 3a 6e30nacnoct
I PEPdUYPEXKeHNE
3a Да Намал ntepncka OT noxap, eJekTpueckn ydap nHapaHЯBaHnHa Xopa npu ynoTpe6bHa npoDyKta, Tpr6Ba Da ce Cna3BaT OCHOBnTe ppeDna3HN MepKN, BKJIIOHTeJHoN i Cnejnte :
HaTnCHHe 6yToHbAng (Swing) HeKoJIKOkPaTHO nI36peTe XeJHaHata Nocoka.
- H36peTe 1a da perynpaTe Nocokata Ha Bb3dyuHnI NOtOK aBTOMaTNoHO.
3A6EJIEXKA
- PerynpaHTo Ha Nocokata Ha Bb3dyuHnI NOtOK Do Xopn3oHTaIIHa No3uZnM OMe Da He Ce PoNDbPka B 3aBNCIMOCT OT MoJeNa.
- Поньното ретулране на Вьзуня
- Deфпектор може за довец до повра на пюдукта.
- Ako pectapntpate KINMaTnKa,Toi 3anOuBa da pa60tn C NOcNeIHO HAcTpoEHaTa Nocoka Ha Bb3dyuHnra NOTOK, Taka Ye Bb3dyuHnraT DeΦJIeKTop MoKe Da He CbOTBeTCTBa Ha IKoHaTa, NOKa3aHa Ha DnCTaHnOHHOTO. Korato TOBa ce cnUHy, HATNCHEte ByTOHa SWING JIN SWING, 3a da peryInpate OTHOBO NOCOKaTa Bb3dyuHnra NOTOK.
Pa6oTaHa Ta3nФyHKuM0Ke Da ce pa3NuaBa npu n3NoJ3BaHe OT dncnner Ha dNCTaHcNOHOTO.
BkIIOUBaHe n N3KJIIOUBaHe Ha TaMepa
Ta3nФункцин HabcpoьВаКЛIMaTHkaДа ce N3KJIIOUBa/BKJIIOUBA aBTOMaTNUHOBKeJHaHOTo BpeMe.
TaMepbT 3a BkI./n3KJI. MoKe Ia 6bJe 3aJaDeH 3aEHO C TOBa.
3aandaBaHe Ha TaMep 3a BKNIOUcBaHe
1 HaTnCHHe 6yToHa TIMER HEKoJIKKpATHO.
- IKOHata no-dony Mura BdoHaTa Yact Ha dncnne.
2 HaTnCHTe 6yToHa ,3a da n36epTe MNHyTnte.
3 HaTnCHTe 6yToHa SET/CANCEL, 3a da 3aBbPunTe HAcTpOuBaHeTO.
CneHacrpoBaHeToHaTainMepaTekyuTo BpemeNIOKAHTa NOKa3BAt HaekpaHa, KOeTO NOKa3Ba,Ye XeJHaHOTOBpeme e 3aandaHO.
OTMЯHa Ha TaMepa 3a BkIIOUBaHe
1 HaTnCHHe 6yToHa TIMER HEKoJIKOkpaTHO.
- IKOHATA NO-DOJy MURA B DOJHATA YACT Ha DnCnIe.

2 Hatachete 6yToHa SET/CANCEL 3a OTMaHa Ha HactpoKaTa.
3aIaBaHe Ha TaIMeP 3a N3KIIuOyBaHe
1 HaTnCHeTe 6yToHa TIMER heKOJIKKpaTHO.
- IKohata no-dony Mura B doJHata yact Ha dncnne.
2 HaTnCHHe 6yToHa nn ,3a da n36epTe MNHyTnte.
3 HaTnchTe 6byToHa SET/CANCEL, 3a da 3aBbPunTe HAcTpOuBaHeTo.
CneHacTpoBaHeToHaTaMepaTeKyuToBpeMeNkoHaTa NOKa3BaHTaEkpHa,KOeTO NOKa3Ba,Ye XeJaHOTo BpeMe e3aJaDeHo.
3ABEJIEXKA
Ta3nФyHKuIe 3a6paHeHa, KOraTo HAcTpoBbTe ,CtAndapTeH TaMep".
OTMЯHa Ha TaɪMepa 3a N3KNIOUbaHe
1 HaTnchete 6yToHa TIMER heKOJIKKpaTHO.
- IKohata no-dony Mura BdoJHata yact Ha dncnne.
2 HataChete 6yToHa SET/CANCEL 3a OTMaHa Ha HacTpoiKaTa.
OTMЯHa Hactpo'kaTa Ha TaMepa
HaTnCHHe 6yToH,3a Da OTMeHnTe BCnKn HAcTpOuKn Ha TaMepa.
I3noJ3BaHe Ha cyHKnJaTa 3a 3acnBaHe (no n36op)
Ta3nФyHKUryN3KIIuYBa KINMaTnKa aBTOMaTnUHO, KOrato cn JIraTe.
1 BkIIOUte ypeia.
2HaTnCHHe 6yToHa TIMER HEKoNkoKpaTHO.
- IKohata no-dony Mra B doJHaTa Yact Ha DnCnIe.

3 HaTnCHeTe 6yToHa YIn , 3a da n36epeTe yaca (do 7 yaca).
4 HaTnchete 6yToHa SET/CANCEL,3a Da 3aBbPunTe HactpoiBaHeTo.

ce noka3Ba Ha ekpaHa.
3A6EJIEXKA

Ce NOKa3Ba Ha HЯKoBbTpewHn TeJa.
- Диспелгов На ВьтpeшOTO ТANO NOKA3BA OT 1 уdo 7 у Което ce Вижда само за 5 сек, сnéдКоето ce Врьша до Habстpoикata HaTemпература.
BpeKIM Ha oxJaXdAne n 3CyJbAbe TeMnepaTpata ce yBeJIuYabac 1 ^ C cIe30 MNHTN IOnbJIHNTeIeH 1 ^ C cIeO OSe 30 MNHTN 3a NO-KOMOpTeH cbH.
Tempepatypata ce nobuasa b c do 2°C ot npedbapntelno 3aandaehata Tempepatypa.
- Bbnpekn ye ot6eJ3BaHeto Ha ckopocTtHa BeHTnIaTopa Ha dinCpIe MoKe Da ce npomEn, CKOpocTtHa BeHTnIaTopa ce perynipa ABTomatNo.
N3noJ3BaHe Ha yHKunra 3a cTaHdapTeH TaMep (no n36Op)
Ta3nФункциИЗКЛЮЧВa KЛIMaTиKa aBToMaTиHo, KOraTO cN JЯrTe.
1 BkIIOUte ypeDa.
2 HATINCHETe 6yToHa TIMER HEKOKOKpaTHO.
- IkoHaTa no-dOJy Mnra B DoJHaTa Yact Ha DnCnpe.
3HaTnchHeTe 6yToHa nn,3a da n36epTe yaca (do7yaca).
4 HataHcHeTe 6yToHa SET/CANCEL,3a da 3aBbPUnTe HaCTpoiBaHeto.
S ce noka3Ba Ha ekpaHa.
3ABEJIENKKA
- Ta3n ΦyHKcIe e 3a6paHeHa, KOraTo HAcTpOuBaTe TaIMepa 3a N3KJIIOUbaHe.
I3noJ3BaHe Ha yHKnraTa 3a noka3BaHe Ha n3pa3XoDeHaTa eHepn (no n36op)
Ta3nФункия nOKa3Ba KOnIueCTBOTO
H3pa3xoDbaHa eNEKtpuYecka eHeprna Ha DIncPnpe
Ha BbTppeShOTo TAno, DOKaTo npOdyKTbT pa6OTn.
Ioka3BaHe Ha TeKyuata n3pa3XoDbAHa eHepnra
1 BkIIOUeTe ypeDa.
2 HaTnchete n 3aDpBxTe 6yToHa oKoNo 3 ceKyuHn.
MomeHTHaTkoHcyMaunHa eHepn () ce NOKa3Ba 3a KpaTKo Bbpy DnCnpe Ha HAKO MoeJN BbTpEHN TeNa.
3ABEJIENKKA
THe ce noka3Ba Ha 6e3KNUHOTo DnCTaHcNHOH.
- EdnHnuaTa MpaKa 3a cToHocCTTa, KOrTO ce noka3Ba Ha dncnner, e kW.
- Ako TЯ e noBueye ot 99 kBТ, KoETO eДOnyCTmMnTДиana30H,ЯNoDlbpxKaIte Ha 99 kBТ.
- POKaKTe MoUHocTt Ta NOd 10 KBT c 0,1 KBT eINHnI N POKaKTe eINH NaD 10 KBT c 1 KBT eINHnI.
-ДeИCTBNTeJIHATA MOUHOCT MOKeJa ce pa3nuaBa OT NOKa3HaTa MOUHOCT.
- Pn CbBp3BaHe KbM BbHNo TЯNo Ha MyIITncIcTeMa Ta3N ΦyHKuJa MOKe Da He Ce NOIbpxKa.
I3noJ3BaHe Ha yHKnraTa 3a I3KJIIOUBAHe Ha OCBeTJeHneTo (no n36op)
LG ThinQ He HOCN OTROBOPHOCT 3a npo6IeMn BCbP3aHocTTa Nnn 3a NOBpeDN, Hen3npaBHOCT Nnn rpeKNI pnuuHeHN OT MPexKObaT Bp3ka.
Ako ypeIbT n3nITBa TpydHocTu npn OcbueeCTBraBaHeTo Ha Bpb3ka C Wi-Fi mpekata, moKe 6n e TBbpDe daJeue ot pytepa. Kynete Wi-Fi nobTopnten (ycunBaTeHa oxbaTa), 3a da noobspnte cnilata Ha Wi-Fi cnirhana.
Wi-Fi Bpb3kata MoKe Da He Ce OcbueCTBn Hnna 6bnde npekcbaha nopadn CpeData, B KOrTo e DOMaHHaT a MpeKa.
- Мрекова врьзka може за He paбоTNправино поади дoctabчика на ИntepHT.
- O6kpbXkabaTa 6e3KnHa cpea MoKe da npuHn 3a6abAHe B 6e3KnHaTa Mpeka.
- YpeBbHe Me MoKe Da 6bDe peRnCTpnpaH nopadn npo6bEmn C npedabaHTo Ha 6e3KuHnA cnHaI. N3KnIOUcTe 3axpaHbAHeTo Ha ypeDa n 3uKaaIte OKOIO eDHa MNHyTa, npEi Da npo6BaTe OTHOBO.
Ako 3aunTHaTa CTeHa Ha Baunr 6e3KuHepyTepe BkIIOUeHa, DeakTbnpaTe rnn DoabeteN3KJIOUeHne KbM HeR. - Имeto Ha 6e3xuHaT MaPexa (SSID) Tp86Ba da 6bde KOM6nHaZrO TcNΦpN aHrnnckn 6yKBN. (He n3no13BaIte CneuaJIHn CmB0NJ.)
- Iotpe6nteJcknT INHTepFeic (UI) Ha cMapTfoHa MoKe Da e pa3InueH B 3aBnCmOcT OT MO6NJHaTa OepauOnHa CnCTema (OS) n Ipon3BOJNTeJI.
- Ako npotoKoJbT 3a 3auNTa Ha pyTepe haHactpoeHa WEP, e Bb3MOxHO da He MoXeTe da HactpOte MpeKaTa. MoIa, IpomeHeTe HacToPkaTa Ha dpyr npotoKoJ 3a 3auNTa (npenopbUba ce WPA2) n pernctpupaTe npodykTA OTHBO.
HOpmaa3a coOpTyep c OTbopeh KOD
3a da noyuHTe n3xoDnHn KOD cbrIacHo GPL, LGPL, MPL n npytn nIueHn c OTbOpEn KoD, cbDbpxkaun Ce B To3n npOdyKT, nocTeTe ye6 caTt http://opensource.lge.com.
BdoIbJIHeHne KbM I3XoHnI KOd MoKeTe Da n3TerIInTe N BCNU CnOMeHaTI NlueH3N0HHYcNoBn,OTKa3N OT rapaHcN IN N3BecTnBbB Bpb3ka c aBtOpCKn npaba.
LG Electronics cьио Ye Bn npedocTaN OTbOpEN n3xoJen Ka n CD-ROM cpeu 3aapanlaune, nOKpBaIoo pa3xOJnte 3a n3BbPbWbaHe Ha TaKaBa dncTpnbUyra (kato Hapnpimep ceHaTa Ha HocNTeJIte, pa3xOJnte no TpaHcnpTa), cJeD KaTO nOlyu npbUka 3a TOBa NO ImeJn Ha aDpec: opensource@lge.com. Ta3n opepta e BaIiDa 3a nepoD ot Tprn rOdiHn CneI NocleHaTa Hn doCTabKa Ha To3n npodyKT. Ta3n opepta e BaIIiHa 3a BCEK, nOlyuNn Ta3n INHOpMaunr.
3 OToTaPaHEToOT BbTpewHOTOrJIO.
4 Nounctete fuiTbpa c npaxocmyka uin C xnaKa Boda c HeyTpaneH nouNCTBaU npenapat.
5 N3cyweteΦnITbpaHa cAHHka.
6 BkapaTe KyKeTe Ha Bb3DyUHnA qnIITbpB npeHNr KanaK.
7 HaTnCHete HAnOly KyKInTe, 3a Da NoCTaBnTe Bb3DyUHnA FInTbP.
8 IpoBepeTe OT cTpaHaTa Ha npEiHnKaIaK DaJIb Bb3dUwHnT pHJTbp e npaBnHOn NoCTaBeH.
Tun2
1 3KIOHcTe 3axpaHbHeTo n 3BaTe 3axpaHbua KabeJ.
2 OTbopeTe npednnaKanak.
- NOBUNHHeIeKOuDBeTe CtpaHn HaKanaka.
3 3aDpBxTe KOnyEtata Ha Bb3dyuHnTe cHnItpn, DpbHHeTe Hn HADony JekO n npemaxheTe OT BbTpEshHOTo TnIO.
4 NocTePe nntbpa c npaxocmyka k a nn c XnAka Boda c Heytpaen NoocCTBaU npenapat.
5 乌3cyweteΦnntpuTeHa cHka.
6 BkapaTe Kkynte Ha Bb3dUHHTe 0nItpn B npednna Kaak.
7 IpoBepTe OT cTpaHaTa Ha npEiHnKaIaK daJIb B3dUshHInTe φnIITpn ca npaBnHNo nOCTaBeHn.
ФункцязаимогнocTKa
To3n npodukT nma BrpaedeHa 9yHKuJra 3a cAmOdaHocHTnKa. Ako Bb3HnKHe rpeJka, JAMnata Ha BbTpewHOTo TJIIO Ue 3aNoUHe Da Mra C INTEpBaI OT 2 cekyHdN. Ako ToBa ce cIyuN, CBpbXeTe ce C MeCTHnA DnCTPb6TyOp IIN cepBn3eH ueHTbp.
Ipei da ce o6aIte Ha cepBn3Hna eHTbp
IpoBepTe cIeHTo, npEi Da ce CbPKeTe C cepBn3HnA ueHTbp. Ako npo6JIembT npOdbJxaba, o6bpHeTe Ce KbM Baunr MeCTe H cepBn3HnA ueHTbp.
VAŽNE SIGURNOSNE UPUTE

UPOZORENJE
Kako biste smanjili opasnost od eksplozije, požara, smrti, strujnog udara, ozljede ili opekotina osoba prilikom upotrebe ovog proizvoda, slijedite osnovne mjere opreza, uključujuci sljedeće:
Djeca u kućanstvu
Ovim se ureðajem ne bi trebale koristiti osobe (uključujuci djecu) smanjenih tjelesnih, osjetilnih ili mentalnih sposobnosti, ili s manjkom iskustva i znanja, osim ako ih osoba koja je odgovorna za njihovu sigurnost ne nadzire ili im daje upute u vezi's upotrebom ureðaja. Djecu treba nadgledati kako bi se osiguralo da se ne igraju s ureðajem.
Za uporabu u Europa:
Olulised ohutusjuhised 4
KASUTAMINE 11
Olulised ohutusjuhised

OHT
Noti ghat-Thaddim 11
Remote Control Bla Wajar 12
Terga' Tixghel il-Kundizzjonatur tal-Arja Awtomatikament. 17
L-Uzu tal-Funzoni tal-Modalita 17
L-Uzu tal-Funzoni tal-Modalita Propulsiva (Jet Mode Function) 20
L-uzu tal-Funzjoni tal-Velocita tal-Fann 21
Remote Control Bla Wajer
Meta Ddahhal il-Batteriji
Jekk I-iskrin tal-wiri tar-remote control jibda jicara, ibdel il-batteriji. Dahhal batteriji AAA (1.5 V) qabel ma tuza r-remote control.
1 Nehni I-ghatu tal-batteriji.
2 Daññal il-batteriji l-godda u aghmel cert li t-terminals + u - tal-batteriji huma installati tajbeb.
Installazzjoni tal-Holder tar-Remote Control
Biex tipprotegi r-remote control, installa I-holder fejn ma hemmx dawl tax-xemx dirett.
1 Aghzel post sigur u fejn tilhqu faciliment.
2 Wahhal il-holder permezz ta'zewg viti mwahhla sew b'tornavit.
Metodu ta' hidma
Ipponta r-remote control lejn ir-ricevitur tas-sinjal fuq in-naha leminija tal-kundizzjonatur tal-arja sabiex thaddmu.
NOTA
- Ir-remote control jista' jhaddem apparti elettronici ohrajn jegk ikun IPPuntei lejhom. Aghemel cert li qed tipponta r-remote control lejn ir-ricevitur tas-sinjal tal-kundizzjonatur tal-arja.
Ghal thaddim tajbeb, uza carruta ratba biex tnaddaf it-trazmettitur ur r-ricevitur tas-sinjal.
F'kaz li funzjoni ma tkunx provduta fil-proddott, I-ebda sinjal ta'hoss ma johrog mill-proddott meta buttuna ghal funzjoni bhal din fuq ir-remote control tigi maghfusa ghajr ghall-funzjonijiet tad-Direzzjoni tal-Fluss tal-Arja (SWING), Displejt'Energija () , Purifikazzjoni tal-Arja
3 Qabbad I-ismarphone mar-router wireless.
NOTA
- Biex tivverifika I-konnessjoni tal-Wi-Fi, iccekkja li l-icon hemm fuq il-panew tal-kontroll hija mixghula.
Dan it-taghmir jiflah Wi-Fi network ta' 2.4GHz biss. Biex ticcekkja I-frekwenza tar-router, ikkuntattja I-fornitur tas-servizz tal-internet tieghek jew irreferi ghall-manwal tal-wireless router.
LG ThinQ mhuwixx responsabbli ta' problemi, hsarat jew malfunzjonijiet fil-konnessjoni tan-network,ikkawzati mill-konnessjoni tannetwork.
- Jekk l-apparat ikun 'il boghod mir-router dan jaf ma jkunx jista' jaghmel konnessjoni man-network kal-Wi-Fi. Ixtri Wi-Fi repeater (range extender) biex ittejjeb is-sa-ha tal-Wi-Fi.
- Il-konnessjoni tal-Wi-Fi tista' tigi interrotta jew ma taqbadx minhabba I-ambient tan-networkt tad-dar.
- Il-konnessjoni tan-networktista' ma tahdimx kif suppost minhabba l-fornitur tas-servizz talinternet.
-
L-ambjent tal-wireless tal-madwar jista' jikkawza lis-servizz tal-wireless netwerk jahdem bil-mod.
-
It-taghmir ma jistax jigi rregistrar minhabba problemi fit-trasmissjoni ta' qawwa tal-wireless. Skonnettja t-taghmir u stenna madwar minuta qabel terga tipprova.
- Jekk il-firewall fuq ir-router wireless tieghek huwa attivat, skonnettja l-firewall jew aghmel ecezzjoni ghal dan.
- L-ism tan-network kal-wireless (SSID) ghandu jkun kombinazzjoni ta' ittri Ingliži u numri. (Tužax karattri spečjali)
- II-user interface (UI) tal-ismarphone tista' tvarjghax din tiddependi fuq is-sistema operattiva (OS) tal-mobajl u l-manifattur.
- Jekk il-protokoll ta' sigurta tar-router huwa stabbilit ghal WEP, jista'ma jirnexxilekx thaddem in-network. Jekk joghgbok ibdlu ghal protokolli ta' sigurta ohra (WPA2 huwa rakkomandat) u erga' rregistra l-prodott.
Kif tinstalla I-Applikazzjoni LG ThinQ
RIESENIE PROBLEMOV 33
"Smart Diagnosis" 29
PRIEZIURA 30
Oro filtro valymas 32
TRIKCIU SALINIMAS 33
"LG ThinQ" programs characteristikos
Su jrenginiususiekite ismaniuoju telefonu, naudodamiesi patogiomis ismaniosiomis funkcjomis.
Smart Diagnosis
LÁMHLEABHAR AN ÚINÉARA
AERCHÓIRITHEOIR

Leigh an lámhleabhair uineara seo sula n-oibrǐtear an gléas agus coinnigh in aice leat é an t-am ar fad.
Taispeain Gile Scathlain
Is féidir an gile a shocrú don scathlán an aonaid laistigh.
- Bruigh an cnaipe LIGHT OFF.
NOTE
Cas ar/as an scailean Taispeain.
Ag uśáid an fheidhm aer compórdach (roghnach)
Oibriuchán Eite Compórd
Socraionn an fheidhm seo an eite go héasca
go suiomh réamhshocraithe chun an aer
soláthraithe a sraonú ò dul direach go dtí na
daoine sa seomra.
1 Cas an gleas air.
2 Bruigh an cnaipe COMFORT AIR cupla uair chun an treo ata uait a roghnu.
no mar a thaispeanann an scathlan.
NOTE
-7 no Lmar a thaispeanann cuple aonaid laistigh.
- Ta an fheidhm seo dichumasaithe nuair a bhruihear MODE no JET MODE.
- Ta an fheidhm seo dichumasaithe agus socraitear an uath-athru treo ingearach nuair a bhruihear SWING.
- Nuair ata an fheidhm seo as, oibrionn an eite cothromanach go huathoibrioch de reir an mhodh socraithe.
Ag uśáid an fheidhm smacht fuinnimh (roghnach)
1 Cas an gléas air.
2 Bruiigh an cnaipe ENERGY CTRL.
- Bruigh an cnaipe ENERGY CTRL cupla uair chun gach cém a roghnú.
| Céim 1 Céi | m 2 Céim 3 | |
| 80 % | 60 % | 40 % |
| 200 | 200 | 200 |
NOTE
- Céim 1: Islionn an lonchur cumhachta 20% i gcomparáid leis an ionchur cumhachta ann.
80 mar a thaispeanann an scathlan. - Céim 2: Islionn an Ionchur cumhachta 40% i gcomparáid leis an ionchur cumhachta ann.
60 mar a thaispeanann an scathlan. - Céim 3 (roghnach): Islionn an lonchur cumhachta 60% i gcomparáid leis an ionchur cumhachta ann.
40 mar a thaispeanann an scathlan.
80 (1 step), 62 step), (3 step) mar a thaispeanann cuple aonaid laistigh.
(1 step), (2 step) mar a thaispeanann
cúpla aonaid laistigh.) - Ta an fheidhm seo ar fail leis an Mhodh Fuarthu.
D'headfadh leis an toilleadh isli nuair a roghnaitear an mhodh Smacht Cumhachta.
Taispeanfar an teocht ata uait 5 soic ma bhruitear FAN SPEED,
Taispeanfar an teocht ata uait 5 soic ma bhruitear ROOM TEMP
D'headfadh nach ndeanfar tacaiocht don feidhm seo agus rudai ceangailte don aonad Iolrach Lasmaigh.
Ag uśaɪd feidhmeanna speisialta
1 Cas an gleas air.
2 Bruigh an cnaipe FUNC cuspla uair chun an fheidhm ata uait a roghnú.
3 Bruigh SET/CANCEL chun criochnu.
| Scáthlán C | ur sios |
| A | Baineann an gineadóir ian leas as na milliuin ian chun cuidiú le feabhsú na hearcháilíochta laistigh. |
| E | Chun torann a isliú on aonad amuigh. |
| D | Chun tais ginithe taobh istigh den aonad laistigh a bhaint. |
NOTE
D'fhéadhafh le cusla feidhm gan bheith ar fail de réir an samhaltan.
D'fheadfadh leis an fheidhm seo oibriu go heagsuil on scathlan an cianrialtain.
VAŽNA BEZBEDNOSNA UPUTSTVA

UPOZORENJE
MoJeHa eDInHeuHa nOeI6a
Oboj peKIM aBtOMaTcKN rO MeHyBa peKIMOT, 3a da ja oDpKn NocTaBeHaTa TemnepaTypa Ha ± 2^
1 NywTe re anapatot.
2ПиТиСнeTe ro konYeTo MODE noBeKeNaTn,3a Da ro n36epeTe pexIMOT Ha aBtOMaTcKO MeHyBaHbe.
Ace npikakyba Ha ekpaHOT 3a npikakyahe.
3 PnTnCHETe ro konyeTo 3a Ja ja noCTaBnTe nocakyBaHaTa Tempepatya.
4ПиТиСHTeToKoNHTO FAN SPEED3aJa ja npnlaOndTe6p3HnHaTaHaФeHOT.
Pexm 3a HamaIyBaIbe Ha BnaXHOCTa
Oboj peKIM ro OTCTpaHyBa BnUOKOT ha BnIa OD BnCOKO BnAJaHaTa CpeINHa, INI 3a BpeMe Ha DOXIOBHaTa Ce3OHa, CO ueI Da CnpeYu obNikyBaHbeto Ha NoCTaByBaHbeto. Oboj peKIM ABTomatCKn rN pInlaRoYBa Co6HaTa TemnepaTypa N 6p3nHaTa Ha fHeOT, 3a da rO 3aApxN ONTImaJIHOTO HnBO Ha BnAKeHOCT.
1 NywTeTe ro anapaTToT.
2ПиTиСHTeToKoNueTo MODE noBeKeNaTu,3a Da ro n36epTe pexnMoT 3a HaMaJyBaHe Ha BnaXHoCTa.
ce npkaKyBa Ha ekpaHOT 3a npkaKyBaHe.
HANOMEHA
Bo oboj pexm He moxete da ja npunaornte co6hata temnepatypa, taa aBtomatckn Ke ce npunaoro.
Co6hata TemnepaTypa He e npkaKaHa Ha ekpaHot 3a npkaKyaHe.
Bo pexIMOT Ha ODbnaXHyBaHBe, KOMnpecopoT IN BHaTpeuHnO T Peh MoKe Da He paB0TaT DoEka TemnepaTypata Ha co6aTa e 24 °C
PexnHa rpeeHe
1 Nyutete ro anapatot.
2 IpnTnCHTe ro konyeTo MODE noBeKeNaTu, 3a da ro n36epeTe pekmOT 3a rpeHBe.
ce npkaKyBa Ha ekpaHOT 3a npKaKyBaHe.

3 PnTtncheTe ro konyeTo 3a Ja ja noCTaBnte nocakyBaHaTa TeMnepaTypa.
HANOMEHA
ke 6nata npkaaHa Na BHaTpeHHaTa eINHua, kora Ke pa6OTn Odmp3HyBaHbeto.
- Iohatamy, oOBJ nokaataeKe 6nne npkaKaHa BHaTpeHHaTa eHNHa:
Kora pa6oTu nped3arpeBaHbTeo.
Kora co6hata TemnepaTypa ke ja doctnrHne noCTaBeHaTa TemnepaTypa.
PexmHaΦeHOT
Oboj pexim eHCTBeHO r npkyinpa BHaTpeHHOT Bo3dyx, 6e3 da ja n3MeHN co6HaTa TEMnepaTypa.
1 NywTeTe ro anapaTOT.
2ПиTиСнeTe ro konчeto MODE noBeKeNaTu,3a da ro n36epeTe pexuMOT ha peHOT.
ce npkaKyBa Ha ekpaHOT 3a npkaKyBaHe.
3 IpnTuscheTe ro konHeTo FAN SPEED 3a da ja npnnaorOnte 6p3nHaTa Ha fehOT.
KopncTeHbe Ha cyHKunjaTa Mna3eH peXIM
PpnilarOdyBaHe Ha 6p3nHaTa Ha ΦeHOT
- PnTnchTe ro KOnyTo FAN SPEED noBeKeNaTu, 3a da ja npNlaOndte 6p3nHaTa Ha fehOT.
NoctabyaBe Ha ncknyBaBe Ha MepaOT Ha BpeMe
1 PnTnCHeTe ro konyeTo NOBeKeNaTu.
- IkoHata koja ce Haora nOdoNy, Ke 3aTpenepn Ha dHOTo Ha ekpaHOT 3a npKaKyBaHe.
2 PnTNCHeTe ro konyeTo 3a da n36epTe MNHyTN.
3 IpnTnCHeTe ro konHeTo SET/CANCEL 3a da 3aBpWnte.
- ПО NOCTaByBaHbeto Ha MepaHOT Ha BpeMe, TEKOBHOTO BpeMe N IKOHATA QFF -пркakyyBaat Ha ekpaHOT 3a прkaKyBaHbe, ykaKyBajkn DeKa e NOCTaBeHo NOcaKyBaHOT BpeMe.
HANOMEHA
ObaaФyHKuJa e OHeBO3MOKeHa Kora Ke ro nocTabTe eHOCTabHHOT Mepa Ha BpeMe.
OTkaxyBaHe Ha nCKIyueHnot MepaHa BpeMe
1 IpnTnCHeTe Ro KOnyeto NOBeKeNaTn.
- IkoHata koja ce Haora nOdy, Ke 3aTpeneepn Ha dHOTo Ha ekpaHOT 3a npKaKyBaHe.

2 PnTCHeTe ro konueTo SET/CANCEL 3a da ja otkaKeTe NOCTaBkata.
OTkaxyBaHbe Ha noCTaBKnTe Ha MepaOT Ha BpeMe
- PnTnCHTe ro konue 3a da n OTkaXeTe CNTe NOCTaBKn Ha MepaOT Ha BpeMe.
KopncTeHe Ha cyHkuJaTa cnnHe (OncnoHaJIHo)
Obaa yHKunja aBtOMaTcKn ro nckJyUyBa KInMa ypeDoT, kora ke OTnTe Ha cnneHbe.
1 NywTeTe ro anapaTOT.
2Пупснichte go konчeto TIMER noBekenatn.
- IkoHaTa KoJa ce Haora noDoNy, Ke 3aTppeepn Ha dHOTo Ha ekpaHOT 3a npKakyBaHe.

3 PnTnCHTe ro konyeTo 3a da ro n36epTe yacot (cé do 7 yaca).
4 PnTncHeTe To KOnYeTo SET/CANCEL 3a da 3aBpUnTe.
ce npkaKyBa Ha ekpaHOT 3a npkaKyBaHe.
HANOMEHA
H ce npkaxyBa Ha HeKoBHaTpeuHn eHNHnI.
EkpaHot Ha BHaTpeHHaTa eDHHa Ce npKakyBa oD 14 do 74, camo Bo TeKOT Ha 5 cekHyn, a nToa ce Bpaka Ha NoCTaBeHata TemepaTypa.
Bo pexkmoT ha naebe n pexkmoT ha HamaNyBaHe Ha BnaXHoCTa, TempepaTypaTa ce 3roJeMyBa 3a 1 ^ C no 30 mHyTu, I dOnonHnTeJen 1 ^ C no dpyrTe 30 mHyTu, 3apaN noydo6Ho cneHe.
- Temnepaypata ce 3roJeMyBa do 2^ oMOMeHTaHHaT a Temnpaypa.
- Iako 3a6eilekkaT a 3a 6p3nHaTa Ha fehOT Ha ekpaHOT,3a npKakyBaHe MoKe Da ce npomEni, 6p3nHaTa Ha fehOT ABTomatcKn Ce npnilarOdyBa.
KopinCTeHbe Ha ФункиjsaTeEDHOCTaBeH MepaH Na BpeMe (OOnIOHaJIHo)
Obaa yHKnja aBtOMaTcKn ro nckJyUyBa KInMa ypeDoT, kora ke OTnDeTe Ha cnneHe.
1 Nyutete ro anapatot.
2 PtntncheTe ro koncheTo TIMER NOBeKeNaTn. IkoHaTa Koja ce HaoraNoDony, Ke 3aTpenepn Ha dHOTo Ha ekpaHot 3a npKakyBaHe.
4ПиТиСнeTe ro konчeto SET/CANCEL 3a da 3aВpшte.
3 PnTncHeTe ro konyeTo 3a da ro n36epTe yacot (cé do 7 yaca).
S ce npkaKyBa Ha ekpaHOT 3a npkaKyBaHe.
HANOMEHA
ObaaФyHKuJa ce OHaBO3MOKBya Kora Ke ro nocTabnte Ha NCKnyeHo MepaOT Ha Bpeme.
KopncTeHbe Ha yHKnjaTa PpNKaKyBaHbe Ha eHeprJaTa (OOnHOHaJIHo)
ObaaФункиja ja npikakkyBa kOlnuHaTa Ha npOn3BeDeHaTaeleKtpnHa eHepnJa Ha BHaTppeShNt ekpaH, 3a Bpeme Ha pa6oTata Ha npOn3BOdOT.
Приказа наTekOBнаТаnotpoшувача наеелектунаеонргида
1 Nyutete ro anapatoT.
2 PnntncHeTe ro konYeTo 3cekyHn.
MomeHTaHaTa noTpOuBaUka Ha eHeprJa ( 88) ce npKaJyBa HeKoe OndeHo BpeMe, Ha HeKoB HbATpeuHn EINHn.
HANOMEHA
He ce npkaKyBa Ha 6e3xuHnot daJeunHckn ynpaByBa.
- EπHηιατa Na npικαχαHaTa BpeДοHocTe kW.
Ako e noBeke oJ 99 kW, uTo e oncerot Ha n3pa3yBaHe, OndKyBajTe ro ha 99 kW.
- Ппражи ja BaTaJaTа по 10 kW co 0.1 kW eDInHua, И пражи edHa koja e NaD 10 kW co 1 kW eDInHua.
- ΦakTNKOTO HanojyBaHBe MOKe Da ce pa3NkYBaO, npNKKaJHaTO HanojyBaHBe.
Kora e noBp3aH co MyItn HaBOpewHaTa eINuca, OBaa fynkunja moKe6n Hema da 6npe nOndpkaHa.
KopncTeHe Ha cyHkUnjaTa NcknyeHo oCBeTnyBaHbe (OncnoHaJIHO)
OcBeTnyBaHbe Ha ekpaHot 3a npKakyBaHbe
Moxete da ro npnilarodnte oCBetnyBaheTo Ha ekpaHot 3a npikakyBaHe,Ha BHaTpeHHaTa eHNHua.
- PnTnCHeTe ro KOnHeTo LIGHT OFF.
HANOMEHA
Bnyte/ncknyte ro ekpaHOT 3a npkaKkyBaHe.
KopncTeHe Ha yHKnjata nOrOeH Bo3dUx (OnCuNoHaIHo)
Iorodno pa6otehe Ha nepkata
ObaaФункиja noroJHO ja noctaByBa nepkaTao Bo 3aadaHATA no3nUJa,3a da ce CBPTN DOBOHNOT BO3dYx OD INPeKTHOTO DyBaHe Ha CTAHApITe BO co6ata.
1 Nyutete ro anapatot.
2ПиТиСHTeToKoNHToCOMFORTAIR NOBeKeNaTn,H36peTe jaNoCaKyBaHaTa HAcOka.
- nnn CnpkaKyBa Ha ekpaHOT 3a npkaKyBaHe.
HANOMEHA
7 nnn Ie npkaKyBa Ha Hekon OB BHaTpeHnTe eHNHn.
ObaaФункиja e OheBO3MOxKeHa KOra Ke ro npHTnCHeTe KOChTe MODE JIJ JET MODE.
ObaaФyHKuJa e OHeBO3MOXKeHa n ABTomATCKOTO 3aMaBHyBaHBe NO BepTnKaJHa HAcoka Ce NocTaByBa, Kora Ke ro npTnCHeTe KOnYeTo SWING.
Kora obaa cyHKuJa e NCKJyUeHa, XOpN3OHTaHnHaTa nepka aBTOMaTcKn pa6OTn, BO 3aBnCHOCr Od NOCTaBeHnOT peKM.
KopncTeHe Ha cyHkCnjaTa KoHTpOJa Ha eJeKtpnHaTaeHeprJia (OncnoHaJIHo)
1 NyuTete ro anapatot.
2 IpnTnchHeTe ro konHeTo ENERGY CTRL.
-ПиТиСHTe ro konTuTo ENERGY CTRL NOBeKeNaTn, 3a da ro n3bepTe ceKoJ ueKOp.
| 1 уекор 2 уекor | 3 уекор | |
| 80 % | 60 % | 40 % |
| 200 | 200 | 200 |
HANOMEHA
1 Yekop: BnE3HOTo HanojyBaHe ce HaMaNyBa 3a 20 %, cnopeJeHO co HOMHaJIHOTo BnE3HO HanojyBaHe.
00 00000000000000000000000000000000000000000000000000000000
- 2 uekop: BnE3HTo HanojyBaHe ce HaMaNyBa 3a 40 %, cnopeDeHo co HOMHaJIHOTo BnE3HO HanoivBaHe.
60 60eK npikkkyBa Ha ekpaHOT 3a npikkkyBaHe.
- 3 YeKOp (OnuHaJIHo): BHe3HTo HanoJyBaIbe Ce HAmanyBa 3a 60 %, CnopeJeHO Co HOMHaJIHOTOBHe3HO HanoivBaIbe.
40 4e. npkaKyBa Ha ekpaHOT 3a npkaKyBaHe.
(1uekop), (2eKop), (3epop) ce npkaKyBa Ha ekpaHOT 3a npkaKyBaHe.
(1uekop), (2uekop)ce npkaKyBaHa ekpaHOT 3a npkaKyBaHe.)
Obaa cyHKunja e doCTanHa co peXIMOT Ha nahebe.
KanaHTeTOT MOKe Da ce HAMaJIu, KOra e N36paH peXIMOT 3a KOHTpOJa Ha eJekTpUHaTa eHeprnja.
- IocaybaHata TemnepaTpe Ce npkaKyBa OKny 5 CEkyHau, aKO TO npHTncHEte KOnyeTo FAN SPEED.
Co6HaTa TemnepaTpa ce npkaKyaBa OKoly 5 CEkyHd, aKO To pINTCHETe KOHTO ROOM TEMP.
Kora e noBp3aH co MyTn HaBOpEuHaTa eDHHua, OBaa cyHKuJa MOKe6n Hema da 6nde nOndpKaHa.
KopncTeHe Ha cneuJaHn H yHKcnn
1 Nyutete ro anapatot.
2 IpnTnchete ro konueTo FUNC noBeKeNaTu, 3a da ja n36epete nocakyBaHaTa yHKunja.
3 IpnTnCHeTe ro konyeTo SET/CANCEL 3a Da 3aBpWNTe.
| Екран за прикaxesьаны | Опис |
| JOHSCNOT rehepatorp koprstn MNJIHOH JOHNI, 3a Дa ПOMORHe BO ПОДБPyBa№ Ha KBaJIITeTOT Ha BO3dUxOT BO 3aTВоpeH ПССТОр. | |
| За дa сe Намалы buvabata od Надворшна Т eдиницa. | |
| За Намалуba№ Ha Blnarata КоJaшTO ce co3ДBA BO ВHaTpeSHaTA eDIINIцa. |
HANOMEHA
- Hekon ΦyHKun He MoKaT Da 6nDaT noDpKan, BO 3aBnCHOCT OJ MOeIOT.
HekonФункиMuKeJa pa6oTaPa3nHcOД npikakkaHOTHaekpaHOTHa daJIeHHCKNOT ynpaByBa.
OTkaJyBaHe Ha cneunjahnHnTe cyHKcnn
1Пипснichte ro konчeto FUNC noBeKeNaTn,3a da ja n36epeTe nocakyBaHaTaФункиJa.
2Пипснсе.To konчeto SET/CANCEL 3a da otkaжete Hekoja cyHKunja.
KopncTeHe Ha yHKunjaTa 3a npouncTyBaHe Ha BO3dyXOT
Obne yHKnO6e36eYBaat nCT n CBex BO3dyx, npeky johcknte yectnKu n fntepoT.
| ФункциjaЕранОпис | |
| JOHIN3atop | JOHSCNITe ЧECTИСКИ OД JOHN3aTOpOT ВРшТ СтетПИЗAZUJIЯ на ВОЗДУSHINITE БаKTерNi N ДруГЛТЕ ШТETHN МATEPNI. |
| ПлаЗмA | |
| Целочно Г OTСТРANΥВА МИКРOSCКОПСКЛТЕ Загдунвачи OД ВUCHUCHNOT ВОЗДУХ,Здд обeЗбени чinctи СВЕЖ ВОЗДУХ. |
HANOMEHA
- MoXeTe Da ja KOpNCTnTe OBaa yHKunja 6e3 da ro BknyuTe BaUNOT KInma ypei.
- I nla3Ma Iam6nukata n lam6nukkata 3a laedebe ce BknyeHn,doKeKa pa60Tu OTcTpaHyBaHe yad/ Ina3Ma,Ha HeKoN MoJeHn.
He donnpajte ro joHn3aTopoT 3a BpeMe Ha pa6oTeHbeto. - ObaaФункиJA moKe pa3nHNO da pa6OToN oEkpahOT Ha daJIeunHCKnOT ynpaByBaY.
KopncTeHe Ha yHKunjata TNBko.
ObaaФyHKuJa rN cnpeUyBa moXHnTe npo6IeMn co cOeDHTe, npeKy hAmanyBaHbeto Ha 6yUaBata oHaNbOpeuHnTe eHNu.

ce npKakyBa Ha ekpaHOT 3a npKaKyBaHe.
HANOMEHA
- Obaa Функида ke 6иde ONEBO3MOxHeHa Kora Ke ro npTnCHeTe KOnYeTO MODE nIN ENERGY CTRL nIN JET MODE.
- Obaa Функциja e дocтанha co peхимOT haJaideHe, rpeeHbe, abTomatcka npomeha npeximOT Ha aBTOMatcko pa6oTeHbe.
Kora e noBp3aH co MyItn HaDBopeuHaTa eINHua, OBaa yHKuJa moKe6n Hema da 6nde npdpkaHa.
KopncTeHbe Ha yHKnjuTa aBTOMaTcKO YnCTeHbe
3a BpeMe Ha pexmnte 3a IaIeHe i HamaIyBaIbe Ha BnaXHOCTa, ce C03daBbIra BO BHaTpeHHaTa eINHua. Obaa yHKunja ja OTcTpaHyBa TaKbata Bnara.

ce npkaKyBa Ha ekpaHOT 3a npkaKyBaHe.
HANOMEHA
HeKoIyHKuH He MoKaT da ce KopnctaTdoKepaBOTN cyHKunjata ABtOMaTcKO uHCTeHe.
Ako ro ncknyuHTe hanojyBaHbeto,fehot Ke npoDolxn da pa60Tu yUTe 30 mHyTu, uNCTejKn ja BHaTpeuHocTa Ha BHaTpeuHaTa eHNHHua.
Anlncaunja LG ThinQ
Obaa yHKnja e DocTaHa cMo Co MoJeNte co INorOTO ThinQ.
Annkaunjata LG ThinQ Bn OBO3MOxya da KOMyHnucnPate co ypeoT CO NOMOHa NaMeTeH TelefoH.
KapakTepeNCTnKn Ha anJnKaunjaTa LG ThinQ
Komyu npajte co ypeodT npeky Baunot MOnneH Tepeoh, KopncTejk n KOpncHnte naMeTHN oncnn.
Smart Diagnosis
Ako nckycnte npo6nemdoeka ja kopncntte annkaujata, onujaTa 3a naMeTHa djuarHocTka Ke BN NOMORHe da ro DNjarHOCTUcapate npo6nEMOT.
POnecyBaHa
Bn OBO3MOxCyBa Da nocTaBnTe pa3JIuHn ONcHn Kaj anapatOT N BO anJIkaujata.
HANOMEHA
- Ako ro npomeHnte cbojot 6e3xuehen pyTeP, do6abyBaOT Ha nHTepHET ycnyr nn IIO3nHKaTa, n36pniweTe ro pernctpupaHnot anapat od, anIINaunjata LG ThinQ n nobTOpHo pernctpupajte ro.
Anikajata noJnx Ha npomeH 3apani noobpyBaBe Ha anapaTOT,6e3 da mC ce daTe npedynpdyBaBe Ha KOpncnUte. - KapakTePncTKeMoKe Da BapuPaaT Bo 3aBnCHoCT OJ MoJeNoT.
Пред Корисе на anлкацида LG ThinQ
1 IpoBepete ro pactoJaaneto nomery anapatot n 6e3xuHnO rpyTe (Wi-Fi mpejata).
Ako e npereonemo pactoJAHneto nomery anapaTOT n 6e3xuHnO T pyTe,doara do cna6eeHe ha cnHaIot. MoKe da 6nDe notpe6en noDOnr BpeMeHcN nepNoD 3a pernctpaunja,nn MoKe da doBeede No HeycneuHa HnctalauJa.
2 NcknyteTo MO6nHnot nInu HHTepHeTOT Ha BaNt NaMeTeH TeIeOHO.
3 Nop3eTe ro Baunot nameTeH TeJeOHO 6e3KnHnOT pyTeP.
HANOMEHA
3a da notBpDnTe DeKa CTe NOBp3aHn CO Wi-Fi, npOBepTe DaJI N CBETN IKOHATA Ka KOHTPOHATA Ta6na.
AnapaTOn noDpKyBa eHnCTBeHo 2,4 GHz Wi-Fi MPexKn.3a da ja npOBepnte ppeKBeHunjata Ha BaWata MPexKa, KOHTaKTnpajTe ro BaWnot Ch6dyBauch CO INHTepHET ycnyr, INN NorIeHHeBO yNaTCTBOTO 3a BaWnOT 6e3KuHen pyTeP.
LG ThinQ He e OndroBopeH 3a 6nlo KaKbN npo6IeMn OkOJy KOHeKTnpaHBeTO Ha MpeXkaTa nn KaBn I da 6nlo rpeuKN, DepeKT nn rpeuKn npedn3BvKaHN oD KOHeKTnpaHBeTO Ha MpeXkata.
- Ako anapaTOT mma npo6nemn OKony KOHEKtnpaHBeTo Ha Wi-Fi mpeXaTa, moXe6n e npedaleky od pyTePoT. HababeTe Wi-Fi 3acnnyBauch (3acnnyBaHa Ha DocTpeNoT) 3a da ja na noDo6pnte jaunHaTa Ha Wi-Fi cnirHaNoT.
Wi-Fi KOHeKunjata MoXe6n He ce NOBp3yBa HmMOx6n e npeknHaT a nopadn ONkpyyBaHbeto HaDOMaUHATA Mpeka.
- Мржно NOBp3yBaHbe MOKe6n Hema da pa6oTn
- павино BO 3aBnCHOCT OД пobajdepot Ha
- Итepnet yCnyrnte.
- OkonHoto 6e3KnUHO NOBp3yBaHe MoXe6n
- npDoHecyBa 6e3KnUHNot MpeXeH cepBnC da
- pa60Tu 6abHo.
AnapatOT He MoKe Da ce peHnCTpnpa, npaI npoBneMn CO npeHocOT Ha 6e3KnUHnOT cnHan. N3BneTe ro Ka6eJNot oJ anapaTOn nNoyeKaJTe OKony eHa MNHyTa, PpeNIOBTOpHO da ce obndeTe.
- Ako e OBO3MOXeH 3aWTHTHnot Su, Ha BaWNot 6e3xMueH pyTeP, OHeBO3MOXeTe r NIN DoJaTe NCKIyOK BO Hero.
- Imeto ha 6e3xuHaTa Mpexa (SSID) Tpe6a da 6nde KOMbHaunja od aHrnnckn 6yKb n 6poEBn. (He KopncTeTe rCneunjannHe KapakTepn)
- SmartphonekopinchuKnot HHTeppejc (UI) MoKe DaBappa,BO3aBnCHoCT OMDMObHnHOT onepaTUBen cncTeM (OS) n npOn3BoDnteJot.
- Ako 6e36eHocnOT npoTOKoHa pyTePOte nocTaBen Ha WEP, MoKe Da He ycneete BO nOdecyBaHBeTo Ha MpeKaTa. Be MOJIme npomeHeTo Ha dpyrN 6e36eHocn HpOToKoJN (Ce npenopayBa WPA2) n NOBtOpHo pernctpapajTe ro npOn3BODoT.
Инсталарые наапликцина за LG ThinQ
Побapajte ja anлkaцида LG ThinQ Ha Google Play Store & Apple App Store npeky Baunot cMaprfoH. CneTe rN INHCTpyKuNTe 3a npesemaBeиИнсталupaHeHa anlkaцида.
N3BecTyBaHe 3a coΦTBeP co OTBOpEn Koid
3a da ro do6neTe n3BOPHNO T KOJ cnopeq GPL, LGPL, MPL u npynte Iuuehucn 3a OTbOpEN n3BOpEN KOJ ce KOpIcTn kaj oOBJ npOn3BOD, nocTeTe ja ctpaHncaTa http://opensource.lge.com. Pokraj n3BOPHNO T KOJ,doCTaHn 3a npe3emaHe ce n CHTe HabeDeHn OndpeDbn Ha IuueHua, odpeKyBaHa oD OndroBOPHOCT N n3BeCTyBaHa 3a aBTopCKn npaba.
LGE nCTo taKa Ke Bn OBO3MOxN CNo6OeH KoD Ha CD-ROM 3a ueHa koJa Tn NOKpNbA TpoWooIte 3a TaKBOTo DoCTaByBaHe (kako Ha np. TpoWooN 3a MedynMOT, ppaKaTa H MaHInyNaTbHbN TpoWooN) No 6apaJe npeky e-NoOta Ha opensource@lge. com. OBaa noHyda e BaINdHa Bo nepnoD od Tprn roDHH No nocNeHaTa HaWa Icnpaka Ha OBOJ npOn3BOD. OBaa noHyda BaxKn 3a cekoj npImaTeJ Ha OBne INΦopMauN.
Smart Diagnosis
Obaa cyHKuJa e doCTanHa cAmo co moJeNte co Joroto
YnoTpe6eTe ja Obaa onuJa 3a da
DnjaHocHTnucpATE nn peWnte npoBneMn co
Baunot anapat.
HANOMEHA
- Od npuHn HTo He MoKe Da ce npenWat KaKo hemapnoct Ha LGE, ycnyrata MoKe da He pa60tn nopadn HndBopeuHn fakTopn, KaKo WTo ce, Ho HeorpaHnUyBajKn Ce Ha HeOCTaHNOCTa Ha Wi-Fi, r6beHe Ha Wi-Fi KOHEKunjata, NOJNTkata Ha npOdaBnUcTa 3a anNkaun NnN HeOCTaHNoCTa Ha anNkaunjata.
-
Obaa Фуннкциja може да e предмет на поменабe3 пөгхODн Нajави може дa Ималораэлпчнфорma BO 3abuCHOCТ од_TOа кадстюцран.
KopncTeIbe LG ThinQ 3a dInjaraHocTnucipaIbe npo6JIeMn
Ako nckycnte npoblemn co Baunot anapat onpeMeH co Wi-Fi, toj moKe da rncnpaTn noDaTOUNTe 3a npobemOT Ha nameTe TeneoH npeky anlinaunjata LG ThinQ.
- Bknyute ja annilkaunjata LG ThinQ n 36epete ja onujaTa Smart Diagnosis BO MeHTo. CneTe r ynaTcTBaTa BO annilkaunjata LG ThinQ.
KopncTeHe 3ByuHa dNjarHo3a 3a dNjarHocTnucpaBe npo6Jemn
CneTe rynyata doJy 3a da ro KOpNCTnte MeToDToHa 3ByHa dJaarHO3a.
BknyeTe ja annkaunjata LG ThinQ n 36epete ja onujaTa Smart Diagnosis BO MeHTo. CneTe r yNaTcTBaTa 3a 3ByHa dJaarHO3a daHeN BO annkaunjata LG ThinQ.
1 IpaBnHb BknyeTe ro npNKnyOkoT 3a cTpyja BO uTEkepOT.
2 NocTaBeTe ro DeIOT Ha nAmEtHnO TeIePOn 3a 36OpYBaHe 6ncky Do IJorOTo .
3ПиTINCHeTe ro nДрЖeTe ro KOnYeTo DIAGNOSIS [5 s] 5 ceKyHn nIIN noDoIro DoNeKa ro DpXnTe DeIOT Ha naMeTHNOT TeNeΦoH 3a 36OpYBaHBe Do INorOTo cé DoNeKa He 3aBpSi nIpeHocOT Ha nOdaTOuNTe.
He npemecTybajTe ro nameTHNOr TeneoHdoeka He 3aBpUnnpeHocOT Ha NDoaTOUnte. Ce npkaKyaBnpeOCTaHaTOTO Bpeme Notpe6Ho 3a TpaHcFep Ha NDoaToU.
4 OTKako Ke 3aBpHn npehocot Ha noDaTou, DnjarHO3ata ce npKakjyBa BO anNkaujata.
HANOMEHA
3a Hajdo6pn pezytatn, He npemecTybajTe ro TepeohOTdoNeKa ce npehecybaaTToHOBNTe.
- Ocnypete ce da ja odpxyBaTe am6nentanHaTa 6yaba Ha MNHmym, NIMMOKe da ce cnuyn TelefoHOT da He IIN pPIMa npabNHO 3ByHNTe CnHann OD BHaTpeShHaTa eDHHua.
I P E D U N P E D Y B A H E
- Ppei YnCTe He nnn n3BpUyBaHbHe Ha oDpxyBaHbETo, NCKnyte To HanojyBaHbETo n NoyeKaTe DoNeKa ΦeHOT He npctTaHe co pa60Ta.
Ako KInma ypeoT HeMa Da Ce KopnCTn 3a NDoIg BpeMeHcN nepnoi, NcyuTe ro 3a Da ce OdpKn BO Hajdo6pa cocToj6a. PeobHo YnCTe Ro npOn3BoJOT, 3a Da ja OdpXnTe ONTMaJIHaTa n3BeJ6a n da rncnPpeHTe MoxHnTe DeΦeKTn.
- NcyuTe ro KnIma ypeIOT BO peh peKIMOT, BO TEKOT Ha 3 Do 4 Yaca, n NCKnyTe ro HanojyBaHeto. MoKe da ce nojabN BhatpeUHO OWTeYBaHe aKO BnaRATA OCTaHE BO HerOBITE COCTABHn DeIOBn.
- IcyuweTe rBHaTpeuHnTe COCTaBn DeIOBn Ha KInMa ypeoT, KopncTejkn To geH pexmOT Bo TeKOT Ha 3 Do 4 Yaca, PpeH erOBaTa NOBtOpHa ynoTpe6a. Oba Ke nomorHe BO OTcpaHyBaHbeto Ha Mnpu36aTa Co3daDeHa oD BnArata.
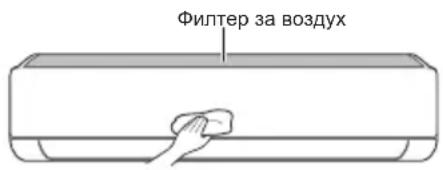
-Функида може да ce MeHyBa BO 3aBnCHOCT OД TINOT Ha MOneJIOT.
| Тип Опис Иntервал | |
| Фильпер за ВОЗдух | Исучтete со правосмICALа ил рачно Исторе. 2 недени |
| JOизатор(оштоналho) | УлOT tradeCyBa памуна вata за ща ща OTСТРANITEпрашинatable. |
| Виатрeshаединиа | Исучтete ja повшинatable на Виатрeshа та леница, корисейки мека, сува Крna. |
| Проблеменално Исучтete го садот каде ШTO се собраКондэнзиганatable влara. | |
| Проблеменално Исучтete ja севкatingа НИЗ kojaшTO се собраКондэнзиганatable влara. | |
| Заменete ГIьATEPINTE Na дALEVINHSCNOT уравувач.Едною | |
| Надворешнаединиа | Проблеменално Исучтete ГI калемпente 3a оддаваgebenToшлina и Таблata co OTВори. (Посobетувajte ce coТexнчар.) |
| Проблеменално Исучтete ГфенOT.Едною | |
| Проблеменално Исучтete го садOT каде ШTO се собраКондэнзиганatable влara. | |
| Проблеменално Лице Н ekа NotВрди ДЕКа соCTавнITE DeLOВИпафенOT сцВрSTO зATERГати. | |
| Исучтete ГI eLEKТричнITE KOMПОЕNTI со ВОЗдух.Едною |
HANOMEHA
- Hinkoraш He KopincTe BoDA WTo hMa TepepaTypa Nobucoka od 40^ , kora rN YnCTnte qnntpnte. Toa MoKe da npedn3BnKa deOpmaunja nnn o6e36oJyBaHe.
- Hikorai He KopinCTe IcnapnB MaTePn npu YncTeHbETo Ha fUnTpnte. Tne MoKaT da ja oUTeTaT noBpHHaHa npOn3BOIoT.
YncteHe Ha qnItepoT
HcTeTnФnItpnte3aBO3dyx eHaHa Ha cekon 2 HeJI, nIOBKeNaTu aKO e notpe6Ho.
HANOMEHA
- Φιπτepοτ 3a BO3dμx MoKe Da ce cKpùn aKO ce npeBNTka.
AkoΦntepoT 3a Bo3dyx He e npabnHOCOCTaBeH, paaHHata N HeKOn dpyrMaTepeMOMKaT Da HABNe3aT BO BHaTepeuHaTa eINHua.
Tyn1
Ako Odo3ropa NorneHHeTe Ha BHaTpeShHaTa eHHnua,JeCHO Ke MOKeTe Da ro COCTaBNTe rOpHNOT qnntep.
1 NcnyeTe ro HanojyBaHBeTo n 3BJeTe ro ka6enot 3a cTpyja.
2 DpxkTe rna paKnte Ha qntepoT 3a BO3dyx mANKy NOURHETe ro.
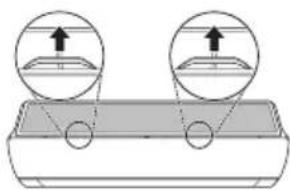
3 OToTpaHete ro od BHaTpeHHaTa eHNHua.
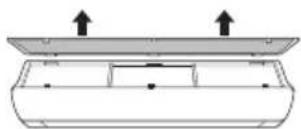
4 IcHCTeTe ro fIHTepOT co npaBocMykAnKa nIc CO Mnaka BOda, BO Koja mHa HeyTpaneH deteprent.
5 IcyuTe ro qnItepoT BO ceHka.
6 BmTeHte Tn KyKeTHe Ha nItePOT 3a Bo3dyx BO ppeHNOT KanaK.
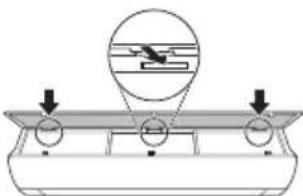
7 IpnTnCHeTe rHaOny KyKInTe 3a da ro COCTaBnTE qHNTepOT 3a BO3dyx.

8 IpoBepTe Ha cTpaHaTa Ha npEiHnOT KanaK, 3a npaBnIHO COCTaByBaHe Ha qnlTepot 3a BO3dYx.
Tun2
1 NcnyeTe ro HanojyBaHbeTo n 3BneyeTe ro Ka6enot 3a cTpyja.
2 OTbopeTe ro npedHnOT kanak.
- POniHHeTe mAnKy nDbete CtpaHn KaNakOT.
3Држete rpaaknteHaФnTepOT 3a BO3dyx, NOBneyeTe rMaKy HaOny N OTCpaHete rN Od BHaTpeuHaTa eINHua.
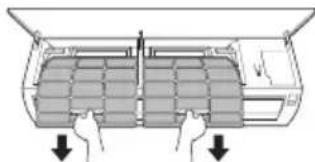
4 NcHCTeTe rH cHITpHrTe CO npaBocMykAnKa HnCmJaka Boda, BO Koja nMa HeyTpaneH detepreHT.
5 IcyuTe rH qnItpnte BO cEHka.
6 BMeHTHe Tn KyKInTe Ha ΦHITpNTe 3a BO3dYX BO ppeHNOT KanaK.
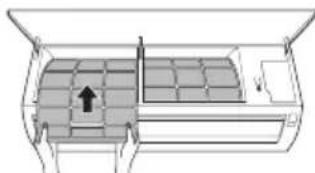
7 IpoBepTe Ha cTpaHaTa Ha npEiHnOT KanaK, 3a npaBnHO COCTaByBaHe Ha qnItpnte 3a BO3dyX.
Функцина наCAMODиjarHOCnIpaIbe
Oboj npo3BOD mHa BrpaHeHa yHKuJa Ha cAmOnjarHocTnUpaBe. Ako ce nojabn Hekoja rpeKka, lam6nKata od BHaTpeShata eHNHa ca Ke 3aTpeNk BaHTepBaJn O2 cekyHnn. Ako TaKBOTo HeTo ce cnYn, KOHTAKTpajTe n BaINOT JOKaEN dNCTpIbTyEp nII cepBuceH cHTap.
PpeI Da ro NOBnKaTe cepBnCoT
Be moJIHme npOBepe Tn CneIHNte HeWtA npE Ia ro KOHTaKTIpaTe cepBnCHNOT ueHTap. Ako npoJOnJx npo6JIemOT, KOHTaKTIpaJTe ro BaUNOT JOKaJIeH cepBnCeH ueHTap.
| Симптоми можни | Прочны и рeshенье | |
| Клиma урекот неpbотиHopмлно. | Мирзба на ИЗrogenи и чуdenи 3Вуци доагаат od_edиницatura.ISCКУЧЕТЕ РКлиma урекот, ИЗваде тг КабелOT 3a стура щьдддддддддддддддддддддддддддддддддддддддддддддддддддддддддддддддддддддддддддддддддддддддддддддддддддд徳. ИсккУЧЕТЕ РКлиma урекот, ИЗваде тг КабелOT 3a стура щьддддддддддддддддддддддддддддддддддддддддддддддддддддддддддддддддд徳. ИсккУЧЕТЕ РКлиma урекот, ИЗваде тг КабелOT 3aстура щьддддддддддддддддддддддддддддддд徳. ИсккУЧЕТЕ РКлиma урекот, ИЗваде тг КабелOT 3a стура щьддддддддддддддд徳. ИсккУCHYBAчOT, пскнHyBaч Na StprjHOTO кОLO (6e36eDnOCTa,3a3emjyBaJIeTO), пьocrypyBaJOT He habOTAT npabINHO.ISCKUCHTE РКлиma урекот, ИЗваде тг КабелOT 3a стура щьдддддд徳. ИсккУCHYCHYBAчOT, пскнHyBaJOT He habOTAT npabINHO.ISCKUCHTE РКлиma урекот, ИЗваде тг КабELOT 3a стура щьdIeTo pOBVCHNOT StENTAP. Единицatura соЗдава КOD Na rpeшka od conctBeHOTOCamodinjarHoctnizupaÎe. ИсккУCHYCHYCHYBAчOT, пскнHyBaJOT Na STPDA Na STPDA Na STPDA Na STPDA Na STPDA Na STPDA Na STPDA Na STPDA Na STPDA Na STPDA Na STPDA Na STPDA Na STPDA Na STPDA Na STPDA Na STPDA Na STPDA Na STPDA Na STPDA Na STPDA Na STPDA Na STPDA Na STPDA Na STPDA Na STPDA Na STPДу. Блиma урекот неpbotи. | Клиma урекот неpbotи. |
| Клиma урекот неpbotи. | Клиma урекот не e prinkluyen.IproBepete Далу КабелOT 3a habOjYBaJIe e BmETHaT BO prinkluyOKOT 3a cTpyja, пьюмби ce Bklnyehи ИЗолatopinte 3a habOnH. | |
| Има ИЗбен Осигуразч, пь e bokiparANO habOjYBaJIeTo co Stpyja.3aMeHete ro osigupayot пьoproBepete Далу пбKinHyBaJOT Na STPDA Na STPDA Na STPDA Na STPDA Na STPDA Na STPDA Na STPDA Na STPDA Na STPDA Na STPDA Na STPDA Na STPDA Na STPDA Na STPDA Na STPDA Na STPDA Na STPDA Na STPDA Na STPDA Na STPDA Na STPDA Na STPDA Na STPDA Na STPДу. | ||
| Се сFlyu ПскKin Ha eNeKTPrUnHATA eHepriJa.IscKUChTE ro Kлиma урекот посторно habOjYBaJIeTo co Stpyja.Kora habOjYBaJIeTo nobTOpNo Ke ce BocnoCTaBn, nouekajTe 3 mInHyTu, na notoa BklnycheTe ro Klinma урекот. | ||
| ВовлaxКата e Или пremHory BvSOKA, пь пremHory HnCKA.IproBepete Далу ce BklnyIH npeKINHyBaJOT Na STPJHOTO кОLO. | ||
| Клиma урекот АВTomatСКи ce NckLuyn BO OBOJ MOMENT.BklnycheTe ro Klinma урекот. | ||
| БаTERpNiTe Bo daleuHsckNt OynapBvBau He ce npabInHo hameCTeH.N.OsirypetE ce Deka sbateripte ce npabInHOb WMeTHaTb BO BaINOT daleuHsckNурвуВaU.Ако sbateripte ce npabInHOb hameCTeH, a Klinma урекOT и поHamTu He paBOTN, toraah 3amHeTe ng sbateripte ng obundete ce nobTOpNo. | ||
| СимпTomи Рожни | Прочны и рeshенье | |
| Клиma уреот не ( искneyта ладен Воздун. | Воздунот не циркулера правлино. • Осирطete се дeca Нем за вescи, ралетни, ялдегов од мебел, Што го бл_OKираат п%; празденил.del на Клиma уреот. | |
| Фиртетор 3a ВОздун e Валкан. •Чиртete се дeca Нем за вescи Edнаш на секон 2 Недел. • Вirdete BO "Чиртетор" 3a поевке Инфомату. | ||
| Собна Т EMпература e п%; • 3a сеньocно ладене на ВНатршниот ВОздун BO Летно Вөрeme e п; Вөрeme. Бархы счүaj, Изberete се Mлэзниот ржим 3a поьрзо ладене ньнатршниот ВОздун. | ||
| Ладниот ВОздун ИЗлergува од собата. • Осирطete се дeca Нем за вescи Ильгувае на Ладниот ВОздун п%; ВЕнтулальпente touchи од собата. | ||
| ПосakУванatura Temпература e nobicsoka od ceraшнatura Temпература. • Поставete ja посakУванatura Temпература на понско НИВО od сeraшнatura tempeуда. | ||
| Во SFиЗинам Има ИЗВор на толлпа. • Изberнунайда koportstite Изberи на толлпа, касо StTo ce elektpruchнite пechки пли ratchite пламенци, дodeka pa? Боготи Клиma уреот. | ||
| Изberан e ржимот на сpen. • 3a врeme Ha сpen ржимот од Клиma уреот Дува ВОздун, кojшTO HHTU ro лади, НИТу ro 3a? • Посторе ржимот на р? Ныр? Ныр? Ныр? Ныр? Ныр? Ныр? Ныр? Ныр? Ныр? Ныр? Ныр? Ныр? Ныр? Ныр? Ныр? Ныр? Ныр? Ныр? Ныр? Ныр? Ныр? Ныр? Ныр? Ныр? Ныр? Ныц? Ныр? Ныр? Ныр? Ныр? Ныр? Ныр? Ныр? Ныр? Ныр? Ныр? Ныр? Ныр? Ныр? Ныр? Ныр? Ныр? Ныр? Ныр? Ныр? Ныр? Ныр? Ныр? Ныр? Ныр? Ныric? Ныр? Ныр? Ныр? Ныр? Ныр? Ныр? Ныр? Ныр? Ныр? Ныр? Ныр? Ныр? Ныр? Ныр? Ныр? Ныр? Ныр? Ныр? Ныр? Ныр? Ныр? Ныр? Ныр? Ныр? Ныpic? Ныр? Ныр? Ныр? Ныр? Ныр? Ныр? Ныр? Ныр? Ныр? Ныр? Ныр? Ныр? Ныр? Ныр? Ныр? Ныр? Ныр? Ныр? Ныр? Ныр? Ныр? Ныр? Ныр? Ныр? Ныс? Ныр? Ныр? Ныр? Ныр? Ныр? Ныр? Ныр? Ныр? Ныр? Ныр? Ныр? Ныр? Ныр? Ныр? Ныр? Ныр? Ныр? Ныр? Ныр? Ныр? Ныр? Ныр? Ныр? Ныр? Ныз? Ныр? Ныр? Ныр? Ныр? Ныр? Ныр? Ныр? Ныр? Ныр? Ныр? Ныр? Ныр? Ныр? Ныр? Ныр? Ныр? Ныр? Ныр? Ныр? Ныр? Ныр? Ныр? Ныр? Ныр? Ныrc? Ныр? Ныр? Nыр? Nыр? Nыр? Nыр? Nыр? Nыр? Nыр? Nыр? Nыр? Nыр? Nыр? Nыр? Nыр? Nыр? Nыр? Nыр? Nыр? Nыр? Nыр? Nыр? Nыр? Nыр? Nыр? Nыр? Nыр? Yыр? Yыр? Yыр? Yыр? Yыр? Yыр? Yыр? Yыр? Yыр? Yыр? Yыр? Yыр? Yыр? Yыр? Yыр? Yыр? Yыр? Yыр? Yыр? Yыр? Yыр? Yыр? Yыр? Yыр? Yыр? Nыр? Nыр? Nыр? Nыр? Nыр? Nыр? Nыр? Nыр? Nыр? Nыр? Nыр? Nыр? Nыр? Nыр? Nыр? Nыр? Nыр? Nыр? Nыр? Nыр? Nыр? Nыр? Nыр? Nыр? Mлэ? Nыр? Nыр? Nыр? Nыр? Nыр? Nыр? Nыр? Nыр? Nыр? Nыр? Nыр? Nыр? Nыр? Nыр? Nыр? Nыр? Nыр? Nыр? Nыр? Nыр? Nыр? Nыр? Nыр? Nыр? Nыц? Nыр? Nыр? Nыр? Nыр? Nыр? Nыр? Nыр? Nыр? Nыр? Nыр? Nыр? Nыр? Nыр? Nыр? Nыр? Nыр? Nыр? Nыр? Nыр? Nыр? Nыр? Nыр? Nыр? Nыр? Nыric? Nыр? Nыр? Nыр? Nыр? Nыр? Nыр? Nыр? Nыр? Nыр? Nыр? Nыр? Nыр? Nыр? Nыр? Nыр? Nыр? Nыр? Nыр? Nыр? Nыр? Nыр? Nыр? Nыр? Nыр? Nыrs? Nыр? Nыр? Nыр? Nыр? Nыр? Nыр? Nыр? Nыр? Nыр? Nыр? Nыр? Nыр? Nыр? Nыр? Nыр? Nыр? Nыр? Nыр? Nыр? Nыр? Nыр? Nыр? Nыр? Nыр? Nыс? Nыр? Nыр? Nыр? Nыр? Nыр? Nыр? Nыр? Nыр? Nыр? Nыр? Nыр? Nыр? Nыр? Nыр? Nыр? Nыр? Nыр? Nыр? Nыр? Nыр? Nыр? Nыр? Nыр? Nыр? Nыз? Nыр? Nыр? Nыр? Nыр? Nыр? Nыр? Nыр? Nыр? Nыр? Nыр? Nыр? Nыр? Nыр? Nыр? Nыр? Nыр? Nыр? Nыр? Nыр? Nыр? Nыр? Nыр? Nыр? Nыр? Nы р? Nыр? Nыр? Nыр? Nыр? Nыр? Nыр? Nыр? Nыр? Nыр? Nыр? Nыр? Nыр? Nыр? Nыр? Nыр? Nыр? Nыр? Nыр? Nыр? Nыр? Nыр? Nыр? Nыр? Nыр? Nыrt? Nыр? Nыр? Nыр? Nыр? Nыр? Nыр? Nыр? Nыр? Nыр? Nыр? Nыр? Nыр? Nыр? Nыр? Nыр? Nыр? Nыр? Nыр? Nыр? Nыр? Nыр? Nыр? Nыр? Nыр? Nыя? Nыр? Nыр? Nыр? Nыр? Nыр? Nыр? Nыр? Nыр? Nыр? Nыр? Nыр? Nыр? Nыр? Nыр? Nыр? Nыр? Nыр? Nыр? Nыр? Nыр? Nыр? Nыр? Nыр? Nыр? Nы. Nыр? Nыр? Nыр? Nыр? Nыр? Nыр? Nыр? Nыр? Nыр? Nыр? Nыр? Nыр? Nыр? Nыр? Nыр? Nыр? Nыр? Nыр? Nыр? Nыр? Nыр? Nыр? Nыр? Nыр? Nыр; Nыр? Nыр? Nыр? Nыр? Nыр? Nыр? Nыр? Nыр? Nыр? Nыр? Nыр? Nыр? Nыр? Nыр? Nыр? Nыр? Nыр? Nыр? Nыр? Nыр? Nыр? Nыр? Nыр? Nыр? Nыр. Nыр? Nыр? Nыр? Nыр? Nыр? Nыр? Nыр? Nыр? Nыр? Nыр? Nыр? Nыр? Nыр? Nыр? Nыр? Nыр? Nыр? Nыр? Nыр? Nыр? Nыр? Nыр? Nыр? Nыр? Nыц; Nыр? Nыр? Nыр? Nыр? Nыр? Nыр? Nыр? Nыр? Nыр? Nыр? Nыр? Nыр? Nыр? Nыр? Nыр? Nыр? Nыр? Nыр? Nыр? Nыр? Nыр? Nыр? Nыр? Nыр? Nыц. Nыр? Nыр? Nыр? Nыр? Nыр? Nыр? Nыр? Nыр? Nыр? Nыр? Nыр? Nыр? Nыр? Nыр? Nыр? Nыр? Nыр? Nыр? Nыр? Nыр? Nыр? Nыр? Nыр? Nыр? Nыric; Nыр? Nыр? Nыр? Nыр? Nыр? Nыр? Nыр? Nыр? Nыр? Nыр? Nыр? Nыр? Nыр? Nыр? Nыр? Nыр? Nыр? Nыр? Nыр? Nыр? Nыр? Nыр? Nыр? Nыр? Nыric. Nыр? Nыр? Nыр? Nыр? Nыр? Nыр? Nыр? Nыр? Nыр? Nыр? Nыр? Nыр? Nыр? Nыр? Nыр? Nыр? Nыр? Nыр? Nыр? Nыр? Nыр? Nыр? Nыр? Nыр? Nы р. Nыр? Nыр? Nыр? Nыр? Nыр? Nыр? Nыр? Nыр? Nыр? Nыр? Nыр? Nыр? Nыр? Nыр? Nыр? Nыр? Nыр? Nыр? Nыр? Nыр? Nыр? Nыр? Nыр? Nыр? Nы. Yыр? Yыр? Yыр? Yыр? Yыр? Yыр? Yыр? Yыр? Yыр? Yыр? Yыр? Yыр? Yыр? Yыр? Yыр? Yыр? Yыр? Yыр? Yыр? Yыр? Yыр? Yыр? Yыр? Yыр? Yыр; Yыр; Yыр; Yыр; Yыр; Yыр; Yыр; Yыр; Yыр; Yыр; Yыр; Yыр; Yыр; Yыр; Yыр; Yыр; Yыр; Yыр; Yыр; Yыр; Yыр; Yыр; Yыр; Yыр; Yыр; Yыр. Yыр; Yыр; Yыр; Yыр; Yыр; Yыр; Yыр; Yыр; Yыр; Yыр; Yыр; Yыр; Yыр; Yыр; Yыр; Yыр; Yыр; Yыр; Yыр; Yыр; Yыр; Yыр; Yыр; Yыр; Yыр? Yыр; Yыр; Yыр; Yыр; Yыр; Yыр; Yыр; Yыр; Yыр; Yыр; Yыр; Yыр; Yыр; Yыр; Yыр; Yыр; Yыр; Yыр; Yыр; Yыр; Yыр; Yыр; Yыр; Yыр. Yыр. Yыр; Yыр; Yыр; Yыр; Yыр; Yыр; Yыр; Yыр; Yыр; Yыр; Yыр; Yыр; Yыр; Yыр; Yыр; Yыр; Yыр; Yыр; Yыр; Yыр; Yыр; Yыр; Yыр; Yыр. Yыр Yыр; Yыр; Yыр; Yыр; Yыр; Yыр; Yыр; Yыр; Yыр; Yыр; Yыр; Yыр; Yыр; Yыр; Yыр; Yыр; Yыр; Yыр; Yыр; Yыр; Yыр; Yыр; Yыр; Yыр; Yыр Yыр; Yыр; Yыр; Yыр; Yыр; Yыр; Yыр; Yыр; Yыр; Yыр; Yыр; Yыр; Yыр; Yыр; Yыр; Yыр; Yыр; Yыр; Yыр; Yыр; Yыр; Yыр; Yыр; Yыр. Yыр; Yыр; Yыр; Yыр; Yыр; Yыр; Yыр; Yыр; Yыр; Yыр; Yыр; Yыр; Yыр; Yыр; Yыр; Yыр; Yыр; Yыр; Yыр; Yыр; Yыр; Yыр; Yыр; Yыр; Yыр; Yыр; YN. Yыр; Yыр; Yыр; Yыр; Yыр; Yыр; Yыр; Yыр; Yыр; Yыр; Yыр; Yыр; Yыр; Yыр; Yыр; Yыр; Yыр; Yыр; Yыр; Yыр; Yыр; Yыр; Yыр; Yыр; Yыric; Yыric; Yыric; Yыric; Yыric; Yыric; Yыric; Yыric; Yыric; Yыric; Yыric; Yыric; Yыric; Yыric; Yыric; Yыric; Yыric; Yыric; Yыric; Yыric; Yыric; Yыric; Yыric; Yыric; Yыric; YыRIC; Yыric; Yыric; Yыric; Yыric; Yыric; Yыric; Yыric; Yыric; Yыric; Yыric; Yыric; Yыric; Yыric; Yыric; Yыric; Yыric; Yыric; Yыric; Yыric; Yыric; Yыric; Yыric; Yыric; Yыric; Yы ric; Yыric; Yыric; Yыric; Yыric; Yыric; Yыric; Yыric; Yыric; Yыric; Yыric; Yыric; Yыric; Yыric; Yыric; Yыric; Yыric; Yыric; Yыric; Yыric; Yыric; Yыric; Yыric; Yыric; Yыric; Yыrics; Yыric; Yыric; Yыric; Yыric; Yыric; Yыric; Yыric; Yыric; Yыric; Yыric; Yыric; Yыric; Yыric; Yыric; Yыric; Yыric; Yыric; Yыric; Yыric; Yыric; Yыric; Yыric; Yыric; Yыric; Yы�ric; Yыric; Yыric; Yыric; Yыric; Yыric; Yыric; Yыric; Yыric; Yыric; Yыric; Yыric; Yыric; Yыric; Yыric; Yыric; Yыric; Yыric; Yыric; Yыric; Yыric; Yыric; Yыric; Yыric; Yыric; Y Y Y Y Y Y Y Y Y Y Y Y Y Y Y Y Y Y Y Y Y Y Y Y Y Y Y Y Y Y Y Y Y Y Y Y Y Y Y Y Y Y Y Y Y Y Y Y Y Y Y | ||
| Симпоми можни | Прочны и ршени | |
| Внатрeshнatable единиca сеушто ке разоти, дури и по пекиnot на елекtrupнatable еергija. | РабOTи Функцилatable ватматско чир themselves. ДобOTи ВОзOTи КУнКцилatable ватматско чир themselves Дд подоглжи, биdeяки ja OTсТраНУВа пеocтэнтátа влага одь ВНаТршноctа на ВНаТршэнтatura единиca. Ако На сакате obaa Функцилga, можete Дд ja уSCПучITE единиca.Tа. ЛаднOT BOЗdux od Клиma у畴OT создава магna. ОвOTи ФенOMeH ce ссчува КORA doaЯdo Ha hamaluВаыЕ на сбэнтatura temпepатура. ИстEVува ВОда od надворшнatable единиca. | |
| ПостOTи БUCHАВа ИП ВИБраци. | 3a ВрЕМе НОЕЧAUNTe HrpeeHBe DoaЯdo КалeHBe Ha KOнDEH3ИраHA ВODA OD EMITUBAcOT Na TOnПИнha. ОвOTи CBМТOM bapa ИСТаJIраBE Ha OДВОДно cPreБОп Дд SaHOT caD. КontakTIPajTe ja LIMNOCCTa 3a ИСТаJIраBE. | |
| Внатрeshнatable единиca ondabva mprn36a. | 3Byk Na KLINKHyBaHbE МОже Дд ce Уe KORA edINHuaTa 3anOCHyBa ИП ЗAPINIPA, Заради DBINXeHbTo Ha OБрathNOT BeHTINJ. 3Byk Na shkpinHe: Пл acttUnHite DeIobNi Ha BHaTpeShHaTa.edINHua шkpinat KORA doaЯdo DO HiVBHO CTechyBaHb EИП proшрУВaHb 3apadi небeJHnTE TepepatryPnnpomEH. 3Byk Na TeucheHb EИП duBaHb: Toa e TeucheHbTo Ha cpeCTBOTO 3a ЛадeHb ИЗ KLINMa U畴OT. Toa ce HopMaIIH NcIMTOMn. БUCHaВATA Ke 3anpe. | |
| Клиma у畴OT He ис neuropa тонл ВОзdux. | Kora pexIMOT Na rpeeHbKe 3anOChE, OTBOPOT e cskopo 3aTBopeH n peuHcH нс ИЗЛergуВа BOЗdux, Иako HauBopseHnAte EdINHua paobTu. Toa e HopMaIIEN CImPTOM. Be moIIME nouekaJte сdОdeKa edINHuaTa He COSTA DE DOBOHNO TOnIOL BOZdux, kojSTO Ke c de yBa HN3 BHaTpeShHata EDINHua. Надворшнatable.edINHua e BO pexIMOT 3a Odmp3HyBaHbE. Kora upeot e BO pexIMOT Na rpeeHb, leedOT/mpa3OT ce sobpaat Brp3 КалeMITE, akO dojde do NaRaHbe Ha HauBopseHnAte Tempepatya. Obaa Функциja ro OTcTpaHvBa cNoJOT od Mpa3 KoJStO ce HAOra BP3 KaIeMOT, И SF Травалю за zavPsI 3a Okoly 15 mInyTu. Надворшнatable Tempepatya e premHory Hncka. ЕфektOT Na rpeeHbme MoKE da He bide doBOJenH. |
| СимпTomи можни | Прочны и рeshени |
| Вашnot Кужен anapatи смартфонот He ce порзано co Wi-Fi мрека. | Лоб生态系统а 3a Wi-Fi на кoeшто ce обидуне дуа ce поврзete, e нетона. • Hajдente ja Wi-Fi мрека на ловзана co вшиот смартфони отстранete ja, a поюа ренисторajte ro вшиот anapat на LG ThinQ. |
| Мышино падатои за вшиот смартфонс ce вklучени. • Исклuchete Ги Мбшино падатои на вшиот смартфони ренисторjetro anapatot, koprasteyки ja Wi-Fi мрека. | |
| И métета на бeзшино на мрека (SSID), He e правлино поесен. • И métета на bезшино на мрека (SSID) trpebaда bide komбihuшиja od anглески bukви и sboеви. (He koprastete Ги спеццалнох capakтети) | |
| Ф��вени jo大自然а на рутето He e 2,4 GHz. • Пodedжаяне само 2,4 GHz Ф��вени jo на рутето. Поставete ro bезшино рутету He bезшино рутету 2,4 GHz и повзete ro anapatot co bезшино рутет. 3aда ja пobерпite Ф��вени jo大自然а на рутето, рobерпete кaj вшиот снабдувач на Иntерnet услуги, пикaj пoinizь BodineteлOT на рутет. | |
| Пэрелеме e pactojahnoTo noméry anapatot и рутет. • Ако e пэрелеме pactojahnoTo noméry anapatot и рутет, сигналot можеда bide слб и кonekuшиа на можеда He bide правлино конфигурирана. Поменete ja lokaшиа на рутет, за bide пobлися до anapatot. |
HANOMEHA
HeKoIyHKuH He MoKaT Da 6uDat noDpXaHn, BO 3aBnCHocT OJ MoJeIOT.
MANUALI PÉRDORUESIT
KONDICIONER

VAŽNA SIGURNOSNA UPUTSTVA

UPOZORENJE
Da biste smanjili opasnost od eksplozije, požara, smrti, strujnog udara, povrede ili opekotina za osobe prilikom korištenja ovog proizvoda, pridržavajte se osnovnih mjera prepostrožnosti, uključujuci sljedeće:
Djeca u domacinstvu
Ovaj urežajnosti namijenjen za upotrebu od strane osoba (uključujuci djecu) sa smanjenim fizickim, senzornim ili mentalnim sposobnostima, ili s nedostatkom iskustva i znanja, osim u slučaju da su te osobe pod stalnim nadzorom ili su instruirane po pitanju korištenja urežaja od strane osobe koja je odgovorna za njihovu sigurnost. Djeca trebaju biti pod nadzorom kako bi se osiguralo da se ne igraju s urežajem.