
ST308WZA - Vacuum Cleaner INVENTUM - Free user manual and instructions
Find the device manual for free ST308WZA INVENTUM in PDF.

User questions about ST308WZA INVENTUM
0 question about this device. Answer the ones you know or ask your own.
Ask a new question about this device
Download the instructions for your Vacuum Cleaner in PDF format for free! Find your manual ST308WZA - INVENTUM and take your electronic device back in hand. On this page are published all the documents necessary for the use of your device. ST308WZA by INVENTUM.
USER MANUAL ST308WZA INVENTUM
natural_image
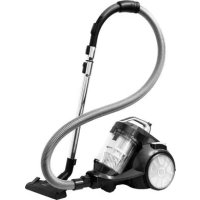
Black and white vacuum cleaner with coiled hose, no visible text or symbols-
safety instructions page 13
-
product description page 16
-
before first use page 17
-
assembly page 17
-
use page 18
-
maintenance page 18
-
frequently asked questions page 20
general terms and conditions of service and warranty page 38
Deutsch
Inventum advises the use of original Inventum dust bags. Any damages to the product or accessories are not covered by the warranty when non-original dust bags are used.
Dust bags, filters and other accessories are available in the webshop of Inventum: https://www.inventum.eu/onderdelen/
When you choose not to use original Inventum dust bags, make sure the capacity of the dust bag is the same as the capacity of the vacuum cleaner.
Manufacturers of dust bags often use the term "Uni-bag" for dust bags which can be suitable for the Inventum vacuum cleaner.
When in doubt, contact the manufacturer concerned of the dust bags.
Deutsch
natural_image
Top-down view of a mechanical device with open lid and internal cavity, labeled '16' (no text or symbols on the object itself)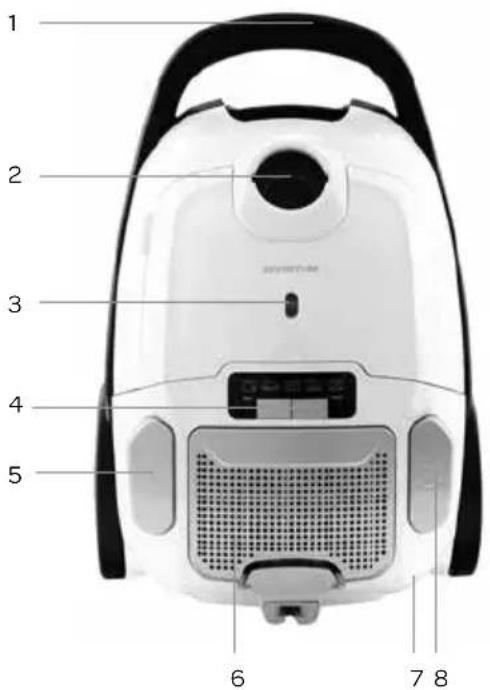

8 • Nederlands
HANDGREEP MET AFSTANDSBEDIENING
natural_image
Close-up of a mechanical component with labeled parts (1, 1, 2), no visible text or symbols beyond labels10 • Nederlands
natural_image
Close-up of a mechanical device with a labeled component (3), no visible text or symbols beyond the number
natural_image
Top-down view of a white and black robotic vacuum cleaner with labeled component '4' (no text or symbols on body)
natural_image
Close-up of a white robotic device with grid-patterned buttons, shown with an inset close-up of its top panel (no text or symbols visible)
natural_image
Close-up of a black wheeled vehicle with a wheel rim and attached seat, labeled with number 6 (no text or symbols on the vehicle itself)1 safety instructions
- First carefully read the instruction manual in full prior to using the appliance and store the manual in a safe place for future reference.
- Only use this appliance for the purposes described in the instruction manual.
• This appliance is only suitable for household use. - The appliance may be used by children of 8 years and older and persons with a limited physical, sensory or mental capacity or lack of experience or knowledge, provided they use the appliance under supervision or have been instructed about its safe use and understand the hazards involved.
• Children must not play with the appliance. - The appliance may not be cleaned or maintained by children younger than 8 years of age, unless this is done under supervision.
- Keep the appliance and cable out of reach of children younger than 8 years of age.
- Strict supervision is required if the appliance is used by or near children.
- Keep hands, feet, loose-fitting clothes, hair and animals out of reach of the rotating brush. This is to prevent injury to skin, eyes or ears, for example.
-
This appliance is intended for household and similar use, such as:
-
in staff kitchens, shops, offices and other work environments;
- by guests of hotels, motels and other residential environments;
- in Bed&Breakfast type environments;
- farms.
- Caution: the appliance may not be used with an external timer or a separate remote control.
- Only connect the appliance to alternate current, to an earthed wall socket, with a mains voltage that corresponds with the information provided on the information plate of the appliance.
-
Never bend the power cord sharply or allow it to run across hot parts.
-
Do not use the appliance if the plug, cord or appliance are damaged, or if the appliance no longer functions properly or if it is damaged in any other way. In that case, consult the shop or our customer service. Never replace the plug or cord yourself.
- The use of accessories not recommended or sold by Inventum may cause fire, electrical shocks or injuries.
- The brush and vacuum cleaner were specially designed for use on carpets and hard floors. In rare cases, and depending on the type of floor, it is possible that scratches are made in the surface to be cleaned. Inventum is not responsible for any damage made on the floor. If necessary, a special parquet brush is available via the Inventum webshop.
- If the appliance is not being used or if parts or accessories must be mounted or removed or if the appliance is being cleaned, fully switch off the appliance and remove the plug from the socket.
- Do not leave the appliance unattended when it is in operation.
- Never place the appliance near appliances that give off heat, such as ovens, gas cookers, hotplates, etc.
- Do not use the appliance outdoors or on a wet surface and do not use it for picking up moisture.
- Do not pick up lightly flammable materials.
- Do not pick up burning materials such as cigarettes, matches or ash.
- Always make sure the appliance is placed on an even, flat surface and is only used indoors.
- Do not stand on the cord while using the appliance.
- Ensure that the cord cannot wrap itself around arms or legs during use.
- Do not use the appliance for cleaning animals or people.
- If the appliance is not used as intended or if the instructions in the manual are not observed, no compensation can be claimed in case of defects or accidents and the warranty will be invalidated.
- Correct installation and maintenance of the motor filter, Hepa filter and dust bag in accordance with the instructions in the manual is necessary to prevent defects in the appliance. In case of defects caused by incorrect use or not placing the dust bag and filters, the warranty becomes invalid.
- Always pull the entire cord out of the appliance when it is being used for more than 30 minutes at a time, to prevent the cord from overheating.
-
Never submerge the appliance, cord or plug in water.
-
Make sure that children are unable to touch the cable or appliance.
- Do not allow the cable to run over sharp edges, hot components or other sources of heat.
- Do not pull the cord and/or appliance to remove the plug from the wall socket. Never touch the appliance with wet or damp hands.
- If you decide to cease using the appliance due to a defect, we recommend cutting off the cord after removing the plug from the wall socket.
- Small household appliances do not belong in the dustbin.
Take them to the waste processing department concerned of your municipality.

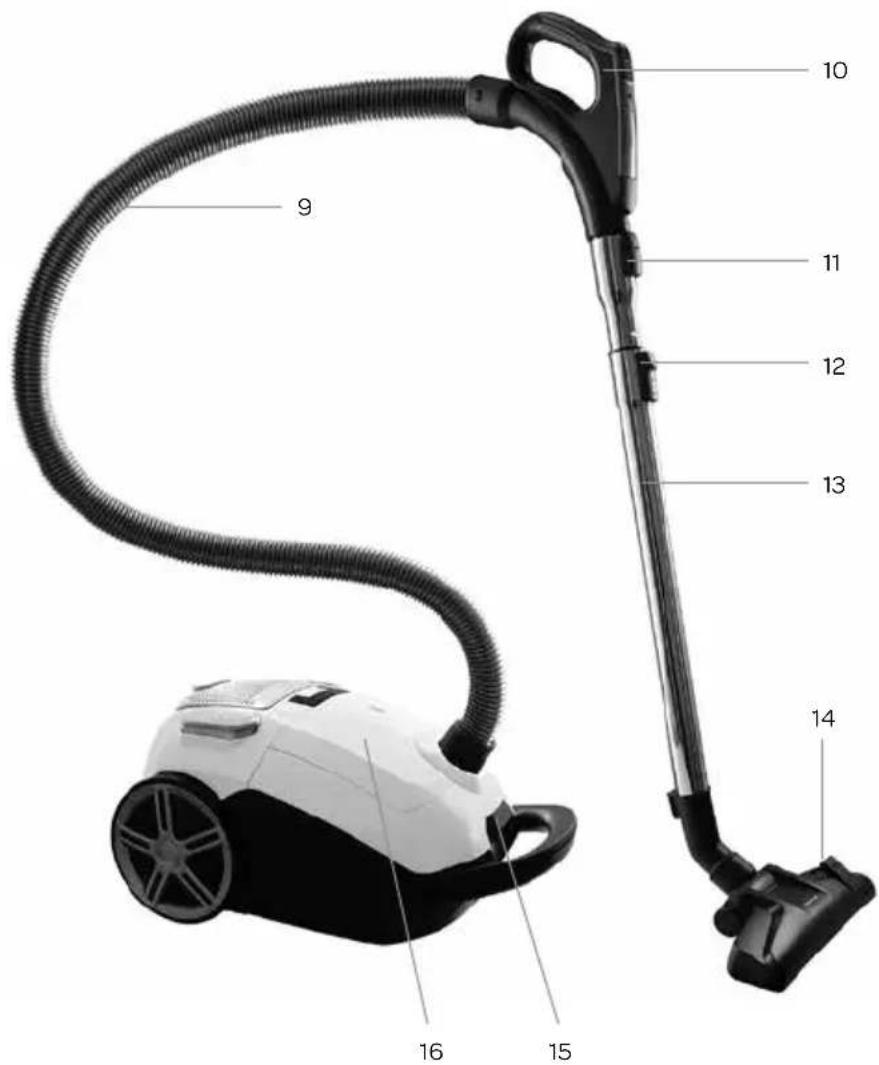
2 product description
- Handle
- Hose connection
- Dust bag full indicator
- Suction power controller with + and - button
- On/off switch ①
- HEPA filter - under the grille
- Cord winding system
- Button for automatic cord winding
- Hose
- Handle with remote control
- Snap-on system for connecting the tube to the hose or disconnecting it
- Slide button to adjust tube length
- Telescopic tube
- Floor nozzle with button for retracting and extending the brushes
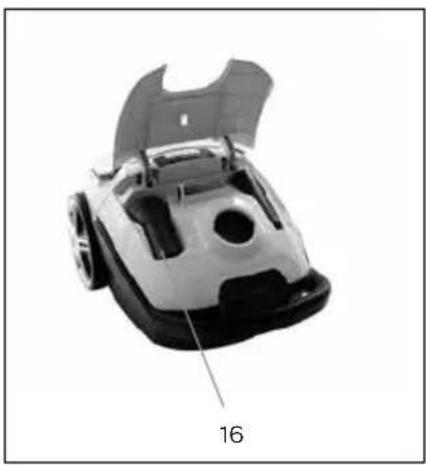
- Handle of dust bag compartment cover
- Storage compartment for accessories
natural_image
Top-down view of a mechanical device with open lid and labeled part '16' (no text or symbols on the object itself)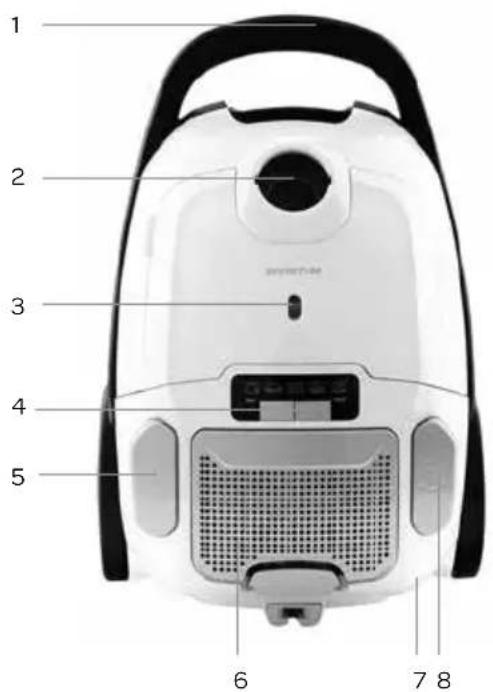

3 prior to first use
Follow these instructions when using the vacuum cleaner for the first time: Carefully remove the vacuum cleaner and all accessories from the packaging. Remove all packaging material and any promotional stickers. Keep the packaging (plastic bags and cardboard) out of reach of children. After unpacking the appliance, carefully check it for external damage that may have occurred during transport. Place the vacuum cleaner on a sturdy, dry and flat surface.
4 assembly
Make sure the plug of the vacuum cleaner is not inserted in a socket when (dis)assembling accessories or parts.
HOSE
Connecting the hose to the vacuum cleaner: insert the end of the hose in the hose connection on the vacuum cleaner and turn it clockwise with a firm twist until you hear a click sound.
Disconnecting the hose from the vacuum cleaner: check that the plug is not in a power socket. Turn the end of the hose counterclockwise to disconnect it from the vacuum cleaner.
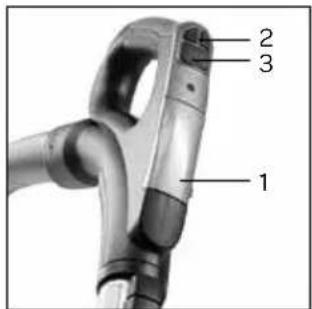
HANDLE WITH REMOTE CONTROL
By means of the ergonomic remote control on the handle, you are able to switch the vacuum cleaner on and off and control the suction power. In order to be able to control the vacuum cleaner with the remote control, you must first switch on the vacuum cleaner with the on/off button ⓘ on the vacuum cleaner itself.
- Open the battery cover on top of the handle and place the batteries. Note the indications for the + and - pole.
- Control the suction power with the + and - button. The active modes on the vacuum cleaner light up.
- Press the on/off button to switch off the vacuum cleaner or switch it on again.
TELESCOPIC TUBE
- Insert the handle of the hose in the telescopic tube, until it snaps in place.
- Adjust the telescopic tube to the required length. Slide the button at the top of the tube upwards and pull the lower section of the tube to make it longer. When you let go of the sliding button, the tube will snap in place at the required length.
- Attach the floor nozzle by sliding the tube firmly into the floor nozzle.
- Disconnect the hose from the tube by pressing the button of the snap-on system and pulling out the handle of the hose at the same time.
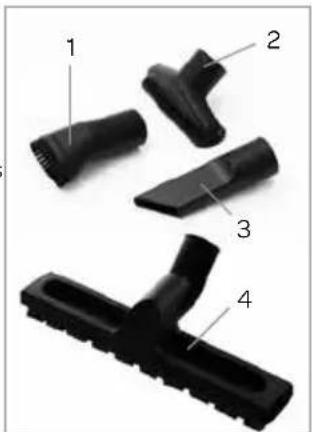
ACCESSORIES
For the benefit of the different cleaning objectives, attach the accessories to the tube or handle of the hose by sliding it firmly on the tube or the handle.
- Round brush nozzle: for cleaning hard furniture surfaces, corners of ceilings or blinds.
- Furniture nozzle: for cleaning mattresses, seats and cushions.
- Crack nozzle: for cleaning skirting boards, corners and small areas that the round brush nozzle cannot reach.
- Parquet brush: the parquet brush is provided with real natural hair. The long soft hairs prevent scratches on the floor. The parquet brush is suitable for parquet floors, laminate or wood floors and all other smooth and hard floors.
5 use
Check that the voltage stated on the information plate matches the voltage used in your region.
SWITCHING ON THE VACUUM CLEANER
- Place the vacuum cleaner on a sturdy and flat surface.
- Carefully pull the cord out of the vacuum cleaner until you reach the required length and insert the plug in a power socket.
-
Switch on the vacuum cleaner by pressing the on/off button Ⓓ with your foot.
-
Depending on the surface to be cleaned, you can adjust the suction power. Use the + and - button on the handle or vacuum cleaner to set the required suction power. The active modes light up.
| minimum suction power Delicate materials, curtains | |
| medium suction power | |
| maximum suction power | |
- Depending on the surface to be cleaned, you can adjust the brushes in the floor nozzle.

When cleaning hard floors, you must make sure the brushes are extended.
When cleaning floor coverings or floor cloths, the brushes must be retracted.
When it is difficult to move the floor nozzle over the floor, you can adjust the suction power with the + and - button on the handle.
PAUSE / SWITCH OFF THE VACUUM CLEANER
PAUSE
Press the on/off button Ⓐ on the remote control to pause the vacuum cleaner. Press the button once more to continue vacuum cleaning.
SWITCH OFF
Fully switch off the vacuum cleaner by pressing the on/off button ⏻ on the vacuum cleaner with your foot. Remove the plug from the socket, hold the plug and allow the cord to wind automatically by pressing the button for automatic rewinding ⏻ with your foot. Guide the cord with your hand to prevent possible damage. The cord is automatically wound up in the vacuum cleaner.
6 maintenance
Regularly check the hose, dust bag and filter to prevent problems. Empty the hose when it is clogged. Replace the dust bag when it is full and clean or replace the filters when they are dirty.
DUST BAGS AND FILTERS
The disposable dust bag and the motor filter are important parts for the efficiency of the vacuum cleaner. The dust bag is for collecting dirt, but at the same time the motor filter should be porous enough to allow sufficient air to pass through.
When the dust bag and motor filter are full, air is no longer able to pass, making it impossible for the vacuum cleaner to pick up dirt, irrespective of how powerful the motor is.
That is why it is important that the dust bag is replaced regularly and that the motor filter is replaced after each fourth dust bag replacement to guarantee optimum functioning of the vacuum cleaner. The air flow can quickly reduce when fine particles are picked up. Due to these fine particles, the performance of the vacuum cleaner will deteriorate, even if the dust bag is not yet full. It is therefore possible that the dust bag and motor filter should be replaced more frequently when picking up carpet cleaners, powders, dust generated during plastering work or other fine dust particles.
REPLACING THE DUST BAG AND MOTOR FILTER
Check that the vacuum cleaner is off and remove the plug from the socket before replacing the dust bag or motor filter.
Never use the vacuum cleaner without a dust bag or motor filter.
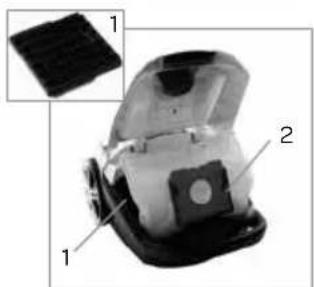
- Replace the dust bag when the dust bag full indicator becomes red or when the dust bag seems to be full.
- Open the dust bag compartment by pushing the handle upwards. Lift the cover.
- The motor filter [1] must be replaced after every fourth change of dust bag. Remove the motor filter by sliding it upwards. Place a new motor filter and place it back in place.
- Carefully slide the full dust bag out of the dust bag holder [2] and throw the full dust bag away.
natural_image
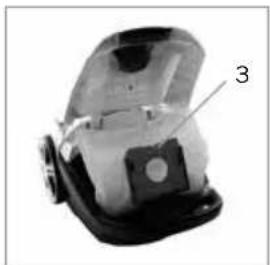
Close-up of a mechanical device with labeled parts (1, 2), showing internal components and a grid-like structure (no text or symbols beyond labels)- Slide a new dust bag [3] in the dust bag holder.
- Open the cover of the dust bag compartment. The opening of the dust bag is automatically pushed on the correct location when the cover is being closed. The cover of the dust bag compartment cannot be closed when the dust bag has not been placed correctly. Place the dust bag once more, in accordance with the instructions.
CLEANING OR REPLACING THE HEPA FILTER
The HEPA filter cleans the air one more time before it is ejected by the vacuum cleaner. Clean the HEPA filter at least once every six months or when it is very dusty. When the HEPA filter is damaged, it must be replaced by a new original filter.
- Press the clip to open the grille [4] under which the HEPA filter is located.
- Push the clip backwards and remove the HEPA filter [5].
- Clean the HEPA filter with lukewarm running water and allow the filter to dry in the air. Do not use cleaning agents or brushes.
- Only place the HEPA filter back once it is fully dry, or place a new HEPA filter.
- Place back the grille. Make sure it is properly attached.
Attention
- Only use the vacuum cleaner when all filters and a dust bag have been placed. If not, the suction power could be reduced or the motor could be damaged.
- Remove the plug from the socket before cleaning or replacing the filters.
- Torn or not properly sealing filters could damage the motor. When a filter is defective, it must be replaced by a new original filter.
• The filters may not be cleaned in the dishwasher. - Do not use a hair dryer to dry the filters.
STORAGE
The vacuum cleaner can be stored in two ways. Standing on its rear side - parking position - or its bottom side, so that the appliance takes up less space.
- Rewind the cord by pressing the button for automatic cord rewinding Ⓓ with your foot.
- Slide the button on the top side of the tube upwards and push the top part of the tube downwards to shorten the tube. When you let go of the sliding button, the tube will snap tight.
- Slide the floor nozzle in the holder on the bottom side of the vacuum cleaner - parking position - or place the vacuum cleaner upright and slide the floor nozzle in the holder [6] on the bottom side of the vacuum cleaner.
natural_image
Close-up of a mechanical device with a labeled component (3), showing internal structure without any readable text or symbols.
natural_image
Top-down view of a white and black robotic vacuum cleaner with labeled component '4' (no text or symbols on body)
natural_image
Close-up of a white robotic device with grid-patterned buttons, shown with an inset close-up of its top panel (no text or symbols visible)
natural_image
Black and white photo of a wheeled vehicle with wheels and a numbered label '6' (no visible text or symbols on the vehicle itself)7 frequently asked questions
| Problem Possible cause Solution | ||
| The suction power is reduced. The dust bag is full. Remove the full dust bag and place a new one. | ||
| The suction power controller is not at maximum. | Set the suction power controller to maximum - | |
| It is difficult to move the floor nozzle over the floor. | The suction power is set too high. Set the suction power to a lower position. | |
| The knob on the floor nozzle is not in the right position. | Make sure the brushes are retracted on carpet.Make sure the brushes are extended on hard floors. | |
| The vacuum cleaner makes more noise. | The tube or hose is clogged. Disconnect the telescopic tube and hose and unclog them. | |
| The motor filter or the HEPA filter is clogged. | Replace the motor filter.Clean or replace the HEPA filter. | |
| The dust bag is full. Remove the full dust bag and place a new one. | ||
| The dust bag compartment cannot be closed. | The dust bag is not placed or is not placed correctly. | Place the dust bag (again) according to the instructions and close the compartment. |
| The remote control does not work. | The batteries are not properly placed in the remote control.The batteries are empty. | Check that the batteries are placed correctly.Place new batteries. |
natural_image
Close-up of a mechanical vacuum cleaner component with no visible text or symbols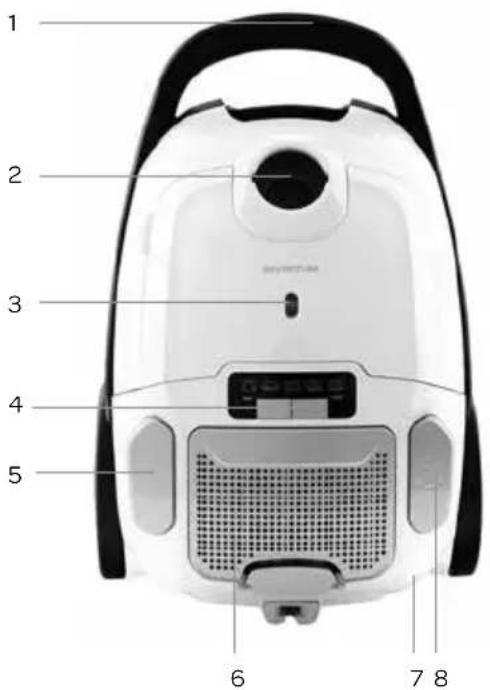
natural_image
Close-up of a mechanical device with a labeled component (3), no visible text or symbols beyond the number.
natural_image
Top-down view of a white and black robotic vacuum cleaner with labeled part '4' (no text or symbols on body)
natural_image
Close-up of a white robotic device with grid-patterned top surface, shown with an inset close-up of its grid pattern (no text or symbols visible)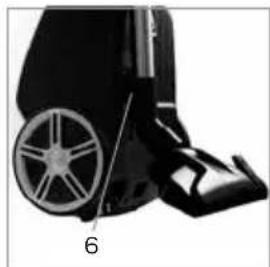
natural_image
Black and white photo of a wheeled vehicle with wheels and a numbered label '6' (no visible text or symbols on the object itself)natural_image
Close-up of a mechanical device with a numbered label pointing to a specific part (no readable text or symbols)

natural_image
Close-up of a mechanical device with labeled parts (1, 2, 1) and an inset showing a textured surface (no text or symbols beyond labels)natural_image
Close-up of a mechanical device with a labeled component (3), no visible text or symbols beyond the number.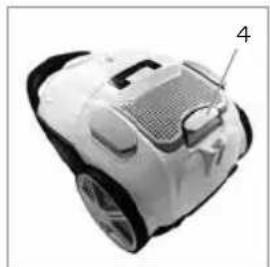
natural_image
Top-down view of a white and black robotic vacuum cleaner with labeled part '4' (no text or symbols on body)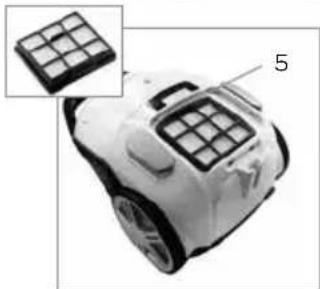
natural_image
Close-up of a white robotic device with grid-patterned top surface, shown with an inset close-up of its grid pattern (no text or symbols visible)
natural_image
Close-up of a black wheeled vehicle with a wheel rim and attached seat (no visible text or symbols)general terms and conditions of service and warranty
We do not need to remind you of the importance of service. After all, we develop our products to a standard so that you can enjoy them for many years, without any concerns. If, nevertheless, there is a problem, we believe you are entitled to a solution straight away. Hence our products come with an exchange service, on top of the rights and claims you are entitled to by law. By exchanging a product or part, we save you time, effort and costs.
2-year full manufacturer's warranty
- Customers enjoy a 2-year full manufacturer's warranty on all Inventum products. Within this period, a faulty product or part will always be exchanged for a new model, free of charge. In order to claim under the 2-year full manufacturer's warranty, you can either return the product to the shop you bought it from or contact the Inventum costumer service department via the form at www.inventum.eu/service-aanvraag.
- The 2-year warranty period starts from the date the product is bought.
- In order to claim under the warranty, you must produce a copy of the original receipt.
- The warranty applies only to normal domestic use of Inventum products within the Netherlands.
Breakdowns or faults outside the warranty period
- Breakdowns or faults in small or large domestic appliances outside the warranty period, can be reported to the costumer services department via the form at www.inventum.eu/service-aanvraag or by calling the costumer services department.
- The costumer services department may ask you to send the product for inspection or repair. The costs of dispatch will be at your expense.
- The inspection to establish whether repair is possible involves a charge. You need to grant your permission for this, in advance.
- In the event of a large domestic appliance, Inventum, at your request, can send out a service engineer. In that case, you will be charged the call-out costs, as well as parts and labour.
- In the event of an instruction to repair, the repair costs must be paid in advance. In the event of a repair by a service engineer, the costs of the repair must be settled with the engineer onsite, preferably by means of PIN payment.
Warranty exclusions
- The following is excluded from the aforesaid warranties:
• normal wear and tear;
- improper use or misuse;
• insufficient maintenance;
- failure to comply with the operating and maintenance instructions;
- unprofessional installation or repairs by third parties or the customer himself;
• non-original parts used by the customer;
- use for commercial or business purposes;
- removal of the serial number and/or rating label.
-
In addition, the warranty does not apply to normal consumer goods, such as:
-
dough hooks, baking tins, (carbon) filters, etc.;
- batteries, bulbs, carbon filters, fat filters etc.;
• external connection cables; -
glass accessories and glass parts such as oven doors;
• and similar items. -
Transport damage not caused by Inventum is also excluded. Therefore, inspect your new device before starting to use it. If you detect any damage, you must report this to the store where you purchased the product within 5 working days, or to the Inventum customer service department via the form at www.inventum.eu/service-aanvraag. If transport damage is not reported within this period, Inventum does not accept any liability in this respect.
-
The following are excluded from warranty and/or replacement: faults, loss of and damage to the device as a result of an event that is normally insured under the home contents insurance.
Important to know
- The replacement or repair of a faulty product, or a part thereof, does not lead to an extension of the original warranty period.
- If a complaint is unfounded, all costs arising from it will be at the customer's expense.
- Following expiry of the warranty period, all costs of repair or replacement, including administration costs, dispatch and call-out charges, will be charged to the customer.
- Inventum cannot be held liable for damage caused by external events, unless this liability arises from mandatory statutory provisions.
- These warranty and service provisions are governed by Dutch law. Disputes will be settled exclusively by the competent Dutch court.
facebook.com/inventum1908
youtube.com/inventum1908


- Deutsch
- • Nederlands
- HANDGREEP MET AFSTANDSBEDIENING
- • Nederlands
- safety instructions
- product description
- prior to first use
- assembly
- HOSE
- HANDLE WITH REMOTE CONTROL
- TELESCOPIC TUBE
- ACCESSORIES
- use
- SWITCHING ON THE VACUUM CLEANER
- PAUSE / SWITCH OFF THE VACUUM CLEANER
- PAUSE
- SWITCH OFF
- maintenance
- DUST BAGS AND FILTERS
- REPLACING THE DUST BAG AND MOTOR FILTER
- CLEANING OR REPLACING THE HEPA FILTER
- Attention
- STORAGE
- frequently asked questions
- general terms and conditions of service and warranty
- 2-year full manufacturer's warranty
- Breakdowns or faults outside the warranty period
- Warranty exclusions
- Important to know
Brand : INVENTUM
Model : ST308WZA
Category : Vacuum Cleaner