
IAN 311317 - Gazebo CRIVIT - Free user manual and instructions
Find the device manual for free IAN 311317 CRIVIT in PDF.

| Product type | Demountable gazebo (pavilion) |
| Brand / Model | Crivit / IAN 311317 |
| Dimensions (W x H x D) | 300 × 245 × 300 cm |
| Weight | Approximately 5.8 kg |
| Material of bars | Steel |
| Roof material | Polyethylene |
| Material of connectors | Plastic (roof cross and corner fittings) |
| Material of stakes | Galvanized steel |
| Number of stakes supplied | 8 |
| Number of guylines | 4 |
| Manufacturing date | 02/2019 |
| Intended use | Outdoor visual and sun protection, non-professional use |
| Weather resistance | Partial, do not use in wind >40 km/h, rain or snow |
| Recommended number of people for assembly | 2 to 4 |
| Maintenance and cleaning | Clean with a damp cloth and mild detergent; the roof can be treated with a waterproofing spray |
| Storage | Dry and clean, in a temperate room |
| Warranty | 3 years from date of purchase (material and manufacturing defects) |
| After-sales service France | 0800 919270 |
| After-sales service Belgium | 070 270 171 (0.15 EUR/min) |
| After-sales service email | deltasport@lidl.fr / deltasport@lidl.be |
| Recycling code | Follow local guidelines for disposal |
Frequently Asked Questions - IAN 311317 CRIVIT
User questions about IAN 311317 CRIVIT
0 question about this device. Answer the ones you know or ask your own.
Ask a new question about this device
Download the instructions for your Gazebo in PDF format for free! Find your manual IAN 311317 - CRIVIT and take your electronic device back in hand. On this page are published all the documents necessary for the use of your device. IAN 311317 by CRIVIT.
USER MANUAL IAN 311317 CRIVIT
Instructions for use
PARTYTENT
Gebruksaonwijzing
G
ALTÁN
Návod kobsluze

B ④
Before reading, fold out the ilustration page and get to know all of the functions of your unit.
00
G/IE Induclion and Solily Nnline Page 13
| FR/EE | Institutions d'utilisation en de la société | Page 18 |
| NL/SE | Gebrokkomponenten verifizierte undastucturées | Fogena 24 |
| FI | Wiktoriki bei bepapierkennia obolaji | Stroma 29 |
| CZ | Pokymy i pośvátne i bezehmerté upozomni | Stráky 34 |
| SK | Pokymy načiljka bei bepapierkenniaPokymy | Stroua 39 |
DELTA SPORT HANDELSKONTOR OMH
Wegendp 6-052397 Hambg
G-800
…
027819
06:50pm4:P4C05
IAN311317IAN311317
8
D A C H B
H

DE AT CH
Lieferumfang 8
Technische Daten 8
Bestimmungsgemäß
Verwendung 8
Danger of injury 13-14
Choice of location 14
Assembly 14-15
Disassembly 15
Cleaning and care 16
Care instructions 16
Storage 16
Disposal 16
Notes on the guarantee and
service handling 16-17
FR BE
Matériel fourni 18
With your purchase you have decided on a high-quality product. Get to know the product before you start to use it.

Carefully read the following instructions for use.
Use the product only as described and only for the given areas of application. Keep these instructions safe. When passing the product on to a third party, always make sure that the documentation is included.

Please read all the safety es and instructions.
Failure to observe them can lead to serious injury.
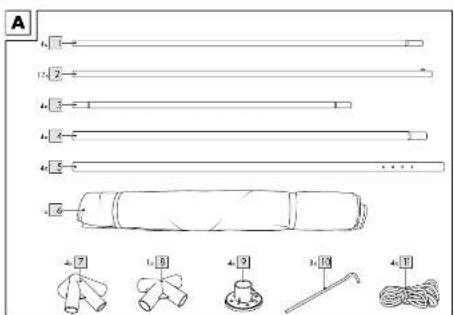
Contents (Fig. A)
4 x roof connector pole (1)
12 × corner connector pole (2)
4 x centre pole (3)
4 x corner pole top (4)
4 x corner pole bottom (5)
1 x pavilion roof (6)
4× corner connector (7)
1 x roof cross connector (8)
4 x base (9)
8 x tent peg (10)
4 x guy rope (11)
1 x instructions for use
Technical data
Dimensions: 300 × 245 × 300cm (W × H × D)
Weight: approx. 5.8kilos
Material
- Poles: steel
- Roof and corner connectors: plastic
- Roof: polyethylene
- Tent pegs: galvanised steel

Date of manufacture (month/year): 02/2019
Proper use
This article has been designed for outdoor use to provide privacy and protection from the sun.
It is not fully weather resistant and is therefore unsuitable for permanent installation outside. The article should not be used for commercial purposes.
Safety information

Danger to life!
- Never allow children to play with the packaging material whilst unsupervised. There is a risk of suffocation.

Danger of injury!
-
The article must not be used in adverse weather conditions such as strong wind or heavy rain and snow.
-
Dismantle the pavilion if wind speeds are expected to exceed 40kilometres per hour (brisk and clearly audible winds, larger branches and trees moving).
- Disassemble the article if the wind begins to rise or if other adverse weather conditions occur.
- Take particular care to avoid squashing your fingers whilst erecting and dismantling the article. This could cause injury in the form of contusions.
- Place the article on a level surface.
- Indicate the presence of the guy rope to other persons and warn them of the danger of tripping.
Make sure that the article is fully stretched out prior to use.
The article may only be used under the supervision of adults and is not designed as a toy. - Check the article for damage or wear and tear prior to each use.
- Check that all elements have been properly installed before using the article. Incorrect assembly may reduce safety and functionality.
-
Do not use open fires, grills or patio heaters in or near the article. Leave the pavilion immediately in the event that it catches fire! Use a fire extinguisher or water to put out the blaze. Alert the fire brigade without delay if necessary.
-
Individual pavilions must not be connected or fixed to one another. A minimum distance of 3 metres must be maintained between individual pavilions.
- Any build-up's of water must be removed!
- The guy ropes must be used at their full length.
Choice of location
- The dimensions of the article are 3 × 3 metres, and additional space will be required for the guy ropes.
- Wherever possible, place the article in an area where it is protected from the wind.
- The ground should be level and should provide the tent pegs with sufficient stability.
Assembly
Please note! At least 2 persons are needed to erect the article. We recommend that assembly should be carried out by 4 persons.
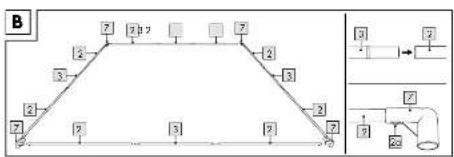
Step 1
Assemble the roof frame. Connect each of the centre poles (3) with two corner connector poles (2) and a corner connector (7). Please make sure that the locking mechanisms (2a) click into place both visibly and audibly in the holes in the corner connector (Fig. B).
Warning! Risk of trapping hands or fingers!
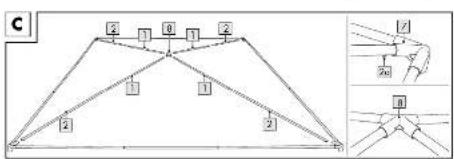
Step 2
Insert the last four corner connector poles into the corner connector. Insert the four roof connector poles (1) and connect these to the roof cross connector (8). Please make sure that the locking mechanisms (2a) click into place both visibly and audibly in the holes in the corner connector (Fig. C).
Warning! Risk of trapping hands or fingers!
Step 3
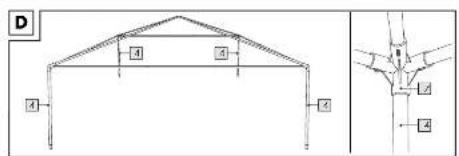
Insert the top corner poles (4) into the corner connector (Fig. D).
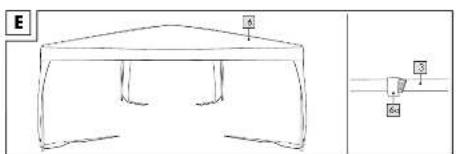
Step 4
Pull the pavilion roof (6) over the frame. Fix the roof into place using the pre-installed velcro fasteners (6a) on the roof frame (Fig. E).
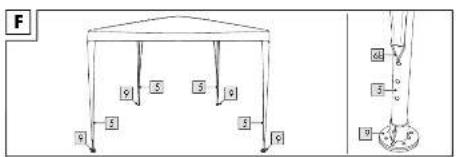
Step 5
Insert the bottom corner poles (5) into the top corner poles and the bases (9). Fasten the roof loops (6b) into one of the drilled holes in the bottom corner pole (Fig. F).
Step 6
Anchor each foot with the help of the tent pegs (10). Use the openings in the feet for this purpose.
Knot one end of each guy rope (11) to a roof loop (6b) at the outer corners of the product.
Warning! Extend the guy ropes to their full length in order to achieve a high level of stability and attach the ends using one tent peg each (Fig. G).
Warning! Make sure the tent pegs are fixed securely.
Disassembly
Step 1
Loosen the tent pegs holding the guy ropes and bases.
Step 2
Release the roof loops from the bottom corner poles. Remove the bases and bottom corner poles.
Step 3
Remove the roof and top corner poles.
Step 4
Disassemble the roof frame.
Press on the locking mechanism to release the poles from the corner connectors.
Warning! Risk of trapping hands or fingers!
Step 5
Make sure that the article is clean and dry prior to storage.
Cleaning and care
Care instructions
Clean the article using a damp cloth and a mild detergent.
Do not use petrol, solvents or strong detergents.

Storage
In order to be able to enjoy the article for as long as possible, we recommend that it should always be stored in a dry and clean condition at room temperature when not in use.
Disposal
Dispose of the article and the packaging materials in accordance with current local regulations. Packaging materials such as foil bags are not suitable to be given to children.
Keep the packaging materials out of the reach of children.

Dispose of the products and the packaging in an environmentally friendly manner.

The recycling code is used to identify various materials for
recycling.
The code consists of the recycling symbol - which is meant to reflect the recycling cycle - and a number which identifies the material.
Notes on the guarantee and service handling
The product was produced with great care and under constant supervision. You receive a three-year warranty for this product from the date of purchase. Please retain your receipt.
The warranty applies only to material and workmanship and does not apply to misuse or improper handling. Your statutory rights, especially the warranty rights, are not affected by this warranty.
With regard to complaints, please contact the following service hotline or contact us by e-mail. Our service employees will advise as to the subsequent procedure as quickly as possible. We will be personally available to discuss the situation with you.
Any repairs under the warranty, statutory guarantees or through goodwill do not extend the warranty period. This also applies to replaced and repaired parts.
Repairs after the warranty are subject to a charge.
IAN:311317
GB Service Great Britain
Tel.: 0800 404 7657
E-Mail: deltasport@lidl.co.uk
IE Service Ireland
Tel.: 1890 930 034
O,O8 EUR/Min.,
(peak))
0,06 EUR/Min.,
(off peak))
E-Mail: deltasport@lidl.ie
Felicitations!

- DE AT CH
- FR BE
- Carefully read the following instructions for use.
- Please read all the safety es and instructions.
- Failure to observe them can lead to serious injury.
- Contents (Fig. A)
- Technical data
- Proper use
- Safety information
- Danger to life!
- Danger of injury!
- Choice of location
- Assembly
- Step 1
- Warning! Risk of trapping hands or fingers!
- Step 2
- Step 3
- Step 4
- Step 5
- Step 6
- Disassembly
- Cleaning and care
- Care instructions
- Storage
- Disposal
- Notes on the guarantee and service handling
Brand : CRIVIT
Model : IAN 311317
Category : Gazebo