
DD24DCTW9 N - Dishwasher Fisher & Paykel - Free user manual and instructions
Find the device manual for free DD24DCTW9 N Fisher & Paykel in PDF.


User questions about DD24DCTW9 N Fisher & Paykel
0 question about this device. Answer the ones you know or ask your own.
Ask a new question about this device
Download the instructions for your Dishwasher in PDF format for free! Find your manual DD24DCTW9 N - Fisher & Paykel and take your electronic device back in hand. On this page are published all the documents necessary for the use of your device. DD24DCTW9 N by Fisher & Paykel.
USER MANUAL DD24DCTW9 N Fisher & Paykel
DISHDRAWER™ DISHWASHER
DOUBLE MODELS
Safety and warnings 5
First use 8
Loading suggestions 10
Wash programs 11
Operating instructions 12
Wash modifiers 13
Delay start 15
Keylock & Childlock 16
Detergent 17
Rinse aid 20
Water softener (some models only) 22
Preferences 24
Wi-Fi connection & remote mode 26
Racking features 28
33
Troubleshooting 37
Fault codes 41
Warranty and service 43
READ AND SAVE THIS GUIDE
When using your DishDrawer™ Dishwasher, follow basic precautions, including the following:
General
- The information in this guide must be followed to minimise the risk of fire or explosion or to prevent property damage, personal injury or loss of life.
-
Use the DishDrawer™ Dishwasher only for its intended function as described in this user guide.
This appliance is intended to be used in household and similar applications such as: -
staff kitchen areas in shops, offices and other working environments
- farm houses
- by clients in hotels, motels and other residential environments
- bed and breakfast environments.
NSF 184-Certified residential dishwashers are not intended for licensed food establishments.
- Use only detergents or rinse aid recommended for use in a domestic dishwasher and keep them out of reach of children. Check that the detergent dispenser is empty after the completion of each wash program.
- When loading items to be washed, locate sharp items so that they are not likely to damage the internal lid of the DishDrawer™ Dishwasher and load sharp knives with the handle up to reduce the risk of cut injuries.
- Do not touch the filter plate in the DishDrawer™ Dishwasher base during or immediately after use, as it may be hot.
- Do not operate your DishDrawer™ Dishwasher unless all enclosure panels are properly in place.
- Do not tamper with the controls.
- Do not abuse, sit on, stand in or on the drawer or dish rack of the DishDrawer™ Dishwasher.
- The drawer should not be left in the open position since this could present a tripping hazard.
- The foldaway cup racks are designed to support cups, glasses and kitchen utensils. When the foldaway cup racks are in the drawer do not lean on or use them to support your body weight.
To reduce the risk of injury, do not allow children to play in or on the DishDrawer™ Dishwasher.
- Under certain conditions, hydrogen gas may be produced in a hot water heater system that has not been used for two weeks or more. HYDROGEN GAS IS EXPLOSIVE. If the hot water system has not been used for such a period, before using the DishDrawer™ Dishwasher, turn on all hot water taps and let the water flow from each for several minutes. This will release any accumulated hydrogen gas. As the gas is flammable, do not smoke or use an open flame during this time.
- Some dishwasher detergents are strongly alkaline. They can be extremely dangerous if swallowed. Avoid contact with the skin and eyes and keep children away from the DishDrawer™ Dishwasher when the door is open.
- Under no circumstances should you open the drawer whilst the DishDrawer™ Dishwasher is in operation.
Always press to pause and wait until you hear four beeps before opening the drawer.
- The DishDrawer™ Dishwasher must be used with the motor assembly, filter plate, drain filter and spray arm in place. To identify what these parts are refer to 'Maintenance'.
- Take care not to load dishware items so they prevent the internal lid from properly sealing with the drawer. Items should be placed so they do not protrude above the drawer.
- Cleaning and maintenance shall not be done by children without supervision.
- Do not allow children to play inside, on or with this appliance or any discarded appliance.
- If the DishDrawer™ Dishwasher is not being used for long periods of time, turn the electricity and water supply off.
- Household appliances are not intended to be used by children. Children of less than 8 years old must be kept away from the appliance unless continuously supervised. This appliance can be used by children aged from 8 years and above, and persons with reduced physical, sensory or mental capabilities or lack of experience and knowledge, if they have been given supervision or instruction concerning the use of the appliance in a safe way and they understand the hazards involved.
- If a dishwasher cleaner is used, we recommend running a wash program with detergent immediately afterward to prevent any damage.
- The DishDrawer™ Dishwasher is designed for washing normal household utensils. Items that are contaminated by petrol, paint, steel, iron debris, corrosive, acidic or alkaline chemicals are not to be washed in the DishDrawer™ Dishwasher.
- Do not wash plastic items unless they are marked dishwasher safe or equivalent. For plastic items not marked, check the manufacturer's recommendations.
Installation
- This DishDrawer™ Dishwasher must be installed and located in accordance with the Installation instructions before it is used. If you did not receive Installation instructions with your DishDrawer™ Dishwasher, you can order them by calling your Authorised Repairer or download them from our local Fisher & Paykel website, listed on the back cover.
- Installation and service must be performed by a Fisher & Paykel trained and supported service technician.
- If the power supply cord is damaged, it must be replaced by a Fisher & Paykel trained and supported service technician or a qualified trades person in order to avoid a hazard.
- Ensure the DishDrawer™ Dishwasher is secured to adjacent cabinetry using the brackets provided. Failure to do so may result in an unstable product, which may cause damage or injury.
- Do not operate this appliance if it is damaged, malfunctioning, partially disassembled or has missing or broken parts, including a damaged power supply cord or plug.
- Do not store or use petrol, or other flammable vapours and liquids in the vicinity of the DishDrawer™ Dishwasher.
- Connect to a properly rated, protected and sized power supply circuit to avoid electrical overload.
- Ensure the power supply cord is located so that it will not be stepped on, tripped over or otherwise subject to damage or stress.
- Do not install or store the DishDrawer™ Dishwasher where it will be exposed to temperatures below freezing or exposed to weather.
-
Do not use an extension cord or a portable electrical outlet device (e.g. multi SOCKET outlet box) to connect the DishDrawer™ Dishwasher to the power supply.
-
This appliance must be grounded. In the event of a malfunction or breakdown, grounding will reduce the risk of electric shock by providing a path of least resistance for electric current.
- This appliance is equipped with a cord having an equipment-grounding conductor and a grounding plug. The plug must be plugged into an appropriate outlet that is installed and grounded in accordance with all local codes and ordinances. Improper connection of the equipment-grounding conductor can result in a risk of electric shock. Check with a qualified electrician or Fisher & Paykel trained and supported service technician if you are in doubt as to whether the appliance is properly grounded.
- Do not modify the plug provided with the appliance; if it will not fit the outlet, contact a Fisher & Paykel trained and supported service technician or qualified electrician.
- If the DishDrawer™ Dishwasher is installed as a permanently connected appliance, this appliance must be connected to a grounded metal, permanent wiring system, or an equipment-grounding conductor must be run with the circuit conductors and connected to the equipment-grounding terminal or lead on the appliance.
Maintenance
- Disconnect the appliance from the power supply before any cleaning or maintenance.
- When disconnecting the appliance pull the plug rather than the power supply cord or junction of cord to avoid damage.
- Do not repair or replace any part of the appliance or attempt any servicing unless specifically recommended in this guide. We recommend contacting a Fisher & Paykel trained and supported service technician or Customer Care.
- Keep the floor around your appliance clean and dry to reduce the possibility of slipping.
- Keep the area around/underneath your appliance free from the accumulation of combustible materials, such as lint, paper, rags and chemicals.
Wi-Fi
- Do not change or modify the wireless communication device in any way. Changes or modifications not expressly approved by Fisher & Paykel could void the user's authority to operate the equipment.
- This device contains licence-exempt transmitter /receiver that comply with Innovation, Science and Economic Development Canada's licence-exempt RSS(s). Operation is subject to the following two conditions:
This device may not cause interference.
- This device must accept any interference, including interference that may cause undesired operation of the device.
- WARNING: The incorporated Wi-Fi module in this appliance is to operate only from channel 1 to channel 11 as per FCC rules.
- This device complies with part 15 of the FCC Rules. Operation is subject to the following two conditions:
This device may not cause harmful interference, and
- this device must accept any interference received, including interference that may cause undesired operation.
- Ensure the installer has completed the 'Final checklist' in the Installation instructions.
- Read this guide, taking special note of the 'Safety and warnings' section.
- Remove all internal and external packaging and dispose of it responsibly. Recycle items that you can.
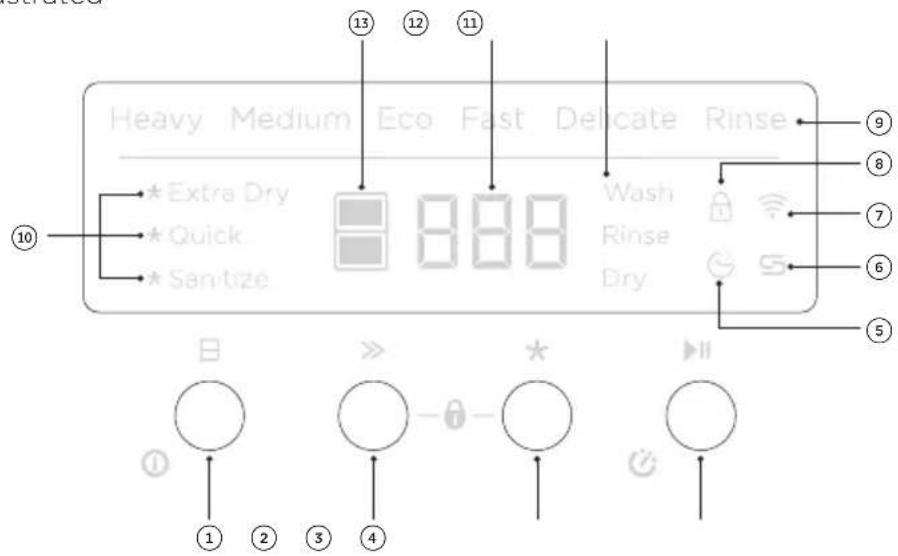
Double model illustrated
Control panel features
On/Off +Drawer selector*
Lock indicator
② Wash program selector
⑨ Wash program indicators
③ Wash modifier selector
⑩ Wash modifier indicators
Start + Delay start
① Wash stage indicators
⑤ Delayed start indicator
12 Display
Salt indicator**
3 Drawer indicator*
⑦ Wi-Fi indicator
Dishware
The combination of high temperatures and dishwasher detergent may cause damage to some items. Refer to the manufacturer's guidance or wash by hand if in doubt.
Cutlery & silverware
All cutlery and silverware should be rinsed immediately after use to prevent tarnishing, RINSE cycle is recommended. Silver should not come into contact with stainless steel, mixing these can cause staining. Remove silver cutlery from the DishDrawer™ Dishwasher and hand dry immediately.
Aluminium
Aluminium can be dulled by detergent. The degree of change depends on the quality of the detergent or aluminium.
Other metals
Iron and cast iron can rust and stain other items. Copper, pewter and brass tend to stain.
Woodware
Woodware is generally sensitive to heat and water. Regular use in the DishDrawer™ Dishwasher may cause deterioration over time.
Glassware
Most glassware is dishwasher safe. Crystal, very fine and antique glassware may etch and will develop a cloudy appearance.
Plastics
Some plastics may change shape or colour with hot water. Refer to the manufacturer's guide. Dishwasher safe plastic should be weighed down so it does not flip and fill with water or fall through the base rack during the wash.
Decorated items
Most modern china patterns are dishwasher safe. Antique items, those with a pattern painted over the glaze, gold rims or hand painted china may be more sensitive to machine washing.
Glued items
Certain adhesives are softened or dissolved in machine washing.
Water hardness
Hard water is water with a high concentration of minerals such as calcium and magnesium. It can be detrimental to the performance of your DishDrawer™ Dishwasher and parts can fail over time. Glassware washed in hard water will become cloudy and dishes will become spotted or covered in a white film over time. Water hardness varies by geographical location.
If you live in a hard water area, and your DishDrawer™ Dishwasher does not have a built-in water softener, we recommend fitting a water softener to the household water supply.
If your home has hard water
Refer to 'Powdered detergent quantity recommendations'.
- Use rinse aid. We recommend you raise the rinse aid setting to 5 to help improve wash performance. Refer to 'Preferences' for details.
Use a dishwasher cleaner/descaler regularly, or whenever you notice a build-up of limescale deposits in your DishDrawer™ Dishwasher.
If your home has soft or softened water
- Avoid using too much detergent.
Remove all food scraps before carefully loading into the drawer. When loading your drawer ensure items are placed so water coming from the rotating spray arm below can reach all areas. Wash performance will be reduced if it can't.
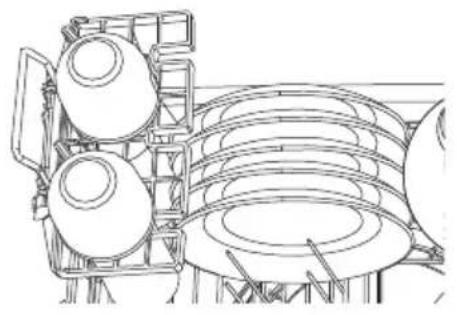
Ensure
Spray arms can rotate freely.
Glass and other fragile items are stable.
- All dish openings are facing downwards.
- Plates are evenly spaced.
- All sharp objects are located securely to avoid injury or damage to the product.
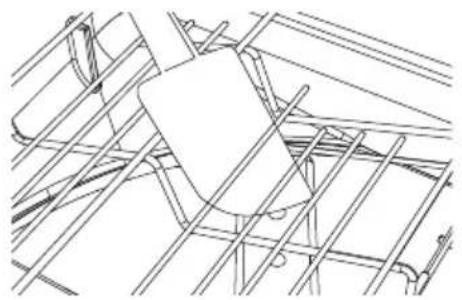
Avoid
Overcrowding.
- Any protrusions below the racks and basket that may prevent spray arm rotation.
Any protrusions at the top of the drawer.*
- Blocking water from any items on the foldaway cup racks.
*maximum dishware height for standard tub models is 280mm and 310mm for tall tub models.
Your DishDrawer™ Dishwasher has a number of wash programs designed to suit your needs. Selecting the most appropriate cycle for each load will help ensure the best wash results.
The Eco program is the most efficient program in terms of combined energy and water consumption. Loading the dishwasher to capacity will contribute to water and energy savings. Pre-rinsing of tableware items will increase water and energy consumption and is not recommended. Washing tableware with a household dishwasher usually consumes less energy and water than hand washing, when used according to manufacturer's instructions.
WASH PROGRAM DESCRIPTION
| HEAVY | Designed for heavily soiled pots, pans and dishes |
| MEDIUM | Best for dishes that are quite heavily soiled or to remove food soils that have been left to dry overnight |
| ECO | For normally soiled dishes for optimum water and energy use |
| FAST | Lightly soiled dishes |
| DELICATE | For lightly soiled and heat sensitive crockery and glassware such as wine glasses |
| RINSE | Prevents odours and soils from drying on dishes |
Setting a wash program
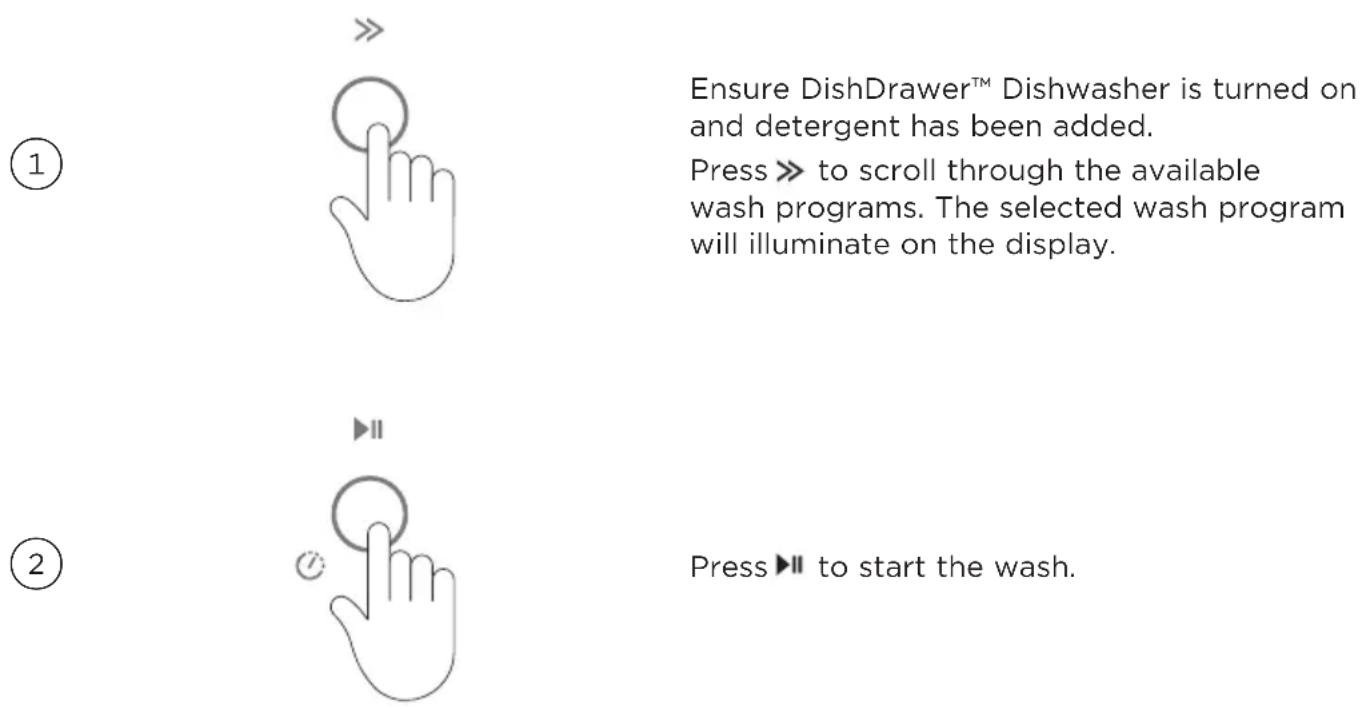
Pausing a wash

To pause the current wash program, press WASH and will flash in the display
Wait for three short and one long tone before opening the drawer. Forcing it open mid cycle may cause damage or injury.
If the drawer is not restarted within 7 minutes it will tone intermittently until it is restarted.
Resuming a wash

To resume, press again.
Cancelling a wash
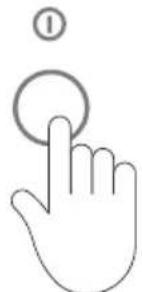
Press ①. If there is any water in the drawer, it will drain before the DishDrawer™ Dishwasher turns off.
*double models only
After setting the wash program, you may select one of the following the additional options. Only one modifier can be set at a time.
EXTRA DRY
Increases the final rinse temperature and the length of the drying phase.
QUICK
Uses additional water and energy for a faster wash time.
SANITIZE
Raises the water temperature during the rinse phase to sanitize.
WASH PROGRAM MODIFIER AVAILABLE
| HEAVY | Extra Dry, Quick, Sanitize |
| MEDIUM | Extra Dry, Quick, Sanitize |
| ECO | n/a |
| FAST | Extra Dry |
| DELICATE | Extra Dry, Quick |
| RINSE | n/a |
Setting a wash modifier
1
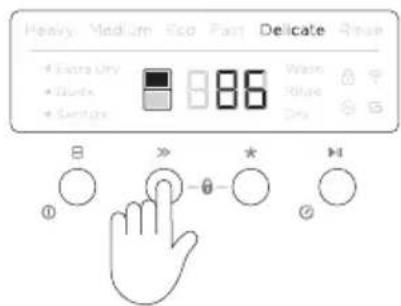
Ensure DishDrawer™ Dishwasher is turned on, detergent has been added and a wash program has been selected.
②
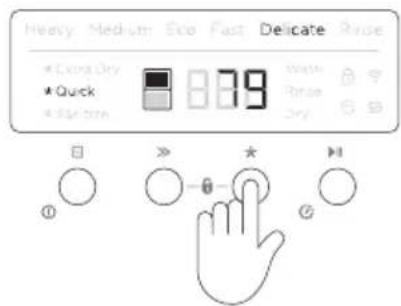
Press to scroll through the available wash modifiers. The selected wash modifier indicator will illuminate on the display.
Press to start the wash.
Using SANITIZE
The SANITIZE wash modifier adjusts the wash program to meet the conditions required by Section 6, NSF 184 for sanitization to occur. While SANITIZE is running, the wash program is monitored to ensure that these conditions are met.
Only programs utilising the SANITIZE wash modifier are certified to meet the conditions required by Section 6, NSF 184. Other wash programs may not reach the temperatures required for sanitization to occur. See table on previous page for wash programs that have sanitize available.
For sanitization to occur, the temperature of the water needs to reach 70^ . Ensure all items are dishwasher safe before running the sanitize modifier.
If the wash is interrupted or the water supply is turned off during the program, the heating conditions for sanitization may not be met. You may need to run the program again.
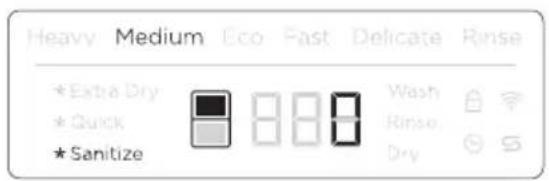
If sanitization has been successful
The DishDrawer™ Dishwasher will beep, will show in the display and the SANITIZE indicator will remain lit. After 30 seconds the display will turn off.

If sanitization has not been successful
An alert will sound and an alert code will show in the display. The SANITIZE indicator will not be lit.
1 Check if the water supply has been turned off or the wash program interrupted.
② Press once to stop the beeping and then again to clear the alert code.
Run the SANITIZE cycle again.
For more information, refer to 'Fault codes'.
DELAY START can delay the start of the wash program between 1-12 hours. The display will show the number of hours until the wash program is set to begin.
Setting Delay start
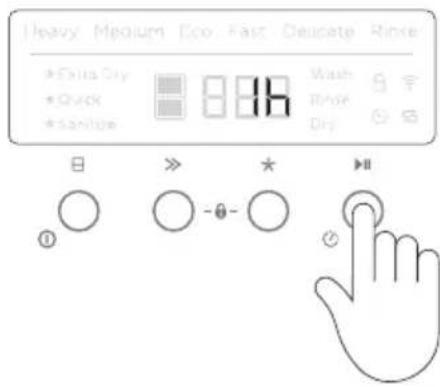
1
Press and hold until it appears in the display to enter DELAY START mode.
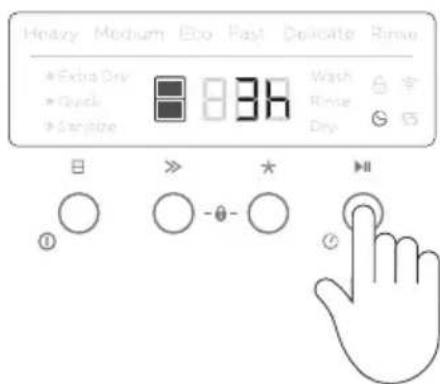
②
Press to increase the delay start time. and will flash in the display and the countdown will begin.
The wash will start once the delay time is over, provided the door is closed.
If the drawer is opened after DELAY START has been set, DELAY START will be paused after closing the drawer. Press to resume.
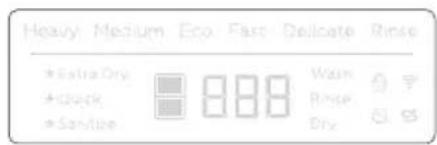
3
If you scroll past 12 hours the dishwasher will exit DELAY START mode
Cancelling Delay start
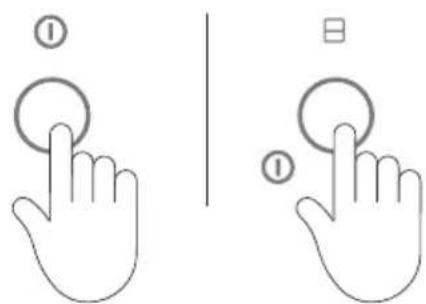
1
Single models Press ①.
Double models Press and hold.
*double models only
Keylock
KEYLOCK disables all buttons across the control panel and door, and locks all drawers closed.
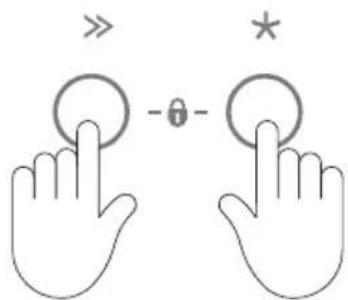
To activate KEYLOCK
Press and hold and together until you hear a tone and illuminates in the display.
To cancelKEYLOCK
Press and hold and together until you hear a tone sound and 0 dims in the display.
Childlock
CHILDLOCK disables all buttons across the control panel and door and locks all drawers closed.
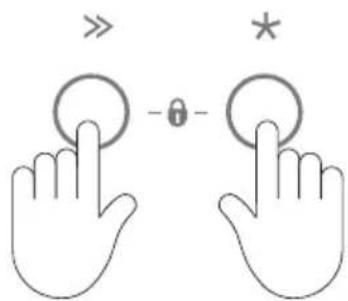
To activate CHILDLOCK
Press and hold and together until you hear two tones and ⑥illuminates in the display.
To cancelCHILDLOCK
Press and hold and together until you hear two tones sound and 0 dims in the display.
WARNING: Dishwasher detergents are strongly alkaline. They can be extremely dangerous if swallowed. Avoid contact with the skin and eyes and keep children and infirm persons away from the dishwasher when it is open. Check the powdered detergent dispenser is empty after each wash.
Unsuitable detergents
These types of detergent are not suitable and may damage your DishDrawer™ Dishwasher and lead to a service call that is not covered by warranty:
Liquid detergents
- Soaps
- Laundry detergents
Disinfectants
- Hand washing liquids
Using powdered detergent
Use the markings to help you measure the correct quantities. Do not place tablets or pouches in the dispenser. Refer to the following 'Powdered detergent quantity recommendations' table and the detergent manufacturer's guidance. No detergent is needed for RINSE.
①
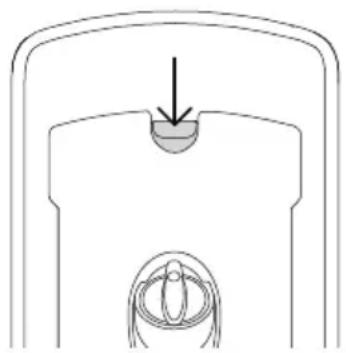
Press the latch down to open the dispenser. Check that the dispenser is empty and dry.
②
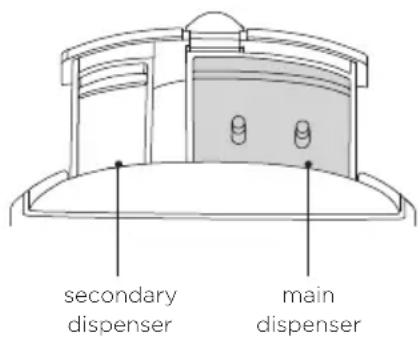
- Add detergent and close the dispenser until it clicks shut.
The detergent will automatically be released into the drawer during the wash program.
When washing heavily soiled dishware in hard water, more detergent may be required. Refer to 'Powdered detergent quantity recommendations'.
Using solid tablets or pouches
Using tablets could improve wash performance in hard water areas. Follow manufacturer guidance. Some tablets or pouches may not be suitable for all wash programs.

Place in cutlery basket
Place tablet or pouch in cutlery basket, ensuring it doesn't come in direct contact with dishes or cutlery.
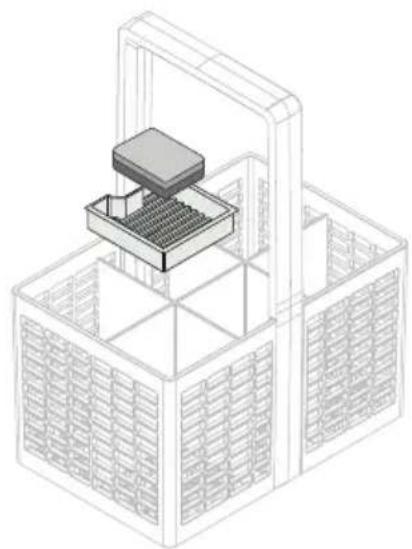
Place on tablet tray
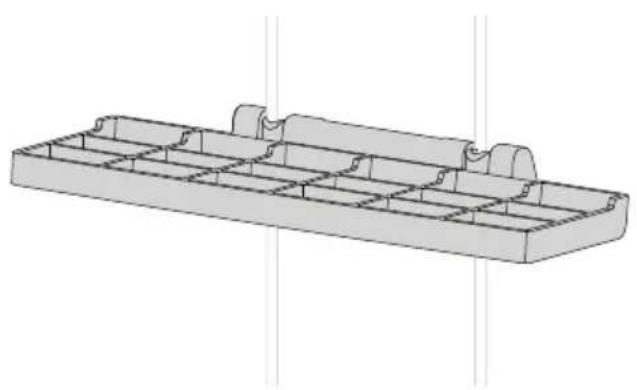
Place tablet or pouch on tablet tray in cutlery basket ensuring it doesn't come in direct contact with dishes or cutlery.
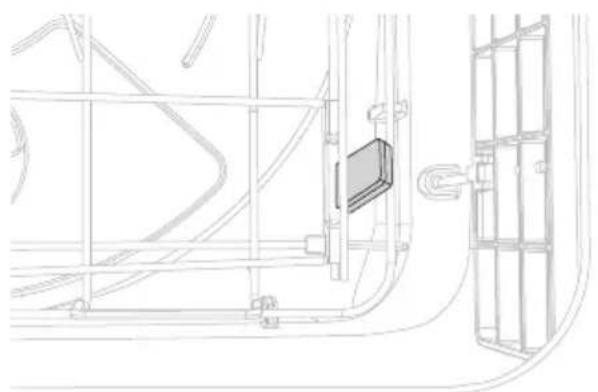
Place directly in tub
Place the tablet or pouch between the racking at the side as shown.
Do not place on the base of the drawer as it may interfere with the spray arm rotation and affect wash performance.
Powdered detergent quantity recommendations
- Use the table below to determine the optimal powdered detergent quantity for each wash program.
- If you have hard water in your area, more detergent may be required. Refer to 'Water hardness' for more details
WASH PROGRAM DETERGENT QUANTITY PER DRAWER
| HEAVY | 2/3 |
| MEDIUM | 2/3 |
| ECO | 2/3 |
| FAST | 1/3 |
| DELICATE | 1/3 |
| RINSE | n/a |
Rinse aid provides a streak-free finish to glass and dishware as well as preventing metal from tarnishing. We recommend using a liquid rinse aid regularly for optimal drying results. During dispensing, a pulsing sound may be heard, this is normal.
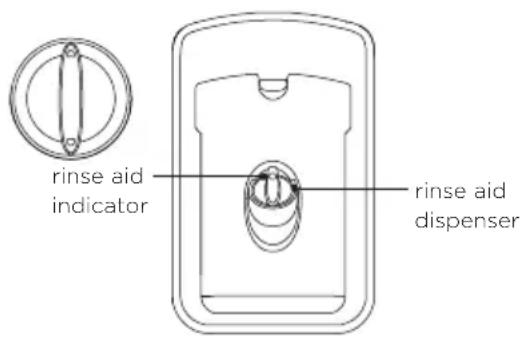
The rinse aid dispenser is located on the inside of the drawer underneath the detergent dispenser. It holds approximately 1.7 fl oz (50ml) of rinse aid.
How much rinse aid to use
The amount of rinse aid dispensed in each wash may need adjusted to suit your water conditions. Refer to 'Preferences' and 'Water softener' for guidance.
When to refill rinse aid
If the indicator glows or flashes bright red, refill rinse aid.
- If the indicator glows or flashes dimly or not at all, you do not need to refill - there is enough rinse aid for the wash.
When using lighter coloured rinse aids, the indicator may not dim as prominently as when using darker rinse aids.
How to refill rinse aid
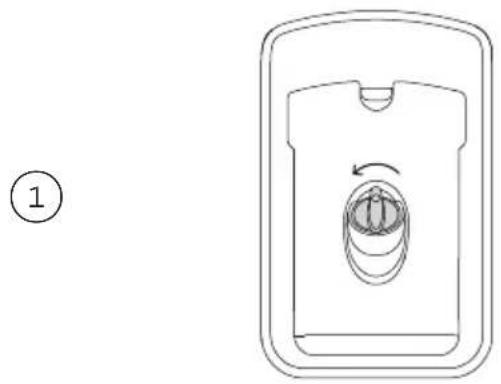
Turn the plug anticlockwise and remove.
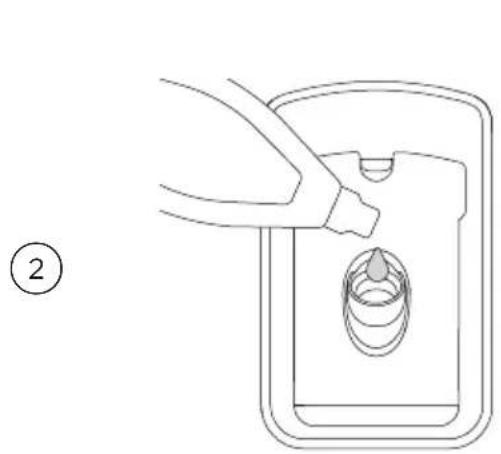
Pour rinse aid into the opening taking care not to spill any into the drawer.
Any accidental spillages must be wiped up. If not wiped up, spilt rinse aid will cause excessive foaming which may result in a service call that will not be covered by warranty
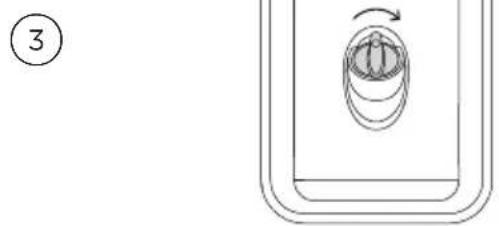
Refit the plug, turning clockwise until secure.
Ensure the plug is closed tight with the hand grip in a vertical position.
The salt reservoir must always be filled with granular salt designed for dishwasher water softening. We do not recommend the use of cooking salt like table salt, rock salt or pellets as they may contain impurities that will damage the water softener. Do not add detergent or rinse aid to the salt reservoir. This will cause damage.
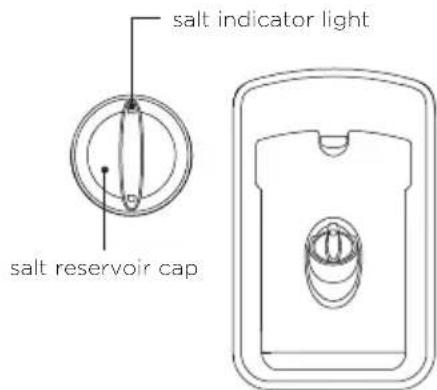
The salt reservoir is located on the inside of the drawer next to the detergent dispenser. It holds up to approximately 0.8lb (350g) of salt (actual capacity will vary depending on brand and grain size of salt used).
Double models: each drawer has a separate salt reservoir.
Water hardness recommendations
- Use the table below to determine the optimal water hardness setting. Your local water company will be able to help.
- If you have a household water softener installed, use the setting recommended for water with a hardness under 100 ppm/6 gpg, irrespective of the water hardness in your area.
- If your water hardness is above 625 ppm/36 gpg, the wash performance of your DishDrawer™ Dishwasher will decline over time. The rinse aid setting should be at 5.
| SETTING | WATER HARDNESS SCALES | |||||
| PPM* GPG** °DH °FH °E / °CLARK MMOL/L | ||||||
| 0 0-100 0-6 | 0-5.6 | 0-10 | 0-7 | 0-0.1 | ||
| 1 | 100-250 | 6-14 | 5.6-14 | 10-25 | 7-17.5 | 0.1-2.5 |
| 2 | 250-350 | 14-20 | 14-19.6 | 25-35 | 17.5-24.5 | 2.5-3.5 |
| 3 | 350-450 | 20-26 | 19.6-25.2 | 35-45 | 24.5-31.5 | 3.5-4.5 |
| 4 | 450-550 | 26-32 | 25.2-30.8 | 45-55 | 31.5-38.5 | 4.5-5.5 |
| 5 | 550-625 | 32-36 | 30.8-35 | 55-62 | 38.5-43.8 | 5.5-6.2 |
Using the salt reservoir
You may hear some noises when the water softener is operating, this is normal.
1
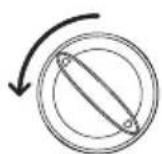

Turn the cap anticlockwise and remove.
②
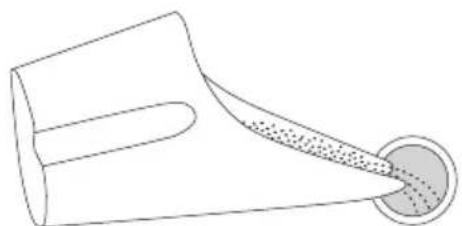
Place the salt into the salt container and carefully pour into the reservoir.
When filling the salt reservoir, you may notice water being displaced from the water softener overflow. This is normal.
3
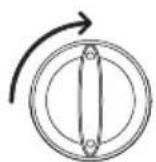
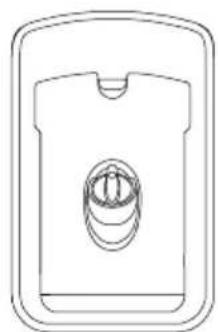
Refit the cap, turning clockwise until secure. If you are not washing your dishes immediately after filling the salt reservoir, we recommend running a RINSE cycle to remove any salt water or spilt granules.
When to refill the salt reservoir
- If the salt indicator is red, the salt reservoir must be filled. If the salt indicator is black, there is enough salt in the reservoir.
- will also illuminate on the display if the salt reservoir must be filled.
You can adjust any of the settings of the below options prior to starting a wash cycle.
Wi-Fi
Allows your DishDrawer™ Dishwasher to connect to your home network. Refer to 'Wi-Fi connection & remote mode' for details.
Rinse aid
Controls the amount of rinse aid dispensed. Refer to 'Rinse aid' for details.
Water softener*
Refer to 'Water softener' for details.
Auto power-on**
Your DishDrawer™ Dishwasher is set to automatically power on for 30 seconds after a drawer is opened. This can be turned off.
Autolock
Allows the drawer to automatically lock 30 seconds after it's closed.
Tones
Adjusts tone settings. When set to OFF all tones will be silenced except fault alerts.
| OPTION DISPLAY SETTINGS | ||||
| Wi-Fi | Con | Disconnected n/a Connected | ☆ | |
| Rinse aid | rR | Off | rRQ | Max: 5 |
| Water softener* | Hd | Off | HdO | Max: 5 |
| Auto power-on** | RP | On | RPa | Off |
| Autolock | Ld | On | Ldo | Off |
| Tones | bP | On | bPa | Off |
Changing the settings
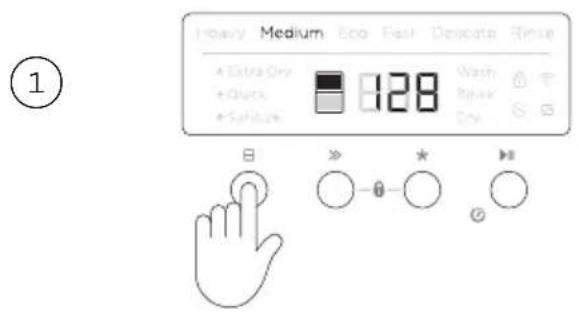
Ensure there is no wash in progress, then press ①.
Press and hold and together for four seconds.
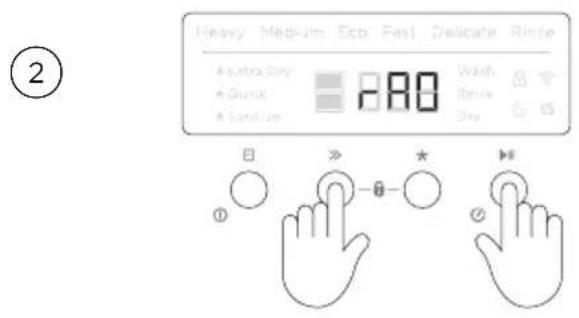
Press to scroll through the available options.
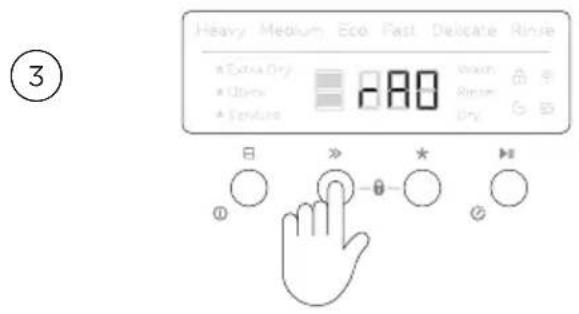
Press to change the setting within an option.
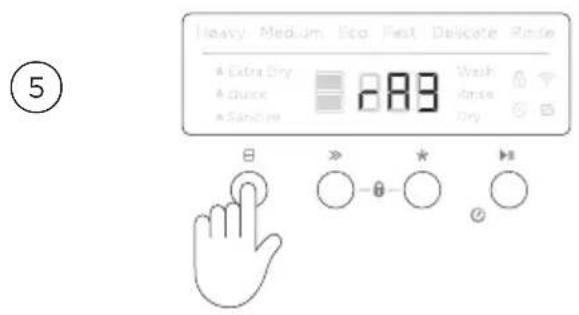
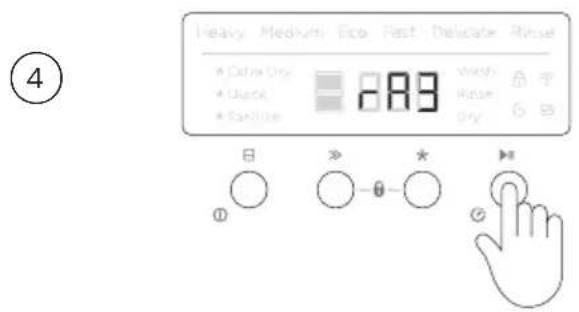
Press ① to save the new setting and leave the preference menu.
Double models
Changing the settings in one tub will set your preferences for both drawers.
Your appliance can be connected to your home wireless network and operated remotely using the app.
Getting started
- Ensure your home Wi-Fi network is turned on.
- You will be given step by step guidance on both your appliance and mobile device.
It may take up to 10 minutes to connect your appliance. - For further guidance and troubleshooting, please refer to the app.
On your mobile device:
① Download the app from www.fisherpaykel.com/connect
② Register and create an account.
Add your appliance and set up the Wi-Fi connection.
Connecting to your home Wi-Fi

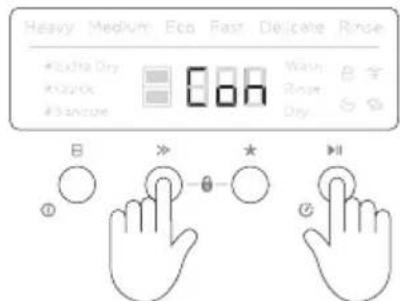
Ensure there is no wash in progress. Press and hold and together for four seconds.

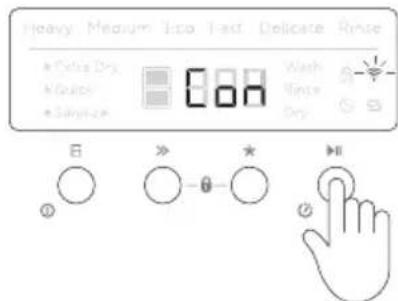
Press and hold to connect to the Wi-Fi network.
When flashes, follow the prompts within the app to complete set-up.

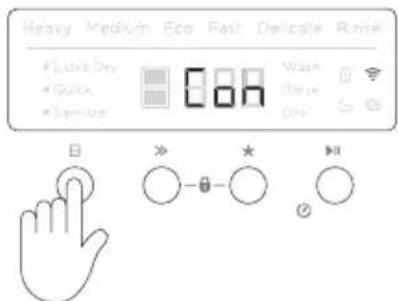
Press and hold to save and leave the menu after Wi-Fi is connected.
Enabling remote mode
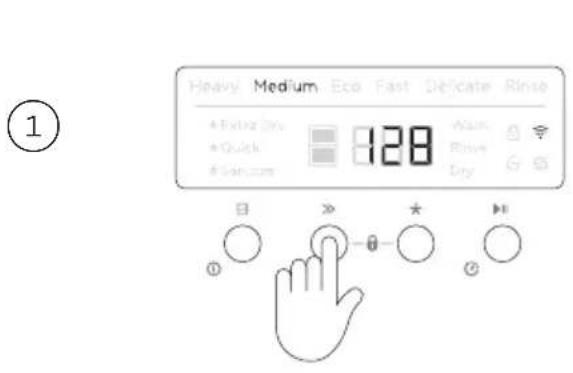
Double models only:
Select a drawer to operate remotely.
With your DishDrawer™ Dishwasher connected to your Wi-Fi network, press and hold for four seconds.
A tone will sound and ≈ will flash. REMOTE MODE is now enabled.
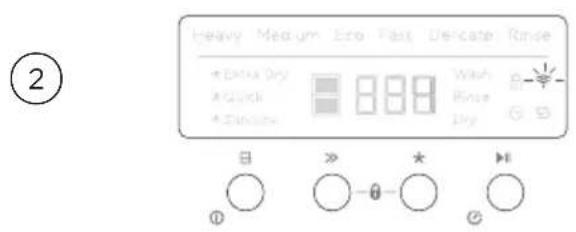
If the drawer is open:
While is flashing, close the drawer to enable REMOTE MODE.
If the drawer is not closed within 4 seconds while is flashing, REMOTE MODE will not be enabled.
Disabling remote mode
REMOTE MODE will automatically be disabled after 72 hours or if a fault occurs. Opening the drawer will also disable REMOTE MODE.
Cutlery basket
To reduce the risk of injury, we recommend loading knives and sharp utensils with handles facing up. Mix spoons, knives and forks within each section to stop cutlery nesting together and to ensure the water circulates freely. Keep stainless steel from touching silver cutlery to avoid staining.
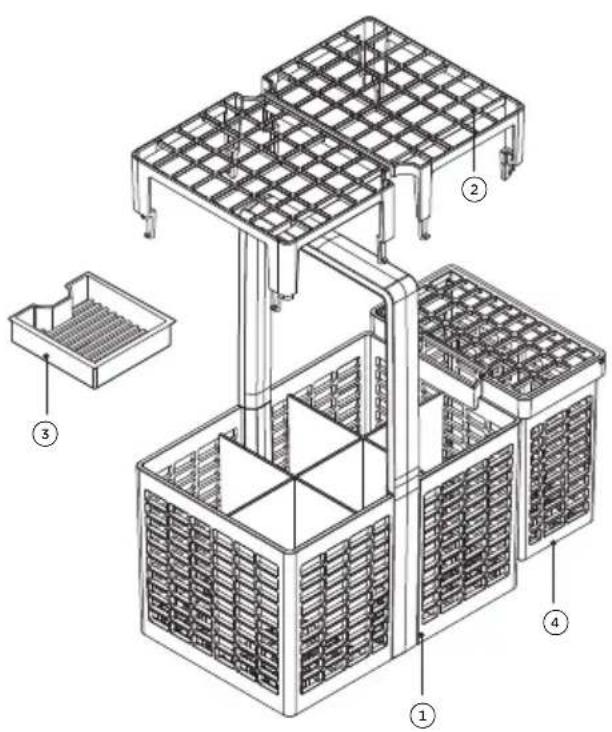
Cutlery basket features and accessories
Cutlery basket
② Removable anti-nesting grid
③ Removable tablet tray
④ Removable small items container
Cutlery basket accessories
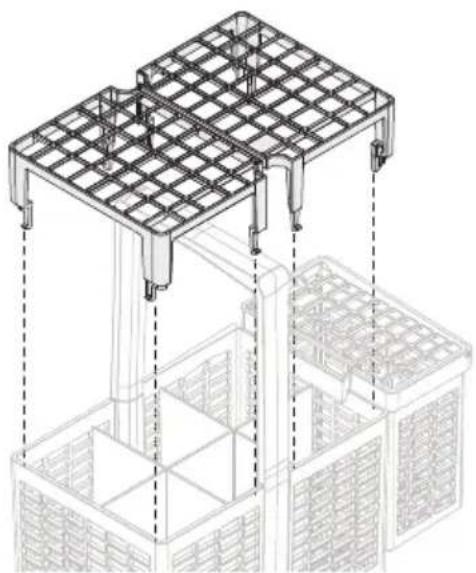
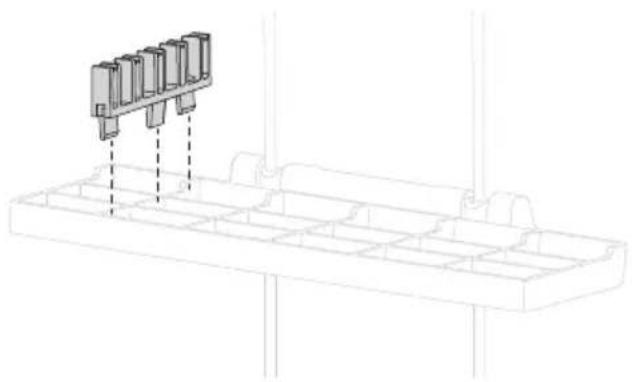
Removable anti-nesting grid
Use the anti-nesting grid to separate cutlery items and stop them from nesting together. The grid clips onto the top of the cutlery basket.
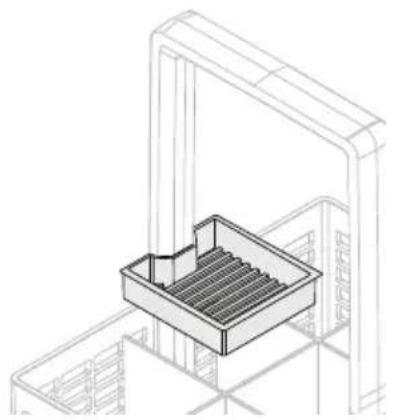
Removable tablet tray
If you are using dishwasher tablets or gel packs, place them on the removable tablet tray. Ensure the tablets are not in direct contact with dishes or cutlery.
See 'Detergent' for more information.
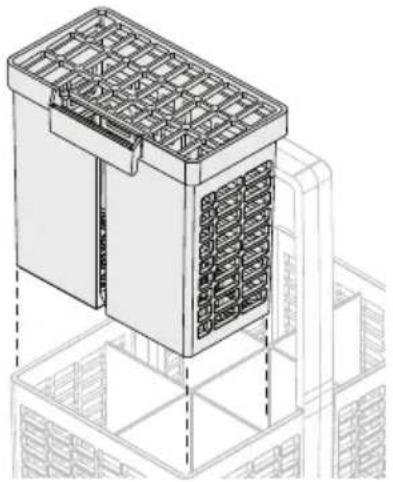
Removable small items container
Small, light items like baby bottle teats are best placed into the small items container to prevent them from being displaced during the wash. The container can clip to the side of the cutlery basket, into the cutlery basket or can be placed elsewhere in the drawer.
If you place the container elsewhere in the drawer, ensure water from the spray arm can still access items in and around the container. If laid flat, ensure the solid plastic side is facing up.
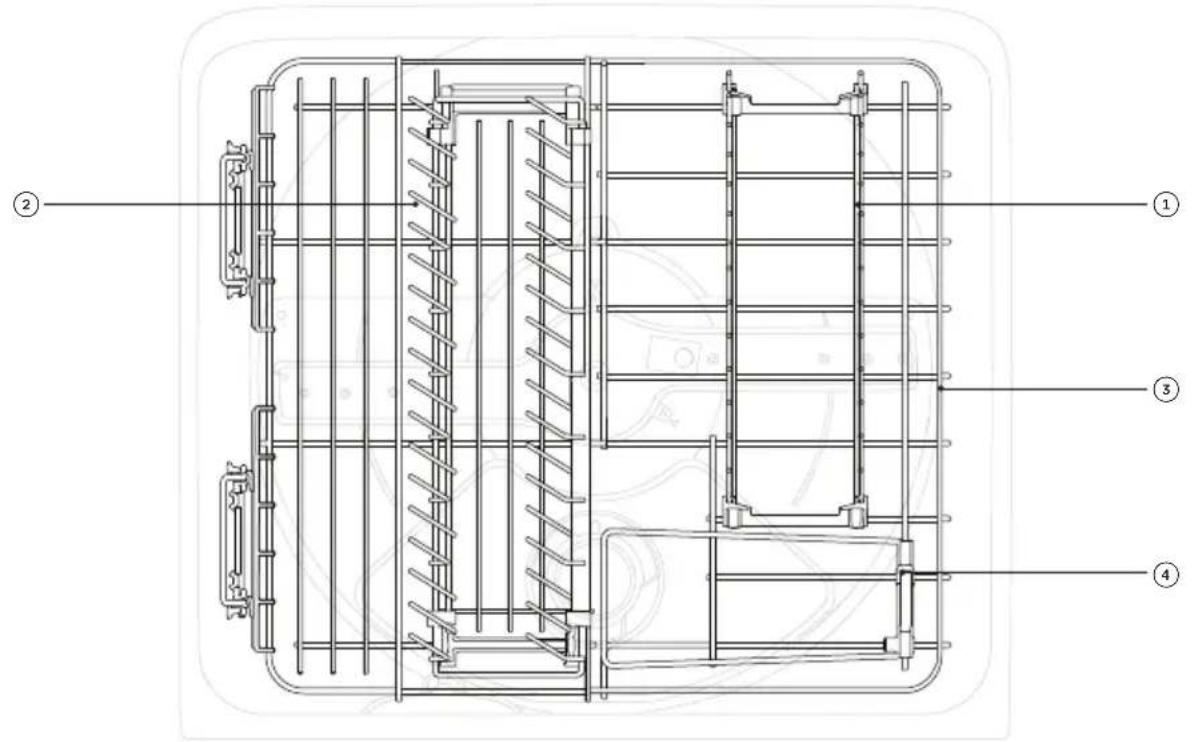
Racking features
Folding tine rack
② Adjustable tine rack
3 Base rack
④ Trap door
Not illustrated: foldable cup racks, knife clip, glass supports
Foldable cup racks
Each cup rack can be folded away independently to create more space within the drawer and are height adjustable.
To adjust height
① Fold up to unlock the rack.
② Adjust the height to suit by sliding up or down.
③ Fold back down to lock in the position.
Knife clip Glass supports
This clips onto the adjustable racks and supports knives and other utensils during the wash.
Always ensure that knife blades are facing down.
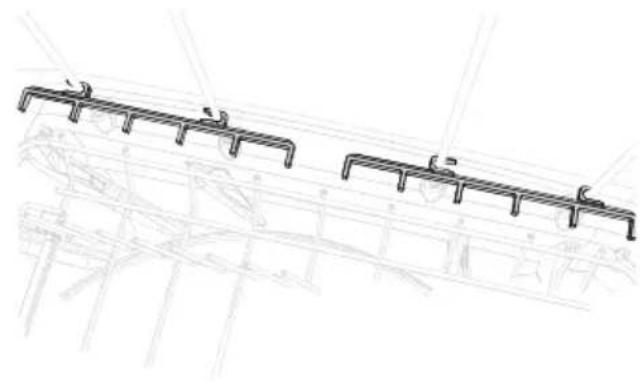
These removable clips provide extra stability when needed.
Folding tine rack
The folding tines can be removed if desired, however it is recommended the tines are folded down rather than removed if more space required.
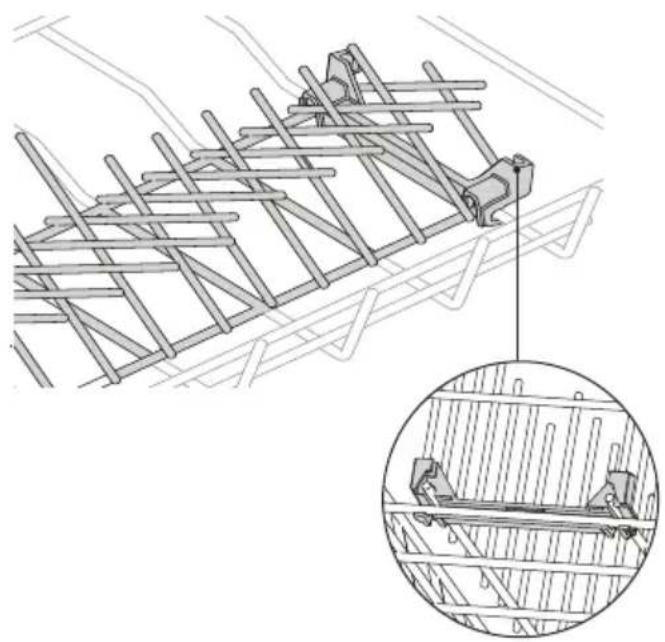
To remove
① Fold tines down towards each other.
Unclip the rack at each end by pulling firmly towards you.
To replace
Line up the clips with the base rack.
② Push firmly to click rack into place.
Adjustable tine rack
This rack is designed to fit deep bowls or small plates by adjusting the spacing of the tines.
To adjust spacing
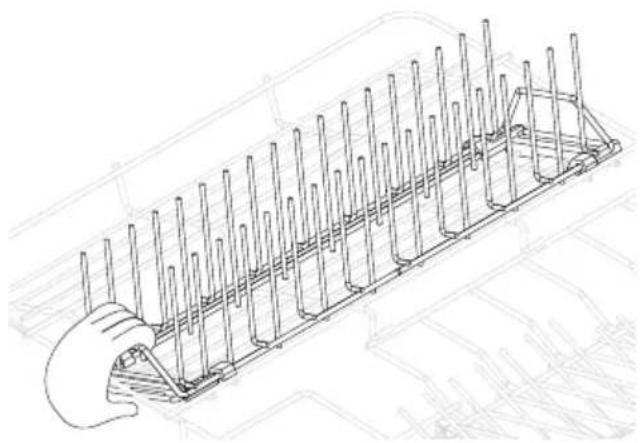
Slide the tines backward or forward by pushing or pulling the front handle.
To remove
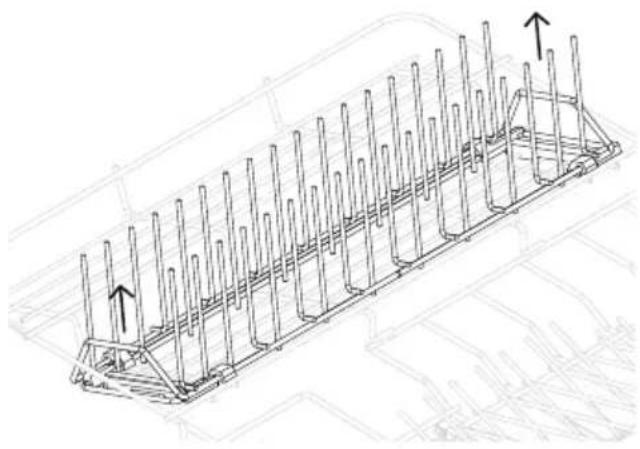
Grip the front and back handles and pull up to unclip.
To replace
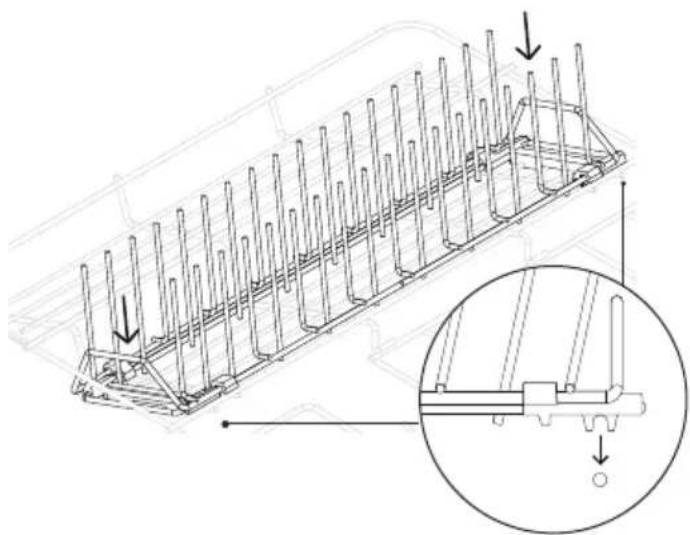
Align front and rear clips with the base rack and clip into place.
Disconnect the DishDrawer™ Dishwasher from the power supply and allow it to cool before undertaking any cleaning or maintenance.
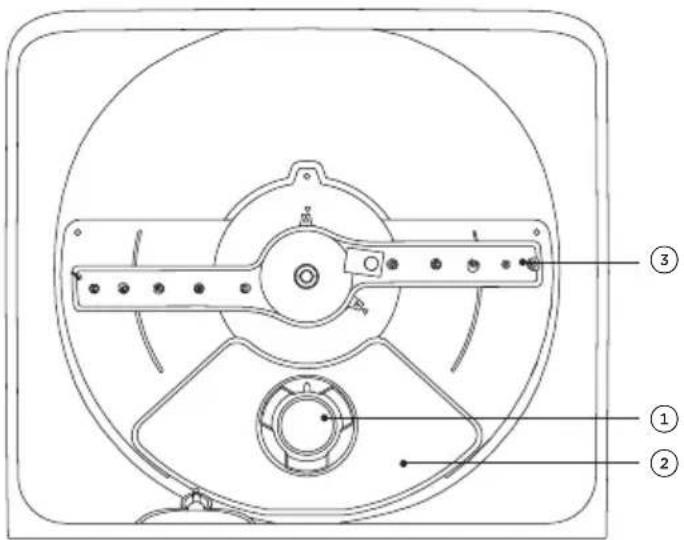
Tub features
① Drain filter
② Filter plate
③ Spray arm
Cleaning surfaces
Wipe with a damp cloth and dry using a lint-free cloth. Take care not to wet the LCD display.
We do not recommend using the following cleaning aids as they may damage the surfaces:
-
Plastic or stainless steel scouring pads
-
Hand washing liquids or soap
-
Abrasive, solvent, household cleaners
-
Stainless steel cleaners or polishes
-
Acid or alkaline cleaners
-
Laundry detergents or disinfectants
Cleaning the drain filter, spray arm and filter plate
We recommend that the drain filter and filter plate in each drawer are removed and cleaned once a month or whenever there is evidence of food particles. The spray arm in normal use should require cleaning less frequently. These parts can be shaken to remove any foreign material, cleaned in hot water, then rinsed in clean water.
The DishDrawer™ Dishwasher must be used with the filter plate, drain filter and spray arm correctly in place. We recommend that you always use the DishDrawer™ Dishwasher with the right hand folding tine rack in place.
If a dishwasher cleaner/descaler is used, you must run a wash program with detergent immediately afterward to prevent any damage to your DishDrawer.
Extended periods of disuse
If the DishDrawer™ Dishwasher is not going to be used for some time we recommend turning off the power and water supply, leaving it clean and empty with the drawers ajar.
When using your DishDrawer™ Dishwasher for the first time after a long period away, we recommend pouring 3 cups of water into the drawer before use. This helps lubricate components that may have dried out during dis-use.
For ease of access to the drain filter and filter plate, the base rack can be removed by lifting it from the rear. Alternately, remove the cutlery tray, lift the trap door and remove the fixed tire rack. Refer to 'Racking features' for details.
Removing and cleaning the drain filter
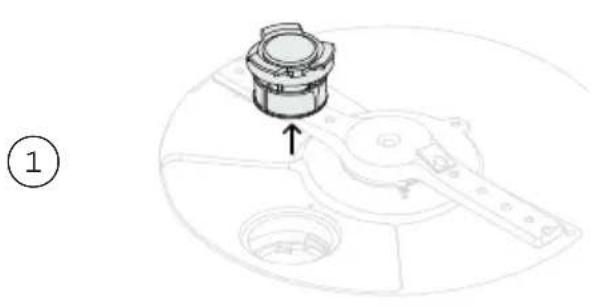
Twist the drain filter counter-clockwise and lift to remove.
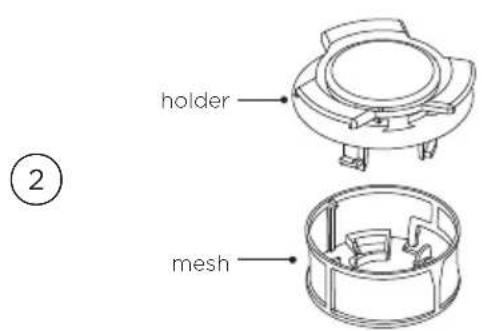
Separate the holder and the mesh by pinching one side of the mesh and pulling.
Do not attempt to remove the mesh by pinching both sides as this may cause damage.
Clean under hot soapy water and rinse thoroughly.
Replacing the drain filter
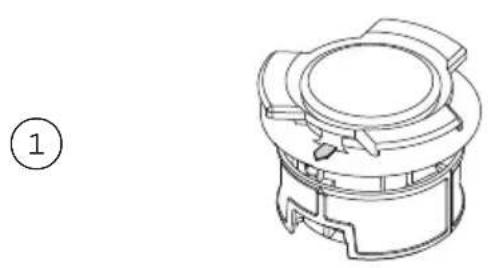
Click the drain filter mesh back onto the holder and twist until the arrows on the mesh and holder align.
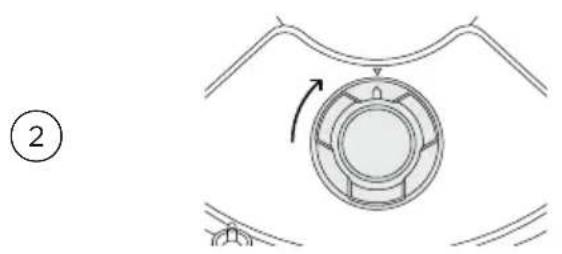
Push the drain filter back into the tub and rotate clockwise until the arrows on the filter and base of the drawer align.
Removing and cleaning the drain filter plate
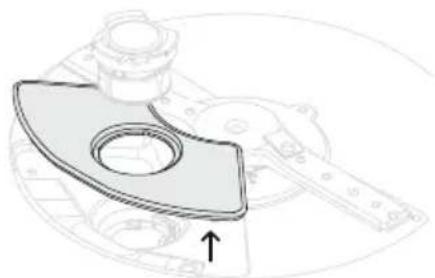
With the drain filter removed, carefully lift the drain filter plate up and out. Clean under hot soapy water and rinse thoroughly.
Refitting the drain filter plate
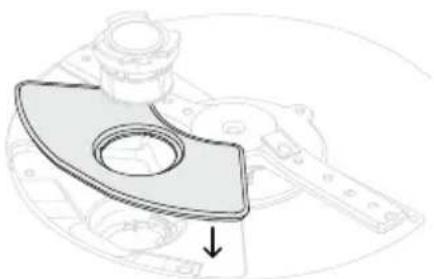
Push the drain filter plate back onto the tub ensuring there are no particles in the recess.
Removing and cleaning the spray arm
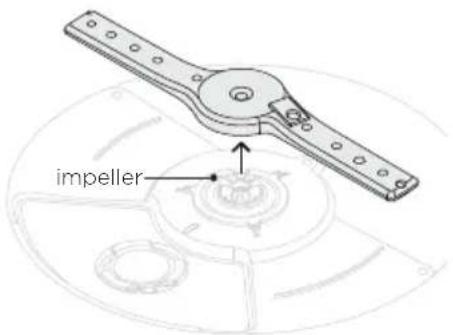
Lift the spray arm off the impeller. Shake to dislodge any loose particles, rinse under running water and wipe with a damp cloth.
Refitting the spray arm
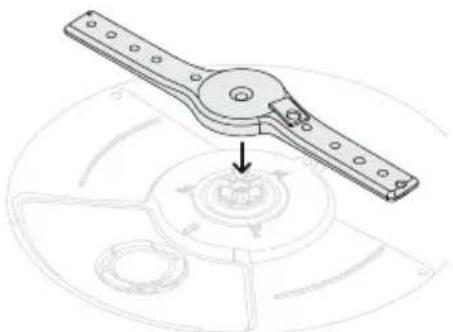
Place the spray arm to the impeller. Ensure the arm rotates freely when refitted.
Winterizing (cold climates)
If the DishDrawer™ Dishwasher is installed in a cold climate where temperatures fall below zero, we recommend winterizing.
①
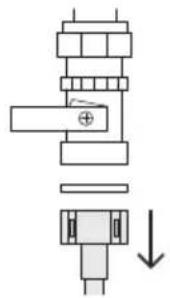
Turn off the water supply.
Disconnect the drain hoses from the sink drain pipe and the water inlet pipe from the water valve.
②
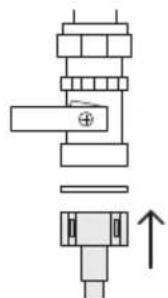
Drain the water from the hoses, inlet pipe and water valve, using a bucket or pan to collect the water.
Reconnect the water inlet pipe to the water valve and hoses to the sink drain pipe.
3
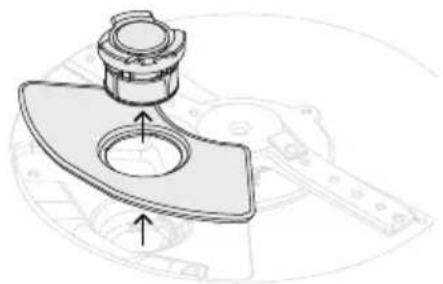
Remove the drain filter and the filter plate from the bottom of the drawer. Use a sponge to remove any remaining water from underneath before replacing.
| PROBLEM POSSIBLE CAUSES WHAT TO DO | ||
| Unclean dishes Unsuitable wash program for load selected. | Select the appropriate wash program for the load. Refer to 'Wash programs'. | |
| Spray arm unable to rotate. | Ensure no items are obstructing the spray arm path. Make sure the spray arm is mounted correctly and free to rotate. | |
| Drawer incorrectly loaded. | Refer to 'Loading suggestions'. | |
| Filter plate or filter is incorrectly inserted. | Refer to 'Maintenance'. | |
| Filter plate or filter is blocked. | Clean the filter plate and drain filter. Refer to 'Maintenance'. | |
| Detergent put in the wrong compartment of the dispenser. | Detergent must be placed in the large compartment. Refer to 'Detergent'. | |
| Incorrect detergent use. Refer to 'Detergent' and follow the detergent manufacturer's instructions. | ||
| Excess food on dishware. | Scrape all food scraps prior to loading. | |
| Spray arm holes are blocked. | Clean the spray arm. | |
| Spray arm rotation blocked. | Remove any protrusions below the rack and ensure the spray arm can rotate freely. | |
| Hard water. Increase the rinse aid setting and the amount of detergent used. Refer to 'Water hardness'. | ||
| Hard water Increase the rinse aid setting and the amount of detergent. Refer to 'Water hardness'. | ||
| Water softener models: Increase the water softener setting. Refer to 'Water softener'. | ||
| Non-water softener models: If living in an area with very hard water, consult a plumber on installing a household water softener. | ||
| PROBLEM POSSIBLE CAUSES WHAT TO DO | ||
| Foaming Incorrect detergent use. Refer to 'Detergent'. | ||
| Egg left on plates. Rinse excess egg prior to loading. | ||
| Rinse aid setting too high. | Decrease the rinse aid setting. | |
| Rinse aid dispenser plug not closed properly. | Ensure the plug is closed tight with the hand grip in a vertical position. Refer to 'Rinse aid'. | |
| Water leaking Drain hose disconnected from waste pipe. | Reconnect the drain hose to the waste pipe. | |
| Water inlet hose not connected correctly. | Ensure the inlet hose is connected securely. | |
| Other leaks. Turn water and power supplies to the DishDrawer™ Dishwasher off. Call Customer Care or your Authorised Service Centre. | ||
| Rinse aid dispenser plug not closed properly. | Ensure the plug is closed tight with the hand grip in a vertical position. Refer to 'Rinse aid'. | |
| Drawer will not open (no tones or wash in progress) | CHILDLOCK is on. | Turn CHILDLOCK off. Refer to 'Keylock & Childlock'. |
| Closed drawer auto lock is on. | Press any button and open drawer within 30 seconds. | |
| Power failure during wash program | Power outage in your home or area. | Wait until power resumes, program will restart in same part of wash program. |
| Continuous beeping with R/F code in display | A fault has occurred. Refer to 'Fault codes'. | |
| Intermittent beeping | DishDrawer™ Dishwasher is paused. | Close the drawer and press▶ to resume the program. |
| DishDrawerTM Dishwasher will not start | Power supply is not connected. | Connect the power supply. |
| The drawer is not closed properly. | Ensure the drawer is firmly closed. | |
| KEYLOCK or CHILDLOCK feature is on. | Turn KEYLOCK or CHILDLOCK off. See your Quickstart guide for instructions. | |
| Cycle not started. Press | II. | |
| DishDrawerTM Dishwasher is in Demo mode. | Contact Customer Care. | |
| Fan noise after a wash program has finished | This is normal. The fan continues to run to assist with drying. | The fan will automatically stop after a set time, or when the drawer is opened. The fan may resume when the drawer is closed again. |
| Fan noise starts when I close the drawer, even though I didn't start a new wash | This is normal. In some cases, the fan will run when the drawer is closed for a set time after a program has finished. | No action required. The fan will automatically stop after the set time is over. |
| No powdered detergent dispensed | Detergent dispenser was wet when loaded. | Clean the dispenser and ensure it is dry before adding detergent. Refer to 'Detergent'. |
| The wash seems to have finished, but the drawer will not open | The wash program is still in progress. It is in a quiet phase that is needed for optimal performance. | No action required. The program will transition into a more audible phase after the quiet phase is over. |
| Water pooling on inner rim of drawer after a wash | This is normal condensation. | Wipe dry. |
| Water under the filter | This is normal. No action required. | |
| Excess water in the drawer | Drain hose(s) bent. Straighten the drain hose(s). | |
| Blocked filters. Refer to 'Maintenance'. | ||
| Water marks on the dishes | Rinse aid depleted. Refill the rinse aid dispenser. | |
| Rinse aid setting too low. | Increase/turn on the rinse aid setting. | |
| DishDrawerTM Dishwasher overloaded/incorrectly loaded. | Refer to 'Loading suggestions'. | |
| Drawer interior is stained | Some foods may stain the inside of the drawer. | Pre-rinse dishes before placing in the drawer. Alternatively, use RINSE after adding the dishes may minimise staining. |
How do I know if there is a fault?
Your DishDrawer™ Dishwasher will beep continuously and a fault code will flash in the display. There are two types of fault codes - 'F' and 'A'.
Double models only
- There may be a fault in one or both of the drawers and the fault codes may be different in each.
- The drawer indicator also flash to show which drawer has a fault.
- If there is a fault in both drawers, both drawer indicators will flash.
- If a fault occurs in one drawer only you are still able to use the other drawer. If you have paused a drawer during a wash program, and the other drawer then faults, the paused drawer indicator will continue flashing but will be dimmed.
To fix a fault
First try to fix the issue and clear the code according to the steps in the following tables. If the problem persists:
① Note down the fault code.
Double models only: Press to scroll between the drawers and note down the code for each drawer.
② Contact Customer Care for support or to organize a visit by a service technician.
Refer to the Service and Warranty booklet for contact details.
F' fault codes
You may be able to clear the fault by resetting the DishDrawer™ Dishwasher. Follow the steps below:
① Press to stop the beeping, then again to turn the DishDrawer™ Dishwasher off.
② Wait a few seconds. Press again to turn the DishDrawer™ Dishwasher back on.
When the fault code has disappeared, the fault has been reset and you can continue to use your DishDrawer™ Dishwasher.
'A' fault codes
Follow the steps below to try and fix the issue.
| DISPLAY POSSIBLE CAUSE WHAT TO DO | ||
| A1 | Water supply fault. | ① Ensure the water supply is turned on. ② Press① once to stop the beeping, then again to clear the fault. ③ Press② to resume the wash program. |
| A3 | Drawer cannot drain. The drainage hose may be blocked or kinked, or the connection to drainage pipe may be blocked. | ① Ensure the drainage hose and connection to pipes are not blocked. ② Press① once to stop the beeping, then again to clear the fault. ③ Press② to resume the wash program. |
| A6 | The spray arm has loosened or come off its mounting, or water pressure is too low. | ① Open the drawer and check the spray arm. ② If the spray arm has loosened or come off its mounting, re-fit it. Check that it is firmly seated and turns freely. Refer to 'Maintenance'. ③ Press① once to stop the beeping, then again to clear the fault. ④ Press② to resume the wash program. |
| A7 | Auto recovery program: DishDrawer™ Dishwasher has detected excess foam in the drawer. | ① Let the auto recovery program run until it is complete. The wash program will resume when the auto recovery program has completed. ② Check that you are using the right detergent before running another wash program. ③ If the drawer is still filled with foam at the end of the wash program, contact Customer Care. |
| A09 | Sanitize cycle hasn't met temperature needed to sanitize dishes. | ① Check if the water supply has been turned off or the wash program interrupted. ② Press① once to stop the beeping, then again to clear the fault. ③ Run the sanitize cycle again. |
Before you call for service or assistance
Check the things you can do yourself. Refer to the installation instructions and your user guide and check that:
① Your product is correctly installed.
You are familiar with its normal operation.
If after checking these points you still need assistance or parts, please refer to the Service & Warranty book for warranty details and your nearest Authorised Service Centre, Customer Care, or contact us through our website www.fisherpaykel.com.
Wash program data & standards test information
Wash program data and standards test information can be viewed online by going to https://www.fisherpaykel.com and searching your model code.
Complete and keep for safe reference:
Model
Serial No.
Purchase Date
Purchaser
Dealer
Suburb
Town
Country
FISHERPAYKEL.COM
Fisher & Paykel Appliances 2024. All rights reserved.
The models shown in this guide may not be available in all markets and are subject to change at any time.
The product specifications in this guide apply to the specific products and models described at the date of issue. Under our policy of continuous product improvement, these specifications may change at any time.
For current details about model and specification availability in your country, please go to our website or contact your local Fisher & Paykel dealer.
FISHER & PAYKEL
LAVE-VAISSELL DISHDRAWER
MODELES DOUBLESS