MX5SLIMV - Hand blender BRANDT - Free user manual and instructions
Find the device manual for free MX5SLIMV BRANDT in PDF.

| Brand | Brandt |
| Model | MX5SLIMV |
| Product type | Immersion blender |
| Power supply | 220-240 V / 50 Hz |
| Power | 400 W |
| Dimensions (H x W x D) | 10 x 10 x 32.8 cm |
| Net weight | 0.852 kg |
| Speed | Continuous speed |
| Functions | Blending, chopping, emulsifying, crushed ice |
| Included accessories | Blending shaft, double blade, crushed ice blade, emulsifier disc, whisk, mini chopper, disassembly key |
| Control | On/off button with indicator light |
| Use | Household |
| Cleaning | Shaft and blades dishwasher-safe, motor block wiped clean |
| Safety | Sharp blades, do not immerse motor block |
| Warranty | According to distributor's terms |
Frequently Asked Questions - MX5SLIMV BRANDT
User questions about MX5SLIMV BRANDT
0 question about this device. Answer the ones you know or ask your own.
Ask a new question about this device
Download the instructions for your Hand blender in PDF format for free! Find your manual MX5SLIMV - BRANDT and take your electronic device back in hand. On this page are published all the documents necessary for the use of your device. MX5SLIMV by BRANDT.
USER MANUAL MX5SLIMV BRANDT
natural_image
Black-and-white photo of a bowl of creamy soup with leafy greens and dried olives, accompanied by a small syringe on the left (no text or symbols)natural_image
Exterior view of a brand light bulb device (no text or symbols visible on body)MX5SLIMV
Chère Cliente, Cher Client,
natural_image
Technical line drawing of a mechanical component with arrows indicating direction (no text or symbols)natural_image
Simple line drawing of a mechanical device with a downward arrow and a cylindrical base (no text or symbols)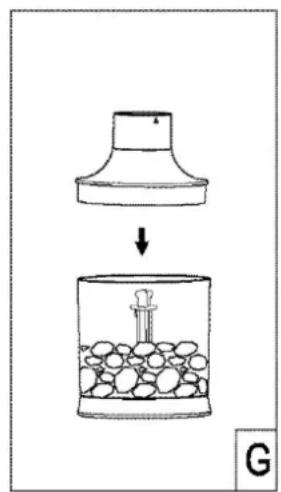
Thank you for buying a BRANDT product and for your confidence in our company.
This product has been designed and manufactured for you considering your lifestyle and your requirements, so that it meets your expectations in the best way possible. We have invested it with our expertise, spirit of innovation and all the enthusiasm which has driven us for more than 60 years.
So that we are always able to satisfy your requirements as well as possible, our customer service is available, ready to listen and suggestions
You can also visit our website www.brandt.com where you will find our latest innovations as well as additional useful information.
BRANDT is happy to support you daily and hopes you will enjoy your purchase to the full.

Important: Before starting your machine, please read this guide for installation and use carefully in order to familiarise yourself with how it operates quickly.
CONTENTS
1) FOR THE USER'S ATTENTION....14
a) Safety Instructions....14
b) Technical Data....16
c) Environmental Protection....17
2) INTRODUCTION TO YOUR MACHINE....18
a) Description of the Hand Blender and Mini-Chopper 18
b) Before Using for the First Time ....18
3) USING YOUR MACHINE....19
a) Assembling the Blender Foot and Blades....19
b) Using the Blender Foot....19
c) Using the Mini-Chopper....20
d) Preparation Guide....21
4) LOOKING AFTER AND CLEANING YOUR MACHINE....21
1) FOR THE USER'S ATTENTION

Keep these instructions with your machine. I this machine to another person second-hand, make sure you give the new owner these instructions. Please I these instructions before installing and using your machine. They are written for your safety and that of others.
a) Safety Instructions
Installation and connection
- This machine is for domestic use only. It may only be used in a covered, enclosed and heated environment using kitchen or any other room meeting the same specifications.
- Having taken your product out of its packaging, check that the machine is in perfect condition and, in particular, that the plug or the power cable is not damaged. If there is any doubt contact your dealer's after-sales service.
- Before connecting the machine make sure that the mains voltage corresponds with that indicated on the machine's rating plate.
- The use of adaptors and/or extension leads is not recommended. If these items prove to be indispensable only use adaptors, and extension leads compliant with the safety standards in force.
- Before using this machine place it on a smooth, dry, stable surface.
- This machine must not be used by children.
- Keep the machine and its power cable out of reach of children.
• Children younger than 8 must not play with the machine.
During Use
- This machine may be used by people with reduced physical, sensory or mental capacities, but only after having given them the necessary information concerning the use of the machine, so that they are aware of the dangers that may be incurred.
- Only use this machine for processing food.
- Do not leave the machine turned on or opera empty, because it could be a source of danger.
- Never pull the lead but disconnect the machine by holding the plug.
- Always disconnect the machine from the power supply if leaving it unattended, and before assembling, dismantling or cleaning.
• The blades are very sharp. Handle them with care to avoid cutting yourself.
- Do not remove the jar from the motor unit whilst the machine is in operation.
- Never put your hands into the container, or other objects when the machine is working. If nece machine and use a spatula to remove the food stuck to the jar walls.
- Never touch the moving blades. Always wait until they have stopped moving.
- The use of accessories not recommended by the manufacturer of the machine may cause danger or injuries.
Maintenance and cleaning
- Before cleaning ensure that the power cable for the machine is unplugged.
- The power cable cannot be replaced. If the cable is damaged the machine should be discarded. This product is guaranteed by your distributor. For more details please refer to the guarantee conditions provided by the distributor.
- To protect yourself from the risk of electric shock, do not in any circumstances immerse the base of the machine in water or other liquids.
- Do not use chemical products, steel wool or abrasive cleaners to clean the outside of the machine. This risks damaging it.
- Cleaning and maintenance of the machine should not be carried out by children unless they are older than 8 and are supervised.
Non-compliant use
- Only use this machine for the purposes described in this manual.
- The manufacturer denies all responsibility in the event of non-compliant use.
- This machine is exclusively intended for do private dwellings. The use of this product in communal or professional premises such as rooms for breaks in offices or workshops, camping or hotel premises, does not represent compliant use as defined by the manufacturer.
b) Technical Data
| Model | MX5SLIMV |
| Power supply | 220-240 V/50 Hz |
| Consumption | 400 W |
| Dimensions (cm) | H10 X W10 X D32.9 |
| Net weight (kg) | 0.852 |
c) Environmental Protection
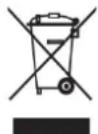
At the end of its life this product must not be discarded with household wa must be taken to a recycling centre or to your dealer. This makes it possible to avoid consequences resulting from inappropriate disposal that are harmful to health and the environment, and to recycle materials to save energy and significant resources.
A logo appears on the product reminding you not to discard it with household waste. For further information, contact your council offices or the shop where you bought this product.
2) INTRODUCTION TO YOUR MACHINE
a) Description of the Hand Blender and Mini-Chopper
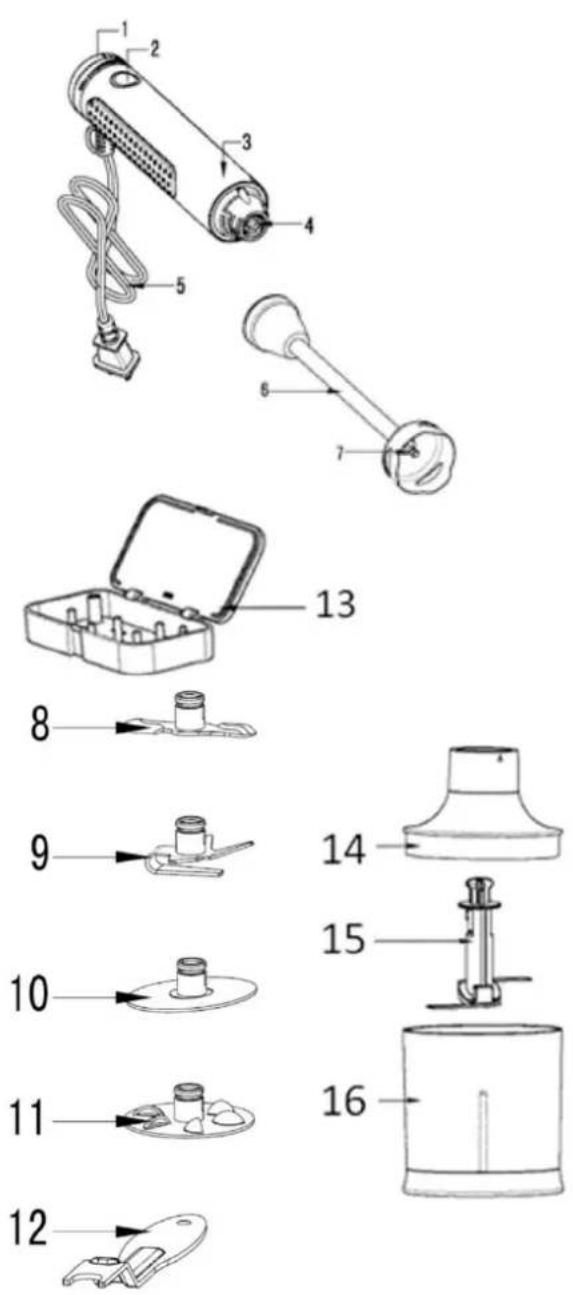
- Speed selector
- Stop/Start button
- Motor unit/machine body
- Attachment parts for the blender foot
- Power supply lead
- Blender foot
- Blade attachment rod
- Double blade
- Crushed ice blade
- Emulsifier disc
- Mixer
- Dismantling key
- Box containing the 4 blades + dismantling key
- Mini-chopper lid
- Mini-chopper blade
- Mini-chopper bowl
b) Before Using for the First Time
- Unpack the machine and remove all the paper and plastic. Makes sure no pieces of packaging remain inside the machine.
- Carefully wash the blender foot and the blades in soapy water. Wipe the motor unit with a slightly damp cloth. Then dry all the parts carefully.
a) Assembling the Blender Foot and Blades
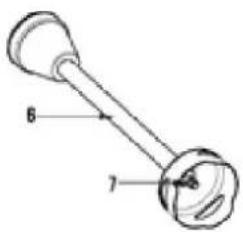
1) Blender foot
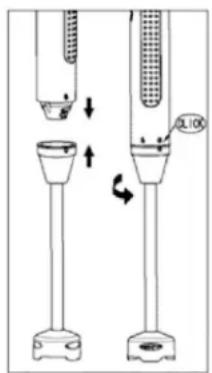
- Screw the motor unit onto the blender foot as shown in the diagram opposite. Make sure that the motor unit is screwed up to the stop. The arrow on the blender foot sh padlock located on the machine body.
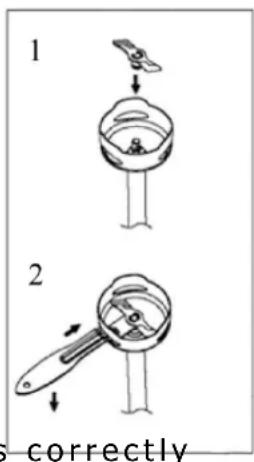
2) Blades
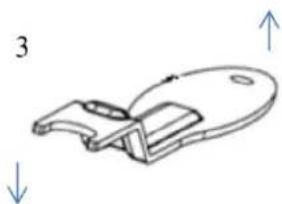
- Choose the blade. Exert a slight pressure on the centre of the blade in the direction of the blender foot to attach it as shown in Diagram 1
- A slight "click" will be heard telling you that the blade is correctly fitted to the blender foot.
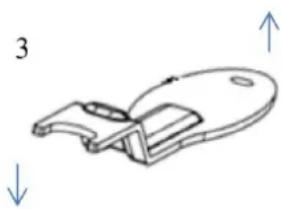
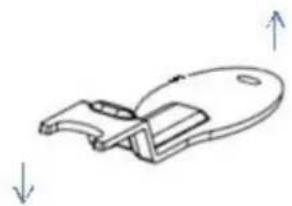
- To remove the blade make sure that the blender foot always faces downwards to avoid any risk of injury when the blade is removed.
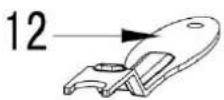
- Take the dismantling key (12) and place it in the space at the bottom of the blender foot (Diagram 2) holding it in the same direction as on Diagram 3. The dismantling key positioned when it touches the rod in the centre of the blender foot.
natural_image
Technical line drawing of a mechanical component with directional arrows (no text or symbols)- Then exercise a slight downward pressure to remove the blade.
b) Using the Blender Foot
• Once a blade is fitted on the blender foot you can plug the machine in.
- The blender foot must be placed at mid-height in the centre of the container.
- Select the desired speed with the speed selector. The selector is on the top of the machine (1). Turn it anti-clockwise towards "Max" to increase the speed.
- Press the Start button (2). The green operating light appears around the button.
• Once you have finished release the Start/Stop button to stop the machine. - Remove the machine from the container and unplug it.
- Then detach the blender foot from the motor body and clean in accordance with the instructions below.
Recommendations for Use
- For hard food (e.g. cheese) dice to avoid blocking the blades.
- If the food remains stuck to the sides of the bowl, remove the bits Distribute them in the container and press the Start button again.
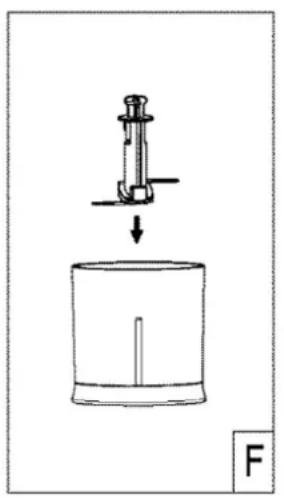
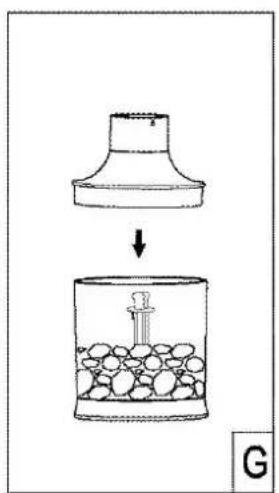
c) Using the Mini-Chopper
natural_image
Simple line drawing of a mechanical device with a downward arrow and a cylindrical base, labeled 'F' (no text or symbols on the diagram itself)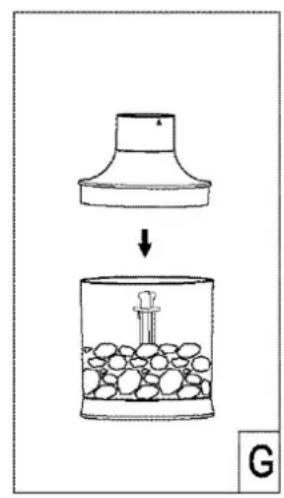
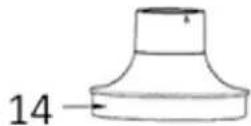
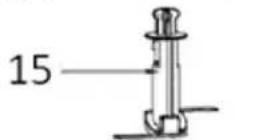
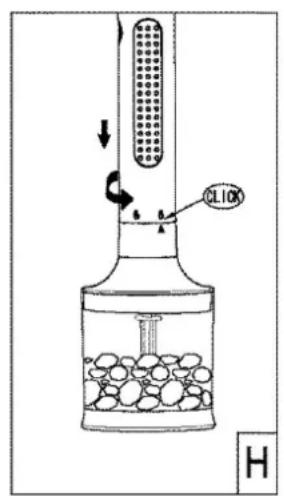
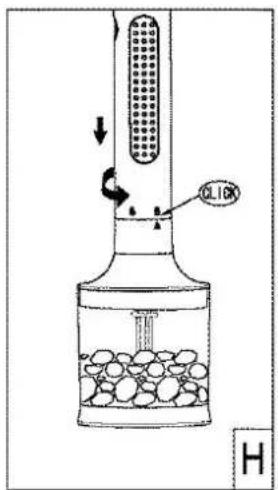
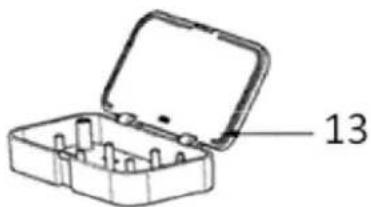
- Introduce the mini-chopper blade (15) onto the shaft located in the middle of the bowl
- Put in the food to be chopped
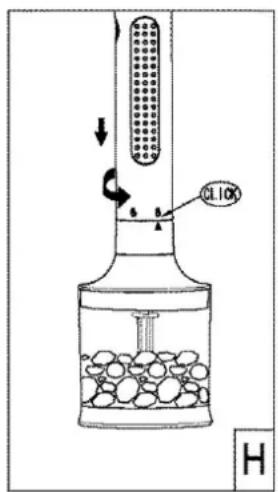
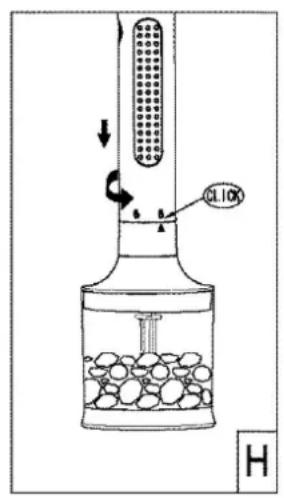
- Close the chopper with the lid (14) and then fit the machine body on the mini-chopper lid in accordance with the diagram (H).
- Select the desired speed with the speed selector. The selector is on the top of the machine. Turn it anti-clockwise towards "Max" to increase the speed.
- Press the Start button. A green start light appears around the button.
- Once you have finished release the Start/Stop button to stop the machine.
- Unplug the machine.
- Then detach the mini-chopper from the motor body.
- You can now serve your preparation.
- Clean according to the instructions given below.
d) Preparation Guide
• Here is a preparation guide to assist you. This information is just an example.
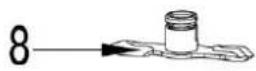
| Recipes Blades Speeds Duration | |||
| Mayonnaise Double blade (8) | |||
| Mixed fruit (compote) | Double blade (8) | ||
| Soup Double blade (8) | |||
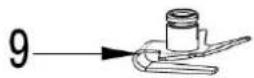
| Whipped cream Emulsifier disc (10) | |||
| Whisked egg whites Emulsifier disc (10) | |||
| Mixing Mixer (11) | |||
| Crushing ice Crushed ice (9) | |||
| Frozen fruit purée | Crushed ice (9) | ||
4) LOOKING AFTER AND CLEANING YOUR MACHINE

Always unplug the machine before cleaning it.
- Wash the blender foot, the mini-chopper bowl and the various blades in soapy water. Rinse in clean water and dry them carefully.
Note: The blender foot and the various double blades can also be washed in the dishwasher.
- Wipe the machine body and the mini-chopper lid with a slightly damp cloth and then dry it carefully. Never immerse the two parts in water or any other liquid.
- Do not use abrasive detergent products for cleaning.
natural_image
Technical line drawing of a mechanical component with arrows indicating direction (no text or symbols)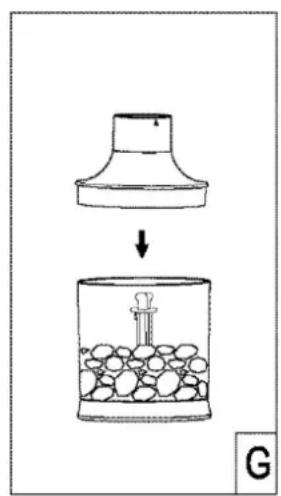
natural_image
Technical line drawing of a mechanical component with arrows indicating direction (no text or symbols)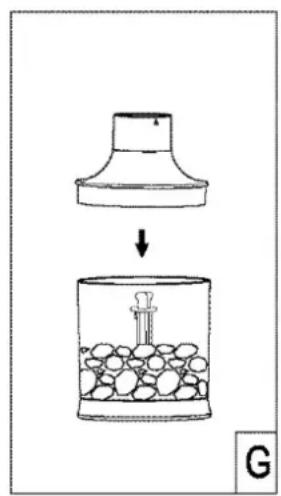

natural_image
Technical line drawing of a mechanical component with directional arrows indicating movement (no text or symbols)3


natural_image
Technical line drawing of an open plastic housing with internal components (no text or symbols)