
Tepor G60017 - Wall electric radiator G3 Ferrari - Free user manual and instructions
Find the device manual for free Tepor G60017 G3 Ferrari in PDF.

User questions about Tepor G60017 G3 Ferrari
0 question about this device. Answer the ones you know or ask your own.
Ask a new question about this device
Download the instructions for your Wall electric radiator in PDF format for free! Find your manual Tepor G60017 - G3 Ferrari and take your electronic device back in hand. On this page are published all the documents necessary for the use of your device. Tepor G60017 by G3 Ferrari.
USER MANUAL Tepor G60017 G3 Ferrari
This product is only suitable for well insulated spaces or occasional use.
ITA: INDICE
Simbologia. p. 2
Safety instructions. p. 10
General information. p. 13
Description. p. 14
p. 14
Main operation. p. 14
Installation and assembly. p. 15
Cleaning. p. 16
Technical features. p. 16
Waste of electric and electronic equipment (WEEE Directive) p. 25
FRANCAIS p. 17
This symbol warns the user that un-insulated dangerous voltage inside the system may cause an electrical shock. Do not open the case.
Class II Appliance symbol. The double insulated electrical appliance is one which has been designed in such a way that it does not require a safety connection to electrical earth/ground.

Caution: this symbol reminds the user to read carefully the important operations and maintenance instructions in this owner's guide.
Caution: this symbol reminds the user that the part on which it is placed must not be covered in any way.
AVVERTENZE DI SICUREZZA
ENGLISH: SAFETY INSTRUCTIONS
The following are important notes on the installation, use and maintenance; save this instruction manual for future reference; use the equipment only as specified in this guide; any other use is considered improper and dangerous; therefore, the manufacturer cannot be held responsible in the event of damages caused by improper, incorrect or unreasonable use.
Before use, ensure the equipment is undamaged; if in doubt, do not attempt to use it and contact the authorized service center; do not leave packing materials (i.e. plastic bags, polystyrene foam, nails, staples, etc.) within the reach of children as they are potential sources of danger;
always remember that they must be separately collected. Make sure that the rating information given on the technical label are compatible with those of the electricity grid; the installation must be performed according to the manufacturer's instructions considering the maximum power of the appliance as shown on the label; an incorrect installation may cause damage to people, animals or things, for which the manufacturer cannot be considered responsible thereof. If it is necessary to use adapters, multiple sockets or electrical extensions, use only those that comply with current safety standards; in any case do not exceed the power consumption limits indicated on the electrical adapter and / or extensions, as well as the maximum power shown on multiple adaptor.
Do not leave the unit plugged; better to remove the plug from the mains when the device is not in use. Always disconnect from power supply if you leave it unattended. Cleaning operations should be carried out after unplugging the unit.
If the unit is out of order and you do not want to fix it, it must be made inoperable by cutting power cord.
- Do not allow the power cord to get closer to sharp objects or in contact with hot surfaces; do not pull it to disconnect the plug.
- Do not use the appliance in the event of damage to the power cord, plug, or in case of short circuits; to repair the product only address an authorized service center.
- Do not handle or touch the appliance with wet hands or bare feet. Do not expose the appliance to harmful weather conditions such as rain, moisture, frost, etc.. Always store it in a dry place.
- Children less than 3 years should be kept away from unit if not continuously supervised.
- Children between 3 and 8 years can only switch on and off appliance, only if it is placed or installed in its
normal functioning position and if they receive supervision and instructions about safe use of the appliance, and understand relative dangers. Children between 3 and 8 years must not insert the plug, set or clean or make the maintenance of the appliance.
-
CAUTION: some parts of this appliance can become very hot and cause skin burning. Pay big attention in presence of children or vulnerable persons.
-
Children must not play with the appliance.
-
Keep the appliance and its cord out of reach of children less than 8 years.
If the power cord is damaged, or in case of failure and / or malfunction do not tamper with the unit. The reparation must be done by manufacturer or by service center authorized by the manufacturer in order to prevent any risk. Failure to comply with the above may compromise the unit safety and invalidate the warranty.
WARNING: This appliance includes heating function. Do not cover. Keep space on sides when using. Surfaces, other than functional surfaces may develop high temperatures. Since temperatures are perceived differently by different people, this device should be used with CAUTION. Hold the appliance exclusively to grip surfaces intended to be touched.
- This appliance is intended to be used in household and similar applications such as: staff kitchen areas in shops, offices and other working environments; by clients in hotels, motels and other residential type environments; farm houses, bed and breakfast type environments.
- The appliance is not intended to be operated by means of an external timer or separate remote-control system.
- Before every use, unroll the power cord.
- Use original spare parts and accessories only.
- Do not subject the product to strong impacts, serious damages may result.
GENERAL INFORMATION
- Never leave the appliance unattended while it is running. Unplug it after each use. Do not insert anything in the protective grid. Not to obstruct it and place the unit half a meter from the surrounding objects. Pay attention: the air outlet becomes very hot during use.
- To unplug the unit, do not pull the power cord.
- Do not immerse the product in water or other liquids and avoid any splashing of liquids reaching the unit.
- Store the product only when it is completely cold.
- Before carrying out any cleaning operation, disconnect the plug from the electrical outlet and wait for the complete cooling of each part of the unit.
- Before each use, unroll the power cord completely.
- Install the unit on solid and stable surfaces. During use, place leave at least half a meter on each side of the unit.
- When mounting on the wall do not install on flammable materials: wood, plastic or synthetic surfaces.
- CAUTION! Don't leave product on unattended. Always turn off the unit after each use.
- Do not use as a shelf support for objects.
- Do not cover for any reason, subject to overheating.
- Do not use in rooms smaller than 4 square meters.
The product is equipped with an automatic switch-off that comes into play in case of overheating. If the product fails during use, check that the ventilation openings are not blocked, unplug the unit and allow to cool down for 30 minutes before operating.
PROTECTION IP23 -BATHROOM USE Appliance is built in compliance with protection level IP23, that allows use also in rooms where there is a risk of sprays of water with an angle up to 60^ . In case of use in these spaces it is recommended to: Keep away from steam and water (sink, shower, toilet). Install making sure that a person using a bath or shower cannot reach unit and its buttons.
G60022 DESCRIPTION
1 Air outlet grille
2 Power button
3 Housing
4 ON/OFF button
5 Display
6 Infrared receiver
7 On the back: ventilation slots
ON REMOTE CONTROL
2 On/Off button 8 + and - key 9 24H button 10 MODE button
11 LOCK button 12 WEEK/TIME button 13 SET button 14 AUTO button
15 DELAY button 16 TEM button
BUTTONS
On the unit
ON/OFF general (4) enables or disables any function.
ON/OFF (2) for turning on/off the unit in heating function (lights and are on).
On the remote control
- ON/OFF button (2) for turning on/off the unit.
24H (9) sets the timer 1-24 hours - MODE (10) sets working modes: fan (业) , heating 1000W(业) , heating 2000W(业)
- LOCK (11) for button locking.
- WEEK/TIME (12) for the weekly programming function.
- SET (13), to set the time.
- AUTO (14) to activate the window detection function.
- DELAY (15) to set temperature in the weekly programmer
TEM. (16) to display current time.
+e - (8) to set temperature and hour.
Display
The 4 digits display can show the time (hours and minutes), the timer or the temperature.
In the case of temperature, the 4 digits show:
- Ambient temperature for first and second digit
- Temperature setting for third and fourth digit
Example: if on display is written "2125", it means that the actual ambient temperature is 21 degree, and the desired temperature is 25 degree.
OPERATION
Install the product as described in the "Installation and Assembly" paragraph.
Insert in the remote control a battery 3V, type CR2025 or CR2032.
Bring the general ON/OFF button (4) in position "I".
MANUAL MODE
- Press the power button on remote control (2). The appliance starts working in ventilation mode (出)
- Press the button MODE (10) on remote control once to activate the heating function on low power. The icon “ ” will light up on the display.
- Press the button MODE (10) on remote control twice to activate the heating function on high power. The icon “ 心 ” icons will light up on the display. Pressing again MODE, it will return in ventilation mode.
- Press the button (2) on unit or remote control to turn it off. The device will stay on in ventilation mode for few seconds and then it turns off.
TIMER 24H
Switch on appliance in any function mode ( , or 品
The heater has a timer up to 24 hours; to activate it, press the button 24H (9) from 1 to 24 times.
On display appears the time set and the icon 們 . After the time, the heater will stop.
TEMPERATURE SETTING
- Switch on appliance in any function mode ( , or 出
-
Set the desired temperature (third and fourth digit on display) from 10 to 49^ , with buttons “+” and “-” (8). In this case the appliance will keep heating until reaching the temperature set.
-
When ambient temperature goes 2 degrees below the temperature set, the heater will switch on again in high power heating mode and then it switches off again when reaching temperature set.
DAY AND TIME SETTING
Switch on appliance in any function mode (or).
To set the current week day and the current time:
- Press button SET (13). On display appears "1".
- Set the day of the week with buttons “+” e “-” (8). (Monday-1, Tuesday-2, Wednesday-3, Thursday-4, Friday-5, Saturday-6, Sunday-7).
- Press again SET (13). The two digits of hours twinkle on the display.
- Set the current hour with buttons "+" e "-" (8).
- Press again SET (13). The two digits of minutes twinkle on the display.
- Set the minutes with buttons “+” e “-” (8).
The time set flashes for 5 seconds and then is saved. In case the unit is unplugged or switched off with the general switch (4), you will have to set again the day and the time.
WEEKLY PROGRAM
Firstly set current day and time, as described in previous paragraph.
Switch on appliance in any function mode (or).
The button W-TIMER (12) commands the weekly program.
On display, "W" indicates the weekly program function, "ON" is switch on time and "OFF" switch off time.
- Press W-TIMER (12) and decide the day to program (from 1 to 7) with buttons “+” and “-” (8).
- Press again W-TIMER (12) to set the switch on time of the selected day.
- Set the hours with "+" and "-" (8).
- Press again W-TIMER (12). The two digits of minutes will flash.
- Set the minutes with "+" and "-" (8).
- Press again W-TIMER (12) to set the switch off time of the selected day.
- Set the hours with "+" and "-" (8).
- Press again W-TIMER (12). The two digits of minutes will flash.
- Set the minutes with "+" and "-" (8).
- Press again W-TIMER (12) to pass to another day, and repeat operation for all the days of the week.
Set temperature in weekly program. It is possible to associate desired temperature to every day of week.
- Press W-TIMER (12), then press DELAY (15). On display appears "1-30", which means that, for the day "1", the temperature set is 30 degree.
- Set the temperature (10 - 49^) of day "1" with buttons "+" and "-" (8).
- Press again DELAY (15) and set temperature (10 - 49^) of day "2" with buttons "+" and "-" (8).
- Repeat operation for all the days of the week.
AUTO MODE
Switch on appliance and push button AUTO (14). On display appears. The heater now works in energy saving mode, and detects sudden variation of ambient temperature, that may be due to a window opening. The heater will switch off is a variation of 3 degree in less than one minute is measured.
To disable that function, press again the button AUTO (14); the symbol disappears.
LOCK BUTTONS
Press LOCK (11) to block all the keys of the remote control. Press again LOCK to enable again.
INSTALLATION AND ASSEMBLY
The assembly and installation must be done by following a few instructions.
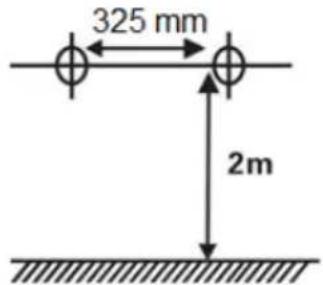
- The appliance must be placed high enough to be out of the reach of children (at least 200cm from the floor).
- The appliance must be placed at a minimum distance of 50~cm from the sidewalls.
- Do not mount on a vibrating surface. Do not install in rooms smaller than 4m^2
- Make sure that the ventilation holes are not obstructed, even partially.
CAUTION! The plugs and screws supplied are only suitable for mounting on masonry walls. If you decide to install the unit on another type of wall (plasterboard or other), buy appropriate anchors.
-
By using a yardstick, measure the distance between the two back shapes on back of unit (325 mm).
-
Take the product and place it on the wall in the desired location. Mark on the wall the positions corresponding to the two back-shapes. Check that the marks are aligned at 325mm from each other. Drill
two holes (diameter 6mm ) in the wall and insert the dowels into the holes.
- Use a screwdriver to insert the screws into the anchors and tighten to lock the pieces themselves, leaving the screws about 1 inch off the wall.
- Set the product to the wall by inserting screws inside the shapes. Once the screws are inserted, move the unit to the right until it locks in position firmly.
CLEANING Unplug the power cord from the electrical outlet and allow the unit to cool down before cleaning.
- Do not immerse the unit in water. Regularly clean the ventilation slot (7) on the back of the unit and the air outlet grille (1) to prevent the dirt from clogging the airflow.
- Do not clean the unit with a sponge or abrasive detergents.
TECHNICAL FEATURES
Power supply: AC 230V~50-60Hz, power: 2000W
- Ceramic Heating elements, Wall-mounting, IP23 protection
- Digital display, Remote control, Safety device against overheating
| Information requirement for the electric local space heaters | |||||
| Model identifier(s):G3FERRARI G60022 | |||||
| Item | Symbol | Value | Unit | Item | |
| Heat output | Type of heat input, for electric storage loc space heaters only (select one) | ||||
| Nominal heat output | Pnom | 2,000 | kW | manual heat charge control, with integrated thermostat | |
| Minimum heat output (indicative) | Pmin | 1,00000 | kW | manual heat charge control with room and/or outdoor temperature feedback | |
| Maximum continuous heat output | Pmax,c | 1,975 | kW | electronic heat charge control with room and/or outdoor temperature feedback | |
| fan assisted heat output | |||||
| Auxiliary electricity consumption | Type of heat output/room temperature control (select one) | ||||
| At nominal heat output | elmax | 0,000 | kW | single stage heat output and no room temperature control | |
| At minimum heat output | elmin | 0,000 | kW | Two or more manual stages, no room temperature control | |
| In standby mode | elsb | 0,000 | kW | with mechanic thermostat room temperature control | |
| with electronic room temperature control | |||||
| electronic room temperature control plus day timer | |||||
| electronic room temperature control plus week timer | |||||
| Other control options (multiple selections possible) | |||||
| room temperature control, with presence detection | |||||
| room temperature control, with open window detection | |||||
| with distance control option | |||||
| with adaptive start control | |||||
| with working time limitation | |||||
| with black bulb sensor | |||||
| Contact details | TREVIDEA SRL, Strada Consolare RN-RSM, 62 - 47924 - Rimini, Italy | ||||
FRANCAIS: ADVERTISSEMENT
The product is made of non-biodegradable and potentially polluting substances if not properly disposed of; other parts can be recycled. It's our duty to contribute to the ecological health of the environment following the correct procedures for disposal. The crossed out wheelie bin symbol indicates the product complies with the requirements of the new directives introduced to protect the environment (2002/96/EC, 2003/108/EC, 2002/95/EC, 2012/19/EC) and must be properly disposed at the end of its lifetime. If you need further information, ask for the dedicated waste disposal areas at your place of residence. Who does not dispose of the product as specified in this section shall be liable according to the law.
To find the nearest service center, please call the telephone number 0541 694246, fax number 0541 756430 or contact us at assistenzatecnica@trevidea.it asking for the service centers supervisor.
Appliance is conform to the pertinent European regulation and is therefore marked with the CE mark.

www.g3ferrari.it TREVIDEA S.r.l.