BBQ9493 - Grill plate SUNTEC - Free user manual and instructions
Find the device manual for free BBQ9493 SUNTEC in PDF.


| Product type | Electric grill plate (electric barbecue) |
| Brand | Suntec Wellness |
| Model | BBQ9493 |
| Power supply | 220-240 V~, 50-60 Hz, 2000-2400 W |
| Plate dimensions | 46 × 35 cm (approx.) |
| Weight | Approx. 12 kg (with trolley) |
| Plate material | Non-stick coating |
| Thermostat | Adjustable, with indicator light |
| Thermometer | Integrated in the hood |
| Grease tray capacity | 0.3 liter |
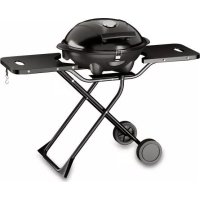
| Main functions | Grill with hood, trolley with wheels, side table, safety lock |
| Maximum temperature | Approx. 250 °C (estimate) |
| Heating time | Approx. 10 minutes at maximum power |
| Maintenance and cleaning | Clean the plate and tray with hot water and a damp cloth. Do not use abrasive products. The plate is dishwasher safe (check manual). |
| Safety | Automatic shutdown not specified; do not use near water; supervision required; use on a stable, heat-resistant surface. |
| Included accessories | Grill plate, hood, drip tray, removable thermostat, trolley, wheels, side table |
| Available spare parts | Replacement plate (ref. 28700), cover for BBQ-9493 (ref. 28724), other accessories |
| Warranty | 24 months |
| Use | Household use only |
Frequently Asked Questions - BBQ9493 SUNTEC
User questions about BBQ9493 SUNTEC
0 question about this device. Answer the ones you know or ask your own.
Ask a new question about this device
Download the instructions for your Grill plate in PDF format for free! Find your manual BBQ9493 - SUNTEC and take your electronic device back in hand. On this page are published all the documents necessary for the use of your device. BBQ9493 by SUNTEC.
USER MANUAL BBQ9493 SUNTEC
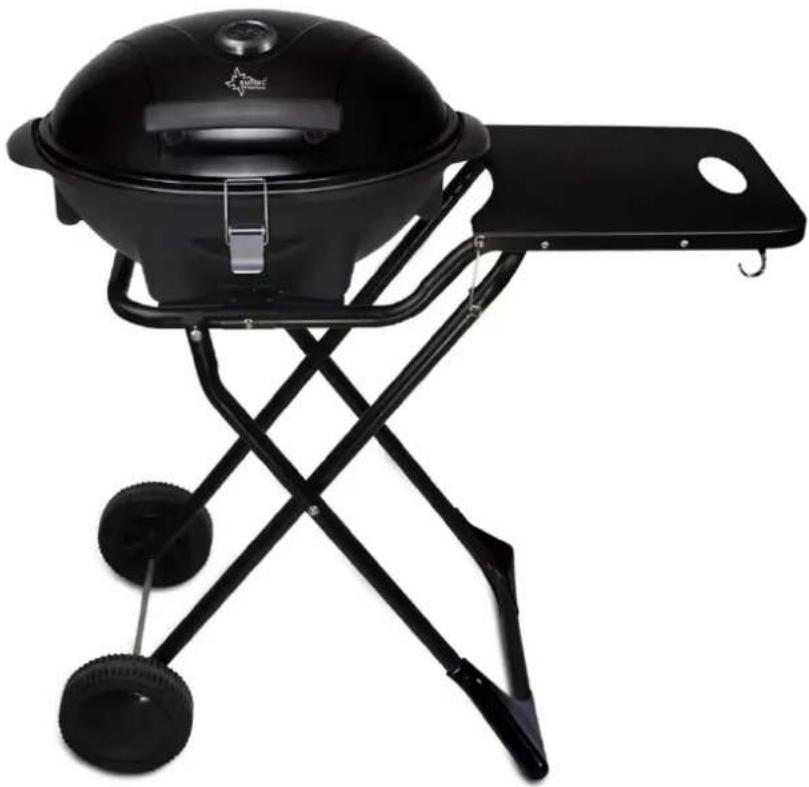
BBQ-9493
Sicherheitshinweise
VORSICHT!
Safety Precautions
CAUTION!
This appliance can be used by children aged from 8 years and above and persons with reduced physical, sensory and mental capabilities or lack of experience and knowledge if they have been given supervision or instruction concerning use of the appliance in a safe way and understand the hazards involved. Cleaning and user maintenance shall not be made by children without supervision. Children of less than 3 years should be kept away unless continuously supervised.
Children aged from 3 years and less than 8 years shall only switch on/off the appliance provided that it has been placed or installed in its intended normal operating position and they have been given supervision or instruction concerning use of the appliance in a safe way and understand the hazards involved. Children aged from 3 years and less than 8 years shall not plug in, regulate and clean the appliance or perform user maintenance.
- Please make sure that the device is connected to a properly earthed socket.
- The installation of a protective device by means of a rated breaking current, offers you additional security that 30mA are not exceeded in the household installation.
- Please contact your installer for advice. There is a risk of electric shock even if the appliance is already switched off, therefore please remove the plug from the socket immediately after use.
- Please do not operate the unit near a bath, shower
or swimming pool.
- Do not expose the unit to rain or other moisture.
- Please check regularly if the cable is defective. In case of defect, refrain from using the device and disconnect the plug immediately.
- Do not operate the device (please unplug the power cord immediately) if:
- the device, housing or cable is damaged
- the device shows visible signs of damage
○ if you suspect a fault after a fall or similar
- Please disconnect the power plug:
- in case of malfunctions during use
- before cleaning or transporting the device
○ after use
- Never pull the plug when it is bent or when your hands are wet.
- Never pull or carry the unit on the electrical cable, as this could damage the cable.
- The cable must not be laid or clamped over sharp edges.
- Never immerse the power cord or thermostat in water or other liquids.
- Please use an extension cable only if it is in perfect condition. Please use a grounded cable with a minimum capacity of 10A.
- Never bring the extension cable into contact with the hot grill plate.
- Always turn off the unit before disconnecting the power cord.
- Always allow the grill to cool down before cleaning the grill or accessories.
- Please be careful! The grill plate can become very hot and cools down very slowly after the appliance
has been switched off. Risk of burns! Please do not touch any hot surfaces and be careful when handling the device after use.
- Please do not place the grill over the edge or corner of the table and avoid any contact with hot surfaces.
- Please do not place the unit near ovens.
- Please do not use the device unless it is placed on a stable and dry surface.
- Please do not leave the device unattended.
- Please switch off the device whenever it is not in use.
- This device is not intended for commercial use, only for private use.
- Please do not use the unit without a grease collecting bowl or the base of the unit.
- Never cover the grill plate with aluminium foil or plates (this could damage the non-stick coating).
- Please make sure that the unit has been correctly assembled before you put it into operation (especially if it is used for the first time in a stationary position).
- Please take care of grease splashes during grilling.
- Please place the device on a surface that is heat resistant. Please keep the electric grill at least 10 cm away from walls when you put it into operation.
- Please use this device only as described in this manual. Any other use not recommended by the manufacturer may result in fire, electric shock or personal injury.
- For safety reasons, please do not use any accessories not supplied or recommended by the manufacturer.
- Only trained personnel should repair electrical appliances. Improper repairs can result in
considerable dangers for the user.
- If the connection cable is damaged, it must be replaced by a qualified person. Please contact your point of sale.
- No liability is assumed for possible damage if the device has been used for improper purposes, has been operated incorrectly or has not been repaired properly. In such a case, you have no warranty claim.
- When used as a table grill, please remove the hood to avoid any tipping over.
- Children should be supervised to ensure that they do not play with the appliance.
- Charcoal or similar combustible fuels must not be used with this appliance.
Attention: Please be careful. Do not trip over the power cord when the unit is in use. Please remember to remove the plug after use.
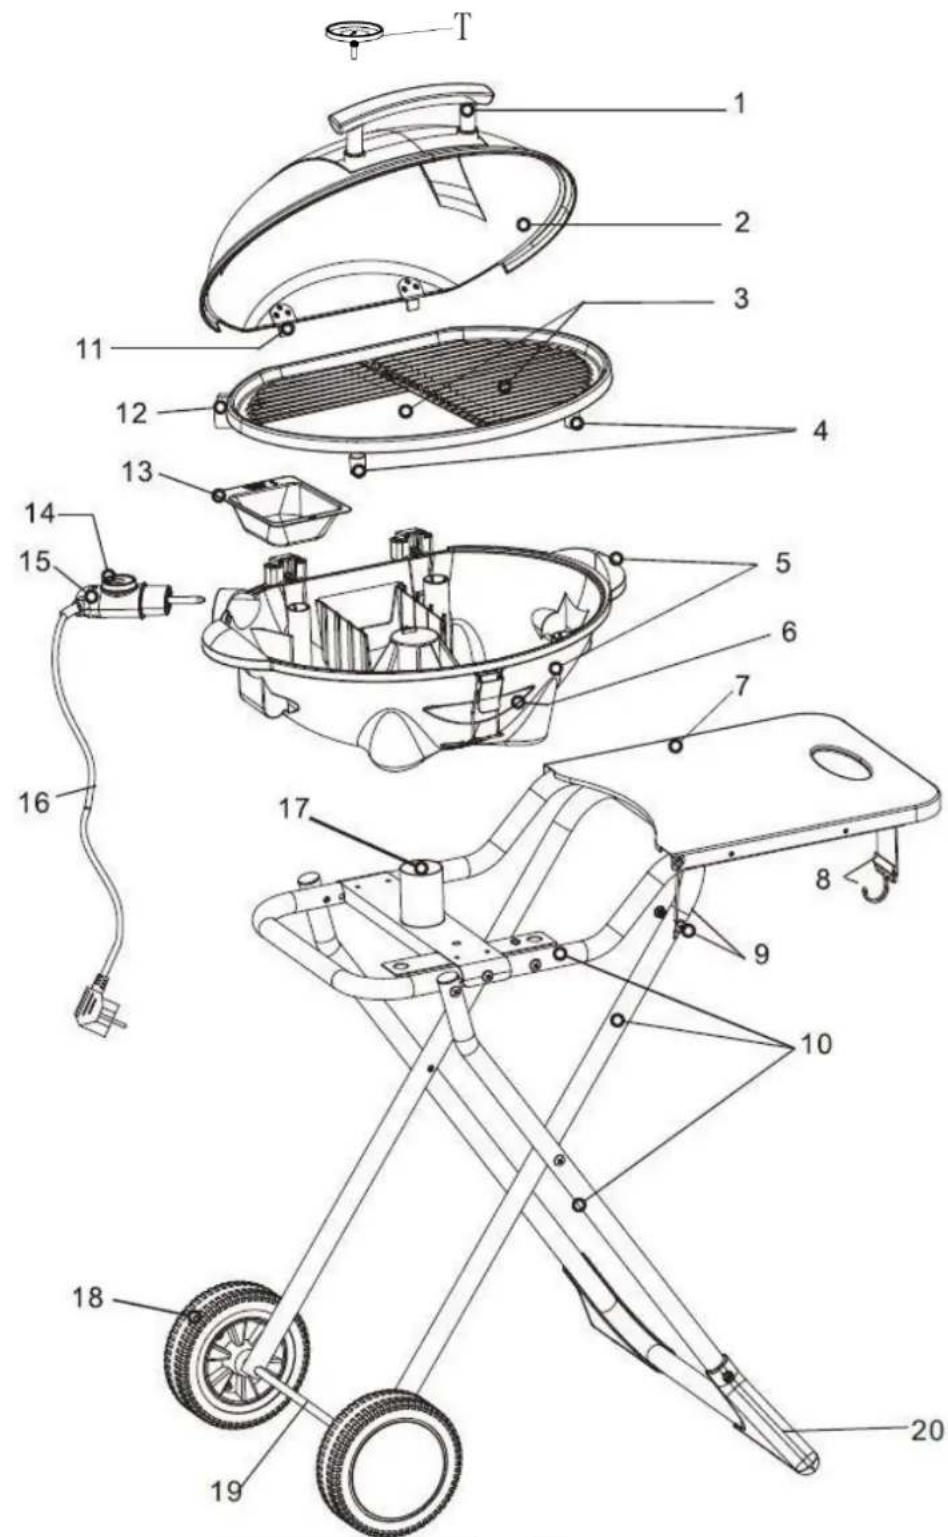
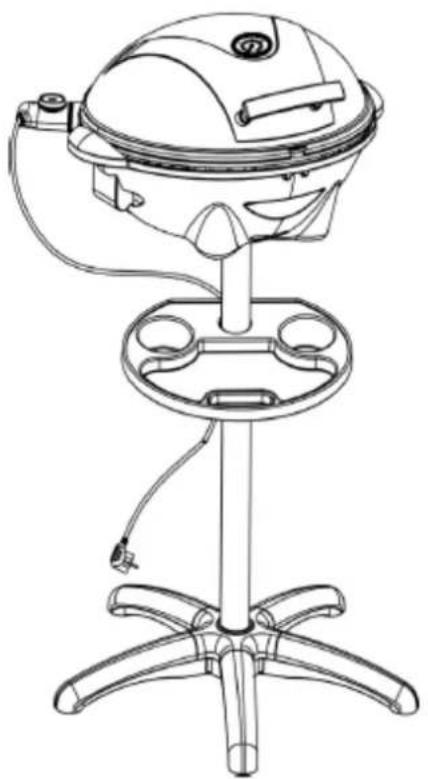
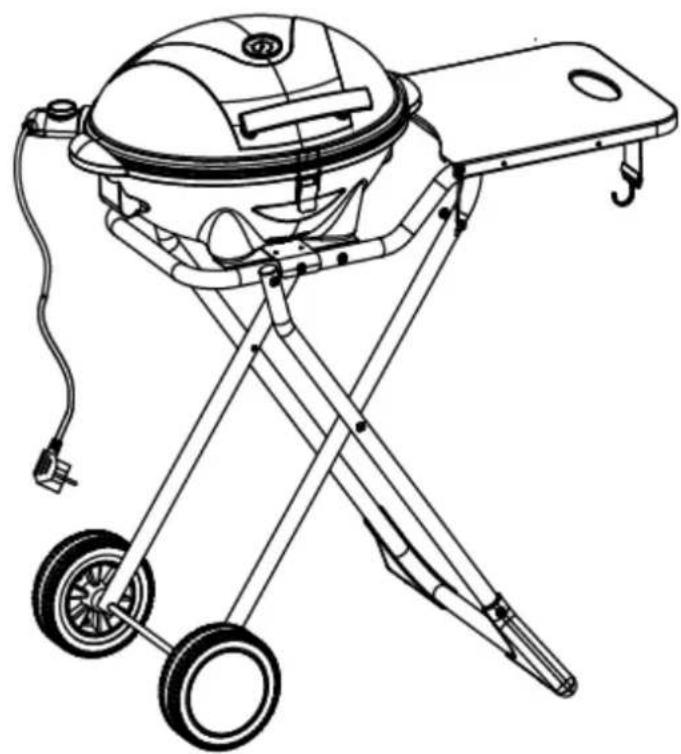
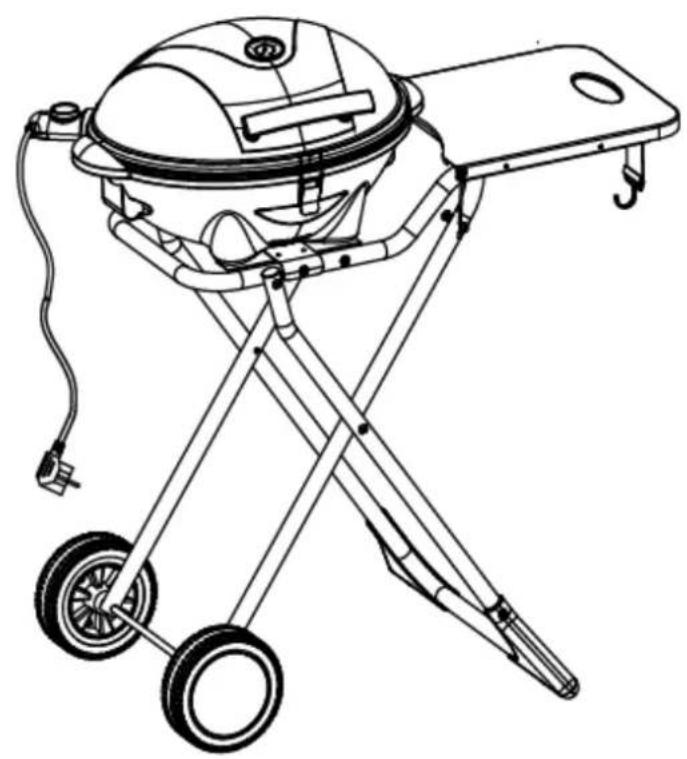
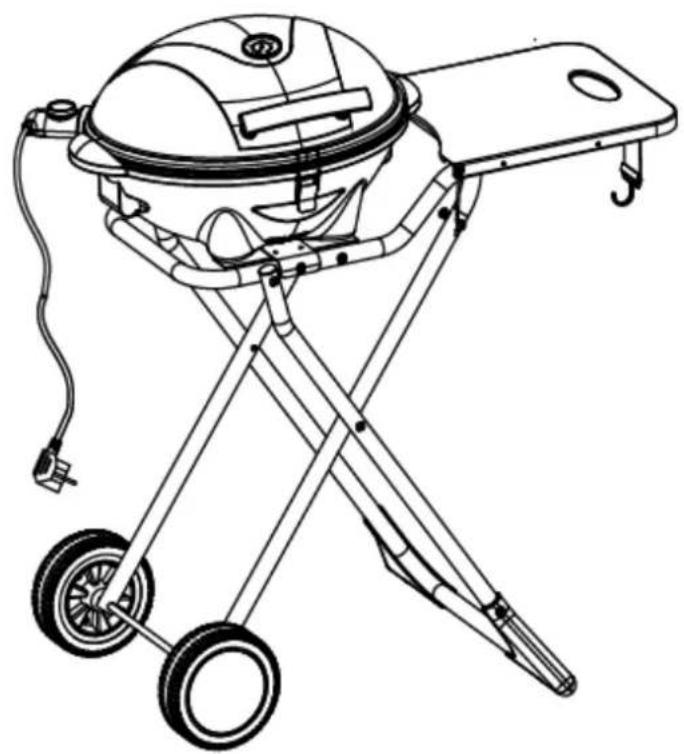
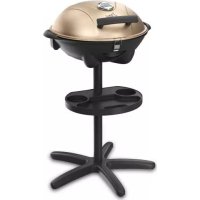
Components of BBQ-9493
T. Thermometer
-
Handle 11. Metal hinge
-
Upper cover 12. Jacket of socket
-
Grill plate 13. Grease collecting bowl
-
Feet 14. Control knob
-
Thermoplastic cover 15. Removable thermostat with cord
-
Buckle of cover 16. Power cord
-
Side table 17. Stand tube
-
Belt hook 18. Wheel
-
Safety lock 19. Axis
-
Support tubes 20. Feet
(The corresponding pictures can be found in the front of this manual.)
Installation of BBQ-9493
-
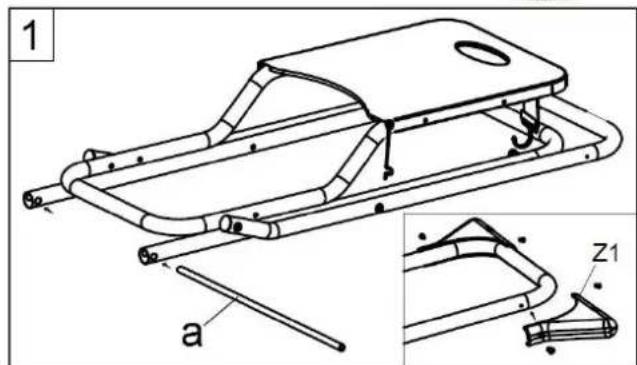
Please remove the trolley frame and accessories from the box. Make sure that the trolley frame is placed on a dry, even and stable surface. Insert the wheel axis (a) through the holes provided at the bottom of the trolley frame. Please attach tge feet (Z1) to the frame as shown in figure 1.
-
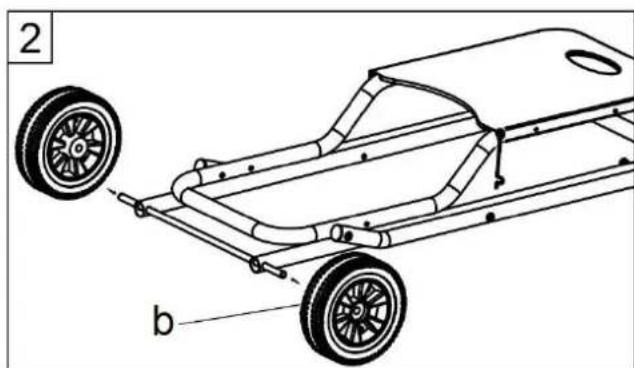
Mount the wheels (b) on the two sides of the axis (a) as shown in figure 2.
-
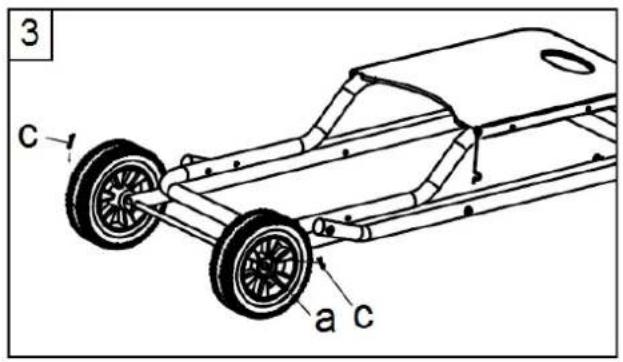
There are two holes on each end side of the axis (a). Insert the pin "R" (c) through the hole to lock the wheels (see figure 3).
-
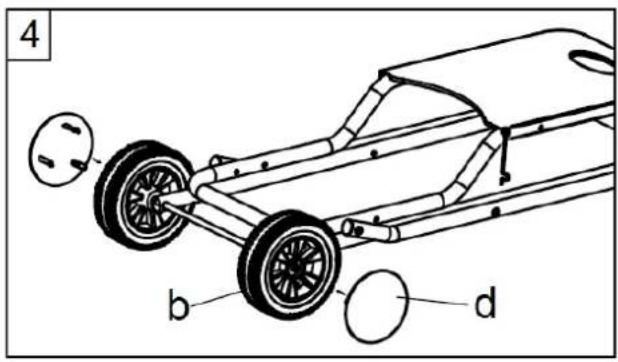
Press the wheel covers (d) on the wheels (b) as shown in figure 4.
-
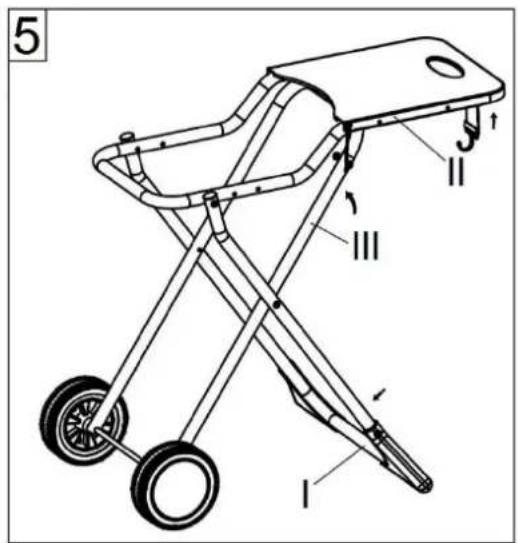
Place the trolley upright: first step with your right foot on the centre of the carrying tube (I), lift the side table (II) with your right hand and the wheel tube (III) with your left hand. Then connect the tube (III) to the tube located under the side table. The trolley frame is now in place (see figure 5).
-
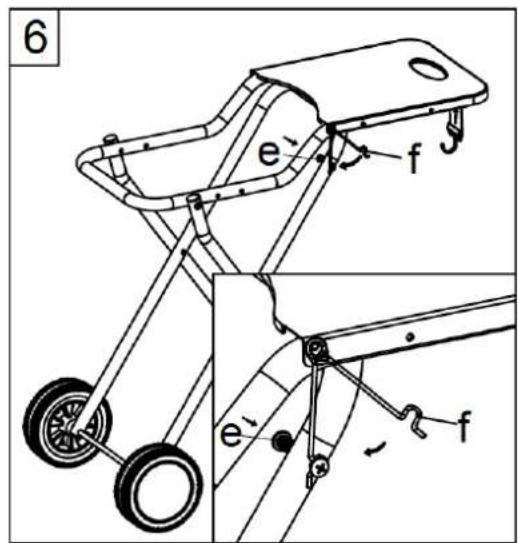
After the trolley frame has been set up, you MUST immediately engage the safety lock (f). This safety lock is self-locking. Press the spring (s) and hook the curved hook (f) into the extended part (s). Then stop pressing so that the safety hook automatically engages (see figure 6).
Attention: Please make sure that the safety hook is LOCKED while grilling or moving. DO NOT attempt to twist or pull the safety hook while using this unit.
-
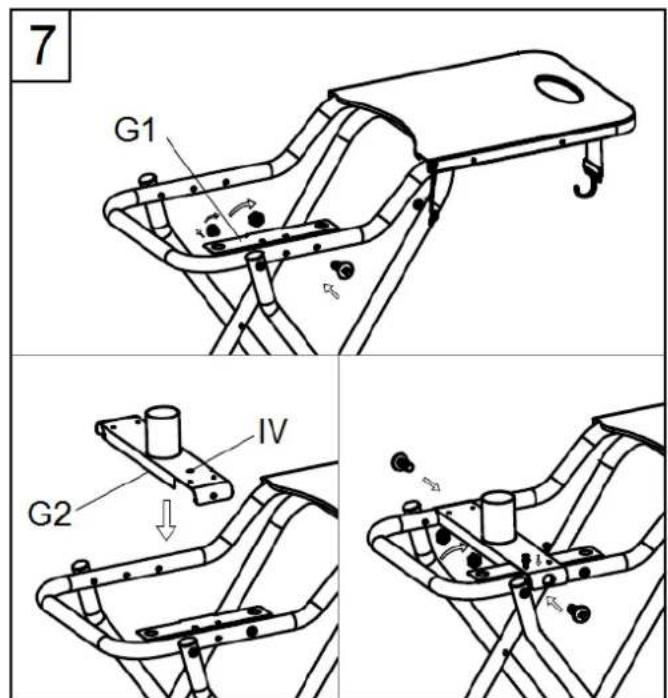
Remove the screw from the trolley tube (III) first. Then mount the standpipe (G1) on the trolley tube (II) and mount the standpipe (G2) on the trolley tube (II). There is a positioning hole (IV) on the standpipe (G2), which secures G1 and G2 to each other with screws. Please fasten the standpipe (G and G2) firmly to the trolley using screws and nuts (see figure 7).
-
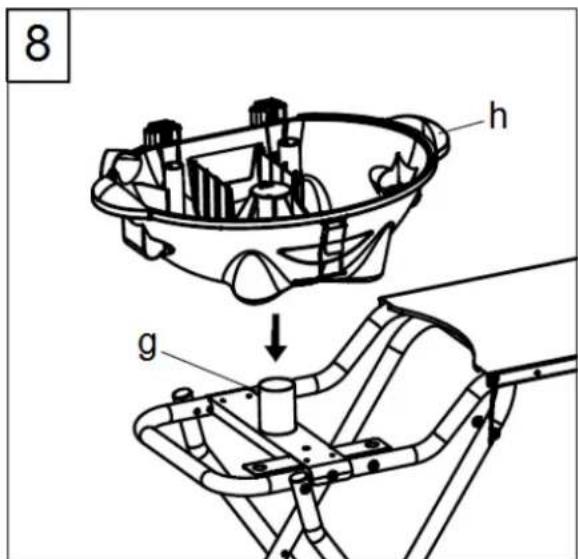
Place the key-shaped bottom of the unit (h) on the standpipe (g). Attach the underside of the base to the positioning hole (IV). When removing the base from the standpipe (g), slightly step onto the support tube (l), hold the base handles and remove them (see figure 8).
-
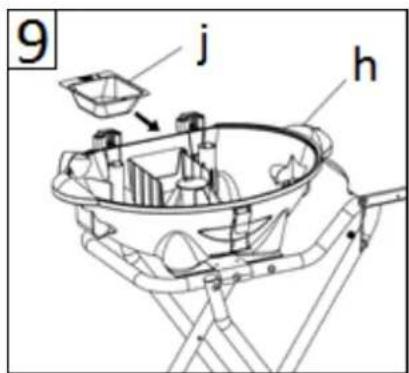
Place the grease collecting bowl (j) in the slot of the bowl-shaped base (h). To secure it properly, make sure that the hole on the grease collecting bowl matches the hole in the middle of the bowl-shaped base (tip: The bowl can be filled with water to make it easier to clean). To remove the grease collecting bowl, gently press lightly on the bottom (see figure 9).
Attention: The capacity of the grease collecting bowl is 0.3 L. Please pour out the fat when it's full. The surface of the bowl is hot. Please do not touch the bowl during grilling.
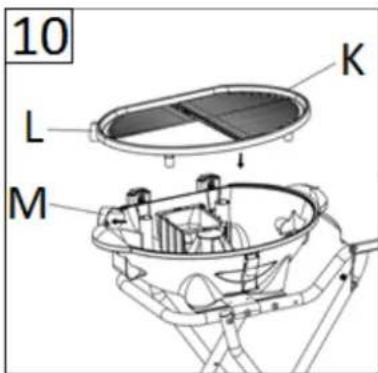
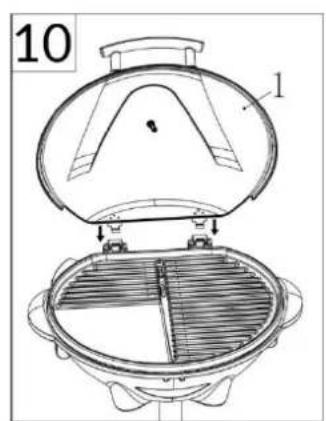
- Place the grill plate (K) on the bottom of the appliance (H). First, insert the socket (L) of the grill plate into the hole (M) of the base. Please place the grill plate horizontally on the base of the appliance. To remove the grill plate, hold the right side of the plate up and remove the connecting socket (L) from the hole (M). Before removing the grill plate, make sure that it is completely cooled and not in use (see figure 10).
Attention: Please use the lid handle to close or open the cover. Please note that the cover is hot during grilling.
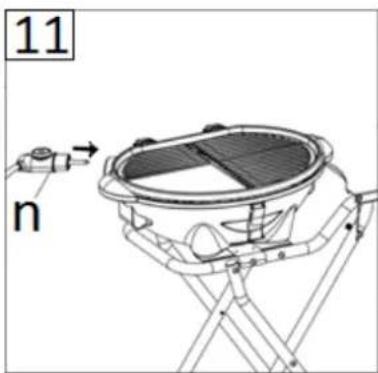
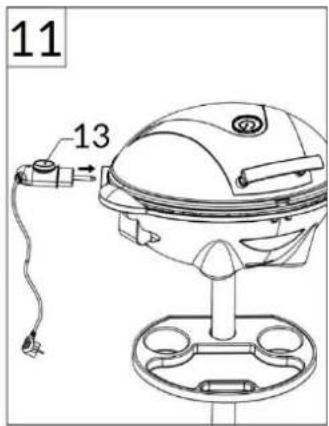
- Please insert the removable thermostat with its cord (s) into the power socket (L). When removing the thermostat, hold the handle of the base to prevent it from tipping over inadvertently (see figure 11).
Attention: Please be careful. Do not trip over the power cord when the unit is in use. Always unplug the power cord after use.
-
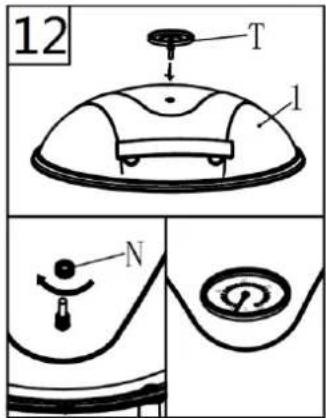
Insert the thermometer (T) into the hole on the hood and fix it from the inside of the hood with the nut (N) (see figure 12).
-
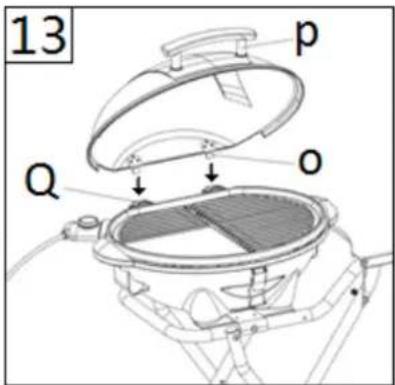
Please mount the upper cover. To do this, hold the cover handle (p) and place the metal hinges (O) into the mounting holes (Q) of the base. When removing the upper cover, please open the cover and tilt it up to 45° between the cover and the grill plate and detach the metal hinges (o) from the mounting holes (Q) (see figure 13).
-
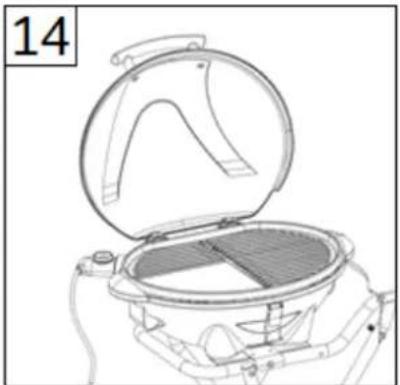
Since the upper cover is removable, it is more convenient for use and cleaning (see figure 14). Attention: To close or open the cover, always use the lid handle. Note that the hood becomes hot during the grilling process.
-
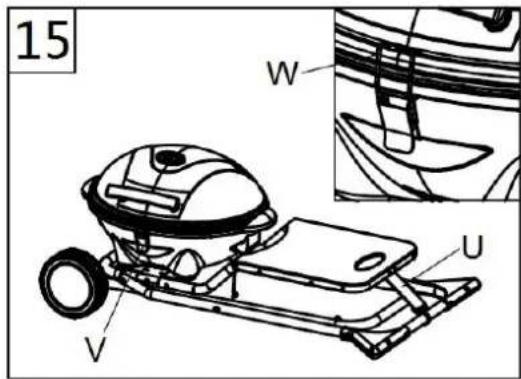
When moving the folded trolley or when not in use, please lock the cover with the buckle and make sure that the belt hook (U) locks the tube (see figure 15).
Components of BBQ-9479
T. Thermometer
-
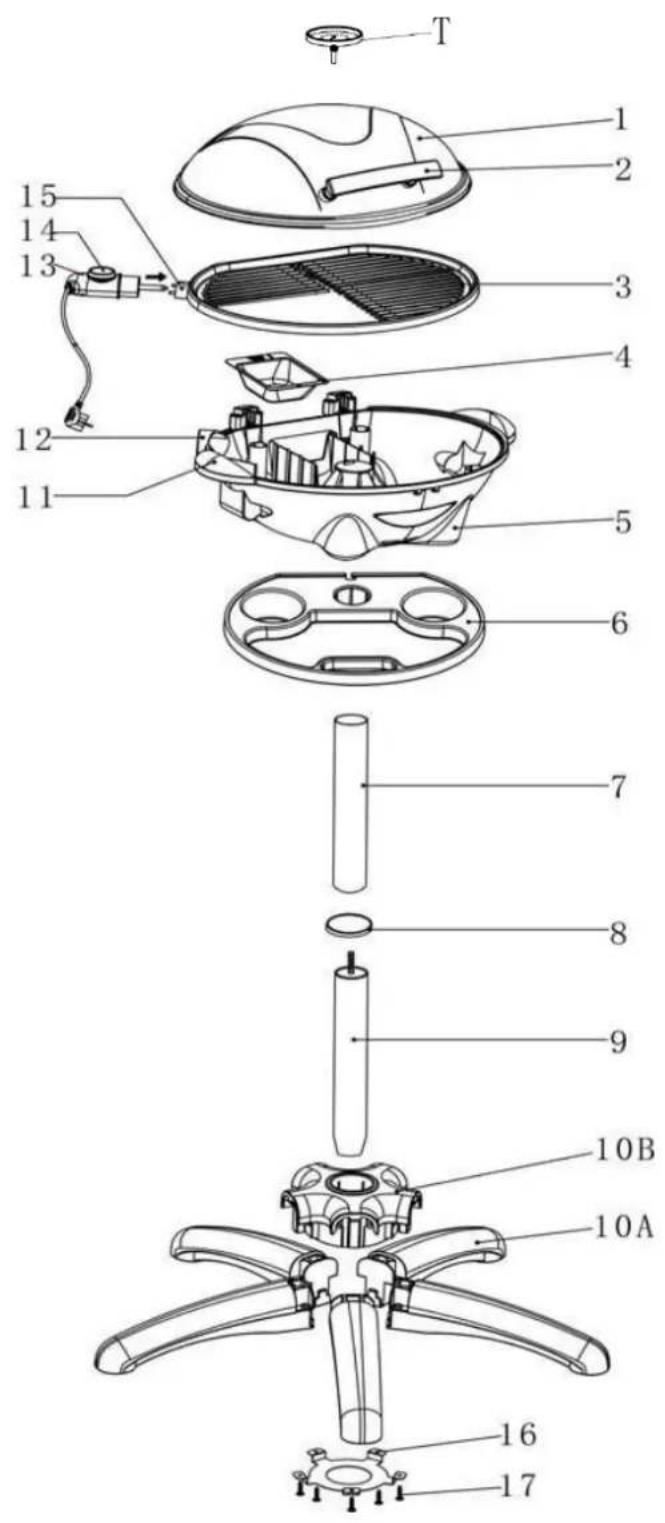
Handle 10 A. Stand feet
-
Upper cover 10 B. Stand base
-
Grill plate 11. Handle
-
Grease collecting bowl 12. Connection socket
-
Base of appliance 13. Removable thermostat with cord
-
Spice rack 14. Indicating light
-
Upper tube 15. Socket
-
Decoration 16. Disk
-
Lower tube 17. Screws
(The corresponding pictures can be found in the front of this manual.)
Installation of BBQ-9479
-
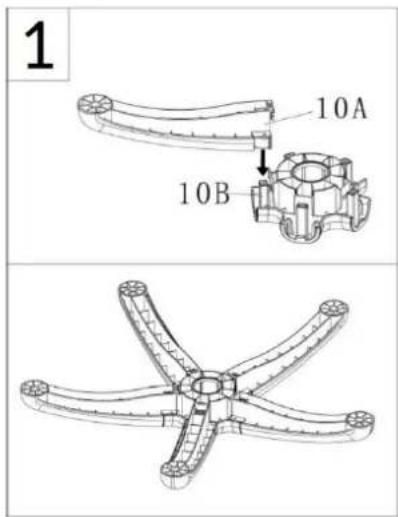
Install the stand feet (10A) into the stand base (10B) until you hear a "click" (see figure 1).
-
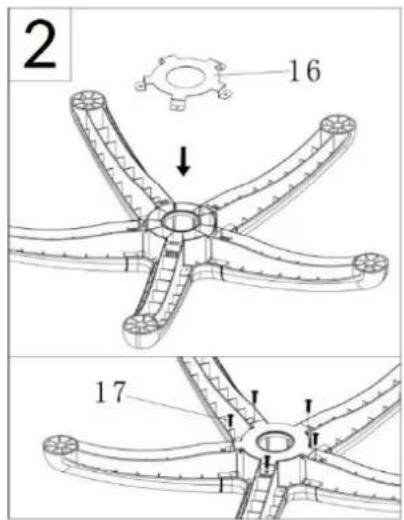
To fix the stand, place the disk (16) on the stand and tighten it with the screws (17) provided (figure 2).
-
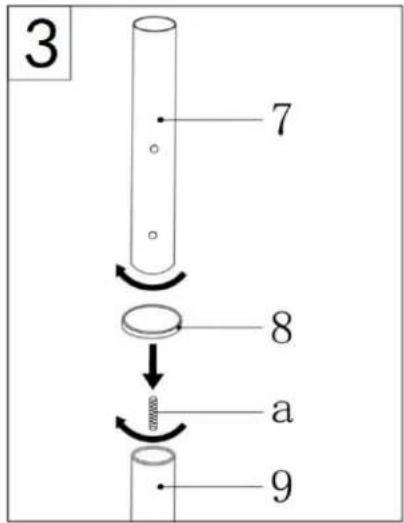
Screw half of the threaded rod (a) into the lower tube (9). Then place the decorative ring (8) on the threaded rod (a) and connect the upper tube (7) to the threaded rod (a) (see figure 3).
-
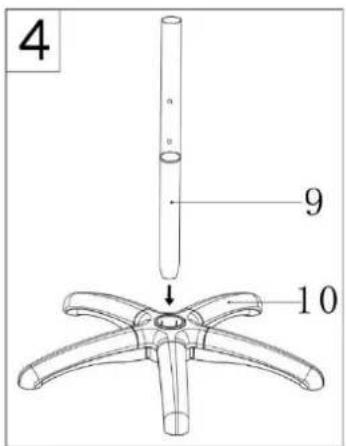
Connect the stand feet (10) to the lower tube (9) to form the complete grill stand (the grill can be used with or without stand) (see figure 4).
-
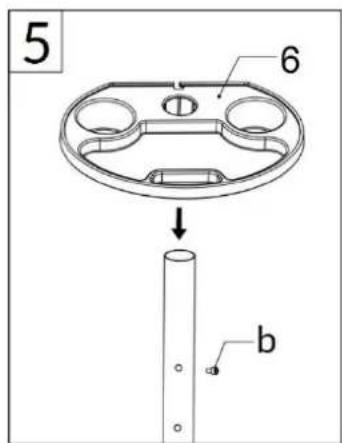
Install the screw (b) on the upper tube (7) and place the spice rack (6) on top. (Please make sure that the compartment is also fixed) (see figure 5).
-
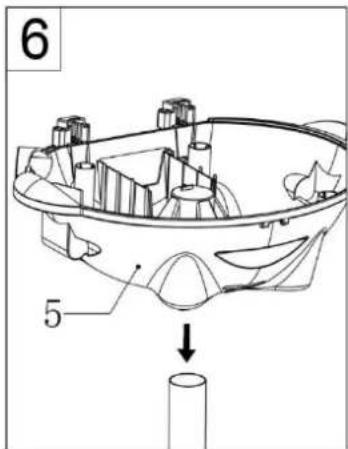
Place the appliance's base (5) on the grill (make sure that the grill is placed on a dry, flat and stable surface) (see figure 6).
-
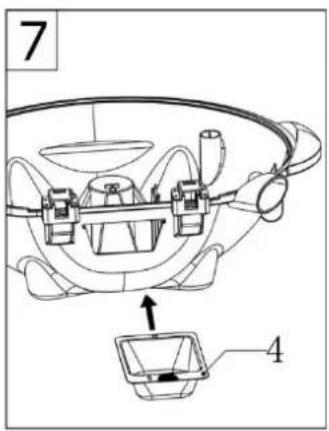
Place the grease collecting bowl (4) into the provided holder of the base (5). Fasten the opening of the grease collecting bowl with a screw (fill the bowl with a little water to make it easier to clean) (figure 7).
-
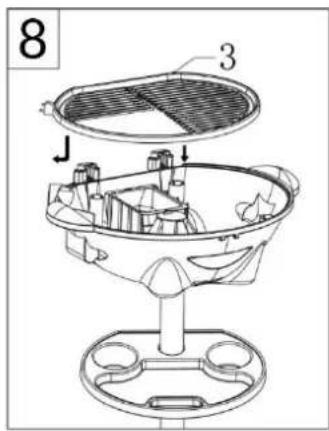
Place the grill plate (3) on the base (5). First, insert the socket (15) into the connection socket (12)
provided for this purpose. Then place the grill plate horizontally on the appliance's base (see figure 8).
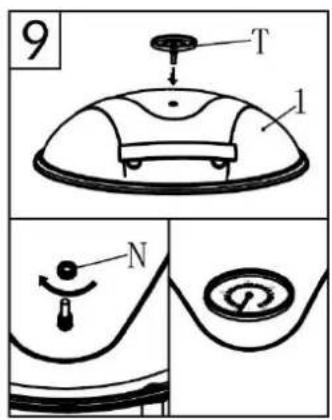
- Insert the thermometer (T) into the hole on the hood and fix it from the inside of the hood with the nut (N) (see figure 9).
- Install the handle (2) with the screw (d) and the hook on the metal cover (C). Then place the metal cover on the grill surface (see figure 10).
- Press the removable thermostat (13) as far as possible into the connection socket (see figure 11).
Prior to first use
- Please remove all packaging materials and clean the grill plate, grease collecting bowl and upper cover thoroughly. The grease collecting bowl is dishwasher-safe.
Important: Please allow all parts to dry thoroughly, especially the connecting socket. Never immerse the thermostat or its cord in water or other liquids. - Please heat the grill with the lid closed for about 10 minutes at maximum setting, without any food on it. Residues from the manufacturing process could cause odour and smoke when the device is used for the first time. This is normal and will disappear after a short time.
Operating the appliance
- Please connect the appliance to the main power supply (220-240V\~, 50-60Hz, 2000-2400W).
- Please set the thermostat to the desired temperature (it usually takes 10 minutes to heat up).
• The indicating light goes out as soon as the set temperature is reached. - Please place the food on the grill plate for grilling.
Grilling times
The following are recommended cooking times. Different times will be required for different weights and sizes of foods to be grilled, and depending on whether you are grilling with or without the metal cover.
| Food | Temperature setting | Grilling time |
| Steak/beef | 5 | 22-30 min. |
| Lamb | 5 | 18-27 min. |
| Chicken drumsticks | 5 | 37-45 min. |
| Chops | 5 | 30-38 min. |
| Chicken wings | 5 | 22-30 min. |
| Fillet of pork | 4-5 | 13-15 min. |
| Whole fish | 5 | 18-23 min. |
| Kebabs | 3-4 | 15-18 min. |
| Various sausages | 3-4 | 18-23 min. |
Tips for grilling
- Meat becomes tender when being marinated overnight. Marinades usually consist of oil (for moisture), vinegar (for tenderness) and a mixture of spices.
- Always use grill tongs or other barbecue utensils to turn over the grilled meat (a fork would dry out the meat and damage the non-stick coating).
- Please turn the meat or fish only once during grilling. If turned over more often, the food will dry out.
- Never grill meat for too long.
• If the food remains stuck on the grill plate, rub the plate with kitchen paper soaked in oil. - Please disconnect the appliance from the power supply after each use.
Cleaning and care of the appliance
- Please allow the grill to cool completely before cleaning.
- Please remove the thermostat from the unit.
- Clean the grill plate and the grease collecting bowl with warm water and a damp cloth. Do not use steel wool, brush or scouring agents to prevent damage to the grill's coating.
- Please wipe the bottom of the appliance with a damp cloth. Grease splashes can be removed with a mild detergent.
• Note: The grill plate has a non-stick coating. Please do not damage it during grilling or cleaning. - Tip: Please protect the device from dust and dirt if it is not used for a longer period of time by wrapping it in a plastic bag. Store it in a dry place.
- You can purchase the following Suntec accessories from your seller:
| Item number | Item description |
| 28700 | Replacement grill plate 46x35 |
| 28717 | Cover for BBQ-9462 / 9479 / 9486 |
| 28724 | Cover for BBQ-9493 |
In case of complaint
• You can claim the device within 24 months from date of purchase (receipt).
- A free replacement or repair will be excluded from prior improper product handling.
- Defects in wear parts, consumables, as well as cleaning, maintenance or replacement of said parts are therefore with costs.
- If you want to make a complaint, please bring the entire device in its original packaging and with proof of purchase to your dealer. For a timely and convenient service register, visit our website www.suntec-wellness.de and learn more.
- Without a proof of purchase, generally there will be no repair or replacement.
- In the event that the complaint case is analogous to our terms of service, all defects of the device or its accessories due to material or manufacturing defects will be eliminated by repair or, at our discretion, replacing the unit.
- The damage of accessories does not automatically lead to a free exchange of the whole device. In these cases, please contact your dealer. Glass breakage, or breakage of plastic parts are always to charge.
- The dealer or repair service can perform the repair after the expiration of warranty against charge.
Note concerning protection of environment
This product must not be disposed of via normal household waste after its service life, but must be taken to a collection station for the recycling of electrical and electronic devices. The symbol on the product, the operating instructions or the packaging indicates such disposal procedures. The materials are recyclable in accordance with their respective symbols. By means of re-use, material recycling or any other form of recycling old appliances you are making an important contribution to the protection of our environment.
Please ask your local council where your nearest disposal station is located.
As part of our extended producer responsibility, this product is indicated in accordance to the European Directive 2002/96/EC on Waste Electrical and Electronic Equipment (WEEE). The aim is to avoid, reduce, and environmentally friendly disposal of electronic waste. Please help actively to protect the environment and dispose electronic waste through local collection points. The packaging and this manual can be recycled.
EC declaration of conformity
The device meets the essential health and safety requirements of the European Union. The EC declaration of conformity is the basis for CE marking this unit.
With publication of this manual supersedes all previous their validity. SUNTEC, SUNTEC Wellness, KLIMATRONIC and the Sun-Logo are registered trademarks. © 2020/01 SUNTEC WELLNESS GMBH
Liability is excluded for all printing errors and omissions.
BBQ-9479
BBQ-9493
For this appliance we assure 24 months warranty.
During the 24 months warranty we guarantee to repair your appliance free of charge or to provide your seller the spare parts free of charge if the appliance fails to work due to production failure.
Other claims are excluded from this warranty. We will not be liable for any defects caused by acts of nature, improper use, neglection of the instruction manual, damage from continuous use and damages during transportation.
This warranty card is only applicable with the according invoice.
In case of service please bring your purchased product to your seller.
Product name:
Serial number:
Name of buyer:
Date of purchase:
Stamp and signature of seller:
Manufacturer:
Suntec Wellness GmbH
Holzstraße 2
40221 Düsseldorf
Germany
Garanzia

- SICHERHEITSHINWEISE
- VORSICHT
- SAFETY PRECAUTIONS
- CAUTION
- COMPONENTS OF BBQ-9493
- INSTALLATION OF BBQ-9493
- COMPONENTS OF BBQ-9479
- INSTALLATION OF BBQ-9479
- PRIOR TO FIRST USE
- OPERATING THE APPLIANCE
- GRILLING TIMES
- TIPS FOR GRILLING
- CLEANING AND CARE OF THE APPLIANCE
- IN CASE OF COMPLAINT
- NOTE CONCERNING PROTECTION OF ENVIRONMENT
- EC DECLARATION OF CONFORMITY
- GARANZIA
Brand : SUNTEC
Model : BBQ9493
Category : Grill plate