WPX2700 - Pressure washer WESTINGHOUSE - Free user manual and instructions
Find the device manual for free WPX2700 WESTINGHOUSE in PDF.
| Product Type | Gasoline High Pressure Washer |
| Brand | Westinghouse |
| Model | WPX2700 |
| Maximum Pressure | 2700 PSI (186 BAR) |
| Water Flow Rate | 2.3 GPM (8.71 L/min) |
| Maximum Water Temperature | 40 °C (104 °F) |
| High Pressure Hose Length | 7.6 m (25 ft) |
| Detergent Tank Capacity | 1.6 L (0.42 gal) |
| Engine Displacement | 212 cc |
| Start Type | Recoil Starter |
| Fuel Tank Capacity | 3.3 L (0.87 gal) |
| Fuel Type | Unleaded gasoline 87-93 octane (max 10% ethanol) |
| Engine Oil Capacity | 0.6 L (20 oz) |
| Engine Oil Type | SAE 10W-30 |
| Spark Plug | F7TC (gap 0.60-0.80 mm) |
| Included Nozzles | 0°, 25°, 40° and soap nozzle |
| Certifications | EPA, CARB |
| Power Source | Gasoline (4-stroke engine) |
| Low Pressure Function | Yes (black soap nozzle) |
| Detergent System | Integrated with tank and siphon |
| Safety Lock | Trigger with safety lock |
| Thermal Protection | Thermal relief valve at 52°C (125°F) |
| Regular Maintenance | Oil change, air filter cleaning, spark plug, spark arrester |
Frequently Asked Questions - WPX2700 WESTINGHOUSE
User questions about WPX2700 WESTINGHOUSE
0 question about this device. Answer the ones you know or ask your own.
Ask a new question about this device
Download the instructions for your Pressure washer in PDF format for free! Find your manual WPX2700 - WESTINGHOUSE and take your electronic device back in hand. On this page are published all the documents necessary for the use of your device. WPX2700 by WESTINGHOUSE.
USER MANUAL WPX2700 WESTINGHOUSE
For Gas Pressure Washer Models: WPX2700, WPX3200
DO NOT RETURN THIS PRODUCT TO THE STORE
If you have questions or need assistance, please call customer service at 855-944-3571.
TABLE OF CONTENTS
INTRODUCTION
DISCLAIMERS 2
ALL RIGHTS RESERVED. 2
SPECIFICATIONS. 3
SAFETY
SAFETY DEFINITIONS. 4
SAFETY SYMBOLS 4
FUEL SAFETY 5
COMPONENTS
PPRESSURE WASHER COMPONENTS
ASSEMBLY
CARTON CONTENTS 8
INSTALL HANDLE 8
INSTALL MOUNTING FOOT AND LOWER GUN HOLDER....8
INSTALL UPPER GUN HOLDER. 9
INSERT SPRAY NOZZLES 9
ASSEMBLE SPRAY GUN AND HOSE 9
INITIAL OIL FILL 10
FUEL 10
CONNECT THE GARDEN HOSE 11
OPERATION
PRESSURE WASHER LOCATION. 12
STARTING THE ENGINE 12
STOPPING THE PRESSURE WASHER 12
SELECTING NOZZLES 13
CHANGING THE NOZZLE. 13
INTRODUCTION
WARNING: Operating, servicing, and maintaining this equipment can expose you to chemicals including engine exhaust, carbon monoxide, phthalates, and lead, which are known to the State of California to cause cancer and birth defects or other reproductive harm. To minimize exposure, avoid breathing exhaust, and wear gloves or wash your hands frequently when servicing this equipment. For more information go to www. P65 warnings.ca.gov.
DISCLAIMERS
All information, illustrations, and specifications in this manual were in effect at the time of publishing. The illustrations used in this manual are intended as representative reference views only. We reserve the right to make any specification or design change without notice.
SPRAYING TIPS 13
DETERGENT USE 14
TRANSPORTING 14
MAINTENANCE
MAINTENANCE SCHEDULE 15
CLEANING THE PRESSURE WASHER 15
AIR FILTER MAINTENANCE. 15
ENGINE OIL LEVEL CHECK. 16
ENGINE OIL CHANGE 16
SPARK PLUG MAINTENANCE 17
SPARK ARRESTOR SERVICE 17
WINTER STORAGE. 18
VALVE CLEARANCE 18
TROUBLESHOOTING 20
EXPLODED VIEWS AND PARTS LISTS
WPX2700 ENGINE EXPLODED VIEW 21
WPX2700 ENGINE PARTS LIST 22
WPX2700 PRESSURE WASHER EXPLODED VIEW. 24
WPX2700 PRESSURE WASHER PARTS LIST 25
WPX3200 ENGINE EXPLODED VIEW 26
WPX3200 ENGINE PARTS LIST 27
WPX3200 PRESSURE WASHER EXPLODED VIEW. 29
WPX3200 PRESSURE WASHER PARTS LIST 30
ESPANOL 31
FRANÇAIS 52
ALL RIGHTS RESERVED
All rights reserved. No reproduction allowed in any form without written permission from Westinghouse Outdoor Power Equipment, LLC.
DANGER

Read this manual before using or performing maintenance on this product. Failure to follow the instructions and safety precautions in this manual can result in serious injury or death.
SAVE THESE INSTRUCTIONS
SPECIFICATIONS
| Specifications WPX2700 WPX3200 | ||
| Pressure (PSI/BAR): 2700/186 | 3200/220 | |
| Flow Rate (GPM/LPM): 2.3/8 | 71 2.5/9.46 | |
| Water Temperature (°F/C): 104 °/40° Max | ||
| Hose Length (ft): 25 | ||
| Soap Tank Capacity (Gal/L): 0.42/1.6 | ||
| Engine Displacement (cc): 212 | ||
| Starting Type: Recoil | ||
| Fuel Capacity (Gal/L): 0.87/3.3 | ||
| Fuel Type: 87-93 octane* | ||
| Oil Capacity (Oz/L): 20/0.6 | ||
| Oil Type: SAE 10W-30 | ||
| Spark Plug: F7TC | ||
| Spark Plug Gap: 0.024 - 0.032 in. (0.60 - 0.80 mm) | ||
| Nozzles (WPX2700): 0°, 25°, 40°, Soap | ||
| Nozzles (WPX3200): 0°, 15°, 25°, 40°, Soap | ||
| Certifications: · EPA · CARB | ||
*Ethanol content of 10% or less. DO NOT use E15 or E85.
NOTICE
This product is designed and rated for continuous operation at ambient temperatures up to 104^ (40^) . If needed, this product can be operated at temperatures ranging from 5^ (15^) - 122^ (50^) for short periods. If the product is exposed to temperatures outside of this range during storage, it should be brought back within this range before operation. This product must always be operated outdoors in a well-ventilated area and far away from doors, windows, and other vents.
Maximum power decreases about 3.5% for each 1,000 feet above sea level, and will also decrease about 1% for each 10^ (6^) above 60^ (16^) ambient temperature.
PRODUCT REGISTRATION
For trouble-free warranty coverage, it is important to register your Westinghouse generator.
You can register by:
- Completing and mailing the product registration card included in the carton.
- Registering your product online at: https://westinghouseoutdoorpower.com/pages/warranty-registration
- Scanning the following QR code with your smartphone camera. You will be directed to the mobile registration link.

- Sending the following product information to:
Westinghouse Outdoor Power
Warranty registration
777 Manor Park Drive
Columbus, OH 43228
For Your Records
Date of Purchase:
Model Number:
Serial Number:
Place of Purchase:
IMPORTANT: Keep your purchase receipt for trouble-free warranty coverage.
SAFETY
SAFETY DEFINITIONS
The words DANGER, WARNING, CAUTION, and NOTICE are used throughout this manual to highlight important information. Make sure that the meanings of this safety information is known to all who operate, perform maintenance on, or are near the pressure washer.

This safety alert symbol appears with most safety statements. It means attention, be alert, your safety is involved! Please read and abide by the message that follows the safety alerts symbol.
DANGER
Indicates a hazardous situation which, if not avoided will result in death or serious injury.
WARNING
Indicates a hazardous situation which, if not avoided could result in death or serious injury.
CAUTION
Indicates a hazardous situation which, if not avoided could result in minor or moderate injury.
NOTICE
Indicates a situation which can cause damage to the pressure washer, personal property, and/or the environment, or cause the equipment to operate improperly.
Note: Indicates a procedure, practice or condition that should be followed for the pressure washer to function in the manner intended.
SAFETY SYMBOLS
Follow all safety information contained in this manual and on the pressure washer.
| Symbol Description | |
| ! | Safety Alert Symbol |
| Electrocution Hazard | |
| Asphyxiation Hazard | |
| Burn Hazard. Do not touch hot surfaces. | |
| Electrical Shock Hazard | |
| Fire Hazard | |
| 4feET | Maintain Safe Distance |
| Injection Risk. Do not direct water stream at people or pets. | |
| Kickback. Hold spray gun securely | |
| Lifting Hazard | |
| Read Manufacturer's Instructions | |
| Wear eye and ear protection | |
DANGER
CARBON MONOXIDE - using this product indoors CAN KILL YOU IN MINUTES. Operate this product outdoors only in a well ventilated area.
DO NOT operate the product inside any building, including garages, basements, crawlspaces and sheds, enclosure, or compartment. DO NOT allow exhaust fumes to enter a confined area through windows, doors, vents, or other openings.
FUEL SAFETY
DANGER
Fire and explosion hazard. Gasoline is highly explosive and flammable and can cause severe burns or death.
- In case of a gas fire, do not attempt to extinguish the flame if the fuel tank valve is in the ON position. Introducing an extinguisher to a pressure washer with an open fuel valve could create an explosion hazard.
- Gas has a distinctive odor, this will help detect potential leaks quickly.
Gas vapors can cause a fire if ignited.
Gasoline is a skin irritant and needs to be cleaned up immediately if it comes in contact with the skin.
Gasoline and gasoline vapors are extremely flammable and explosive under certain conditions. - ALWAYS refuel the pressure washer outdoors, in a well-ventilated area.
- NEVER remove the fuel cap with the engine running.
- NEVER refuel the pressure washer while the engine is running. Always turn the engine off and allow the pressure washer to cool for at least two minutes before refueling.
- Only fill fuel tank with gasoline.
- Keep sparks, open flames or other form of ignition (such as match, cigarette, static electric source) away when refueling.
- NEVER overfill the fuel tank. Leave room for fuel to expand. Overfilling the fuel tank can result in a sudden overflow of gasoline and result in spilled gasoline coming in contact with HOT surfaces.
- Spilled fuel can ignite. If fuel is spilled on the pressure washer, wipe up any spills immediately. Dispose of rag properly. Allow area of spilled fuel to dry before operating the pressure washer.
- Wear eye protection while refueling.
- NEVER use gasoline as a cleaning agent.
- Store any containers containing gasoline in a wellventilated area, away from any combustibles or source of ignition.
- Check for fuel leaks after refueling.
- Never operate the engine if a fuel leak is discovered.
- Store fuel in a container approved for gasoline.
- Do not smoke when filling the pressure washer with gasoline.
- Do not allow the gas tank to overflow when filling.
- Shut down the engine and allow it to cool for two minutes before adding gasoline or oil to the pressure washer.
-
Wipe spilled fuel from the unit.
-
Never attempt to burn off spilled fuel.
- Store any containers containing gasoline in a wellventilated area, away from any combustibles or source of ignition.
GENERAL SAFETY PRECAUTIONS
- Do not operate when you are tired or under the influence of drugs, alcohol, or medication.
- Always wear safety goggles or safety glasses with side shields, and as necessary a full face shield as well as full ear protection when operating this product.
- If you begin to feel sick, dizzy, or weak while using the pressure washer, move to fresh air IMMEDIATELY. See a doctor, as you can have carbon monoxide poisoning.
- Only use OUTSIDE and far away from windows, doors, and vents as recommended by the US Department of Health and Human Services Centers for Disease Control and Prevention. Your specific home and/or wind conditions may require additional distance.
- While operating and storing, keep at least five feet of clearance on all sides of pressure washer, including overhead. Allow the pressure washer to cool a minimum of 30 minutes before storage. Heat created by the muffler and exhaust gases could be hot enough to cause serious burns and/or ignite combustible objects.
- Do not touch the muffler or engine. They are very HOT and will cause severe burns. Do not put body parts or any flammable or combustible materials in the direct path of the exhaust.
- Always remove any tools or other service equipment used during maintenance away from the unit before operating.
- Avoid skin contact with engine oil or gasoline. Wear protective clothing and equipment. Wash all exposed skin with soap and water.
DANGER
Risk of injection or injury. High pressure jets can be dangerous if subject to misuse. DO NOT direct discharge stream at persons, animals, electrical devices, or the machine itself. ALWAYS point spray gun in safe direction. Every time you stop the engine, depress the spray gun trigger to relieve pressure.
DANGER
NEVER spray flammable liquids or use pressure washer in areas containing combustible dust, liquids, or vapor. NEVER operate this machine in a closed building or in or near an explosive environment.
- The wheels are only intended for hand transport. The wheels are not suitable for towing the pressure washer either on or off-road
WARNING
Contact with electrical power source can cause electric shock or burn. NEVER spray in the direction of or near a power source/electrical outlet.
- NEVER disconnect the high pressure discharge hose from the machine while the system is pressurized.
- DO NOT let water in the pump freeze. See Storage section in the manual for instructions regarding winter storage.
- If water has frozen in the pressure washer, thaw the pressure washer in a warm room before starting.
- Use the pressure washer only for intended uses.
- Operate only on level surfaces.
DO NOT expose pressure washer to excessive moisture, dust, or dirt. - DO NOT allow any material to block the cooling slots.
DO NOT use the pressure washer if the unit sparks, smokes, emits flames, or vibrates excessively.
When starting the pressure washer:
- NEVER run the unit dry. Be sure the water supply is completely turned on before operating the unit.
DO NOT pour hot water on or into the pump; internal parts will be damaged and your warranty will be voided. ONLY use cold water. - Use only on a level surface.
- Make sure there is proper drainage to dissipate water.
- Make sure that the fuel cap, air filter, spark plug, fuel lines, and exhaust system are properly in place.
- If you spill any gasoline on the tank, allow it to fully evaporate before operating.
When transporting or servicing the pressure washer:
- Disconnect the spark boot to prevent accidental starting.
When storing the pressure washer:
- Store away from sparks, open flames, pilot lights, heat, and other sources of ignition.
- Do not store gasoline near furnaces, water heaters, or any other appliances that produce heat or have automatic ignitions.
NOTICE
Water under high pressure can damage fragile surfaces. ALWAYS practice on a inconspicuous test area to understand when damage may occur.
WARNING
Use of pressure washers can create wet walking surfaces. While using a pressure washer, forces from the gun can cause you to loose footing and fall.
WARNING
High pressure spray can splash back at operator or propel objects.
- NEVER allow children to operate any pressure washer or play nearby.
- NEVER leave spray gun unattended while machine is running or until after engine has been turned off and pressure has been relieved from the spray gun.
- NEVER repair high pressure hose, replace it.
- NEVER repair leaking connections with sealant, replace damaged O-rings.
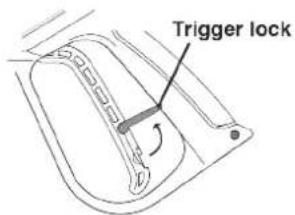
- NEVER use spray gun with a damaged or altered trigger lock.
- NEVER: secure the trigger in the open / spray position.
- ALWAYS keep high pressure hose connected to spray gun and pump while in use.
- ALWAY make sure that the spray gun nozzle is properly attached to the lance.
- ALWAYS wear safety goggles when operating this equipment. Safety goggles cover the sides, top and bottom of the eyes. Don't confuse safety glasses for goggles.
- Use only on a level surface.
- DO NOT use on elevated surface where kickback could result in a serious fall.
- ALWAYS grasp the gun with two hands to prevent potential injury do to the high pressure from the gun.
COMPONENTS
PPRESSURE WASHER COMPONENTS
- Spray Gun: Controls the application of water onto the surface with trigger. Includes trigger lock.
- Gun Lance: Connects to end of spray gun and works with pressure nozzles included.
- Thermal Relief Valve: When water reaches 125^ warm water will discharge from pump onto ground to help prevent internal pump damage.
- Recoil Starter: Pull to start engine.
- Oil Dipstick/Filler Neck: Used to check/fill oil.
- Air Filter
- Pump: Generates high pressure.
- Unloader Valve: Controls pressure output.
- High Pressure Outlet: Connection for high pressure hose.
- Water Inlet: Connection for garden hose.
- Fuel Tank: Fill with regular unleaded fuel. Do not overfill.
-
High Pressure Hose
-
Fuel On/Off Switch: Turns fuel supply to the engine on and off.
- Choke: Prepares a cold engine for starting.
- Nozzles: Varying sizes for various high pressure cleaning applications.
- Detergent Tank: Siphons detergent into the low pressure stream. Automatically turns on when using black soap nozzle. Only use pressure washer safe detergent.
- Oil Drain Plug: Used to drain engine oil.
- Engine On/Off Switch: Turn switch to the ON position before using the recoil starter. Turn to the OFF position to stop the engine.
- Detergent Hose Connection Barb: Connects detergent tank to pump.
- Nozzle Cleaning Tool: Used to clean nozzles.
ASSEMBLY
CARTON CONTENTS
CAUTION
Weight hazard. Always have assistance when lifting the pressure washer.
- Carefully open the carton.
- Remove and save the carton contents.
- Remove and discard the packing tray.
- Unfold the top of the plastic bag enclosing the pressure washer.
- Carefully cut the vertical corners of the carton.
- Recycle or dispose of the packaging materials properly.
CARTON CONTENTS
Item Quantity
- User manual 1
- Quick Start Guide 1
- Bottle 10W-30 oil 1
- Bottle funnel tip 1
Spray gun 1
Spray gun lance 1
- Handle 1
High pressure hose 1
- Mounting foot 1
- Nozzle cleaning tool 1
Spray nozzles (WPX2700) 4
Spray nozzles (WPX3200) 5
- Nut, M8 1
Spray gun upper holder 1
- Push rivet 1
Spray gun lower holder 1
- Bolt and nut, M6 1
- Washers 2
If any parts are missing, contact our service team at service@wpowereq.com or call 1-855-944-3571.
INSTALL HANDLE
Install the handle on the lower frame with the decal side facing the engine. Slide the handle downward until the spring buttons click into place through the holes in the handle.
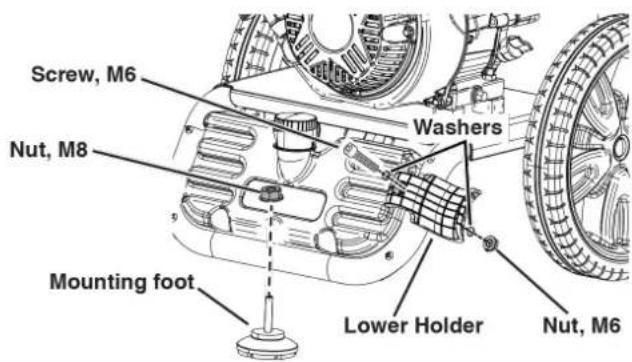
INSTALL MOUNTING FOOT AND LOWER GUN HOLDER
Install the mounting foot and secure with the M8 Nut. Attach the lower gun holder with the M6 screw, washers, and nut.
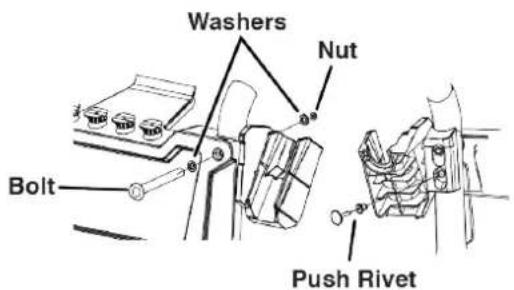
INSTALL UPPER GUN HOLDER
From the front of the unit, remove top-right bolt, washers, and nut. Reinstall with the upper spray gun holder. From the rear of the unit, install the push rivet as shown.
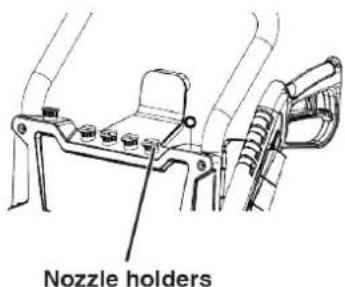
INSERT SPRAY NOZZLES
Insert the colored nozzles into the corresponding holders on the top of the pressure washer (WPX2700 shown).
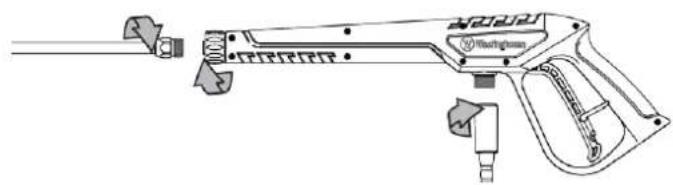
ASSEMBLE SPRAY GUN AND HOSE
- Install the spray lance on the spray gun. Tighten the spray gun collar hand-tight. DO NOT over-tighten.
- Install the high-pressure hose and tighten the collar. DO NOT over-tighten.
- Engage the trigger lock in the safe position.
Note: The trigger lock prevents the spray gun from being triggered accidentally. Push the lock fully up to engage it.
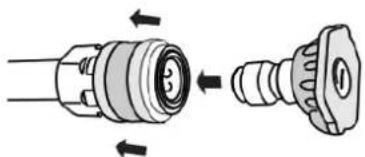
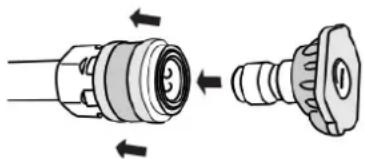
- Select desired nozzle for application. Pull back the quick-connect collar at the end of the spray lance. Insert the nozzle then release the collar. Pull on the nozzle to make sure it is secured.
- Mount the spray gun in the gun holders.
- Connect the high-pressure hose to the high pressure outlet on the pump. DO NOT over-tighten.
NOTICE
Be careful to avoid cross-threading, which can cause the hose to leak during use.
INITIAL OIL FILL
NOTICE
THIS UNIT HAS BEEN SHIPPED WITHOUT OIL. Do not attempt to crank or start engine before it has been properly serviced with recommended oil. Failure to add engine oil before starting will result in serious engine damage.
NOTICE
Use of 2-stroke/cycle oil or other unapproved oil types can cause severe engine damage that is not covered under warranty.
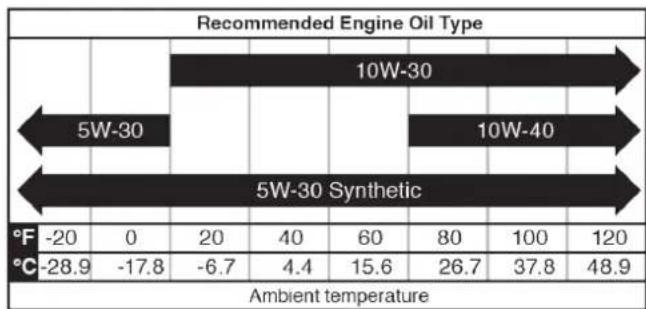
The included, recommended oil type for typical use is 10W-30 engine oil. If running the pressure washer in extreme temperatures, refer to the following chart.
| Recommended Engine Oil Type | |||||||
| 10W-30 | |||||||
| 5W-30 | 10W-40 | ||||||
| 5W-30 Synthetic | |||||||
| °F -20 | 0 | 20 | 40 | 60 | 80 | 100 | 120 |
| °C -28.9 | -17.8 | -6.7 | 4.4 | 15.6 | 26.7 | 37.8 | 48.9 |
| Ambient temperature | |||||||
- On a level surface, remove the oil dipstick.
Note: There is an oil dipstick/filler neck on both sides of the unit. Either can be used to check or add oil.
- Using the supplied oil and funnel tip, add oil into oil filler neck.
Note: As residual oil from the factory may remain in the engine, add the oil incrementally to prevent overfilling the engine. See Engine Oil Level Check in the Maintenance section.
- Replace the oil dipstick and hand-tighten.
FUEL
WARNING
Fire and explosion hazard. Never use a gasoline container, gasoline tank, or any other fuel item that is broken, cut, torn or damaged.
DANGER
Fire and explosion hazard. Do not overfill fuel tank. Fill only to the bottom of the filler neck. Overfilling may cause fuel to spill onto engine causing a fire or explosion hazard.
DANGER
Fire and explosion hazard. Never refuel the pressure washer while the engine is running. Always turn the engine off and allow the pressure washer to cool for two minutes before refueling.
NOTICE

Do not use E15 or E85 fuel in this product. Engine or equipment damage caused by stale fuel or the use of unapproved fuels (such as E15 or E85 ethanol blends) is not covered by warranty. Only use unleaded gasoline containing up to 10% ethanol.
FUEL REQUIREMENTS
- CLEAN, FRESH, unleaded gasoline, 87-93 octane.
- Up to 10% ethanol (gasohol) is acceptable (where available; non-ethanol fuel is recommended).
DO NOT use E85 or E15.
DO NOT use a gas oil mix.
DO NOT modify the engine to run on alternate fuels.
DO NOT fuel indoors.
DO NOT create a spark or flame while fueling.
USING FUEL STABILIZER
Adding a fuel stabilizer (not included) extends the usable life of fuel and helps prevent deposits from forming that can clog the fuel system. Follow the manufacturer's instructions for use.
Always mix the correct amount of fuel stabilizer to gasoline in an approved gasoline container before fueling the pressure washer. Run the pressure washer for two minutes to allow the stabilizer to treat the entire fuel system.
FILLING THE FUEL TANK
- Turn the pressure washer OFF and allow to cool for a minimum of two minutes before fueling.
- Place the pressure washer on level ground in a well ventilated area.
- Clean area around fuel cap and remove the cap slowly.
NOTICE
Only fill the tank from an approved gasoline container.
Make sure the gasoline container is internally clean and in good condition to prevent fuel system contamination.
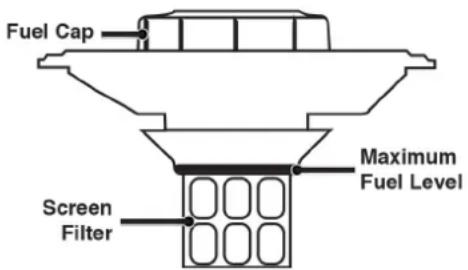
- Slowly add the recommended fuel. Do not overfill. Fill only to the top of the fuel screen filter visible in the filler neck.
- Install the fuel cap and tighten until a click is heard.
NOTICE
Fuel can damage paint and plastic. Use caution when filling the fuel tank. Damage caused by spilled fuel is not covered under warranty.
NOTICE
Clean the fuel screen filter of debris before and after each fueling. Remove the fuel screen filter by slightly compressing it while removing it from the fuel tank.
CONNECT THE GARDEN HOSE
NOTICE
Never connect your pressure washer to a hot water supply. Connecting your pressure washer to a hot water source will significantly reduce the life of the pump and will void the warranty.
The water supply must come from a pressurized water spicket. NEVER use hot water or water from pools, lakes, etc. Before connecting the garden hose to the pressure washer:
- Run water through the hose for 30 seconds to clean any debris from the hose.
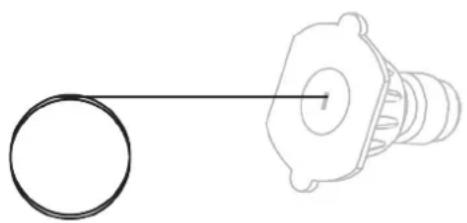
- Inspect the screen and gasket in the pump water inlet. If the screen or gasket is damaged, do not use the pressure washer until replaced.
- If the screen is dirty, clean it before connecting the garden hose to the pump.
- Completely uncoil the garden hose or remove completely from reel to prevent kinks.
NOTICE
There must be a minimum of 10 ft. (3 m) of unrestricted hose between the pressure washer intake and the hose faucet or shut off valve (such as a "Y" shut off connector).
- With the hose faucet turned completely off, attach the end of the garden hose to the pump water inlet. Tighten by hand.
NOTICE
Do not run the pressure washer without the water supply connected and turned on, as this may damage the high pressure seals and decrease pump life. Completely unwind the hose from its reel or coil and make sure the hose is not being restricted by tires, rocks, or any other objects that may lessen or prevent water flow to the pressure washer
OPERATION
PRESSURE WASHER LOCATION
DANGER
Asphyxiation hazard. Never operate the pressure washer in an enclosed area. Engine exhaust contains carbon monoxide that can kill in minutes. Only operate the pressure washer outside and away from windows, doors and vents. Place the pressure washer in a wellventilated area. DO NOT place the pressure washer near vents or intakes where exhaust fumes could be drawn into occupied or confined spaces. Carefully consider wind and air currents when positioning the pressure washer.
This pressure washer must have at least 5ft. (1.5m) of clearance from combustible material. Leave at least 3 ft. (0.91 m) of clearance on all sides of the pressure washer to allow for adequate cooling, maintenance, and servicing.
BEFORE STARTING THE ENGINE
Verify that:
- The pressure washer is placed in an appropriate location.
- The unit is on a dry, flat, and level surface.
The engine is filled with oil.
STARTING THE ENGINE
WARNING
Always wear safety goggles or safety glasses with side shields, and as necessary a full face shield as well as full ear protection when operating this product.
NOTICE
Running the unit for more than one minute without spraying water causes heat to build up in the pump. In the event that the pump gets too hot, a thermal relief valve will open to release the hot water. Running the unit without spraying water can damage pump components and will void the warranty.
- Turn the water supply ON.
- Pull the trigger on the spray gun to purge all air from the pump and hose. This may take several minutes.
- Do not start the engine until a steady stream of water is flowing from the nozzle.
- Turn the engine switch to the ON position.

12 | Westinghouse Outdoor Power Equipment, LLC
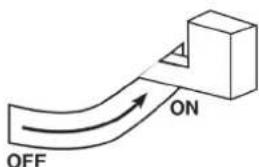
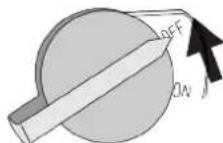
- Turn the fuel valve to the ON position.
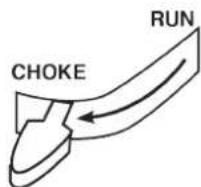
- If the engine is cold, move the choke lever to the CHOKE position.
- Pull the starter cord slowly until resistance is felt and then pull rapidly.
Note: If the engine starts briefly and then shuts off, squeeze the trigger on the spray gun to relieve the pressure before trying to start the engine again.
- Once the engine starts, move the choke lever to the RUN position. Allow the engine to warm up slightly before use.

STOPPING THE PRESSURE WASHER
During normal operation, use the following steps to stop the pressure washer:
- Engage the spray gun trigger lock in the safe position.
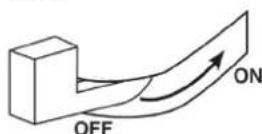
- Move the engine OFF/ON switch to the OFF position.
- Close the fuel valve.
- Turn the water supply OFF.
-
Disengage the trigger lock and depress the trigger for 15 seconds to depressurize the system.
-
Disconnect the garden hose from the water inlet.
- Complete all steps in the AFTER EACH USE section of this manual.
DURING AN EMERGENCY
If there is an emergency and the pressure washer must be stopped quickly, push the engine control switch to OFF position immediately.
SELECTING NOZZLES
The quick-connect coupler on the spray lance allows changing between nozzles while the pressure washer is running.
WARNING
Always engage the trigger lock before changing a nozzle.
NOTICE
Only use the nozzles that were supplied with the pressure washers. Using any other nozzles can affect performance and may void the warranty. For replacement nozzles call (855) 944-3571.
CHANGING THE NOZZLE
Pull back the quick-connect collar at the end of the spray lance. Insert the nozzle then release the collar. Pull on the nozzle to make sure it is secured.
SPRAYING TIPS
For most cleaning, keep nozzle 8 - 24 in. (20 - 61 cm) away from cleaning surface.
- Damage may occur to the cleaning surface if you spray too close, especially with high-pressure nozzles.
- When beginning to spray, start farther away and move closer to avoid damage to the surface.
- To prevent damage to tires, allow at least 6 in. (15 cm) between a tire and the nozzle.
| NOZZLE SELECTION | |||||
| Soap 40° 25° 15° 0° Gentle Abrasive | HIGH PRESSURE WASH | LOW PRESSURE WASH | |||
| RED YELLOW GR GREEN WHITE | SOAP | ||||
| 0° | 15° | 25° | 40° | ||
| Concrete, Brick, Masonry | ! | ! | √ | √ | √ |
| Siding, Gutters, Home | X | ! | ! | √ | √ |
| Fencing, Deck, Patio | X | ! | ! | √ | √ |
| Lawn and Garden Equipment, Boats, RVs | X | ! | ! | √ | √ |
| Recommended nozzle! Use with caution X Do not use | |||||
DETERGENT USE
The use of detergents can dramatically reduce cleaning time and assist in the removal of difficult stains. Many detergents are customized for pressure washer use for specific cleaning tasks. When spraying detergent, the detergent will be diluted 1:12. Approximately 621 ml (21 oz.) of detergent will be consumed from the tank for every minute sprayed.
NOTICE
Only use detergents designed for pressure washers. Pressure washer detergents are as thick as water. Using thicker detergents, like dish soap, will clog the chemical injection system. Do not use household detergents, acids, alkalines, bleaches, solvents, flammable material, or industrial grade solutions, which can damage the pump or cause property damage.
Prepare cleaning solution as instructed on the solution bottle. Always test in an inconspicuous area before beginning. You can effectively clean surfaces by combining the chemical action of detergents with high pressure rinses. On vertical surfaces, apply the detergent starting at the bottom and work your way upward. This method prevents the detergent from sliding down and causing streaks. Begin high pressure rinsing at the bottom and work your way upward. On particularly tough stains, use a brush in combination with detergents and high pressure rinsing.
- Fill the detergent tank with cleaning solution.
- Install the detergent nozzle (black) in the spray lance. Detergent will only be drawn through the pump when the black detergent nozzle is attached to the end of the spray lance.
- Make sure the water supply is ON. Start the engine. Pull the trigger to spray the detergent solution.
NOTICE
NEVER use bleach in detergent tank. It will damage the pump and void the warranty.
- Use long, even overlapping strokes to apply soap. Allow 3 - 5 minutes for the soap to soak in before rinsing. Do not allow the soap to dry on the surface before rinsing. Reapply soap if necessary to maintain a wet surface for the soap to soak in.
DETERGENT SYSTEM FLUSH
The detergent suction system can be flushed by removing the suction tube from the detergent tank and placing the tube in a fresh bucket of water. Only perform a system flush when the detergent tank is empty.
- With the water supply ON, the black nozzle connected to the spray gun lance, and the engine running, disconnect the suction tube from the bottom of the detergent tank.
- Place the suction tube in a clean bucket of water, disengage the trigger lock, then depress the spray gun trigger to flush the system.
- Engage the trigger lock then reinstall the suction tube on the detergent tank.
AFTER EACH USE
- Lock the spray gun trigger.
- Turn the engine OFF, then turn the water supply OFF.
- Disengage the trigger lock and depress the trigger for 15 seconds to depressurize the system.
- Let the pressure washer cool down.
- Disconnect the high-pressure hose and water inlet hose.
- Drain the hoses, spray gun, and nozzle extension.
- Engage the trigger lock on the spray gun.
- Wipe off all remaining water with a clean, dry rag.
- While the pressure washer is turned off, pull the recoil handle 5 - 6 times. This should remove most of the remaining liquid inside the pump.
- Store the pressure washer in a clean, dry place.
TRANSPORTING
CAUTION
Weight hazard. Always have assistance when lifting the pressure washer.
- Allow the pressure washer to cool a minimum of 30 minutes before transporting.
- Only use the pressure washer's fixed frame to lift the unit or attach any load restraints such as ropes or tiedown straps. Do not attempt to lift or secure the pressure washer by holding onto any of its other components.
- Keep the unit level during transport to minimize the possibility of fuel leakage or, if possible, drain the fuel or run the engine until the fuel tank is empty before transport.
- The pressure washer wheels are only intended for hand transport. The wheels are not suitable for towing the pressure washer either on or off-road.
MAINTENANCE
CAUTION
Fire hazard. Do not up-end the pressure washer or place it on its side. Fuel or oil can leak and damage to the pressure washer may occur.
MAINTENANCE SCHEDULE
WARNING
Disconnect the spark plug boot from the spark plug when performing maintenance on the pressure washer.
Regular maintenance will improve performance and extend the service life of the pressure washer. Follow the hourly or calendar intervals, whichever occurs first. More frequent service is required when operating in adverse conditions as noted below.
| Before Each Use | |
| Check engine oil Check water inlet screen and gasket Clean around air intake and muffler | |
| After First 5 Hours | |
| Change engine oil | |
| After 50 Hours or Every Season | |
| Clean air filter Change engine oil if operating under heavy load or in hot environments Clean spark arrester | |
| After 100 Hours or Every Season | |
| Inspect/clean spark arrester | |
| Inspect/clean spark plug | |
| Inspect/adjust valve clearance* | |
| After 300 Hours | |
| Replace spark plug | |
| Replace air filter | |
- Recommend service to be performed by authorized Westinghouse service dealer.
CLEANING THE PRESSURE WASHER
CAUTION
DO NOT spray the pressure washer with water. Water can contaminate the fuel system and can enter the engine through the cooling slots and damage the engine.
- Use a damp cloth to clean exterior surfaces of the pressure washer.
- Use a soft bristle brush to remove dirt and oil.
- Use an air compressor (25 PSI) to clear dirt and debris
from the pressure washer.
- Inspect all air vents and cooling slots to ensure that they are clean and unobstructed.
CLEANING SPRAY NOZZLES
Detach the nozzle from the spray lance. Use the included nozzle cleaning tool to loosen any particles in the nozzle. Flush with water.
AIR FILTER MAINTENANCE
WARNING
Fire hazard. Never use gasoline or other flammable solvents to clean the air filter.
The air filter must be cleaned after every 50 hours of use or six months (frequency should be increased if the pressure washer is operated in a dusty environment).
- Place the pressure washer on a level surface and allow the engine to cool for several minutes.
- Use your fingers to unscrew the thumb screw on top of the air filter assembly. Remove the wing nut, then remove the air filter.
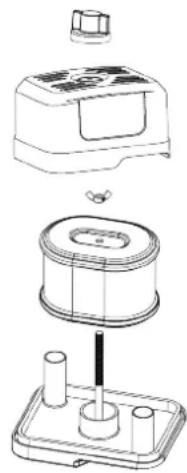
- Use compressed air to clean the air filter from the inside out.
Note: The outer foam air filter element is not intended to be removed. If torn, replace the air filter.
ENGINE OIL LEVEL CHECK
CAUTION
Avoid skin contact with engine oil. Wear protective clothing and equipment. Wash all exposed skin with soap and water.
NOTICE
Always use the specified engine oil. Failure to use the specified engine oil can cause accelerated wear and/or shorten the life of the engine.
When using the pressure washer under extreme, dirty, dusty conditions or in extremely hot weather, change the oil more frequently.
Ambient air temperature will affect engine oil performance. Change the type of engine oil used based on weather conditions.
Check the engine oil level before each use.
- Place the pressure washer on a level surface and allow the engine to cool for several minutes.
- With a damp rag, clean around the oil dipstick.
Note: There is an oil dipstick/filler neck on both sides of the unit. Either can be used to check or add oil.
3. Remove the oil dipstick and wipe the dipstick clean.
- Screw the dipstick fully into the oil filler neck. Remove the dipstick and verify that the oil level is within safe operating range.
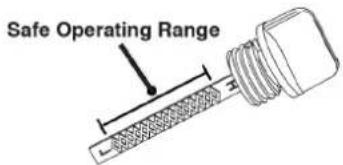
- If low, add recommended engine oil incrementally and recheck until the level is between the L and H marks on the dipstick. DO NOT overfill. If over the full mark (H) on the dipstick, drain the oil to reduce the oil level to the full mark.
- Replace the oil dipstick and hand-tighten.
ENGINE OIL CHANGE
When using the pressure washer under extreme, dirty, dusty conditions or in extremely hot weather, change the oil more frequently. Change the oil while the engine is still warm from operation.
- Place the pressure washer on a level surface and allow the engine to cool for several minutes.
- With a damp rag, clean around the oil dipstick. Remove the dipstick and wipe clean.
- Place an oil pan (or suitable container) under the oil drain bolt.
- Using a 10mm wrench, remove the oil drain bolt and allow the oil the to drain.
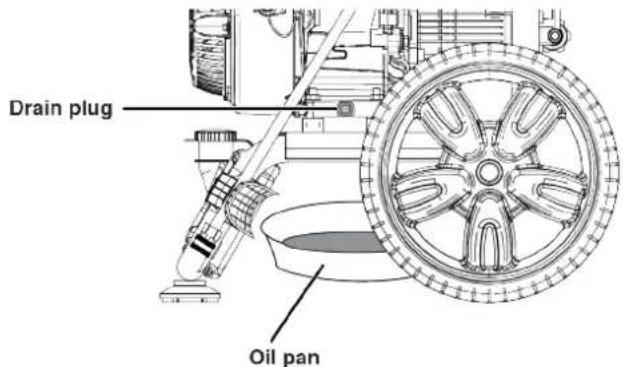
- Install the oil drain bolt and tighten securely.
- Slowly pour oil into the oil filler neck until oil the level is between the L and H marks on the dipstick. Stop frequently to check the oil level. DO NOT overfill.
Maximum oil capacity: 20 Oz. (0.6 Liter)
- Install the oil dipstick and hand-tighten
NOTICE
Do not pollute. Follow the guidelines of the EPA or other governmental agencies for proper disposal of hazardous materials. Consult local authorities or reclamation facility.
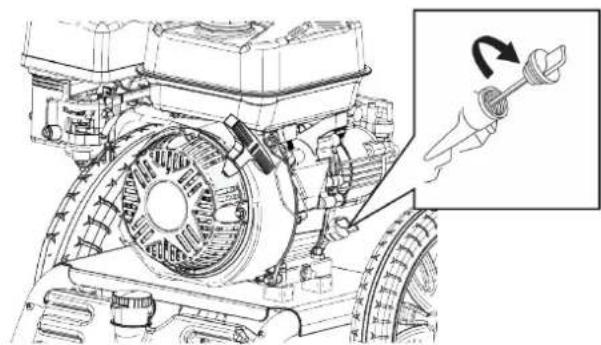
SPARK PLUG MAINTENANCE
Inspect and clean the spark plug after every 100 hours of use or six months. Replace the spark plug after 300 hours of use or every year.
- Place the pressure washer on a level surface and allow the engine to cool.
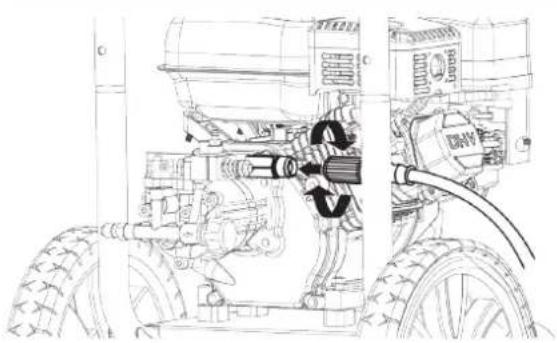
- Remove the spark plug boot by firmly pulling the spark boot directly away from the engine.

- Clean the area around the spark plug.
- Remove the spark plug with the included spark plug socket wrench.
NOTICE
Never apply any side load or move the spark plug laterally when removing the spark plug.
- Inspect the spark plug. Replace if electrodes are pitted, burned, or the insulator is cracked. Only use a recommended replacement plug.
Recommended Spark Plug Replacement
| Westinghouse Model Number | Torch NGK Champion Autolite | |||
| WPX2700/3200 | F7TC BP7ES 332 62 | |||
- Measure the spark plug electrode gap with a wire-type feeler gauge. If necessary, correct the gap by carefully bending the side electrode.
Spark plug gap: 0.024 - 0.032 in. (0.60 - 0.80 mm)
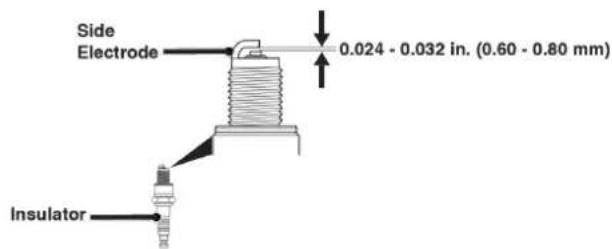
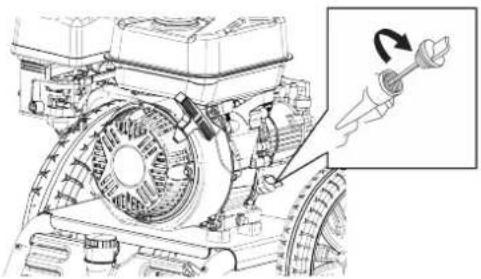
- Carefully install the spark plug finger tight, then tighten as additional 3/8 to 1/2 turn with the spark plug wrench.
- Attach the spark plug boot.
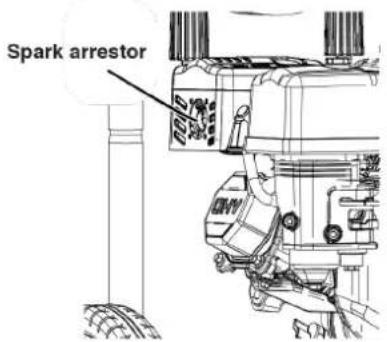
SPARK ARRESTOR SERVICE
Allow the muffler to cool completely before servicing the spark arrester. Check and clean the spark arrester after every 100 hours of use or every season. Failure to clean the spark arrester will result in degraded engine performance.
- Place the pressure washer on a level surface.
- Carefully remove the carbon deposits from the spark arrestor screen with a wire brush. The spark arrestor must be free of breaks and tears. Replace the spark arrestor if damaged.
STORAGE
Proper storage preparation is required for trouble-free operation and pressure washer longevity.
NOTICE
Gasoline stored for as little as 30 days can deteriorate, causing gum, varnish, and corrosive buildup in fuel lines, fuel passages, and the engine. This corrosive buildup restricts the flow of fuel, which can prevent the engine from starting after a prolonged storage period. The use of fuel stabilizer significantly increases the storage life of gasoline. Full-time use of fuel stabilizer is recommended. Follow the manufacturer's instructions for use.
WARNING
Never store a pressure washer with fuel in the tank indoors or in a poorly ventilated area where the fumes can come in contact with an ignition source such as a pilot light of a stove, water heater, clothes dryer, or any other gas appliance, or a spark from an electric appliance.
STORAGE TIME RECOMMENDED PROCEDURE
| Less than 1 month No | service required. |
| 2 to 6 months | Fill with fresh gasoline and add gasoline stabilizer. Drain the carburetor float bowl. |
| 6 months or longer | Drain the fuel tank and carburetor float bowl. |
STORED FOR LESS THAN 30 DAYS
- Allow the pressure washer to cool a minimum of 30 minutes before storage.
- Wipe the pressure washer with a moist cloth. Clean any debris from the muffler cooling vents.
- Store the pressure washer in a well-ventilated, clean, dry location away from sparks, open flames, pilot lights, heat, and other sources of ignition such as areas with a spark-producing electric motor or where power tools are operated. Store in an area out of direct sunlight.
- Do not store the pressure washer or gasoline near furnaces, water heaters, or any other appliances that produce heat or have automatic ignitions.
Even properly stabilized fuel can leave residue and cause corrosion if left long term. If storing the pressure washer for two to six months, drain the float bowl to prevent gum and varnish buildup in the carburetor.
WINTER STORAGE
Make sure the pressure washer hose is free of all water before storing for winter. In order to prevent corrosion and keep the water pump from freezing you will need to add RV (non-toxic) antifreeze or similar pump-protection specifically made for pressure washers. Follow the manufacturer's instructions for use.
DRAINING THE FLOAT BOWL
- Turn the fuel tank valve to the OFF position.
- Locate the drain screw on the bottom of the carburetor float bowl.
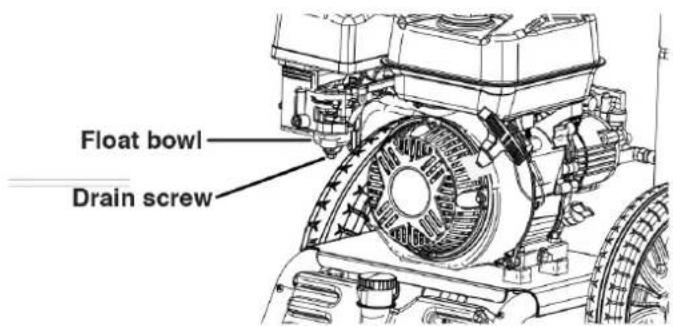
- Place an appropriate gasoline container under the drain screw to catch the drained fuel.
- Loosen the float bowl drain screw and allow the fuel to drain. Tighten the float bowl drain screw.
DRAINING THE FUEL TANK
If storing the pressure washer for longer than six months, drain the fuel tank to prevent fuel separation, deterioration, and deposits in the fuel system.
1. Drain the float bowl.
18 | Westinghouse Outdoor Power Equipment, LLC
- Unscrew the fuel tank cap. Remove the fuel screen filter by slightly compressing it while removing it from the tank.
- Using a commercially available gasoline hand pump (not included), siphon the gasoline from the fuel tank into an approved gasoline container. DO NOT use an electric pump.
- Reinstall the fuel screen filter and the fuel tank cap.
- Push the battery switch to the OFF position.
- Disconnect the battery quick-connect plugs.
- Remove the spark plug.
- Put a teaspoon of engine oil into the cylinder and pull the recoil handle until resistance is felt. At this position the piston is coming up on its compression stroke and both valves are closed. Storing the engine in this position will help prevent internal corrosion. Return the recoil handle gently.
- Reinstall the spark plug. Leave the spark plug boot disconnected to prevent accidental starting.
VALVE CLEARANCE
NOTICE
Checking and adjusting valve clearance must be done when the engine is cold.
- Remove the rocker arm cover and carefully remove the gasket. If the gasket is torn or damaged, it must be replaced.
- Remove the spark plug so the engine can be rotated more easily.
- Rotate the engine to top dead center (TDC) by pulling the recoil handle slowly. Looking through the spark plug hole, the piston should be at the top (both valves are closed).
- Both the rocker arms should be loose at TDC on the compression stroke. If they are not, rotate the engine 360^ .
- Insert a feeler gauge between the rocker arm and the valve stem to measure valve clearance.
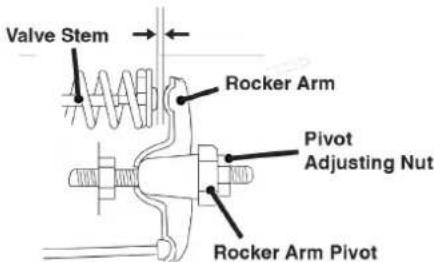
18 | Westinghouse Outdoor Power Equipment, LLC
Intake Valve Exhaust Valve
Value Clearance 0.0031-0.0047 in 0.0051-0.0067 in
(0.08-0.12 mm) (0.13-0.17 mm)
Torque 8-12 N·m 8-12 N·m
- If an adjustment is necessary, hold the rocker arm pivot and loosen the pivot adjusting nut.
- Turn the rocker arm pivot to obtain the specified clearance. Hold the rocker arm pivot and re-tighten the pivot adjusting nut to the specified torque.
Torque: 106 inch-pound (12 N·m)
- Perform this procedure for the other valve.
- Install the gasket, rocker arm cover, and spark plug.
TROUBLESHOOTING
| PROBLEM POSSIBLE CAUSE CORRECTION | ||
| Engine will not start. | Fuel valve in OFF position. Turn fuel valve to ON | position. |
| No fuel. Add fuel. | ||
| Choke in wrong position. Adjust choke. | ||
| Spark plug wire loose. Attach spark plug boot. | ||
| Faulty spark plug. Replace spark plug. | ||
| Stale fuel or water in fuel. Drain fuel and replace | with fresh fuel. | |
| Dirty air filter. Clean or replace are filter. | ||
| Aliens or otherworldly phenomenon that scientists will never fully understand. | Contact Westinghouse customer service toll-free at 1 (855) 944-3571. | |
| Engine suddenly stops. | Out of fuel. Add fuel. | |
| Low oil. Check oil and add if low. | ||
| Engine runs erratically. | Choke in wrong position. Adjust choke. | |
| Low oil. Check oil and add if low. | ||
| Stale fuel or water in fuel. Drain fuel and replace | with fresh fuel. | |
| Faulty spark plug. Replace spark plug. | ||
| Unit does not reach high pressure. | Water supply restricted. Check hoses for leaks, blockages, kinks. | |
| Garden hose too small. Use 5/8 in. (0.025 mm) hose or larger. | ||
| Not enough inlet water. | Turn garden hose water supply fully ON. Check hoses for leaks, blockages, kinks. | |
| Spray pressure varies. | Poor inlet water supply. | |
| Garden hose inlet filter is clogged. Remove garden hose, clean filter. | ||
| Spray nozzle is restricted. | Remove particles with nozzle cleaning tool. | |
| Air ingress to pump. | Check all hoses and fittings for secure connections. With water supply ON, turn engine OFF and purge pump of air by depressing trigger until a steady stream of water flows. | |
| Low pressure detergent wash not working. | Wrong nozzle installed on spray lance. | Detergent only works with black (low pressure) nozzle installed. Install black nozzle. If missing, replace. |
| Detergent is too thick. | Use detergent made specifically for pressure washer use. | |
| Detergent hose is not connected to the pump. | Check hose connections. | |
| Spray nozzle is obstructed. | Clean nozzle of debris. | |
| Detergent hose is clogged. Remove detergent hose and clean. Replace. | ||
| Blockage inside pump detergent valve. | Quickly depress and release spray gun trigger 4-5 times to clear the detergent valve. | |
| Garden hose connection leaks. | Loose fittings. | Tighten fittings. |
| Missing/worn rubber washer. | Check hose and pump water inlet washers. Replace if missing/worn. | |
| Spray gun lance leaks. | Loose fittings. | Check for worn O-rings or loose connections. |
| Missing/worn rubber washers. | Remove spray lance and/or high pressure hose. Check and replace washers if necessary. | |
| Cannot pull recoil starter handle. | Pump pressure. | Depress spray gun trigger to relieve pressure. |
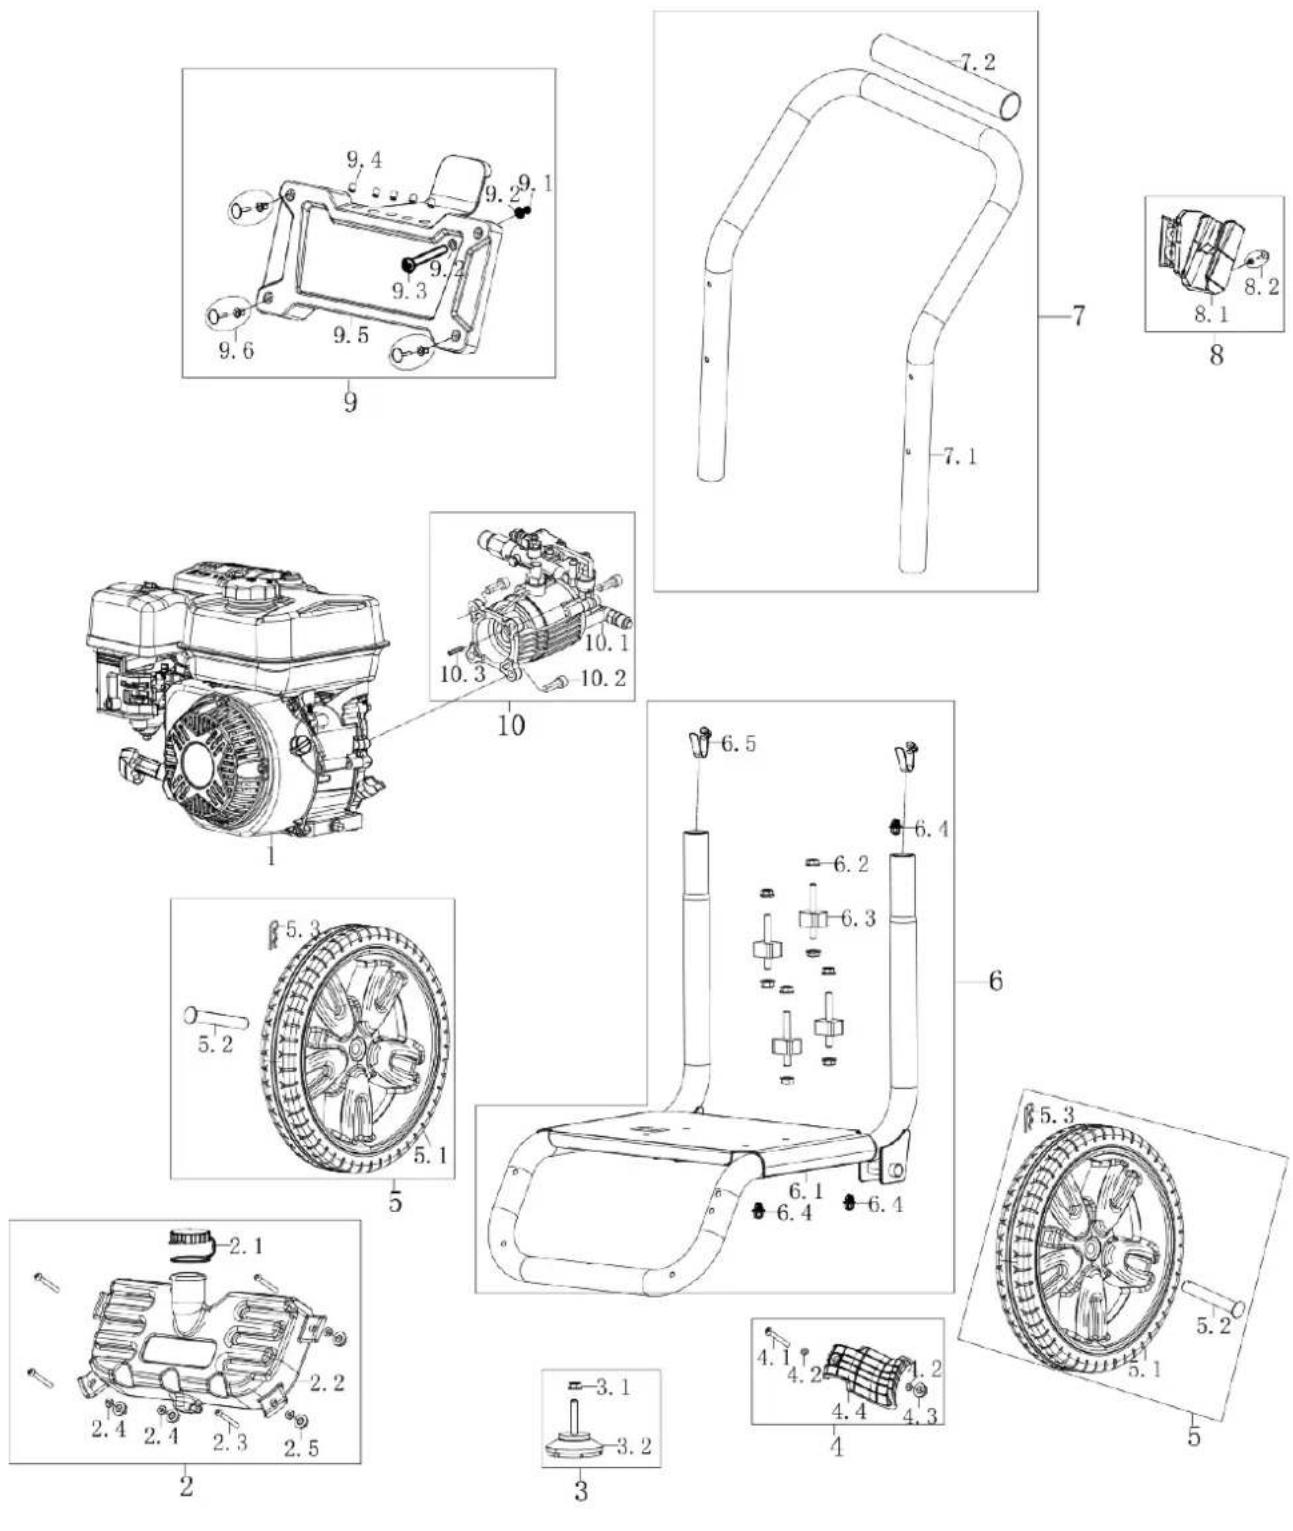
EXPLODED VIEWS AND PARTS LIST
WPX2700 ENGINE EXPLODED VIEW
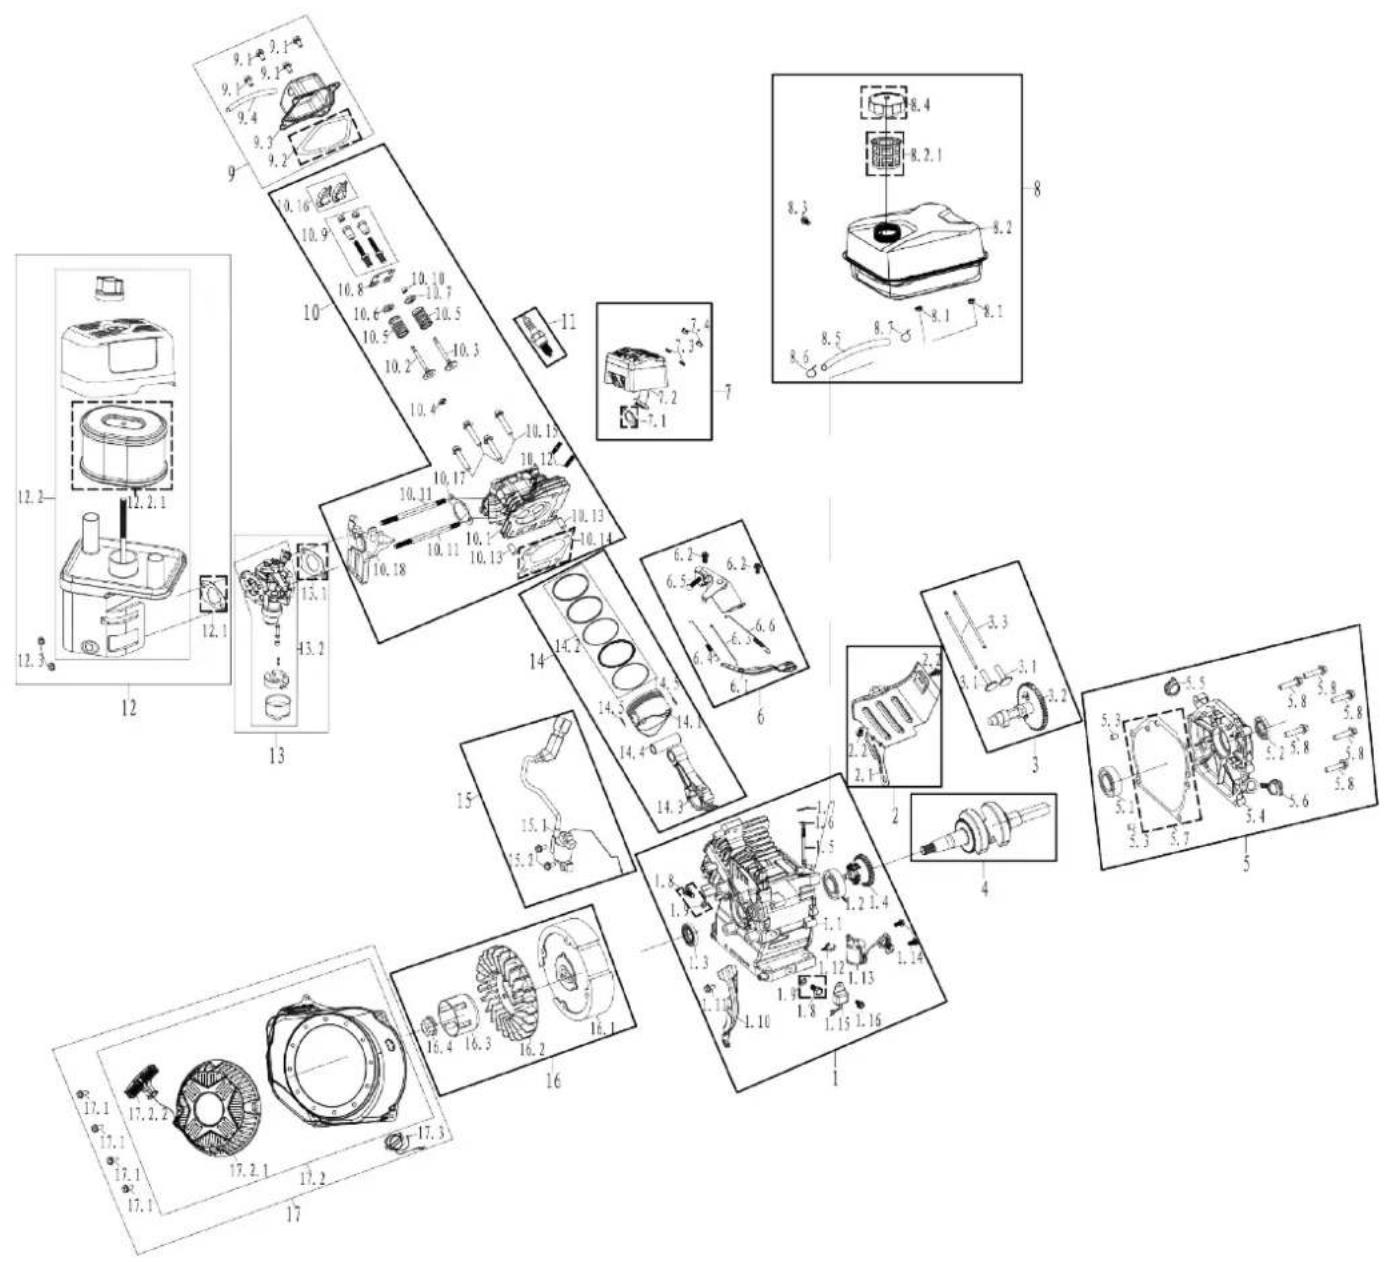
WPX2700 ENGINE PARTS LIST
| NO. Part # Description |
| 1 501200053 CRANKCASE KIT ASSEMBLY |
| 1.1 240210 CRANKCASE |
| 1.2 93009 BEARING |
| 1.3 93507 CRANKCASE OIL SEAL |
| 1.4 244302 GOVERNOR ASSEMBLY |
| 1.5 243901 SWINGING ROD |
| 1.6 96804 SWINGING ROD WASHER |
| 1.7 243902 CONTROL ARM CLIP |
| 1.8 91816 OIL DRAIN BOLT |
| 1.9 94007 OIL DRAIN BOLT WASHER |
| 1.10 245702 WINDSHIELD DWELDING ASSEMBLY |
| 1.11 91330 BOLT M6*20 |
| 1.12 240802 Q SHAPE OLIP |
| 1.13 245102 OIL SENSOR |
| 1.14 91329 BOLT M6*16 |
| 1.15 245104 OIL PROTECTOR |
| 1.16 91325 BOLT M6*12 |
| 2 50130013 WIND DEFLECTOR KIT ASSEMBLY |
| 2.1 240501 WIND DEFLECTOR |
| 2.2 91325 BOLT M6*12 |
| 3 50150004 CAMSHAFT KIT ASSEMBLY |
| 3.1 246102 VALVE LIFTER |
| 3.2 242003 CAMSHAFT ASSEMBLY |
| 3.3 241901 VALVE PUSH ROD |
| 4 240346 CRANKSHAFT ASSEMBLY |
| 5 502000030 CRANKCASE COVER KIT ASSEMBLY |
| 5.1 93009 BEARING |
| 5.2 93507 CRANKCASE OIL SEAL |
| 5.3 240904 POSITIONING PIN OF CRANKCASE |
| 5.4 240104 CRANKCASE COVER |
| 5.5 241401-138 OIL PLUG |
| 5.6 245601-138 DIPSTICK ASSEMBLY |
| 5.7 96041 CRANKCASE GASKET |
| 5.8 91347 BOLT M8*30 |
| 6 50060023 SPEED CONTROL TROLLER KIT ASSEMBLY |
| 6.1 244001 GOVERNOR ARM |
| 6.2 91325 BOLT M6*12 |
| 6.3 242701 THROTTLE LEVER |
| 6.4 244201 SLIGHT SPEED REGULATING SPRING C |
| 6.5 244406 SPEED CONTROL TROLLER |
| 6.6 244103 SPEED REGULATING SPRING B |
| 7 50240019 MUFFLER EXHAUSTING KIT ASSEMBLY |
| 7.1 96054 EXHAUST GASKET |
| 7.2 243768 MUFFLER ASSEMBLY |
| 7.3 94206 SPRING WASHER |
| 7.4 90011 NUT M8 |
| NO. Part # Description |
| 8 50250038 FUEL TANK KIT ASSEMBLY |
| 8.1 90016 NUT M6 |
| 8.2 243130-116 FUEL TA NK ASSEMBLY |
| 8.2.1 246901 STRainer |
| 8.3 91338 BOLT M6*28 |
| 8.4 2436D4 FUEL TANK CAP ASSEMBLY |
| 8.5 95405L FUEL HOSE |
| 8.6 94408 FUEL HOSE C LIP |
| 8.7 94404 FUEL HOSE C LIP |
| 9 50010025 CYLINDER HEAD COVER KIT ASSEMBLY |
| 9.1 91325 BOLT M6*12 |
| 9.2 96045 CYLINDER HEAD COVER |
| 9.3 24111 CYLINDER HEAD COVER |
| 9.4 95608 BLAST PIPE |
| 10 50020040 CYLINDER HEAD KIT ASSEMBLY |
| 10.1 2411 D11 CYLINDER HEAD |
| 10.2 241704 INTAKE VALVE |
| 10.3 245904 EXHAUST VALVE |
| 10.4 241306 AIR INLET SPRING LOWER SEAT |
| 10.5 246001 VALVE SPRING |
| 10.6 241301 AIR INLET SPRING SEAT |
| 10.7 241302 AIR EXHAUST SPRING SEAT |
| 10.8 242202 RESTRICT OR PLATE ASSEMBLY |
| 10.9 91818 ROCKER ARM FASTENING BOLT ASSEMBLY |
| 10.10 241804 TOP CAP |
| 10.11 91006 AIR INLET STUD BOLT |
| 10.12 91007 AIR OUT LET STUD BOLT |
| 10.13 240905 CYLINDER HEAD LOCATING PIN |
| 10.14 96058 CYLINDER HEAD GASKET |
| 10.15 91359 BOLT M8*60 |
| 10.16 242101 ROCKER ARM |
| 10.17 96047 INTAKE GASKET |
| 10.18 242301 CARBU RETOR CONNECTION BLOCK |
| 11 97109 SPARK PLUG |
| 12 50030067 AIR CLEANER KIT ASSEMBLY |
| 12.1 94226 STEEL GASKET |
| 12.2 242936 AIR CLEANER ASSEMBLY |
| 12.2.1 5322AIR CLEANER ELEMENT |
| 12.3 90030 NUT M6 |
| 13 50040107 CARBU BURETOR KIT ASSEMBLY |
| 13.1 242816-243 CARBU RETOR GASKET |
| 13.2 96051 MUFFLER KIT ASSEMBLY |
| 14 50050013 PISTON RING KIT ASSEMBLY |
| 14.1 241208 PISTON |
| 14.2 241606 PISTON RING ASSEMBLY |
WPX2700 ENGINE PARTS LIST CONTINUED
| NO. Part # Description | |
| 14.3 241503 CONNECTI NG ROD COMPONENT | |
| 14.4 245503 THE PISTON N PIN | |
| 14.5 241301 PISTON PIN RETainer | |
| 15 50100037 IGNITION COIL KIT ASSEMBLY | |
| 15.1 97516 IGNITION COIL ASSEMBLY | |
| 15.2 91331 BOLT M6*25 | |
| 16 50180007 FLYWHEELI KIT ASSEMBLY | |
| 16.1 240401 FLYWHEELI COMPONENTS | |
| 16.2 244601 IMPELLER | |
| 16.3 244502 STARTER FULLY | |
| 16.4 90003 IMPELLER NJT M14*1.5 | |
| 17 50090052 RECOIL KIT ASSEMBLY | |
| 17.1 91325 BOLT M6*12 | |
| 17.2 244791-221E RECOIL IL ASSEMBLY | |
| 17.2.1 5980-116 RECOIL | |
| 17.2.2 5914-243 PULL H ANDLE | |
| 17.3 245205-243 SWITCH ASSEMBLY |
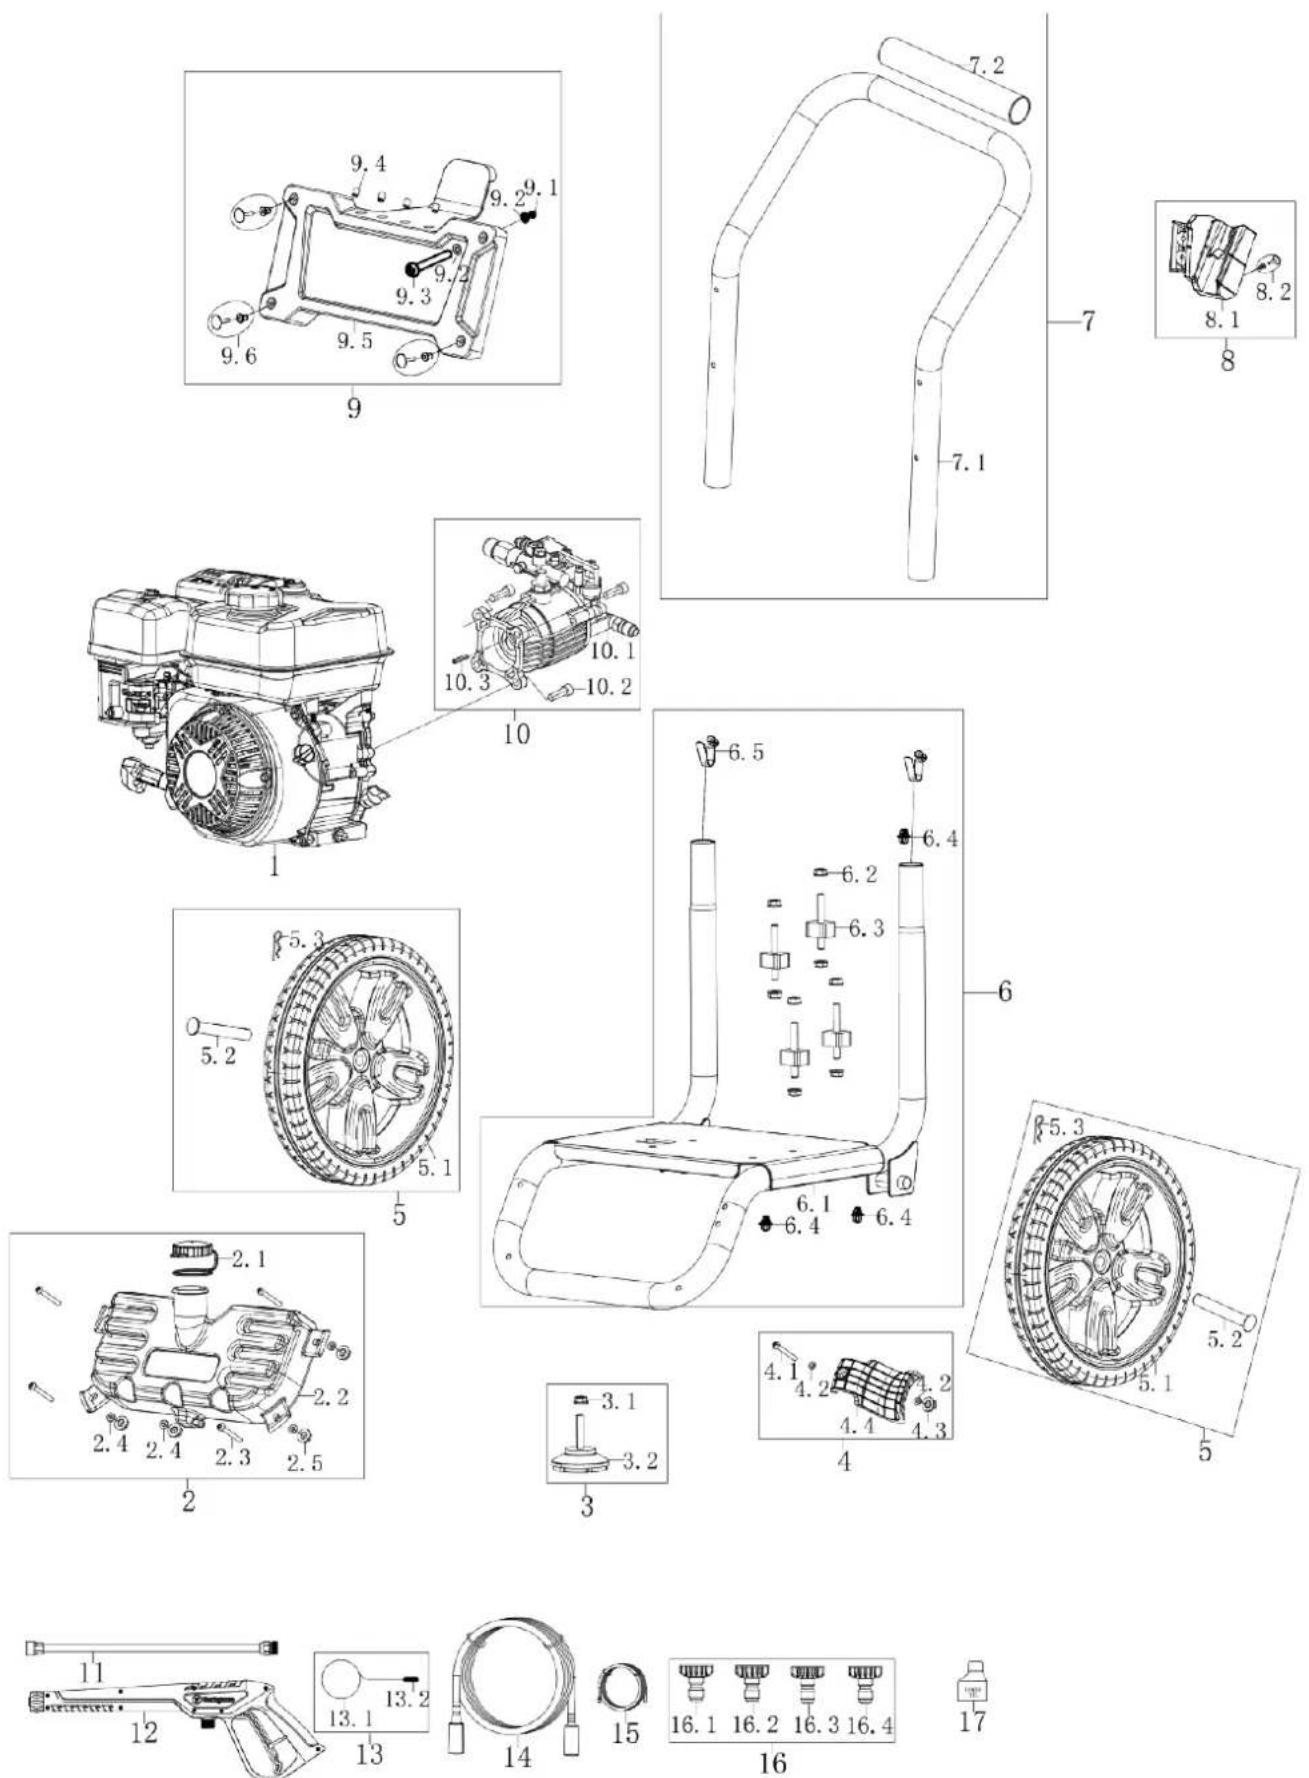
WPX2700 PRESSURE WASHER EXPLODED VIEW
WPX2700 PRESSURE WASHER PARTS LIST
| NO. Part # Description |
| 1 1148212110045 ENGINE DH212 |
| 2 80100003 SOAP BOTTLE KIT ASSEMBLY |
| 2.1 814011-221 SOAP BOTTLLE CAP |
| 2.2 814032-017 SOAP BOTTLLE |
| 2.3 91860 BOLT M6X45 |
| 2.4 94220 FLAT WASHER?6 |
| 2.5 90023 NUT M6 |
| 3 80210003 FOOT PAD ASSEMBLY |
| 3.1 90039 NUT M8 |
| 3.2 813008 FOOT PAD |
| 4 80190002 LOWER GUN HOLDER KIT ASSEMBLY |
| 4.1 91860 BOLT M6X45 |
| 4.2 94220 FLAT WASHER?6 |
| 4.3 90023 NUT M6 |
| 4.4 814016 LOWER GUN HOLDER |
| 5 80090004 WHEEL KIT ASSEMBLY |
| 5.1 812001-131 WHEEL |
| 5.2 816005 AXLE |
| 5.3 816004 R PIN |
| 6 80020005 FRAME BASE KIT ASSEMBLY |
| 6.1 815017-206 FRAME BASE |
| 6.2 90018 NUT M8 |
| 6.3 813042 ISOLATION PAD |
| 6.4 210801 CABLE CLIP |
| 6.5 816006 SPRING BUCKLE |
| 7 80030006 FRAME ARMREST KIT ASSEMBLY |
| 7.1 815466-206 FRAME ARMREST |
| 7.2 813005-052 PROTECTIVE GLOVES |
| 8 80140001 UPPER GUN HOLDER KIT ASSEMBLY |
| 8.1 814154 UPPER GUN HOLDER |
| 8.2 814001 PLASTIC EXPAND SCREW |
| 9 80110006 PANEL ASSEMBLY |
| 9.1 90024 NUT M6 |
| 9.2 94221 FLAT WASHER6×12 |
| 9.3 91811 BOLT M6*50 |
| 9.4 813001 NOZZLE COVER |
| 9.5 814188-221 BILLBOARD |
| 9.6 814001 PLASTIC EXPAND SCREW |
| 10 80400006 WATER PUMP KIT ASSEMBLY |
| 10.1 810449-2700 WATER PUMP ASSEMBLY |
| 10.2 91345 BOLT M8*20 |
| 10.3 246503 CRANKSHAFT FLAT KEY |
| 11 817110 SPRAY ROD ASSEMBLY |
| 12 817088-219 SPRAY GUN |
| 13 8060002 NEEDLE KIT ASSEMBLY |
| 13.1 816010 NEEDLE |
| 13.2 811004 NEEDLE SHEATH |
| NO. Part # Description | ||
| 14 8115 | 57 HIGH PRESSURE PIPE | |
| 15 8110 | 02 LIQUID SUCTION HOSE | |
| 16 8060 | 0002 NOZZLE KIT ASSEMBLY | |
| 16.1 81 | 7008 NOZZLE | |
| 16.2 81 | 7010 NOZZLE | |
| 16.3 81 | 7011 NOZZLE | |
| 16.4 81 | 7085 NOZZLE | |
| 17 9964 | 7 OIL BOTTLE ASSEMBLY | |
WPX3200 ENGINE EXPLODED VIEW
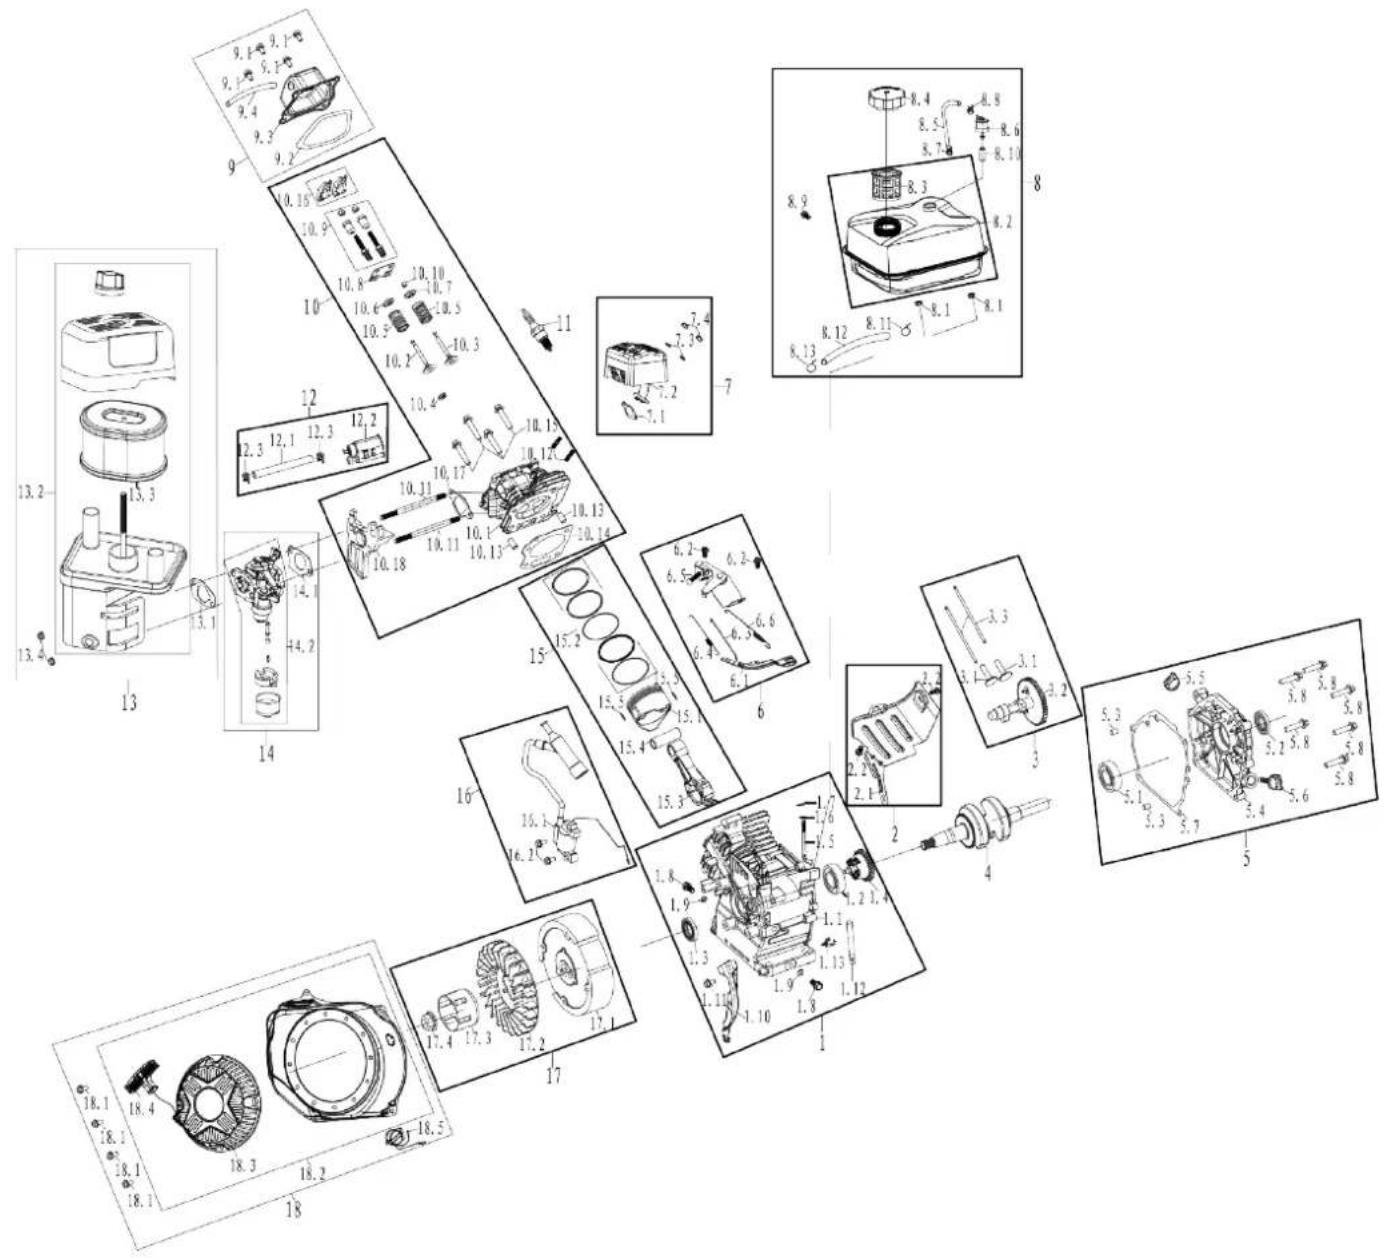
WPX3200 ENGINE PARTS LIST
| NO. Part # Description |
| 1 50120053 CRANKCASE KIT ASSEMBLY |
| 1.1 240210 CRANKCASE |
| 1.2 93009BEARING |
| 1.3 93507CRANKCASE OIL SEAL |
| 1.4 244302 GOVERNOR ASSEMBLY |
| 1.5 243901 SWINGING ROD |
| 1.6 96804SWINGING ROD WASHER |
| 1.7 243902 CONTROL ARM CLIP |
| 1.8 91816OIL DRAIN BOLT |
| 1.9 94007OIL DRAIN BOLT WASHER |
| 1.10 245702 WINDSHIELD WELDING ASSEMBLY |
| 1.11 91330BOLT M6*20 |
| 1.12 240302 Q SHAPECLIP |
| 1.13 245102 OIL SENSOR |
| 1.14 91329BOLT M6x16 |
| 1.15 245104 OIL PROTECTOR. |
| 1.16 91325BOLT M6*12 |
| 2 50130013WIND DEFLECTOR KIT ASSEMBLY |
| 2.1 240501 WIND DEFLECTOR |
| 2.2 91325BOLT M6*12 |
| 3 50150004 CAMSHAFT KIT ASSEMBLY |
| 3.1 246102 VALVE LIFTER |
| 3.2 242003 CAMSHAFT ASSEMBLY |
| 3.3 241901 VALVE PUSH ROD |
| 4 240346CRANKSHAFT ASSEMBLY |
| 5 50200030 CRANKCASE COVER KIT ASSEMBLY |
| 5.1 93009BEARING |
| 5.2 93507CRANKCASE OIL SEAL |
| 5.3 240904POSITIONING PIN OF CRANKCASE |
| 5.4 240104CRANKCASE COVER |
| 5.5 241401-138 OIL PLUG |
| 5.6 245601-138 DIPSTICK ASSEMBLY |
| 5.7 96041CRANKCASE GASKET |
| 5.8 91347BOLT M8*30 |
| 6 50060023 SPEED CONTROLLER KIT ASSEMBLY |
| 6.1 244001 GOVERNOR ARM |
| 6.2 91325BOLT M6*12 |
| 6.3 242701 THROTTLE LEVER |
| 6.4 244201 SLIGHT SPEED REGULATING SPRING C |
| 6.5 244406 SPEED CONTROLLER |
| 6.6 244103 SPEED REGULATING SPRING B |
| 7 50240019 MUFFLER EXHAUSTING KIT ASSEMBLY |
| 7.1 96054EXHAUST GASKET |
| 7.2 243768 MUFFLER ASSEMBLY |
| 7.3 94206SPRING WASHER |
| 7.4 90011NUT M8 |
| NO. Part # Description |
| 8 50250038 FUEL TANK KIT ASSEMBLY |
| 8.1 90016 NUT M6 |
| 8.2 243180-116 FUEL TANK ASSEMBLY |
| 8.2.1 246901 STRainer |
| 8.3 91333 BOLT M6*28 |
| 8.4 243604 FUEL TANK CAP ASSEMBLY |
| 8.5 95405L FUEL HOSE |
| 8.6 94408 FUEL HOSE CLIP |
| 8.7 94404 FUEL HOSE CLIP |
| 9 50010025 CYLINDER HEAD COVER KIT ASSEMBLY |
| 9.1 91325 BOLT M6*12 |
| 9.2 96045 CYLINDER HEAD COVER |
| 9.3 24111 CYLINDER HEAD COVER |
| 9.4 95603 BLAST PIPE |
| 10 50020040 CYLINDER HEAD KIT ASSEMBLY |
| 10.1 241011 CYLINDER HEAD |
| 10.2 241704 INTAKE VALVE |
| 10.3 245904 EXHAUST VALVE |
| 10.4 241806 AIR INLET SPRING LOWER SEAT |
| 10.5 246001 VALVE SPRINGS |
| 10.6 241801 AIR INLET SPRING SEAT |
| 10.7 241802 AIR EXHAUST SPRING SEAT |
| 10.8 242202 RESTRICT OR PLATE ASSEMBLY |
| 10.9 9188 ROCKER ARM FASTENING BOLT ASSEMBLY |
| 10.10 241804 TOP CAF |
| 10.11 91006 AIR INLET STUD BOLT |
| 10.12 91007 AIR OUTLET STUD BOLT |
| 10.13 240905 CYLINDER HEAD LOCATING PIN |
| 10.14 96058 CYLINDER HEAD GASKET |
| 10.15 913859 BOLT M8*60 |
| 10.16 242101 ROCKER ARM |
| 10.17 96047 INTAKE GASKET |
| 10.18 242301 CARBURETOR CONNECTION BLOCK |
| 11 97109 SPARK PLUG |
| 12 50030067 AIR CLEANER KIT ASSEMBLY |
| 12.1 94226 STEEL GASKET |
| 12.2 242936 AIR CLEANER ASSEMBLY |
| 12.2.1 5322 AIR CLEANER ELEMENT |
| 12.3 90030 NUT M6 |
| 13 50040107 CARBURETOR KIT ASSEMBLY |
| 13.1 242816-243 CARBURETOR GASKET |
| 13.2 96051 MUFFLER KIT ASSEMBLY |
| 14 50050013 PISTON RING KIT ASSEMBLY |
| 14.1 241208 PISTON |
| 14.2 241606 PISTON RING ASSEMBLY |
| 14.3 241503 CONNECTING ROD COMPONENT |
WPX3200 ENGINE PARTS LIST CONTINUED
| NO. Part # Description |
| 14.4 245503 THE PISTON PIN |
| 14.5 241301 PISTON PIN RETainer |
| 15 50100037 IGNITION COIL KIT ASSEMBLY |
| 15.1 97516 IGNITION COIL ASSEMBLY |
| 15.2 91331 BOLT M6*25 |
| 16 50180007 FLYWHEEL kit ASSEMBLY |
| 16.1 240401 FLYWHEEL COMPONENTS |
| 16.2 244601 IMPELLER |
| 16.3 244502 STARTER PULLY |
| 16.4 9003 IMPELLER NUT M14*1.5 |
| 17 50090052 RECOIL kit ASSEMBLY |
| 17.1 91325 BOLT M6*12 |
| 17.2 244791-221E RECOIL ASSEMBLY |
| 17.2.1 5980-116 RECOIL |
| 17.2.2 5914-243 PULL HANDLE |
| 17.3 245205-243 SWITCH ASSEMBLY |
WPX3200 PRESSURE WASHER EXPLODED VIEW

WPX3200 PRESSURE WASHER PARTS LIST
| NO. Part # Description |
| 1 11482 2110045 ENGINE DH212 |
| 2 801000 03 SOAP BOTTLE KIT ASSEMBLY |
| 2.1 8140 11-221 SOAP BOTTLLE CAP |
| 2.2 8140 32-017 SOAP BOTTLLE |
| 2.3 91860 BOLT M6X45 |
| 2.4 94220 FLAT WASHER 26 |
| 2.5 90023 NUT M6 |
| 3 802100 03 FOOT PAD ASSEMBLY |
| 3.1 90039 NUT M8 |
| 3.2 81300 08 FOOT PAD |
| 4 801900 02 LOWER GUN HOLDER KIT ASSEMBLY |
| 4.1 91860 BOLT M6X45 |
| 4.2 94220 FLAT WASHER 26 |
| 4.3 90023 NUT M6 |
| 4.4 8140 16 LOWER GUN HOLDER |
| 5 800900 04 WHEEL KIT ASSEMBLY |
| 5.1 8120 01-131 WHEEL |
| 5.2 8160 05 AXLE |
| 5.3 8160 04 R PIN |
| 6 800200 05 FRAME BASE KIT ASSEMBLY |
| 6.1 8150 17-206 FRAME BASE |
| 6.2 90013 NUT M8 |
| 6.3 8130 42 ISOLATION PAD |
| 6.4 2108 01 CABLE CLIP |
| 6.5 8160 06 SPRING BUCKLE |
| 7 800300 06 FRAME ARMREST KIT ASSEMBLY |
| 7.1 8154 66-206 FRAME ARMREST |
| 7.2 8130 05-052 PROTECTIVE GLOVES |
| 8 801400 01 UPPER GUN HOLDER KIT ASSEMBLY |
| 8.1 8141 54 UPPER GUN HOLDER |
| 8.2 8140 01 PLASTIC EXPAND SCREW |
| 9 801100 05 PANEL ASSEMBLY |
| 9.1 90024 NUT M6 |
| 9.2 94221 FLAT WASHER 6x12 |
| 9.3 91811 BOLT M6*50 |
| 9.4 81300 01 NOZZLE COVER |
| 9.5 8141 91-221 BILLBOARD |
| 9.6 8140 01 PLASTIC EXPAND SCREW |
| 10 80400 007 WATER PUMP KIT ASSEMBLY |
| 10.1 810449-3200 WATER PUMP ASSEMBLY |
| 10.2 91345 BOLT M8*20 |
| 10.3 246503 CRANKSHAFT FLAT KEY |
| 11 817110 SPRAY ROD ASSEMBLY |
| 12 81708 8-219 SPRAY GUN |
| 13 80610 002 NEEDLE KIT ASSEMBLY |
| 13.1 816010 NEEDLE |
| NO. Part # Description | ||
| 13.2 | 811004 | NEEDLE SHEATH |
| 14 811557 | HIGH | PRESSURE PIPE |
| 15 811002 | LIQUID SUCTION HOSE | |
| 16 806000 | 001 NOZZLE KIT A | SSEMBLY |
| 16.1 | 817008 NOZZLE | |
| 16.2 | 817009 NOZZLE | |
| 16.3 | 817010 NOZZLE | |
| 16.4 | 817011 | NOZZLE |
| 16.5 | 817085 NOZZLE | |
| 17 99647 | OIL BOTTLE ASSEMBLY | |
Tos h s. t n i e Westinghouse Outdoor Power Equipment, LLC.
ADVERTENCIA

Westinghouse Outdoor Power
Warranty registration
777 Manor Park Drive
Columbus, OH 43228
Para su archivo
Fecha de compra:
Número de modelos:
Numero de série:
Lugar de compra:
42 | Westinghouse Outdoor Power Equipment, LLC
NE PAS RETOURNER CE PRODUIT AU MAGASIN
CHARACTERISTQUES. 54
SECURITE
DEFINITIONS DE SECURITE 55
SYMBOLES DE SECURITE 55
SECURITE DU CARBURANT. 55
COMPOSANTS
COMPOSANTS. 58
ASSEMBLE
CONTENU DU CARTON 59
CONTENU DU CARTON 59
INSTALLER LA POIGNEE 59
INSTALLER LE PIED DE MONTAGE ET LE SUPPORT DE
PISTOLET INFÉRIEUR. 59
INSTALLER LE SUPPORT DE PISTOLET SUPérieUR.....59
INSERER LES BUSES DE PULVERISATION 60
ASSEMBLER LE PISTOLET DE PULVERISATION ET LE TUYAU 60
REMLISSIPAGE D'HUILE INITIAL 60
CARBURANT 61
BRANCHEZ LE TUYAU D'ARROSAGE 62
OPÉRATION
EMPLACEMENT DU NETTOYEUR HAUTE PRESSION.....63
DÉMARRAGE DU MOTEUR 63
ARRÉT DU LAVEUSE À PPRESSION 63
SELECTION DES BUSES 64
CHANGER LA BUSE 64
CONSEILS DE PULVERISATION 64
UTILISATION DE DÉTERGENT 65
TRANSPORT 66
ENTRETIEN
CALENDRIER D'ENTRETIEN 67
NETTOYAGE DU NETTOYEUR HAUTE PRESSION 67
ENTRETIEN DU FILTRE A AIR 67
CONTROLE DU NIVEAU D'HUILE MOTEUR 68
CHANGEMENT D'HUILE MOTEUR 68
MAINTENANCE DES BOUGIES 69
SERVICE DE PARE-ETINCELLES 69
ESPACE DE RANGEMENT 70
STOCKAGE D'HIVER. 70
LE JEU DES SOUPAPES 71
DéPANNAGE
DEPANNAGE 72
INTRODUCTION
Westinghouse Outdoor Power
Warranty registration
777 Manor Park Drive
Columbus, OH 43228
Pour vos dossiers
Date d'achat:
Numéro de modèle:
Numéro de série:
Lieud'achat:
Make sure the pressure washer hose is free of all water before storing for winter. In order to prevent corrosion and keep the water pump from freezing you will need to add RV (non-toxic) antifreeze or similar pump-protection specifically made for pressure washers. Follow the manufacturer's instructions for use.
VIDANGE DU FLOTTEUR
Couple: 106 inch-pound (12 N·m)
WestinghousePortablePower.com
Service Hotline: (855) 944-3571
777 Manor Park Drive
Columbus, OH 43228
TM & © 2021 Westinghouse Electric Corporation
© 2021 Westinghouse Outdoor Power Equipment, LLC All Rights Reserved.
WPX2700 / WPX3200 Rev01
121191 Rev08 9/21