
AKCQ08ACA - Air Conditioning GE - Free user manual and instructions
Find the device manual for free AKCQ08ACA GE in PDF.

| Product Type | Wall-mounted air conditioner |
| Brand | GE |
| Model | AKCQ08ACA |
| Power supply | 115/120 V AC, 60 Hz, 15 A (time-delay fuse or circuit breaker) |
| Plug type | Grounded three-prong plug |
| Power cord | With current interruption mechanism (TEST/RESET buttons) |
| Refrigerant | R410A |
| Operation modes | Cool, Eco (energy saving), Fan, Dehum (dehumidification) |
| Fan speeds | High, Med, Low |
| Timer | Programmable from 1 to 24 hours (auto on/off) |
| Remote control | Yes (CR2025 battery included) |
| Display | LED digital (set or ambient temperature) |
| Air filter | Washable, cleaning recommended every 2 weeks |
| Warranty | 2 years (parts and labor) |
| Annual maintenance | Recommended by a qualified technician |
| Safety | Do not use extension cord; do not remove grounding prong; risk of chemical burn (batteries) |
| Operating temperature in Cool mode | ≥ 16 °C (61 °F) outdoor |
Frequently Asked Questions - AKCQ08ACA GE
User questions about AKCQ08ACA GE
0 question about this device. Answer the ones you know or ask your own.
Ask a new question about this device
Download the instructions for your Air Conditioning in PDF format for free! Find your manual AKCQ08ACA - GE and take your electronic device back in hand. On this page are published all the documents necessary for the use of your device. AKCQ08ACA by GE.
USER MANUAL AKCQ08ACA GE
SAFETY INFORMATION 3
USING THE AIR CONDITIONER
Controls 4
Starting the Air Conditioner. 5
Using the Remote Control 6
Air Direction. 7
CARE AND CLEANING
Grille and Case 7
Air Filter. 7
Annual Maintenance. 7
INSTALLATION INSTRUCTIONS
Before You Begin. 8
Electrical Requirements 8
Tools You will Need. 8
Installation Requirements 8
Parts Included. 9
Installing the Air Conditioner. 10
TROUBLESHOOTING
Normal Operating Sounds 11
Troubleshooting Tips. 12
LIMITED WARRANTY 13
CONSUMER SUPPORT 14
Write the model and serial numbers here:
Model #
Serial #
You can find the rating label on the side of the air conditioner.
OWNER'S MANUAL
AKCQ08ACA
AKCQ10ACA
AKCQ10DCA
AKCQ12ACA
AKCQ12DCA
ENGLISH/FRANÇAIS/ ESPÁÑOL
THANK YOU FOR MAKING GE APPLIANCES A PART OF YOUR HOME.
Whether you grew up with GE Appliances, or this is your first, we're happy to have you in the family.
We take pride in the craftsmanship, innovation and design that goes into every GE Appliances product, and we think you will too. Among other things, registration of your appliance ensures that we can deliver important product information and warranty details when you need them.
Register your GE appliance now online. Helpful websites and phone numbers are available in the Consumer Support section of this Owner's Manual.

GE APPLIANCES
IMPORTANT SAFETY INFORMATION READ ALL INSTRUCTIONS BEFORE USING THE APPLIANCE
WARNING
For your safety, the information in this manual must be followed to minimize the risk of fire, electric shock or personal injury.
Use this appliance only for its intended purpose as described in this Owner's Manual.
This air conditioner must be properly installed in accordance with the Installation Instructions before it is used.
- Never unplug your air conditioner by pulling on the power cord. Always grip plug firmly and pull straight out from the receptacle.
- Replace immediately all electric service cords that have become frayed or otherwise damaged. A damaged power supply cord must be replaced with a new power supply cord obtained from the manufacturer and not repaired. Do not use a cord that shows cracks or abrasion damage along its length or at either the plug or connector end.
Turn the unit OFF and unplug your air conditioner before cleaning.
To avoid risk of injury or property damage, the air conditioner should only be serviced by a qualified servicer, who should hold a current valid certificate
from an industry-accredited assessment authority, which authorizes their competence to handle refrigerants safely in accordance with an industry recognized assessment specification.
For your safety...do not store or use combustible materials, gasoline or other flammable vapors or liquids in the vicinity of this or any other appliance.
All air conditioners contain refrigerants, which under federal law must be removed prior to product disposal. If you are getting rid of an old product with refrigerants, check with the company handling disposal about what to do.
If the receptacle does not match the plug, the receptacle must be changed out by a qualified electrician.
These R410A air conditioning systems require contractors and technicians to use tools, equipment and safety standards approved for use with this refrigerant. DO NOT use equipment certified for R22 refrigerant only.
WARNING
USE OF EXTENSION CORDS
RISK OF FIRE. Could cause serious injury or death.
DO NOT use an extension cord with this Built-In Air Conditioner.
DO NOT use surge protectors or multi-outlet adaptors with this Built-In Air Conditioner.
HOW TO CONNECT ELECTRICITY
Do not, under any circumstances, cut or remove the third (ground) prong from the power cord. For personal safety, this appliance must be properly grounded.
DO NOT use an adapter plug with this appliance.
The power cord of this appliance is equipped with a 3-prong (grounding) plug which mates with a standard 3-prong (grounding) wall outlet to minimize the possibility of electric shock hazard from this appliance.
Power cord includes a current interrupter device. A test and reset button is provided on the plug case. The device should be tested on a periodic basis by first pressing the TEST button and then the RESET button while plugged into the outlet. If the TEST button does not trip or if the RESET button will not stay engaged, discontinue use of the air conditioner and contact a qualified service technician.
Have the wall outlet and circuit checked by a qualified electrician to make sure the outlet is properly grounded.
Where a 2-prong wall outlet is encountered, it is your personal responsibility and obligation to have it replaced with a properly grounded 3-prong wall outlet.
The air conditioner should always be plugged into its own individual electrical outlet which has a voltage rating that matches the rating plate.
This provides the best performance and also prevents overloading house wiring circuits which could cause a fire hazard from overheated wires.
See the Installation Instructions, Electrical
Requirements section for specific electrical connection requirements.
WARNING
Chemical Burn Hazard. Keep batteries away from children.
This product contains a lithium button/coin cell battery. If a new or used lithium button/coin cell battery is swallowed or enters the body, it can cause severe internal burns and can lead to death in as little as 2 hours. Always completely secure the battery compartment. If the battery compartment does not close securely, stop using the product, remove the batteries, and keep it away from children.
If you think batteries might have been swallowed or placed inside any part of the body, seek immediate medical attention.
The cells shall be disposed of properly, including keeping them away from children.
Even used cells may cause injury.
READ AND SAVE THESE INSTRUCTIONS
Controls
Features and appearance will vary.
Lights below the touch pads on the air conditioner control panel indicate the selected settings.
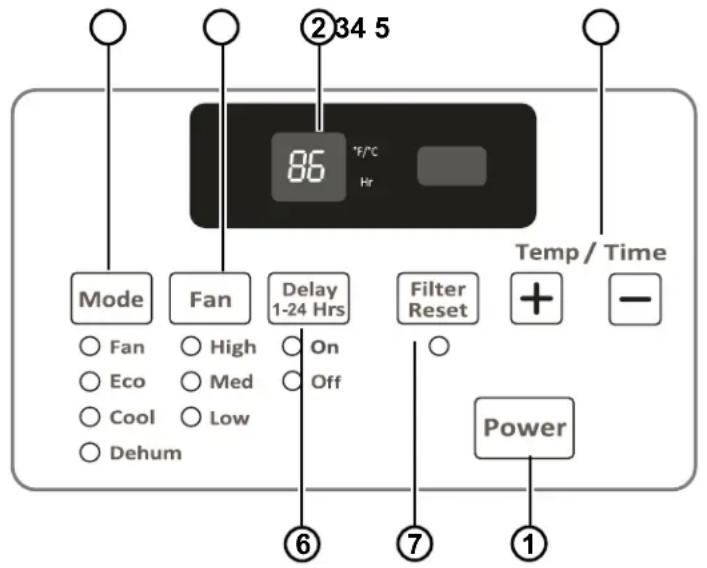
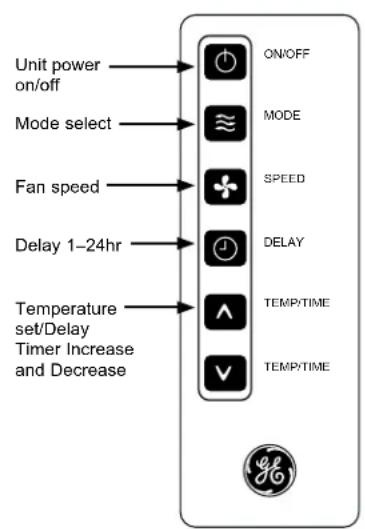
Air Conditioner Controls Remote Control
Controls
1.Power Pad
Turns air conditioner on and off. When turned on, the display will show the room temperature.
2.Display
Shows the room temperature or time remaining on the Delay timer. Shows the Set temperature while setting the temperature in Cool or Eco modes.
3. Temp and Delay Increase +/Decrease - Pads
Use to set temperature or delay time. Temperature can be set in Cool and Eco mode.
4.Mode Pad
Use to set the air conditioner to Fan, Energy Save, Cool or Dehum mode.
5.Fan Speed Pad
Use to set the fan speed to High, Med, or Low on the unit.
6. Timer
Use to set the air conditioner to turn on or off automatically.
7. Filter Reset Pad
This feature automatically notifies you that the air filter must be cleaned.
Using the Air Conditioner
Operating your air conditioner properly helps you to obtain the best possible results. This section explains how to operate this air conditioner.
IMPORTANT:
-
When you turn off the air conditioner, either at the control panel or with the remote control, wait at least 3 minutes before turning it back on. This prevents the compressor from overloading. This 3 minute delay also applies when switching from cool mode to fan and back.
-
Do not operate your air conditioner in the Cool mode when the outside temperature is below 61^ ( 16^ ). The inside evaporator coil will freeze up, and the air conditioner will not operate properly.
Starting the Air Conditioner
- Carefully remove the clear plastic film from the control panel.
- PressPower once to turn on the air conditioner.
NOTE: When the air conditioner is first plugged in, the LED display will show "88" for 3 seconds.
After the air conditioner is turned on for the first time, the display will show the temperature 72 F and the fan is automatically set to Low speed and the Mode indicator will show ECO.
NOTE: To switch the temperature display between Fahrenheit (F) and Celsius(C), the air conditioner must be plugged in, and turned ON. On the control panel on the front of the AC, press the UP and DOWN button at the same time and hold for 3 seconds. The change cannot be done using the remote control.
- Select Mode. Refer to "Mode."
- Select Speed. Refer to "Speed."
- Set Timer. Refer to "Temp/Time."
- Reset the filter. Refer to "Filter Reset."
MODE
- Press mode until you see the indicator light come on next to the desired setting.
- Choose Fan, Eco, Cool, or Dehum.
FAN - Only the fan runs. Press SPEED to select High, Med or Low fan speed. The display shows the current room temperature.
ECO - In this mode the fan runs only when cooling is needed. The fan will run for 3 minutes after the compressor shuts off. The fan then cycles on for 2 minutes at 10 minute intervals until the temperature in the room is above the set temperature. The compressor then turns back on.
COOL - Cools the room. Press SPEED to select High, Med, Low Fan speed. Press the TEMP/TIME up or down arrow button to adjust the temperature.
DEHUM - Aids in removing humidity from the room. This setting will NOT cool the room. NOTE: Dehum mode cannot be used to cool the room.
SPEED
- PressFAN SPEED until you see the indicator light come on next to the desired setting.
- Choose High, Med, Low HIGH-For maximum cooling
MED - For normal cooling
LOW - For minimum cooling
TIMER
To set the air conditioner to turn off between 1 hour and 24 hours (The air conditioner must be ON to set):
- Press TIMER. Timer Off indicator light will be on. The display will show the remaining hours before the air conditioner will turn off.
- Press the TEMP/TIME up or down arrow button to change the delay time from 1 hour to 24 hours.
- After 5 seconds, Timer Off indicator light will remain on. The display will show the remaining time to Timer Off.
To set the air conditioner to turn on between 1 hour and 24 hours:
- Press TIMER. Timer On indicator light will be on. The display will show the remaining hours before the air conditioner will turn on.
- Press the TEMP/TIME up or down arrow button to change the delay time from 1 hour to 24 hours.
- After 5 seconds, Timer On indicator light will remain on. The display will show the remaining time to Timer On.
To clear timer program:
NOTE: Air conditioner can be either on or off.
Press TIMER until Timer indicator light turns off.
To view or change the remaining time (in hours):
TIMER OFF
- Press the TEMP/TIME up or down arrow button to increase or decrease the time.
- After 5 seconds, the display will show the remaining time to Timer OFF.
TIMER ON
- The display will show the remaining time.
- Press the TEMP/TIME up or down arrow button to increase or decrease the time.
- After 5 seconds, the display will show the remaining time to Timer ON.
Using the Air Conditioner
Starting the Air Conditioner (Cont.)
TEMP/TIME
- Press the TEMP/TIME up arrow button to raise the temperature. Each time you press the TEMP/TIME up arrow button, the temperature will go up 1^ until it reaches 86^ (30^) .
- Press the TEMP/TIME down arrow button to lower the temperature. Each time you press the TEMP/TIME down arrow button, the temperature will go down 1^ until it reaches 61^ (16^) .
NOTE: After 5 seconds, under Fan mode, the display will show the current temperature. Under Cool, Eco or Dehum mode, the display will show the set temperature.
FILTER RESET
This feature automatically notifies you that the air filter must be cleaned. The indicator light will come on after 240 hours of operation. Clean the air filter (refer to Care and Cleaning), place it back in the front panel, and press the Filter Reset button. The light will turn off.
Using the Remote Control
NOTE: The raised dots are Braille for the visually impaired.
Remote control may differ in appearance from the image shown.
NOTE: Remove and discard protective film prior to use. The remote control runs on one CR2025 battery (included). Replace battery after 6 months of use, or when the remote control starts to lose power. To change battery, remove screw on back panel of remote to remove cover.
POWER
Press ON/OFF to turn on the air conditioner.
Mode
Press MODE to choose Fan, Eco, Cool or Dehum.
Speed
Press SPEED to choose High, Med, Low.
TIMER
To set the air conditioner to turn off after a set amount between 1 hour and 24 hours (unit must be ON):
- Press TIMER. Timer OFF indicator light on the air conditioner control panel will be on.
- Press the TEMP/TIME up or down arrow button to change the delay time from 1 hour to 24 hours.
- After 5 seconds, Timer OFF indicator light on the air conditioner control panel will remain on.
TO SET THE AIR CONDITIONER TO TURN ON BETWEEN 1 HOUR AND 24 HOURS:
- Press TIMER. Timer On indicator light on the air conditioner control panel will be on.
- Press the TEMP/TIME up or down arrow button to change the delay time from 1 hour to 24 hours.
- After 5 seconds, Timer On indicator light on the air conditioner control panel will remain on.
TO CLEAR TIMER PROGRAM:
NOTE: Air conditioner can be either on or off.
Press TIMER until Timer indicator light turns off.
TO VIEW OR CHANGE THE REMAINING TIME (IN HOURS):
TIMER OFF
- Press the TEMP/TIME up or down arrow button to increase or decrease the time.
- After 5 seconds, the display will show the remaining time to Timer OFF.
TIMER ON
- The display will show the remaining time.
- Press the TEMP/TIME up or down arrow button to increase or decrease the time.
TEMP/TIME
- Press the TEMP/TIME up arrow button to raise the temperature. Each time you press the TEMP/TIME up arrow button, the temperature will go up 1^ until it reaches 86^ (30^) .
- Press the TEMP/TIME down arrow button to lower the temperature. Each time you press the TEMP/TIME down arrow button, the temperature will go down 1^ until it reaches 61^ (16^) .
Using the Air Conditioner
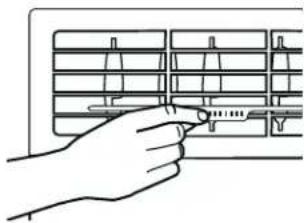
Air Direction
Use the lever to adjust the air direction left, right, up and down.
Care and Cleaning
Grille and Case
Turn the air conditioner off and remove the plug from the wall outlet before cleaning.
To clean, use water and a mild detergent. Do not use bleach or abrasives.
Air Filter
The air filter behind the front grille should be checked and cleaned at least every 2 weeks or more often if necessary.
CAUTION
DO NOT operate the air conditioner
without a filter because dirt and lint will clog it and reduce performance.
Cleaning the Air Filter
- Turn off the air conditioner.
- Remove the air filter by pulling the front panel to open and removing the air filter.
- Use a vacuum cleaner to clean air filter. If the air filter is very dirty, wash it in warm water with a mild detergent. Do not wash the air filter in the dishwasher or use any chemical cleaners. Air dry the air filter completely before replacing to ensure maximum efficiency.
- Replace the air filter.
- Close the front panel.
- Turn on the air conditioner.
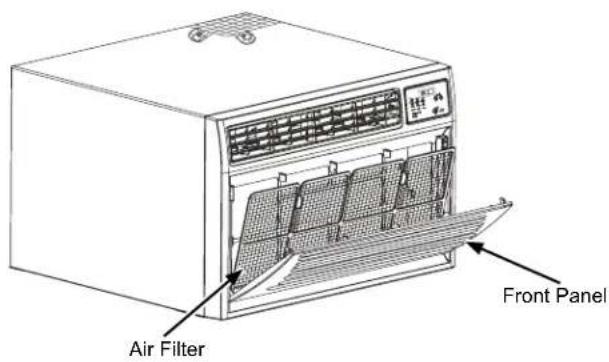
Cleaning the Front Panel
- Turn off the air conditioner.
- Clean the front panel with a soft, damp cloth.
- Air dry the front panel completely.
- Turn on the air conditioner.
Annual Maintenance
Your air conditioner needs annual maintenance to help ensure steady, top performance throughout the year.
Call your local authorized dealer to schedule an annual checkup. The expense of an annual inspection is your responsibility.
Installation Instructions
Questions? Call 800.GE.CARES (800.432.2737) or Visit our Website at: GEAppliances.com
BEFORE YOU BEGIN
Read these instructions completely and carefully.
- IMPORTANT - Save these instructions for local inspector's use.
- IMPORTANT - Observe all governing codes and ordinances.
Note to Installer - Be sure to leave these instructions with the Consumer.
Note to Consumer - Keep these instructions for future reference.
- Skillevel- Installation of this appliance requires basic mechanical skills.
Completion time - Approximately 1 hour
- We recommend that two people install this product.
- Proper installation is the responsibility of the installer.
Product failure due to improper installation is not covered under the Warranty.
- You MUST use all supplied parts and use proper installation procedures as described in these instructions when installing this air conditioner.
TOOLS YOU WILL NEED
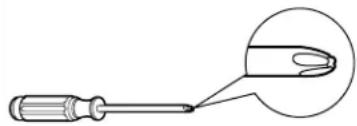
Phillips head screwdriver

Drill and 1/8" drill bit

Ruler or tape measure

Level
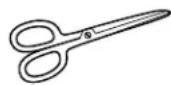
Scissors or knife
CAUTION
There are sharp edges that can cause serious cuts. When lifting the air conditioner, it is HEAVY. Use 2 peoples to lift.
ELECTRICAL REQUIREMENTS

These models require a 115/120-volt AC or a 230-volt AC, 60-Hz grounded outlet protected with a 15-amp time-delay fuse or circuit breaker.
The 3-prong grounding plug minimizes the possibility of electric shock hazard. If the wall outlet you plan to use is only a 2-prong outlet, it is your responsibility to have it replaced with a properly grounded 3-prong wall outlet.
CAUTION
Do not, under any circumstances, cut or remove the third (ground) prong from the power cord.
Do not change the plug on the power cord of this air conditioner.
Aluminum house wiring may present special problems—consult a qualified electrician.
Power cord includes a current interrupter device. A test and reset button is provided on the plug case. The device should be tested on a periodic basis by first pressing the TEST button and then the RESET button while plugged into the outlet. If the TEST button does not trip or if the RESET button will not stay engaged, discontinue use of the air conditioner and contact a qualified service technician.
INSTALLATION REQUIREMENTS
For new construction, install the Haier Wall Sleeve HTTWSB.
Remove old air conditioner and inspect sleeve for the following:
Installation - Make sure that sleeve is securely installed and in sound structural condition.
Dimensions - Measure the size to make sure the air conditioner will fit.
Slope - Ensure wall sleeve is level or has a rearward slope for condensate to drain from the unit.
If pre-existing wall sleeve is suspect, it is recommended to install Haier Wall Sleeve, model HTTWSB, in its place.
Check the contents of the accessories supplied with your air conditioner as shown below:
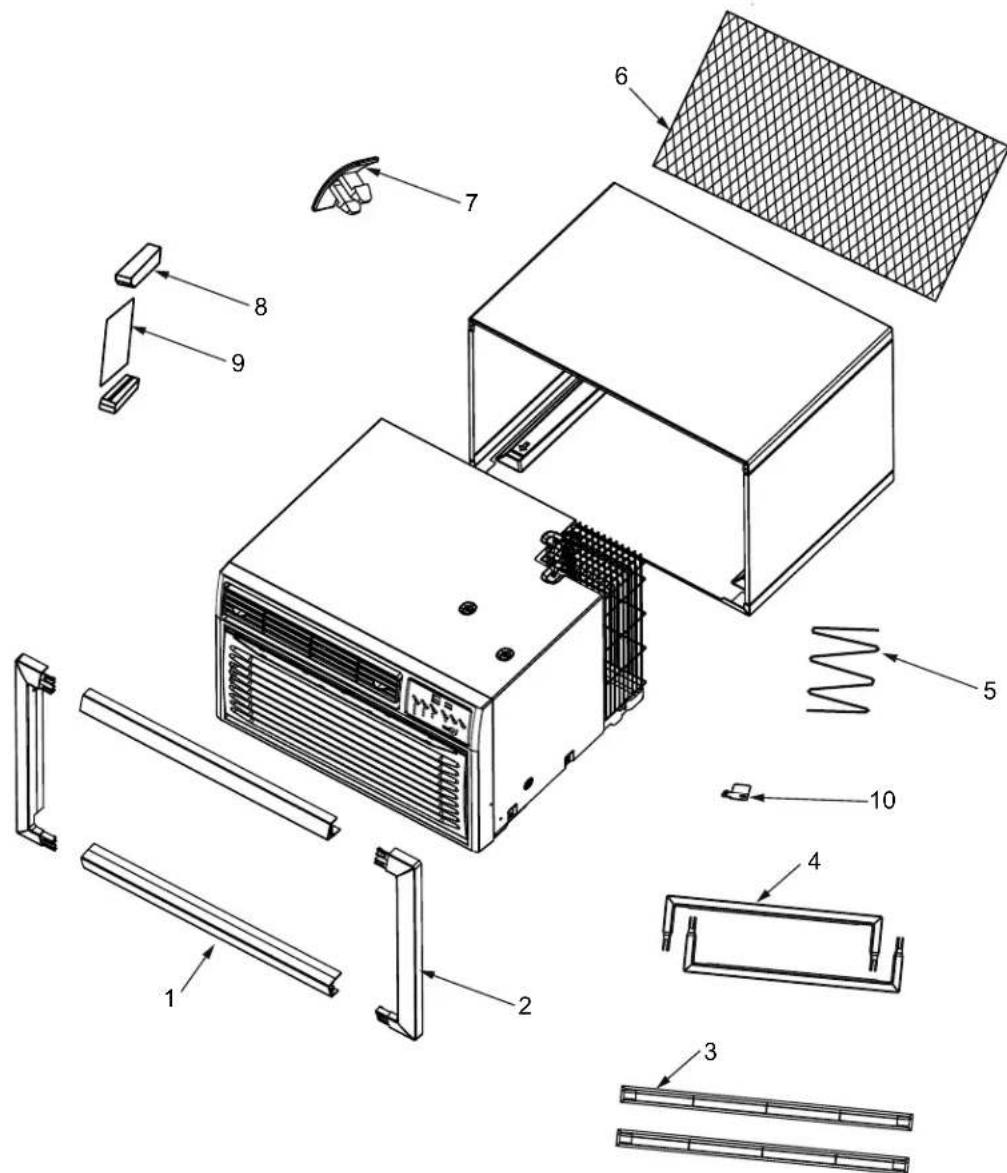
| Number | Part name QTY. | |
| 1 | Wide Top/Bottom Trim Frame 2 | |
| 2 | Wide Side Trim Frame 2 | |
| 3 | Narrow Top/Bottom Trim Frame 2 | |
| 4 | Narrow Side Trim Frame 2 | |
| 5 | Foam Seal 1 | |
| 6 | Universal Fit Rear Grille 1 | |
| 7 | Rubber Clamp 4 | |
| 8 | Tapered Spacer Block 2 | |
| 9 | Board 1 | |
| 10 | Retaining Bracket | 1 |
Installing the Air Conditioner
- Identify the existing wall sleeve before installing the unit from the list below:
| Brand | Wall Sleeve Dimensions | ||
| Width Height | ht Depth | ||
| Haier Amana 25-13/32" 15-3/4" 1 | 7-1/2" | ||
| Haier Amana 25-7/8" 15-9/16" 16 | -3/4" | ||
| White-Westinghouse Frigidare Carrier (52F series) | 25-1/2" 15-1/4" 16, 17-1 | /2" or 22 | |
| GE Appliances/ Hotpoint | 26" 15-5/8" | 16-7/8" | |
| Whirlpool 25-7/8" 16-1/2" 17-1/8" | |||
| Sears/Kenmore 25-7/8" 15-17/32" 16-23/32" | |||
| Carrier (51S series) | 25-3/4" 16-7/8" 18-5/8" | ||
| LG | 25-7/8" 15-7/32" 16-23/32" | ||
NOTE: All wall sleeves used to mount the new Air Conditioner must be in sound structural condition and have a rear grille that securely attaches to sleeve, or rear flange that serves as a stop for the Air conditioner.
2. Clean the interior of the sleeve (do not disturb seals).
3. Repaint the sleeve if needed.
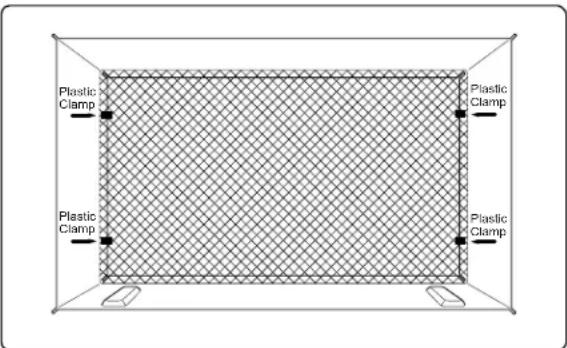
4. For best performance and energy efficiency, replace the existing rear louver grille with the plastic mesh supplied in the package. Measure and cut the plastic grille to fit and place inside the wall sleeve against the rear flange.
Installing the Air Conditioner (Cont.)
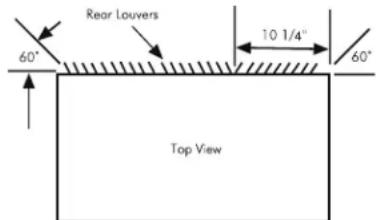
If your existing sleeve has a rear grille and you wish to retain: redirect the louvers to 60 angle as shown below.
- If the depth of your existing wall sleeve is less than or equal to 20^ skip to step 7. Otherwise, cut the baffles and the support blocks according to length "A" in the table below.
| Depth “D” of the existing wall sleeve (inches) | Length “A” (inches) |
| 20 < D ≤ 20-5/8" | 3/4 |
| 20-5/8 < D ≤ 21-3/4 | 1-3/4 |
| 21-3/4 < D ≤ 24 | 4 |

- Remove the backing from the support blocks and attach them to the inside of the wall sleeve as shown below. Slide the baffle into slots of the support blocks.

- Install unit into the wall sleeve, leaving enough of the unit exposed to access bracket location.
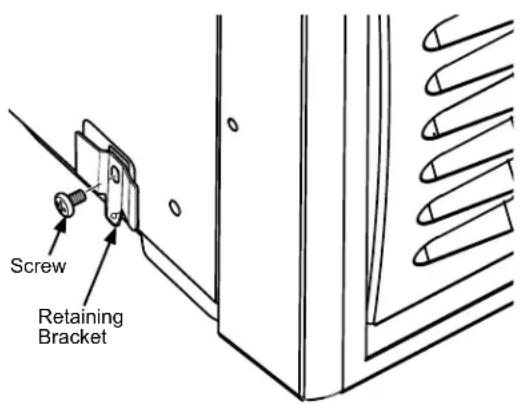
- Install retaining bracket at front left corner by removing and reusing screw. Push unit fully into sleeve
Installing the Air Conditioner (Cont.)
- Install the 1'' × 1 - 1/2'' × 84'' long stuffer seal between the wall sleeve and the unit.
- To assemble trim, snap the tab of each piece into the slot of the other piece as shown below. Two different trim frames are supplied with unit. Use the trim frame that best fits your sleeve. Slide trim over the front of the air conditioner until trim is flush with sleeve as shown below.
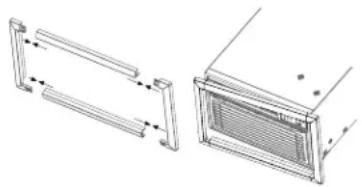
NOTE: Be sure to route the cord through the trim frame before placing the trim frame on the unit. Do not trap the cord between the trim frame and the wall.
Normal Operating Sounds
When your air conditioner is operating normally, you may hear sounds such as:
- Droplets of water hitting the condenser, causing a pinging or clicking sound. The water droplets help cool the condenser.
Air movement from the fan. - Clicks from the thermostat cycle.
Vibrations or noise due to poor wall or window construction.
A high-pitched hum or pulsating noise caused by the modern high-efficiency compressor cycling on and off.
Troubleshooting Tips... Before you call for service
Save time and money! Review the charts on the following pages first and you may not need to call for service.
| Problem Possible | Cause What To Do | |
| Air conditioner does not operate. | The unit is unplugged. Plug into a grounded Plug into a grounded Plug into a grounded Plug into a grounded Plug into a grounded Plug into a grounded Plug into a grounded Plug into a grounded Plug into a grounded Plug into a grounded Plug into a grounded Plug into a grounded Plug into a grounded Plug into a grounded Plug into a grounded Plug into a grounded Plug into a grounded Plug into a grounded Plug into a grounded Plug into a grounded Plug into a grounded Plug into a grounded Plug into a grounded Plug into a grounded Plug into a grounded Plug into a grounding Plug into a grounded Plug into a grounding Plug into a grounding Plug into a grounding Plug into a grounding Plug into a grounding Plug into a grounding Plug into a grounding Plug into a grounding Plug into a grounding Plug into a grounding Plug into a grounding Plug into a grounding Plug into a grounding Plug into a grounding Plug into a grounding Plug into a grounding Plug into a grounding Plug into a grounding Plug into a grounding Plug into a grounding Plug into a grounding Plug into a grounding Plug into a grounding Plug into a grounding Plug into a grounding Plug into a grounded Plug into a grounded Plug into a grounded Plug into a grounded Plug into a grounded Plug into a grounded Plug into a grounded Plug into a grounded Plug into a grounded Plug into a grounded Plug into a grounded Plug into a grounded Plug into a grounded Plug into a grounded Plug into a grounded Plug into a grounded Plug into a grounded Plug into a grounded Plug into a grounded Plug into a grounded Plug into a grounded Plug into a grounded Plug into a grounded Plug into a grounded Plug into a underground Plug into a grounded Plug into a grounded Plug into a grounded Plug into a grounded Plug into a grounded Plug into a grounded Plug into a grounded Plug into a grounded Plug into a grounded Plug into a grounded Plug into a grounded Plug into a grounded Plug into a grounded Plug into a grounded Plug into a grounded Plug into a grounded Plug into a grounded Plug into a grounded Plug into a grounded Plug into a grounded Plug into a grounded Plug into a grounded Plug into a grounded Plug into a grounded Plug into a地下室地下室地下室地下室地下室地下室地下室地下室地下室地下室地下室地下室地下室地下室地下室地下室地下室地下室地下室地下室地下室地下室地下室地下室地下室地下室地下室地下室地下室地下室地下室地下室地下室地下室地下室地下室地下室地下室地下室地下室地下室地下室地下室地下室地下室地下室地下室地下室地下室地下室地下室地下室地下室地下室地下室地下室地下室地下室地下室地下室地下室地下室地下室地下室地下室地下室地下室地下室地下室地下室地下室地下室地下室地下室地下室地下室地下室地下室地下室地下室地下室地下室地下室地下室地下室地下室地下室地下室地下室地下室地下室地下室地下室地下室地下室地下室地下室地下室地下室地下室 LABORATORY CHECKS | |
| The power supply cord has tripped (Reset button has popped out). | Press and release RESET (listen for click; Reset button will latch and on some devices, a green light will turn on) to resume operation. | |
| A household fuse has blown, or circuit breaker has tripped. | Replace the fuse or reset the circuit breaker. If the problem continues, call an electrician. See "Electrical Requirements." | |
| The Power button has not been pressed or the Mode control knob is turned off. | Press POWER or turn the Mode control knob to an active setting. | |
| The local power has failed. Wait for power to be restored. | To be restored. | |
| Air conditioner blows fuses or trips circuit breakers | Too many appliances are being used on the same circuit. | Unplug or relocate appliances that share the same circuit. |
| Time-delay fuse or circuit breaker of the wrong capacity is being used. | Replace with a time-delay fuse or circuit breaker of the correct capacity. See "Electrical Requirements." | |
| An extension cord is being used. | Do not use an extension cord with this or any other appliance. | |
| You are trying to restart the air conditioner too soon after turning off the air conditioner. | Wait at least 3 minutes after turning off the air conditioner before trying to restart the air conditioner. | |
| Air conditioner power supply cord trips (Reset button pops out) | Disturbances in your electrical current can trip (Reset button will pop out) the power supply cord. | Press and release RESET (listen for click; Reset button will latch and on some devices, a green light will turn on) to resume operation. |
| Electrical overloading, overheating, cord pinching or aging can trip (Reset button will pop out) the power supply cord. | After correcting the problem, press and release RESET (listen for click; Reset button will latch and on some devices, a green light will turn on) to resume operation. | |
| NOTE: A damaged power supply cord must be replaced with a new power supply cord obtained from the product manufacturer and must not be repaired. | ||
| Air conditioner seems to run too much | The current air conditioner replaced an older model. | The use of more efficient components may cause the air conditioner to run longer than an older model, but the total energy consumption will be less. Newer air conditioners do not emit the "blast" of cold air you may be accustomed to from older air conditioners, but this is not an indication of lesser cooling capacity or efficiency. Refer to the efficiency rating (EER) and capacity rating (in Btu/h) marked on the air conditioner. |
| The air conditioner is in a heavily occupied room, or heat-producing appliances are in use in the room. | Use exhaust vent fans while cooking or bathing and try not to use heatproducing appliances during the hottest part of the day. A higher capacity air conditioner may be required, depending on the size of the room being cooled. | |
| Air conditioner cycles on and off too much or does not cool room in cooling mode | The air conditioner is not properly sized for your room. | Check the cooling capabilities of your room air conditioner. Room air conditioners are not designed to cool multiple rooms. |
| The filter is dirty or obstructed by debris. | Clean the filter. | |
| There is excessive heat or moisture (open container cooking, showers, etc.) in the room. | Use a fan to exhaust heat or moisture from the room. Try not to use heat-producing appliances during the hottest part of the day. | |
| The louvers are blocked. Install the air conditioner in a location where the louvers are free from curtains, blinds, furniture, etc. | Adjust the Temp/TIME control to a cooler setting by pressing the minus button to reduce the temperature. Set the Fan Speed control to the highest setting. | |
| The outside temperature is below 65°F (18°C). | Do not try to operate your air conditioner in the cooling mode when the outside temperature is below 65°F (18°C). | |
| The temperature of the room you are trying to cool is extremely hot. | Allow extra time for the air conditioner to cool off a very hot room. | |
| Windows or doors to the outside are open. | Close all windows and doors. | |
| The Temperature control is not at a cool enough setting. | Adjust the Temp/TIME control to a cooler setting by pressing the minus button to reduce the temperature. Set the Fan Speed control to the highest setting. | |
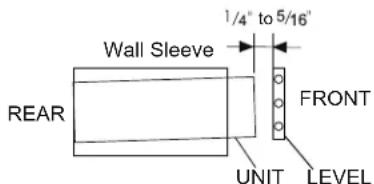
| Water drips from cabinet into your house | The air conditioner is not properly leveled. | The air conditioner should slope slightly downward toward the outside. Level the air conditioner to provide a downward slope toward the outside to ensure proper drainage. See the Installation Instructions. |
| NOTE: Do not drill a hole into the bottom of the metal base and condensate pan. | ||
GE Appliances Air Conditioner Limited Warranty
All warranty service must be provided by our Factory Service Centers, or an authorized Customer Care® technician. To schedule service, visit us on-line at GEAppliances.com/service, or call 800.GE.CARES (800.432.2737). Have serial number and model number available when calling for service.
| For The Period Of: | GE Appliances Will Replace: |
| Two YearsFrom the date of theoriginal purchase | Any part of the air conditioner which fails due to a defect in materials or workmanship.During this limited two-year warranty, GE Appliances will also provide, free of charge, all labor and related service to replace the defective part. |
What GE Appliances Will Not Cover:
Service trips to your home to teach you how to use the product.
- Improper installation, delivery or maintenance. If you have an installation problem, or if the air conditioner is of improper cooling capacity for the intended use, contact your dealer or installer. You are responsible for providing adequate electrical connecting facilities.
Failure of the product resulting from modifications to the product or due to unreasonable use including failure to provide reasonable and necessary maintenance.
In commercial locations, labor necessary to move the unit to a location where it is accessible for service by an individual technician.
- Replacement of house fuses or resetting of circuit breakers.
Failure due to corrosion on models not corrosion-protected. - Damage to the product caused by improper power supply voltage, accident, fire, floods or acts of God.
- Incidental or consequential damage caused by possible defects with this air conditioner.
Damage caused after delivery.
EXCLUSION OF IMPLIED WARRANTY--Your sole and exclusive remedy is product repair as provided in this Limited Warranty. Any implied warranties, including the implied warranties of merchantability or fitness for a particular purpose, are limited to two years or the shortest period allowed by law.
This limited warranty is extended to the original purchaser and any succeeding owner for products purchased for home use within the USA. If the product is located in an area where service by a GE Appliances Authorized Servicer is not available, you may be responsible for a trip charge or you may be required to bring the product to an Authorized GE Service location for service. In Alaska, the limited warranty excludes the cost of shipping or service calls to your home.
Some states do not allow the exclusion or limitation of incidental or consequential damages. This limited warranty gives you specific legal rights, and you may also have other rights which vary from state to state. To know what your legal rights are, consult your local or state consumer affairs office or your state's Attorney General.
Warrantor: GE Appliances, a Haier company
Louisville, KY 40225
Consumer Support
GE Appliances Website
Have a question or need assistance with your appliance? Try the GE Appliances Website 24 hours a day, any day of the year! You can also shop for more great GE Appliances products and take advantage of all our on-line support services designed for your convenience. In the US: GEAppliances.com
Register Your Appliance
Register your new appliance on-line at your convenience! Timely product registration will allow for enhanced communication and prompt service under the terms of your warranty, should the need arise. You may also mail in the pre-printed registration card included in the packing material. In the US: GEAppliances.com/register
Schedule Service
Expert GE Appliances repair service is only one step away from your door. Get on-line and schedule your service at your convenience any day of the year. In the US: GEAppliances.com/service or call 800.432.2737 during normal business hours.
Extended Warranties
Purchase a GE Appliances extended warranty and learn about special discounts that are available while your warranty is still in effect. You can purchase it on-line anytime. GE Appliances Services will still be there after your warranty expires. In the US: GEAppliances.com/extended-warranty or call 800.626.2224 during normal business hours.
Remote Connectivity
For assistance with wireless network connectivity (for models with remote enable), visit our website at GEAppliances.com/connected-home-smart-appliances or call 800.220.6899 in the US.
Parts and Accessories
Individuals qualifed to service their own appliances can have parts or accessories sent directly to their homes (VISA, MasterCard and Discover cards are accepted). Order on-line today 24 hours every day. In the US: GEApplianceparts.com or by phone at 877.959.8688 during normal business hours.
Instructions contained in this manual cover procedures to be performed by any user. Other servicing generally should be referred to qualified service personnel. Caution must be exercised, since improper servicing may cause unsafe operation.
Contact Us
If you are not satisfied with the service you receive from GE Appliances, contact us on our Website with all the details including your phone number, or write to:
General Manager, Customer Relations | GE Appliances, Appliance Park | Louisville, KY 40225
GEAppliances.com/contact
CLIMATISEUR
individual
INFORMATION DE SECURITE...3
UTILISANT LE CONDITIONNEUR D'AIR
Commandes 4
3. Temp and Delay Increase + /Decrease - Pads
Power cord includes a current interrupter device. A test and reset button is provided on the plug case. The device should be tested on a periodic basis by first pressing the TEST button and then the RESET button while plugged into the outlet. If the TEST button does not trip or if the RESET button will not stay engaged, discontinue use of the air conditioner and contact a qualified service technician.
EXIGENCES RELATIVES À L'INSTALLATION
Garant: GE Appliances, a Haier company
Louisville, KY 40225
Annual Maintenance. 7
| Marca | Dimensiones del forro aislante para pared | |
| Ancho Altura | Profundidad | |
| Haier Amana 25-13 | 32" 15-3/4" | 7-1/2" |
| Haier Amana 25-7/8 | " 15-9/16" | 16-3/4" |
| White-Westinghouse Frigidare Carrier (52F series) | 25-1/2" 15- | /4" 16, 17- |
| or 22 | ||
| GE Appliances/ Hotpoint | 26" 15-5/8" | 16-7/8" |
| Whirlpool 25-7/8" | 16-1/2" | 17-1/8" |
| Fedders/Emerson | 27" 16-3/4" | 16-3/4" or |
| Sears/Kenmore 25-7 | 7/8" 15- | 17/32" |
| Carrier (51S series) | 25-3/4" 16-7 | /8" 18-5/8" |
| Emerson/Fedders | 26-3/4" 15-3/4" | 15" |
| Friedrich | 27" 16-3/4" | 16-3/4" |
| LG | 25-7/8" 15- | 17/32" |
Garante: GE Appliances, a Haier company
Louisville, KY 40225
GEAppliances.com/contact