
F3 - Router Tenda - Free user manual and instructions
Find the device manual for free F3 Tenda in PDF.
| Product type | Wireless router |
| Brand | Tenda |
| Model | F3 |
| Wireless standards | IEEE 802.11 b/g/n |
| Maximum wireless speed | 300 Mbps |
| Frequency bands | 2.4 GHz |
| LAN ports | 4 ports 10/100 Mbps |
| WAN port | 1 port 10/100 Mbps |
| Antennas | 2 external fixed antennas |
| Power supply | 9 V DC, 0.6 A |
| Dimensions (L x W x H) | 155 x 120 x 30 mm |
| Weight | 200 g |
| Wireless security | WPA / WPA2-PSK, WEP |
| Firewall | NAT, SPI |
| VPN | Pass-through PPTP/L2TP/IPSec |
| Operating modes | Router, Access Point, Repeater |
| Configuration | Web interface, Tenda WiFi app |
| Operating temperature | 0 °C to 40 °C |
| Care and cleaning | Clean with a soft, dry cloth |
| Spare parts and repairability | Not available separately |
| General information | Budget router for home use |
Frequently Asked Questions - F3 Tenda
User questions about F3 Tenda
0 question about this device. Answer the ones you know or ask your own.
Ask a new question about this device
Download the instructions for your Router in PDF format for free! Find your manual F3 - Tenda and take your electronic device back in hand. On this page are published all the documents necessary for the use of your device. F3 by Tenda.
USER MANUAL F3 Tenda
© 2015 Shenzhen Tenda Technology Co., Ltd. All rights reserved.
Tenda is a registered trademark legally held by Shenzhen Tenda Technology Co., Ltd. Other brand and product names mentioned herein are trademarks or registered trademarks of their respective holders. Copyright of the whole product as integration, including its accessories and software, belongs to Shenzhen Tenda Technology Co., Ltd. No part of this publication can be reproduced, transmitted, transcribed, stored in a retrieval system, or translated into any language in any form or by any means without the prior written permission of Shenzhen Tenda Technology Co., Ltd
Disclaimer
Pictures, images and product specifications herein are for references only. To improve internal design, operational function, and/or reliability, Tenda reserves the right to make changes to the products without obligation to notify any person or organization of such revisions or changes. Tenda does not assume any liability that may occur due to the use or application of the product described herein. Every effort has been made in the preparation of this document to ensure accuracy of the contents, but all statements, information and recommendations in this document do not constitute the warranty of any kind, express or implied.
Setup Wizard of Common Functions
| How to access the Internet quickly? | Go |
| How to extend your wireless range? | Go |
| How to change your login password? | Go |
| How to configure your WiFi password (security key)? | Go |
| How to configure your WiFi Name (Wireless Network name)? | Go |
| How to control your Internet speed? | Go |
| How to prevent unknown device from connecting to your network? | Go |
Contents
I Get to Know Your Router....1
1 Package Contents....1
2 LED Indicators .... 1
3 Buttons & Interfaces....2
4 Product Label....3
II Specify Your Internet Settings....4
1 Position Your Router....4
2 Connect Your Router 6
3 Access to the Router 8
4 Specify the Internet Settings....9
PPPoE....10
DHCP (Dynamic IP)....11
Static IP....11
PPTP 12
L2TP 14
- Done & Enjoy....16
6 Join Your WiFi 16
Windows 8....17
Windows 7....17
iPad/iPhone....18
Android....19
III Specify Advanced Settings....22
1 Advanced....22
Status 22
Internet Connection Setup 25
MAC Clone 26
WAN Speed 27
WAN Medium Type....28
LAN Settings 33
DNS Settings 34
DHCP Server 35
DHCP Client List....35
2 Wireless 39
Wireless Basic Settings.... 39
Wireless Security 47
Access Control....52
Wireless Connection Status 54
Universal Repeater....54
3 QoS....58
Bandwidth Control....58
Traffic Statistics....60
4 Applications....61
Port Range Forwarding....61
DMZ Host....64
DDNS 65
UPnP Settings 66
Static Routing 67
Routing Table....69
5 Security....70
URL Filter Settings....70
MAC Address Filter Settings....71
Client Filter Settings 72
6 Tools 74
Reboot....74
Restore To Factory Default....74
Backup / Restore....75
Syslog 75
Remote Web Management....75
Time Settings....77
Change Password....78
Upgrade 79
IV Appendix 80
1 Configure Your Computer 80
Windows 8....80
Windows 7 81
Windows XP 83
2 FAQs....85
3 Technical Support 86
4 Safety and Emission Statement....87
CE Mark Warning....87
FCC Statement 87
IC RSS Warning....88
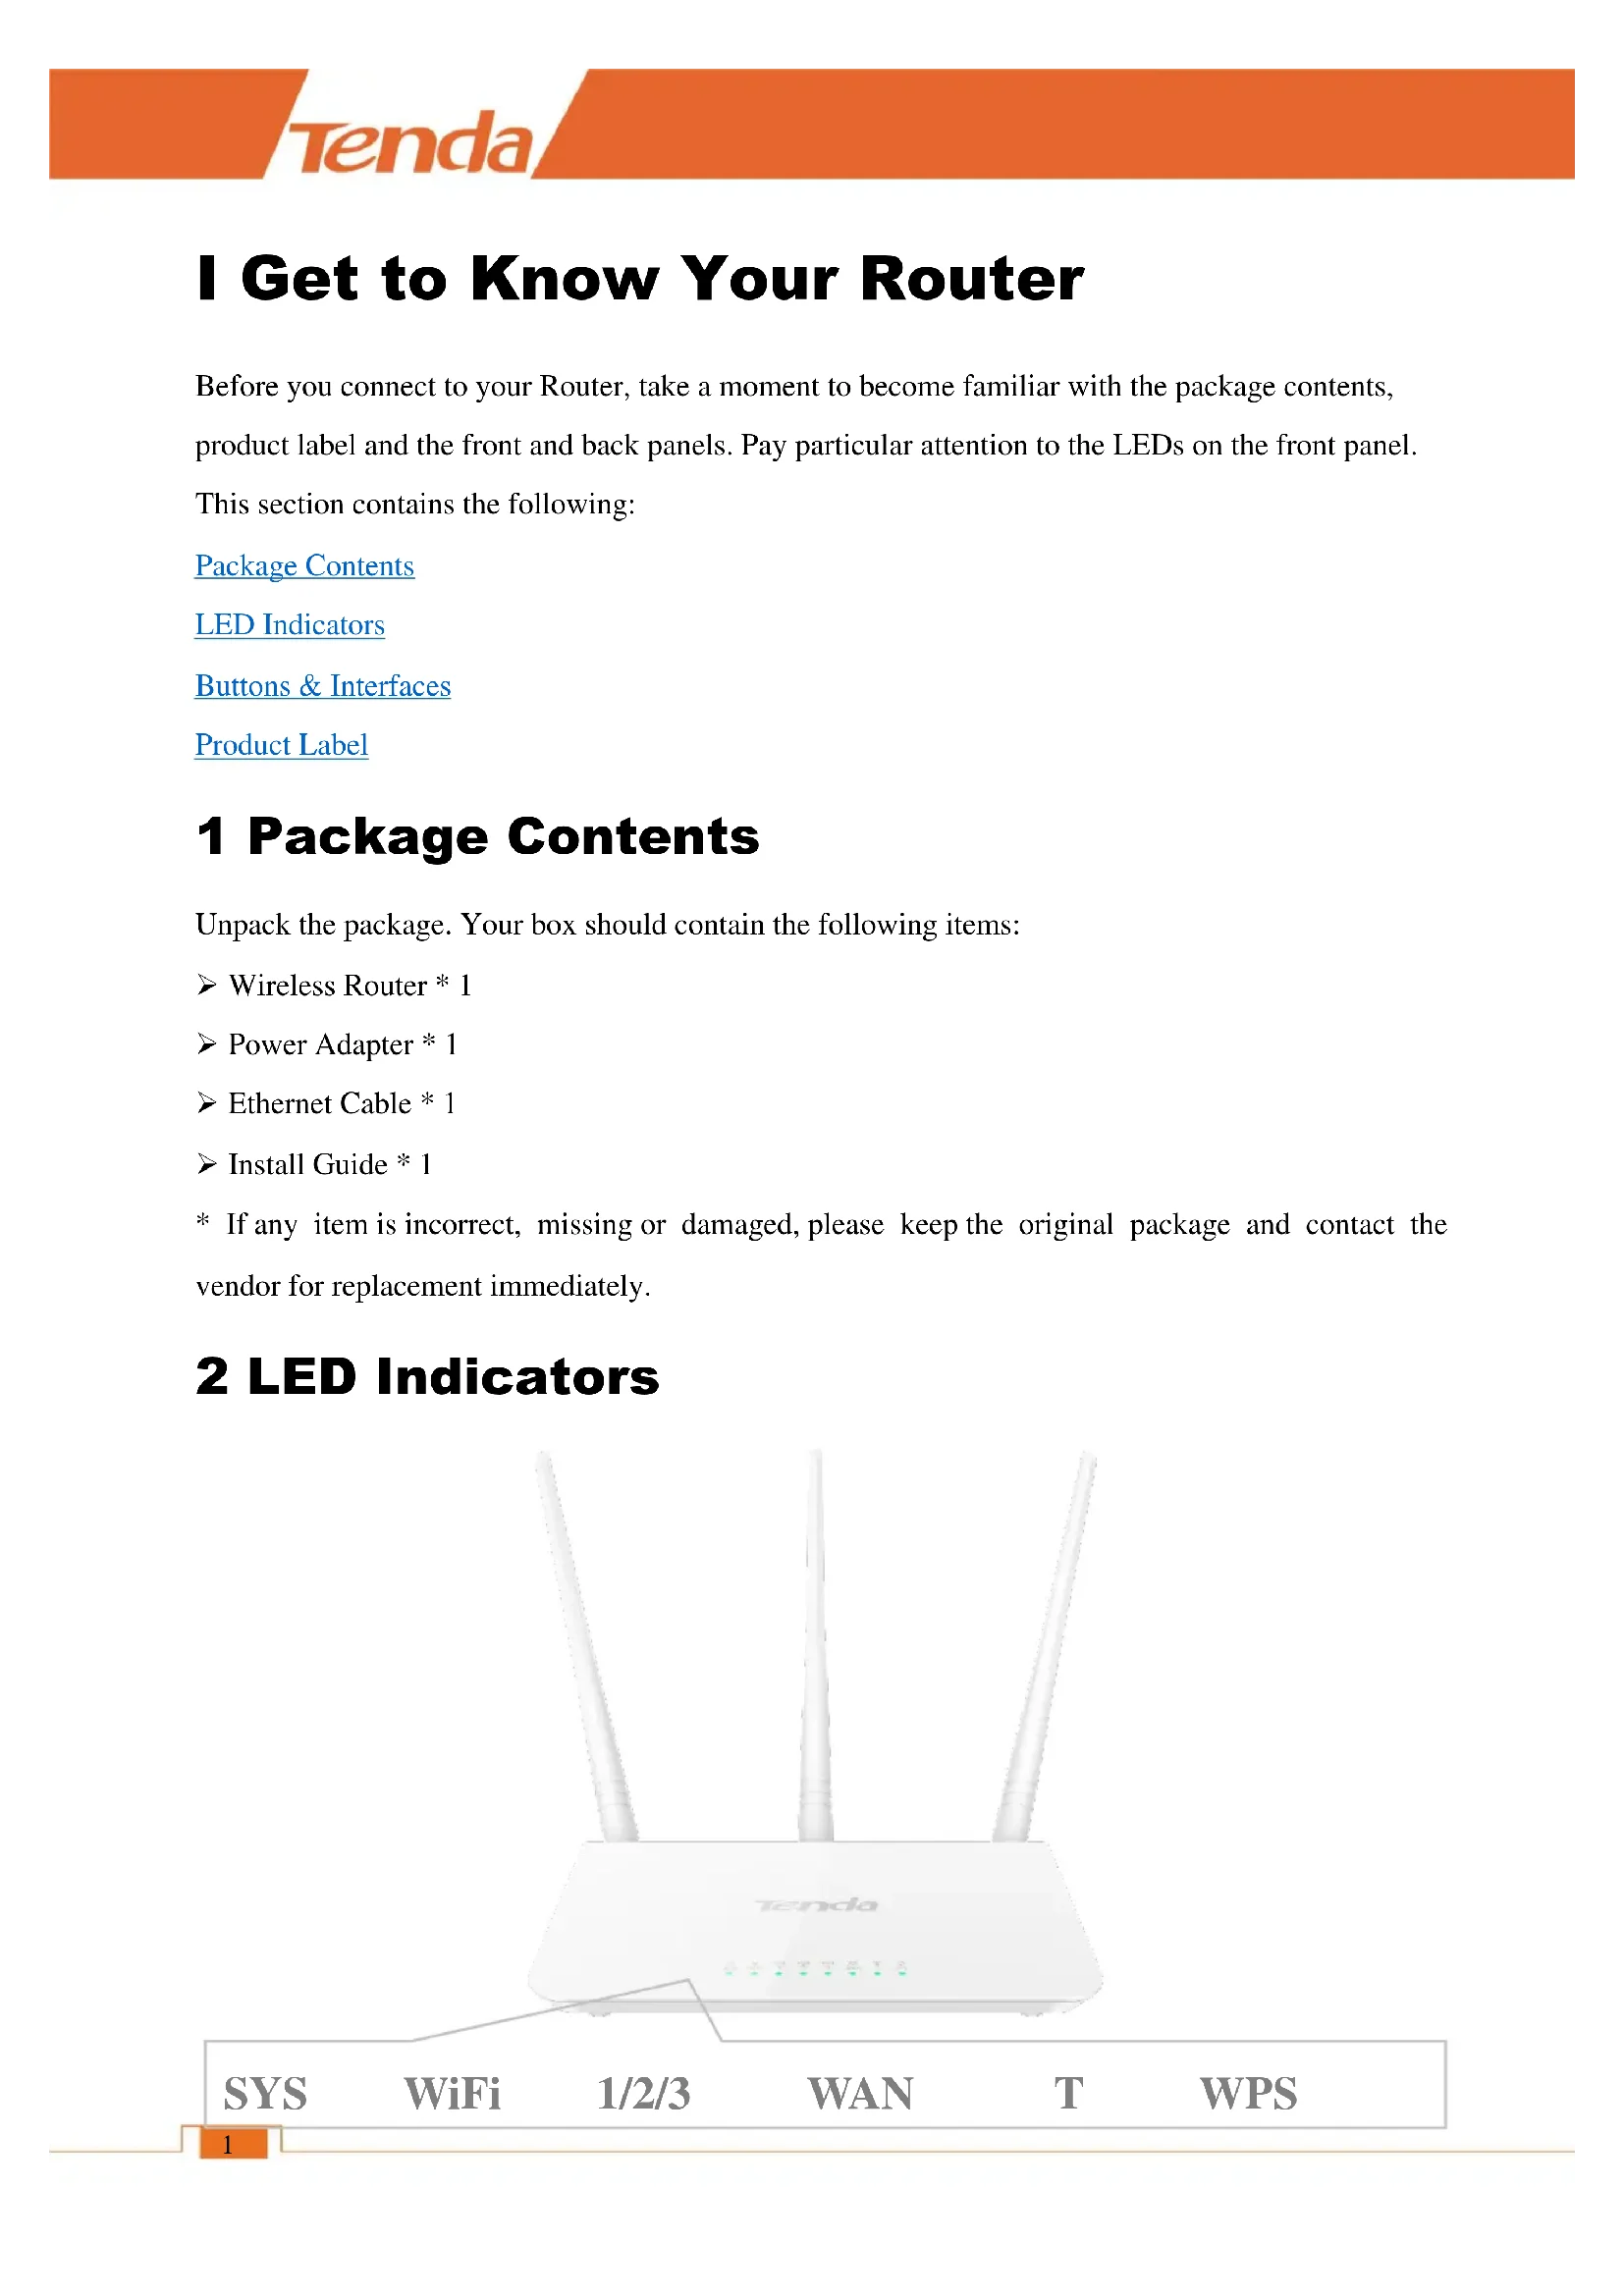
I Get to Know Your Router
Before you connect to your Router, take a moment to become familiar with the package contents, product label and the front and back panels. Pay particular attention to the LEDs on the front panel.
This section contains the following:
Package Contents
LED Indicators
Buttons & Interfaces
Product Label
1 Package Contents
Unpack the package. Your box should contain the following items:
➢ Wireless Router * 1
Power Adapter * 1
➢ Ethernet Cable * 1
Install Guide * 1
* If any item is incorrect, missing or damaged, please keep the original package and contact the vendor for replacement immediately.
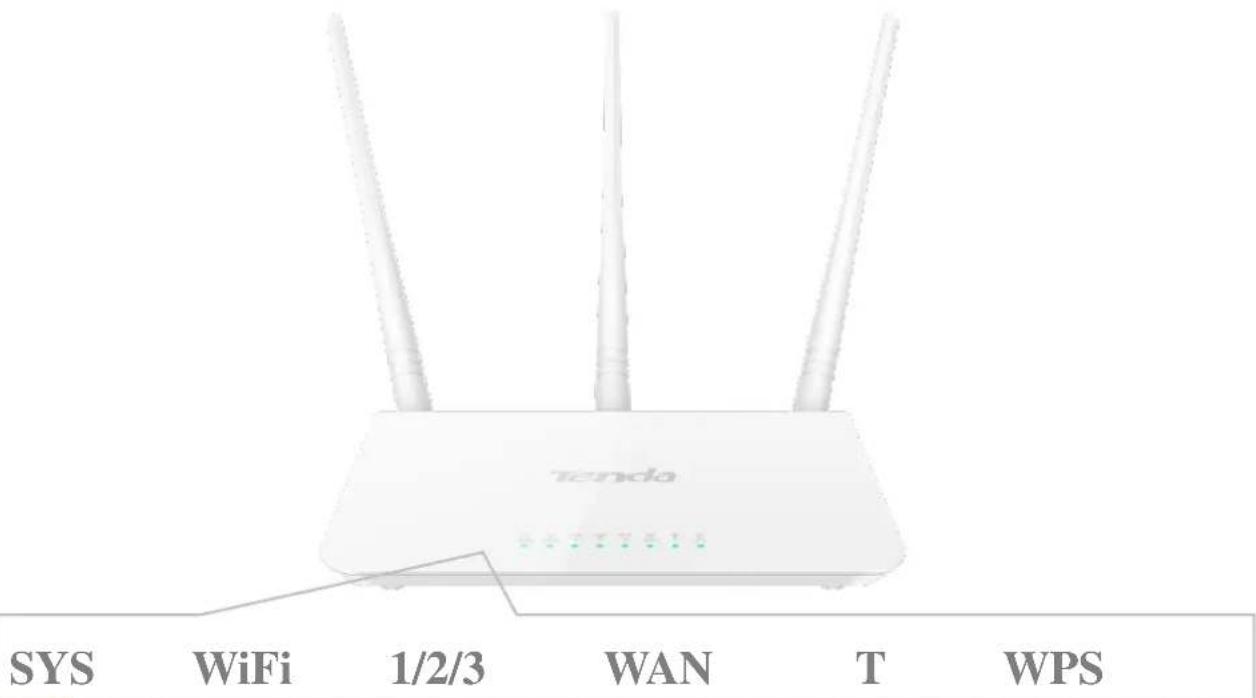
2 LED Indicators
text_image
SYS WiFi 1/2/3 WAN T WPS TendaSYS
WiFi
1/2/3
WAN
T
WPS
| LED Indicator | Status | Description |
| SYS [2534] | Blinking | The system is working fine. |
| Off | There is no power supply, or the router malfunctions. | |
| WiFi [TW78]....1 | Solid | WiFi is enabled. |
| Blinking | The Router is sending or receiving WiFi data. | |
| Off | WiFi is disabled. | |
| 1/2/3[IMAGE] | Solid | The LAN port is well-connected. |
| Blinking | The LAN port is transmitting data. | |
| Off | No connection is detected on the LAN port. | |
| WAN [WHEX] | Solid | The WAN port is well-connected. |
| Blinking | The WAN port is transmitting data. | |
| Off | No Ethernet cable is connected to the WAN port. | |
| WPS [3440] | Solid | WPS is enabled, or a WPS connection is established. |
| Blinking | The Router is performing WPS negotiation to a client device, or transmitting data. | |
| Off | WPS is disabled. Or 5 minutes later after the WPS connection is established, the WPS LED indicator will be off. |
3 Buttons & Interfaces

text_image
WAN 3 2 1 PWR WPS/RST4 Product Label
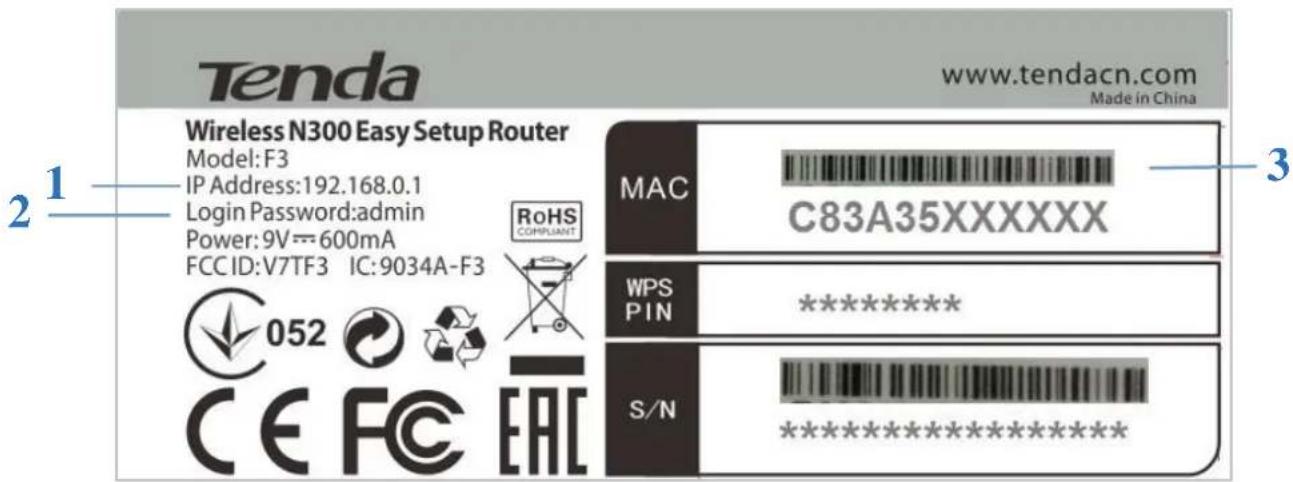
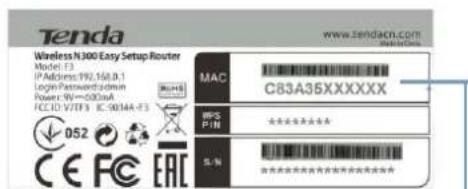
This label is on the bottom panel of the router.
text_image
Tenda www.tendacn.com Made in China Wireless N300 Easy Setup Router Model: F3 IP Address:192.168.0.1 Login Password:admin Power: 9V==600mA FCCID:V7TF3 IC:9034A-F3 RoHS COMPLIANT MAC C83A35XXXXXX 3 WPS PIN ********** S/N **********1. Default Access: 192.168.0.1
The default login IP address of the router. Type this IP address in the address bar of a web browser to log in to the router's User Interface.
2. Default Login Password: admin
The router requires a login password when you access to its User Interface. If you access to the router's User Interface for the first time, use the default login password admin. You'd better change it in Tools > Change Password for security purpose, and write it down to avoid forgetting it.
3. MAC Address
This is the MAC address of the router.
The wireless router's default WiFi name is Tenda_XXXXXX, where XXXXXX represents the last six characters of the MAC address.
II Specify Your Internet Settings
This Chapter will instruct you to position, connect and configure your router.
It contains the following sections:
Position Your Router
Connect Your Router
Access to the Router
Specify the Internet Settings
Join Your WiFi
1 Position Your Router
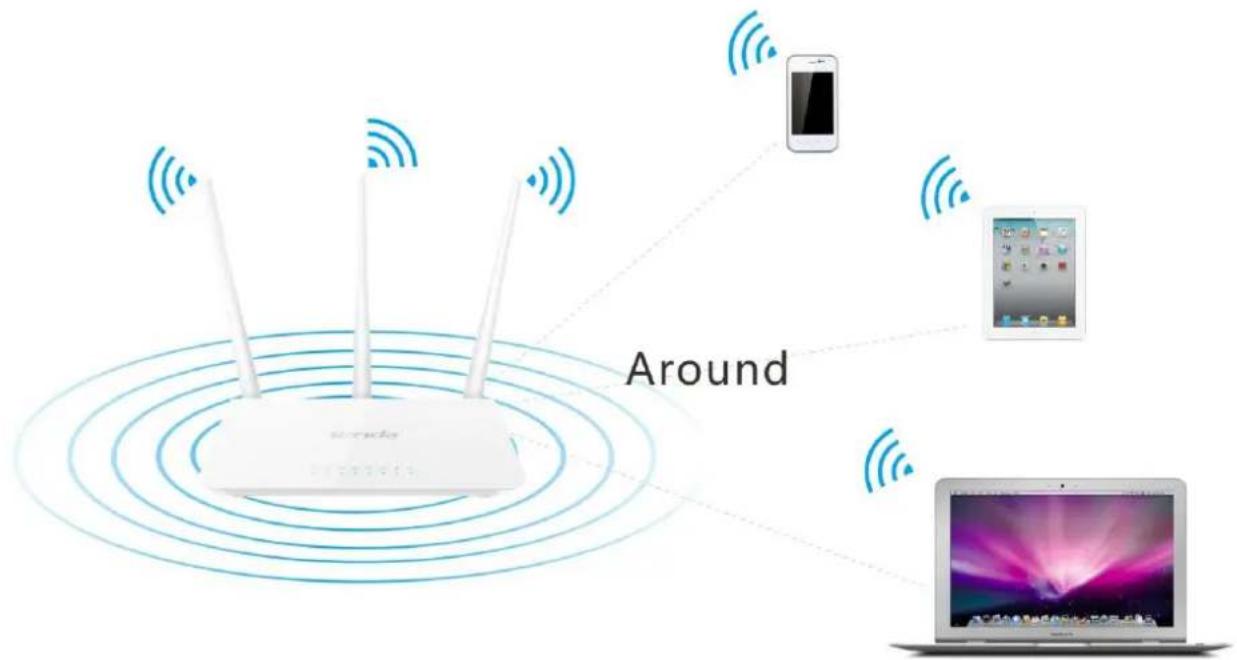
The router lets you access the Internet anywhere within the operating range of your wireless network. However, the operating range of your wireless connection can vary significantly depending on the physical placement of your Router.

natural_image
Modern home console with wireless router, TV screen displaying 'Titanic', and decorative plants and accessories against a blue background (no readable text or symbols)➢ Put it on an elevated spot such as a high shelf, keeping the number of walls and ceilings to a minimum between the Router and other clients such as computers and smart phones.
text_image
Around WiFi @www.it➢ Place it around the central area which your laptops, smart phones and other devices usually surround, and preferably within line of sight to your wireless devices.
text_image
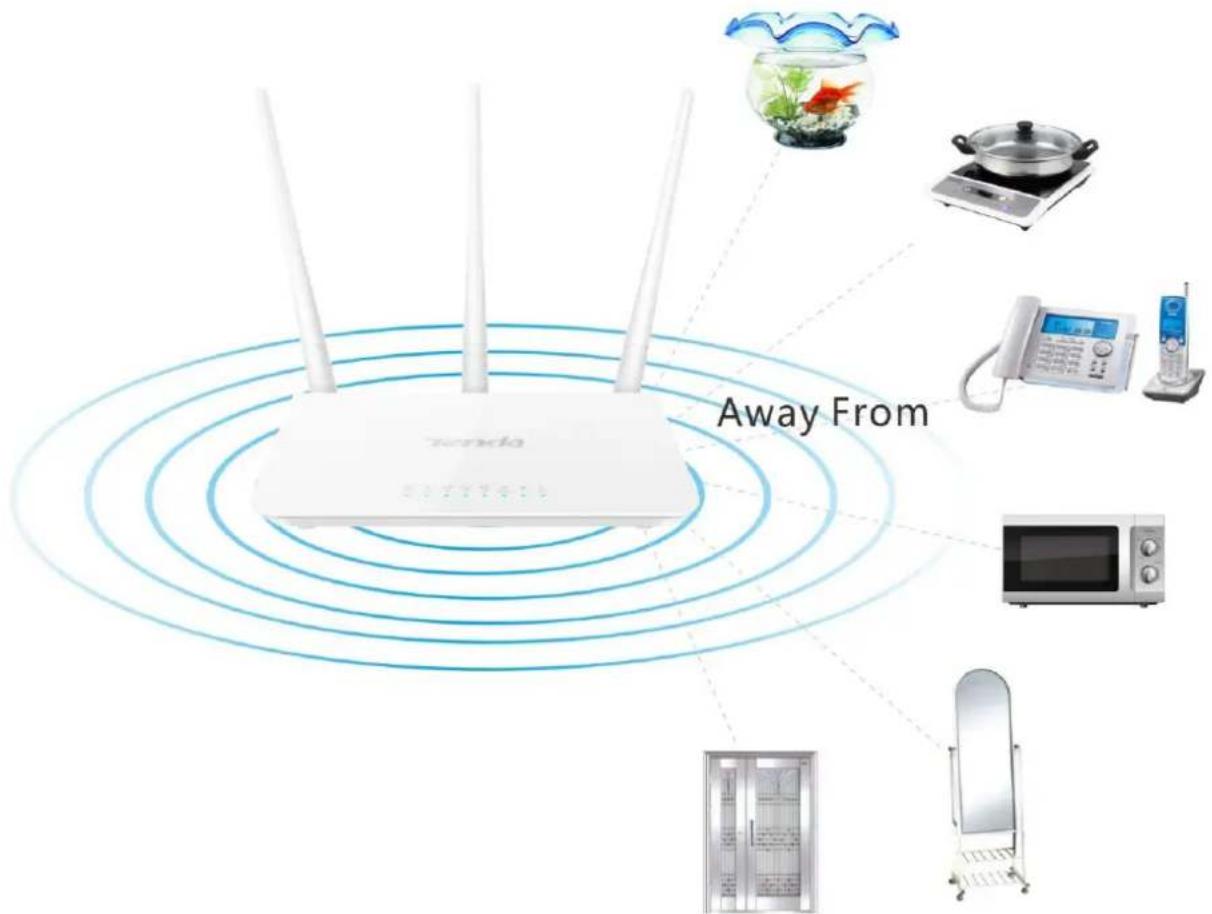
Away From Tecada 5000000000Keep it away from electrical devices that are potential sources of interference, such as ceiling fans, home security systems or microwaves.
Tenda
Keep it away from any large metal surfaces, such as a solid metal door or aluminum studs.
Keep it away from other materials such as glass, insulated walls, fish tanks, mirrors, brick, and concrete that may also affect your wireless signal.
2 Connect Your Router
Connect your router to the Internet:
Select ADSL/Fiber/Cable or Ethernet Cable access according to your Internet access type.
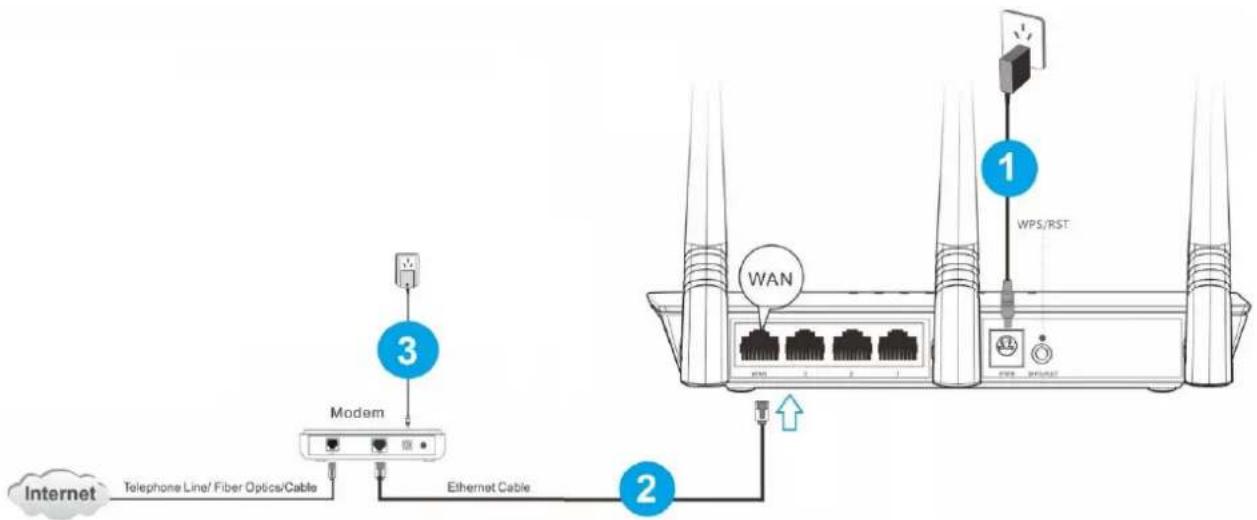
ADSL/Fiber/Cable Access
flowchart
graph TD
    A["Modem"] -->|3| B["Internet"]
    B --> C["Telphone Line/ Fiber Optics/Cable"]
    C --> D["Ethernet Cable"]
    D --> E["WAN"]
    E --> F["WPS/RST"]
    F --> G["1"]
    G --> H["2"]
    H --> I["3"]
Insert the power adapter to your router's PWR port, and plug the other end to a power outlet.
2 Connect the modem to the WAN port of your router using an Ethernet cable.
3 Insert your modem's power adapter to the power interface, and plug the other end to a power outlet.
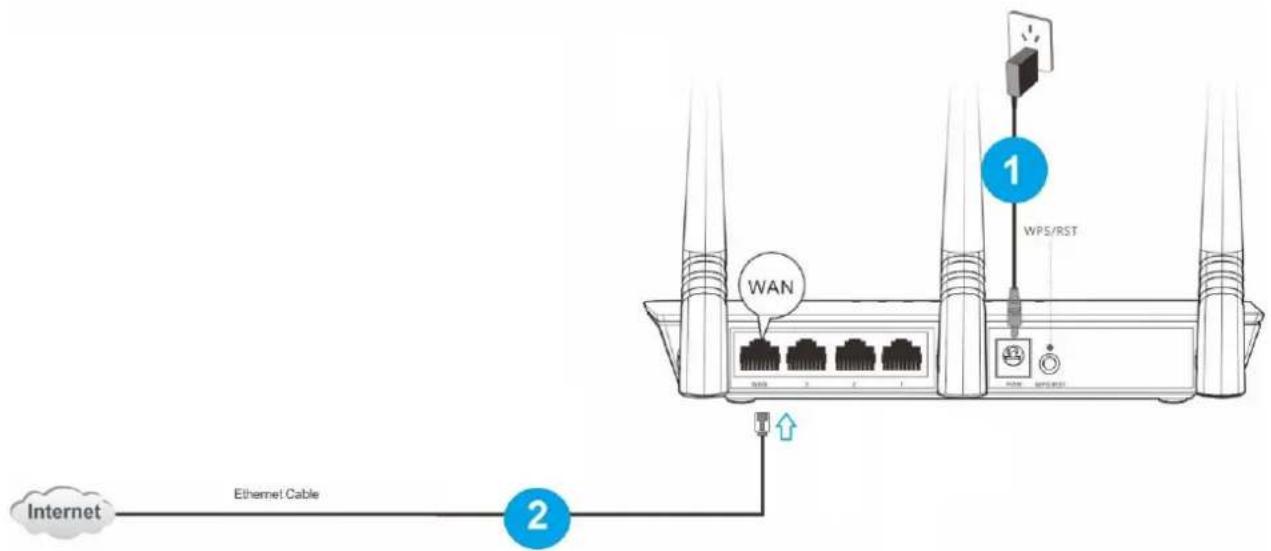
Ethernet Cable
text_image
Internet Ethernet Cable 2 1 WPS/RSTInsert the power adapter to your router's PWR port, and plug the other end to a power outlet.
② Insert the Ethernet cable into the router's WAN port.
Connect your computer to the router:
You can connect your computer to the router wirelessly or via an Ethernet cable.
Wired
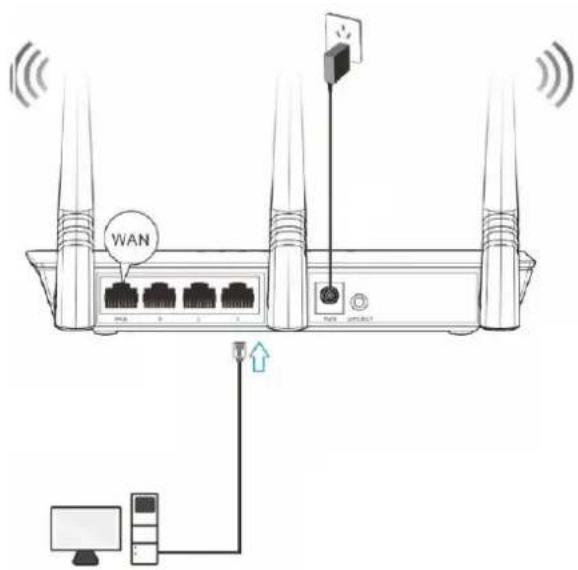
text_image
WANWireless
text_image
Tenda Wireless N300 Easy Setup Router Model: F3 IP Address: 192,168.0.1 Login Password: zdmn Power: 9W=0.023mA FC ID: Y/TF3 EC 9014A-F3 052 CE FC EAC MAC C83A35XXXXXX IFRS P/16 S. % ★★★★★★★ ★★★★★★★★★★★WiFi Name: Tenda_XXXXXX (Default)
No WiFi password set by default.
XXXXXX is the last six characters of the router's MAC address.
Wired:
Connect your computer to the router using the included Ethernet cable.
Wireless:
To connect with WiFi, use the WiFi name and password on the product label. And your computer MUST have a wireless adapter.
This label is on the bottom panel of the router.

Tips
- If you don't know how to join its WiFi, please refer to 6 Join Your WiFi.
- Either WiFi (SSID) or WiFi password is changed, devices are required to reconnect with WiFi manually once again.
- The devices can only access the Internet after you finish Internet configuration.
3 Access to the Router
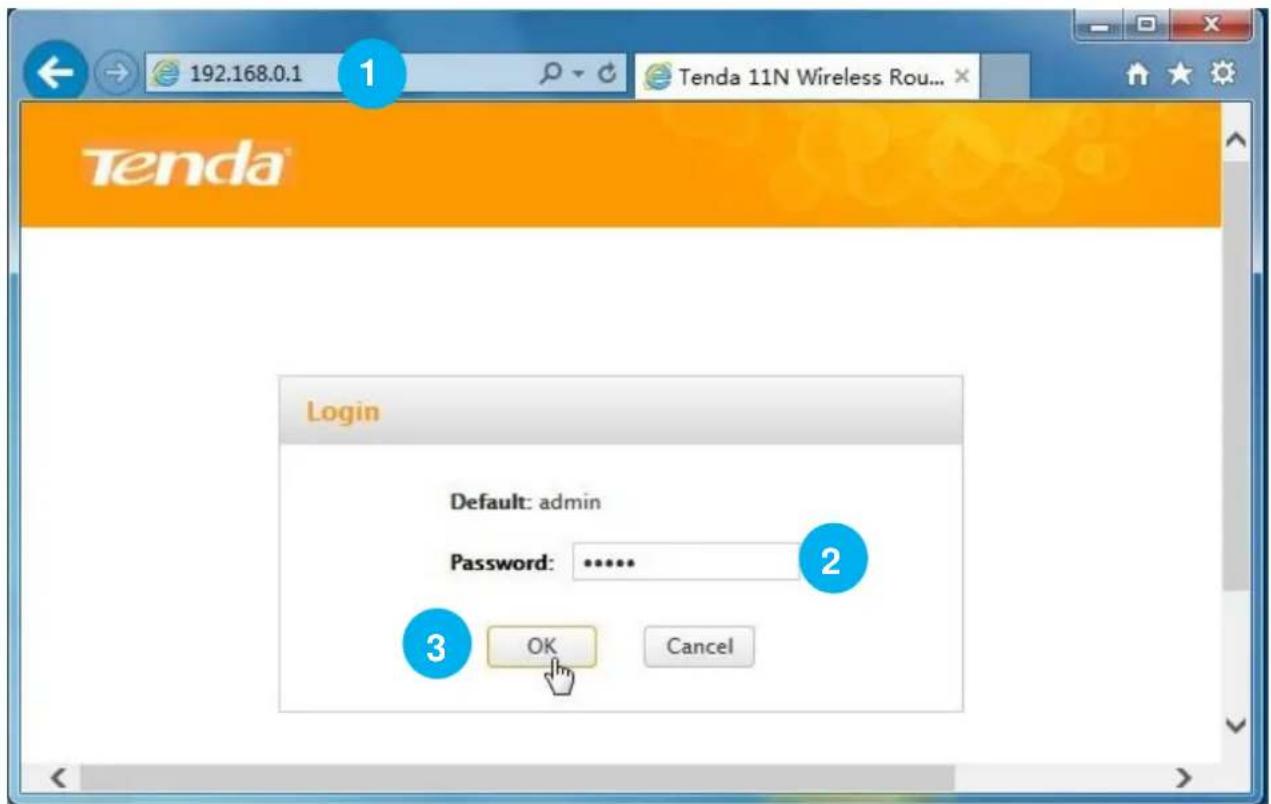
text_image
192.168.0.1 Tenda 11N Wireless Rou... Login Default: admin Password: .......... 2 3 OK Cancel1 Launch a web browser on your connected computer, say IE, type 192.168.0.1 in the address bar, and click Enter on the keyboard.
② Type the default login password admin in the Password field.
③ Click OK.

Tips
If you cannot access the router's User Interface after the steps above, try to set your computer to obtain an IP address automatically. Refer to Configure Your computer for details.
4 Specify the Internet Settings
After the steps above, you will log in to Home page of the router's User Interface. If your Internet connection type is PPPoE or DHCP (Dynamic IP), you can finish Internet setup in Home Page. For other Internet connection types, click Advanced > Internet Connection Setup.
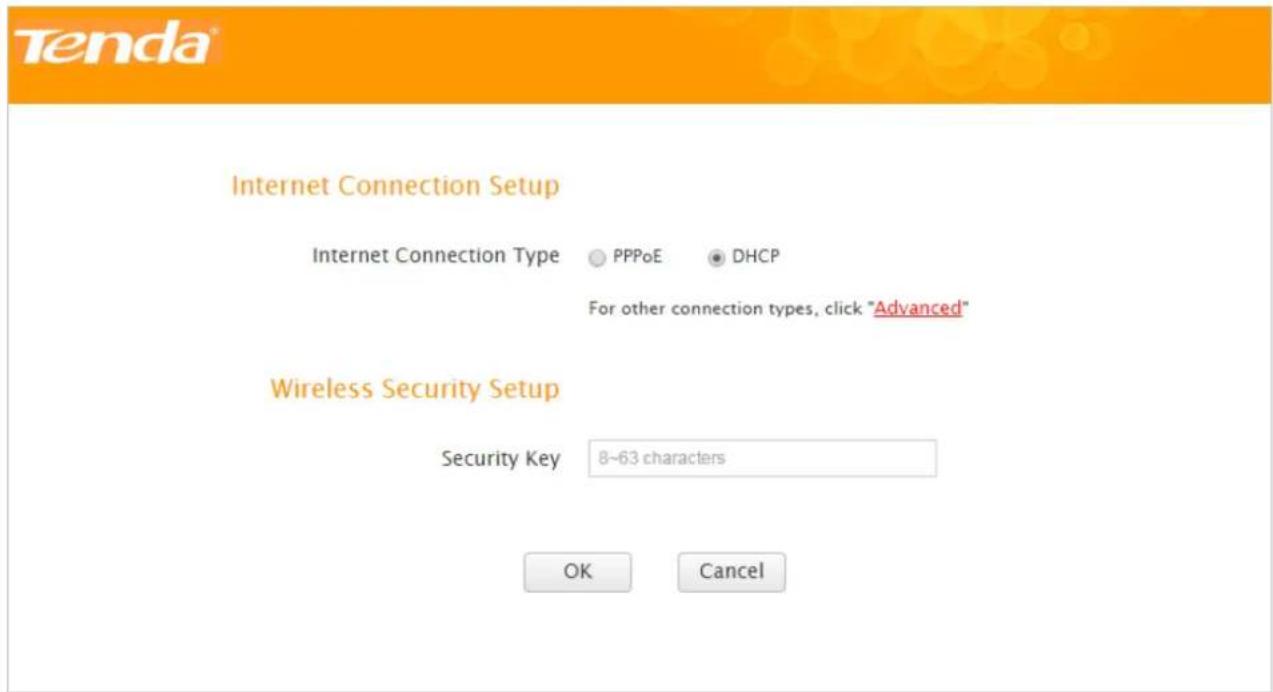
text_image
Tenda® Internet Connection Setup Internet Connection Type ○ PPPoE ● DHCP For other connection types, click "Advanced" Wireless Security Setup Security Key 8~63 characters OK CancelRefer to the instructions in the form below to select your Internet connection type.
| Connection Type | The parameters your Internet Service Provider provided for Internet access |
| PPPoE | User name and password. |
| DHCP (Dynamic IP) | Nothing. |
| Static IP | Static IP address, subnet mask, gateway, DNS server. |
| PPTP | PPTP server address, user name, password. Sometimes static IP info is also provided. |
| L2TP | L2TP server address, user name, password. Sometimes static IP info is also provided. |
PPPoE
Tenda
Internet Connection Setup
Internet Connection Type
1
- PPPoE
DHCP
PPPoE Username
Enter username provided by ISP
PPPoE Password
Enter password provided by ISP
For other connection types, click "Advanced"
Wireless Security Setup
Security Key
8\~63 characters
2
3
4
OK
Cancel
1 Select PPPoE.
② Type the PPPoE user name and password your ISP (Internet Service Provider) provided.
③ Customize a WiFi password (Security Key) for your WiFi.
4 Click OK to save your settings.
DHCP (Dynamic IP)
Tenda
Internet Connection Setup
Internet Connection Type
PPPoE
DHCP
1
For other connection types, click "Advanced"
Wireless Security Setup
Security Key
8\~63 characters
2
3
OK
Cancel
1 Select DHCP.
② Customize a WiFi password (Security Key) for your WiFi.
③ Click OK to save your settings.
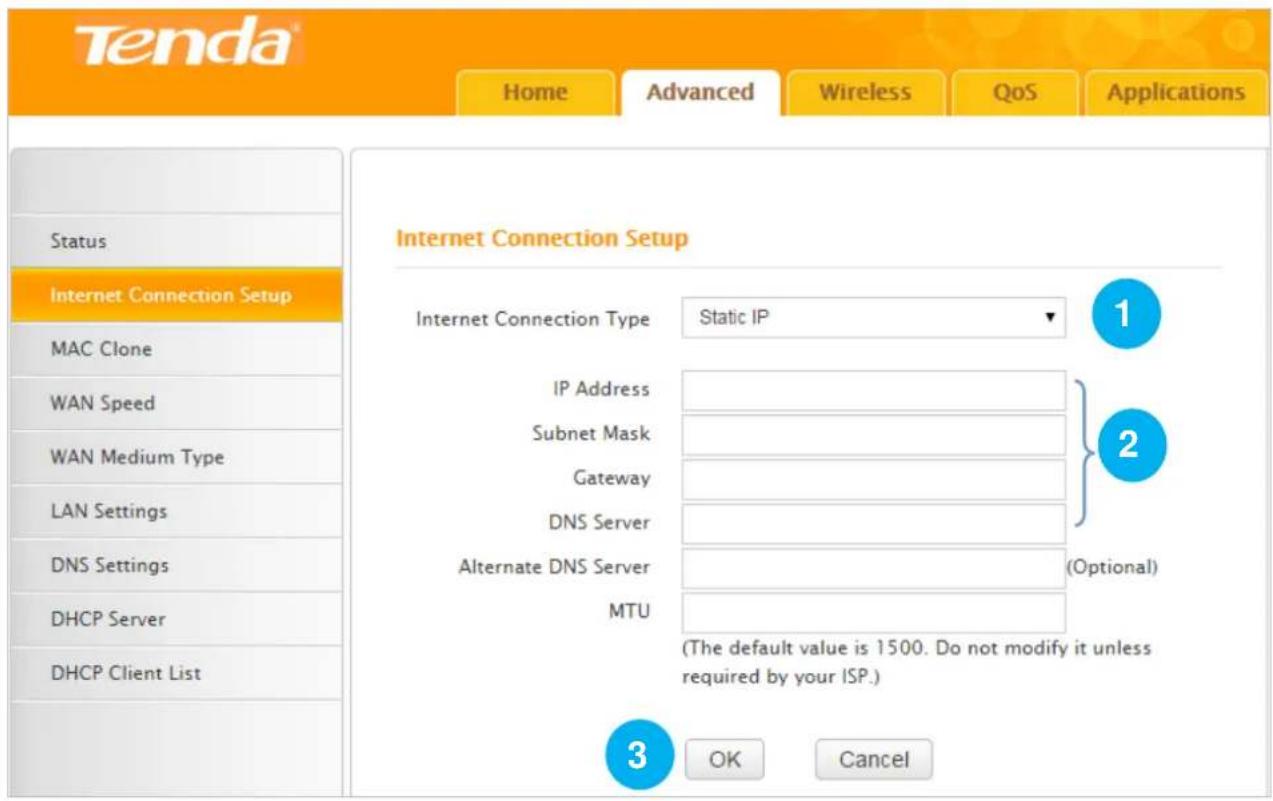
Static IP
Click Advanced > Internet Connection Setup.
text_image
Tenda® Home Advanced Wireless QoS Applications Status Internet Connection Setup MAC Clone WAN Speed WAN Medium Type LAN Settings DNS Settings DHCP Server DHCP Client List Internet Connection Setup Internet Connection Type Static IP IP Address Subnet Mask Gateway DNS Server Alternate DNS Server (Optional) MTU (The default value is 1500. Do not modify it unless required by your ISP.) 3 OK Cancel1 Select Static IP.
② Type the static IP info (IP address, subnet mask, gateway and etc.) your ISP (Internet Service Provider) provided.
③ Click OK to save your settings.
PPTP
Click Advanced > Internet Connection Setup.
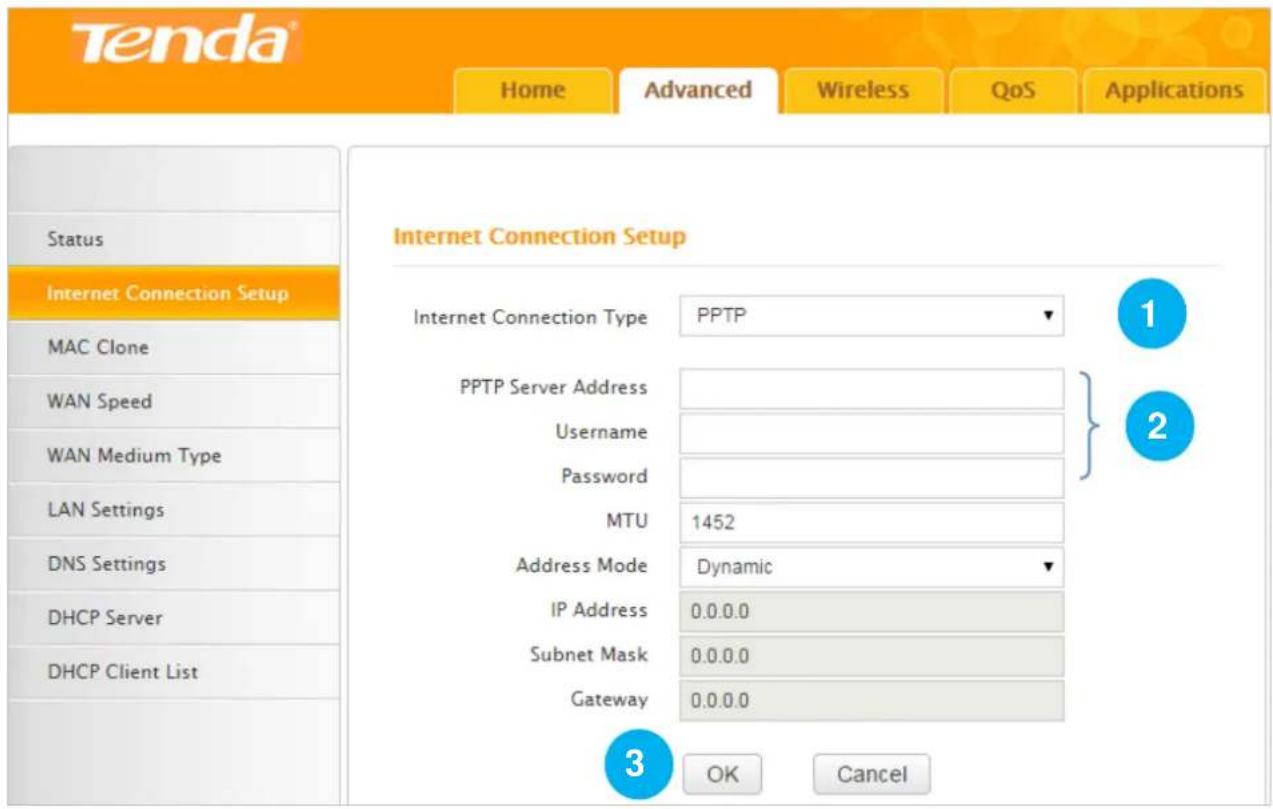
text_image
Tenda® Home Advanced Wireless QoS Applications Internet Connection Setup Internet Connection Type PPTP 1 PPTP Server Address Username Password MTU 1452 Address Mode Dynamic IP Address 0.0.0.0 Subnet Mask 0.0.0.0 Gateway 0.0.0.0 3 OK Cancel Status Internet Connection Setup MAC Clone WAN Speed WAN Medium Type LAN Settings DNS Settings DHCP Server DHCP Client List1 Select PPTP.
② Type the PPTP server address, use name and password your ISP (Internet Service Provider) provided.
③ Click OK to save your settings.
If your ISP has assigned you a static IP address, follow the steps below:
Tenda
Status
Internet Connection Setup
MAC Clone
WAN Speed
WAN Medium Type
LAN Settings
DNS Settings
DHCP Server
DHCP Client List
Internet Connection Setup
Internet Connection Type
PPTP
PPTP Server Address
Username
Password
MTU
Address Mode
IP Address
Subnet Mask
Gateway
Static
OK
Cancel
1
2
3
4
1 Select PPTP.
② Type the PPTP server address, use name and password your ISP (Internet Service Provider) provided.
3 Select Static.
4 Type the IP address, subnet mask and gateway.
⑤ Click OK to save your settings.
L2TP
Click Advanced > Internet Connection Setup.
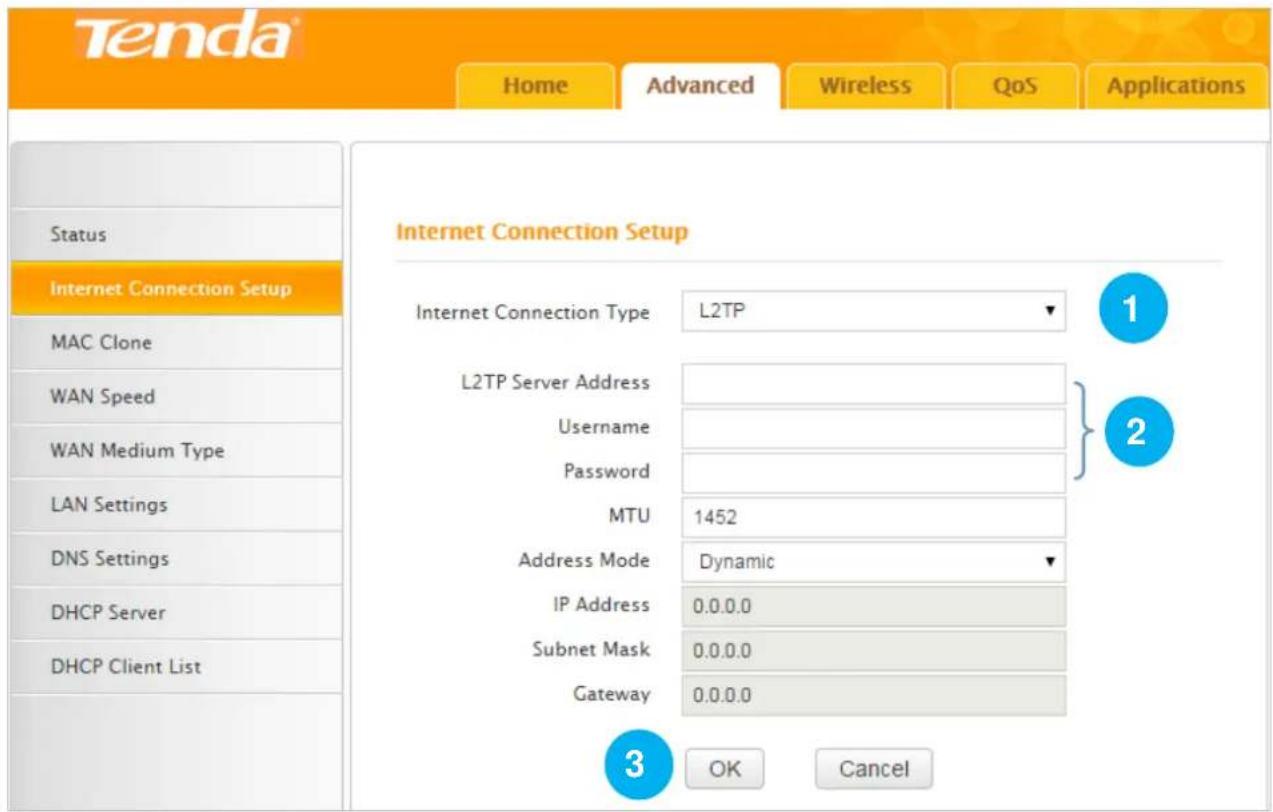
text_image
Tenda® Home Advanced Wireless QoS Applications Internet Connection Setup Internet Connection Type L2TP L2TP Server Address Username Password MTU 1452 Address Mode Dynamic IP Address 0.0.0.0 Subnet Mask 0.0.0.0 Gateway 0.0.0.0 3 OK Cancel Status Internet Connection Setup MAC Clone WAN Speed WAN Medium Type LAN Settings DNS Settings DHCP Server DHCP Client List1 Select L2TP.
② Type the L2TP server address, use name and password your ISP (Internet Service Provider) provided.
③ Click OK to save your settings.
If your ISP has assigned you a static IP address, follow the steps below:
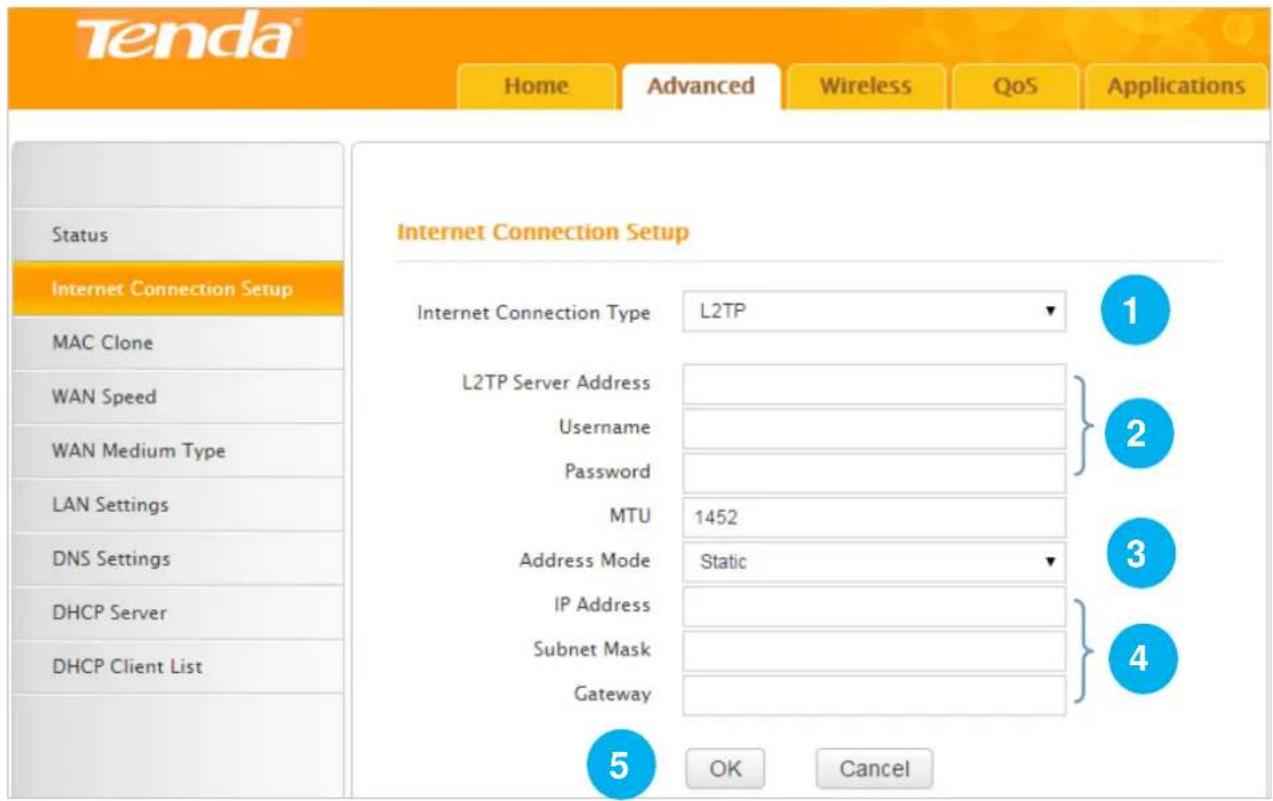
text_image
Tenda® Home Advanced Wireless QoS Applications Status Internet Connection Setup MAC Clone WAN Speed WAN Medium Type LAN Settings DNS Settings DHCP Server DHCP Client List Internet Connection Setup Internet Connection Type L2TP L2TP Server Address Username Password MTU 1452 Address Mode Static IP Address Subnet Mask Gateway OK Cancel1 Select L2TP.
② Type the L2TP server address, use name and password your ISP (Internet Service Provider) provided.
③ Select Static.
4 Type the IP address, subnet mask and gateway.
⑤ Click OK to save your settings.
5. Done & Enjoy
After you complete the settings above, you can access the Internet now.
6 Join Your WiFi
This part instructs you how to connect to your wireless network via your notebook or other wireless devices. We take Windows 8, Windows 7, iPad/iPhone, and Android as examples here. Choose the corresponding configuration steps according to your needs.
Windows 8
① Click the icon 📋 on the bottom right corner of your desktop.

text_image
Links ENG 3:22 PM 1/4/2015
Tips
- If you cannot find the icon, please move your cursor to the top right corner of your desktop, select Settings > Control Panel > Network and Internet > Network and Sharing Center > Change adapter settings, right click Wi-Fi and select Connect/Disconnect.
- If you cannot find your WiFi from the list, ensure the Airplane Mode is not enabled on your computer.
2 Select your WiFi from the list, click Connect and then follow onscreen instructions.
3 Connected successfully.
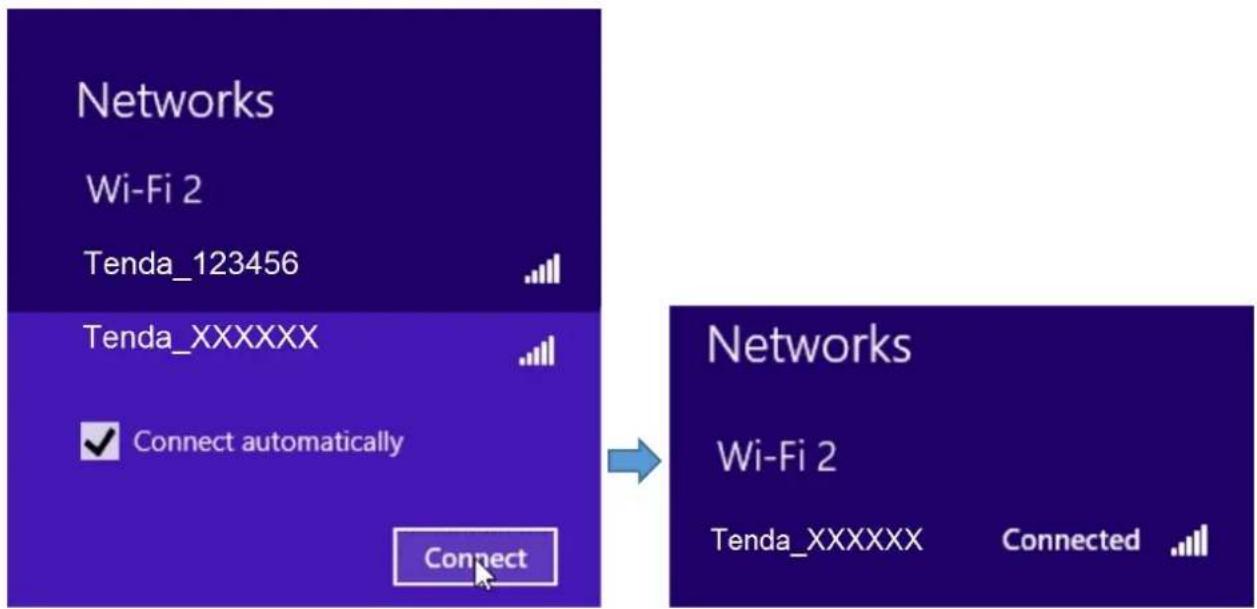
text_image
Networks Wi-Fi 2 Tenda_123456 Tenda_XXXXXX Connect automatically Connect Networks Wi-Fi 2 Tenda_XXXXXX ConnectedWindows 7
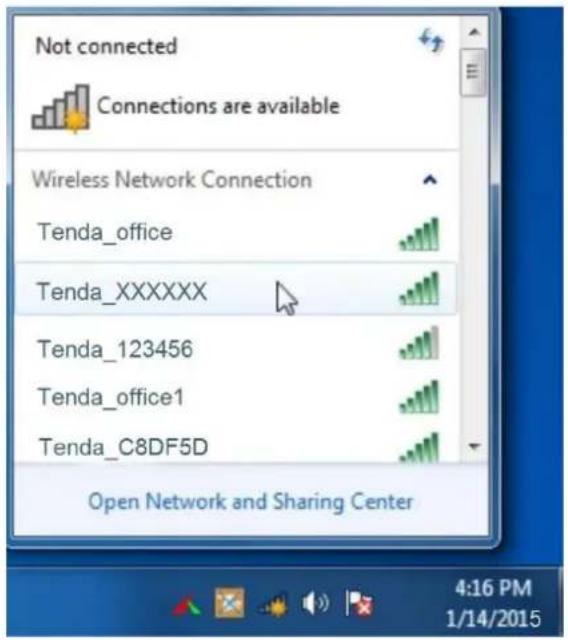
① Click the icon 📋 on the bottom right corner of your desktop. Select your WiFi from the list, click Connect and then follow onscreen instructions.
text_image
Not connected Connections are available Wireless Network Connection Tenda_office Tenda_XXXXXX Tenda_123456 Tenda_office1 Tenda_C8DF5D Open Network and Sharing Center 4:16 PM 1/14/2015
Tips
If you cannot find the icon , please move your mouse to the bottom left corner of your desktop, select Start > Control Panel > Network and Internet > Network and Sharing Center > Change adapter settings, right click Wireless Network Connection and select Connect/Disconnect.

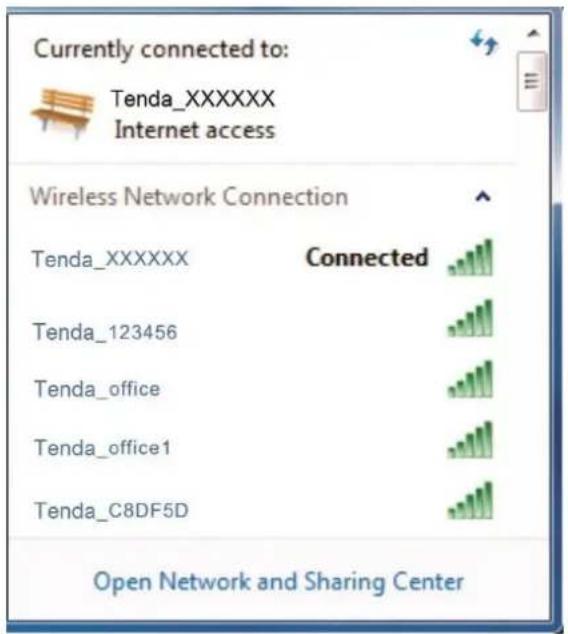
Connected successfully.
text_image
Currently connected to: Tenda_XXXXXX Internet access Wireless Network Connection Tenda_XXXXXX Connected Tenda_123456 Tenda_office Tenda_office1 Tenda_C8DF5D Open Network and Sharing CenteriPad/iPhone
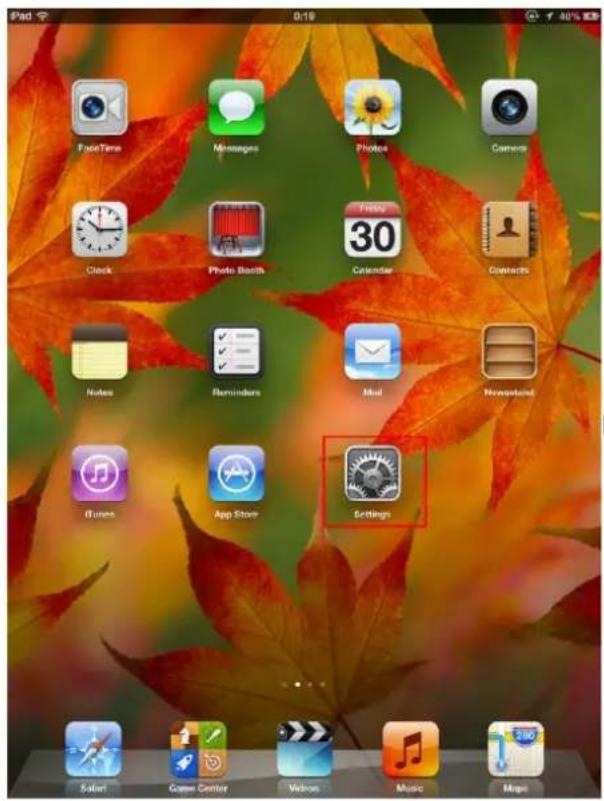
1 Click on Settings.
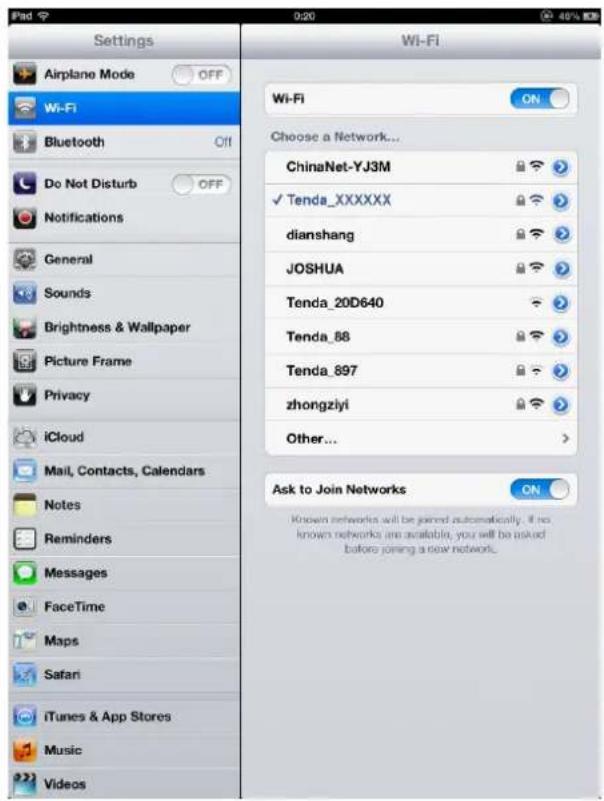
② Click Wi-Fi, and choose your SSID.
text_image
iPad 0:19 40% 83% FadeTime Messages Photos Camera Clock Photo Booth Calendar Contacts Notes Reminders Mail Newsland iTunes App Store Settings Salari Game Center Volkon Music Maps
text_image
Settings Airplane Mode OFF Wi-Fi Bluetooth Off Do Not Disturb OFF Notifications General Sounds Brightness & Wallpaper Picture Frame Privacy iCloud Mail, Contacts, Calendars Notes Reminders Messages FaceTime Maps Safari iTunes & App Stores Music Videos Wi-Fi ON Choose a Network... ChinaNet-YJ3M ✓ Tenda_XXXXXX dianshang JOSHUA Tenda_20D640 Tenda_88 Tenda_897 zhongziyi Other... Ask to Join Networks ON Known networks will be joined automatically. If no known networks are available, you will be asked before joining a new network.③ Enter your Wireless password, and click Join.

text_image
Settings Airplane Mode Off Wi-Fi Bluetooth On ChinaNet-YJ3M Do Not E Notification Enter the password for "Tenda_X00000" Enter Password: Password Q W E R T Y U I O P A S D F G H J K L Z X C V B N M ! ? .7123 .7123Android
① Click on Settings.
② Click WLAN to enter your WLAN settings.

text_image
Settings Phone 37% 10:35
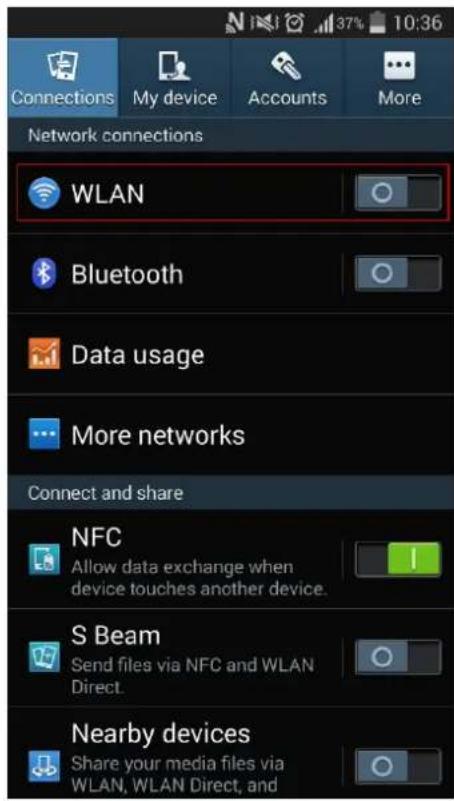
text_image
Network connections WLAN Bluetooth Data usage More networks Connect and share NFC Allow data exchange when device touches another device. S Beam Send files via NFC and WLAN Direct. Nearby devices Share your media files via WLAN, WLAN Direct, and3 Enable your WLAN, and select your SSID.
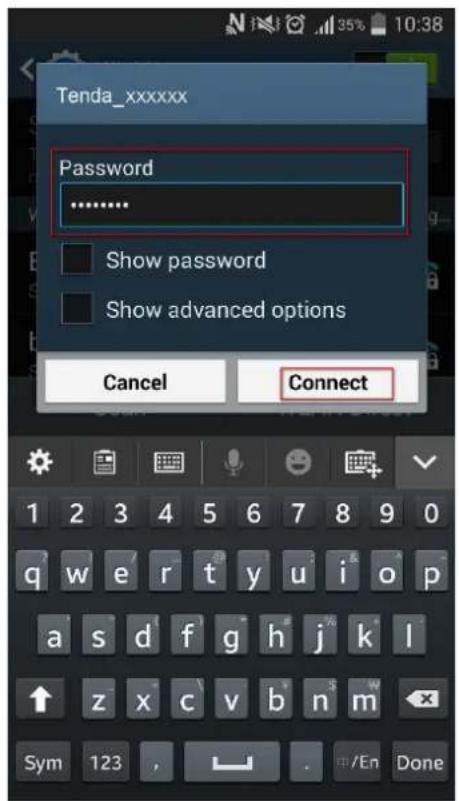
4 Enter your wireless password, and click Connect.

text_image
WLAN Smart network switch This feature has been turned off because mobile data is off. WLAN networks Tenda_XXXXXX Secured JY_FH307_liuli Secured Tenda_12AB90 Open (WPS available) JY_LMT_AS_2.4 Secured (WPS available) bx_luozhihui Secured Tenda_00A198 Open Scan WLAN Direct
text_image
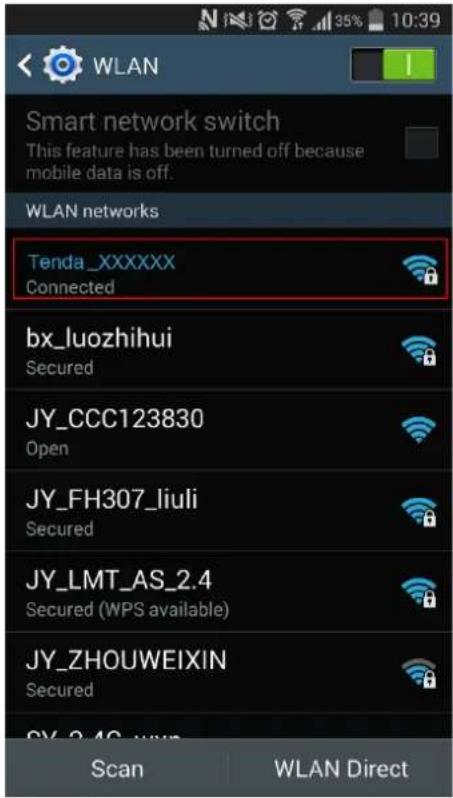
Tenda_xxxxxx Password .......... Show password Show advanced options Cancel Connect 1 2 3 4 5 6 7 8 9 0 q w e r t y u i o p a s d f g h j k l ↑ z x c v b n m Sym 123 , .~/En Done⑤ When your WiFi is connected successfully, it will display Connected.
text_image
WLAN Smart network switch This feature has been turned off because mobile data is off. WLAN networks Tenda_XXXXXX Connected bx_luozhihui Secured JY_CCC123830 Open JY_FH307_liuli Secured JY_LMT_AS_2.4 Secured (WPS available) JY_ZHOUWEIXIN Secured Scan WLAN DirectIII Specify Advanced Settings
This Chapter describes the advanced features of your Router, such as Access Control, DDNS, Bandwidth Control, and etc.
Advanced
Wireless
QoS
Applications
Security
Tools
1 Advanced
Status
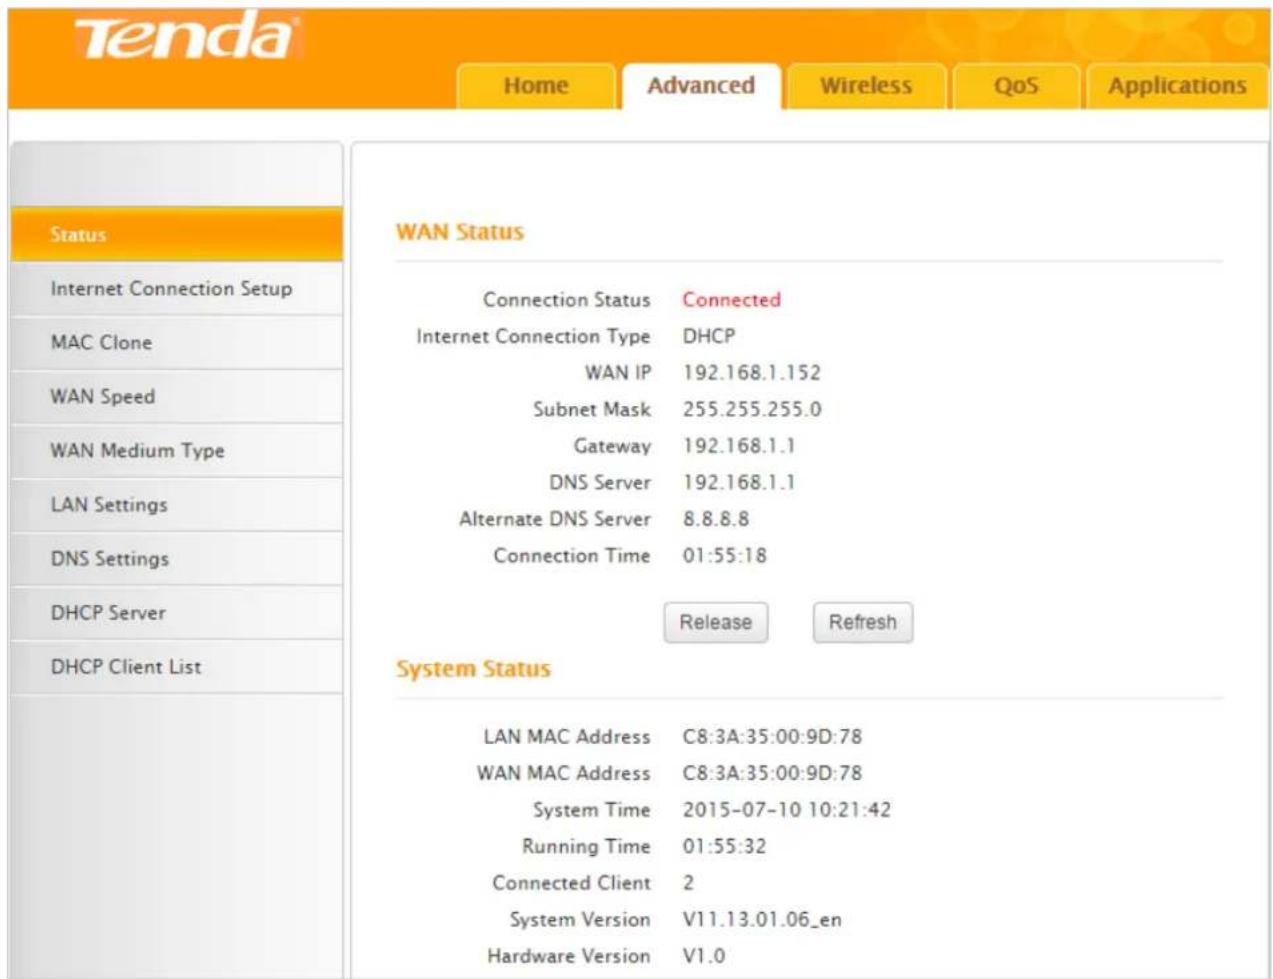
This section refers to WAN Status and system status, displaying the current Internet Connection.
text_image
Tenda Home Advanced Wireless QoS Applications Status Internet Connection Setup MAC Clone WAN Speed WAN Medium Type LAN Settings DNS Settings DHCP Server DHCP Client List WAN Status Connection Status Connected Internet Connection Type DHCP WAN IP 192.168.1.152 Subnet Mask 255.255.255.0 Gateway 192.168.1.1 DNS Server 192.168.1.1 Alternate DNS Server 8.8.8.8 Connection Time 01:55:18 Release Refresh System Status LAN MAC Address C8:3A:35:00:9D:78 WAN MAC Address C8:3A:35:00:9D:78 System Time 2015-07-10 10:21:42 Running Time 01:55:32 Connected Client 2 System Version V11.13.01.06_en Hardware Version V1.0Tenda
The Router's system will skip to the Advanced > Status page when you finish all needed settings on the Home page. In the WAN status part, you may find one of the three WAN statuses: Connected, Disconnected and Connecting. Following parts help you to understand the indications of these WAN statuses.
Connected
When you find Connected and a WAN IP address with the subnet mask, gateway, DNS server address displayed as below, you can access the Internet via the Router.

text_image
Tenda® Home Advanced Wireless QoS Applications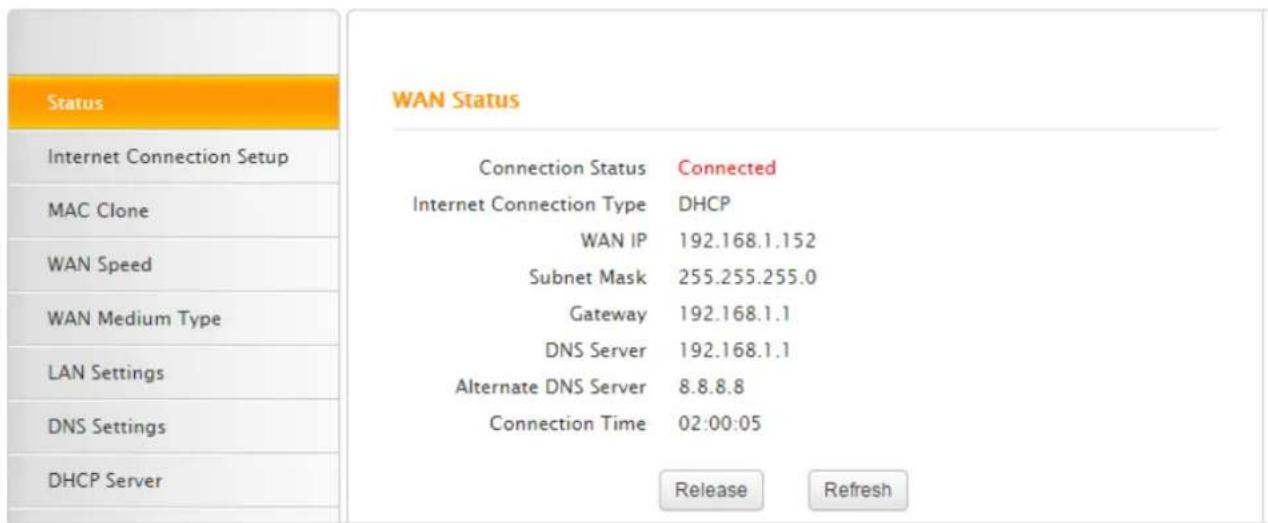
text_image
Status Internet Connection Setup MAC Clone WAN Speed WAN Medium Type LAN Settings DNS Settings DHCP Server WAN Status Connection Status Connected Internet Connection Type DHCP WAN IP 192.168.1.152 Subnet Mask 255.255.255.0 Gateway 192.168.1.1 DNS Server 192.168.1.1 Alternate DNS Server 8.8.8.8 Connection Time 02:00:05 Release RefreshDisconnected
When you find Disconnected and there is no WAN IP address displayed, you cannot access the Internet.
Tenda
Home
Advanced
Wireless
QoS
Applications
Status
Internet Connection Setup
MAC Clone
WAN Speed
WAN Medium Type
LAN Settings
DNS Settings
DHCP Server
DHCP Client List
WAN Status
Connection Status
Disconnected
Internet Connection Type
DHCP
WAN IP
Subnet Mask
Gateway
DNS Server
Alternate DNS Server
Connection Time
00:00:00
Diagnose Connection
Status
Please check hardware connection of the WAN port.
Release
Refresh
Try following steps one by one to solve the problem:
- Make sure that your computer is well connected to the LAN port of the Router and the WAN port is well connected to the Ethernet cable from the Internet side.
- Make sure that your Internet service is active and undue.
- Click Refresh to renew the web page.
If nothing goes wrong, you will find Connecting or Connected there.
Connecting
If you find Connecting here and see no WAN IP address, you cannot access the Internet right now. Try to refresh the web page several times.

text_image
Tenda® Home Advanced Wireless QoS Applications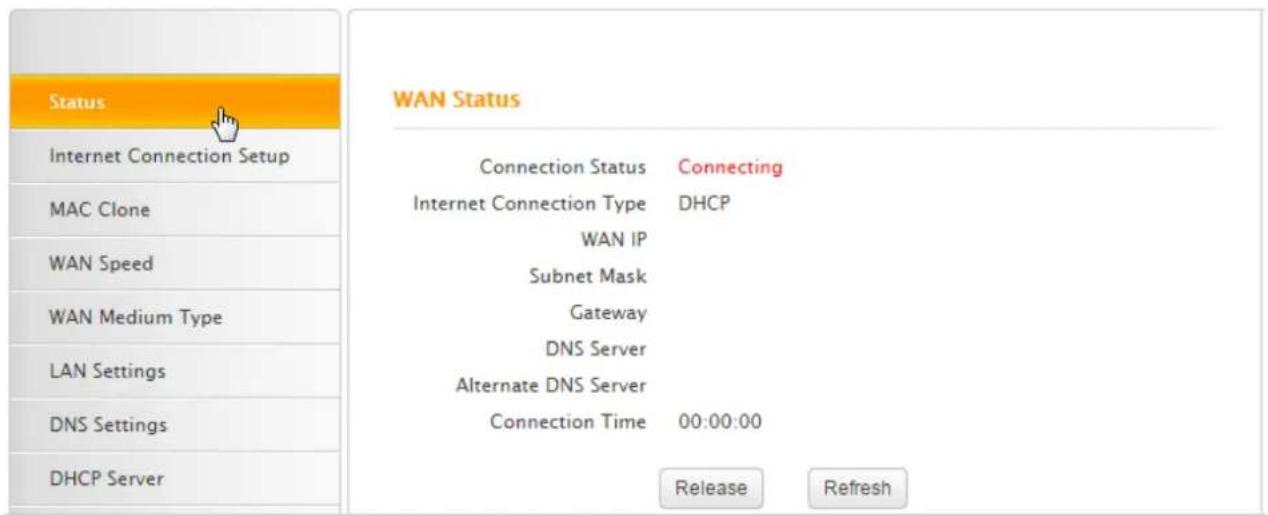
text_image
Status Internet Connection Setup MAC Clone WAN Speed WAN Medium Type LAN Settings DNS Settings DHCP Server WAN Status Connection Status Connecting Internet Connection Type DHCP WAN IP Subnet Mask Gateway DNS Server Alternate DNS Server Connection Time 00:00:00 Release RefreshHowever, when it's still Connecting, follow the guidelines below:
- Try cloning the MAC address (MAC Clone).
- Check the information in Diagnostic Connection Status.
- Check the info you typed (if any).
- Consult your ISP for help.
Internet Connection Setup
You can also set up your Internet connection here by clicking Advanced > Internet Connection Setup. For details, see Specify the Internet Settings.

text_image
Tenda® Home Advanced Wireless QoS Applications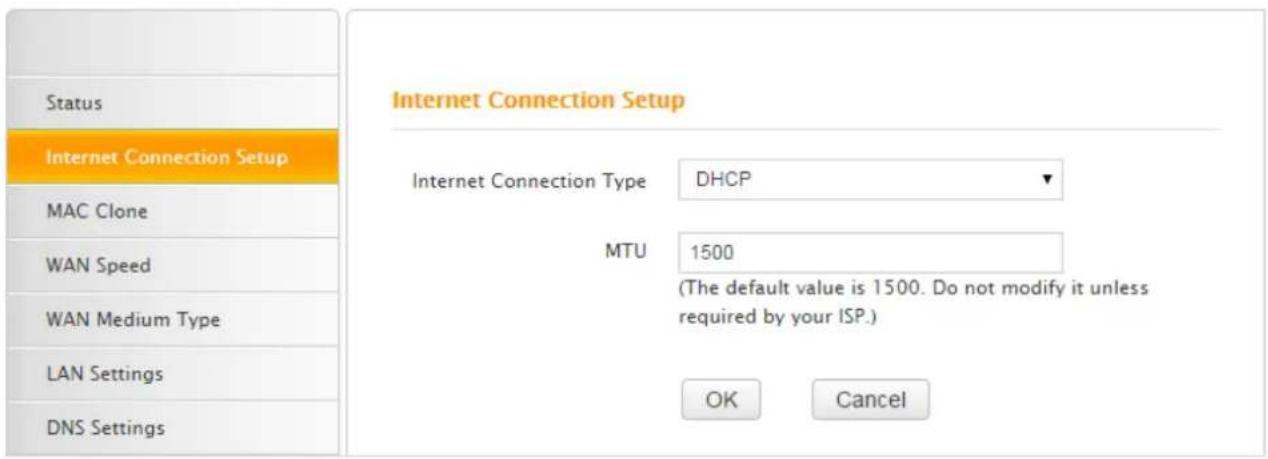
text_image
Status Internet Connection Setup MAC Clone WAN Speed WAN Medium Type LAN Settings DNS Settings Internet Connection Setup Internet Connection Type DHCP MTU 1500 (The default value is 1500. Do not modify it unless required by your ISP.) OK CancelMTU Value
If you come across some troubles (cannot access some website, send or receive emails, visit the FTP or POP servers), try to decrease the max MTU value from 1500 to 1400 step by step, till the trouble is gone.
Note that changing the MTU Value for optimal performance of some specific websites or application software on the other hand may bring downside. For all the Internet connection types on the Router, it's recommended to keep this value as the default setting.
| MTU | Application |
| 1500 | The most common setting when it’s not PPPoE or VPN dial-up. |
| 1492 | Always for PPPoE dial-up connection. |
| 1472 | The max value when using ping cmd. |
| 1468 | Some DHCP applications. |
| 1436 | VPN or PPTP applications. |
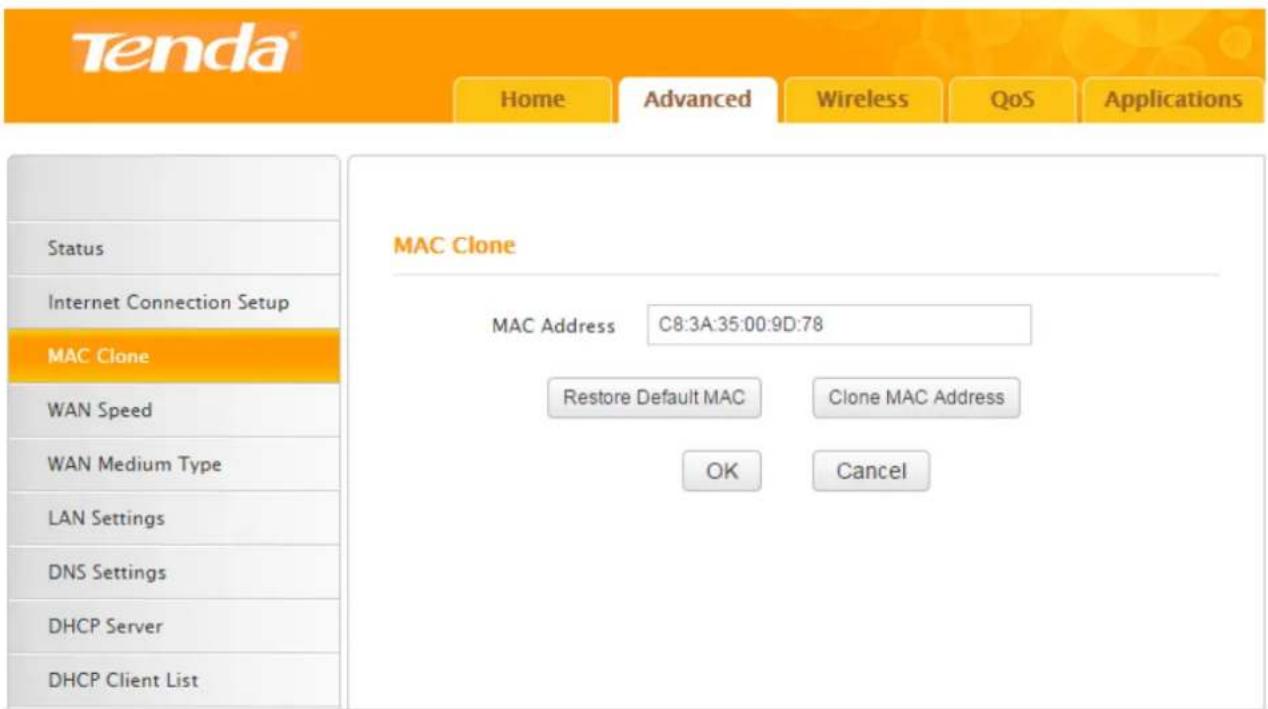
MAC Clone
In general, if you cannot access the Internet via your connected computer or smart-phone, meanwhile you find you can only access the Internet via a specified computer directly without a router, you can try cloning the MAC address on the MAC Clone page.
Click Advanced > MAC Clone to enter the configuration interface.
text_image
Tenda® Home Advanced Wireless QoS Applications Status Internet Connection Setup MAC Clone WAN Speed WAN Medium Type LAN Settings DNS Settings DHCP Server DHCP Client List MAC Clone MAC Address C8:3A:35:00:9D:78 Restore Default MAC Clone MAC Address OK CancelIf the specified computer connected to your router via an Ethernet cable, and you configure the
router on the specified computer, follow the steps below:
1 Click Clone MAC address. The specified computer's MAC address will be entered in the MAC Address field.
2 Click OK
If the computer connected to your router is not the specified computer, follow the steps below:
1 Enter the MAC address of the specified computer in the MAC Address field.
2 Click OK.
Other Options may help:
Restore Default MAC: Click it to restore the current MAC address to factory default MAC of the Router.
Clone MAC Address: Click it to copy the MAC address of the connected computer to the MAC Address field.
WAN Speed
Here you can set the speed and duplex mode for the WAN port. It is advisable to keep the default AUTO setting to get the best speed. If you select other option, you may fail to access some websites.

text_image
Tenda® Home Advanced Wireless QoS Applications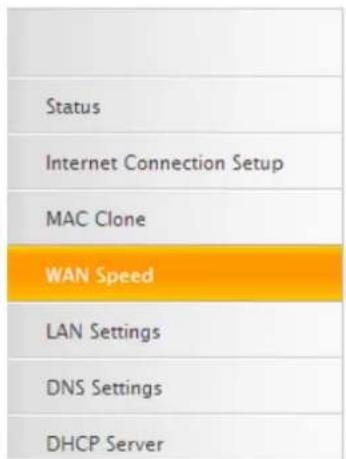
text_image
Status Internet Connection Setup MAC Clone WAN Speed LAN Settings DNS Settings DHCP ServerChoose The WAN Speed
AUTO
C 10M HALF-duplex
C 10M FULL-duplex
C 100M HALF-duplex
○ 100M FULL-duplex

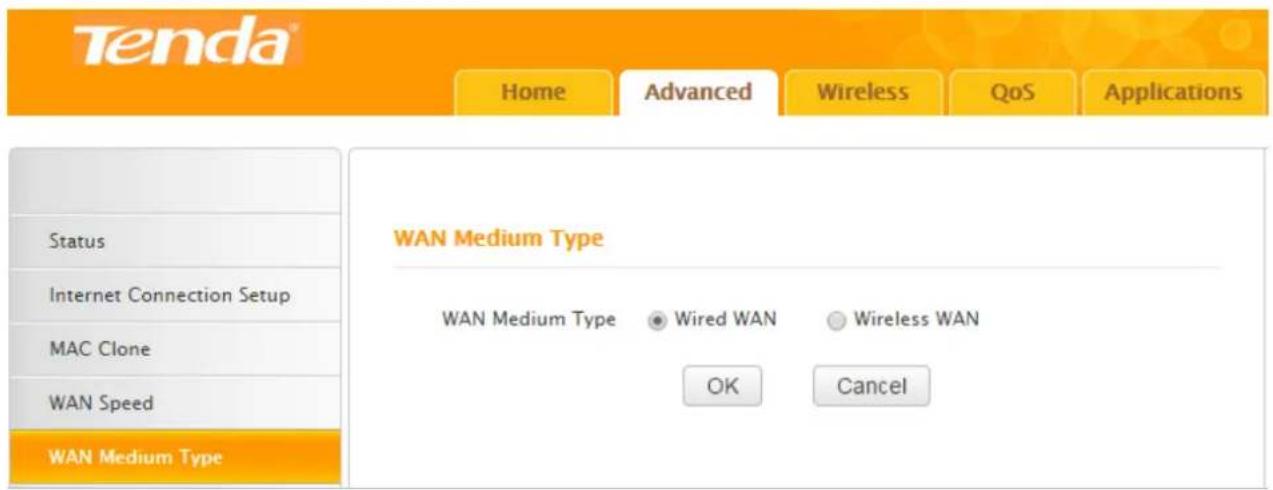
WAN Medium Type
text_image
Tenda® Home Advanced Wireless QoS Applications Status Internet Connection Setup MAC Clone WAN Speed WAN Medium Type WAN Medium Type • Wired WAN • Wireless WAN OK CancelThe device supports two WAN medium types: Wired WAN and Wireless WAN. Select Wired WAN if your router is connected to the Internet via a physical cable, and select Wireless WAN if your router is connected to the router wirelessly. The default WAN Medium Type is Wired WAN, so no settings are required here if your router is connected to the Internet via a physical cable. If your router is connected to the router wirelessly, do as follows:
text_image
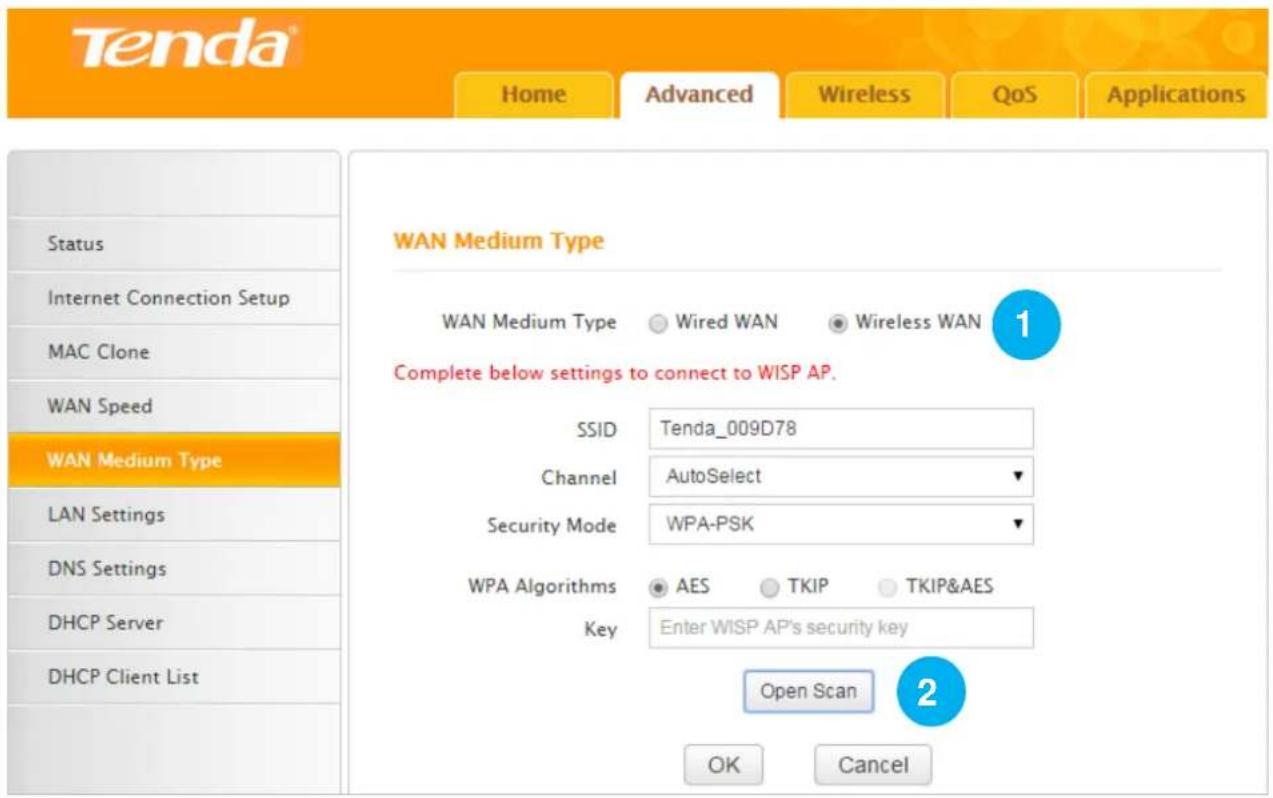
Tenda® Home Advanced Wireless QoS Applications Status Internet Connection Setup MAC Clone WAN Speed WAN Medium Type LAN Settings DNS Settings DHCP Server DHCP Client List WAN Medium Type WAN Medium Type Wired WAN Wireless WAN 1 Complete below settings to connect to WISP AP. SSID Tenda_009D78 Channel AutoSelect Security Mode WPA-PSK WPA Algorithms AES TKIP TKIP&AES Key Enter WISP AP's security key Open Scan 2 OK Cancel1 Select Wireless WAN.
② Click Open Scan.
Tenda
Home
Advanced
Wireless
QoS
Applications
Status
Internet Connection Setup
MAC Clone
WAN Speed
WAN Medium Type
LAN Settings
DNS Settings
DHCP Server
DHCP Client List
WAN Medium Type
WAN Medium Type

Wired WAN

Wireless WAN
Complete below settings to connect to WISP AP.
SSID
Tenda_009D78
Channel
AutoSelect
Security Mode
WPA-PSK
WPA Algorithms
Key

AES

TKIP

TKIP&AES
Enter WISP AP's security key
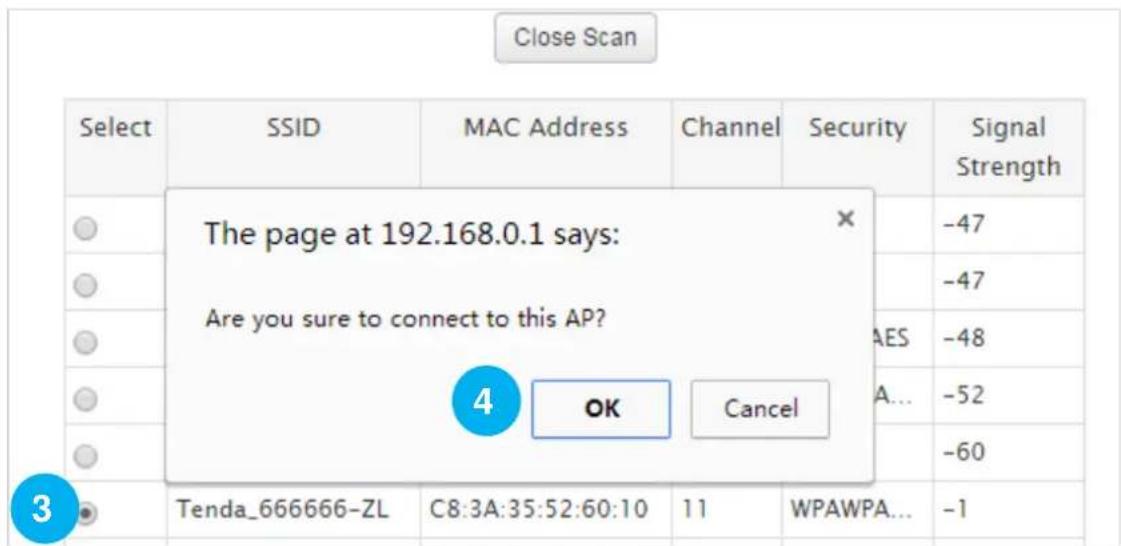
text_image
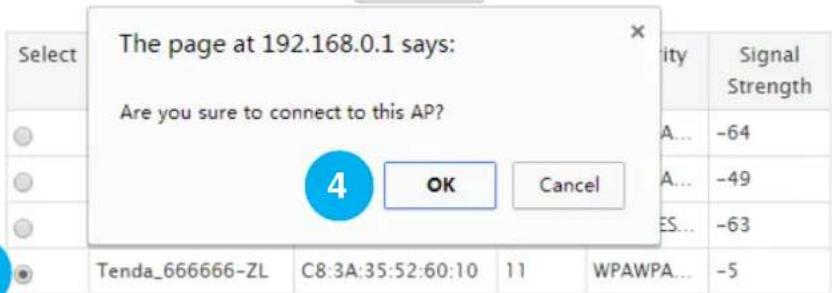
The page at 192.168.0.1 says: Are you sure to connect to this AP? 4 OK Cancel Tenda_666666-ZL C8:3A:35:52:60:10 11 WPAWPA... -53
3 Find and select the wireless network name (WiFi name) of your Wireless ISP (WISP).
4 Click OK.
Tenda
Home
Advanced
Wireless
QoS
Applications
Status
Internet Connection Setup
MAC Clone
WAN Speed
WAN Medium Type
LAN Settings
DNS Settings
DHCP Server
DHCP Client List
WAN Medium Type
WAN Medium Type
Wired WAN
Wireless WAN
Complete below settings to connect to WISP AP.
SSID
Tenda_666666-ZL
Channel
11
▼
Security Mode
Mixed WPA/WPA2 - PSK
▼
WPA Algorithms
Key
AES
© TKIP
TKIP&AES
Enter WISP AP's security key
5
Close Scan
| Select | SSID | MAC Address | Channel | Security | Signal Strength |
| ○ | Tenda_yuan123456 | 00:90:4C:12:34:56 | 11 | WPAWPA... | -64 |
| ○ | bayanDSLWIFI_4235 | C8:3A:35:68:42:36 | 11 | WPAWPA... | -49 |
| ○ | Tenda_4E0CF8 | C8:3A:35:4E:0C:F9 | 10 | WPA/AES... | -63 |
| ● | Tenda_666666-ZL | C8:3A:35:52:60:10 | 11 | WPAWPA... | -5 |
Tenda
Home
Advanced
Wireless
QoS
Applications
Status
Internet Connection Setup
MAC Clone
WAN Speed
WAN Medium Type
LAN Settings
DNS Settings
DHCP Server
DHCP Client List
WAN Medium Type
WAN Medium Type

Wired WAN

Wireless WAN
Complete below settings to connect to WISP AP.
SSID
Tenda_666666-ZL
Channel
11
▼
Security Mode
Mixed WPA/WPA2 - PSK
▼
WPA Algorithms

AES

TKIP

TKIP&AES
Key
********
[Non-Text]
[Non-Text]
Open Scan
7
OK
Cancel
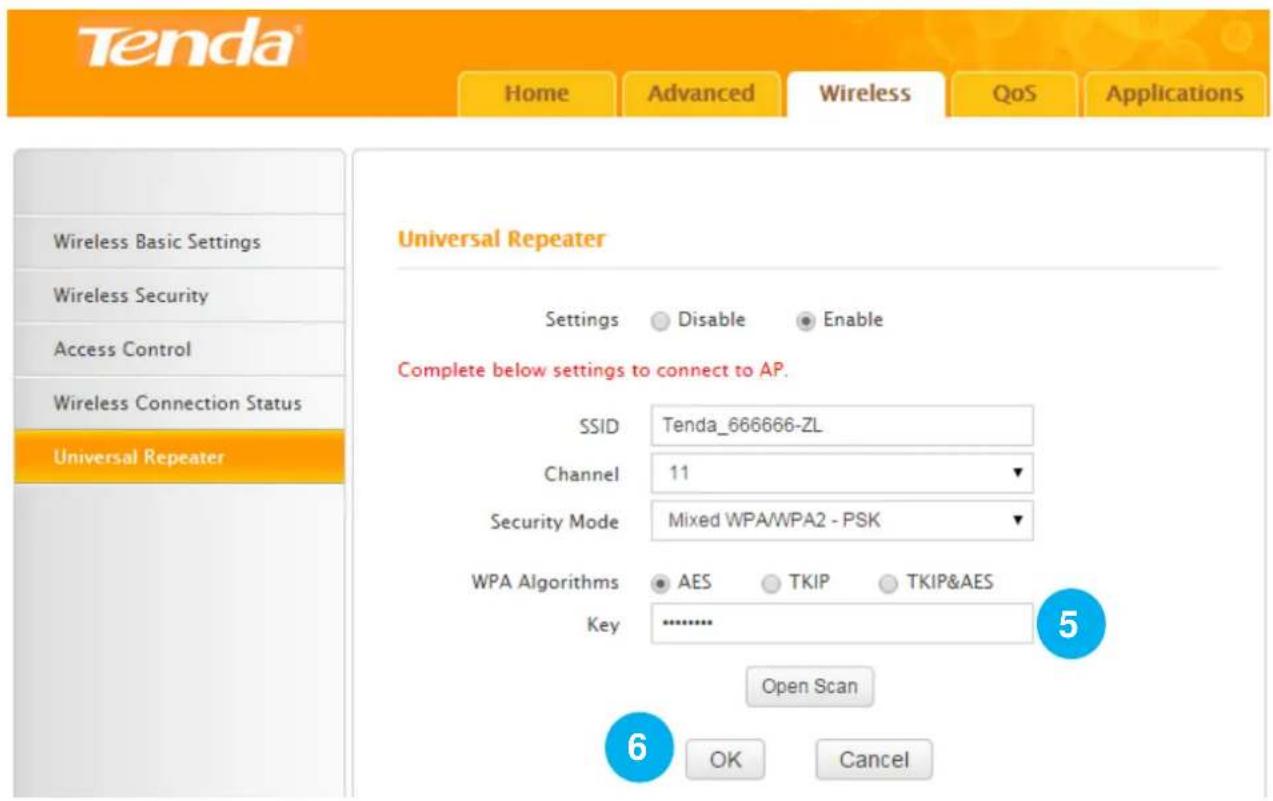
5 Type the wireless security key (WiFi password) of the wireless network name (WiFi name) of
your WISP in the Key field.
⑥ Click Close Scan.
⑦ Click OK.
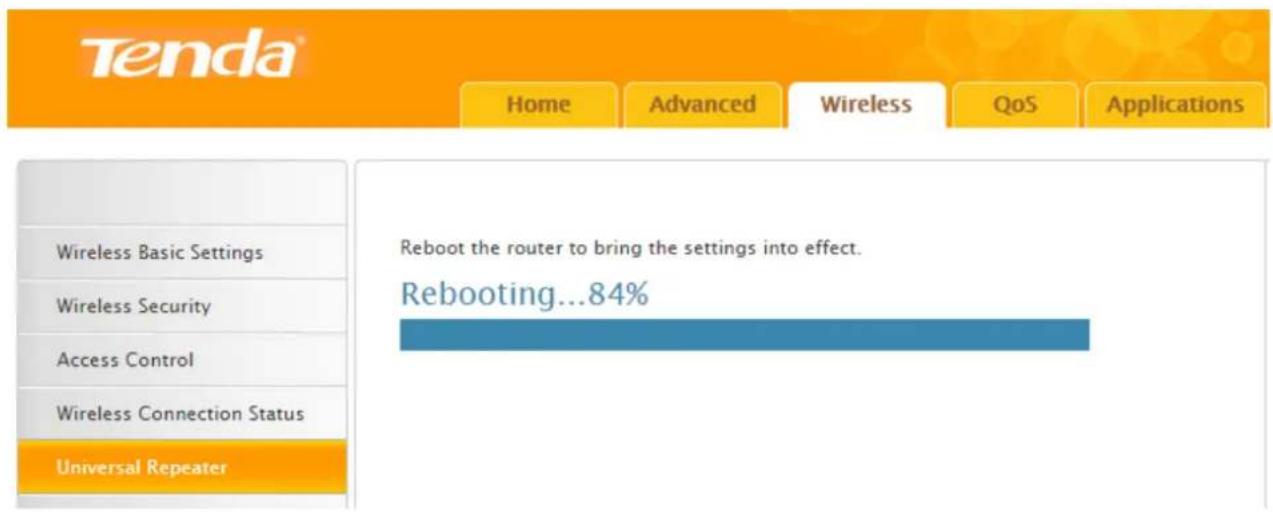
The router will reboot automatically.
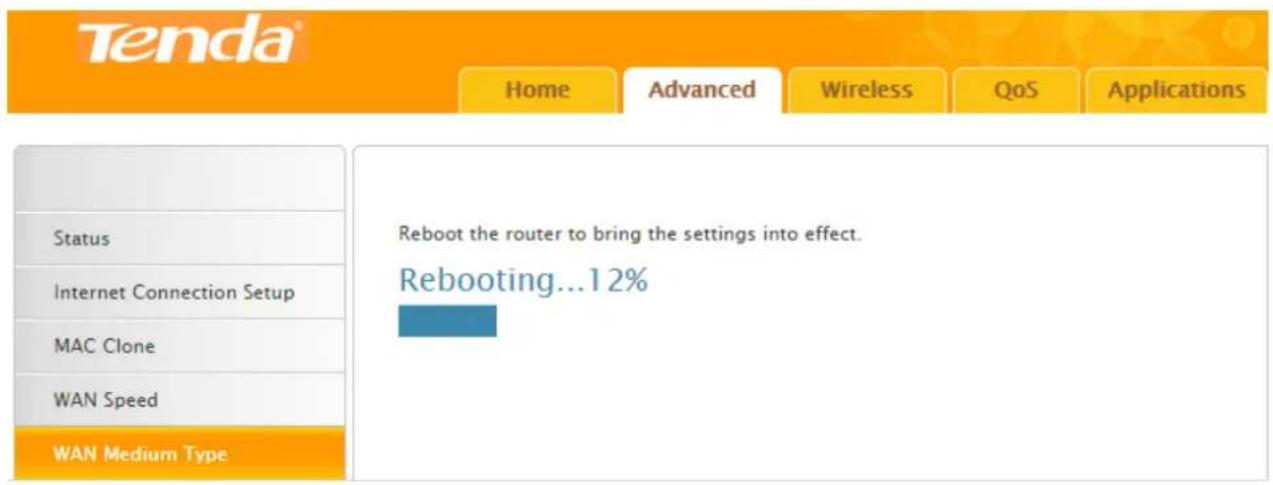
text_image
Tenda® Home Advanced Wireless QoS Applications Status Internet Connection Setup MAC Clone WAN Speed WAN Medium Type Reboot the router to bring the settings into effect. Rebooting... 12%After the router reboots, check the WAN status. If it displays Connected, it indicates that you can access to the Internet now.

text_image
Tenda® Home Advanced Wireless QoS Applications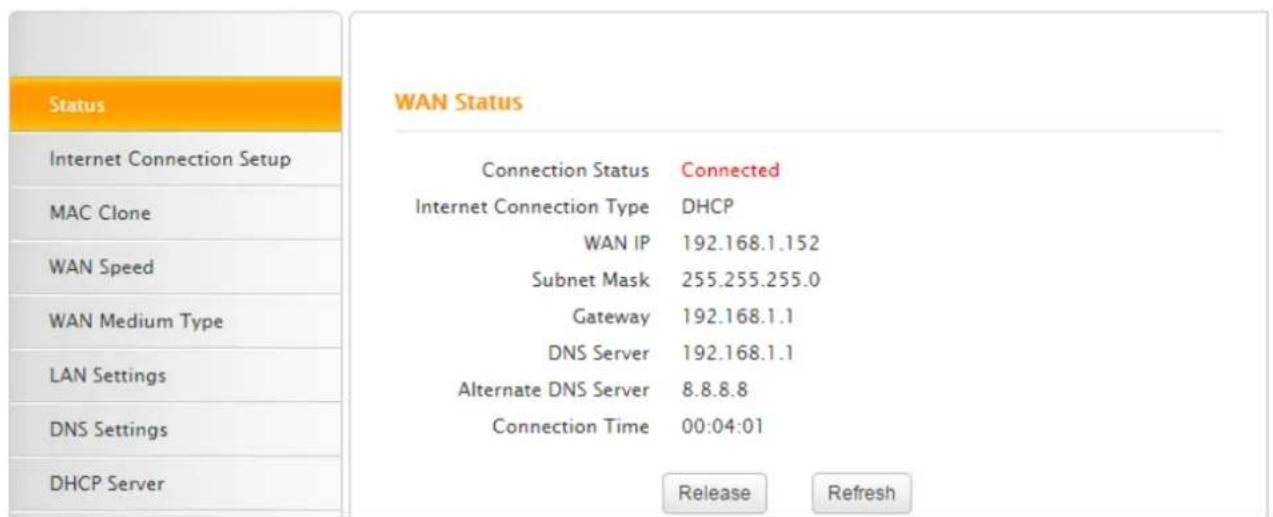
text_image
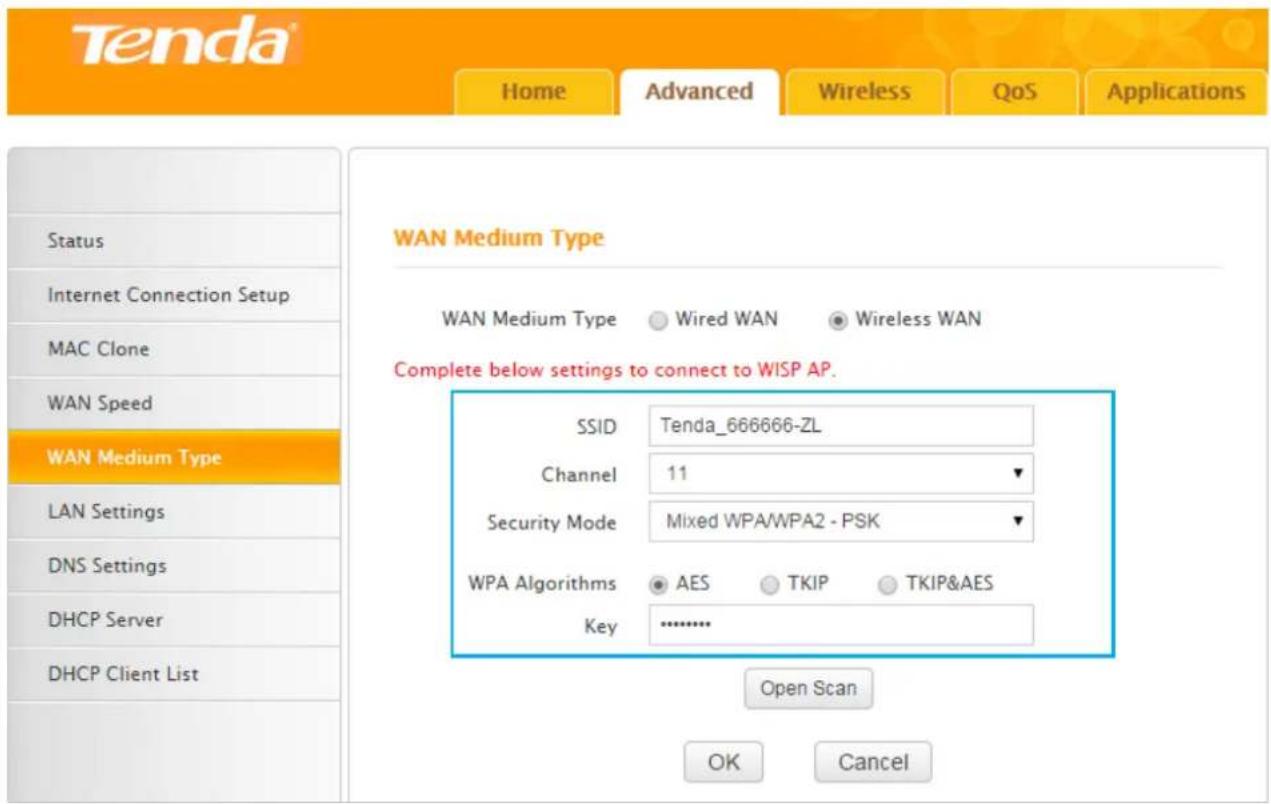
Status Internet Connection Setup MAC Clone WAN Speed WAN Medium Type LAN Settings DNS Settings DHCP Server WAN Status Connection Status Connected Internet Connection Type DHCP WAN IP 192.168.1.152 Subnet Mask 255.255.255.0 Gateway 192.168.1.1 DNS Server 192.168.1.1 Alternate DNS Server 8.8.8.8 Connection Time 00:04:01 Release RefreshIf you failed to connect to your WISP, try following steps below one by one to solve the problem:
- Check the security key (WiFi password), the SSID (wireless network name), channel, security mode, and WPA Algorithms.
text_image
Tenda® Home Advanced Wireless QoS Applications Status Internet Connection Setup MAC Clone WAN Speed WAN Medium Type LAN Settings DNS Settings DHCP Server DHCP Client List WAN Medium Type WAN Medium Type Wired WAN Wireless WAN Complete below settings to connect to WISP AP. SSID Tenda_666666-ZL Channel 11 Security Mode Mixed WPA/WPA2 - PSK WPA Algorithms AES TKIP TKIP&AES Key .......... Open Scan OK CancelGenerally, when you select the wireless network name of your WISP, and type the correct security key (WiFi password), the SSID (wireless network name), channel, security mode, and WPA
Algorithms will be changed to the same as those of your WISP automatically. If they are not the same, correct them manually, and try to connect again.

Tips
If you don't know those parameters of your WISP you connected, contact your WISP for help.
- Check the Internet connection type.

text_image
Tenda® Home Advanced Wireless QoS Applications Internet Connection Setup Internet Connection Type DHCP MTU 1500 (The default value is 1500. Do not modify it unless required by your ISP.) OK Cancel Status Internet Connection Setup MAC Clone WAN Speed WAN Medium Type LAN Settings DNS SettingsMake sure that you select the correct Interest convection type according to the parameters your Wireless Internet Service Provider provided. If you don't know how to select, refer to the form in Specify the Interest Settings.
- Check the LAN IP address of your router.
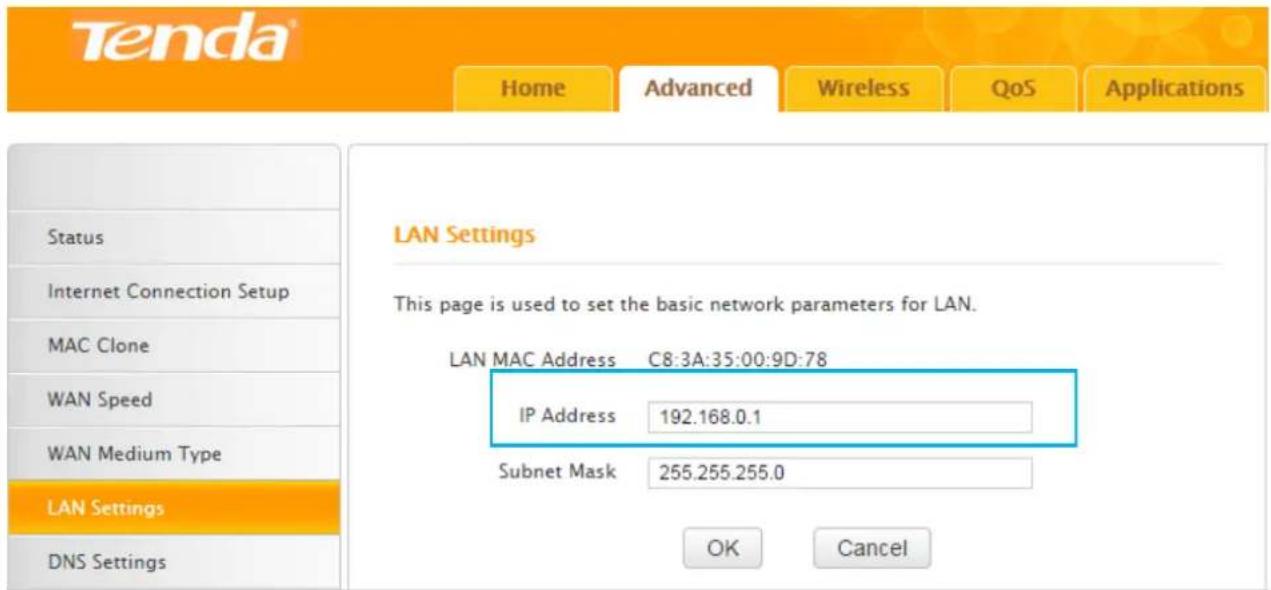
text_image
Tenda® Home Advanced Wireless QoS Applications LAN Settings This page is used to set the basic network parameters for LAN. LAN MAC Address C8:3A:35:00:9D:78 IP Address 192.168.0.1 Subnet Mask 255.255.255.0 Status Internet Connection Setup MAC Clone WAN Speed WAN Medium Type LAN Settings DNS Settings OK CancelThe LAN IP address of the router should not be in the same network segment as that of your WISP you connected. For example, if the LAN IP address of your WISP is 192.168.0.1, the LAN IP address of your router can be 192.168.2.1.
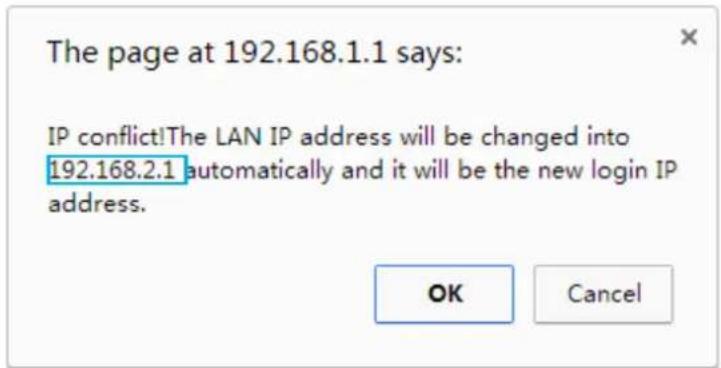
It will have a prompt when there is an IP conflict. Just click OK, and remember the new LAN IP address.
text_image
The page at 192.168.1.1 says: IP conflict!The LAN IP address will be changed into 192.168.2.1 automatically and it will be the new login IP address. OK CancelLAN Settings
You can change the IP address to log in to the User Interface of the Router here. Remember or note down the new IP address for next login if you change it.
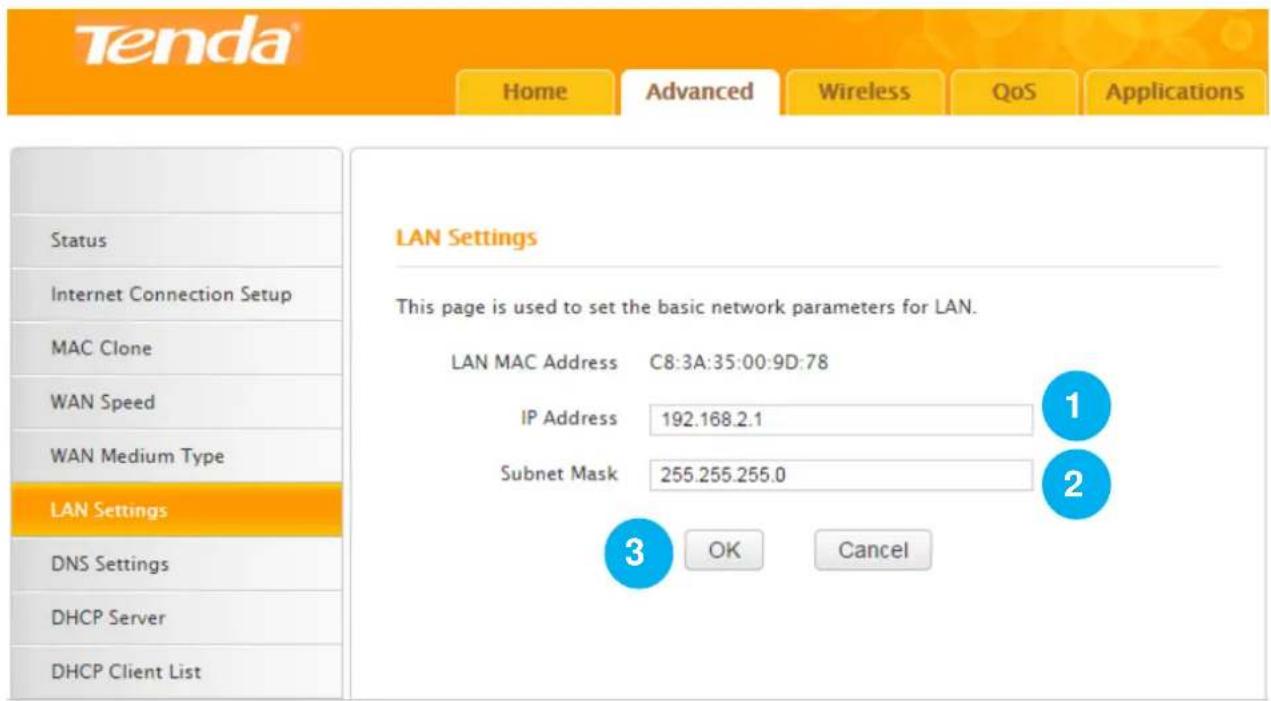
Click Advanced > LAN Settings to modify the login IP address.
text_image
Tenda® Home Advanced Wireless QoS Applications LAN Settings This page is used to set the basic network parameters for LAN. LAN MAC Address C8:3A:35:00:9D:78 IP Address 192.168.2.1 Subnet Mask 255.255.255.0 3 OK Cancel1 IP Address: Modify the IP address, say "192.168.2.1". (The default IP "192.168.0.1")
② Subnet Mask: Enter a LAN subnet mask matching the IP address in ①, say “255.255.255.0” (the default value).
③ Click OK.
DNS Settings
DNS settings page is for you to manually enable and set up the DNS settings.
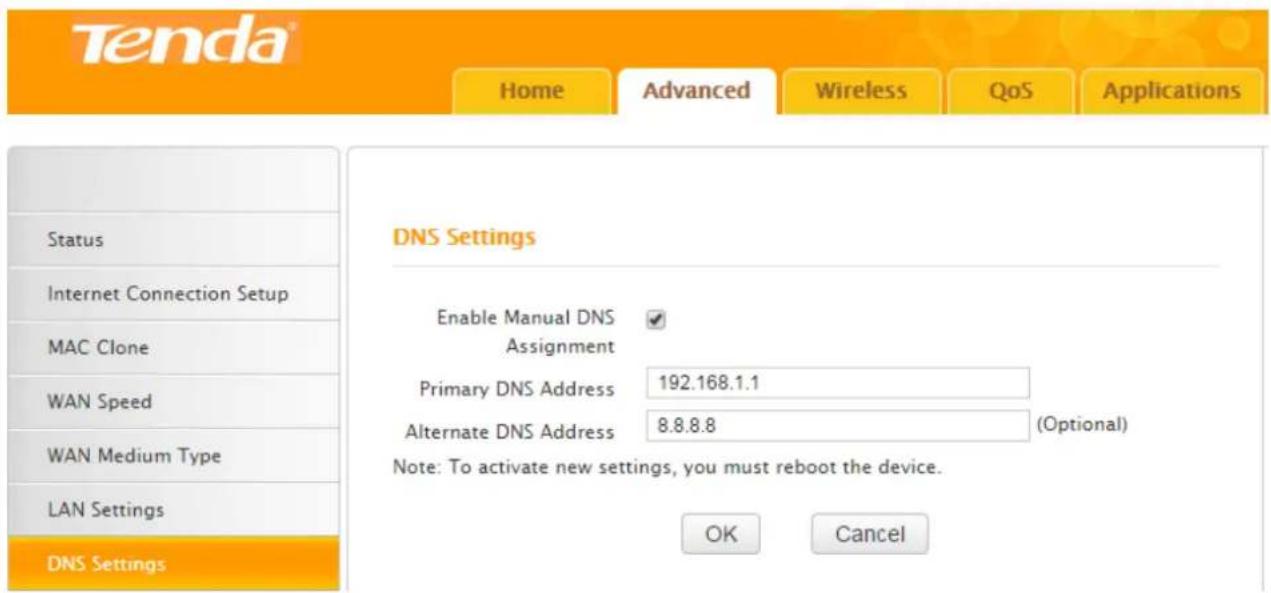
Click Advanced > DNS Settings to start the DNS setup.
text_image
Tenda® Home Advanced Wireless QoS Applications Status Internet Connection Setup MAC Clone WAN Speed WAN Medium Type LAN Settings DNS Settings DNS Settings Enable Manual DNS Assignment Primary DNS Address 192.168.1.1 Alternate DNS Address 8.8.8.8 (Optional) Note: To activate new settings, you must reboot the device. OK Cancel1 Enable Manual DNS Assignment: Check the box to enable DNS manual setup of the Router.
Tenda
2 Primary DNS Address: Enter the preferred address of the DNS server provided by your ISP.
3 Alternate DNS Address (optional): Enter the alternate DNS address if your ISP provides this address.
4 Click OK and go to the Tools page to reboot the device to activate these new DNS settings.
DHCP Server
DHCP server can automatically assign the broadband service info (IP Address, Subnet Mask, Gateway and DNS Server Address) to the computer or smart phone, or other devices which are connected to the Router. Do not disable this function until you want to configure the IP address manually for each device connected to the Router.
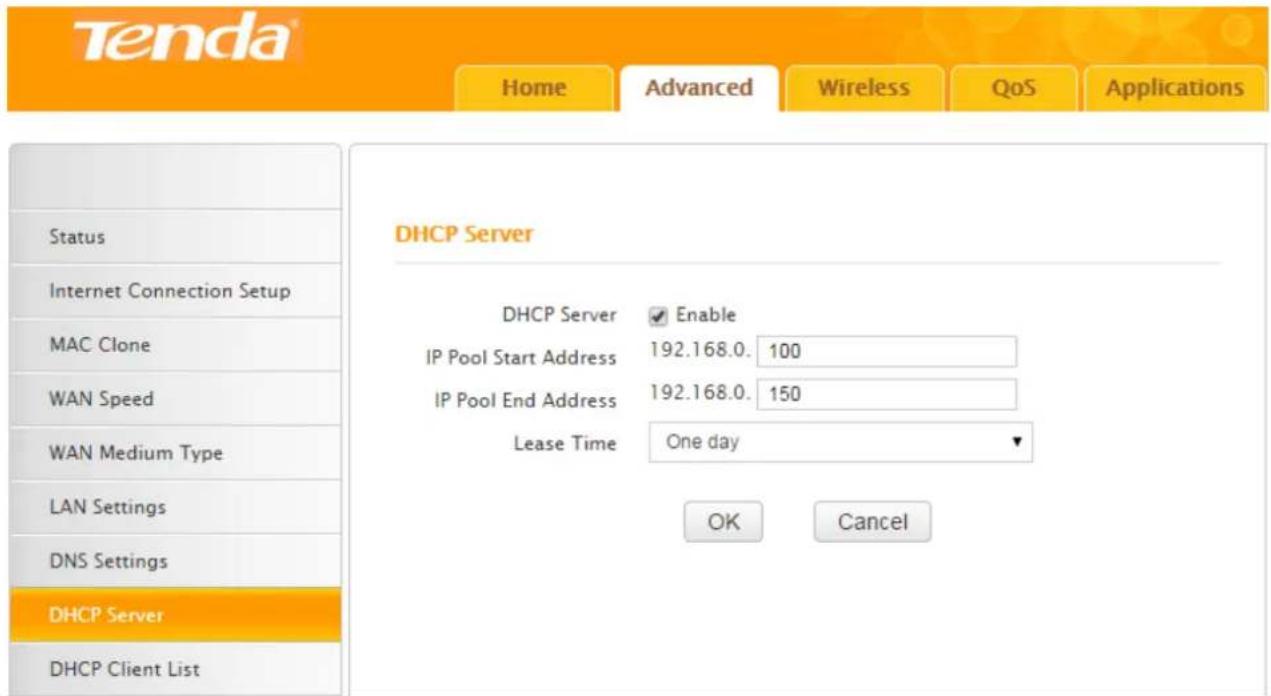
Click Advanced > DHCP Server to modify the IP range and the lease time.
text_image
Tenda® Home Advanced Wireless QoS Applications Status Internet Connection Setup MAC Clone WAN Speed WAN Medium Type LAN Settings DNS Settings DHCP Server DHCP Server Enable IP Pool Start Address 192.168.0. 100 IP Pool End Address 192.168.0. 150 Lease Time One day OK Cancel1 DHCP Server: Check Enable. (It's enabled by default.)
② IP Pool Start/End Address: Configure the rightmost segment of the start address/end address, say 100/150 shown in the picture.
3 Lease Time: Select the lease time of the IP assigned automatically, say One day. When the lease time is used up, the IP will renew automatically. So you don't need to reset it manually.
4 Click OK.
DHCP Client List
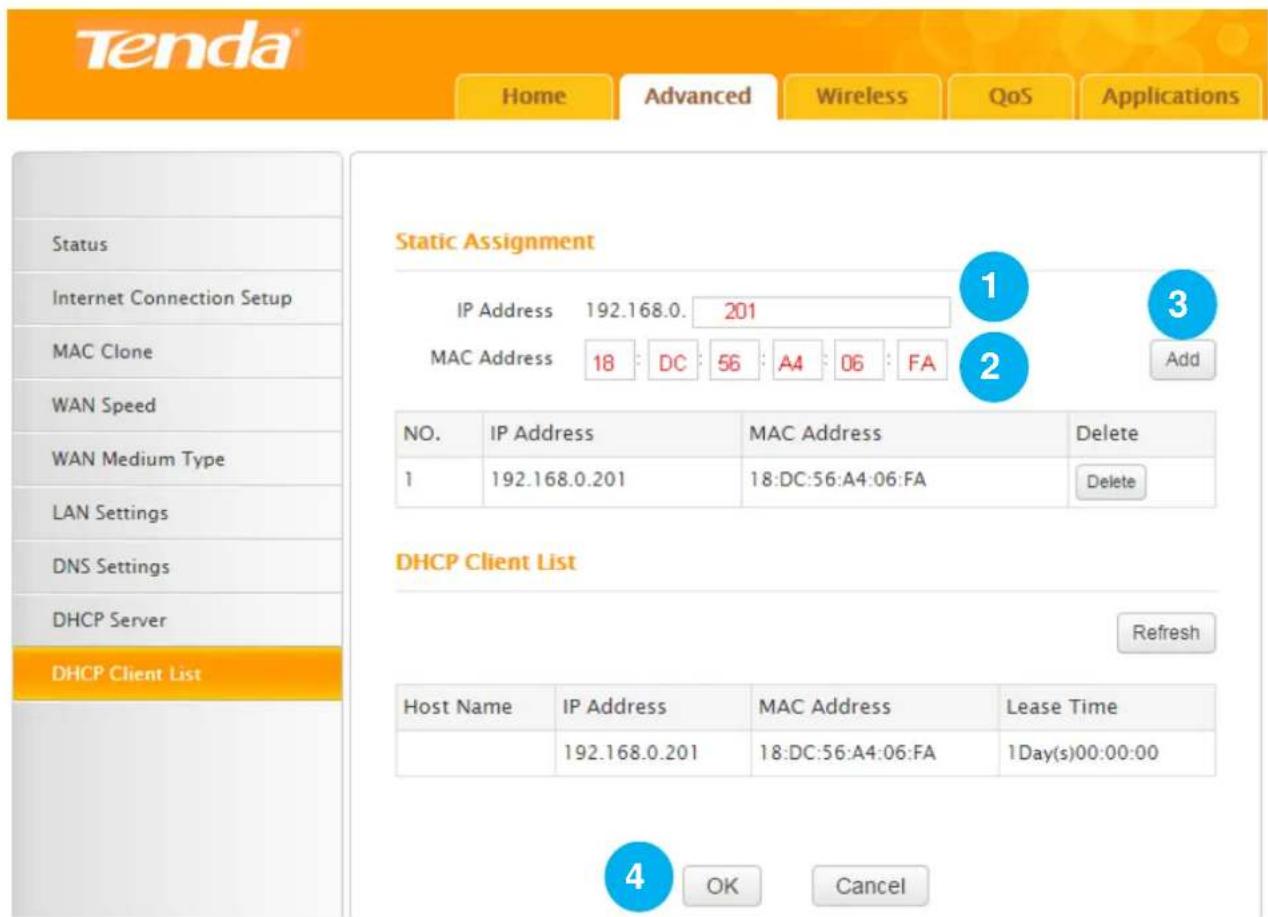
This feature includes two parts, Static Assignment and DHCP Client List.
Static Assignment
Here you can set a static IP address to a specified device manually for convenient management. The static IP you set should be different from other IPs in use, or it will take no effect. Suggest you set the static IP with the rightmost part within “200\~254”. E.g., your current LAN IP is “192.168.0.1”, you can set the static IP within “192.168.0.200” \~“192.168.0.254”.
Here we cite an example to explain how to set up a static IP to a specific device on the User Interface.
Example
You hope that your notebook (MAC address: 18:DC:56:A4:06:FA) can always automatically get the IP address "192.168.0.201" to access the Internet. What should you do?
Configuration
In this case, Static Assignment feature of the Router can help you to get what you want.
text_image
Tenda Home Advanced Wireless QoS Applications Status Internet Connection Setup MAC Clone WAN Speed WAN Medium Type LAN Settings DNS Settings DHCP Server DHCP Client List Static Assignment IP Address 192.168.0. 201 MAC Address 18: DC: 56: A4: 06: FA NO. IP Address MAC Address Delete 1 192.168.0.201 18:DC:56:A4:06:FA Delete DHCP Client List Refresh Host Name IP Address MAC Address Lease Time 192.168.0.201 18:DC:56:A4:06:FA 1Day(s)00:00:00 OK CancelClick Advanced > DHCP Client List to enter the configuration page.
1 IP Address: Enter the rightmost segment of the IP address "201".
2 MAC Address: Enter the MAC address of notebook "18:DC:56:A4:06:FA".
Tenda
3 Click Add and then the static IP route you set will be displayed on the Static Assignment section.
4 Click OK to save the settings.
Click Refresh one to three times and you will see the Static IP rules are displayed in the DHCP Client List.
Verification
After the settings above, check and verify your notebook is set to obtain IP automatically. Then, connect your notebook to the Router wirelessly or via an Ethernet cable, and your notebook will get the IP “192.168.0.201” and you can start surfing the Internet through the notebook.
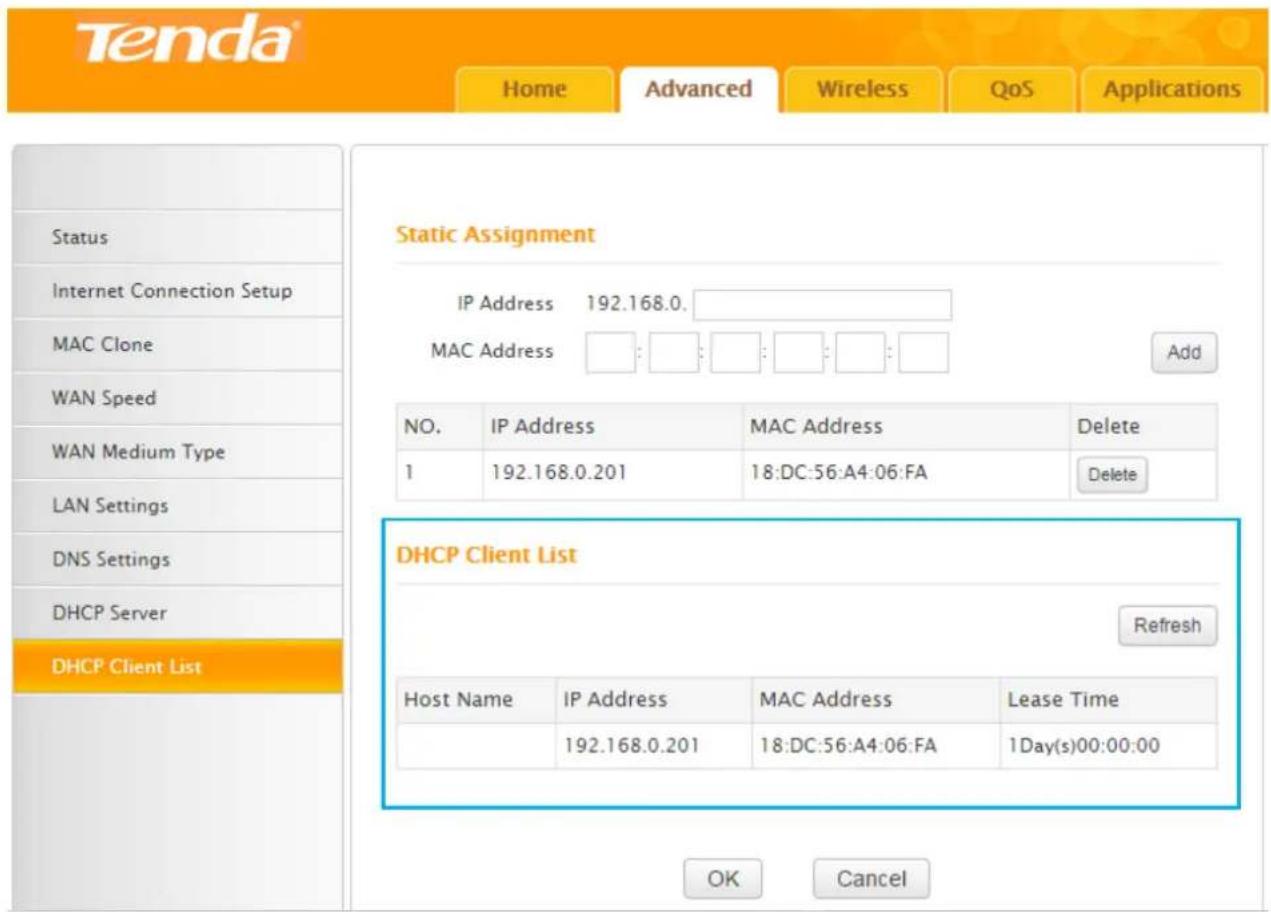
DHCP Client List
All connected devices to the Router will be listed on the DHCP Client List. You can find the host name, IP, MAC address and lease time about a working IP.
text_image
Tenda® Home Advanced Wireless QoS Applications Status Internet Connection Setup MAC Clone WAN Speed WAN Medium Type LAN Settings DNS Settings DHCP Server DHCP Client List Static Assignment IP Address 192.168.0. MAC Address Add NO. IP Address MAC Address Delete 1 192.168.0.201 18:DC:56:A4:06:FA Delete DHCP Client List Refresh Host Name IP Address MAC Address Lease Time 192.168.0.201 18:DC:56:A4:06:FA 1Day(s)00:00:00 OK CancelRules you set in the Static Assignment section will be displayed on the list but the host name is absent when the device with the corresponding MAC address is not connected to the Router (via an Ethernet cable or wirelessly).
If there're unknown devices connected to your Router, you can check them on the list easily. To
Tenda
stop they from accessing your router, go to Wireless > Access Control to forbid its MAC address.
2 Wireless
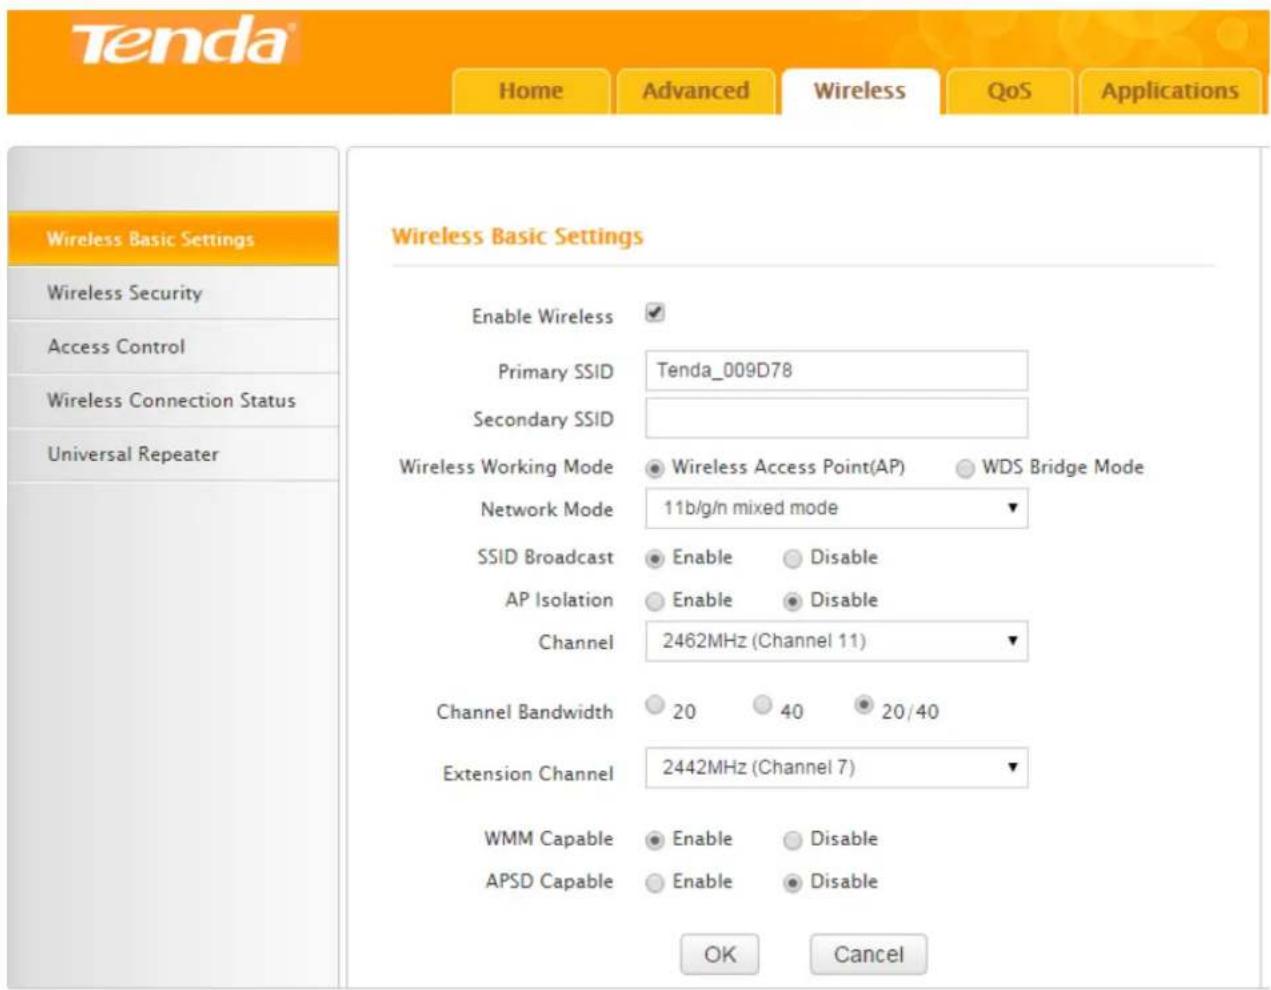
Wireless Basic Settings
Here you can change the WiFi name (Primary SSID) and do some basic settings to create a WLAN for easy recognition or management.
Click Wireless > Wireless Basic Settings to start settings.
text_image
Tenda® Home Advanced Wireless QoS Applications Wireless Basic Settings Wireless Security Access Control Wireless Connection Status Universal Repeater Enable Wireless ✓ Primary SSID Tenda_009D78 Secondary SSID Wireless Working Mode ● Wireless Access Point(AP) ○ WDS Bridge Mode Network Mode 11b/g/n mixed mode ▼ SSID Broadcast ● Enable ○ Disable AP Isolation ○ Enable ● Disable Channel 2462MHz (Channel 11) ▼ Channel Bandwidth ○ 20 ○ 40 ● 20/40 Extension Channel 2442MHz (Channel 7) ▼ WMM Capable ● Enable ○ Disable APSD Capable ○ Enable ● Disable OK CancelCheck the Enable Wireless option, and change the Primary SSID.
Suggest you leave other options the way they are.
Description of other options on the configuration page
- Secondary SSID: The second name of your WiFi, an optional field. You can connect your wireless device to the secondary SSID for accessing the Internet.
- Network Mode: 4 modes supported on the Router.
| Mode | Compatibility | Wireless Speed |
| 11b/g/n | Allows 802.11b, 802.11g, and 802.11n devices to join the network. | Up to 300Mbps |
| 11b/g | Allows 802.11b and 802.11g devices to join the network. | Up to 54Mbps |
| 11b | Allows 802.11b devices to join the network. | Up to 11Mbps |
| 11g | Allows 802.11g devices to join the network. | Up to 54Mbps |
-
SSID Broadcast: When it's enabled, the wireless device will scan your Router's SSID; when it's disabled, your Router's SSID is hidden and you cannot find it on the SSID list, in which case you need to enter the SSID manually for connecting to it.
-
AP Isolation: When it's enabled, wireless devices connecting to your device cannot communicate with each other.
-
Channel: Do not change the channel unless you experience interference (shown by lost wireless connection or slow data transfers). If this happens, experiment with different channels to see which the best is. The recommended channel spacing between adjacent access points is four channels (for example, use channel 1 and 5, or 6 and 10).
-
Channel Bandwidth: Select any of these channel bandwidth options to accommodate higher transmission speeds:
➢ 40: Select this bandwidth to maximize the wireless throughput.
➢ 20: Select this bandwidth if you encounter some issues with your wireless connection.
➢ 20/40 (default): Keep the default unless you encounter some issues with your wireless connection.
-
Extension Channel: It's used to determine the wireless frequency band of your Router. It can only take effect in 11b/g/n mode when the channel bandwidth is "20/40".
-
WMM Capable: It's used to improve the wireless transmission performance. Suggest that you keep this field Enable by default.
-
APSD Capable: It's the time-saving mode, and can only take effect when WMM Capable is enabled. Suggest that you keep the APSD Capable field is disabled by default.
Wireless Working Mode
When your router performs as a wireless router, the wireless working mode will be Wireless Access Point (AP). However, when you want to use it as a repeater, you can select WDS Bridge Mode.
WDS Bridge Mode
Example
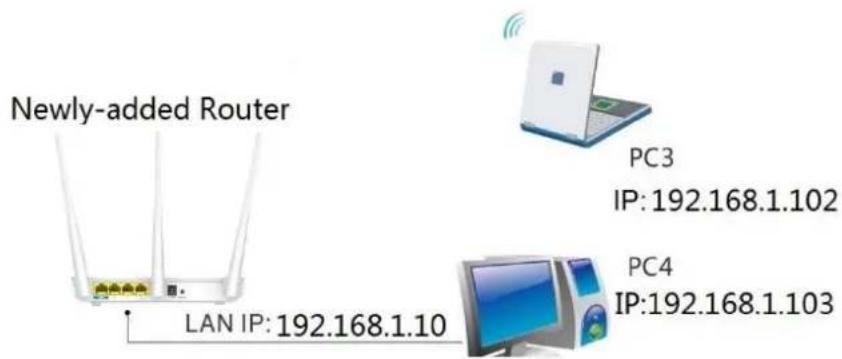
If you already position a router in your house, but its WiFi signal may not be strong enough to cover both your home office and bedroom. To extend your Router's WiFi coverage, you can prepare one more router and enable WDS Bridge Mode of the router.
Do the following preparation before configuring WDS Bridge Mode. For easy recognition, we call the existing router “remote router” and call the Router you need to prepare “newly-added router”.
- Verify the remote router is connected to the Internet and provides proper Internet service.
- Keep the WAN port of the newly-added router unplugged.
- Go to the User Interface of the remote router and collect the following info: WiFi Name (SSID), security mode, encryption rule, the security key and LAN IP. And take a note.

Tips
- The router or AP you select must be WDS-capable. This Router supports WDS.
- When WDS settings are finished, SSIDs of both the remote device and newly-added device will be the same.
- Do not change the SSID, channel, and security key in case the bridge disconnected.
flowchart
graph LR
    A["Internet"] -->|WAN| B["Remote Router"]
    B -->|LAN IP: 192.168.1.1| C["PC1"]
    C -->|IP: 192.168.1.101| D["PC2"]
    D -->|IP: 192.168.1.100| E["Computer"]
text_image
Newly-added Router LAN IP: 192.168.1.10 PC3 IP:192.168.1.102 PC4 IP:192.168.1.103Configure the newly-added router:
Change LAN IP of the newly added Router into another one, which should be in the same segment as LAN IP of the remote Router but should not be the same LAN IP, say 192.168.1.10
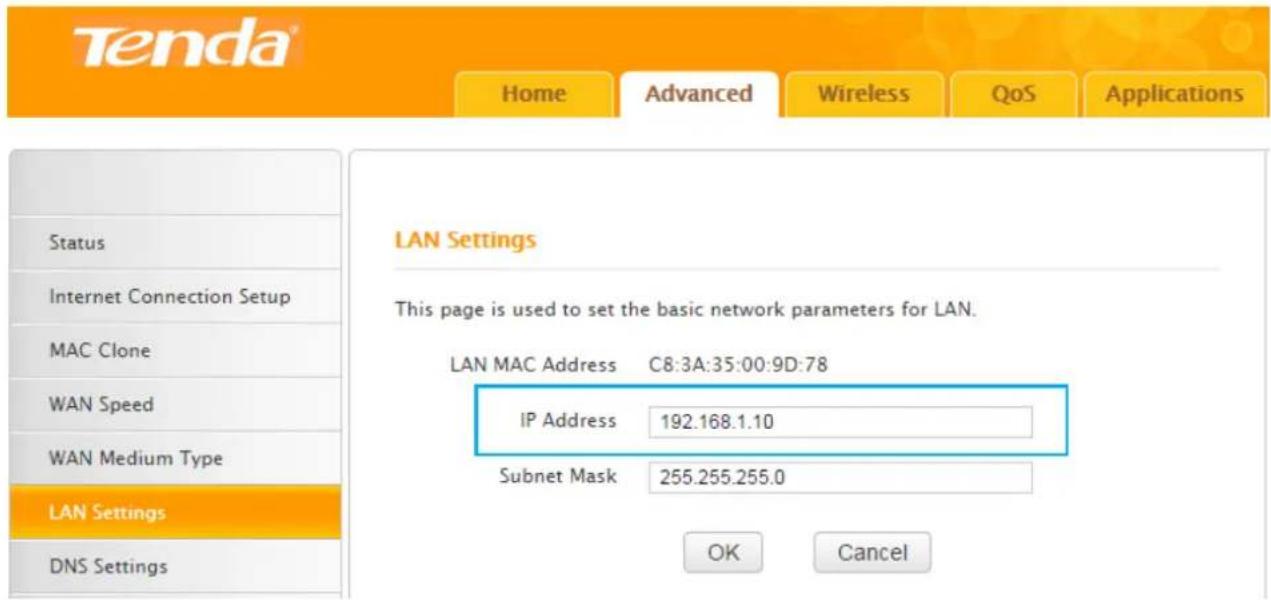
text_image
Tenda® Home Advanced Wireless QoS Applications LAN Settings This page is used to set the basic network parameters for LAN. LAN MAC Address C8:3A:35:00:9D:78 IP Address 192.168.1.10 Subnet Mask 255.255.255.0 Status Internet Connection Setup MAC Clone WAN Speed WAN Medium Type LAN Settings DNS Settings OK CancelClick Wireless > Wireless Basic Settings.
Tenda
Home
Advanced
Wireless
QoS
Applications
Wireless Basic Settings
Wireless Security
Access Control
Wireless Connection Status
Universal Repeater
Wireless Basic Settings
Enable Wireless

Primary SSID
Tenda_009D78
Secondary SSID
Wireless Working Mode
Wireless Access Point(AP)
WDS Bridge Mode
Network Mode
11b/g/n mixed mode
SSID Broadcast
Enable
Disable
AP Isolation
Enable
Disable
Channel
AutoSelect
Channel Bandwidth
20
40
20/40
Extension Channel
AutoSelect

WMM Capable
Enable
Disable
APSD Capable
Enable
Disable
Wireless Working Mode: WDS(Repeater mode)
AP MAC Address
AP MAC Address
Note: SSID and channel will automatically set to match your selected AP. Note that the AP you select MUST also support WDS. WEP is recommended for the connection for better compatibility with your selected AP.
Open Scan
2
OK
Cancel
1 Select WDS Bridge Mode.
② Click Open Scan.
Close Scan
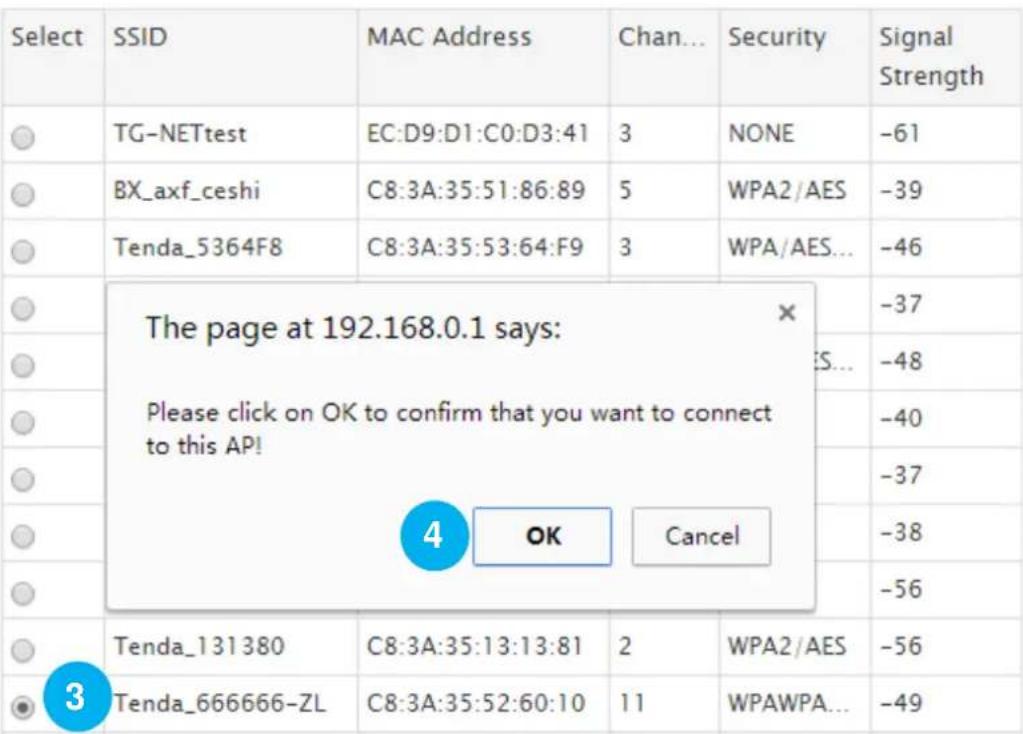
text_image
Select SSID MAC Address Chan... Security Signal Strength TG-NETtest EC:D9:D1:C0:D3:41 3 NONE -61 BX_axf_ceshi C8:3A:35:51:86:89 5 WPA2/AES -39 Tenda_5364F8 C8:3A:35:53:64:F9 3 WPA/AES... -46 The page at 192.168.0.1 says: Please click on OK to confirm that you want to connect to this AP! OK Cancel S... -48 -40 -37 -38 -56 Tenda_131380 C8:3A:35:13:13:81 2 WPA2/AES -56 Tenda_666666-ZL C8:3A:35:52:60:10 11 WPAWPA... -49Wireless Working Mode: WDS(Repeater mode)
AP MAC Address
C8:3A:35:52:60:10
AP MAC Address
Note: SSID and channel will automatically set to match your selected AP. Note that the AP you select MUST also support WDS. WEP is recommended for the connection for better compatibility with your selected AP.
Open Scan
5
OK
Cancel
The page at 192.168.0.1 says:
The SSID (network name) will be changed to Tenda_666666-ZL! Please reconnect to the new SSID!
6
OK
Cancel
3 Select the SSID of the remote Router.
4 Click OK on the pop-up window.
⑤ Then click OK on the bottom of the page.
⑥ Click OK on the pop-up window.
The MAC address of the router will be entered in the AP MAC address field automatically.
Wireless Working Mode: WDS(Repeater mode)
AP MAC Address
C8:3A:35:52:60:10
AP MAC Address
Note: SSID and channel will automatically set to match your selected AP. Note that the AP you select MUST also support WDS. WEP is recommended for the connection for better compatibility with your selected AP.
Verify that the primary SSID (wireless network name), network mode, channel, channel bandwidth, security mode, WPA Algorithms and security key (WiFi password) are the same as the note you've taken. If not, change them to the same.

text_image
Tenda® Home Advanced Wireless QoS Applications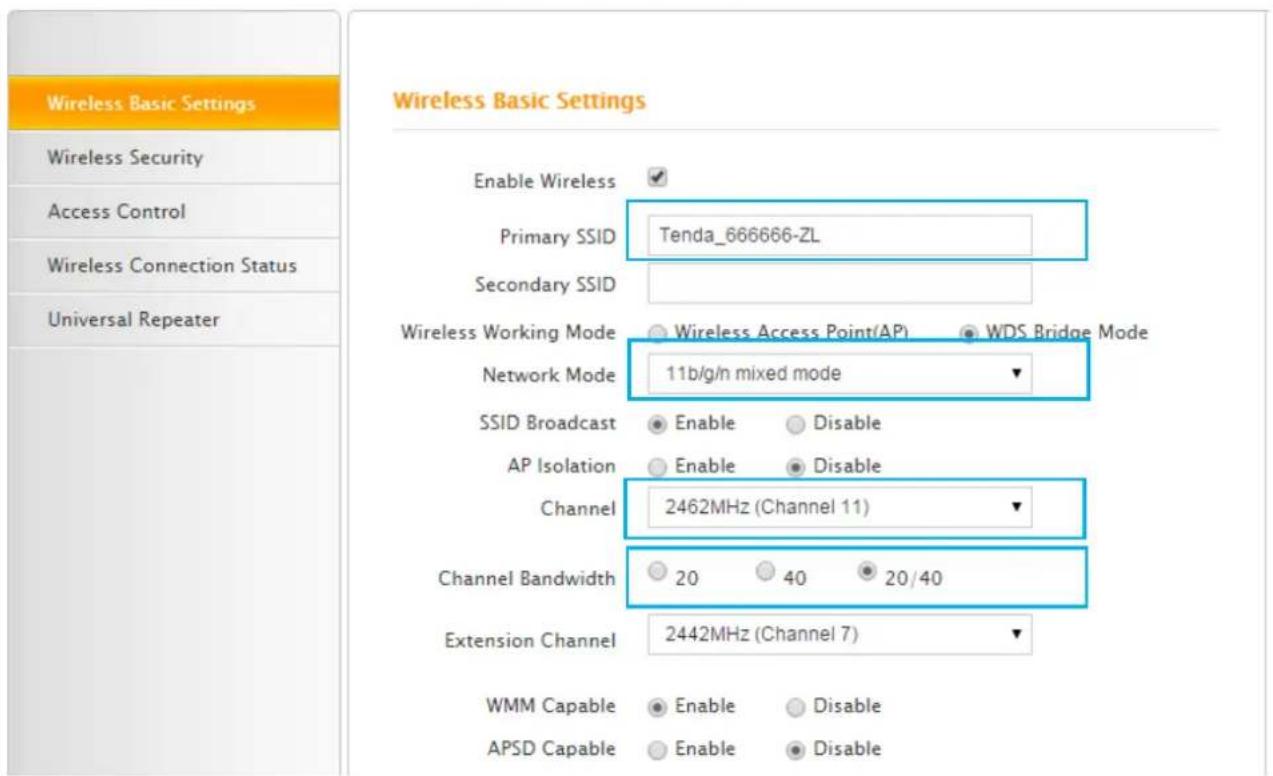
text_image
Wireless Basic Settings Wireless Security Access Control Wireless Connection Status Universal Repeater Enable Wireless Primary SSID Tenda_666666-ZL Secondary SSID Wireless Working Mode Wireless Access Point(AP) WDS Bridge Mode Network Mode 11b/g/n mixed mode SSID Broadcast Enable Disable AP Isolation Enable Disable Channel 2462MHz (Channel 11) Channel Bandwidth 20 40 20/40 Extension Channel 2442MHz (Channel 7) WMM Capable Enable Disable APSD Capable Enable Disable
text_image
Tenda® Home Advanced Wireless QoS Applications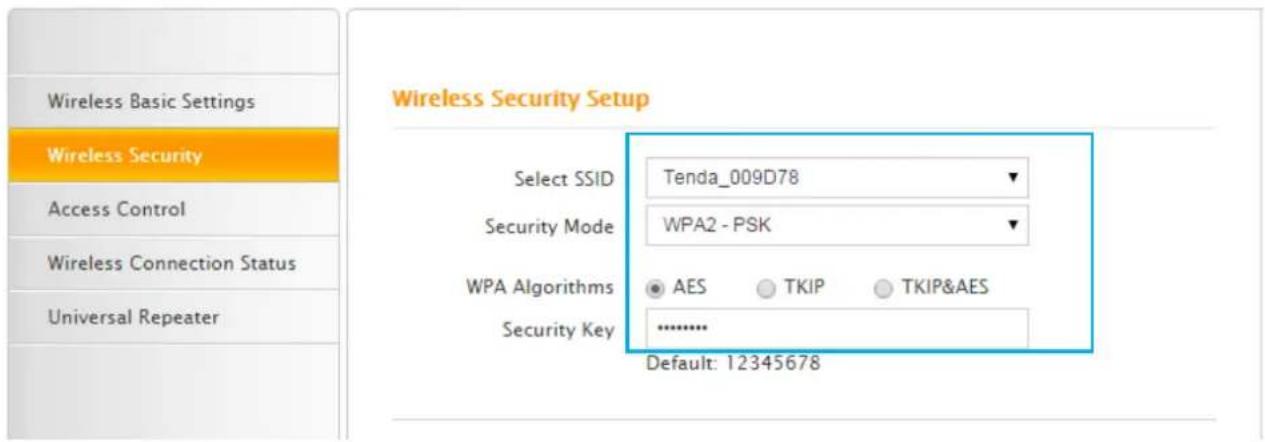
text_image
Wireless Basic Settings Wireless Security Access Control Wireless Connection Status Universal Repeater Wireless Security Setup Select SSID Tenda_009D78 Security Mode WPA2 - PSK WPA Algorithms AES TKIP TKIP&AES Security Key ****** Default: 12345678Click Advanced > DHCP Server, and keep DHCP server on the newly added Router disabled.

text_image
Tenda® Home Advanced Wireless QoS Applications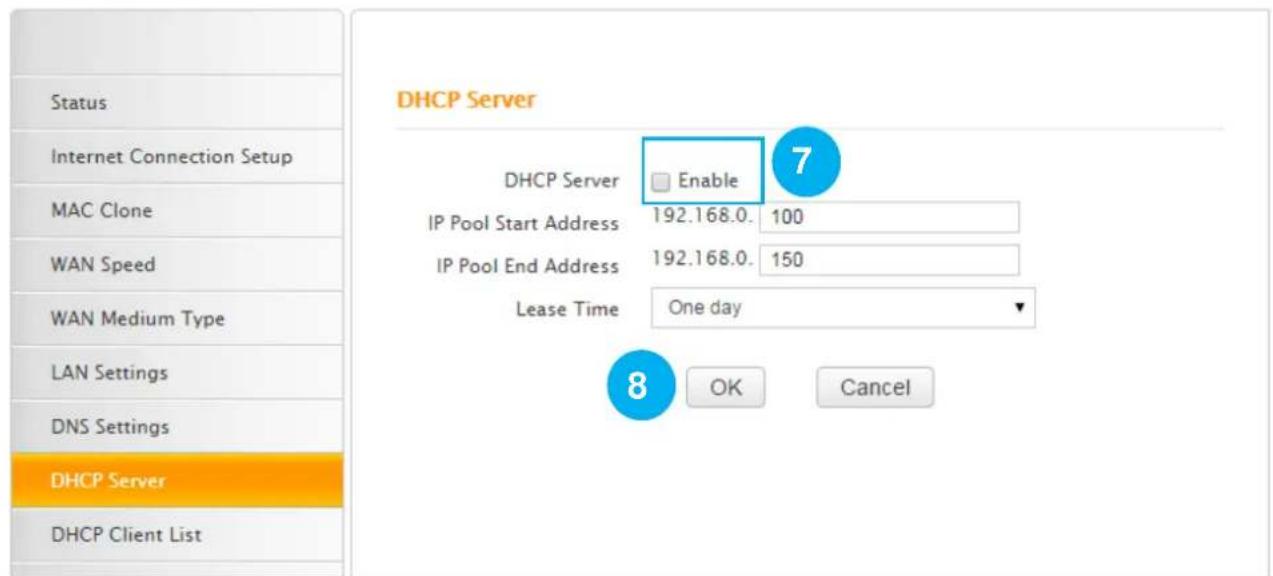
text_image
Status Internet Connection Setup MAC Clone WAN Speed WAN Medium Type LAN Settings DNS Settings DHCP Server DHCP Client List DHCP Server Enable 7 IP Pool Start Address 192.168.0. 100 IP Pool End Address 192.168.0. 150 Lease Time One day 8 OK Cancel⑦ Uncheck the Enable option.
8 Click OK.
Configure the remote router:
Refer to steps 1-6 to configure similar settings on the remote router.

Tips
Verify that the DHCP server on the remote Router is enabled.
Check whether the WDS mode is set successfully
Connect a wireless client (computer, smart phone, etc.) to the newly added router's WiFi. And check whether the client can access the Internet.
Wireless Security
If you didn't set the Security Key at the home page, you can come to the Wireless Security section to encrypt your WiFi password. Click Advanced > Wireless Security to set the WiFi protected access, for providing extremely strong data security and very effectively blocking eavesdropping.
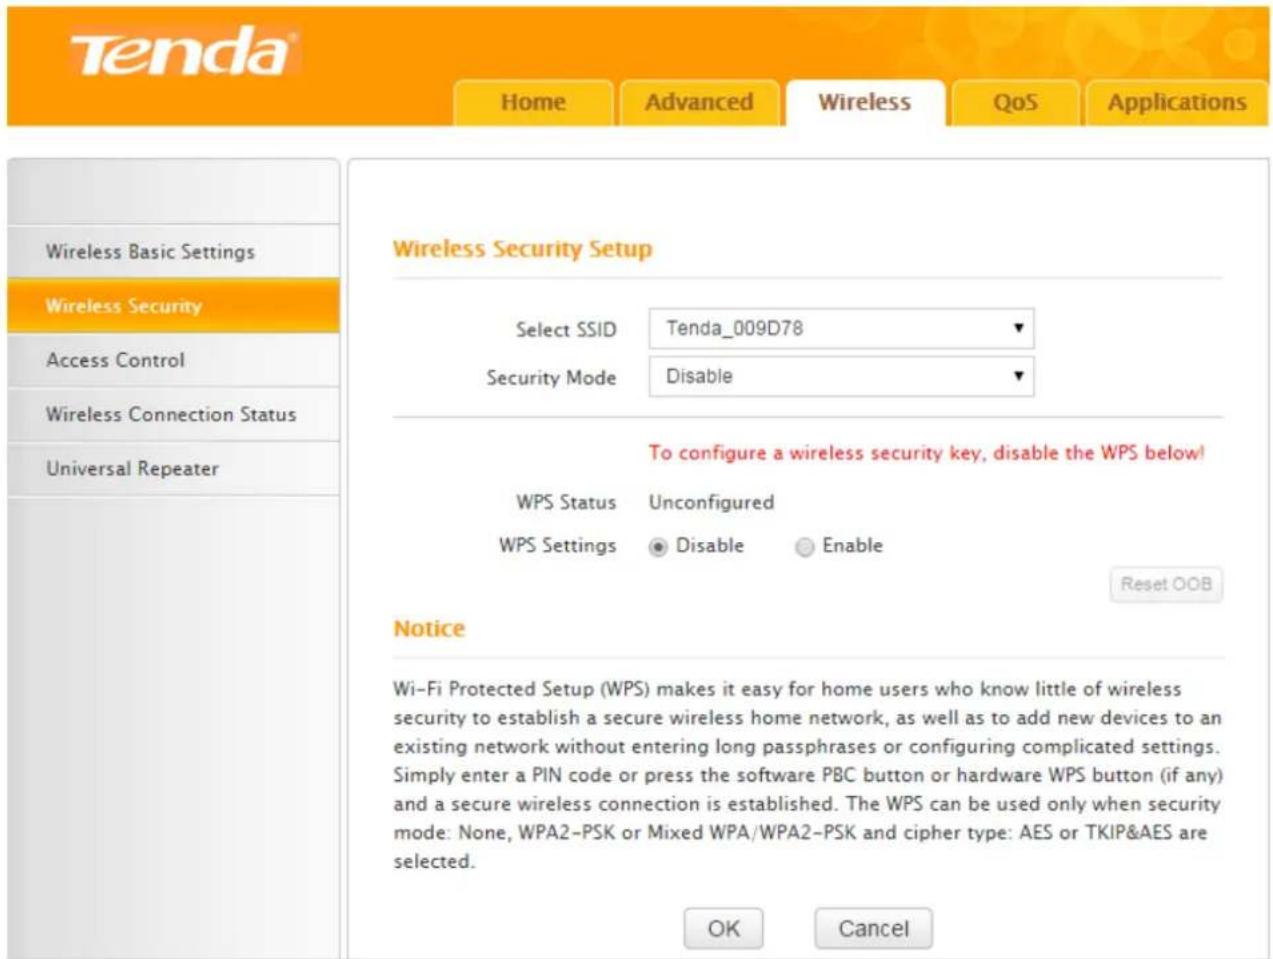
text_image
Tenda® Home Advanced Wireless QoS Applications Wireless Basic Settings Wireless Security Access Control Wireless Connection Status Universal Repeater Wireless Security Setup Select SSID Tenda_009D78 Security Mode Disable To configure a wireless security key, disable the WPS below! WPS Status Unconfigured WPS Settings Disable Enable Reset OOB Notice Wi-Fi Protected Setup (WPS) makes it easy for home users who know little of wireless security to establish a secure wireless home network, as well as to add new devices to an existing network without entering long passphrases or configuring complicated settings. Simply enter a PIN code or press the software PBC button or hardware WPS button (if any) and a secure wireless connection is established. The WPS can be used only when security mode: None, WPA2-PSK or Mixed WPA/WPA2-PSK and cipher type: AES or TKIP&AES are selected. OK CancelCommonly Used Encryption Methods
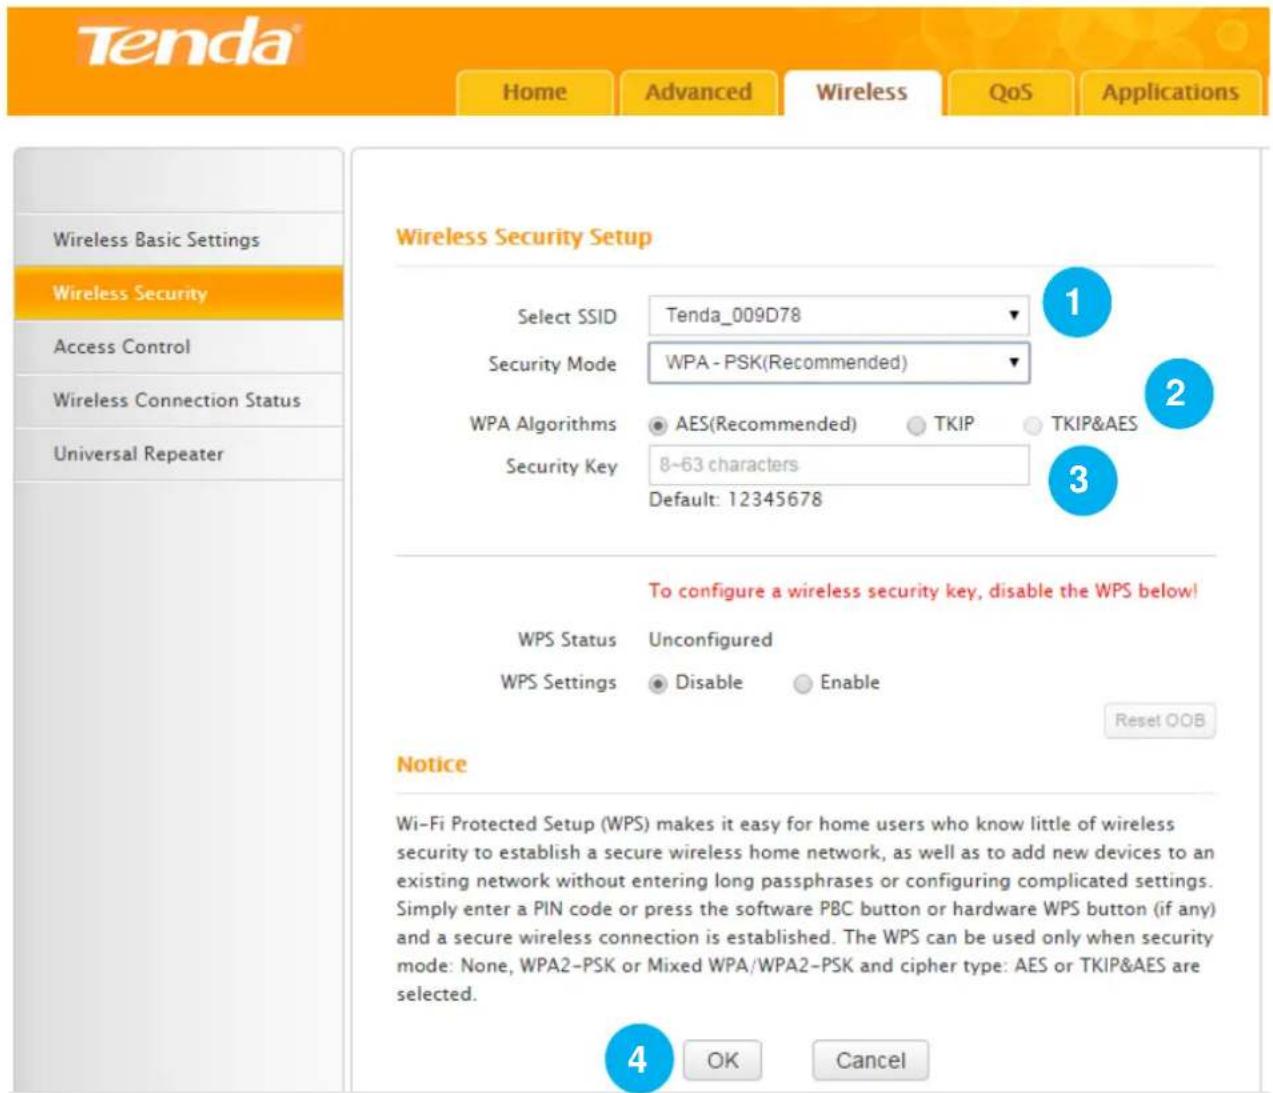
text_image
Tenda® Home Advanced Wireless QoS Applications Wireless Basic Settings Wireless Security Access Control Wireless Connection Status Universal Repeater Wireless Security Setup Select SSID Tenda_009D78 Security Mode WPA - PSK(Recommended) WPA Algorithms AES(Recommended) TKIP TKIP&AES Security Key 8~63 characters Default: 12345678 To configure a wireless security key, disable the WPS below! WPS Status Unconfigured WPS Settings Disable Enable Reset OOB Notice Wi-Fi Protected Setup (WPS) makes it easy for home users who know little of wireless security to establish a secure wireless home network, as well as to add new devices to an existing network without entering long passphrases or configuring complicated settings. Simply enter a PIN code or press the software PBC button or hardware WPS button (if any) and a secure wireless connection is established. The WPS can be used only when security mode: None, WPA2-PSK or Mixed WPA/WPA2-PSK and cipher type: AES or TKIP&AES are selected. OK Cancel① Select SSID: Select the WiFi name (SSID) you wish to encrypt, say "Tenda_009D78".
② Security Mode, WPA Algorithms: Taking security, compatibility and wireless speed into consideration, suggest you select the WPA-PSK in the Security Mode field, and AES in the WPA Algorithms option.
③ Security Key: Customize the WiFi password. (Note: To configure a WiFi password, please verify that the WPS function is disabled.)
4 Click OK.
Description of other options on the configuration page
√ Security Modes
-
Open: Open mode, WEP encryption, up to 54Mbps wireless speed.
-
Shared: Shared mode, WEP encryption, up to 54Mbps wireless speed.
-
WPA-PSK: WPA personal security key, supporting AES and TKIP.
-
WPA2-PSK: WPA2 personal security key, supporting AES, TKIP and TKIP&AES.
-
Mixed WPA/WPA2-PSK: Mixed mode. Wireless devices connect to the Internet by using WPA-PSK or WPA2-PSK.
√ WPA Algorithms:
- AES: When using this rule, wireless rate is up to 300Mbps.
- TKIP: When using this rule, wireless rate is up to 54Mbps.
- TKIP&AES: Compatible with TKIP and AES. Wireless devices connect to the Internet by using AES or TKIP.
WPS Encryption
Wi-Fi Protected Setup (WPS) makes it easy for home users to establish a home network, as well as to add new devices to an existing network without entering long passphrases or configuring complicated settings.
Only use WPS when your wireless device supports WPS function.
Here in the Router, if you choose to use WPS encryption, other security modes listed above in the pull-down menu cannot be configured.
Click Wireless > Wireless Security to enter the Wireless security setup page.
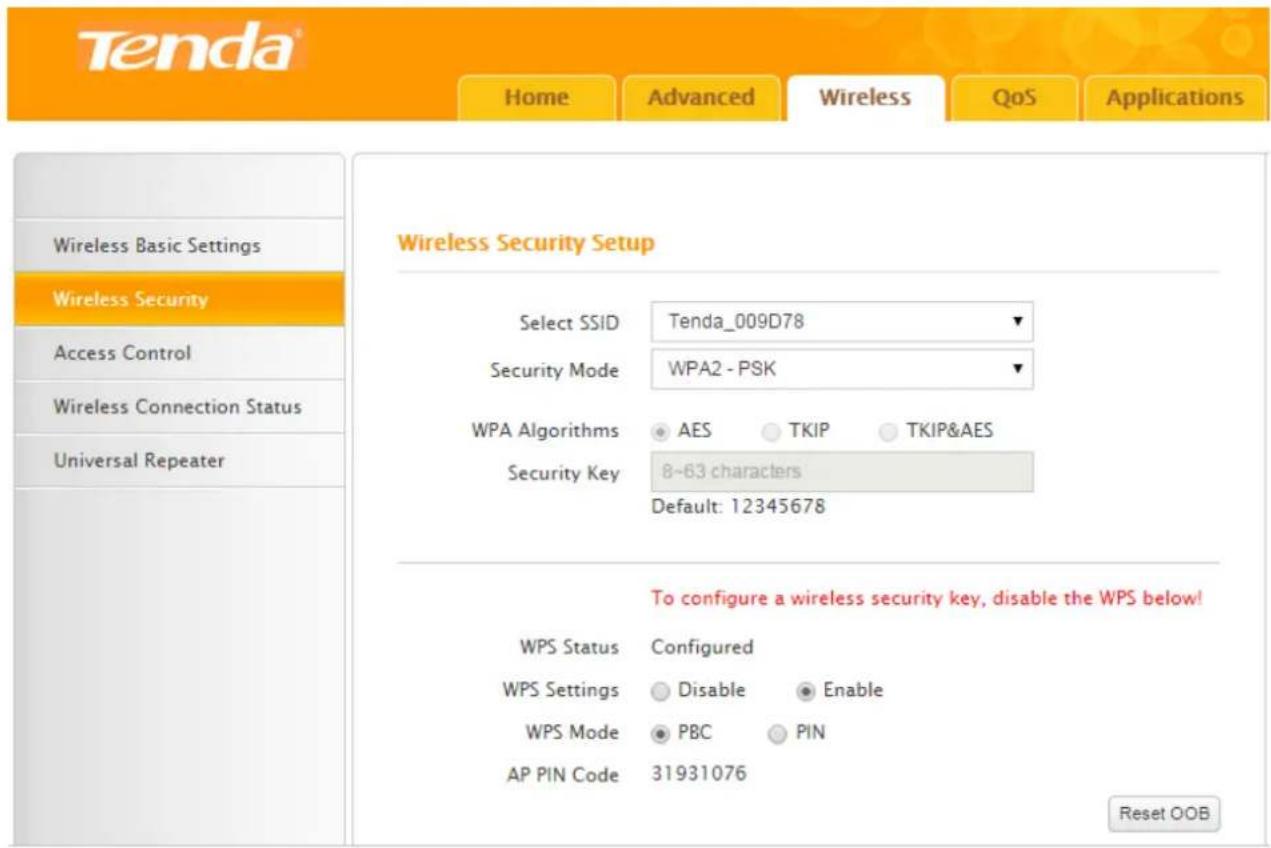
text_image
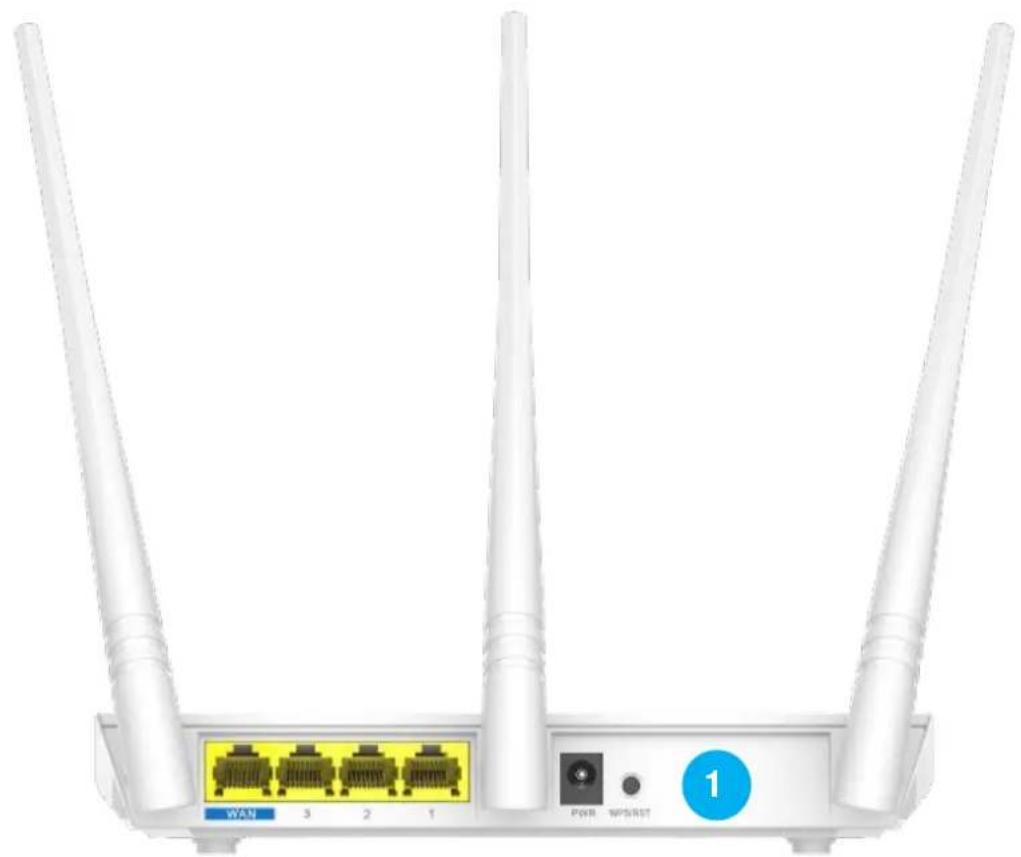
Tenda® Home Advanced Wireless QoS Applications Wireless Basic Settings Wireless Security Access Control Wireless Connection Status Universal Repeater Wireless Security Setup Select SSID Tenda_009D78 Security Mode WPA2 - PSK WPA Algorithms AES TKIP TKIP&AES Security Key 8~63 characters Default: 12345678 To configure a wireless security key, disable the WPS below! WPS Status Configured WPS Settings Disable Enable WPS Mode PBC PIN AP PIN Code 31931076 Reset OOBUse a WPS button
If your wireless client has a WPS push button, you can use it to connect to the router.
natural_image
Front view of a white wireless router with three antennas and labeled ports (no text or symbols on the device body)① Press the WPS button on the router for 1\~3 seconds and then release it.
② Within 2 minutes, enable WPS feature on your wireless clients.
Take SAMSUNG cellphone as an example:
Enter the WLAN setting page, and tap the icon on the bottom left corner on the cellphone.
Then select WPS push button on the pop-up subpage. The cellphone's WPS feature is enabled.
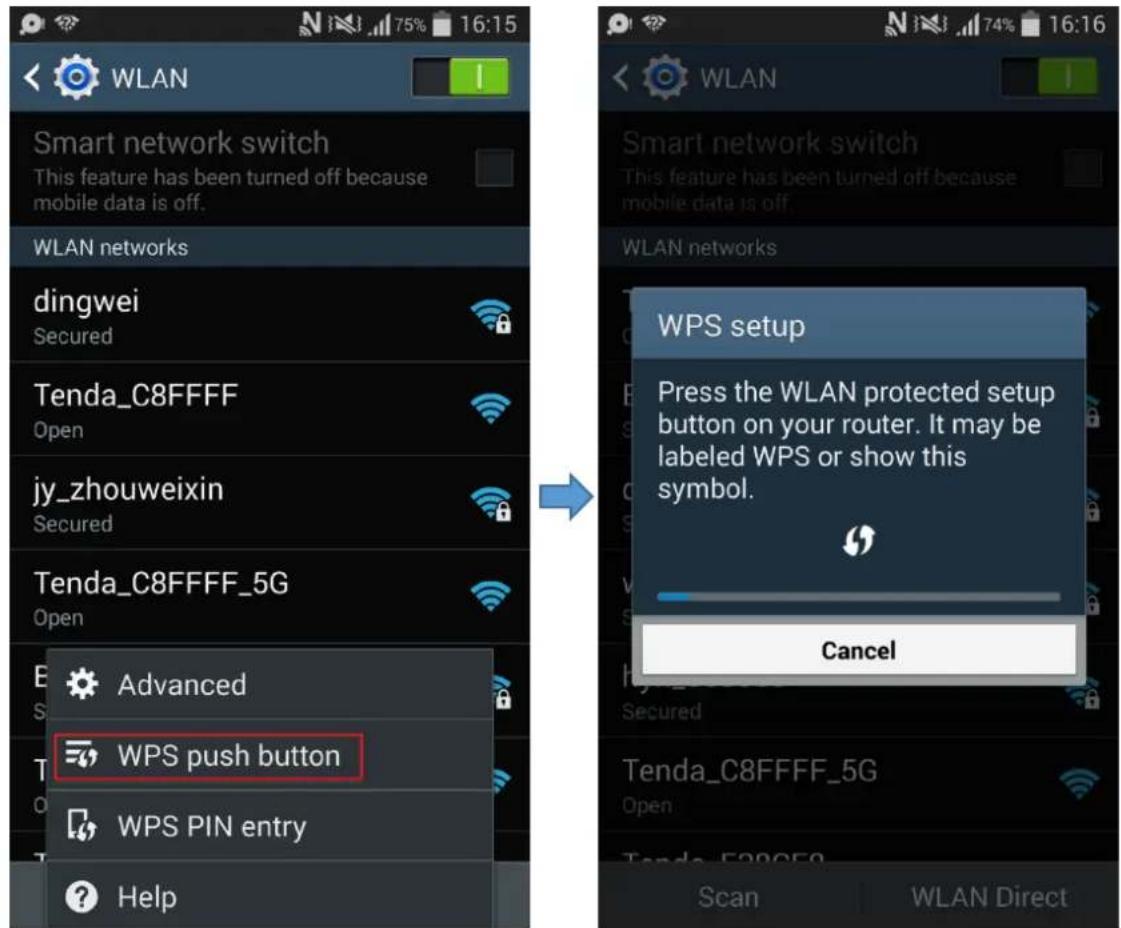
text_image
WLAN Smart network switch This feature has been turned off because mobile data is off. WLAN networks dingwei Secured Tenda_C8FFFF Open jy_zhouweixin Secured Tenda_C8FFFF_5G Open Advanced WPS push button WPS PIN entry Help WLAN Smart network switch This feature has been turned off because mobile data is off. WLAN networks WPS setup Press the WLAN protected setup button on your router. It may be labeled WPS or show this symbol. Cancel Scan WLAN DirectUse a PIN code
There are two ways to use PIN code. You can choose one to follow according to the WPS feature type of your wireless device.
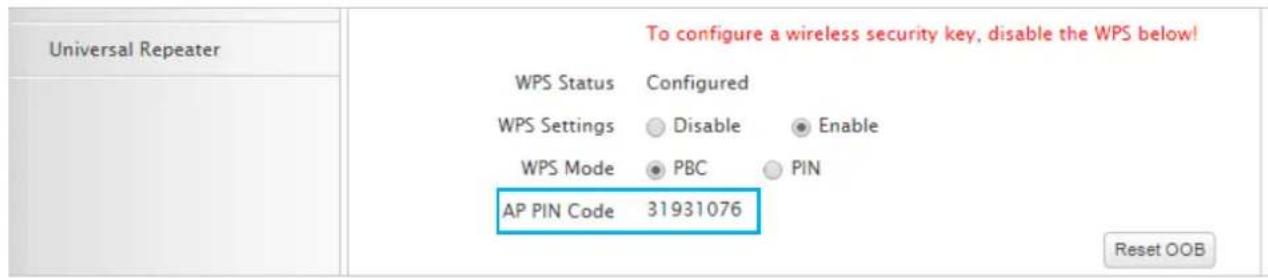
Method 1:
Type the AP PIN Code to your wireless device's PIN required box, 31931076 here, and the click OK in the bottom of this page..
text_image
Universal Repeater To configure a wireless security key, disable the WPS below! WPS Status Configured WPS Settings Disable Enable WPS Mode PBC PIN AP PIN Code 31931076 Reset OOBMethod 2:
Type your wireless device's PIN code in the PIN box, and the click OK in the bottom of this page.
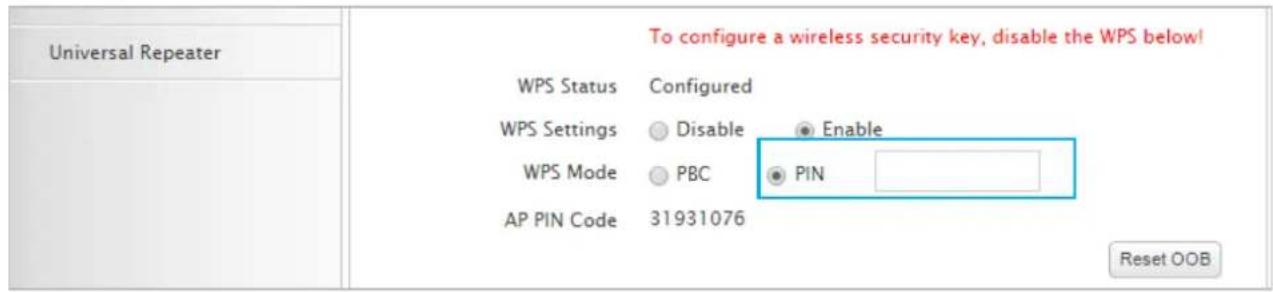
text_image
Universal Repeater To configure a wireless security key, disable the WPS below! WPS Status Configured WPS Settings Disable Enable WPS Mode PBC PIN AP PIN Code 31931076 Reset OOBAccess Control
Here you can set rules to permit or forbid wireless devices to connect to your WiFi. The rules refer to these devices' MAC addresses.
Example
You permit your computer (MAC: C8:9C:DC:54:90:77) to connect to the WiFi (SSID: Tenda_135760).

text_image
Tenda Home Advanced Wireless QoS Applications Wireless Basic Settings Wireless Security Access Control Wireless Connection Status Universal Repeater Access Control Select SSID Tenda_009D78 MAC Address Filter Permit 1 2 3 Operate Add 4 C8: 9C: DC: 54: 90: 77 C8:9C:DC:54:90:77 Delete 5 OK Cancel1 Select SSID: Select the WiFi name that you want to permit, say "Tenda_009D78".
② MAC Address Filter: Select Permit mode from the pull-down menu.
③ MAC address: Enter your MAC address (C8:9C:DC:54:90:77) into the MAC address box.
4 Click Add
⑤ Click OK.

Tips
You can check the wireless devices' MAC addresses in Wireless Connection Status or DHCP Client List.
Wireless Connection Status
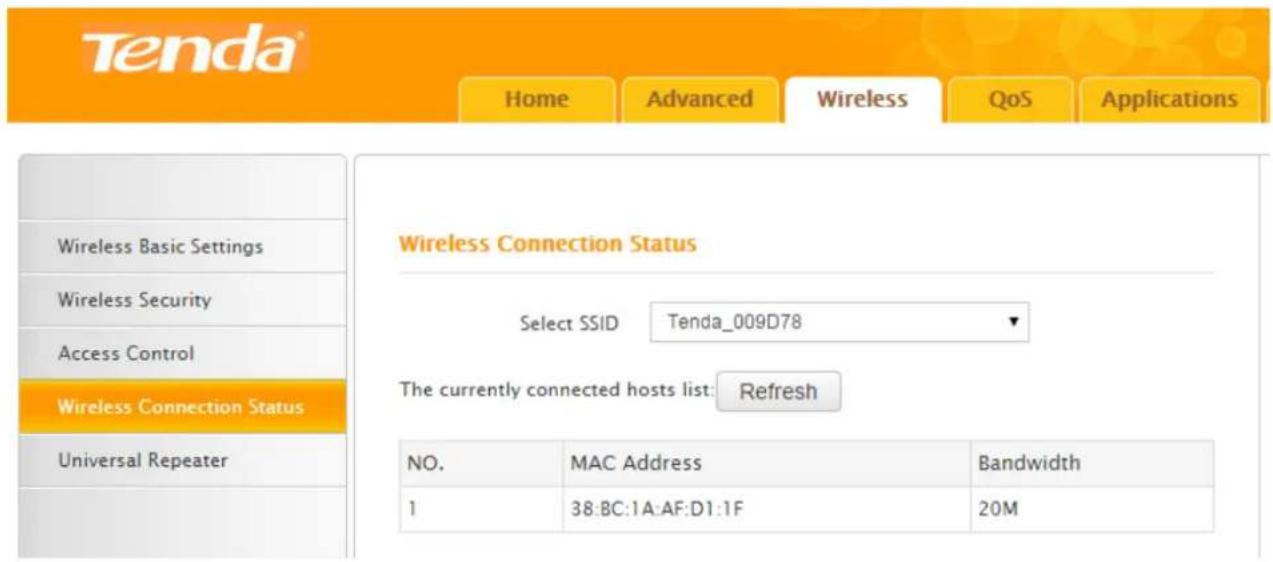
text_image
Tenda Home Advanced Wireless QoS Applications Wireless Basic Settings Wireless Security Access Control Wireless Connection Status Universal Repeater Wireless Connection Status Select SSID Tenda_009D78 The currently connected hosts list: Refresh NO. MAC Address Bandwidth 1 38:BC:1A:AF:D1:1F 20MIf there're unknown wireless devices to connect to your Router, you can check them on the list easily. To stop them from accessing your router, go to Wireless > Access Control to forbid its MAC address.
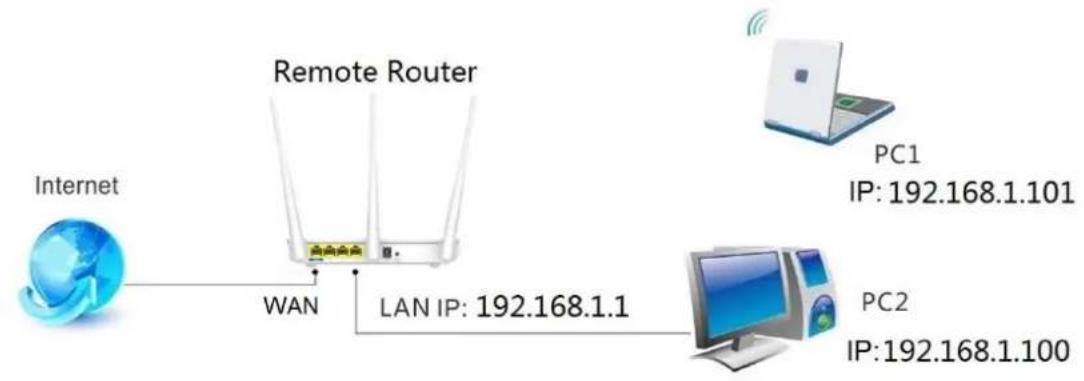
Universal Repeater
This section involves wireless network extension. The example below is for you to better understand how to extend the wireless network coverage.
Example
If you already position a router in your house, but its WiFi signal may not be strong enough to cover both your home office and bedroom. To extend your Router's WiFi coverage, you can prepare one more router and enable any wireless extender mode of the router.
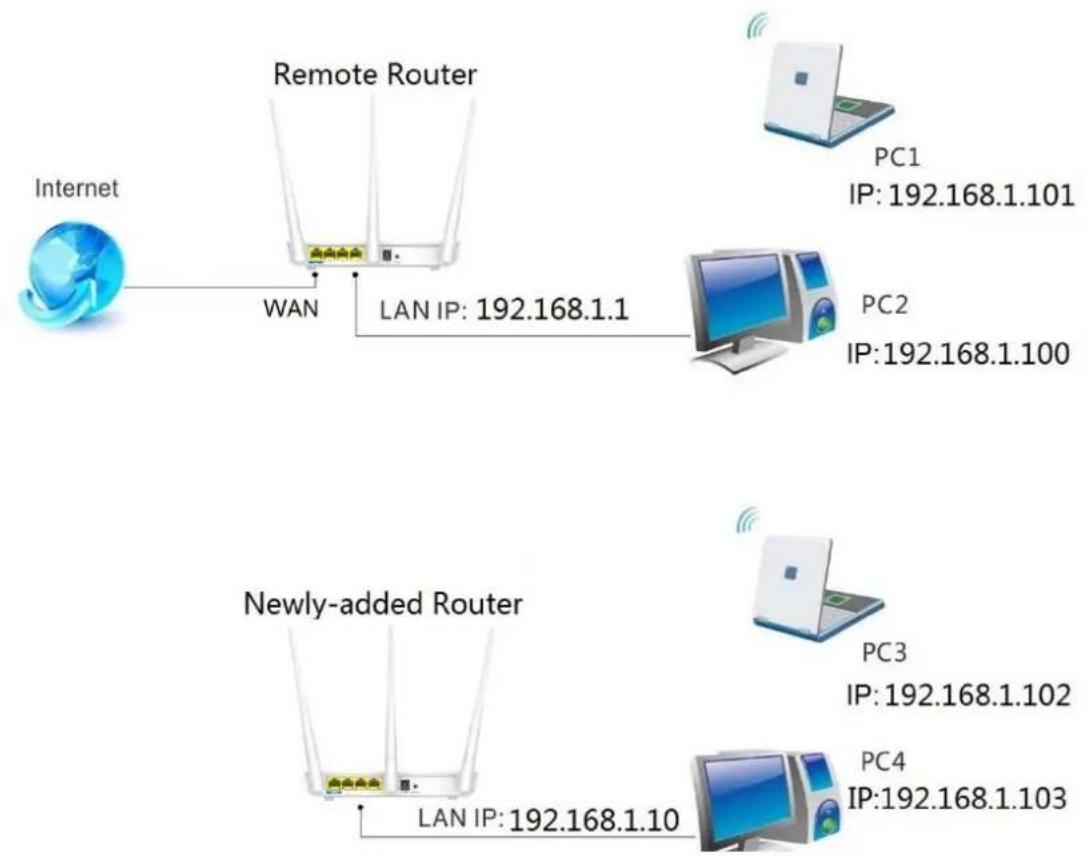
Do the following preparation before configuring Universal Repeater function. For easy recognition, we call the router in your home “remote router” and call the Router you need to prepare “newly-added router”.
- Verify the remote router is connected to the Internet and provides proper Internet service.
- Keep the WAN port of the newly-added router unplugged.
- Go to the User Interface of both routers and collect the following info: WiFi Name (SSID), security mode, encryption rule, the security key and LAN IP. And take a note.
text_image
Internet Remote Router WAN LAN IP: 192.168.1.1 PC1 IP: 192.168.1.101 PC2 IP: 192.168.1.100 Newly-added Router LAN IP: 192.168.1.10 PC3 IP: 192.168.1.102 PC4 IP: 192.168.1.103Configure the newly-added router:
Change LAN IP of the newly added Router into another one, which should be in the same segment as LAN IP of the remote Router but should not be the same LAN IP, say 192.168.1.10

text_image
Tenda® Home Advanced Wireless QoS Applications LAN Settings This page is used to set the basic network parameters for LAN. LAN MAC Address C8:3A:35:00:9D:78 IP Address 192.168.1.10 Subnet Mask 255.255.255.0 Status Internet Connection Setup MAC Clone WAN Speed WAN Medium Type LAN Settings DNS Settings OK CancelClick Wireless > Universal Repeater.
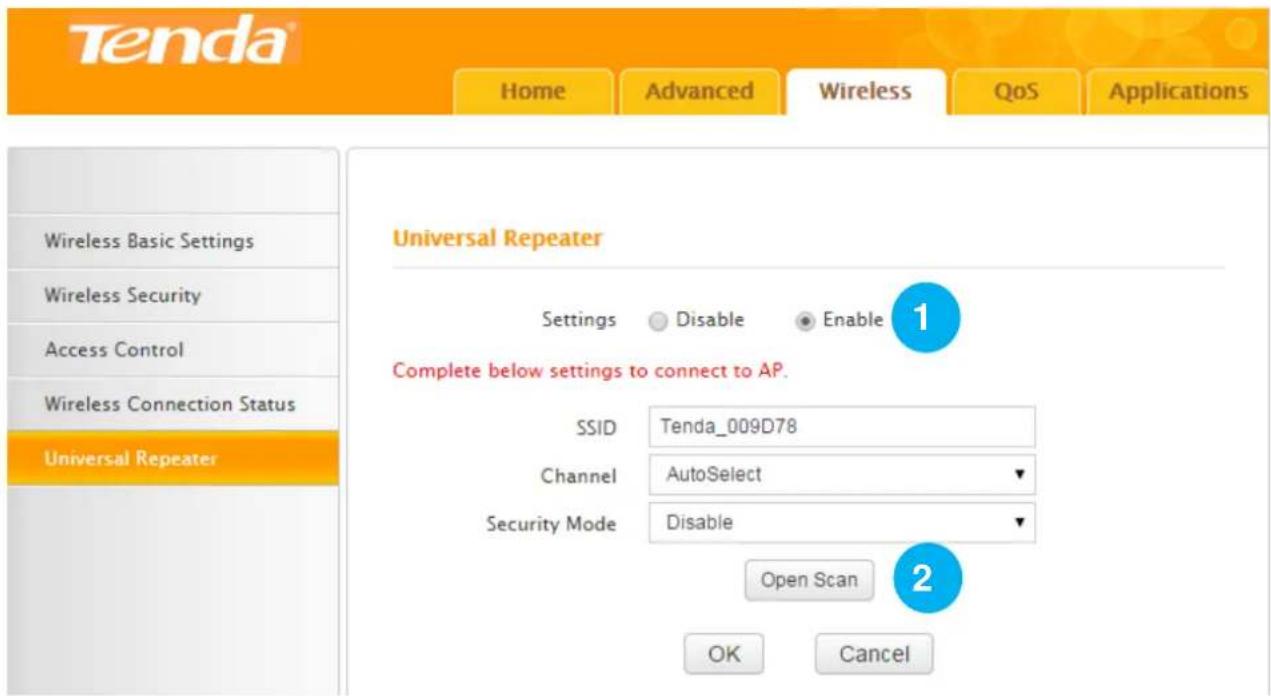
text_image
Tenda® Home Advanced Wireless QoS Applications Wireless Basic Settings Wireless Security Access Control Wireless Connection Status Universal Repeater Universal Repeater Settings Disable Enable Complete below settings to connect to AP. SSID Tenda_009D78 Channel AutoSelect Security Mode Disable Open Scan 2 OK Cancel① Select Enable.
② Click Open Scan.
text_image
Close Scan Select SSID MAC Address Channel Security Signal Strength The page at 192.168.0.1 says: Are you sure to connect to this AP? OK Cancel Tenda_666666-ZL C8:3A:35:52:60:10 11 WPAWPA... -13 Find and select the wireless network name (WiFi name) of the remote router.
4 Click OK on the pop-up window.
text_image
Tenda Home Advanced Wireless QoS Applications Wireless Basic Settings Wireless Security Access Control Wireless Connection Status Universal Repeater Universal Repeater Settings Disable Enable Complete below settings to connect to AP. SSID Tenda_666666-ZL Channel 11 Security Mode Mixed WPA/WPA2 - PSK WPA Algorithms AES TKIP TKIP&AES Key ............ 5 Open Scan 6 OK Cancel⑤ Type the wireless security key (WiFi password) of the wireless network name (WiFi name) of the remote router.
⑥ Click OK.
The router will reboot automatically. After the router reboots, you can try surfing the Internet.
text_image
Tenda® Home Advanced Wireless QoS Applications Wireless Basic Settings Wireless Security Access Control Wireless Connection Status Universal Repeater Reboot the router to bring the settings into effect. Rebooting...84%
Tips
The Connection Status in Advanced > Status cannot indicate that whether the router can access to the Internet or not in this situation.
3 QoS
Here QoS is about how to allocate the bandwidth properly for several clients which are connected to your Router's wired or wireless network. You can go to Bandwidth Control to configure and check traffic statistics in Traffic Status.
Bandwidth Control
Click QoS > Bandwidth Control to improve network performance by specifying the download/upload speed for connected clients. The example below is for you to consult to configure Bandwidth Control based on your own demands.
Example
Always several devices share 4M broadband service in your home. You recently have to watch lots of news videos to prepare for a special program but only to find it's hard to go through the videos smoothly. Your notebook starves for more bandwidths.
In this case, you can choose to configure a download bandwidth rule in Bandwidth Control to allocate sufficient bandwidth for your notebook. If you calculate the download/upload speed by yourself, these formats may help: 1M (Bytes) = 1024K (Bytes); 1Bytes = 8Bits. Upload bandwidth rule is not always used unless you have to upload lots of files and videos.
Configuration
① Specify a static IP for your notebook (MAC address: 18:DC:56:A4:06:FA), “192.168.0.150”. Make it always automatically get “192.168.0.150” to access the Internet. Consult Static Assignment for steps.
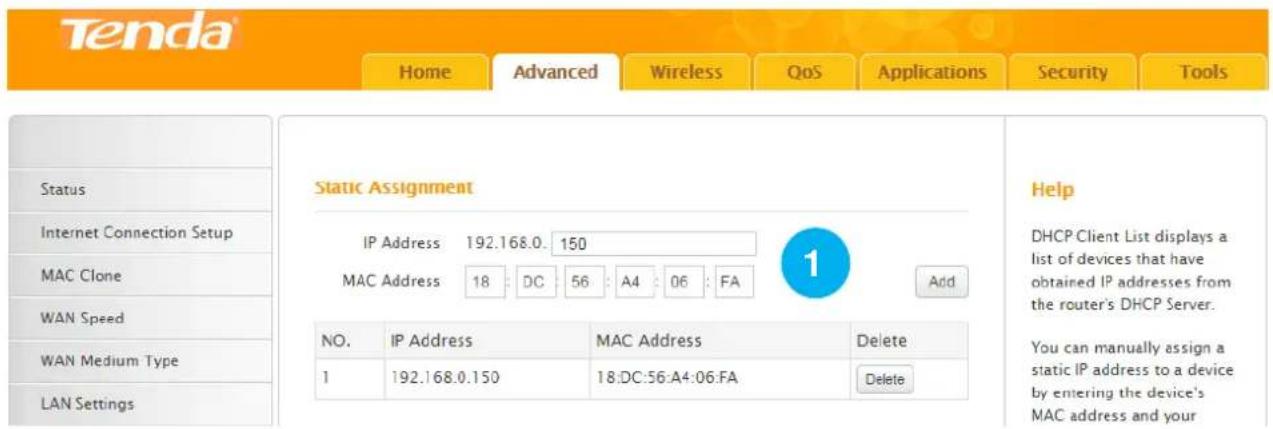
text_image
Tenda® Home Advanced Wireless QoS Applications Security Tools Static Assignment IP Address 192.168.0. 150 MAC Address 18 DC 56 A4 06 FA Add NO. IP Address MAC Address Delete 1 192.168.0.150 18:DC:56:A4:06:FA Delete Status Internet Connection Setup MAC Clone WAN Speed WAN Medium Type LAN Settings Help DHCP Client List displays a list of devices that have obtained IP addresses from the router's DHCP Server. You can manually assign a static IP address to a device by entering the device's MAC address and your② Check the Enable box.
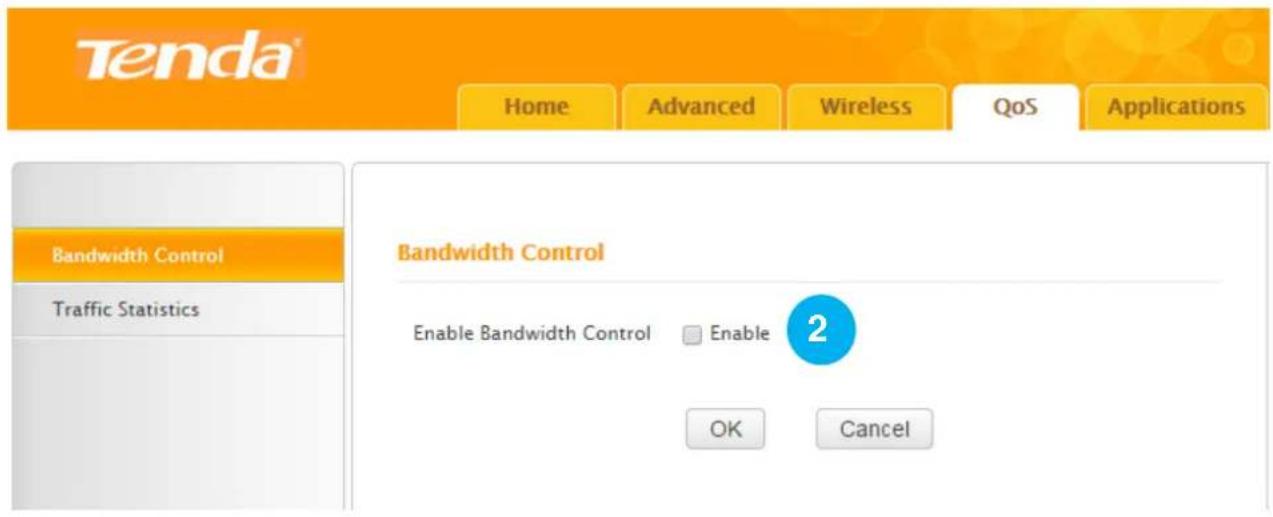
text_image
Tenda® Home Advanced Wireless QoS Applications Bandwidth Control Traffic Statistics Bandwidth Control Enable Bandwidth Control Enable 2 OK CancelConfigure a download bandwidth rule for the IP.

text_image
Tenda® Home Advanced Wireless QoS Applications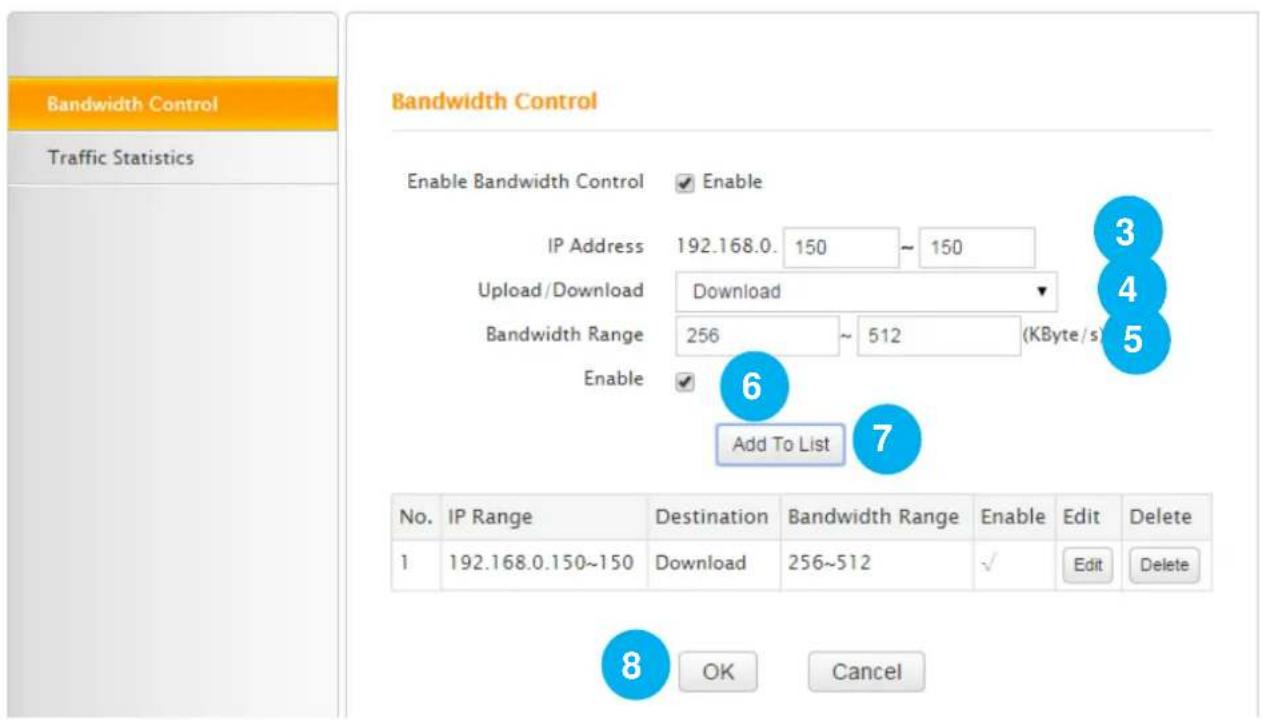
text_image
Bandwidth Control Traffic Statistics Bandwidth Control Enable Bandwidth Control ✓ Enable IP Address 192.168.0. 150 ~ 150 Upload/Download Download Bandwidth Range 256 ~ 512 (KByte/s) Enable ✓ Add To List 7 No. IP Range Destination Bandwidth Range Enable Edit Delete 1 192.168.0.150~150 Download 256~512 ✓ Edit Delete 8 OK Cancel③ IP Address: Enter “150” in two rightmost boxes. If you want to specify a rule for several devices which get IPs within an IP range, you need to enter the start IP and end IP to these two rightmost boxes respectively.
4 Upload/Download: Select Download from the pull-down menu.
5 Bandwidth Range: Enter "256" in the first box and "512" in the second box. Because your
Tenda
broadband service is 4M, so the download speed is up to 512KByte/s (4 * 128KByte=512). On the other hand, 256\~512KByte/s are sufficient for you to watch smooth HD videos.
6 Enable: Check the Enable box to enable all the settings in this rule.
⑦ Click Add to List. You can view the rule in the table, shown as the figure below. The icon “√” indicates the rule is enabled. If it’s “×”, the rule is not enabled.
| No. | IP Range | Destination | Bandwidth Range | Enable | Edit | Delete |
| 1 | 192.168.0.150~150 | Download | 256~512 | √ | Edit | Delete |
8 Click OK.
Traffic Statistics
Here you can view how much traffic each device is using via your Router.
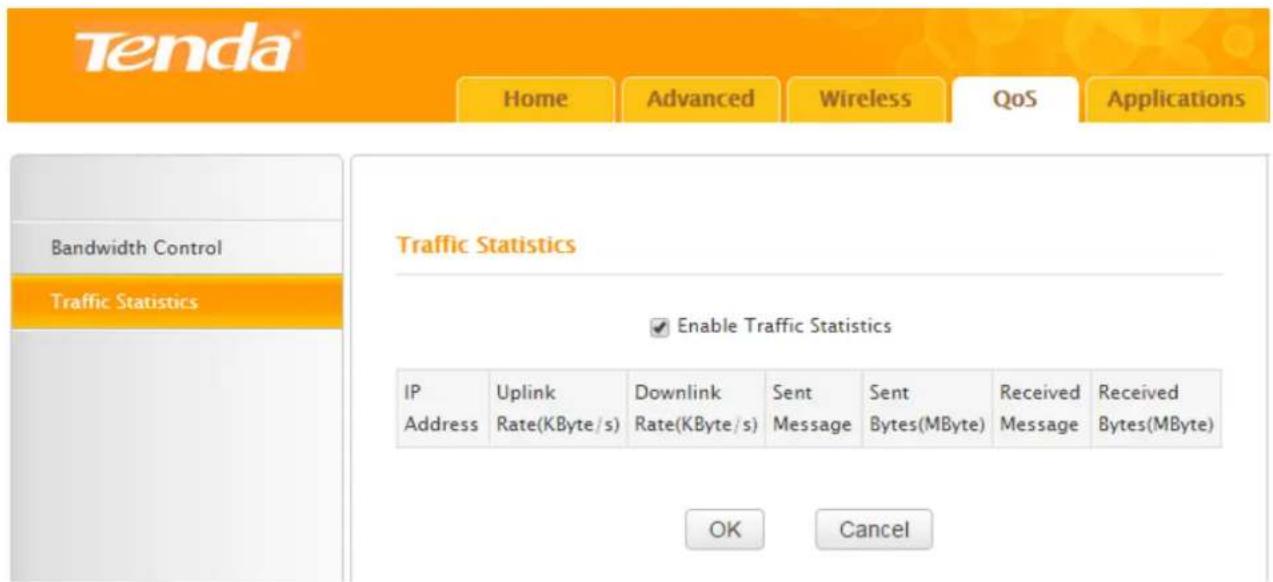
text_image
Tenda® Home Advanced Wireless QoS Applications Bandwidth Control Traffic Statistics Traffic Statistics Enable Traffic Statistics IP Uplink Downlink Sent Sent Received Received Address Rate(KByte/s) Rate(KByte/s) Message Bytes(MByte) Message Bytes(MByte) OK CancelEnable Traffic Statistics: Check the box to enable Traffic Statistics feature, to see at a glance how much traffic each device in your network is using. When the option is enabled, the page will refresh every five minutes.
This option is disabled by default. Disabling it may boost your network. Suggest you only enable it if necessary. Statistics you can see on the list:
| Statistics | Indications Description |
| IP Address | The IP address of one device connected to your Router |
| Uplink Rate | The upload speed (KByte/s) of a corresponding device |
| Downlink Rate | The download speed (KByte/s) of a corresponding device |
| Sent Message | The number of packets sent by a corresponding device via the Router |
| Sent Bytes | The number of Bytes (Unit: MByte) sent by a corresponding device via the Router |
| Received Message | The number of packets received by a corresponding device via the Router |
| Received Bytes | The number of Bytes (Unit: MByte) received by a corresponding device via the Router |
4 Applications
Click Applications to join this part. The Router provides several ways for helping you or your friend to visit the intranet resource from the Internet.
Port Range Forwarding
Port range forwarding serves for web servers, ftp servers, e-mail servers, game consoles, and other specialized internet applications. The feature will help to forward some special services from the Internet via your Router's WAN port to the specified IP address (es). Other IPs will not share these services.
Example
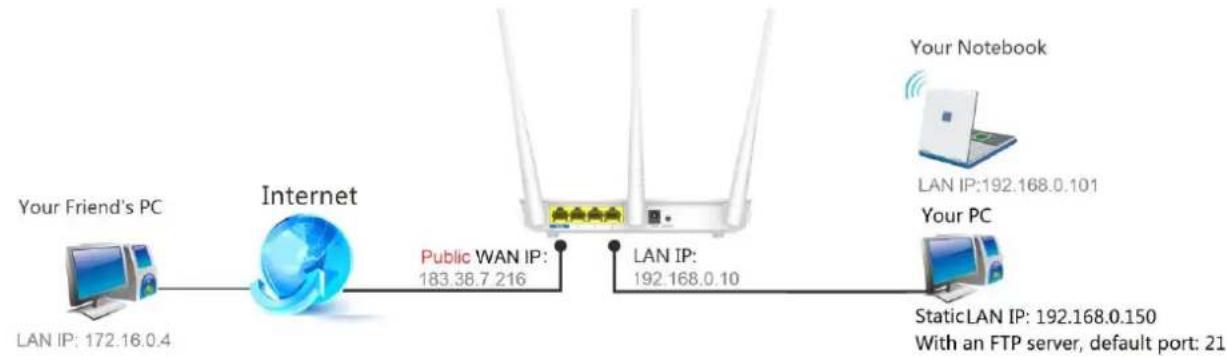
If you want to share a giant file with your friend who are not in the same LAN with you, and it will take a lot of time to upload them. You can firstly establish an ftp server in your computer and then set a rule of Port Range Forwarding in your Router to share them quickly and conveniently. All parameters shown in the figure below are examples.
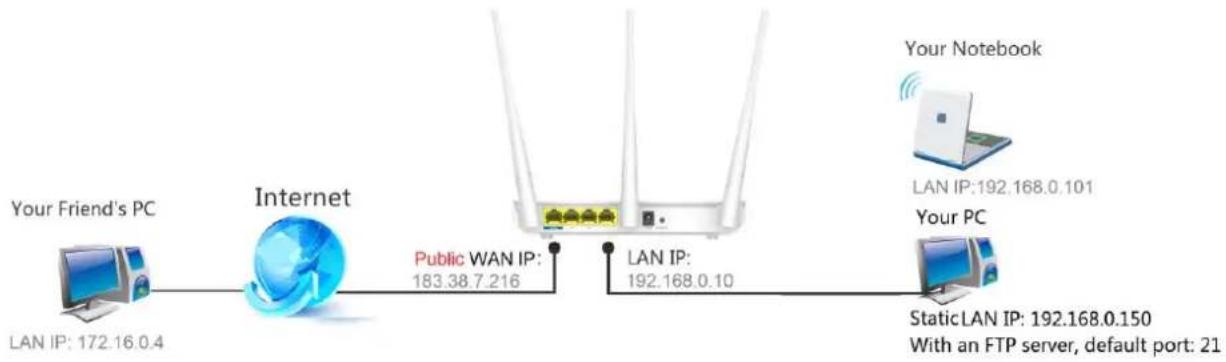
flowchart
graph LR
    A["Your Friend's PC"] -->|LAN IP: 172.16.0.4| B["Internet"]
    B -->|Public WAN IP: 183.38.7.216| C["Router"]
    C -->|LAN IP: 192.168.0.10| D["Your Notebook"]
    D -->|LAN IP: 192.168.0.101| E["Your PC"]
    E -->|StaticLAN IP: 192.168.0.150\nWith an FTP server, default port: 21| C
Configuration
① Specify a static IP for your computer (MAC address: 18:DC:56:A4:06:FA), “192.168.0.150”. Make it always get “192.168.0.150” to access the Internet. Consult Static Assignment for steps.

text_image
Tenda® Home Advanced Wireless QoS Applications Security Tools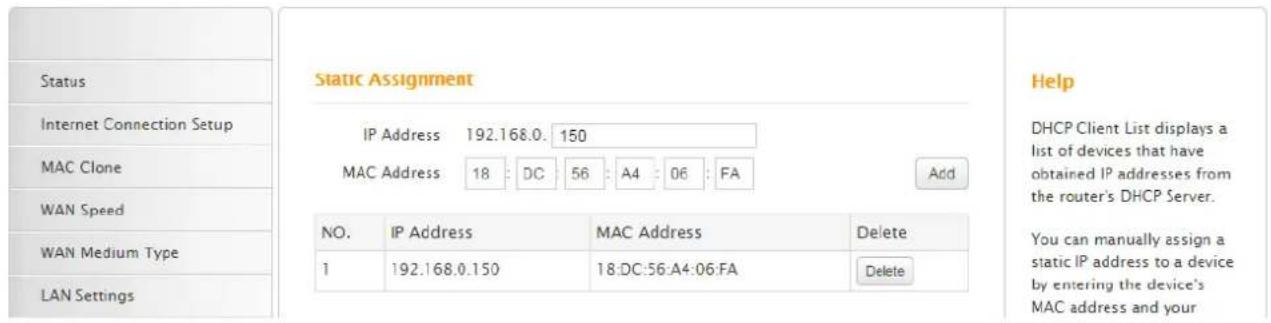
text_image
Status Internet Connection Setup MAC Clone WAN Speed WAN Medium Type LAN Settings Static Assignment IP Address 192.168.0. 150 MAC Address 18 : DC : 56 : A4 : 06 : FA Add NO. IP Address MAC Address Delete 1 192.168.0.150 18:DC:56:A4:06:FA Delete Help DHCP Client List displays a list of devices that have obtained IP addresses from the router's DHCP Server. You can manually assign a static IP address to a device by entering the device's MAC address and your② Verify that the WAN IP of the Router is a public IP. If not, your environment is not fit for the Port Range Forwarding feature.
③ Establish an FTP server in your computer, default port: “21”, using TCP protocol. And update your file to the server.
④ Disable the firewall, virus protection and security guard on your computer. If not, users from the Internet might not be able to access the server on the internal computer.
5 Login to the Router's User Interface again, go to Port Range Forwarding section and do the following configurations.
Tenda
Home
Advanced
Wireless
QoS
Applications
Port Range Forwarding
DMZ Host
DDNS
UPNP Settings
Static Routing
Routing Table
Port Range Forwarding
Port range forwarding is useful for web servers, ftp servers, e-mail servers, gaming and other specialized Internet applications. When you enable the port range forwarding, the communication requests from the Internet to your router's WAN port will be forwarded to the specified LAN IP address.
| NO. | Start Port-End Port | LAN IP | Protocol | Enable | Delete | |||
| 1. | 21 | - 21 | 192.168.0. | 150 | TCP | ✓ | ||
| 2. | 192.168.0. | TCP | ✓ | |||||
| 3. | 192.168.0. | TCP | ✓ | |||||
| 4. | 192.168.0. | TCP | ✓ | |||||
| 5. | 192.168.0. | TCP | ✓ | |||||
| 6. | 192.168.0. | TCP | ✓ | |||||
| 7. | 192.168.0. | TCP | ✓ | |||||
| 8. | 192.168.0. | TCP | ✓ | |||||
| 9. | 192.168.0. | TCP | ✓ | |||||
| 10. | 192.168.0. | TCP | ✓ | |||||
| Well-known service ports: | DNS(53) | ✓ | Add to ID 1 | |||||

- Start Port- End Port: Enter "21" in both fields.
You can also come to the Well-known service ports part, select FTP (21) from the pull-down menu. Select 1 from the ID pull-down menu. And click Add to, then you will find the Stat Port- End Port fields are entered with "21" automatically. Service port will vary according to your server type.

text_image
Well-known service ports: FTP(21) ▼ Add to ID 1 ▼- LAN IP: the internal host's IP address. Enter "150" as the rightmost byte of the LAN IP: "192.168.0.150".
-
Protocol: the protocol required for the service port(s). Select TCP from the pull-down menu in this example.
-
Enable: Check it to enable current settings.
- Click OK to activate your this rule for Port Range Forwarding.
Verification
The IP format used by the Internet users to access your Intranet is Server Type://Your Router's WAN IP:Port Number. Here in the example, your friend can input ftp://183.38.7.216:21 in his web browser and try to access your FTP server to download the giant file.

text_image
ftp://183.38.7.216:21Port Range Forwarding + DDNS
For the WAN IP address (Public IP) may be the dynamic IP allocated from the ISP, you can give your ftp server a static host name by setting DDNS so that friends on the Internet can visit the ftp server via the static host name. Your Tenda Router has DDNS feature. Go to DDNS for details.
DMZ Host
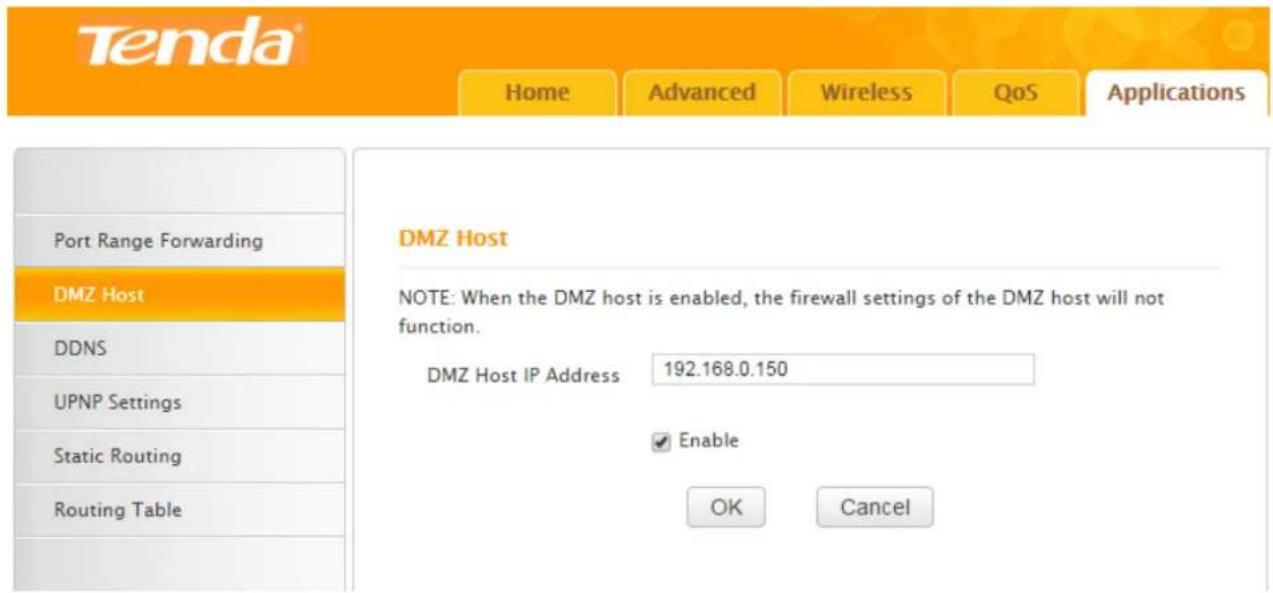
The DMZ host allows a particular interface or computer to have a direct access to some special massages via the Router without any firewall or network address translator (NAT) to mask the true identity of the interface or computer. These special messages refer to an HTTP server or FTP server. Your Router contains its DMZ settings shown as the screenshot below.
text_image
Tenda Home Advanced Wireless QoS Applications Port Range Forwarding DMZ Host DDNS UPNP Settings Static Routing Routing Table DMZ Host NOTE: When the DMZ host is enabled, the firewall settings of the DMZ host will not function. DMZ Host IP Address 192.168.0.150 Enable OK CancelExample
You want to create a DMZ host in your computer for messages transmitting via the HTTP server.
Configuration
① Specify a static IP for your computer, “192.168.0.150”. Make it always automatically get
"192.168.0.150" to access the Internet. Consult Static Assignment for steps.
② Login to the Router's User Interface, click Applications > DMZ, to configure detailed settings.
- DMZ Host IP Address: Enter "192.168.0.150" in this field. It is the IP address of the computer with DMZ host created.
- Enable: Check it to enable the DMZ host feature.
- Click OK to enable your settings.

Note
Once enabled, the DMZ host loses protection from the firewall and becomes vulnerable to Internet attacks. If you do not need to use DMZ host, disable it as soon as possible.
DDNS
DDNS (Dynamic Domain Name Server) allows a dynamic public IP address of one service to be associated with a static host name, so that anyone anywhere on the Internet can visit the host and share the service. Thus, uninterrupted access to services whose numeric IPs may change is maintained. After DDNS is enabled, using URL “hostname.dyndns.org” or “hostname.no-ip.com” can access the host.
DDNS is always used with Port Range Forwarding feature. Continue the example in Port Range Forwarding section. For your WAN IP (public IP) may change, DDNS can help you use a static host name to maintain the connection.
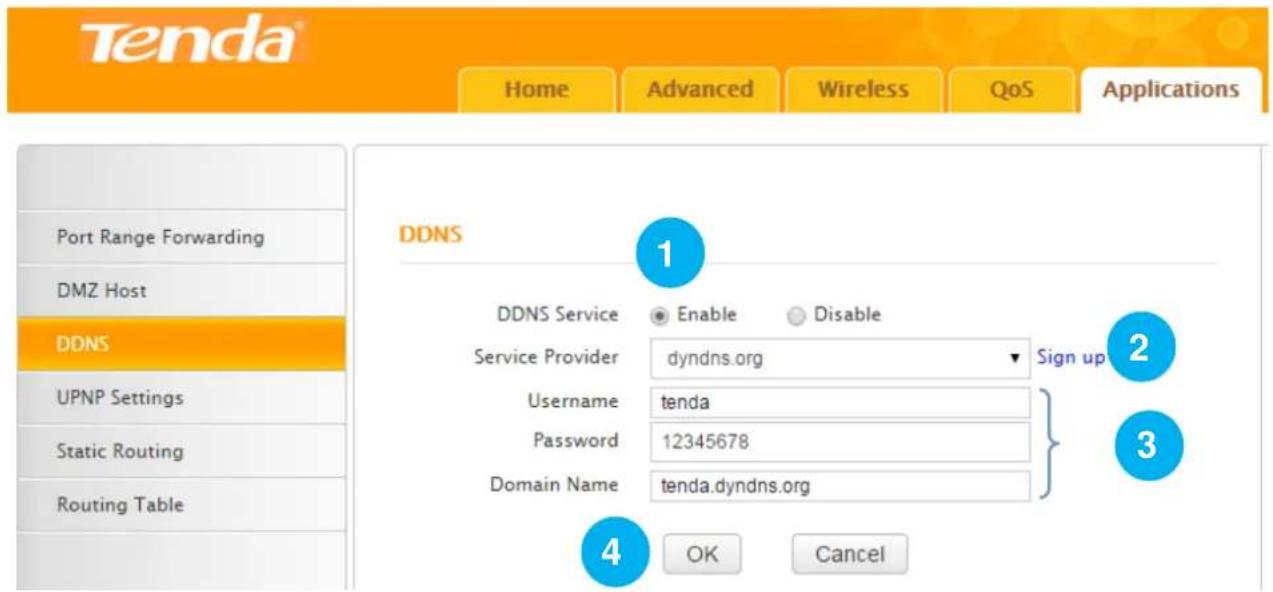
Follow steps below to apply for the domain name tenda.dyndns.org, username tenda and password 12345678.
text_image
Tenda® Home Advanced Wireless QoS Applications Port Range Forwarding DMZ Host DDNS UPNP Settings Static Routing Routing Table DDNS 1 DDNS Service Enable Disable Service Provider dyndns.org Sign up Username tenda Password 12345678 Domain Name tenda.dyndns.org 4 OK CancelConfiguration
① DDNS Service: Check the Enable box to enable the DDNS feature.
② Service Provider: Select your DDNS service provider from the drop-down menu. Here you can only use dyndns.org and no-ip.com.
(If you haven't got a DDNS account, click Sign up next to the pull down menu to sign in an DDNS account and then come back to continue the settings with the DDNS domain name, username and password.)
③ User Name, Password, Domain Name: Enter the registered user name, password and domain name.
④ Click OK to activate your settings.
Verification
flowchart
graph LR
    A["Your Friend's PC"] -->|LAN IP: 172.16.0.4| B["Internet"]
    B -->|Public WAN IP: 183.38.7 216| C["Router"]
    C -->|LAN IP: 192.168.0.10| D["Your Notebook"]
    C -->|LAN IP: 192.168.0.101| E["Your PC"]
    C -->|StaticLAN IP: 192.168.0.150 With an FTP server, default port: 21| F["Router"]
After the configuration above, your friend can access your ftp server via ftp://tenda.dyndns.org instead of ftp://183.38.7.216:21 to download the giant file.

text_image
ftp://tenda.dyndns.orgUPnP Settings
When UPnP is enabled on your Router, a network device possessing a specific purpose, such as a printer, can be identified and used automatically by another computer or device on your network. If the UPnP protocol is disabled, devices behind the Router may have difficulty communicating their identification or purpose. Access your Tenda Router to turn on UPnP.
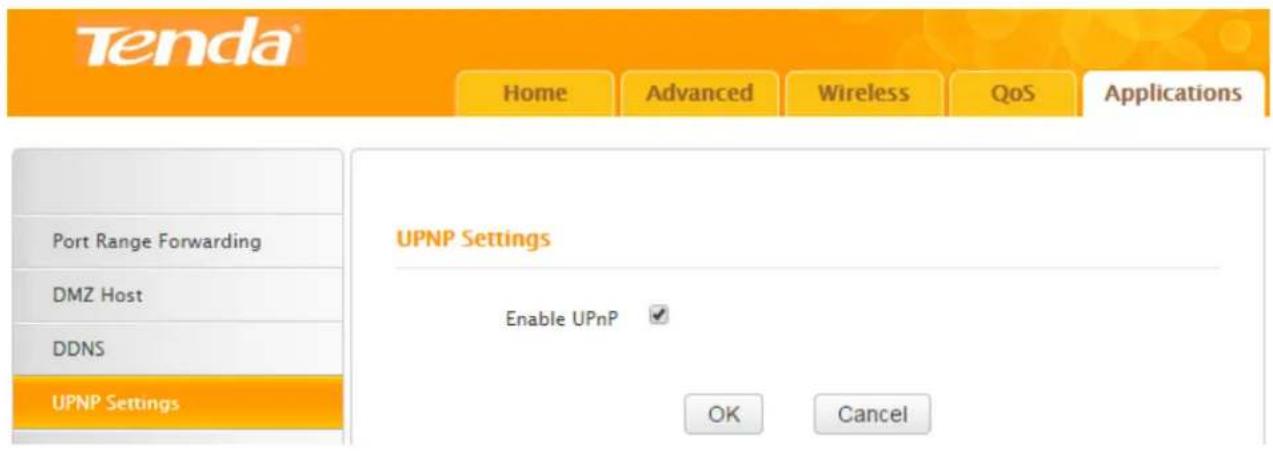
text_image
Tenda® Home Advanced Wireless QoS Applications Port Range Forwarding DMZ Host DDNS UPNP Settings UPNP Settings Enable UPnP ✓ OK CancelStatic Routing
Generally, dynamic routing is default and recommended, because this feature allows the router to detect physical changes of networking automatically.
Static Routing in the Router can provide additional routes for connecting to external network. It's commonly needed at home when there're several routers, or IP subnets on the network.
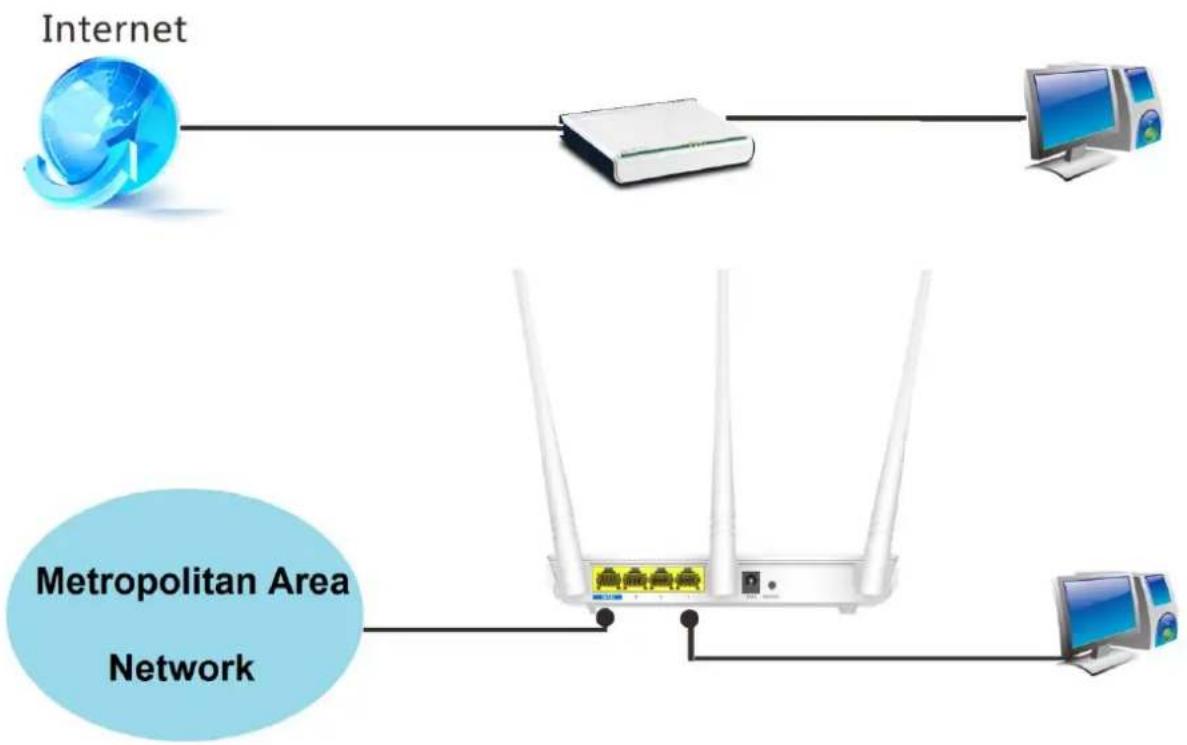
Example
You've applied for 2 network services: Internet service and MAN (Metropolitan Area Network) service. These 2 networks are isolated, shown as below.
flowchart
graph TD
    A["Internet"] --> B["Router"]
    B --> C["Computer Monitor"]
    D["Metropolitan Area Network"] --> E["Router"]
    E --> F["Computer Monitor"]
Every time you want to enjoy the Internet, you should go to COMPUTER1. When you want to enjoy the specified MAN service, like a movie or an old TV show on one of the servers on the
MAN, you should go to COMPUTER2.
To avoid such inconvenient switch over these two isolated networks, as well as expand your Internet service to more wireless devices, you can add this Tenda Router and set up a static routing. Connect and configure the devices as below. Parameters here are examples.
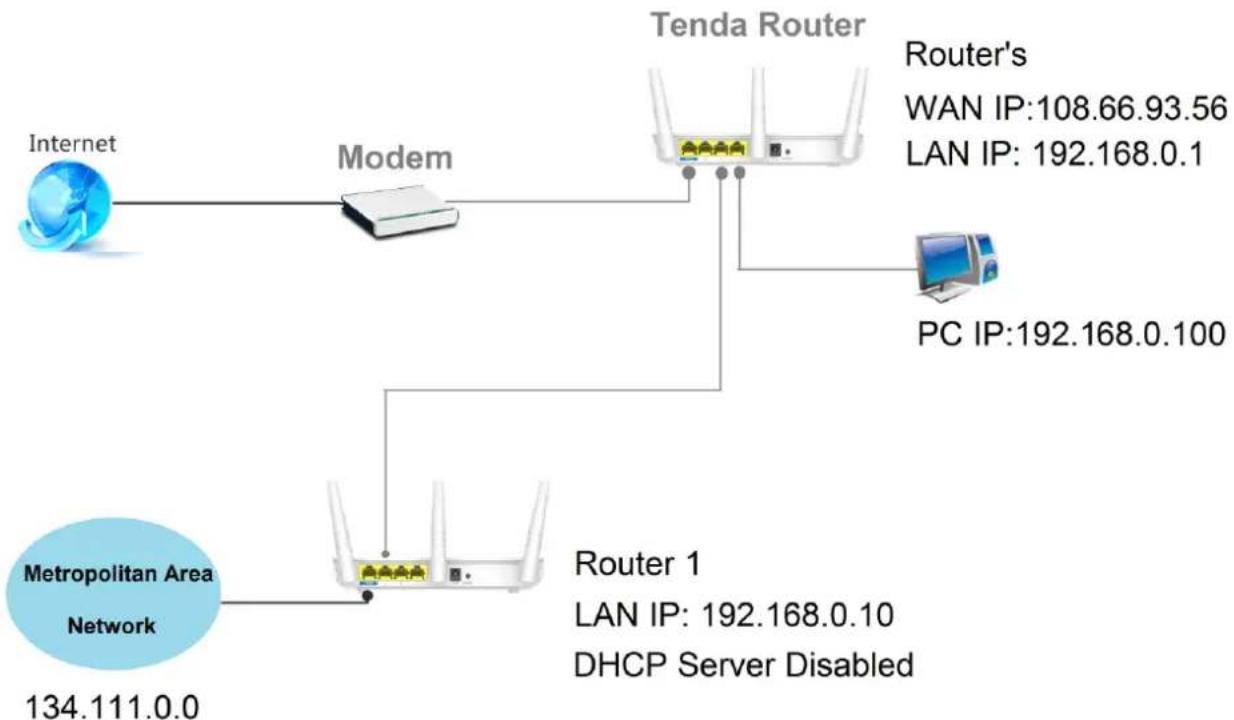
flowchart
graph TD
    A["Internet"] --> B["Modem"]
    B --> C["Tenda Router"]
    C --> D["PC IP:192.168.0.100"]
    C --> E["Router's WAN IP:108.66.93.56 LAN IP:192.168.0.1"]
    F["Metropolitan Area Network 134.111.0.0"] --> G["Router 1 LAN IP:192.168.0.10 DHCP Server Disabled"]
Connection & Parameters Notes
-
Tenda Router and your located router (Router 1) should be connected via their LAN ports. And both routers should be in the same network segment. Here both are in 192.168.0.0 segment. Also, their LAN IP should be different. Here one is “192.168.0.1”, the other is “192.168.0.10”.
-
Your located router (Router 1) should disable its DHCP server. If you want to connect more devices to Router 1, you should configure static IP for every wanted device which can also both connect to the Internet and MAN.
Configuration

text_image
Tenda® Home Advanced Wireless QoS Applications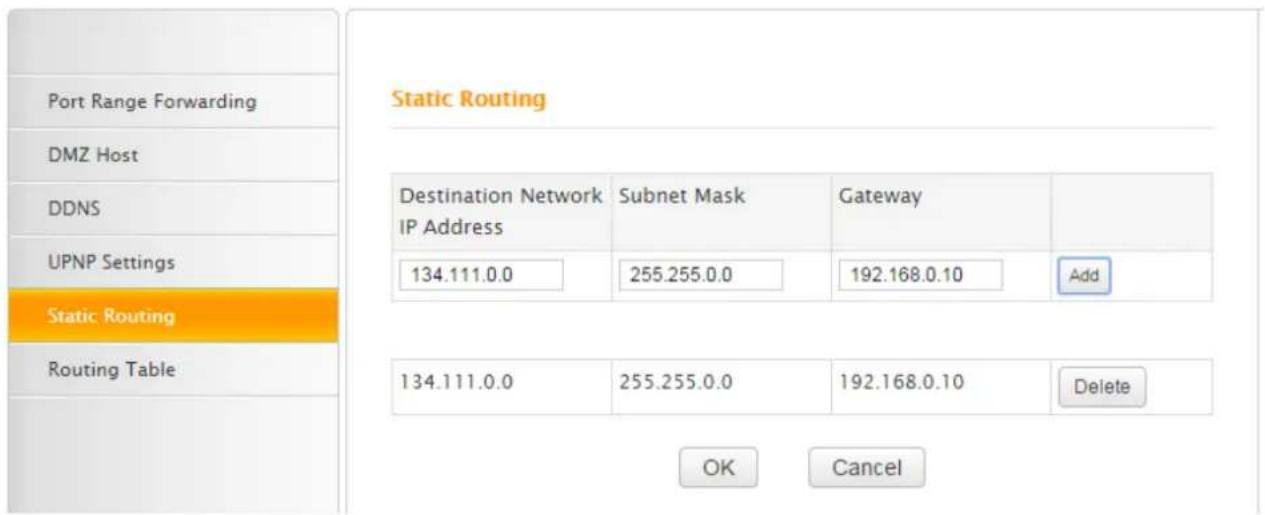
text_image
Port Range Forwarding DMZ Host DDNS UPNP Settings Static Routing Routing Table Static Routing Destination Network IP Address 134.111.0.0 Subnet Mask 255.255.0.0 Gateway 192.168.0.10 Add 134.111.0.0 255.255.0.0 192.168.0.10 Delete OK Cancel① Login to your Tenda Router's User Interface, click Advanced (on the homepage) > Applications > Static Routing to enter the setting page.
② Add a static route here.
Destination Network IP address: Enter the destination network range, "134.111.0.0".
Subnet Mask: Enter the subnet mask of the destination network range, "255.255.0.0".
Gateway: Input the LAN IP address of the next hop to which messages are forwarded from Tenda Router, here “192.168.0.10”. Note that this Tenda Router and your located router should be in the same network segment.
③ Click Add to add the route to the list. Click OK to activate the settings.
Verification
Try visiting the Internet and MAN service from the computer or other connected wireless devices, if you can visit them successfully, the static routing you set takes effect.
Routing Table
Statistics through the Router are transmitted according to the routing table.

text_image
Tenda® Home Advanced Wireless QoS Applications| Port Range Forwarding | Routing Table | ||||
| DMZ Host | |||||
| DDNS | Destination IP | Subnet Mask | Gateway | Hops | Interface |
| 0.0.0.0 | 0.0.0.0 | 192.168.1.1 | 1 | vlan2 | |
| UPNP Settings | 192.168.0.0 | 255.255.255.0 | 192.168.0.0 | 0 | br0 |
| Static Routing | 192.168.1.0 | 255.255.255.0 | 192.168.1.0 | 0 | vlan2 |
| Routing Table | Refresh | ||||
5 Security
Here explains how to control the websites access, or block unauthorized accesses and malicious packet sniffing.
URL Filter Settings
By filtering URLs, and you will control websites access for an IP (range) within a specified time range.
Example
If you want to disallow all computers on your LAN to access youtube.com from 8:00 to 18:00 during working days: Monday- Friday, then do as follows.

text_image
Tenda® Home Advanced Wireless QoS Applications Security Tools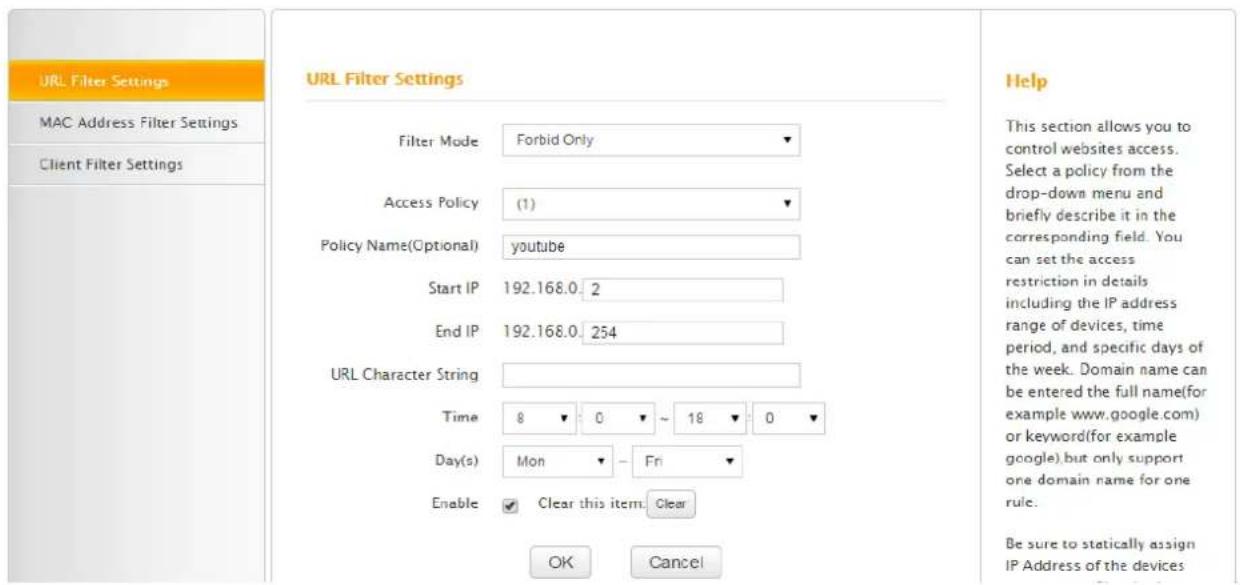
text_image
URL Filter Settings MAC Address Filter Settings Client Filter Settings URL Filter Settings Filter Mode Forbid Only Access Policy (1) Policy Name(Optional) youtube Start IP 192.168.0 2 End IP 192.168.0 254 URL Character String Time 8 0 ~ 18 0 Day(s) Mon Fri Enable ✓ Clear this item Clear OK Cancel Help This section allows you to control websites access. Select a policy from the drop-down menu and briefly describe it in the corresponding field. You can set the access restriction in details including the IP address range of devices, time period, and specific days of the week. Domain name can be entered the full name(for example www.google.com) or keyword(for example google),but only support one domain name for one rule. Be sure to statically assign IP Address of the devices① Filter Mode: Select Forbid Only from the pull-down menu.
② Access Policy: Select the serial number of the access policy. The maximum policy is 10.
③ Policy Name (Optional): Enter a descriptive name for the policy, or leave it blank.
④ Start IP, End IP: Enter 2 and 254 in the corresponding field to limit all computers on the LAN. To restrict only one device, input the same number in corresponding field. For example, if the IP of the device you want to restrict is “192.168.0.13”, enter “13” in both Stat IP and End IP field.
⑤ URL Character String: Enter a domain name you want to restrict, say "youtube".
⑥ Time, Day(s): Select 8:00\~18:00, Mon\~Fri.
⑦ Check Enable to activate your settings.
8 Click OK to save the settings.
How to disable URL Filter?
Select disable from the pull-down menu of the Filter Mode option and click OK.
MAC Address Filter Settings
By filtering the MAC address of the wanted devices, you can control their Internet access.
Example
To allow the computer (MAC address—00:E4:A5:44:35:69) to access the Internet from 13:00\~18:00 on Sunday to Saturday, do as steps below.
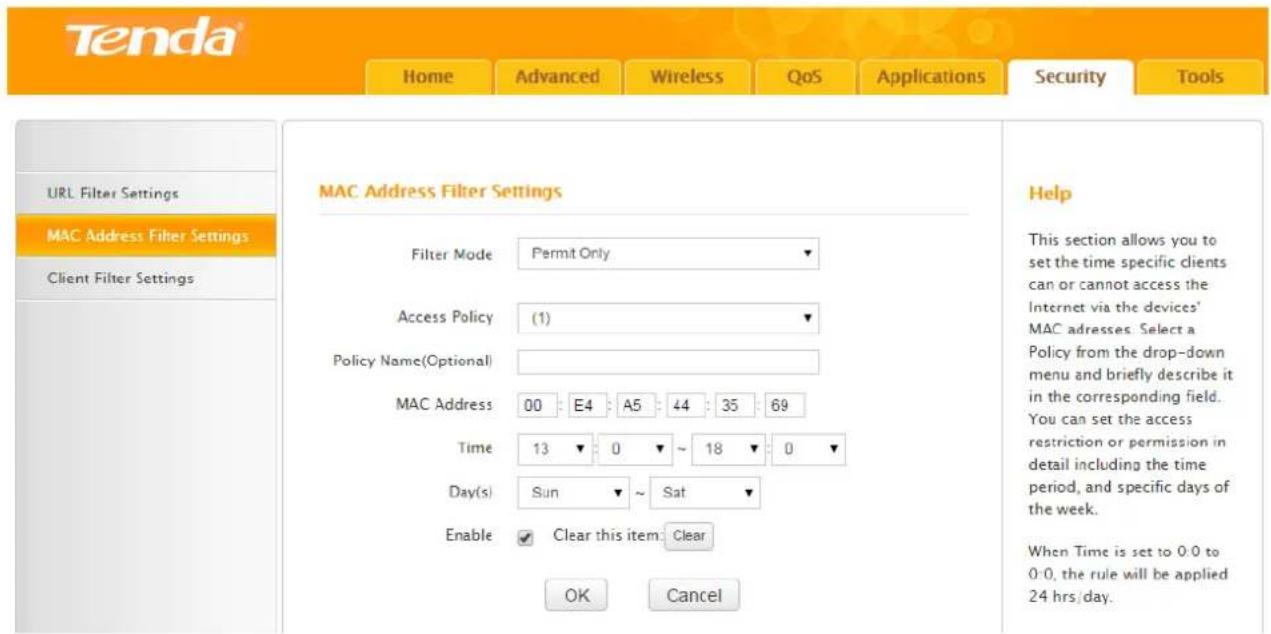
text_image
Tenda® Home Advanced Wireless QoS Applications Security Tools URL Filter Settings MAC Address Filter Settings Client Filter Settings MAC Address Filter Settings Filter Mode Permit Only Access Policy (1) Policy Name(Optional) MAC Address 00 E4 A5 44 35 69 Time 13 0 ~ 18 0 Day(s) Sun ~ Sat Enable Clear this item Clear OK Cancel Help This section allows you to set the time specific clients can or cannot access the Internet via the devices' MAC addresses. Select a Policy from the drop-down menu and briefly describe it in the corresponding field. You can set the access restriction or permission in detail including the time period, and specific days of the week. When Time is set to 0:0 to 0:0, the rule will be applied 24 hrs/day.① Filter Mode: Select Permit Only from the pull-down menu.
② Access Policy: Select the serial number of the access policy. The maximum policy is 10.
③ Policy Name (Optional): Enter a descriptive name for the policy, or leave it blank.
④ MAC Address: Input the MAC address of the device you want to permit, here 00:E4:A5:44:35:69.
⑤ Time, Day(s): Select 13:00\~18:00, Sun\~Sat.
⑥ Enable: Check this box to enable the settings.
⑦ OK: Click OK to save the settings.
How to disallow the device with a specified MAC address?
Select Forbid Only from the pull-down menu of the Filter Mode option. And consult steps ②\~⑦ in the example above.
How to disable MAC Address Filter?
Select Disable from the pull-down menu of the Filter Mode option and click OK.
Client Filter Settings
By filtering the IP address and port of the wanted clients, you can control their Internet access.
Example
If you want to prohibit COMPUTERs within the IP address range of "192.168.0.100--192.168.0.120" from accessing the Internet, do as follows.
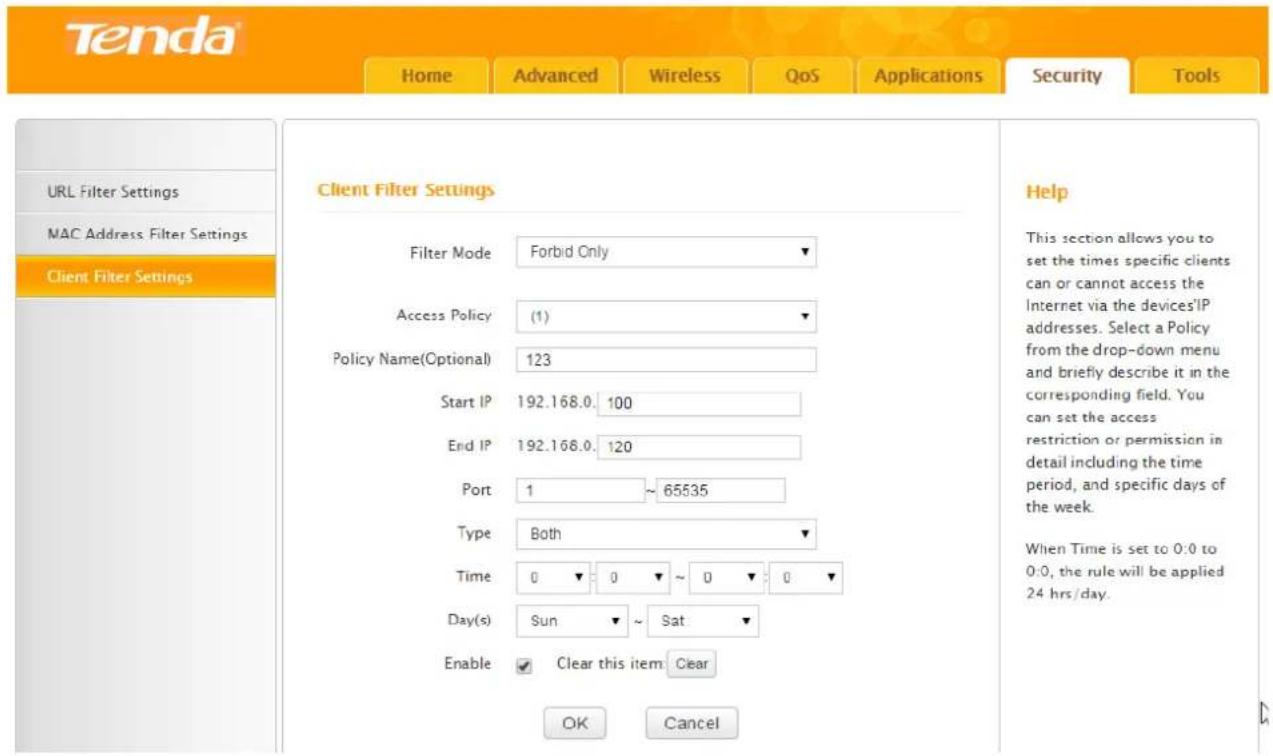
text_image
Tenda Home Advanced Wireless QoS Applications Security Tools URL Filter Settings MAC Address Filter Settings Client Filter Settings Client Filter Settings Filter Mode Forbid Only Access Policy (1) Policy Name(Optional) 123 Start IP 192.168.0: 100 End IP 192.168.0: 120 Port 1 ~ 65535 Type Both Time 0 ▼ 0 ▼ ~ 0 ▼ 0 ▼ Day(s) Sun ▼ ~ Sat ▼ Enable ✓ Clear this item Clear OK Cancel Help This section allows you to set the times specific clients can or cannot access the Internet via the devices'IP addresses. Select a Policy from the drop-down menu and briefly describe it in the corresponding field. You can set the access restriction or permission in detail including the time period, and specific days of the week. When Time is set to 0:0 to 0:0, the rule will be applied 24 hrs/day.① Filter Mode: Select Forbid Only from the pull-down menu.
② Access Policy: Select the serial number of the access policy. The maximum policy is 10.
Tenda
③ Policy Name (Optional): Enter a descriptive name for the policy, or leave it blank.
4 Start IP, End IP: Enter 100 and 120 in corresponding fields to limit devices within the IPs.
To restrict one device, input the same number in corresponding field. For example, the IP of the device you want to restrict is “192.168.0.13”. Enter ‘13’ in both Stat IP and End IP field.
⑤ Port: Enter 1-65535 to forbid all Internet services and applications.
⑥ Type: Select Both.
⑦ Time, Day(s): Select 0 for a whole day and Sun\~Sat for a whole week.
8 Enable: Check the box to enable the settings.
⑨ OK: Click OK to save the settings.
How to permit clients with specified IP addresses?
Select Permit Only from the pull-down menu of the Filter Mode option. And consult steps ②\~⑨ in the example above.
How to disable Client Filter?
Select Disable from the pull-down menu of the Filter Mode option and click OK.
6 Tools
You can configure the Router in this section for administration and maintenance.
Reboot
Rebooting the Router will activate any modified settings on the Router. When parameters you set cannot take effect, you can try that. Note that when the Router is rebooting, do not power off any relevant devices (Router, computer, etc.).
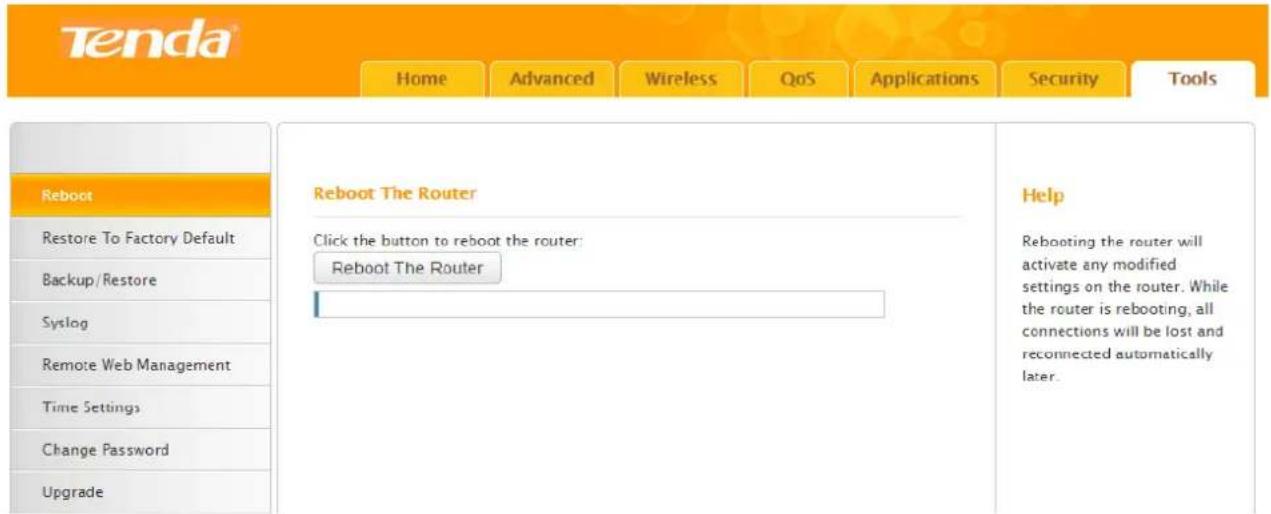
text_image
Tenda Home Advanced Wireless QoS Applications Security Tools Reboot Restore To Factory Default Backup / Restore Syslog Remote Web Management Time Settings Change Password Upgrade Reboot The Router Click the button to reboot the router: Reboot The Router Help Rebooting the router will activate any modified settings on the router. While the router is rebooting, all connections will be lost and reconnected automatically later.It's recommended that do not default the device unless you forget the login password or Tenda technical support suggests restoring it to factory default.
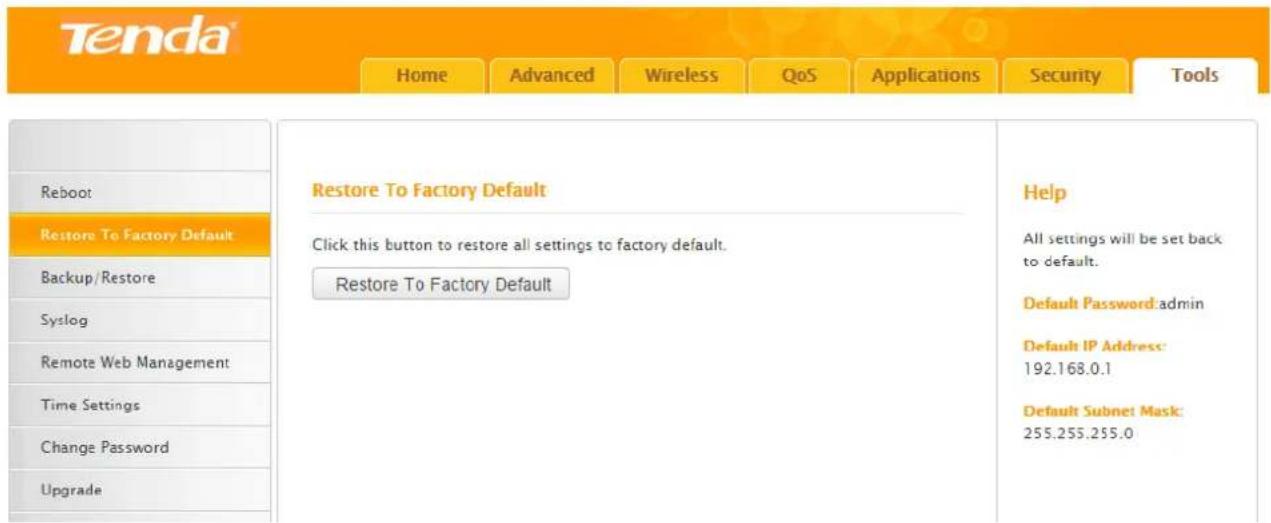
text_image
Tenda Home Advanced Wireless QoS Applications Security Tools Reboot Restore To Factory Default Backup/Restore Syslog Remote Web Management Time Settings Change Password Upgrade Restore To Factory Default Click this button to restore all settings to factory default. Restore To Factory Default Help All settings will be set back to default. Default Password:admin Default IP Address: 192.168.0.1 Default Subnet Mask: 255.255.255.0Click the button: Restore to Factory Default, and all the settings will be restored to factory defaults.
Then you need to use the default login IP and password to login to the User Interface to reconfigure
the Router. Note that during the restoration, do not disconnect the power of the Router and other relevant devices.
Backup / Restore
If you find the current settings can maintain a good performance for your Router, you can back up the configurations on time in case of need.
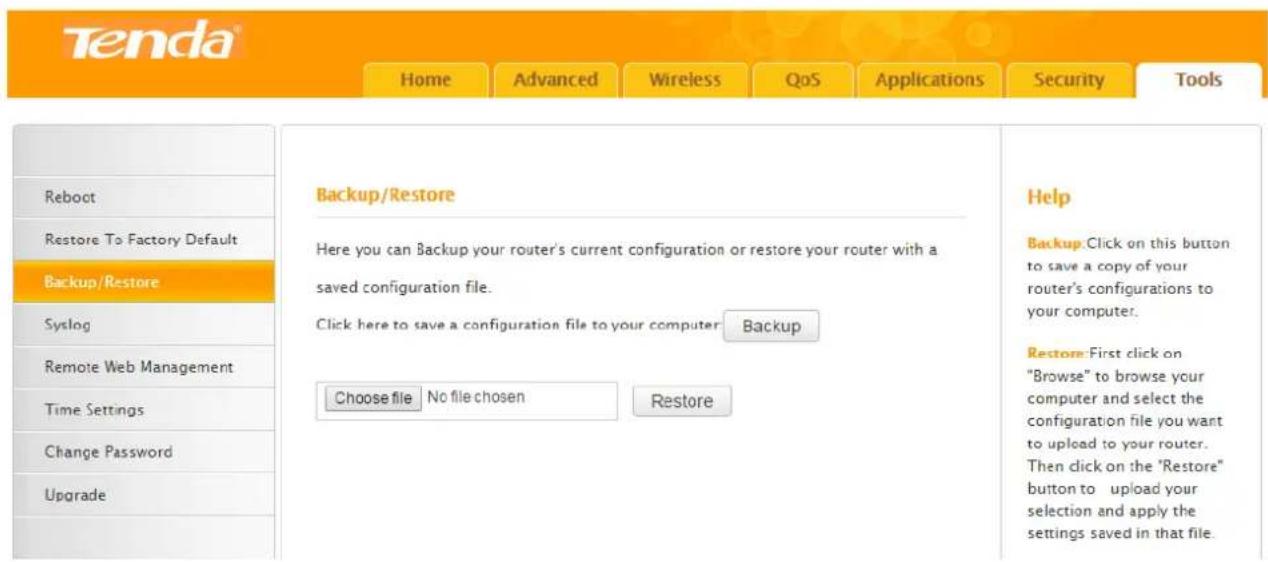
text_image
Tenda® Home Advanced Wireless QoS Applications Security Tools Reboot Restore To Factory Default Backup/Restore Syslog Remote Web Management Time Settings Change Password Upgrade Backup/Restore Here you can Backup your router's current configuration or restore your router with a saved configuration file. Click here to save a configuration file to your computer Backup Choose file No file chosen Restore Help Backup: Click on this button to save a copy of your router's configurations to your computer. Restore: First click on "Browse" to browse your computer and select the configuration file you want to upload to your router. Then click on the "Restore" button to upload your selection and apply the settings saved in that file.Syslog
Syslog refers to the history of the Router's action. Up to 150 entries can be listed on the pages.
When one more entry added, the earliest log will be cleared automatically.
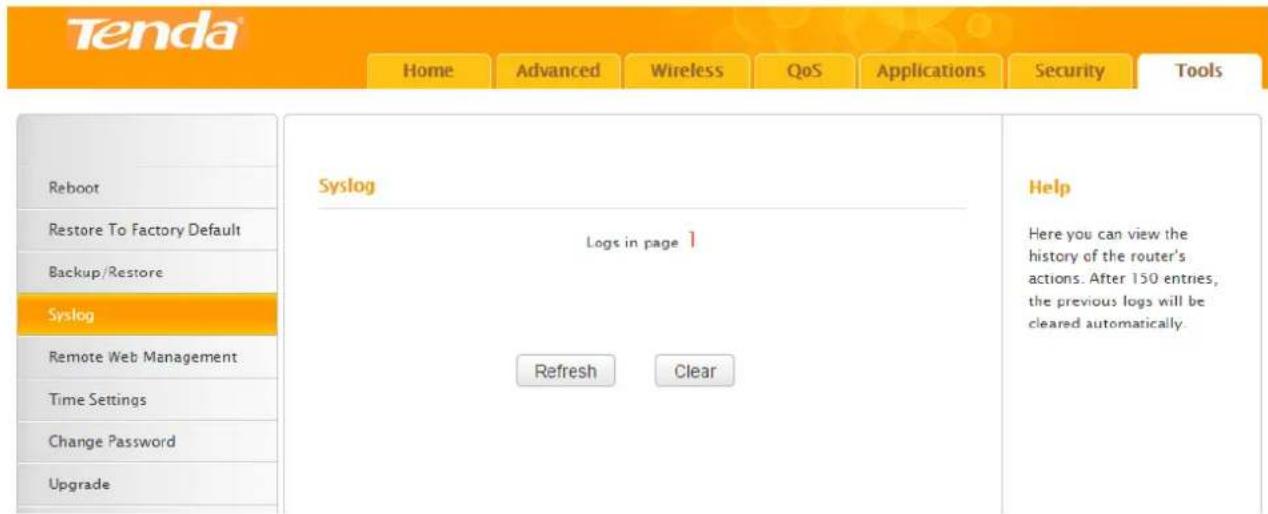
text_image
Tenda Home Advanced Wireless QoS Applications Security Tools Reboot Restore To Factory Default Backup/Restore Syslog Remote Web Management Time Settings Change Password Upgrade Syslog Logs in page 1 Refresh Clear Help Here you can view the history of the router's actions. After 150 entries, the previous logs will be cleared automatically.Remote Web Management
This section can help you to manage your Router remotely.
Example
You want to manage your home network when you are in the company. Assume that the WAN IP
address of your computer in the company is “202.165.100.105”, and it is a public IP address (Only when the IP is a public IP, can this Router can be managed remotely). And your Router at home is working properly, the WAN IP is “190.136.2.5”, and it’s a public IP address as well.
Now configure the Router to provide remote web management.
Configuration
① Click Tools > Remote Web Management to the section. Check the Enable option.
② Port: The default port 8080 is a common alternate for HTTP. For greater security, enter a custom port of the remote web management interface. Select a number from 1024\~65535, but do use the number of any common service port. Note that normal web browser access uses port 80.
③ Input the IP address “202.165.100.105” into the IP Address field, and click OK.

text_image
Tenda® Home Advanced Wireless QoS Applications Security Tools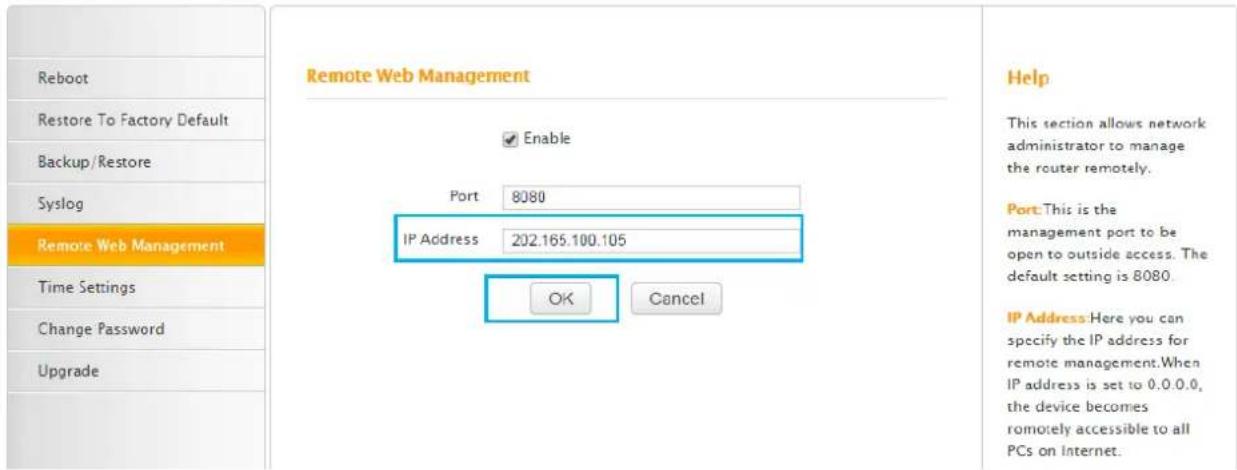
text_image
Reboot Restore To Factory Default Backup/Restore Syslog Remote Web Management Time Settings Change Password Upgrade Remote Web Management Enable Port 8080 IP Address 202.165.100.105 OK Cancel Help This section allows network administrator to manage the router remotely. Port: This is the management port to be open to outside access. The default setting is 8080. IP Address: Here you can specify the IP address for remote management. When IP address is set to 0.0.0.0, the device becomes remotely accessible to all PCs on Internet.Verification
When you're in the company, you can use your computer to access your Router's User Interface by entering "http://190.136.2.5:8080" in a browser.

text_image
http://190.136.2.5:8080Remote Web Management + DDNS
However, in the example above, the WAN IP of the Router in your home may not always be static. You can give the WAN IP a static host name via DDNS to maintain the connection between your Router and the computer in your company. Go to “DDNS” for details to configure a username, password, and domain name.
Assume you signed up an account tenda01.3322.org from dyndns.org, the username is tenda01, and
the password is 1234567890.
After you bind a static hostname to the WAN IP, when you're in the company, you can also access the Router's User Interface by entering "http://tenda01.3322.org:8080" in a browser of your computer in the company.

text_image
http://tenda01.3322.org:8080Time Settings
In this section, you can set the time manually or let the router sync GMT time from the Internet automatically.
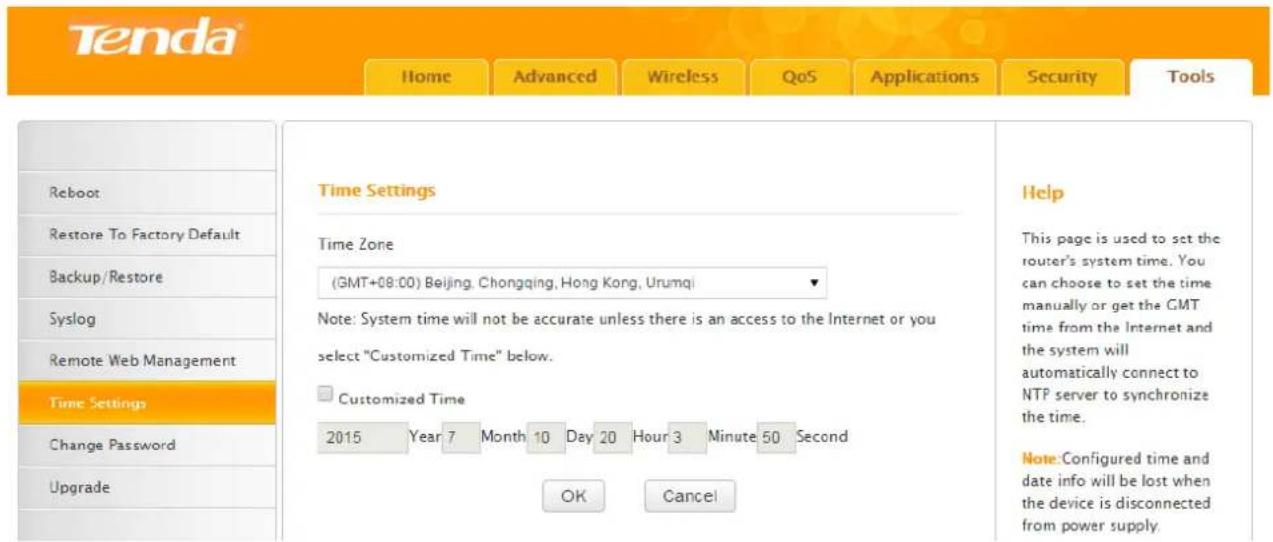
text_image
Tenda® Home Advanced Wireless QoS Applications Security Tools Reboot Restore To Factory Default Backup/Restore Syslog Remote Web Management Time Settings Change Password Upgrade Time Settings Time Zone (GMT+08:00) Beijing, Chongqing, Hong Kong, Urumqi Note: System time will not be accurate unless there is an access to the Internet or you select "Customized Time" below. Customized Time 2015 Year 7 Month 10 Day 20 Hour 3 Minute 50 Second OK Cancel Help This page is used to set the router's system time. You can choose to set the time manually or get the GMT time from the Internet and the system will automatically connect to NTP server to synchronize the time. Note: Configured time and date info will be lost when the device is disconnected from power supply.To auto-sync the system time with the Internet server, just uncheck the Customized Time option and click OK.
To manually customize the time, check the Customized Time option, enter the current time and click OK.
Verification
Click Advanced > Status to check whether the System Time is correct.
Tenda
Home
Advanced
Wireless
QoS
Applications
Security
Tools
Status
Internet Connection Setup
MAC Clone
WAN Speed
WAN Medium Type
LAN Settings
DNS Settings
DHCP Server
DHCP Client List
WAN Status
Connection Status
Internet Connection Type
WAN IP
Connected
DHCP
192.168.1.152
Subnet Mask
255.255.255.0
Gateway
192.168.1.1
DNS Server
192.168.1.1
Alternate DNS Server
8.8.8.8
Connection Time
00:47:46
Release
Refresh
System Status
LAN MAC Address
C8:3A:35:00:9D:78
WAN MAC Address
C8.3A.35.00.9D.78
System Time
2015-07-10 20.01.02
Running Time
00:50:50
Connected Client
1
System Version
V11.13.01.06_en
Hardware Version
V1.0
Help
Connection Status: Refers to the connection between the router and the device connected to the router's WAN.
Internet Connection Type
This can be set in Advanced > Internet Connection Setup. DHCP and PPPoE are the most common.
Connection Time: Displays WAN connection duration for the DHCP/Dynamic IP and PPPoE connection type
System Version: Displays the current firmware version of the device.

Note
The configured system time will be lost when the device is disconnected from power supply. However, it will be updated automatically when the device reconnects to Internet.
To make some time-based features (e.g. System Log) effective, the time shall be set correctly first, either manually or automatically.
Change Password
It is advisable to change the default login password “admin” for better security. Note that the login password is not the WiFi password; the login password only includes 0\~12 characters without any space.
Tenda
Home
Advanced
Wireless
QoS
Applications
Security
Tools
Reboot
Password must be alpha-numeric
Old Password
New Password
Confirm New Password
OK
Cancel
Help
This section allows you to change the login password.
Device's default password is "admin". It is advisable to change it for better security. Otherwise, anyone in your network may access this utility to view or change your settings.
Old Password: Enter the old password. If you use the
Upgrade
Tenda official website offers the latest software version for your Router. Follow steps below to upgrade the device if needed. However, when the Router is in normal operation, it is not advisable to upgrade it.
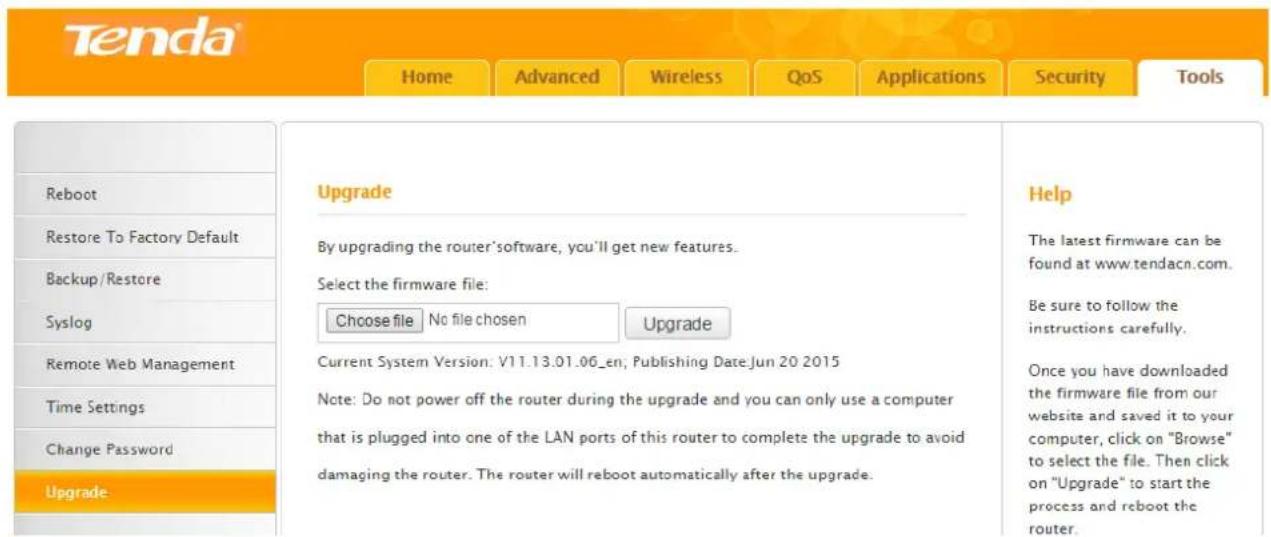
text_image
Tenda Home Advanced Wireless QoS Applications Security Tools Reboot Restore To Factory Default Backup / Restore Syslog Remote Web Management Time Settings Change Password Upgrade Upgrade By upgrading the router'software, you'll get new features. Select the firmware file: Choose file No file chosen Upgrade Current System Version: V11.13.01.06_en; Publishing Date: Jun 20 2015 Note: Do not power off the router during the upgrade and you can only use a computer that is plugged into one of the LAN ports of this router to complete the upgrade to avoid damaging the router. The router will reboot automatically after the upgrade. Help The latest firmware can be found at www.tendacn.com. Be sure to follow the instructions carefully. Once you have downloaded the firmware file from our website and saved it to your computer, click on "Browse" to select the file. Then click on "Upgrade" to start the process and reboot the router.① Verify your computer is connected to one of the LAN port of the Router by using an Ethernet cable; and every device is kept with power supply.
Download the firmware file from Tenda website “www.tendacn.com”, save and unzip it to the local computer.
② Click Choose file to select the .bin file you saved.
③ Click Upgrade to start the upgrade process and the Router will reboot automatically.
④ Login to the User Interface again to restore the Router to factory default after the Router finishes reboot. After that, customize the Router as you like.

Tips
Do not upgrade your Router from the computer that is wirelessly connected, or damage might be done to the Router. Once damages happen, contact your reseller.
IV Appendix
This Chapter provides you with more information about how to configure your computer, common questions and answers, and etc.
It contains the following sections:
Configure Your computer
FAQs
Technical Support
Safety and Emission Statement
1 Configure Your Computer
Windows 8
1 Right click the icon 📋 on the bottom right corner of your desktop. Click Open Network and Sharing Center.

text_image
2:21 PM 1/24/2015 Troubleshoot problems Open Network and Sharing Center 1/24/2015
Tips
If you cannot find the icon, please move your cursor to the top right corner of your desktop, select Settings > Control Panel > Network and Internet > Network and Sharing.
2 Click Ethernet > Properties.
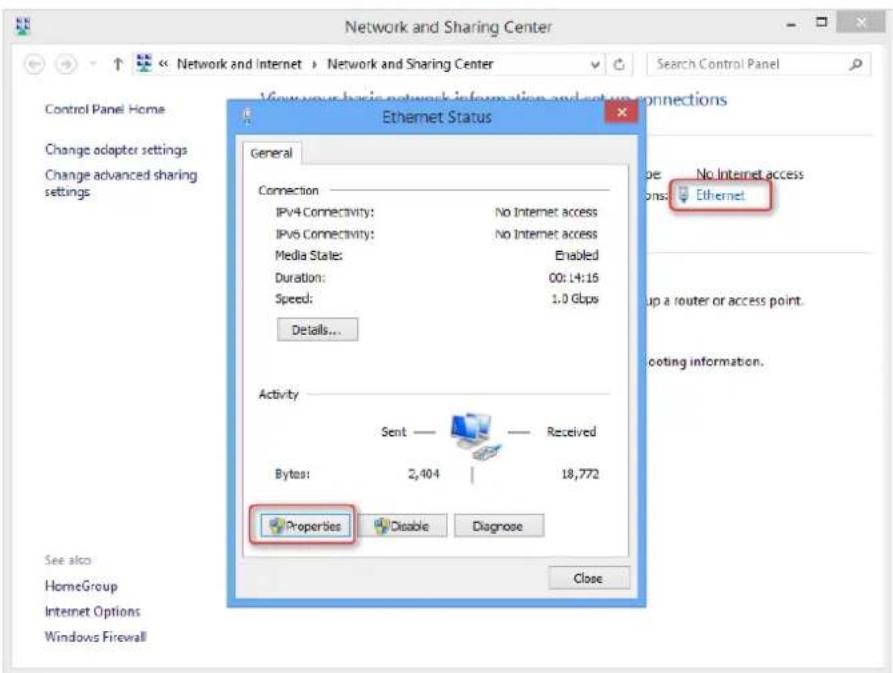
text_image
Network and Sharing Center View your basic network information and setup connections Control Panel Home Change adapter settings Change advanced sharing settings Ethernet Status General Connection IPV4 Connectivity: No Internet access IPV5 Connectivity: No Internet access Media State: Enabled Duration: 00: L4:15 Speed: 1.0 Gbps Details... Activity Sent — Received Bytes: 2,404 | 18,772 Properties Disable Diagnose See also HomeGroup Internet Options Windows Firewall Close No Internet access Ethernet Up a router or access point. Coping information.3 Find and double click Internet Protocol Version 4(TCP/IPv4). Select Obtain an IP address automatically and Obtain DNS server address automatically and click OK.
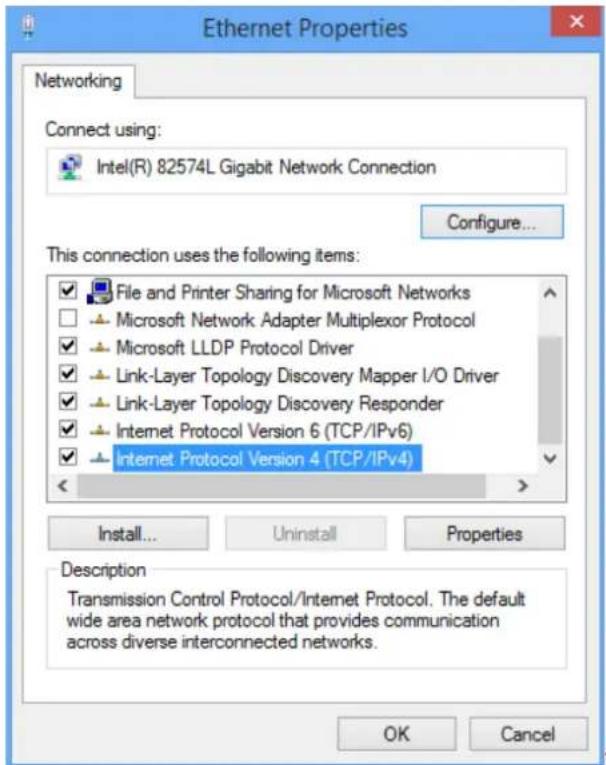
text_image
Ethernet Properties Networking Connect using: Intel(R) 82574L Gigabit Network Connection Configure... This connection uses the following items: ✓ File and Printer Sharing for Microsoft Networks □ Microsoft Network Adapter Multiplexor Protocol ✓ Microsoft LLDP Protocol Driver ✓ Link-Layer Topology Discovery Mapper I/O Driver ✓ Link-Layer Topology Discovery Responder ✓ Internet Protocol Version 6 (TCP/IPv6) ✓ Internet Protocol Version 4 (TCP/IPv4) Install... Uninstall Properties Description Transmission Control Protocol/Internet Protocol. The default wide area network protocol that provides communication across diverse interconnected networks. OK Cancel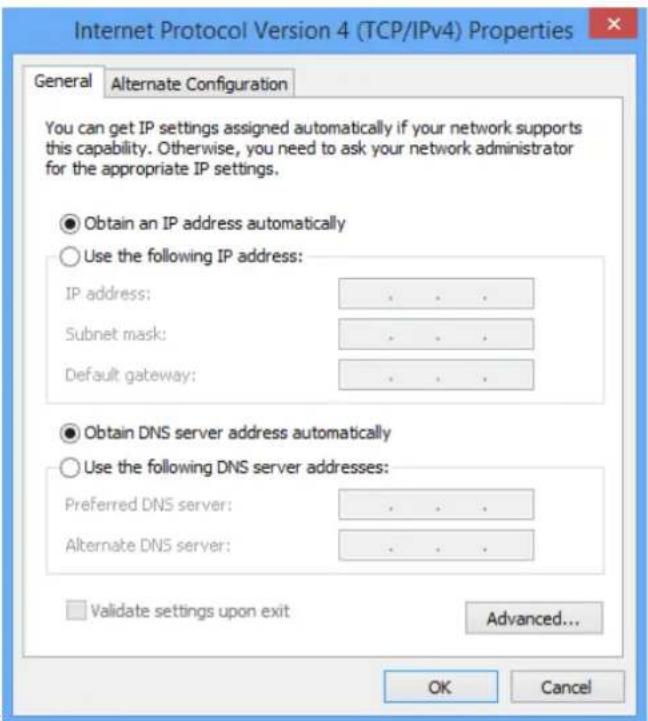
text_image
Internet Protocol Version 4 (TCP/IPv4) Properties General Alternate Configuration You can get IP settings assigned automatically if your network supports this capability. Otherwise, you need to ask your network administrator for the appropriate IP settings. Obtain an IP address automatically Use the following IP address: IP address: . Subnet mask: . Default gateway: . Obtain DNS server address automatically Use the following DNS server addresses: Preferred DNS server: . Alternate DNS server: . Validate settings upon exit Advanced... OK Cancel④ Click OK on the Ethernet Properties window (see ③ for the screenshot).
Windows 7
1 Click the icon 📋 on the bottom right corner of your desktop. Click Open Network and Sharing Center.
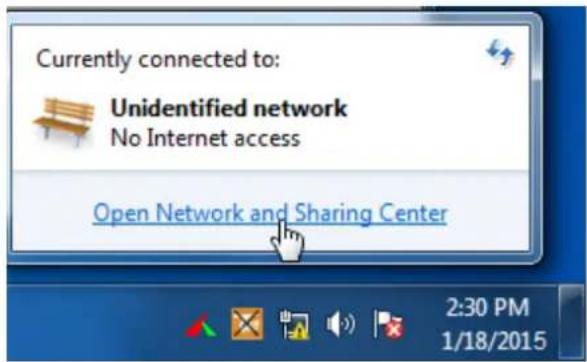
text_image
Currently connected to: Unidentified network No Internet access Open Network and Sharing Center 2:30 PM 1/18/2015
Tips
If you cannot find the icon

he bottom right corner of your desktop, follow steps below:
Click Start > Control Panel > Network and Internet > Network and Sharing Center.
2 Click Local Area Connection > Properties.
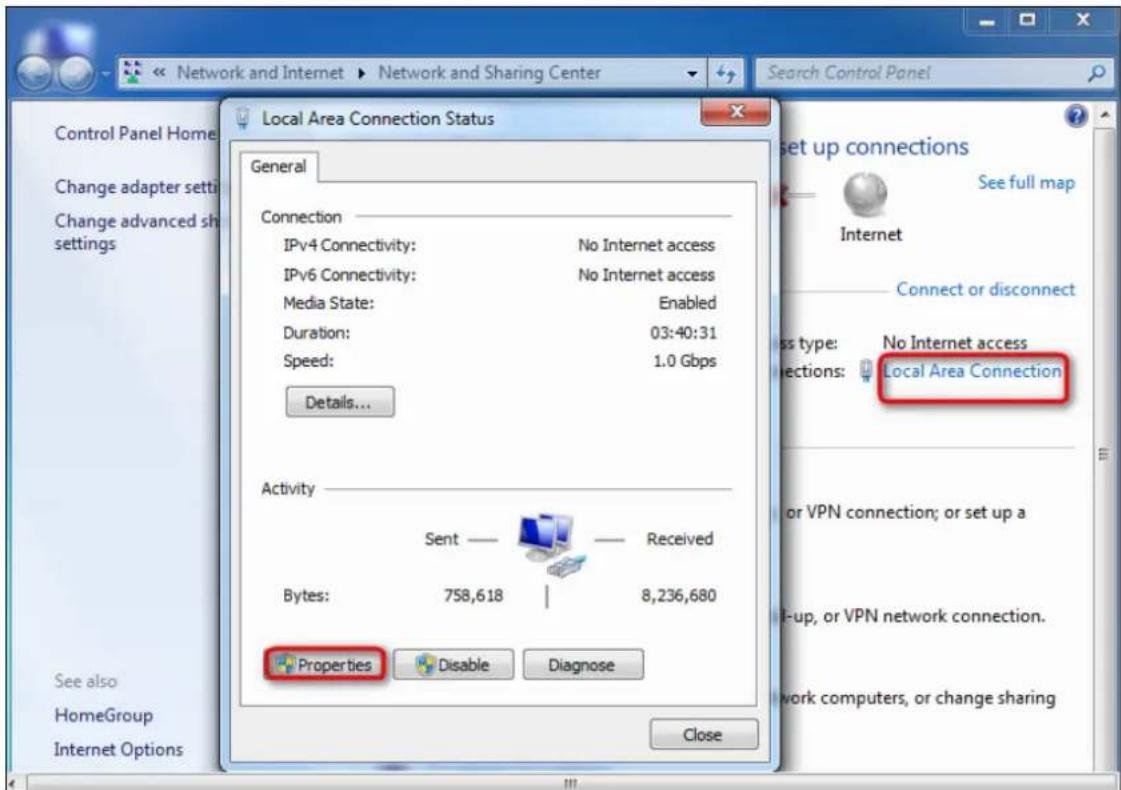
text_image
Network and Internet ▶ Network and Sharing Center Local Area Connection Status General Connection IPv4 Connectivity: No Internet access IPv6 Connectivity: No Internet access Media State: Enabled Duration: 03:40:31 Speed: 1.0 Gbps Details... Activity Sent — Received Bytes: 758,618 | 8,236,680 Properties Disable Diagnose See also HomeGroup Internet Options Close Set up connections See full map Internet Connect or disconnect Class type: No Internet access Connections: Local Area Connection or VPN connection; or set up a Up, or VPN network connection. Work computers, or change sharing3 Find and double click Internet Protocol Version 4(TCP/IPv4). Select Obtain an IP address automatically and Obtain DNS server address automatically and click OK.
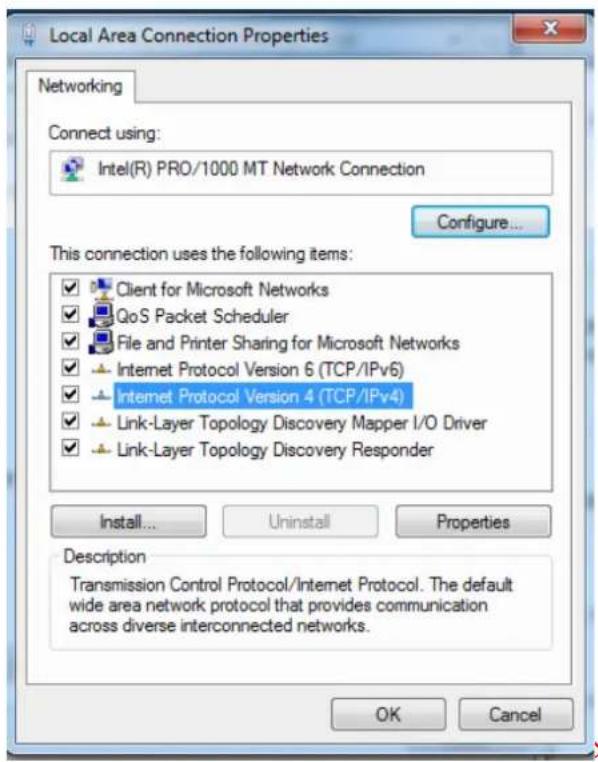
text_image
Local Area Connection Properties Networking Connect using: Intel(R) PRO/1000 MT Network Connection Configure... This connection uses the following items: ✓ Client for Microsoft Networks ✓ QoS Packet Scheduler ✓ File and Printer Sharing for Microsoft Networks ✓ Internet Protocol Version 6 (TCP/IPv6) ✓ Internet Protocol Version 4 (TCP/IPv4) ✓ Link-Layer Topology Discovery Mapper I/O Driver ✓ Link-Layer Topology Discovery Responder Install... Uninstall Properties Description Transmission Control Protocol/Internet Protocol. The default wide area network protocol that provides communication across diverse interconnected networks. OK Cancel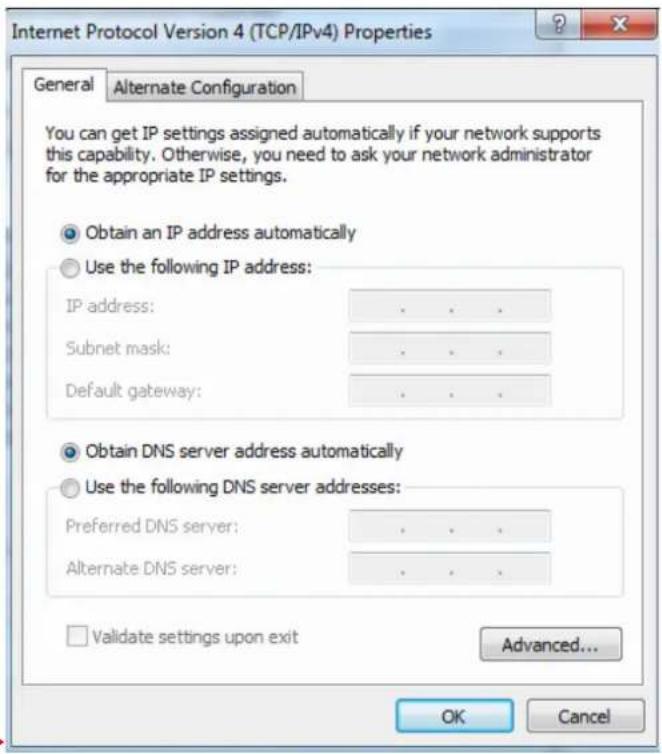
text_image
Internet Protocol Version 4 (TCP/IPv4) Properties General Alternate Configuration You can get IP settings assigned automatically if your network supports this capability. Otherwise, you need to ask your network administrator for the appropriate IP settings. Obtain an IP address automatically Use the following IP address: IP address: . Subnet mask: . Default gateway: . Obtain DNS server address automatically Use the following DNS server addresses: Preferred DNS server: . Alternate DNS server: . Validate settings upon exit Advanced... OK Cancel4 Click OK on the Local Area Connection Properties window (see 3 for the screenshot).
Windows XP
① Right click My Network Places on your desktop and select Properties. Right click Local Area Connection and select Properties.
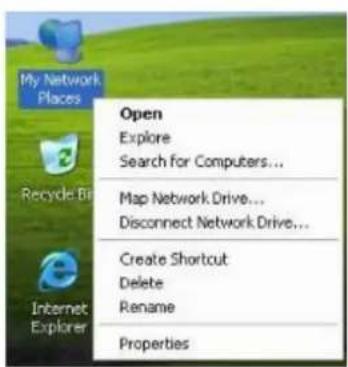
text_image
My Network Places Open Explore Search for Computers... Recycle Bin Map Network Drive... Disconnect Network Drive... Internet Explorer Create Shortcut Delete Rename Properties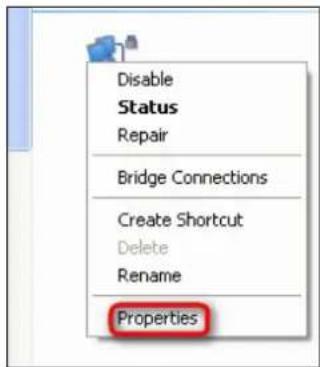
text_image
Disable Status Repair Bridge Connections Create Shortcut Delete Rename Properties② Scroll down to find and double click Internet Protocol (TCP/IP). Select Obtain an IP address automatically and Obtain DNS server address automatically and click OK.
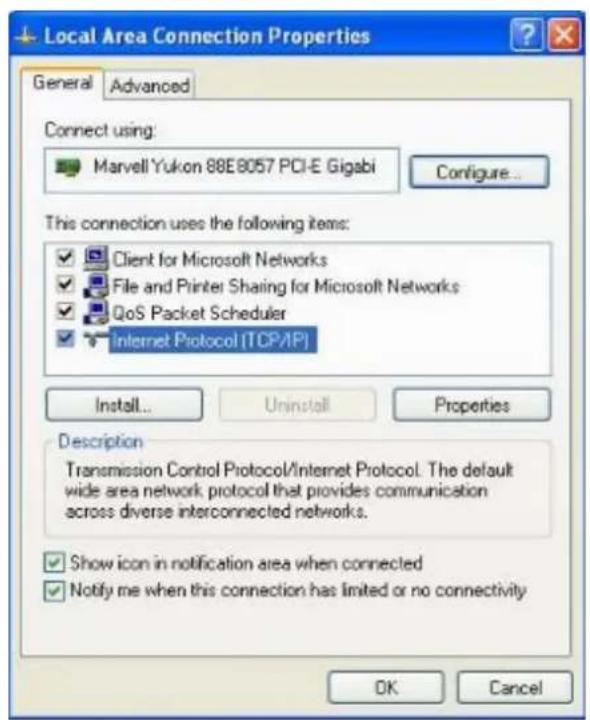
text_image
Local Area Connection Properties General Advanced Connect using: Marvell Yukon 88E8057 PCI-E Gigabi Configure... This connection uses the following items: ✓ Client for Microsoft Networks ✓ File and Printer Sharing for Microsoft Networks ✓ QoS Packet Scheduler ✓ Internet Protocol (TCP/IP) Install... Uninstall Properties Description Transmission Control Protocol/Internet Protocol. The default wide area network protocol that provides communication across diverse interconnected networks. ✓ Show icon in notification area when connected ✓ Notify me when this connection has limited or no connectivity OK Cancel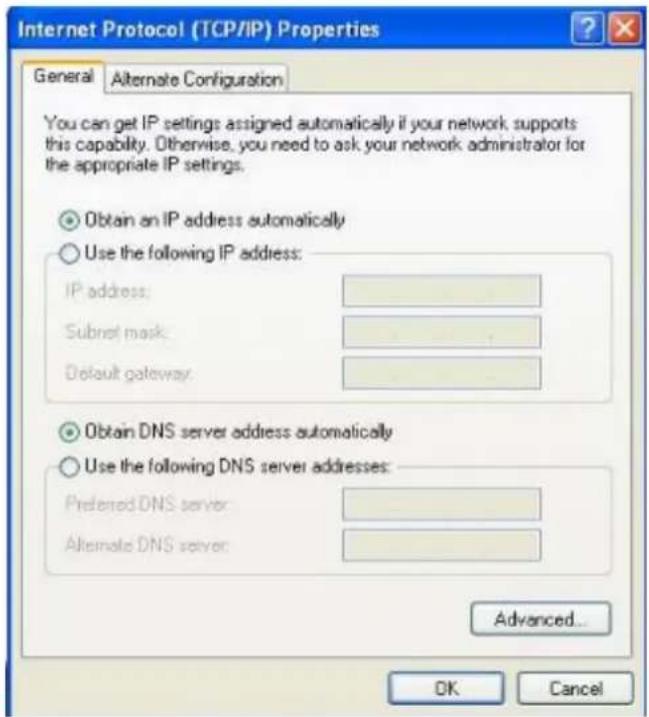
text_image
Internet Protocol (TCP/IP) Properties General Alternate Configuration You can get IP settings assigned automatically if your network supports this capability. Otherwise, you need to ask your network administrator for the appropriate IP settings. Obtain an IP address automatically Use the following IP address: IP address: Subnet mask: Default gateway. Obtain DNS server address automatically Use the following DNS server addresses: Preferred DNS server: Alternate DNS server Advanced... OK Cancel3 Click OK on the Local Area Connection Properties window (see 2 for the screenshot).
2 FAQs
Read the following Frequently Asked Questions if you are running into problems.
Q1: I cannot access the device's User Interface. What should I do?
A1: Please do as the following one by one until you solve your problem.
a. Clear cache of your browser, or change another browser. b. Verify the Ethernet cable is undamaged and well-connected to your computer and router. If not, change the Ethernet cable. For details, see Connect Your Router here.
c. Make sure you've set your computer to Obtain an IP address automatically or Use the following IP address and input a different IP address which should be the same net segment as LAN IP address of the Router. If you are using the recommended addressing scheme, your computer's IP address should be in the range of 192.168.0.2 to 192.168.0.254.
d. Press and hold the WPS/RST button on the top panel of the router for about 8 seconds to reset the Router to factory default. And try again.
e. Try accessing the User Interface from another computer, smart phone or iPad.
Q2: My notebook is unable to search wireless networks, what should I do?
A2: Please do as the following one by one until you solve your problem.
a. Check the wireless hardware or software button on your notebook. Verify that the wireless is enabled. b. Verify that the wireless feature is enabled.
c. Log in to the User Interface, and click Advanced > Wireless > Wireless Basic Settings to change the WiFi Name (SSID). Then search again on your notebook.
Q3: I cannot join my wireless network, what should I do?
A3: Please do as the following one by one until you solve your problem.
a. Verify that you entered a correct WiFi password. If you forget it, try next step. Note that the WiFi Password is different from login password.
b. Log in to the User Interface, change the Security Key (WiFi Password) in Home page, and click Advanced > Wireless > Wireless Basic Settings to change the WiFi Name (SSID). Then connect again.
3 Technical Support
If you still have some problems, please contact our technical support.
| Global Hotline: (86) 755-27657180 | United States Hotline: 1-800-570-5892 |
| Australia Hotline: 1300787922 | New Zealand Hotline: 800787922 |
| HongKong Hotline: 00852-81931998 | United Kingdom Hotline: 44 0800 1337 824 |
| Canada Hotline: 1-888-998-8966 | Skype: Tendasz |
| Website: http:// www.tendacn.com | E-mail: support@tenda.com.cn |
4 Safety and Emission Statement
CE Mark Warning
CE Mark Warning
This is a Class B product. In a domestic environment, this product may cause radio interference, in which case the user may be required to take adequate measures. This device complies with EU 1999/5/EC.
NOTE: (1) The manufacturer is not responsible for any radio or TV interference caused by unauthorized modifications to this equipment. (2) To avoid unnecessary radiation interference, it is recommended to use a shielded RJ45 cable.
FCC Statement
FCC Statement
This device complies with Part 15 of the FCC Rules. Operation is subject to the following two conditions: (1) This device may not cause harmful interference, and (2) this device must accept any interference received, including interference that may cause undesired operation.
This equipment has been tested and found to comply with the limits for a Class B digital device, pursuant to Part 15 of the FCC Rules. These limits are designed to provide reasonable protection against harmful interference in a residential installation. This equipment generates, uses and can radiate radio frequency energy and, if not installed and used in accordance with the instructions, may cause harmful interference to radio communications. However, there is no guarantee that interference will not occur in a particular installation. If this equipment does cause harmful interference to radio or television reception, which can be determined by turning the equipment off and on, the user is encouraged to try to correct the interference by one of the following measures:
— Reorient or relocate the receiving antenna.
— Increase the separation between the equipment and receiver.
— Connect the equipment into an outlet on a circuit different from that to which the receiver is connected.
— Consult the dealer or an experienced radio/TV technician for help.
FCC Caution: Any changes or modifications not expressly approved by the party responsible for compliance could void the user's authority to operate this equipment.
This transmitter must not be co-located or operating in conjunction with any other antenna or transmitter.
The manufacturer is not responsible for any radio or TV interference caused by unauthorized modifications to this equipment.
Radiation Exposure Statement
This equipment complies with FCC radiation exposure limits set forth for an uncontrolled environment. This equipment should be installed and operated with minimum distance 20cm between the radiator & your body.
NOTE: (1) The manufacturer is not responsible for any radio or TV interference caused by unauthorized modifications to this equipment. (2) To avoid unnecessary radiation interference, it is recommended to use a shielded RJ45 cable.
IC RSS Warning
Industry Canada (RSS-Gen Issue 4)
This device complies with Industry Canada's licence-exempt RSSs. Operation is subject to the following two conditions:
(1) This device may not cause interference; and
(2) This device must accept any interference, including interference that may cause undesired operation of the device.
Under Industry Canada regulations, this radio transmitter may only operate using an antenna of a type and maximum (or lesser) gain approved for the transmitter by Industry Canada. To reduce potential radio interference to other users, the antenna type and its gain should be so chosen that, the equivalent isotropically radiated power (e.i.r.p.) is not more than that necessary for successful communication.
IC Radiation Exposure Statement:
This equipment complies with IC RF radiation exposure limits set forth for an uncontrolled environment. This transmitter must not be co-located or operating in conjunction with any other antenna or transmitter.
The device meets the exemption from the routine evaluation limits in section 2.5 of RSS 102 and compliance with RSS-102 RF exposure, users can obtain Canadian information on RF exposure and compliance.
This transmitter must not be co-located or operating in conjunction with any other antenna or transmitter. This equipment should be installed and operated with a minimum distance of 20 centimeters between the radiator and your body.