
KB6000 - Loudspeaker KICKER - Free user manual and instructions
Find the device manual for free KB6000 KICKER in PDF.
| Product Type | 2-way full-range speaker |
| Brand | KICKER |
| Model | KB6000 |
| Woofer Diameter | 6 1/2" (16.5 cm) |
| Tweeter Diameter | 2" x 5" (5.1 x 12.7 cm) |
| Tweeter Type | Compression |
| Nominal Impedance | 8 ohms |
| DC Resistance | 6.8 ohms |
| Power Range (RMS) | 6–75 Watts RMS |
| Maximum Power Handling | 150 Watts |
| Sensitivity (SPL) | 90 dB @ 1 W, 1 m |
| Frequency Response | 55 Hz – 21 kHz |
| Dimensions (H x W x D) | 11" x 8 1/8" x 8 1/8" (279 x 210 x 210 mm) |
| Intended Use | Marine, outdoor, garage, workshop, basement, dormitory |
| Mounting | Wall-mount (bracket included) or shelf (rubber feet provided) |
| Adjustable Angle | Yes, via locking knobs |
| Protection Rating | Designed for marine environment (moisture resistant) |
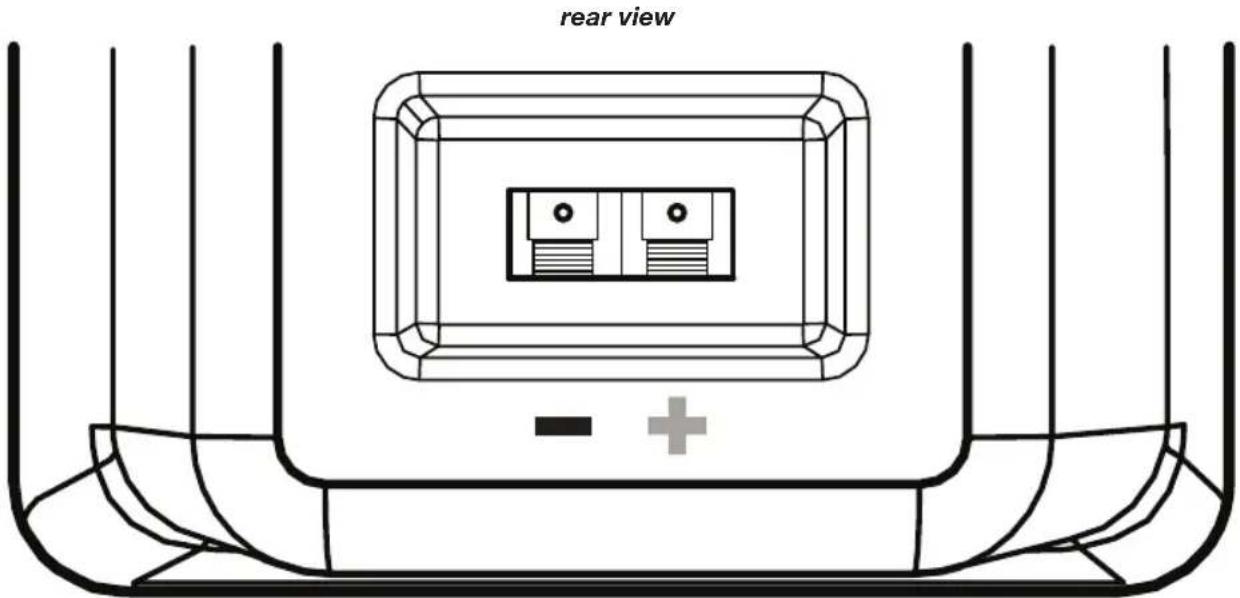
| Wiring | Screw terminal, marked polarity |
| Package Contents | 2 speakers, wall brackets, screws, rubber feet |
| Maximum Sound Level | Can cause irreversible hearing damage |
| Repairability | Spare parts available through authorized dealer |
| Warranty | International warranty - contact dealer |
| Customer Service | support@kicker.com / (+1) 405-624-8583 |
Frequently Asked Questions - KB6000 KICKER
User questions about KB6000 KICKER
0 question about this device. Answer the ones you know or ask your own.
Ask a new question about this device
Download the instructions for your Loudspeaker in PDF format for free! Find your manual KB6000 - KICKER and take your electronic device back in hand. On this page are published all the documents necessary for the use of your device. KB6000 by KICKER.
USER MANUAL KB6000 KICKER
KB6000 Full-Range Enclosure Owner's Manual
MODEL:
KB6000
Authorized KICKER Dealer:
Purchase Date:
Serial Number:
The Kicker KB6000 full-range enclosure is specifically designed for mounting in the open-air. Its weather-resistant, UV-treated enclosure and ability to produce clean and crisp sound over long distances make the KB6000 ideal for many outdoor applications. It may be mounted vertically or horizontally, and the mounting bracket can be angled for the optimum firing direction. Find the best location for stereophonic sound and, if necessary, add more KB6000 full-range enclosures to the system to help distribute and balance the sound. The KICKER badge on the grill may be removed, rotated and reattached to stay oriented with your mounting location.
Model: KB6000
Speaker Design 2-Way
Wooler Size | inches [cm] 6 1/2" [16.5]
Midrange/Tweeter Size | inches (cm) 2" x 5" [5.1 x 12.7]
Midrange/Tweeter Design Compression-loaded
Rated Impedance | ohm 8
DC Resistance | ohm 6.8
Power Range | Watts RMS 6-75
Peak Power Handling | Watts 150
Sensitivity [SPLo], dB @ 1W, 1m 90
Effective Frequency Range | Hz 55–21k
Height | inches (mm) 11" [279]
Width | inches (mm) 8 1/8" [210]
Depth | inches (mm) 8 1/8" [210]
INSTALLATION
Mounting: After determining the best mounting locations, carefully check the areas where the mounting hardware will be placed. In most vehicle applications, the best mounting position for your new KB6000 enclosure is as far away from the listening position as possible, with the speakers facing toward the listening position. In the home environment, the KB6000 can easily "rock-out" from eight to twenty feet away from, and facing towards, the listening area. Custom mounting locations may require more preparation, work and different mounting hardware. If the mounting location requires you to cut metal, avoid structural metal, sewer lines and braces. Make sure the speaker will not interfere with the vehicle's mechanisms or the party you are throwing out on the back patio.
natural_image
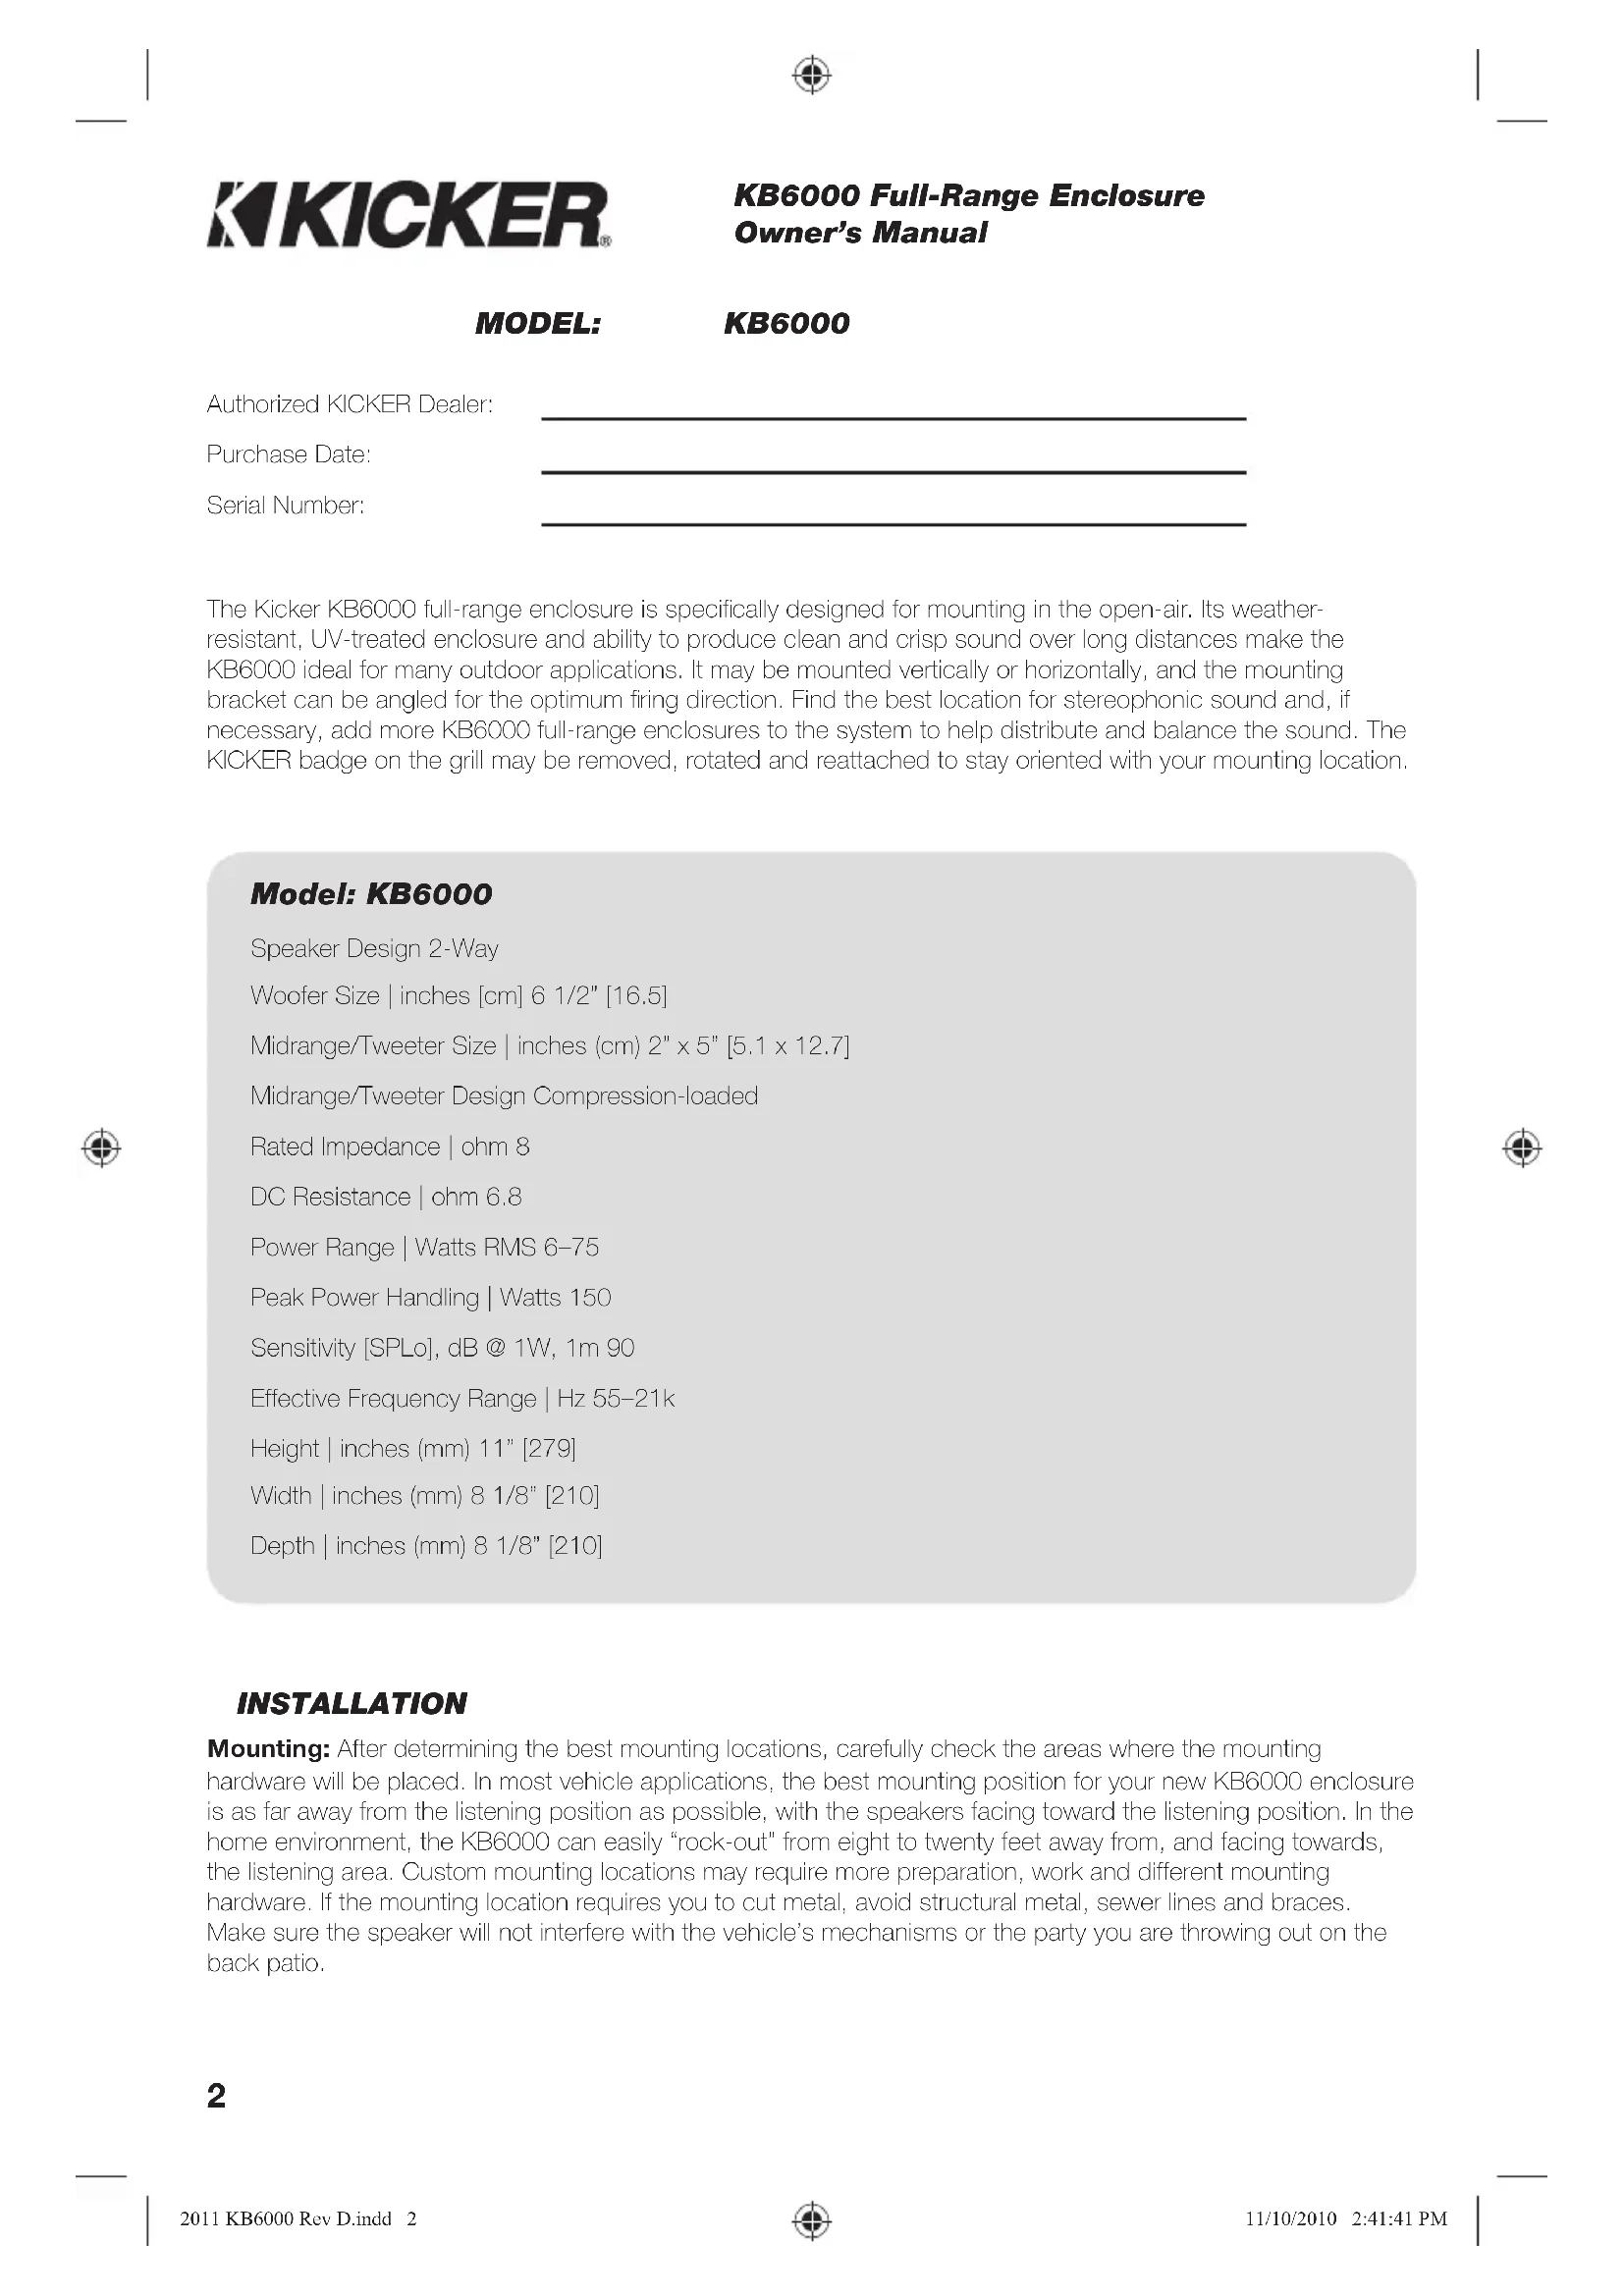
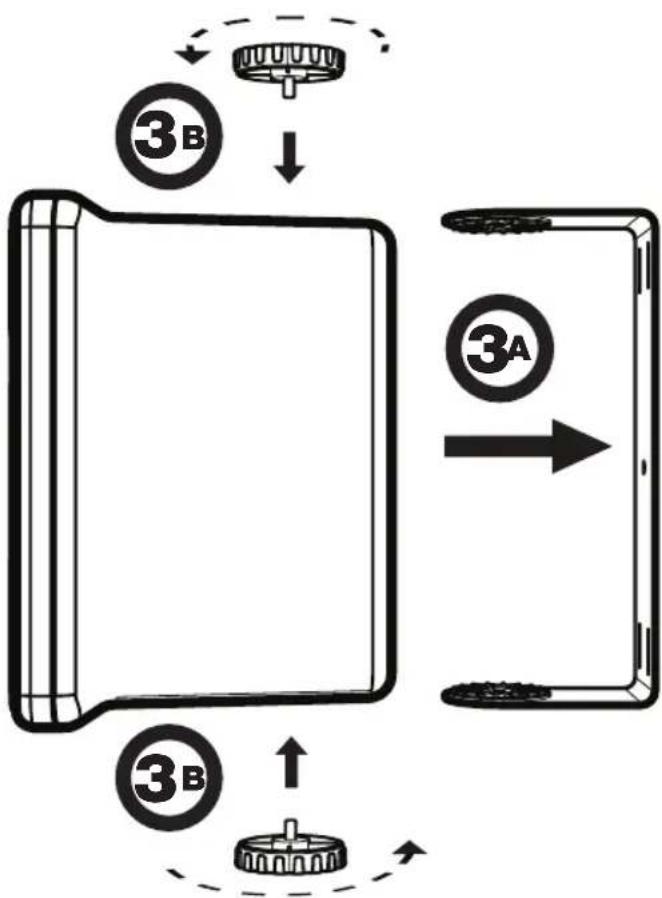
Technical line drawing of a mechanical component with gear and shaft, no text or symbols presentUse the mounting bracket as a template to mark the mounting holes on the mounting surface. Make sure there is adequate room to tighten the locking knobs on both sides of the mounting bracket before you pre-drill the mounting holes. Use a 7/64" (2.5mm) drill bit when using the supplied black coated stainless steel mounting screws, then screw the mounting bracket to the mounting surface.
flowchart
graph TD
    A["Device 3A"] --> B["Component 3B"]
    B --> C["Arrow to Product 3A"]
    C --> D["Arrow to Component 3B"]
    D --> E["Arrow to Product 3A"]
    style A fill:#f9f,stroke:#333
    style B fill:#ccf,stroke:#333
    style C fill:#cfc,stroke:#333
    style D fill:#fcc,stroke:#333
    style E fill:#ffc,stroke:#333
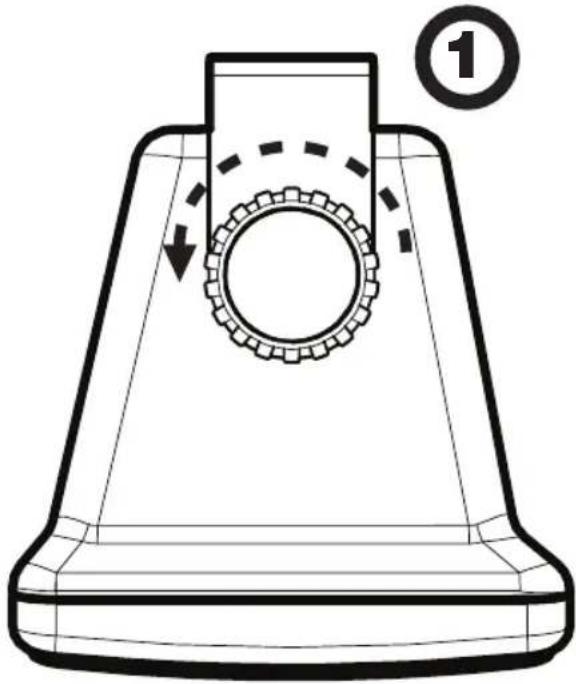
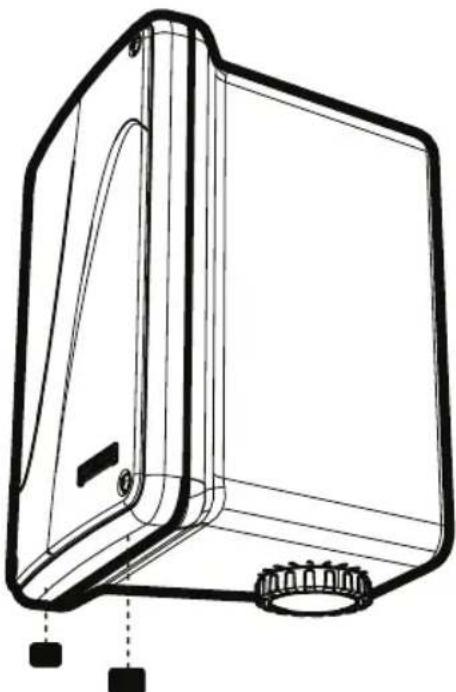
Unscrew the locking knobs on both sides of the speaker mounting bracket.
Position the KB6000 enclosure, loosely fasten the locking knobs, adjust the angle of the speaker and then tighten the locking knobs once you have the desired listening angle.
If the supplied hardware is not applicable to your installation, some other means of securely attaching the speakers to the vehicle or mounting location must be used. The threaded inserts on the top, bottom and back of the KB6000 are 1/4"-20 (.25 inches in diameter, 20 threads per inch), and may be used with other mounting systems to customize your installation. You are solely responsible for securely fastening the enclosure.
Wiring: If pre-existing speaker wiring is not available in your desired mounting location, it may be necessary to run the wire through the wakeboarding tower, attic in your home or along the wall in your dorm. The speaker wire should be kept away from sharp edges to avoid the possibility of getting pinched by moving mechanisms, and out of the way of people. If you must drill a hole to run the speaker wire through any location, be careful not to drill into other wiring or existing mechanisms. Any time a wire is run through a hole, it is necessary to insert a rubber or plastic grommet to protect the wire from damage. Check your local building codes for the necessary procedures and precautions for running low voltage wiring in your building.
Once the speaker wiring job is finished, plug the speaker wires securely into the spring-loaded, positive and negative speaker terminals on the back of the KB6000 enclosure. You may want to remove the mounting bracket to get a clear view of the terminals. Maintain proper polarity between all KB6000 speakers. The other end of these wires connect to your source unit or amplifier in a similar manner, observing proper polarity.
Bookshelf: The Kicker KB6000 enclosure speakers can be used as bookshelf speakers. Rubber feet are provided for this type of application. Remove the two locking knobs and then the mounting bracket from the enclosure. Attach the rubber feet, reattach the bottom locking knob and adjust it until the desired angle is achieved. We recommend starting with the speaker at a level angle.
natural_image
Technical line drawing of a mechanical component with gears and mounting holes (no text or symbols)If you have any questions about the installation of your Kicker KB6000 enclosure speakers, see the Authorized Kicker Dealer where you made your purchase. Please E-mail support@kicker.com or call Technical Services (405) 624-8583 for specific or unanswered questions.
4
ACOUSTICS LIMITED WARRANTY
KICKER warrants this product to be free from defects in material and workmanship under normal use for a period of THREE (3) MONTHS from date of original purchase with receipt. When purchased from an Authorized KICKER Dealer it is warranted for ONE (1) YEAR from date of original purchase with receipt. In all cases you must have the original receipt. Should service be necessary under this warranty for any reason due to manufacturing defect or malfunction during the warranty period, KICKER will repair or replace (at its discretion) the defective merchandise with equivalent merchandise at no charge. Warranty replacements may have cosmetic scratches and blemishes. Discontinued products may be replaced with more current equivalent products. This warranty is valid only for the original purchaser and is not extended to owners of the product subsequent to the original purchaser. Any applicable implied warranties are limited in duration to a period of the express warranty as provided herein beginning with the date of the original purchase at retail, and no warranties, whether express or implied, shall apply to this product thereafter. Some states do not allow limitations on implied warranties; therefore these exclusions may not apply to you. This warranty gives you specific legal rights; however you may have other rights that vary from state to state.
WHAT TO DO IF YOU NEED WARRANTY OR SERVICE:
Defective merchandise should be returned to your local Authorized Stillwater Designs (KICKER) Dealer for warranty service. Assistance in locating an Authorized Dealer can be found at www.kicker.com or by contacting Stillwater Designs directly. You can confirm that a dealer is authorized by asking to see a current authorized dealer window decal.
If it becomes necessary for you to return defective merchandise directly to Stillwater Designs (KICKER), call the KICKER Customer Service Department at (405) 624-8510 for a Return Merchandise Authorization (RMA) number. Package only the defective items in a package that will prevent shipping damage, and return to:
Stillwater Designs, 3100 North Husband St, Stillwater, OK 74075
The RMA number must be clearly marked on the outside of the package. Please return only defective components. The return of functioning items increases your return freight charges. Non-defective items will be returned freightcollect to you. For example, if a subwoofer is defective, only return the defective subwoofer, not the entire enclosure. Include a copy of the original receipt with the purchase date clearly visible, and a "proof-of-purchase" statement listing the Customer's name, Dealer's name and invoice number, and product purchased. Warranty expiration on items without proof-of-purchase will be determined from the type of sale and manufacturing date code. Freight must be prepaid; items sent freight-collect, or COD, will be refused.
WHAT IS NOT COVERED?
This warranty is valid only if the product is used for the purpose for which it was designed. It does not cover:
o Damage due to improper installation
o Subsequent damage to other components
o Damage caused by exposure to moisture, excessive heat, chemical cleaners, and/or UV radiation
o Damage through negligence, misuse, accident or abuse. Repeated returns for the same damage may be considered abuse
o Any cost or expense related to the removal or reinstallation of product
o Speakers damaged due to amplifier clipping or distortion
o Items previously repaired or modified by any unauthorized repair facility
o Return shipping on non-defective items
o Products with tampered or missing barcode labels
o Products returned without a Return Merchandise Authorization (RMA) number
o Freight Damage
o The cost of shipping product to KICKER
o Service performed by anyone other than KICKER
stillwaterdesigns
HOW LONG WILL IT TAKE?
KICKER strives to maintain a goal of 1 week service for all acoustics (subwoofers, midrange drivers, tweeters, crossovers, etc) returns. Delays may be incurred if lack of replacement inventory or parts is encountered. Failure to follow these steps may void your warranty. Any questions can be directed to the KICKER Customer Service Department at (405) 624-8510. Contact your International KICKER dealer or distributor concerning specific procedures for your country's warranty policies.
Note: All specifications and performance figures are subject to change. Please visit www.kicker.com for the most current information.
P.O. Box 459 • Stillwater, Oklahoma 74076 • USA • (405) 624–8510
11KB6000-D-20101110
KKICKER®
Sensibilidad [SPLo] | dB @ 1W, 1m 90
natural_image
Pure technical line drawing of a mechanical component with no text, numbers, or symbolsnatural_image
Technical line drawing of a mechanical component with gear and mounting bracket (no text or symbols)Höhe | Zoll [mm] 11" [279]
Breite | Zoll [mm] 8 1/8" [210]
Tiefe | Zoll [mm]
8 1/8" [210]
INSTALLATION
natural_image
Technical line drawing of a mechanical component with gear and shaft, no text or symbols presentnatural_image
Pure technical line drawing of a mechanical component with no text, numbers, or symbolsAuf dem Bücherbord:
natural_image
Technical line drawing of a mechanical component with gear and mounting bracket (no text or symbols)natural_image
Technical line drawing of a mechanical component with gear and shaft, no text or symbols presentnatural_image
Pure technical line drawing of a mechanical component with no text, numbers, or symbolsnatural_image
Technical line drawing of a mechanical component with mounting holes and a central hub (no text or symbols)Contact your International KICKER dealer or distributor concerning specific procedures for your country's warranty policies.
WARNING: KICKER products are capable of producing sound levels that can permanently damage your hearing! Turning up a system to a level that has audible distortion is more damaging to your ears than listening to an undistorted system at the same volume level. The threshold of pain is always an indicator that the sound level is too loud and may permanently damage your hearing. Please use common sense when controlling volume.
GARANTÍA INTERNACIONAL
Versión Español
©2010 Stillwater Designs

- KB6000 Full-Range Enclosure Owner's Manual
- Model: KB6000
- INSTALLATION
- ACOUSTICS LIMITED WARRANTY
- WHAT TO DO IF YOU NEED WARRANTY OR SERVICE:
- Stillwater Designs, 3100 North Husband St, Stillwater, OK 74075
- WHAT IS NOT COVERED?
- stillwaterdesigns
- HOW LONG WILL IT TAKE?
- KKICKER®
- Auf dem Bücherbord:
- GARANTÍA INTERNACIONAL
- Versión Español
Brand : KICKER
Model : KB6000
Category : Loudspeaker