
L2410NM - Monitor WESTINGHOUSE - Free user manual and instructions
Find the device manual for free L2410NM WESTINGHOUSE in PDF.
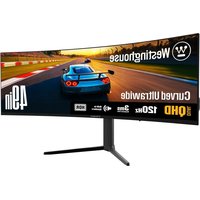
| Product type | 24-inch multifunction LCD monitor |
| Native resolution | 1920 x 1200 (WUXGA) |
| Screen size | 24 inches (diagonal), active matrix TFT screen |
| Response time | 5 ms (gray to gray) |
| Contrast ratio | 700:1 |
| Brightness | 450 cd/m² (Nits typ.) |
| Viewing angles | 170° horizontal / 160° vertical |
| Built-in speakers | 2 x 3 watts stereo |
| Video inputs | HDMI (HDCP), VGA D-sub, Composite, S-Video, YPbPr (component) |
| Audio inputs | RCA stereo (x2), 3.5 mm mini-jack |
| Power supply | 100-240 V AC, 50/60 Hz, 1.6 A |
| Power consumption (on) | Less than 105 W |
| Power consumption (standby) | Less than 2 W |
| Dimensions (with stand) | 22.5 x 18.9 x 8.3 inches (W x H x D) |
| Weight (with stand) | 16.3 lb (approx. 7.4 kg) |
| Wall mount | VESA compatible (bracket not included) |
| Security | Built-in Kensington® lock |
| Screen cleaning | Soft non-linting cloth; if necessary, ammonia- and alcohol-free glass cleaner |
| Housing cleaning | Slightly damp soft cloth (water only) |
| Power saving functions | Automatic Power Saver mode after inactivity |
| Plug & Play | VESA DDC (automatic recognition) |
| Standards | FCC-B, ICES003, UL, CUL, CCC, VCCI, EPA |
Frequently Asked Questions - L2410NM WESTINGHOUSE
User questions about L2410NM WESTINGHOUSE
0 question about this device. Answer the ones you know or ask your own.
Ask a new question about this device
Download the instructions for your Monitor in PDF format for free! Find your manual L2410NM - WESTINGHOUSE and take your electronic device back in hand. On this page are published all the documents necessary for the use of your device. L2410NM by WESTINGHOUSE.
USER MANUAL L2410NM WESTINGHOUSE
Multifunctional Monitor
IMPORTANT PRODUCT SAFETY INSTRUCTIONS 2
SAFETYGUIDELINES 3
FCC COMPLIANCE STATEMENT 3
CLEANING THE LCD MONITOR 4
FEATURES 5
POWERSAVER. 5
PLUG & PLAY 5
INSTALLATION 6
PACKAGE CONTENTS 6
- ATTACHING THE BASE STAND TO THE LCD MONITOR 6
- CONNECT INPUTS 7
- CONNECT POWER CABLE 8
- TURN THE POWER ON 9
CONTROL PANEL BUTTONS 10
OSD MENU FUNCTIONS 11
IMAGE MENU (WHILE IN A/V INPUTS) 12
AUDIO MENU 13
COLOR MENU 14
MISCELLANEOUS MENU (WHILE IN A/V INPUTS) 15
IMAGE MENU (WHILE IN PC INPUTS) 16
MISCELLANEOUS MENU (WHILE IN PC INPUTS) 17
INFO MENU (WHILE IN PC INPUTS) 18
APPENDIX 19
SPECIFICATIONS. 19
TROUBLESHOOTING 20
IMPORTANT PRODUCT SAFETY INSTRUCTIONS
Follow and obey all warnings and instructions marked on the LCD Monitor. For your safety, please read all the safety and operating instructions before you operate the LCD Monitor. Keep this user's manual for future reference.
Overloading
Do not overload wall outlets, extension cords, or power strips. This can result in fire or electronic shock.
Power Cord Protection
Power supply cords should be routed so that they are not likely to be walked on or pinched by items placed upon or against them. Periodically inspect the cords and each end of the cords for damage. The LCD Monitor shall be installed near a wall socket outlet and the plug on power cord shall be readily accessible.
Ventilation
Slots and openings on the cabinet are provided for ventilation purposes. To ensure reliable operation of the LCD Monitor and to protect it from overheating, these openings must not be blocked or covered.
- Do not block the openings by placing the LCD Monitor on a bed, sofa, rug or other similar surface.
- Do not place the LCD Monitor in a built-in installation such as a bookcase or rack unless proper ventilation is provided and the manufacturer's instruction have been adhered to.
Other Notices
- Avoid exposing the LCD Monitor to direct sunlight or high temperatures.
- Avoid exposing the LCD Monitor to moisture or high humidity.
- Do not attempt repairs yourself. Your warranty does not cover repairs or attempted repairs by anyone not authorized by Westinghouse Digital.
- If your LCD Monitor will not be used for a long period of time, unplug the LCD Monitor.
Precautions
- Avoid touching the screen. Skin oils are difficult to remove.
- Never remove the rear cover. Your LCD Monitor contains high-voltage parts. You may be seriously injured if you touch them..
Always handle your LCD display with care when moving it. - Place your LCD Monitor in a well-ventilated area; don't place the LCD Monitor in airtight compartments. Do not place anything on your LCD Monitor that prevents heat dissipation.
- Do not place heavy objects on the LCD Monitor, video cables, or power cord.
- If the LCD Monitor emits smoke, abnormal noise, or a strange odor, immediately turn it off and contact the Westinghouse Service Center.
- WARNING - To Reduce The Risk Of Fire Or Electric Shock, Do Not Expose The LCD Monitor To Rain Or Moisture! The LCD Monitor shall not be exposed to dripping or splashing and objects filled with liquids, such as vases, shall not be placed on the Monitor.
Safety Guidelines
CAUTION: The power supply outlet should be located near the LCD Monitor and should be easily accessible. Always use the appropriate AC cord that is certified for your specific country. Some examples are listed below:
USA. UL
Canada.....CSA
Germany.....VDE
Switzerland SEV
Britain BASE/BS
Japan .Electric Appliance Control Act
IMPORTANT NOTICE CONCERNING POWER CORD SELECTION
The specific power cord for this LCD Monitor is enclosed and has been selected according to the country of destination and must be used to prevent electric shock. Use the following guidelines if it is necessary to replace the original cord set, or if the cord set is not enclosed. The female receptacle of the cord set must meet IEC-60320 requirements and should look like Figure A1 below:

Figure A1 Figure A2
For the United States and Canada
In the United States and Canada the male plug is a NEMA5-15 style (Figure A2), UL Listed, and CSA Labeled. For LCD Monitors that are placed on a desk or table, type SVT or SJT cord sets may be used. For LCD Monitors placed directly on the floor, only SJT type cord sets may be used. The cord set must be selected according to the current rating for the LCD Monitor. Please consult the table below for the selection criteria for power cords used in the United States and Canada.
| Cord Type Size of Conductors in Cord Maximum Current Rating of Unit | ||
| SJT | 18 AWG | 10 Amps |
| 16 AWG | 12 Amps | |
| 14 AWG | 12 Amps | |
| SVT | 18 AWG | 10 Amps |
| 17 AWG | 12 Amps | |
FCC Compliance Statement
This equipment has been tested and complies with the limits for a Class B digital device, pursuant to part 15 of the FCC Rules. These limits are designed to provide reasonable protection against harmful interference in a residential installation. This equipment generates, uses, and can radiate radio frequency energy, and may cause harmful interference to radio communications if not installed and used in accordance with the instructions. However, there is no guarantee that interference will not occur in a particular installation. If this equipment does cause harmful interference to radio or television reception, which can be determined by turning the equipment off and on, the user is encouraged to try to correct the interference by one or more of the following measures:
- Reorient or relocate the receiving antenna.
- Increase the separation between the LCD Monitor and receiver.
- Connect the equipment into an outlet on a circuit different from that to which the receiver is connected.
- Consult the Westinghouse Service Center or an experienced radio/Monitor technician for assistance.
FCC Warning
To assure continued FCC compliance, the user must use a grounded power supply cord and the provided shielded video interface cable with bonded ferrite cores. If a BNC cable used, use only a shielded BNC (5) cable. Also, any unauthorized changes or modifications not expressly approved by Westinghouse Digital will void the user's authority to operate this device.
CLEANING THE LCD MONITOR
- MAKESURE THE LCD MONITOR IS TURNED OFF
-NEVER SPRAY OR POUR ANY LIQUID DIRECTLY ONTO THE SCREEN OR CASE
To clean the screen:
- Wipe the screen with a clean, soft, lint-free cloth. This removes dust and other particles.
- If it still is not clean, apply a small amount of non-ammonia, non-alcohol based glass cleaner onto a clean, soft, lint-free cloth, and wipe the screen.
To clean the case:
- Use a soft, dry cloth.
- If it still is not clean, apply a small amount of water onto a clean, soft, lint-free cloth, then wipe the surface.
Disclaimer
Westinghouse Digital does not recommend the use of any ammonia or alcohol-based cleaners on the LCD Monitor screen or case. Some chemical cleaners have been reported to damage the screen and/or LCD Monitor case. Westinghouse Digital will not be liable for damage resulting from the use of any ammonia or alcohol-based cleaners.
- Beyond full HD resolution at 1920 × 1200 native
- Multiple A/V connectivity with the latest HDMI-HDCP
- Ultra Bright Display Image
- Wide Viewing Angles
Super Fast Response Time
Built-in Stereo Speakers
Power Saver
Plug & Play - Wall Mountable
- Kensington Compatible Security Lock
Power Saver

A power control system, Power Saver, is installed inside the LCD monitor. If the LCD monitor has not been used for a certain period of time, the system will turn the LCD monitor to low voltage mode to save electrical power. Slight movement of the mouse or pressing any key on the keyboard will return the original screen image. You can use your PC to set the function.
Plug & Play
VESA Plug and Play eliminates the complicated and time-consuming installation process. Your computer system will identify and automatically adjust the LCD monitor. The LCD monitor uses Display Data Channel (DDC) to send Extended Display Identification Data (EDID) to the computer system, so the computer system can automatically adjust the LCD monitor.
INSTALLATION
Congratulations on your purchase of a Westinghouse 24" widenscreen multifunctional LCD Monitor. Sleek and practical, this glossy lightweight multifunctional LCD monitor delivers a bright and clear display optimized for 1920 × 1200 display resolution from almost every video source: desktop/ notebook PC, HDTV/satellite/cable receivers, DVD player, camcorder and game consoles via its built-in HDMI-HDCP, VGA D-sub and A/V connectors.
Package Contents
Your product package includes:
- 24" Westinghouse widenscreen multifunctional LCD Monitor
- Detachable Base Stand
- AC Power Cord
VGA Male - Male Cable - 3.5 mm Mini-Stereo Cable
- User's Manual
Warranty Card
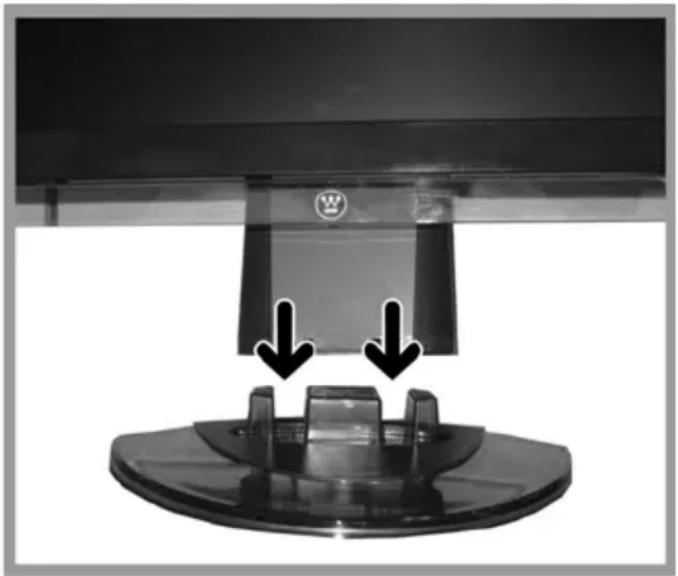
1. Attaching the Base Stand to the LCD Monitor
Place the base on a flat surface, align the holes and tabs and slide monitor neck onto the base until it snaps into place, as shown below.
To remove the base stand, place monitor face down on a flat and soft surface, press the tabs on the bottom of the stand neck and remove the base.
2. Connect Inputs
Connect one or all of the following into the back of this multifunctional LCD Monitor:
IMPORTANT: Before beginning, make sure this monitor, PC or A/V apparatus that connects to are all turned off.

Inputs on the right side


Inputs on the left side

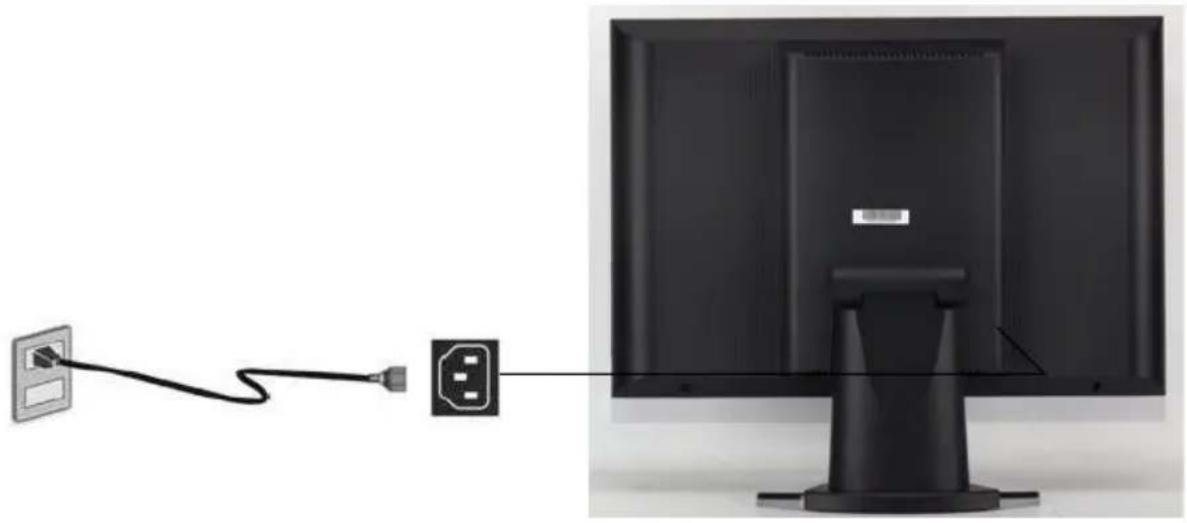
3. Connect Power Cable
Connect the AC power cord to the LCD Monitor (to the connector labeled "AC-IN") and then connect the cord into a properly grounded AC outlet.
Option only if needed: For wall mount option, first carefully pull from both end of the back cover, as shown in Picture A below; then slide down to remove the cover as shown in Picture B. Place monitor screen on a flat but soft surface and refer to your wall mount instructions for further details.

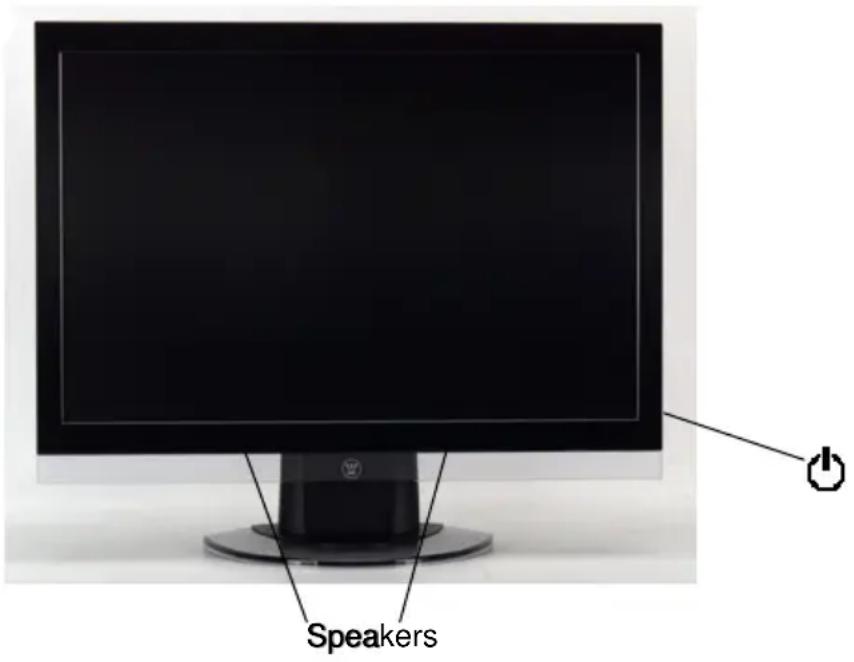
4. Turn the Power On
Remove the protective films on the monitor bezel. Press the power button on the side of the LCD monitor first, and then power on the rest of your PC and A/V apparatus. The LED light will turn on if a signal input is detected or it will be blinking if no input is detected.
NOTE: If your desktop image looks fuzzy, adjust the computer's resolution to 1920 x 1200. To do that, you may need to download, install the latest drivers of your graphic card and reboot your computer.
Control Panel Buttons
Use the control buttons on the side of the LCD Monitor to display the On Screen Display (OSD) menu. Below is a list of the control button functions. The OSD controls are defined in "OSD Functions" on page 11.

| 1.▲ | • Scroll up the OSD sub-menu list when the OSD is displayed. |
| 2.▼ | • Scroll down the OSD sub-menu list when the OSD is displayed. |
| 3.▲ | • Move a selection left when the OSD is displayed. |
| 4.▲ | • Move a selection right when the OSD is displayed. |
| 5.■ | • Press this button to switch between different video inputs: Video, S-Video, YPbPr, D-Sub and HDMI. • Press and hold this button to enter or exit the OSD menu |
| 6.◇ | • Power On and Off button • LED Power Indicator Light • White: Normal • Blinking: Standby • Off: Power Off |
OSD Menu Functions
All the function settings for this multifunctional LCD monitor are controlled via the control keys located on the side of the monitor. To display the OSD main menu, press and hold the "Menu" keypad button on the control panel. (Note: The OSD menu display will disappear automatically after approximately 10 seconds, if no action is taken.)
This LCD monitor has been adjusted to optimal settings before shipment. If needed, adjustments to the monitor settings can also be made using the OSD menu.
- Press and hold the "Menu" button to display the OSD.
- Press the or button to scroll through the sub-menus (Image, Audio, Color, Miscellaneous, and Information Sub-Menus).
- Press the button to enter the sub-menu.
- Press the or button to select the function to be adjusted.
- Press the or buttons to change the current setting of the sub-function.
- To go back to the previous menu, press the button. Changes are saved automatically.
- To exit the OSD menu press "Menu" again. It automatically will save any changes that have been made.
- To switch input, simply press "Menu"

NOTES:
- Any changes are automatically saved in memory when the OSD turns off. Turning off the power should be avoided while using the OSD menu.
- Adjustments for clock, phase, and positions are saved for each individual signal timing. Except for these adjustments, all other adjustments have only one setting, which applies to all signal timings.
- The icon color will change from gray to blue when a sub-menu is selected.
The following is a list of the OSD sub-menus for this multifunctional LCD monitor:
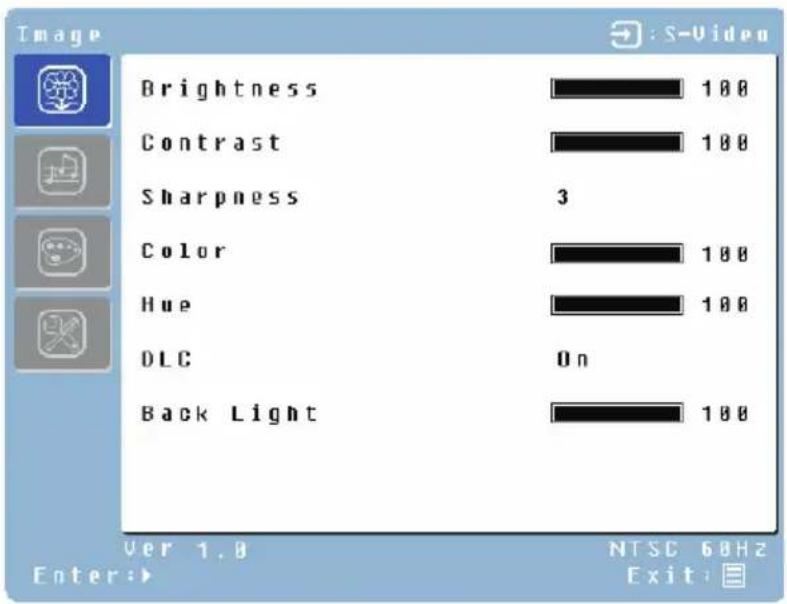
Image Menu (while in A/V inputs, including HDMI input)
| Function | Description |
| Brightness | Adjust the black level of the picture |
| Contrast | Adjust the contrast of the picture |
| Sharpness | Soften or sharpen the picture |
| Color | Adjust color saturation of the picture. |
| Hue | Adjust color phase, either more green or red |
| DLC | Turn Dynamic Luminance Control On or Off |
| Back Light | Backlight adjustment of the screen, range between 0-100 |
Audio Menu

| Function | Description |
| Volume | Turn volume up and down |
| Mute | Turn volume off and on |
| Treble | Adjust the high pitch sounds |
| Bass | Adjust the low pitch sounds |
| Balance | Emphasize sounds from left or right speaker |
| Audio Select (Only available in HDMI) | Select Digital audio input from HDMI or Analog audio input from 3.5 mm stereo jack |
Color Menu

| Function | Description |
| Color temp | Select between User/9300K/7500K/6500K |
| Red | Adjust the intensity of red color in User mode. |
| Green | Adjust the intensity of green color in User mode. |
| Blue | Adjust the intensity of blue color in User mode. |
Miscellaneous Menu (while in A/V inputs including HDMI input)

| Function | Description |
| Language | Select OSD languages between: English, French, Spanish, Chinese |
| OSD Transparency | Adjust the transparency of the OSD menu. |
| OSD time-out | Adjust OSD display time. |
| OSD position | Move OSD display position to any one of the following 5 positions within the overall screen. 1 2 3 5 4 5 |
| Reset | Restore this LCD monitor to its factory default settings. |
| Sleep | Set the time for monitor to go to “sleep”. |
| Aspect Ratio | Set video aspect ratio between Normal/Full/Zoom modes. |
Image Menu (while in PC inputs including DVI when using DVI-HDMI cable)

| Function | Description |
| Brightness | Adjust the black level of the image. |
| Contrast | Adjust the contrast of the image. |
| Sharpness | Soften or sharpen the image |
| Clock | Adjust the LCD monitor clock. (VGA only) |
| Phase | Adjust the LCD monitor phase. (VGA only) |
| H. Position | Move the image left or right on the screen. (VGA only) |
| V. Position | Move the image up or down on the screen. (VGA only) |
| Auto-Config | Select to automatically fine tune the screen image |
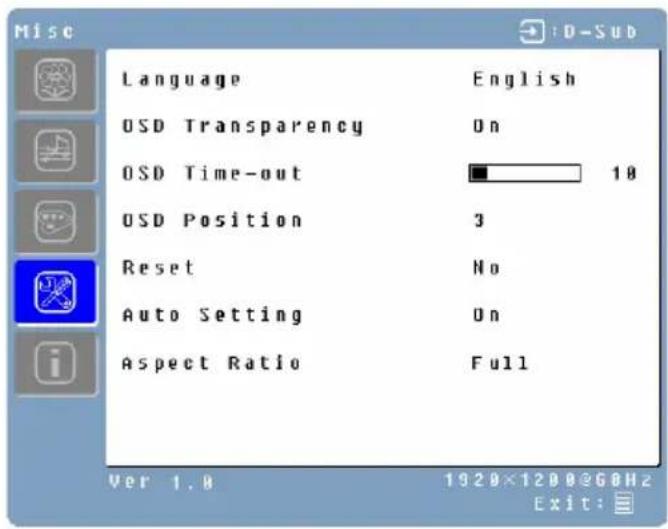
Miscellaneous Menu (while in PC Inputs including DVI when using DVI-HDMI cable)
| Function | Description |
| Language | Select OSD languages between: English, French, Spanish and Chinese. |
| OSD Transparency | Adjust the transparency of the OSD menu. |
| OSD time-out | Adjust OSD display time. |
| OSD position | Move OSD display position to any one of the following 5 positions within the overall screen. 1 2 3 4 5 |
| Reset | Restore this LCD monitor to its factory default settings. |
| Auto Setting | Set to automatically perform Auto-Config function when a new timing is detected. |
| Aspect Ratio | Select Fill to fill screen or Normal to keep input aspect ratio |
INFO Menu (while in PC Inputs including DVI when using DVI-HDMI cable)
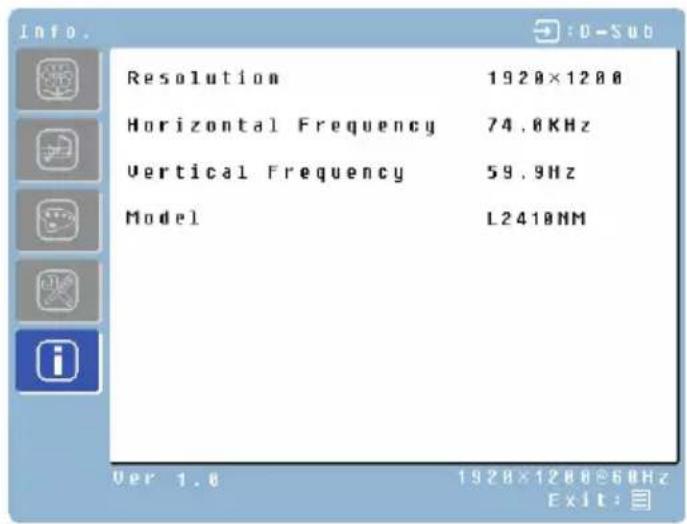
Display system information
Specifications
| Item | Specification | |
| Panel Size | Type | 24" (diagonal) Color TFT Active Matrix LCD. Anti-static and hard coated. |
| Optimum Resolution | 1920 x 1200 | (native) |
| Response Time | 5 ms (gray to gray) | |
| Contrast Ratio | 700:1 | |
| Brightness | 450 Nits typ | |
| Viewing Angles | 170° (H) / 1 | 60° (V) |
| PC Compatibility | VGA, SVGA, XGA, SXGA, WUXGA(1920x 1200 preferred) | |
| Video Compatibility (Video, S-Video, YPbPr) | NTSC, PAL | 480P, 576P, 720P, 1080i and 1080P |
| Video Features | Motion adaptive de-interlacing digital noise reduction Aspect Ratio Adjustment (Normal/Full/Zoom) Dynamic Luminance Control (DLC) Function Brightness/Contrast/Sharpness/Hue/Color | |
| Audio Features | Built-in audio amplifier and speakers at 3 watts x 2 | |
| Input connections | Video | 1 x Composite Video |
| Audio | 1x S-Video | |
| PC | 1x Component YPbPr (supports 480i/P, 576i/P,720P and 1080i) Dual RCA stereo x 2 | |
| 1x HD-15 pin D-Sub (VGA connector) | ||
| 1x HDMI-HDCP (supports 480i/P, 720P and 1080i/1080P) | ||
| 1 x Mini Stereo (share between D-sub and DVI-D when using DVI-HDMI cable) | ||
| Power | Voltage 100- | 240 VAC, 50/60 Hz (auto switch), 1.6A |
| Operating Conditions | Temperature | 32° F to +95° F (0° C to +35° C) |
| Humidity 20% | % to 90% (no condensation) | |
| Altitude Up to | 3,000 meters | |
| Storage Conditions | Temperature | -4° F to +140° F (-20° C to +60° C) |
| Humidity 10% | % to 90% (no condensation) | |
| Altitude Up to | 12,000 meters | |
| Dimensions | Unit 22.5 (w) | x 18.9 (h) x 8.3 (d) in |
| Carton 25.4" | (w) x 21.5" (h) x 7.8 (d) in | |
| Weight | Unit | 16.3 lbs |
| Regulations | FCC-B, ICE | S-003, UL, CUL, CCC, VCCI, EPA |
| Power consumption | AC On | <105W |
| AC Off <2W | ||
| Lamp Life | 50,000 hours | |
Troubleshooting
No Power
- Make sure the AC cord is plugged into the back of the LCD monitor.
- Make sure the AC power cord is securely connected to an AC outlet.
- Plug another electrical device (like a radio) to the power outlet to verify that the outlet is supplying the proper voltage.
No Screen Image
Make sure monitor is turned on.
- Make sure the video cable is securely connected to both the monitor and PC or Audio/Video apparatus.
- Make sure you have selected the correct video input source
- Adjust the brightness and contrast levels.
Fuzzy Image
- Set desktop resolution on your PC to 1920 × 1200 at 60Hz .
- Adjust Phase/Sharpness setting on the monitor
Cannot find 1920 x 1200 under screen resolution on my Display Properties
- You may need to download and install the latest video card driver for your PC. Listed below are websites for some major video card manufacturers:
Nvidia: http://www.nvidia.com/content/drivers/drivers.asp
Intel: http://downloadfinder.intel.com/scripts-df/support_intel.asp
ATI: https://support.ati.com/ics/support/default.asp?deptID=894
Image Too Bright or Too Dark
- Adjust the brightness and contrast levels under the OSD menu.
- Make sure the video cable is securely connected to both the monitor and PC or Audio/Video apparatus.
- Perform Auto Adjust.
Distorted Image
- Reset the LCD monitor by performing the "Reset" function using the OSD.
- Remove extra accessories (such as a VGA extension cord).
Image is Not Centered (size is not scaled correctly)
- Perform Auto Adjust
- Adjust the horizontal and/or vertical position using the OSD.
- Check image size setting.
Colors are Incorrect
- Make sure the video cable is securely connected to both the monitor and PC or Audio/Video apparatus
- Adjust the color setting using the OSD.
No sound
- Check your audio connection.
- Check your audio settings; make sure Mute is off.
Press the Vol key
How to connect a DVI-D input to the monitor
- Us a DVI-HDMI cable to connect between PC with DVI output and the HDMI input of L2410NM.
- Start PC, monitor will indicate a DVI signal once detected via its information OSD menu.
- Audio input of the monitor will switch to its 3.5mm stereo jack automatically.
Additional Questions
See our website at www.westinghousedigital.com.
- Contact Westinghouse Digital Customer Service at (866) 287-5555 or write us at service@westinghousedigital.com.
TABLE DES MATIÈRES
CONSIGNES DE SECURITE IMPORTANTES 2
DIRECTIVES DE SECURITE 3
DECLARATION DE CONFORMITE A LA FCC 3
NETTOYAGE DU MONITEUR ACL 5
CHARACTERISTIQUES 6
ECONOMISEUR D'ENERGIE 6
AUTOCONFIGURATION (PLUG & PLAY) 6
INSTALLATION 7
CONTENU DE L'EMBALLAGE 7
- FIXATION DU TRÉPIED AU MONITEUR ACL 7
- BRANCHEMENT DES ENTRÉES 8
- BRANCHEMENT DU CABLE D'ALIMENTATION 9
4.METTRE LE MONITEUR SOUS TENSION. 10
TABLEAU DE COMMANDE 11
AFFICHAGE DES FONCTIONS DU MENU 12
MENU IMAGE (ENTRÉES AUDIO VIDEO, ENTRÉE HDMI) 13
MENU AUDIO 14
MENUCOULEUR. 15
MENUDIVERS (ENTREES AUDIOVIDEO, INCLUANT L'ENTREE HDMI) 16
MENU IMAGE (ENTREES PC, DVI AVEC CABLE DVI-HDMI) 17
MENUDIVERS(ENTREESPC,DVI AVEC CABLE DVI-HDMI) 18
MENUDINFORMATION(ENTREESPC,DVI AVEC CABLE DVI-HDMI) 19
APPENDICE 20
FICHE TECHNIQUE 20
GUIDE DE DÉPANNAGE 21
CONSIGNES DE SECURITE IMPORTANTES
Autoconfiguration (Plug & Play)
Nvidia: http://www.nvidia.com/content/drivers/drivers.asp
Intel : http://downloadfinder.intel.com/scripts-df/support_intel.asp
ATI:https://support.ati.com/ics/support/default.asp?deptID=894
Nvidia: http://www.nvidia.com/content/drivers/drivers.asp
Intel: http://downloadfinder.intel.com/scripts-df/support_intel.asp
ATI: https://support.ati.com/ics/support/default.asp?deptID=894
Nvidia: http://www.nvidia.com/content/drivers/drivers.asp
Intel: http://downloadfinder.intel.com/scripts-df/support_intel.asp
ATI: https://support.ati.com/ics/support/default.asp?deptID=894
图像太亮或太黑
Nvidia: http://www.nvidia.com/content/drivers/drivers.asp
Intel: http://downloadfinder.intel.com/scripts-df/support_intel.asp
ATI: https://support.ati.com/ics/support/default.asp?deptID=894
映像が明るARDS、あらは暗ARDS


- IMPORTANT PRODUCT SAFETY INSTRUCTIONS 2
- CLEANING THE LCD MONITOR 4
- FEATURES 5
- INSTALLATION 6
- OSD MENU FUNCTIONS 11
- APPENDIX 19
- IMPORTANT PRODUCT SAFETY INSTRUCTIONS
- Overloading
- Power Cord Protection
- Ventilation
- Other Notices
- Precautions
- Safety Guidelines
- IMPORTANT NOTICE CONCERNING POWER CORD SELECTION
- For the United States and Canada
- FCC Compliance Statement
- FCC Warning
- CLEANING THE LCD MONITOR
- To clean the screen:
- To clean the case:
- Disclaimer
- Power Saver
- Plug & Play
- INSTALLATION
- Package Contents
- Attaching the Base Stand to the LCD Monitor
- Connect Inputs
- Connect Power Cable
- Turn the Power On
- Control Panel Buttons
- OSD Menu Functions
- NOTES:
- Image Menu (while in A/V inputs, including HDMI input)
- Audio Menu
- Color Menu
- Miscellaneous Menu (while in A/V inputs including HDMI input)
- Image Menu (while in PC inputs including DVI when using DVI-HDMI cable)
- Miscellaneous Menu (while in PC Inputs including DVI when using DVI-HDMI cable)
- INFO Menu (while in PC Inputs including DVI when using DVI-HDMI cable)
- Troubleshooting
- No Power
- No Screen Image
- Fuzzy Image
- Image Too Bright or Too Dark
- Distorted Image
- Image is Not Centered (size is not scaled correctly)
- Colors are Incorrect
- No sound
- How to connect a DVI-D input to the monitor
- Additional Questions
- TABLE DES MATIÈRES
- CONSIGNES DE SECURITE IMPORTANTES 2
- NETTOYAGE DU MONITEUR ACL 5
- CHARACTERISTIQUES 6
- INSTALLATION 7
- AFFICHAGE DES FONCTIONS DU MENU 12
- APPENDICE 20
- CONSIGNES DE SECURITE IMPORTANTES
- Autoconfiguration (Plug & Play)
- 图像太亮或太黑
- 映像が明るARDS、あらは暗ARDS
Brand : WESTINGHOUSE
Model : L2410NM
Category : Monitor