
13972 - Saucepan BELLA - Free user manual and instructions
Find the device manual for free 13972 BELLA in PDF.
| Product Type | Electric Slow Cooker Set |
| Capacity | 2.4 L per stoneware pot |
| Materials | Aluminum base, stoneware pot, tempered glass lid |
| Maximum Number of Bases | 6 (can be assembled from 1 to 6) |
| Temperature Settings | Off (OFF), Low (LOW), High (HIGH), Warm (WARM) |
| Functions | Slow cooking, keep warm, metal lid holder, spoon slot, stackable |
| Power Supply | 120 VAC, 60 Hz (detachable power cord) |
| Safety | Polarized plug, do not immerse base, hot surfaces, avoid thermal shock |
| Care and Cleaning | Pots and lids dishwasher safe; wipe base with damp cloth; do not use abrasives |
| Spare Parts and Repairability | No user-serviceable parts; contact authorized service center |
| Warranty | 2-year limited |
Frequently Asked Questions - 13972 BELLA
User questions about 13972 BELLA
0 question about this device. Answer the ones you know or ask your own.
Ask a new question about this device
Download the instructions for your Saucepan in PDF format for free! Find your manual 13972 - BELLA and take your electronic device back in hand. On this page are published all the documents necessary for the use of your device. 13972 by BELLA.
USER MANUAL 13972 BELLA
natural_image
Electric cooktop with two open dishes and a lid, no visible text or symbolsnatural_image
Exterior view of a modern kitchen grater with a lid and side legs (no text or symbols visible)Instruction Manual Recipe Guide
www.bellahousewares.com/welcome
Table of Contents
Important Safeguards....3-4
Additional Important Safeguards......5
Notes on the Cord....6
Notes on the Plug 6
Plasticizer Warning....6
Electric Power....6
Getting To Know Your BELLA LINX Serve & Store Slow Cooker ......7
Introduction to the BELLA LINX Slow Cooker 8
Stoneware Pot Care 8
Before Using for the First Time 8-9
BELLA LINX Slow Cookers Assembly Instructions.... 9-10
Operating Instructions....11-12
Hints for Slow Cooking 12-13
User Maintenance Instructions....13
Care & Cleaning Instructions 13-14
Storing Instructions....14
Recipes....15-16
Warranty 17
Table des matières
When using electrical appliances, basic safety precautions should always be followed, including the following:
- READ ALL INSTRUCTIONS.
- Do not touch hot surfaces. Use handles or knobs.
- To protect against electrical shock, do not immerse cord, plugs or appliance in water or other liquid.
- This appliance is not intended for use by persons (including children) with reduced physical, sensory or mental capabilities, or lack of experience and knowledge, unless they have been given supervision or instruction concerning use of the appliance by a person responsible for their safety.
- Close supervision is necessary when any appliance is used by or near children.
- Unplug from outlet when not in use and before cleaning. Allow to cool before putting on, or taking off parts.
- Do not operate any appliance with a damaged cord or plug or after the appliance malfunctions or has been damaged in any manner. Return appliance to the nearest authorized service facility for examination, repair or adjustment.
- The use of accessory attachments not recommended by the appliance manufacturer may cause injuries.
- Do not use outdoors.
- Do not let cord hang over edge of table or counter, or touch hot surfaces.
- Do not place on or near a hot gas or electric burner, or in a heated oven.
- Extreme caution must be used when moving an appliance containing hot oil or other hot liquids.
CAUTION: To protect against damage or electric shock, do not cook in the LINX aluminum liner(s). Cook only in the stoneware pot(s) provided.
- To disconnect, turn all OFF/LOW/HIGH/WARM control dials to OFF, then remove plug from wall outlet.
- Do not use appliance for other than intended use.
- Avoid sudden temperature changes, such as adding refrigerated foods into a heated stoneware pot.
- Do not use any stoneware pot or any glass lid if chipped, cracked, or severely scratched.
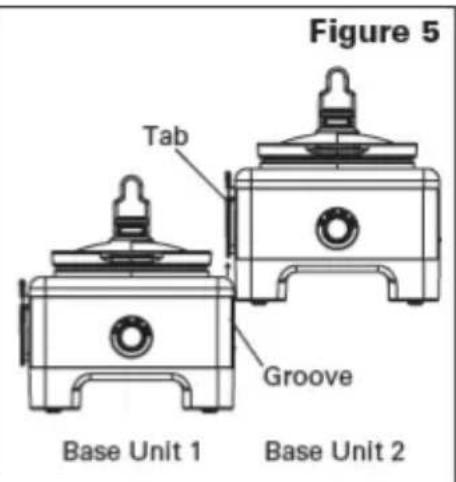
- WARNING: When using more than 1 LINX base unit, always make sure base units are properly assembled with the tab along the side of the unit linked securely into the groove of the next unit.
- CAUTION: NEVER CARRY MULTIPLE INTERCONNECTED LINX BASE UNITS, FILLED OR EMPTY. Unplug unit.
Following the detailed instructions in the section entitled: "Care & Cleaning Instructions," always disconnect all LINX base units before moving to serve or to clean. (See Figure 5.)
FOR HOUSEHOLD USE ONLY SAVE THESE INSTRUCTIONS
ADDITIONAL IMPORTANT SAFEGUARDS
CAUTION, HOT SURFACES: This appliance generates heat and escaping steam during use. Proper precautions must be taken to prevent the risk of burns, fires or other injury to persons or damage to property.
- A person who has not read and understood all operating and safety instructions is not qualified to operate this appliance. All users of this appliance must read and understand this Instruction Manual before operating or cleaning this appliance.
- If this appliance falls or accidentally becomes immersed in water, unplug it from the wall outlet immediately. Do not reach into the water!
- When using this appliance, provide adequate air space above and on all sides for air circulation. Do not operate this appliance while it is touching or near curtains, wall coverings, clothing, dishtowels or other flammable materials.
- Do not leave this appliance unattended during use.
- If this appliance begins to malfunction during use, immediately turn all OFF/LOW/HIGH/WARM control dials to OFF, then remove the plug from the outlet. Do not use or attempt to repair a malfunctioning appliance!
- The cord to this appliance should be plugged into a 120V AC electrical wall outlet.
- Do not use this appliance in an unstable position.
- Never use any stoneware pot on a gas or electric cooktop or on an open flame.
- Lift off lid(s) carefully to avoid scalding, and allow water to drip into stoneware pot(s).
Notes on the Plug
This appliance has a polarized plug (one blade is wider than the other). To reduce the risk of electric shock, this plug will fit in a polarized outlet only one way. If the plug does not fit fully into the outlet, reverse the plug. If it still does not fit, contact a qualified electrician. Do not modify the plug in any way.
Notes on the Cord
The provided short power-supply cord (or detachable power-supply cord) should be used to reduce the risk resulting from becoming entangled in or tripping over a longer cord. Do not use an extension cord with this product
Plasticizer Warning
CAUTION: To prevent Plasticizers from migrating from the finish of the counter top or table top or other furniture, place NON-PLASTIC coasters or place mats between the appliance and the finish of the counter top or table top. Failure to do so may cause the finish to darken; permanent blemishes may occur or stains can appear.
Electric Power
If the electrical circuit is overloaded with other appliances, your appliance may not operate properly. It should be operated on a separate electrical circuit from other appliances.
Getting To Know Your BELLA LINX Serve & Store Slow Cooker
Product may vary slightly from illustration
NOTE: This illustration applies to all configurations: 1, 2, or 3 ...up to 6 units.
All units are identical.
Figure 1
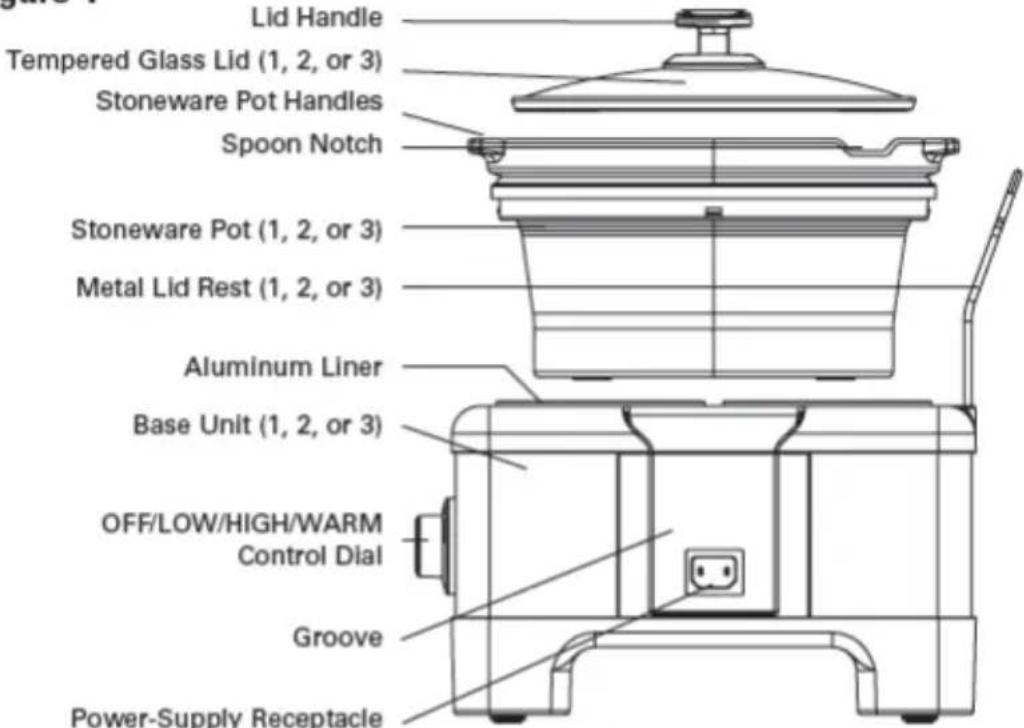
Right side
Introduction to the BELLA LINX Slow Cooker
This unique BELLA LINX Serve & Store Slow Cooker expands from 1 to 2 to 3...up to 6 units sharing 1 power-supply cord. Prepare and serve an array (up to 6!) of warm favorites. Each 2.5 slow cooker has its own heating/warm control — dishes can be slow cooked to perfection or set to serve warm for hours. Each LINX slow cooker has it's own convenient metal lid rest to stand the glass lid while serving! Units stack on top of each other for compact storage.
Stoneware Pot Care
Like any ceramic, the stoneware pot may crack or break if not properly handled. To prevent damage, handle with care!
WARNING: Failure to follow these instructions can cause breakage resulting in injury or property damage.
- ALWAYS USE POTHOLDERS OR OVEN MITTS WHEN HANDLING ANY HOT STONEWARE POT.
- DO NOT place any hot stoneware pot(s) on countertop. Use the LINX base unit to serve. Keep hot stoneware pot(s) in the base unit's aluminum liner until cooled.
- DO NOT place any stoneware pot on range top burner, under a broiler, microwave browning element, or in a toaster oven.
- DO NOT strike utensils against rim of any stoneware pot to dislodge food.
- DO NOT use stoneware pot(s) to pop corn, caramelize sugar, or make candy.
- DO NOT use abrasive cleaners, scouring pads, or any object that will scratch the stoneware pot(s) or accessories.
- DO NOT use or repair any stoneware pot(s) or lid(s) that is chipped, cracked, or broken.
- DO NOT use stoneware pot(s) for reheating foods or for general food storage.
• Always place foods into the stoneware pot(s) at room temperature; then place stoneware pot(s) into the aluminum liner before turning unit ON. - NEVER heat stoneware pot(s) when empty.
Before Using for the First Time
- Carefully unpack your LINX slow cooker unit(s). Remove all packaging and materials from each LINX base unit (1, 2, or 3), stoneware pots (1, 2, or 3), glass lids (1, 2, or 3), metal lid rests (1, 2, or 3), and detachable power-supply cord.
- It is necessary to operate the slow cooker once before placing food in the stoneware pot. Following the detailed instructions in the section entitled: "BELLA LINX Slow Cookers Assembly Instructions," link units (2 or 3...up to 6) together.
-
Pour 1.5 cups of water into each of the 2.5 qt. stoneware pots. Cover each stoneware pot with a glass lid.
-
Plug the detachable power-supply cord's connectors into the receptacle on the right side of the LINX base unit 1.
- Plug cord into a 120V AC electrical outlet.
- Turn all control dials to HIGH and allow to heat for approximately 20 minutes. You will notice a slight odor; this is normal and should quickly disappear.
- Turn all control dials to OFF and allow to cool for 20 minutes.
- Wearing oven mitts, grasp each of the stoneware pot handles carefully to lift and remove stoneware pots from each aluminum liner; pour out the water from the stoneware pots.
- Rinse all stoneware pots, dry thoroughly, and replace in each LINX base unit's aluminum liner.
BELLA LINX Slow Cookers Assembly Instructions
NOTE: These instructions apply to all configurations: 2 or 3 ... up to 6 units. All LINX slow cookers are identical
- Link units (2 or 3...up to 6) together. Determine the number of BELLA LINX slow cookers needed (2 to 6).
- Lift LINX base unit 2 to slide the tab (located on the left side) down into the groove on the right side of LINX base unit 1. If 3 units are connected, lift LINX base unit 3 to slide the tab (located on the left side) down into the groove on the right side of LINX base unit 2. (See Figure 2.)
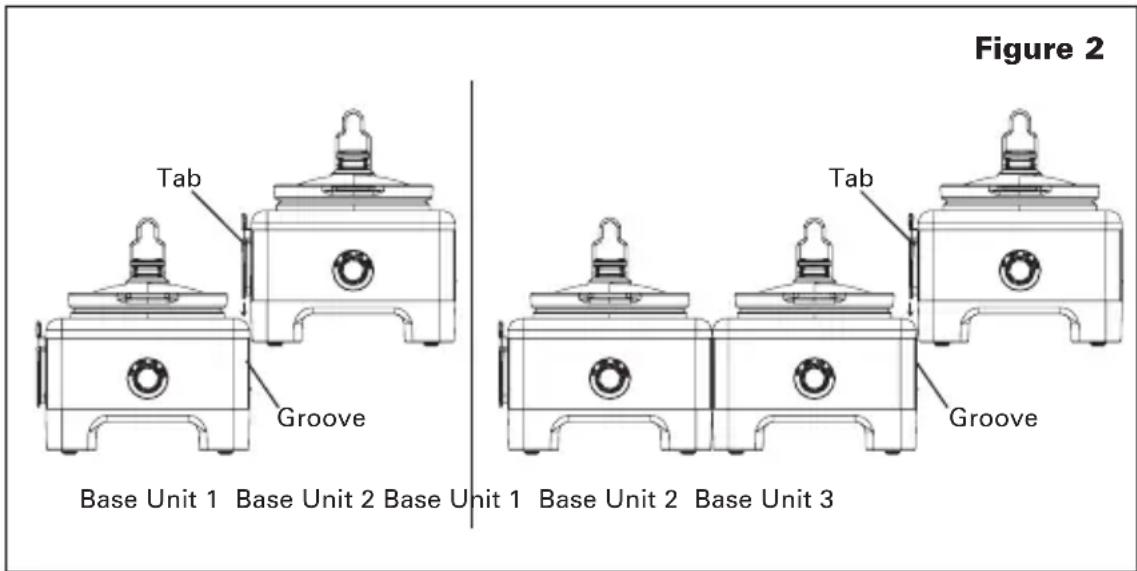
WARNING: When using more than 1 LINX base unit, always make sure base units are properly assembled with the tab along the side of the unit linked securely into the groove of the next unit.
CAUTION: NEVER CARRY MULTIPLE INTERCONNECTED LINX BASE UNITS. IMPORTANT: Always disconnect all LINX base units before moving to serve or to clean. Follow detailed instructions outlined in the section entitled: "Care & Cleaning Instructions." (See Figure 5.)
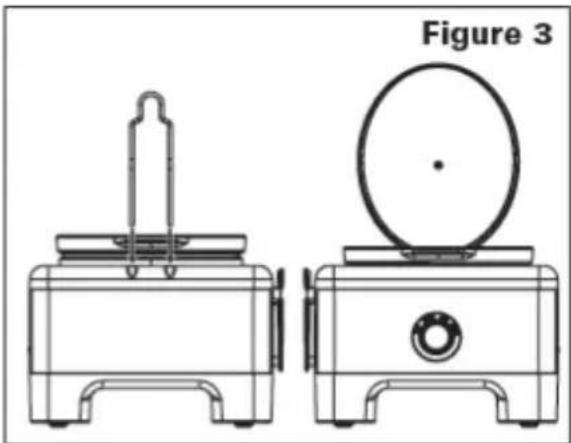
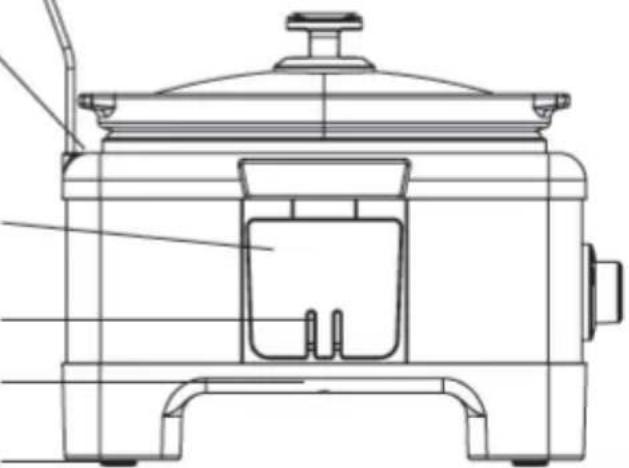
- Attach metal lid rest(s).
Insert the lid rest posts into the 2 holes on each base unit behind the stoneware pot. To use, slide each lid handle over its metal lid rest to facilitate serving. (See Figure 3.) - Add stoneware pot(s) to each LINX base unit's aluminum liner (1, 2 or 3...up to 6).
- Add lid(s) to cover stoneware pot(s) until use.
- Plug the detachable power-supply cord's connectors into the receptacle on the right side of the assembled (1, 2, or 3 ...up to 6) LINX base unit (See Figure 4.).
natural_image
Technical line drawing of two mechanical devices, one with a spool and the other with a circular component (no text or symbols)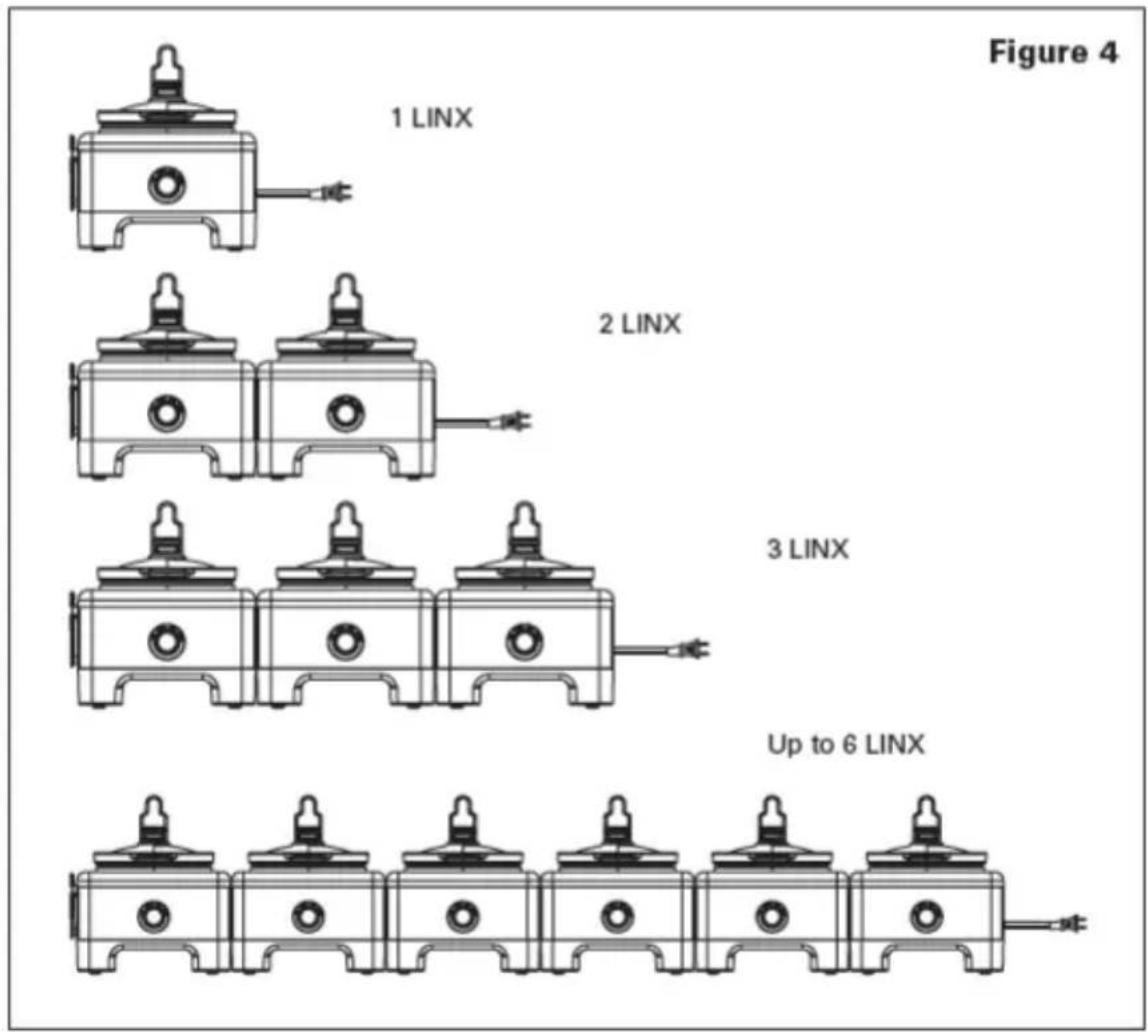
Operating Instructions
WARNING: When using more than 1 LINX base unit, always make sure base units are properly assembled with the tab along the side of each base unit linked securely into the groove of the next unit.
- Prepare recipe according to instructions.
- Place food into the stoneware pot(s) and cover with glass lid(s). DO NOT FILL ANY STONEWARE POT TO THE TOP WITH FOOD. For best results, the slow cooker(s) should be at least half-filled. When cooking soups or stews, allow a 2-inch space between the food and the top of the stoneware pot, so ingredients can come to a simmer.
NOTE: When cooking a meat and vegetable combination, place the vegetables in the bottom of the stoneware pot first. Then add the meat and other ingredients. NOTE: When cooking on HIGH, check cooking progress, as some soups may come to boil. Remember that frequent lifting of the lid during cooking delays the cook time.
WARNING: The stoneware pot(s) CANNOT stand the shock of sudden temperature changes. If any stoneware pot is hot, DO NOT add cold food. Before cooking frozen food, add some warm liquid.
-
Plug the detachable power-supply cord's connectors into the receptacle on the right side of the assembled (1, 2, or 3 ...up to 6) LINX base unit (See Figure 4.).
-
Plug cord into a 120V AC electrical outlet.
-
Turn the appropriate control dial to select temperature setting: LOW or HIGH.
-
Cook according to recipe instructions.
-
When cooking time is complete, turn the control dial to WARM for serving.
-
To serve, using oven mitts, carefully remove any glass lid by grasping the lid knob and lifting the lid slightly away from you. This will allow the steam to escape before removing the lid. Allow a few seconds for all steam to escape.
-
Use a serving spoon to stir cooked food, if needed. Rest spoon in the spoon notch on the stoneware pot rim and replace lid. To serve food, hang each lid on the wire lid rest behind the stoneware pot. Replace each lid immediately after serving to retain heat.
-
If food is ready to serve, but LINX slow cooker(s) need to be moved to another location, NEVER CARRY MULTIPLE INTERCONNECTED LINX BASE UNITS.
-
Wearing oven mitts, grasp each of the stoneware pot handles carefully to lift and remove stoneware pot(s) (with lids) from each aluminum liner. Place filled and covered stoneware pots in a safe, heat-proof, flat, clean area.
-
First unplug, then, following the detailed instructions in the section entitled: "Care & Cleaning Instructions," disconnect all LINX base units. (See Figure 5.)
-
Move single LINX base units to the new location, then reassemble. Link together (2 or 3...up to 6) units.
-
Replace filled stoneware pots (with lids) into each base unit's aluminum liner.
-
Plug cord into a 120V AC electrical outlet.
-
Turn control dial(s) to WARM to serve.
-
Allow each LINX base unit to cool completely before cleaning, see Care & Cleaning Instructions.
CAUTION: Even when turned OFF and unplugged, each LINX base unit, aluminum liner, and stoneware pot remains hot for some time after using; allow each unit to cool before cleaning or storing.
Hints for Slow Cooking
- Less tender, cheaper cuts of meat are better candidates for slow cooking than more expensive cuts.
- Meats will not brown during the slow cooking process. Browning fatty meats will reduce the amount of fat and help to preserve color while adding richer flavor. Heat a small amount of oil in a skillet and brown meats prior to putting into the stoneware pot.
- Whole herbs and spices flavor better in slow cooking than crushed or ground. Cut the recipe amount by half. Add ground herbs during the last hour of slow cooking.
- When cooking in a slow cooker, remember that liquids do not boil away like they do in conventional cooking. Reduce the amount of liquid in any recipe that is not designed for a slow cooker. The exceptions to this rule would be rice and soups. Remember, liquids can always be added at a later time if necessary. If a recipe results in too much liquid at the end of the cooking time, remove the cover and continue to cook HIGH for 1 hour. Check every 15 minutes until the amount of liquid is reduced. Turn the control dial to OFF when the desired consistency is achieved.
- Most recipes that call for uncooked meat and vegetables require about 6 to 8 hours on LOW temperature setting.
- The higher the fat content, the less liquid needed. If cooking meat with a high fat content, use thick onion slices under it so that the meat will not sit and cook in the fat. If necessary, use a slice of bread, a spoon, or a straining spoon to skim off excess fat from top of foods before serving.
- Foods cut into uniform pieces will cook faster and more evenly than foods left whole such as roast or poultry.
- Always use a meat thermometer to determine if meats have been cooked to proper temperature.
- Root vegetables such as carrots, potatoes, turnips and beets require longer cooking time than many meats. Place them on the bottom of the slow cooker and cover with liquid. Check to see they are fork-tender when meat temperature is reached. Remove meat and continue cooking vegetables if necessary.
- Add fresh dairy products (milk, sour cream or yogurt) prior to serving. Evaporated milk or condensed creamed soups may be added at the start of cooking.
- Rice, noodles and pasta are not recommended for long cooking periods. Cook them separately and then add to the slow cooker during the last 30 minutes.
User Maintenance Instructions
This appliance requires little maintenance. It contains no user serviceable parts. Do not try to repair it yourself. Any servicing requiring disassembly other than cleaning, must be performed by a qualified appliance repair technicianStoring Instructions
Care & Cleaning Instructions
CAUTION: NEVER IMMERSE BASE UNIT OR CORD IN WATER OR OTHER LIQUID.
- Always unplug and allow to cool completely before disassembly and cleaning.
- Remove plug from electrical outlet. Detach power-supply cord from the receptacle on the LINX base unit.
- Remove all stoneware pots and tempered glass lids and clean in the dishwasher. To avoid damage, position the stoneware pots and glass lids in dishwasher rack so that they will not hit other items during cleaning. To clean by hand, wash the stoneware pots and glass lids in warm, soapy water.
- Avoid sudden, extreme temperature changes. For example, do not place a hot stoneware pot into cold water or onto a wet surface.
- Avoid hitting the stoneware pots and glass lids against the faucet or other hard surfaces. CAUTION: Do not use any stoneware pot or any glass lid if chipped, cracked, or severely scratched.
- If food sticks to any stoneware pot, fill with warm soapy water and allow to soak before cleaning. A paste of baking soda may be used with a plastic scouring pad.
- To remove water spots or mineral deposits, wipe stoneware pot with distilled white vinegar. For difficult stains, pour a small amount into the stoneware pot and allow to soak. Rinse and dry thoroughly.
- Disconnect all LINX base units. If 3 units are connected, lift LINX base unit 3 to slide the tab up and out of the groove on the right side of LINX base unit 2. Lift LINX base unit 2 to slide the tab up and out of the groove on the right side of LINX base unit 1. Disconnect all LINX base units before moving to clean.
- Wipe interior and exterior of the each LINX base unit and aluminum liner with a soft, slightly damp cloth or sponge. Never use abrasive cleansers or scouring pads to clean the base unit or aluminum liner, as they may damage the surfaces.

Storing Instructions
-
Make sure the power-supply cord is unplugged from the electrical outlet and detached from the LINX base unit.
-
Be sure all parts are clean and dry before storing. Never store any LINX slow cooker unit while it is hot or wet.
-
Store Linx slow cooker unit(s) with each stoneware pot inside aluminum liner.
-
Remove each of the metal lid rests, wrap in a paper towel and store inside 1 of the stoneware pots.
-
Cover each lid with a paper towel, then replace each glass lid upside down over each stoneware pot to store. Remove and store detachable power-supply cord in stoneware pot until use.
-
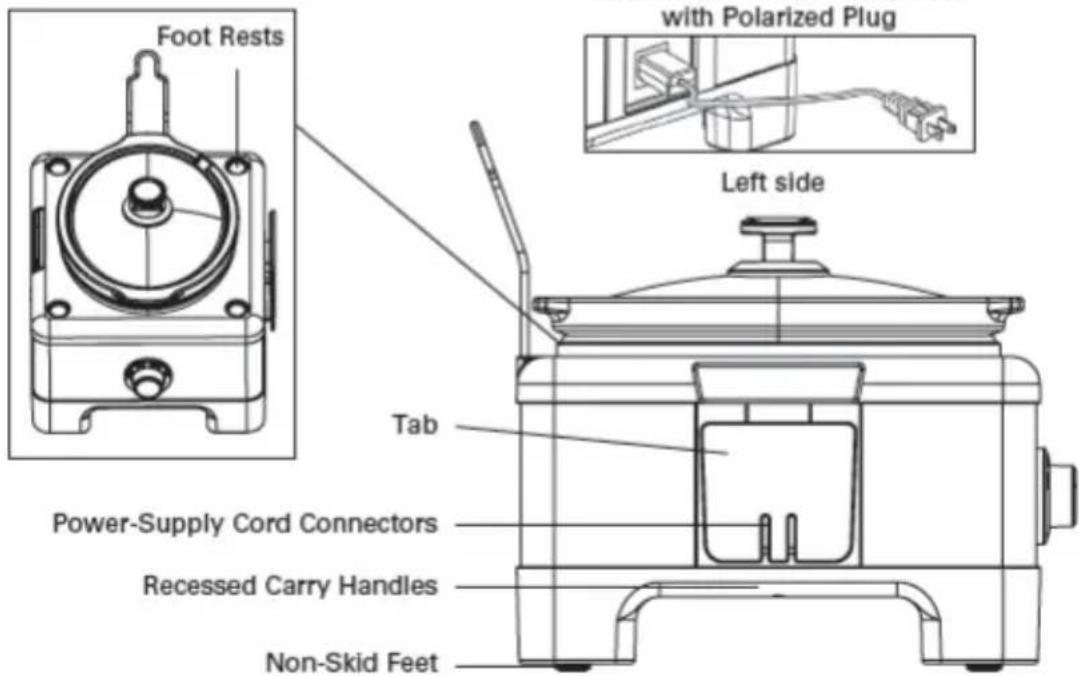
Stack (2 or 3) LINX base units for compact storage. Position each upper unit's 4 feet into the lower unit's 4 foot rests (see Figure 6) and stack LINX base units securely on top of each other. Add the last glass lid to store.
-
Store stacked LINX base units in a clean, dry place.

Recipes
NOTE: When slow cooking on HIGH setting, it is very much like a covered pot on the stove top. Foods will cook on HIGH in about half the time required for LOW cooking. Additional liquid may be required as foods do boil on HIGH.
Sweet Potato Gumbo
Serves 4 to 6
• 3 cups sweet potato cubed 1-inch pieces
• 3 oz. soy chorizo (may substitute pork or beef)
- 1 cup chopped tomatoes (may substitute canned)
• 1/2 cup chopped red onion
• 1-1/2 cups vegetable stock
• 1 pablano pepper, chopped
• 2 celery stalks, chopped
- 2 cups raw okra, sliced (may substitute frozen)
-
Place all ingredients into stoneware pot.
-
Cover and cook on LOW for 6 to 7 hours.
-
Before the final cooking hour, test gumbo for seasoning and add salt to taste. If a thinner gumbo is desired, add more vegetable stock.
-
Turn control dial to WARM and serve with plenty of warm, crusty bread.
Chicago Style Italian Beef Sliders
Party Chicago Style!
Set out plenty of dipping bowls with gravy, small onion dinner rolls, creamy horseradish, even sliced cheeses. Let guests prepare their own mini open-faced sandwiches, top with 2 slices of cheese. Place under the broiler until cheese is melted. Top with peppers, onions, giardiniera and toasted roll.
Dip sliders in luscious gravy.
Makes 10 to 12 Sliders
• 2 - 2-1/2 lbs. boneless beef chuck roast
• 2 large onions, sliced in half
• 1/2 cup Italian giardiniera, drained
- 1/2 cup pepperoncini peppers. drained
• 1 tablespoon dry packaged Italian salad dressing
• 1 cup low sodium beef broth
• 4 tablespoons ketchup
• 2 garlic cloves, minced
- 2 bay leaves
- creamy horseradish
- sliced cheese, provolone, mozzarella, cheddar, if desired
- small onion dinner rolls
-
Trim any silverskin or excess fat pockets from roast. Place onions into the stoneware pot. Add roast to the top.
-
Drain giardiniera and pepperoncini, mix with remaining ingredients and spread over roast.
-
Cover and cook on LOW for 8 - 10 hours, or HIGH for 6 - 8 hours.
-
Use 2 forks to shred the meat. Return and serve in stoneware pot with remaining gravy and giardiniera vegetables, onions and peppers.
-
Turn control dial to WARM to serve
-
Guests can pile beef onto toasted dinner rolls slathered with creamy horseradish. Top with cooked peppers, onions, giardiniera.
-
Serve with Maple Orange Butternut Squash.
Limited TWO-YEAR Warranty
SENSIO Inc. hereby warrants that for a period of TWO YEARS from the date of purchase, this product will be free from mechanical defects in material and workmanship, and for 90 days in respect to non-mechanical parts. At its sole discretion, SENSIO Inc. will either repair or replace the product found to be defective, or issue a refund on the product during the warranty period.
The warranty is only valid for the original retail purchaser from the date of initial retail purchase and is not transferable. Keep the original sales receipt, as proof of purchase is required to obtain warranty validation. Retail stores selling this product do not have the right to alter, modify, or in any way revise the terms and conditions of the warranty.
EXCLUSIONS:
The warranty does not cover normal wear of parts or damage resulting from any of the following: negligent use of the product, use of improper voltage or current, improper routine maintenance, use contrary to the operating instructions, disassembly, repair, or alteration by anyone other than qualified SENSIO Inc. personnel. Also, the warranty does not cover Acts of God such as fire, floods, hurricanes, or tornadoes.
SENSIO Inc. shall not be liable for any incidental or consequential damages caused by the breach of any express or implied warranty. Apart from the extent prohibited by applicable law, any implied warranty of merchantability or fitness for a particular purpose is limited in time to the duration of the warranty. Some states, provinces or jurisdictions do not allow the exclusion or limitation of incidental or consequential damages, or limitations on how long an implied warranty lasts, and therefore, the above exclusions or limitations may not apply to you. The warranty covers specific legal rights which may vary by state, province and/or jurisdiction.
HOW TO OBTAIN WARRANTY SERVICE:
You must contact Customer Service at our toll-free number: 1-866-832-4843. A Customer Service Representative will attempt to resolve warranty issues over the phone. If the Customer Service Representative is unable to resolve the problem, you will be provided with a case number and asked to return the product to SENSIO Inc. Attach a tag to the product that includes: your name, address, daytime contact telephone number, case number, and description of the problem. Also, include a copy of the original sales receipt. Carefully package the tagged product with the sales receipt, and send it (with shipping and insurance prepaid) to SENSIO Inc.'s address. SENSIO Inc. shall bear no responsibility or liability for the returned product while in transit to SENSIO Inc.'s Customer Service Center.
CONSIGNES DE SÉCURITÉ IMPORTANTES
ADDITIONAL IMPORTANT SAFEGUARDS
natural_image
Technical line drawing of a mechanical device with no visible text or symbolsnatural_image
Technical line drawing of a mechanical component with no visible text or symbolsLanguette
natural_image
Pure mechanical assembly diagram showing a linkage between two components (no text or symbols)Côté gauche
natural_image
Technical line drawing of a mechanical device with no visible text or symbolsnatural_image
Technical line drawing of two mechanical devices, one with a spool and the other with a circular component (no text or symbols)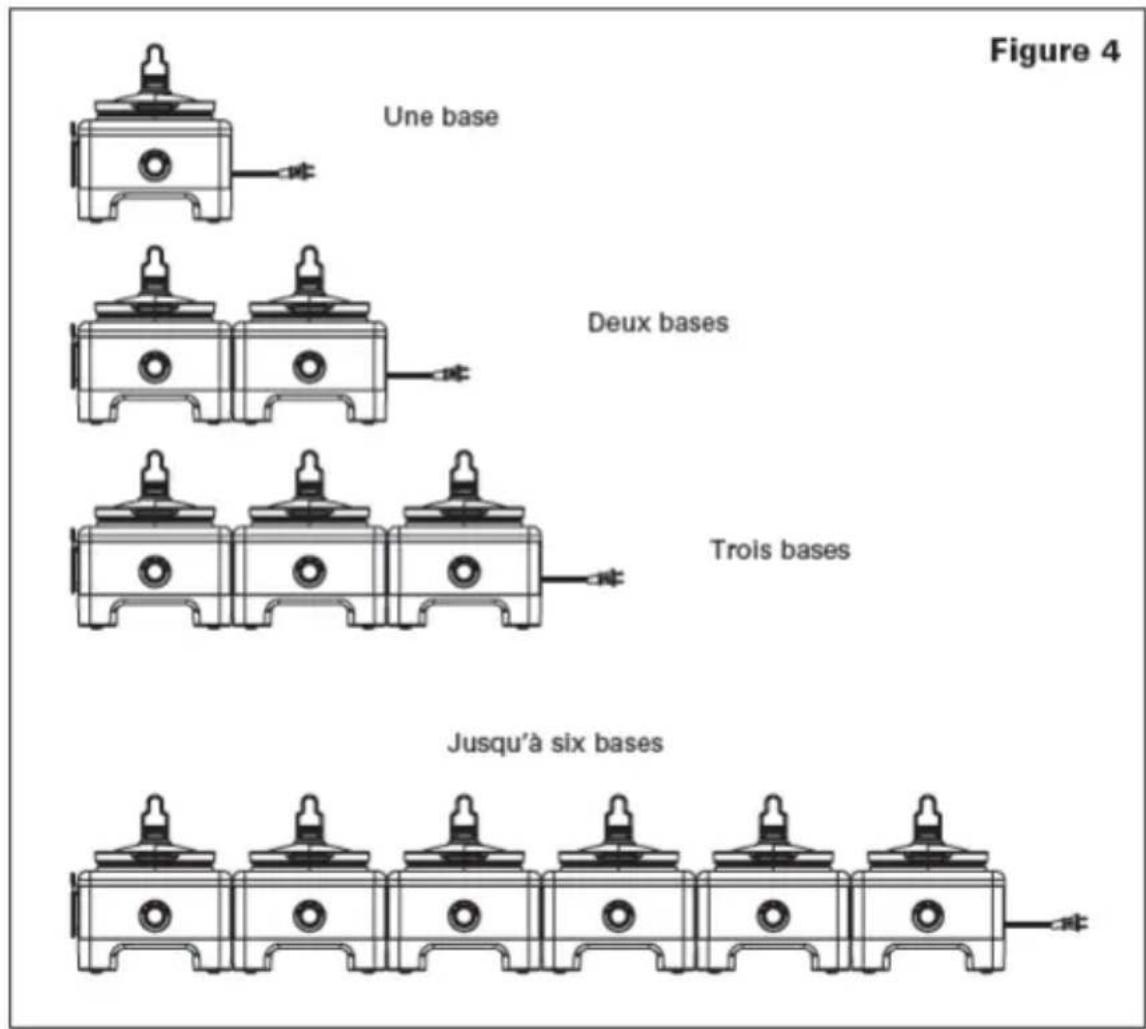
Mode d'emploi
Base 1 Base 2 Base 1 Base 2 Base 3
natural_image
Technical line drawing of two mechanical devices, one with a spool and the other a circular component (no text or symbols)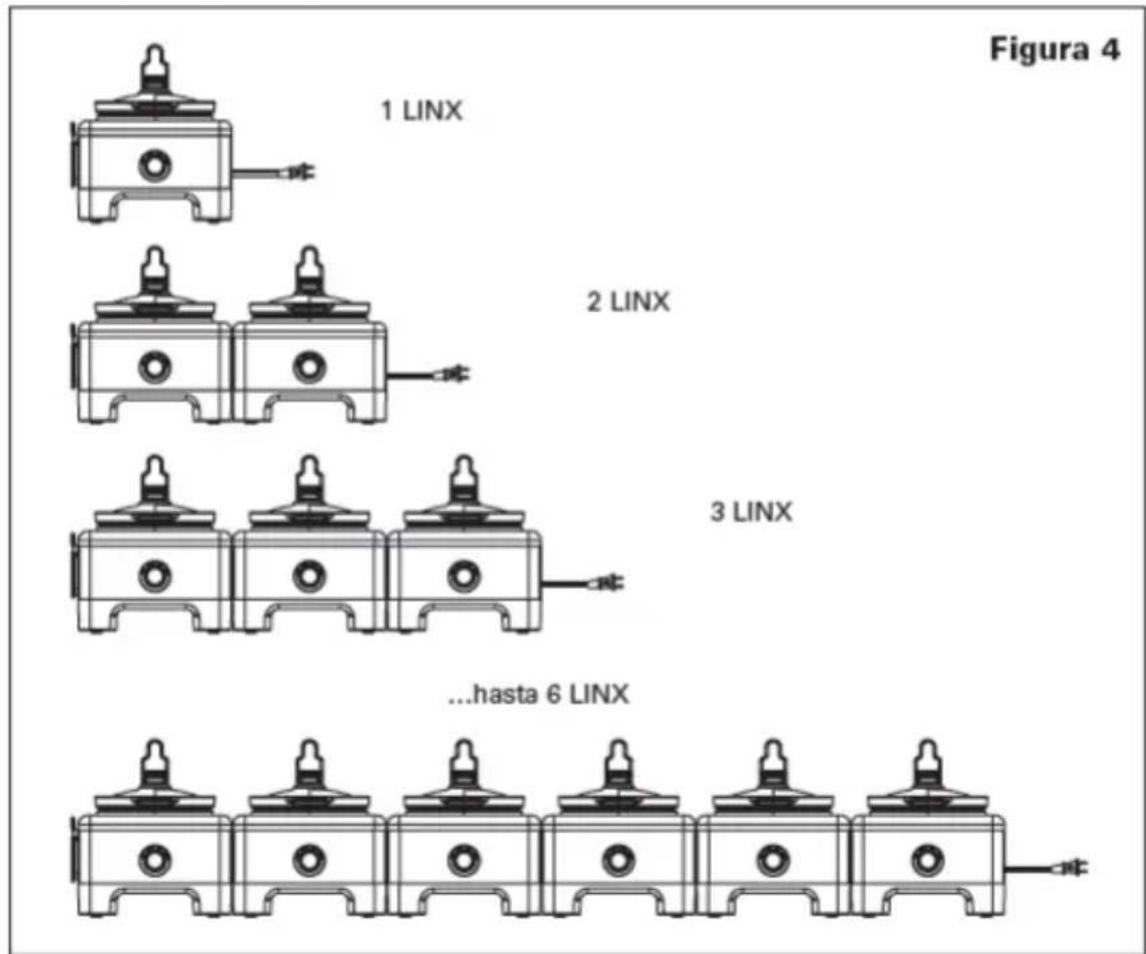
For customer service questions or comments
BELLA® is a registered trademark of Sensio Inc.,


- Table of Contents
- Table des matières
- FOR HOUSEHOLD USE ONLY SAVE THESE INSTRUCTIONS
- ADDITIONAL IMPORTANT SAFEGUARDS
- Notes on the Plug
- Notes on the Cord
- Plasticizer Warning
- Electric Power
- Getting To Know Your BELLA LINX Serve & Store Slow Cooker
- Introduction to the BELLA LINX Slow Cooker
- Stoneware Pot Care
- Before Using for the First Time
- BELLA LINX Slow Cookers Assembly Instructions
- Operating Instructions
- Hints for Slow Cooking
- User Maintenance Instructions
- Care & Cleaning Instructions
- CAUTION: NEVER IMMERSE BASE UNIT OR CORD IN WATER OR OTHER LIQUID.
- Storing Instructions
- Recipes
- Sweet Potato Gumbo
- Serves 4 to 6
- Chicago Style Italian Beef Sliders
- Party Chicago Style!
- Makes 10 to 12 Sliders
- Limited TWO-YEAR Warranty
- EXCLUSIONS:
- HOW TO OBTAIN WARRANTY SERVICE:
- CONSIGNES DE SÉCURITÉ IMPORTANTES
- Mode d'emploi
Brand : BELLA
Model : 13972
Category : Saucepan