
GWHD101KIT - Wireless presentation system IOGEAR - Free user manual and instructions
Find the device manual for free GWHD101KIT IOGEAR in PDF.

| Product Type | Wireless Presentation System |
| Brand | IOGEAR |
| Model | GWHD101KIT |
| Power Supply | USB 5V, 500mA minimum |
| Connectivity | HDMI |
| Range | Up to 20 meters (line of sight) |
| Supported Resolution | 1080p |
| Wireless Frequency | 2.4 GHz |
| Number of Transmitters Included | 2 |
| Number of Receivers Included | 1 |
| Included Accessories | HDMI cable, HDMI extenders, 90° adapters, micro USB cables, 5V power adapter |
| Warranty | 1 year limited |
| Maintenance | Clean with a dry, non-abrasive cloth |
| Safety | Avoid exposure to water and extreme temperatures |
| Certifications | FCC, CE |
Frequently Asked Questions - GWHD101KIT IOGEAR
User questions about GWHD101KIT IOGEAR
0 question about this device. Answer the ones you know or ask your own.
Ask a new question about this device
Download the instructions for your Wireless presentation system in PDF format for free! Find your manual GWHD101KIT - IOGEAR and take your electronic device back in hand. On this page are published all the documents necessary for the use of your device. GWHD101KIT by IOGEAR.
USER MANUAL GWHD101KIT IOGEAR
Share Pro™ Expandable Wireless Presentation System
2 x Mini wireless transmitters
1 x Wireless receiver
1 x HDMI cable
2 x HDMI cable extender
2 × 90^ HDMI adapter
2 x USB-A male-to-USB micro power cables
1 x 5V Wall mount power adapter with barrel connector
1 x Quick Start Guide
1 x Warranty Card
System Requirements
1 HDMI source device (DVD, PS3, Satellite box, PC etc.) with USB-A connector that carries power (and not used as a firmware upgrade port)
1 HDMI display device (HDTV, projector with HDMI port, etc.)
Note: In the case that there is no USB-A port that supplies power to the transmitters, please use a USB power supply with minimum 500mA.
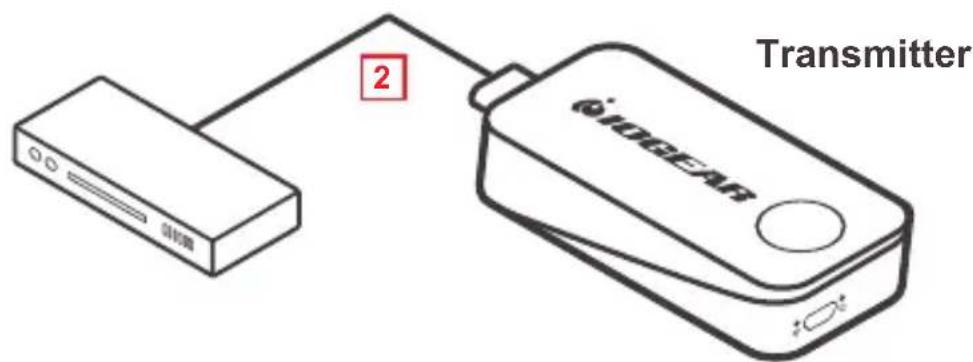
Transmitter
A. Wireless signal indicator (red LED)
B. Power input port
C. Power signal indicator (Blue LED)
D. HDMI male connector
E. Connection switch button

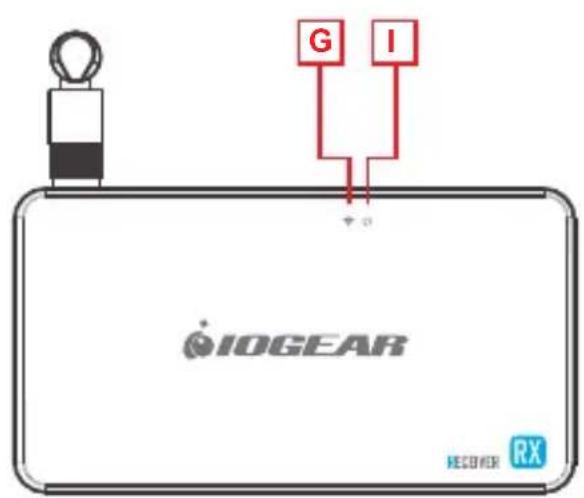
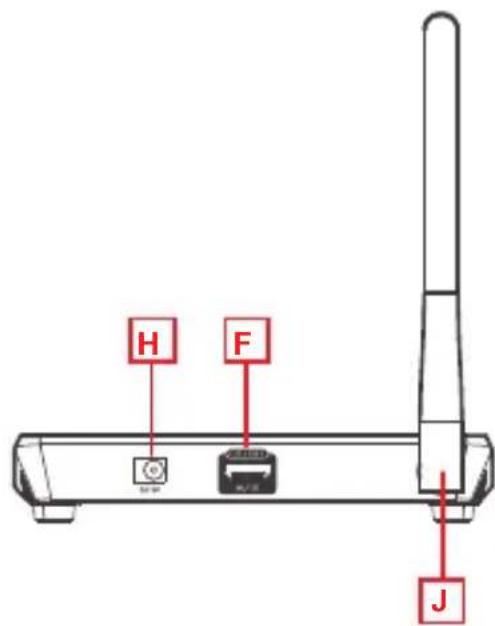
Receiver
F. HDMI input male connector
G. Wireless signal indicator (Green LED)
H. Power input
I. Connection indicator (Green LED)
J. Antenna connector
Hardware Installation
STEP1
Turn on both the video source and the display (TV or projector). Make sure that the input source on your display corresponds to the HDMI port that the transmitter is connected to.
STEP2
Insert the transmitter into the HDMI port of your video source device.
STEP3
Use one of the USB charging cables to connect to the micro USB port of the transmitter to a type USB-A port on the source device to obtain power. In a rare case that the source device has no USB port, please use a 5V USB power adapter with a minimum of 500mA output (not included in the package). At this time both the power LED (blue) and the wireless LED (red) will light up solid and then the wireless LED (red) will go out and come back on and both will remain solid.
In case the space around the HDMI port is too tight or the position is too awkward and could cause a connection issue, use the HDMI cable extender or the 90 degree HDMI adapter included in the package to correct this issue or to increase the spacing.
STEP4
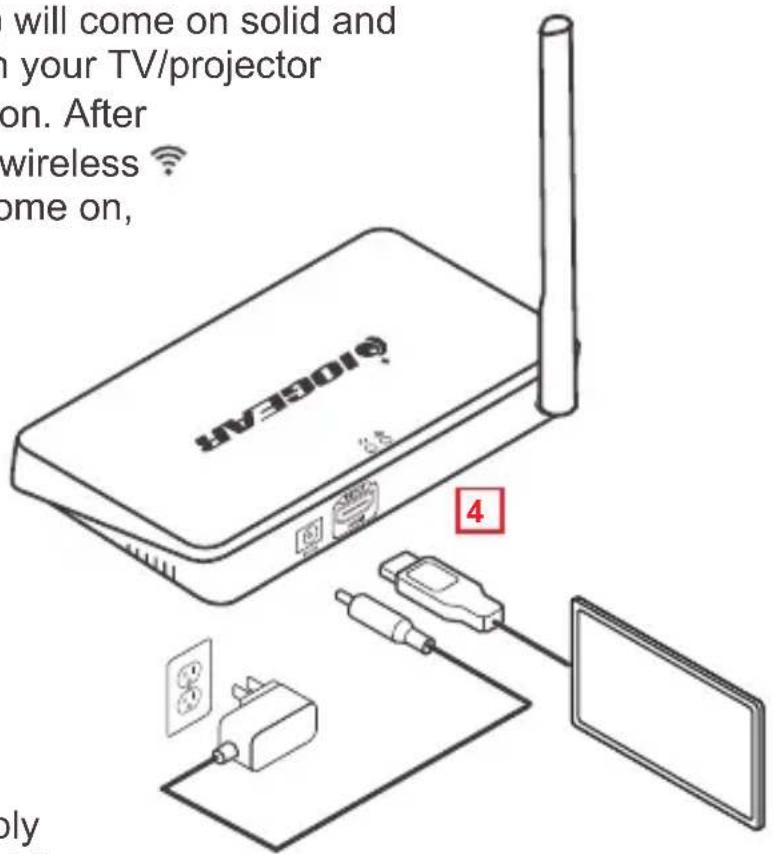
Connect the receiver into a free HDMI port of your video display device (TV, projector, etc.) using the provided HDMI cable and switch your TV Input to the HDMI input source it is connected to.
Hardware Installation
STEP5
The connection () LED (green) will come on solid and a message will be displayed on your TV/projector
stating it is waiting for connection. After approximately 30 seconds the wireless
LED (green) the receiver will come on,
the connection LED on the receiver will start to blink once every second. The transmitter wireless LED (red) will also blink every second. The connection is now established.
The LED around the transmitter swtich button will also turn from red to blue. For the next transmitter to be connected to the receiver, simply press the transmitter button and the red LED will turn to blue and the previously connected transmitter LED
will change from blue LED to red indicating that the transmitter is now disconnected.
STEP6
Video from your source device will now be duplicated on your TV/projector.
NOTE: We recommend that this device is used for line-of-sight only as it is designed as a short range device.
FAQ
Q. Everything is connected, power LEDs are on for both devices, but no video on the video display.
A. 1. Make sure the video source device and the video display are turned on.
-
Check the HDMI cable connection at both sides on both the transmitter and receiver to make sure they are plugged in firmly and completely.
-
Check the video input selection on the video display device; make sure that the HDMI input port you selected is the same port as the one the receiver is actually plugged into.
-
If still no video after some time, connect the video source device directly to the video display with an HDMI cable to make sure that there are no compatibility issues.
-
If the direct connection is working, reconnect everything and restart (unplug and then re-plug the USB power cables) both the transmitter and the receiver and make sure the power and wireless LEDs both light up on both the transmitter and the receiver.
Q: Video is flickering or not stable on the video display.
A: 1. Check the distance and environment; make sure no other wireless device with a strong signal is within close proximity.
-
Change the location of the transmitter and receiver to make sure the devices are within the allowed range and there are no obstacles in between, operating distance of up to 40 feet in ideal condition.
-
Check the HDMI cable connection at both sides on both the transmitter and receiver to make sure they are plugged in firmly.
If all of the above has been checked and there are still no video displayed, please contact IOGEAR Technical Support for further support.
Limited Warranty
Warranty Information
This product carries a 1 Year Limited Warranty. For the terms and conditions of this warranty, please go to https://www.iogear.com/support/warranty
Register online at https://www.iogear.com/register
Important Product Information Product Model Serial Number
Contact
WE'RE HERE TO HELP YOU!
NEED ASSISTANCE SETTING UP THIS PRODUCT?
Make sure you:
- Visit www.iogear.com for more product information
- Visit www.iogear.com/support for live help and product support
IOGEAR
iogear.custhelp.com
support@iogear.com
www.iogear.com
Compliance Information
Federal Communication Commission Interference Statement
This equipment has been tested and found to comply with the limits for a Class B digital service, pursuant to Part 15 of the FCC rules. These limits are designed to provide reasonable protection against harmful interference in a residential installation. Any changes or modifications made to this equipment may void the user's authority to operate this equipment. This equipment generates, uses, and can radiate radio frequency energy. If not installed and used in accordance with the instructions, may cause harmful interference to radio communications. However, there is no guarantee that interference will not occur in a particular installation. If this equipment does cause harmful interference to radio or television reception, which can be determined by turning the equipment off and on, the user is encouraged to try to correct the interference by one or more of the following measures:
- Reorient or relocate the receiving antenna
- Increase the separation between the equipment and receiver
- Connect the equipment into an outlet on a circuit different from that to which the receiver is connected
- Consult the dealer or an experienced radio/TV technician for help
FCC Caution: Any changes or modifications not expressly approved by the party responsible for compliance could void the user's authority to operate this equipment.
This device complies with Part 15 of the FCC Rules. Operation is subject to the following two conditions:
(1) this device may not cause harmful interference, and
(2) this device must accept any interference received, including interference that may cause undesired operation.
CE Statement:
This device has been tested and found to comply with the following European Union directives: Electromagnetic Capability (2004/108/EC), Low Voltage (2006/95/EC) and R&TTED (1999/5/EC).
https://iogear.custhelp.com
support@iogear.com
www.iogear.com
https://iogear.custhelp.com
support@iogear.com
www.iogear.com
- System Requirements
- Transmitter
- Receiver
- Hardware Installation
- STEP1
- STEP2
- STEP3
- STEP4
- STEP5
- STEP6
- FAQ
- Everything is connected, power LEDs are on for both devices, but no video on the video display.
- Q: Video is flickering or not stable on the video display.
- Limited Warranty
- Warranty Information
- Contact
- IOGEAR
- Compliance Information
- Federal Communication Commission Interference Statement
- CE Statement:
Brand : IOGEAR
Model : GWHD101KIT
Category : Wireless presentation system