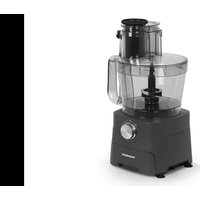
THCM8255 - Food processor THOMSON - Free user manual and instructions
Find the device manual for free THCM8255 THOMSON in PDF.

| Brand | THOMSON |
| Model | THCM8255 |
| Product type | Multifunction food processor |
| Bowl capacity | 2 liters |
| Bowl material | Stainless steel (with non-stick coating) |
| Power | 1000 W (estimated) |
| Power supply | 220-240 V ~ 50/60 Hz |
| Dimensions (approx.) | 30 x 25 x 40 cm |
| Weight (approx.) | 5 kg |
| Main functions | Blend, chop, steam, simmer, soup, jam, dough, easy cleaning, pulse mode |
| Speeds | 10 speeds (01-10) + pulse mode (speed 10) |
| Temperature range | 30°C to 120°C |
| Timer | 0 to 3 hours (depending on function) |
| Included accessories | 4-blade blade, butterfly whisk, inner basket, steamer (2 parts), measuring cup (100 ml), spatula, disassembly key |
| Safety | Automatic shutdown, lid lock, overheating protection, improperly installed bowl detection |
| Maintenance and cleaning | Bowl and accessories washable by hand (warm soapy water), do not put in dishwasher; main appliance wipe with damp cloth |
| Available spare parts | Blade, sealing ring, bowl, lid, measuring cup, whisk, basket, steamer |
| Repairability | Thomson authorized service center |
| General information | Compliant with EU directives; domestic use only; do not use accessories not supplied |
Frequently Asked Questions - THCM8255 THOMSON
User questions about THCM8255 THOMSON
0 question about this device. Answer the ones you know or ask your own.
Ask a new question about this device
Download the instructions for your Food processor in PDF format for free! Find your manual THCM8255 - THOMSON and take your electronic device back in hand. On this page are published all the documents necessary for the use of your device. THCM8255 by THOMSON.
USER MANUAL THCM8255 THOMSON
natural_image
White THOMSON kitchen blender with digital display and control buttons (no visible text or symbols on main body)natural_image
3D rendering of a black cylindrical electronic device with two ports and a labeled 'R' on the side (no other text or symbols)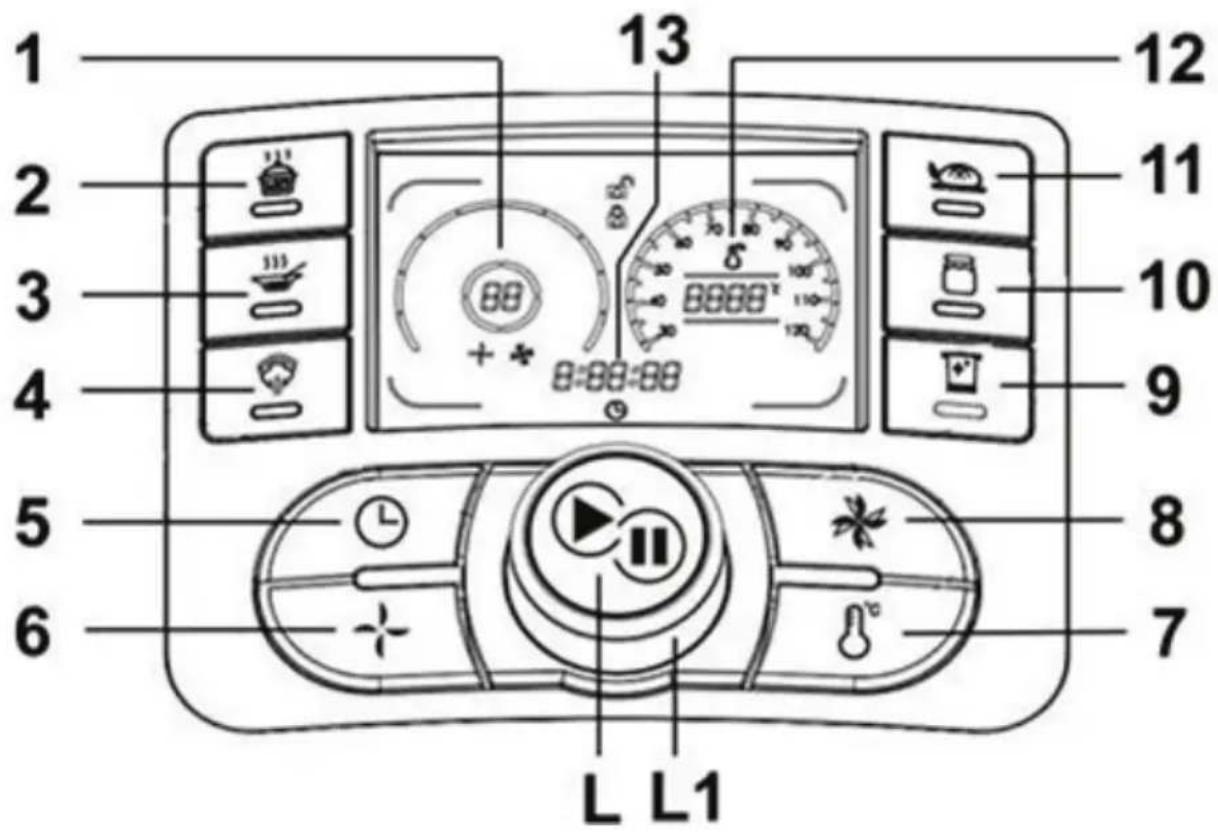
natural_image
Close-up of a black industrial waste bin with warning symbol and arrow (no text or labels)natural_image
Diagram showing two states of a mechanical component with arrows indicating direction (no text or symbols)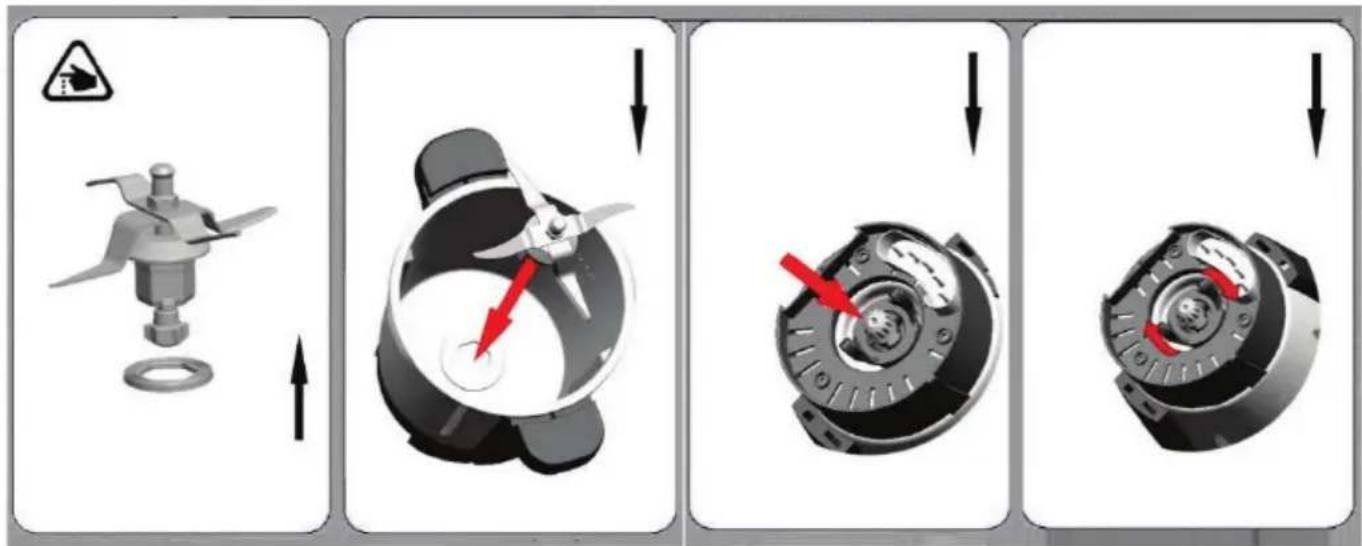
natural_image
Two-step diagram showing a mechanical device before and after assembly, with no visible text or symbols.flowchart
graph TD
    A["1: Cooking Plate with lid"] --> B["2: Stopping Box with Oven"]
    B --> C["3: Adding Dish to lid with lid"]
    C --> D["4: Finishing Cooktop with fan and monitor"]
flowchart
graph TD
    A["Step 1: Breakfast bowl with filter and warning symbol"] --> B["Step 2: Cover lid, lid removed"]
    B --> C["Step 3: Plate with lid, lid removed"]
    C --> D["Step 4: Process cooker with digital display, control panel"]
natural_image
Symbol of a trash bin crossed with a diagonal line and a horizontal bar below (no text or labels)MULTIFUNCTION COOKING FOOD PROCESSOR
THCM8255
natural_image
White THOMSON brand kitchen blender with digital display and control buttons (no visible text or symbols on main body)Please read these instructions carefully before using this appliance. Please keep these instructions for future reference.
This product conforms to the requirements of directives 2014/35/UE (repealing directive 73/23/CEE amended by directive 93/68/CEE) and 2014/30/UE (repealing directive 89/336/CEE).
CE
Important Safety Instructions
-
Before using the appliance, read these instructions and illustrations carefully.
-
Keep these instructions for use for future reference.
-
Check if the voltage indicated on the appliance corresponds to the local mains voltage before you connect the appliance.
-
Never use any accessories of parts from other manufactures. Your guarantee will become invalid if such accessories or parts have been used.
-
Don't use the appliance if the mains cord, the plug or other parts is damaged.
-
Thoroughly clean the parts that will come into contact with food before you use the appliance for the first time.
-
Always put the main appliance on a flat, dry and clean surface.
-
Don't touch the 4-blade knife especially while they are running. They are very sharp. Only hold the upper part of the blade while removing or re-inserting it.
-
Don't use your attachment and/or appliance if it has been damaged. You should contact an approved service center.
-
This appliance shall not be used by children. Keep the appliance and its cord out of reach of children.
-
Never let the appliance run unattended.
-
Switch the appliance off before detaching and installing any accessory.
-
Wait until moving parts have stopped running before you remove the parts of the appliance.
-
Never immerse the main appliance in water or any other liquid, nor rinse it under the tap.
Use only a moist cloth to clean the appliance.
-
Unplug the appliance immediately after use.
-
Switch off the appliance and disconnected from supply before changing accessories or approaching parts which move in use.
-
Appliances can be used by persons with reduced physical, sensory or mental capabilities or lack of experience and knowledge if they have been given supervision or instruction concerning use of the appliance in a safe way and if they understand the hazards involved.
-
This appliance is intended to be used in household and similar applications.
-
Children shall not play with the appliance.
-
When processing hot food (for temperature ≥ 60^ ), don't touch the measuring cup.
- Be sure to place the appliance on a clean, solid, even and non-heatable surface, particularly when using the steam tool.
- The spatula is only used for moving the food out of the bowl. Don't use it while the 4-blade knife is running.
- Be careful if hot liquid is poured into the food processor as it might be ejected out of the appliance due to a sudden steaming.
- This appliance is intended to be used in household.
- When the current temperature of the bowl is ≥ 60^ , you will find: The working speed will be limited at speed 00-04.
The appliance will automatically switch the working speed to 04; even through the current working speed is set at speed 5-10.

For Food contact use.
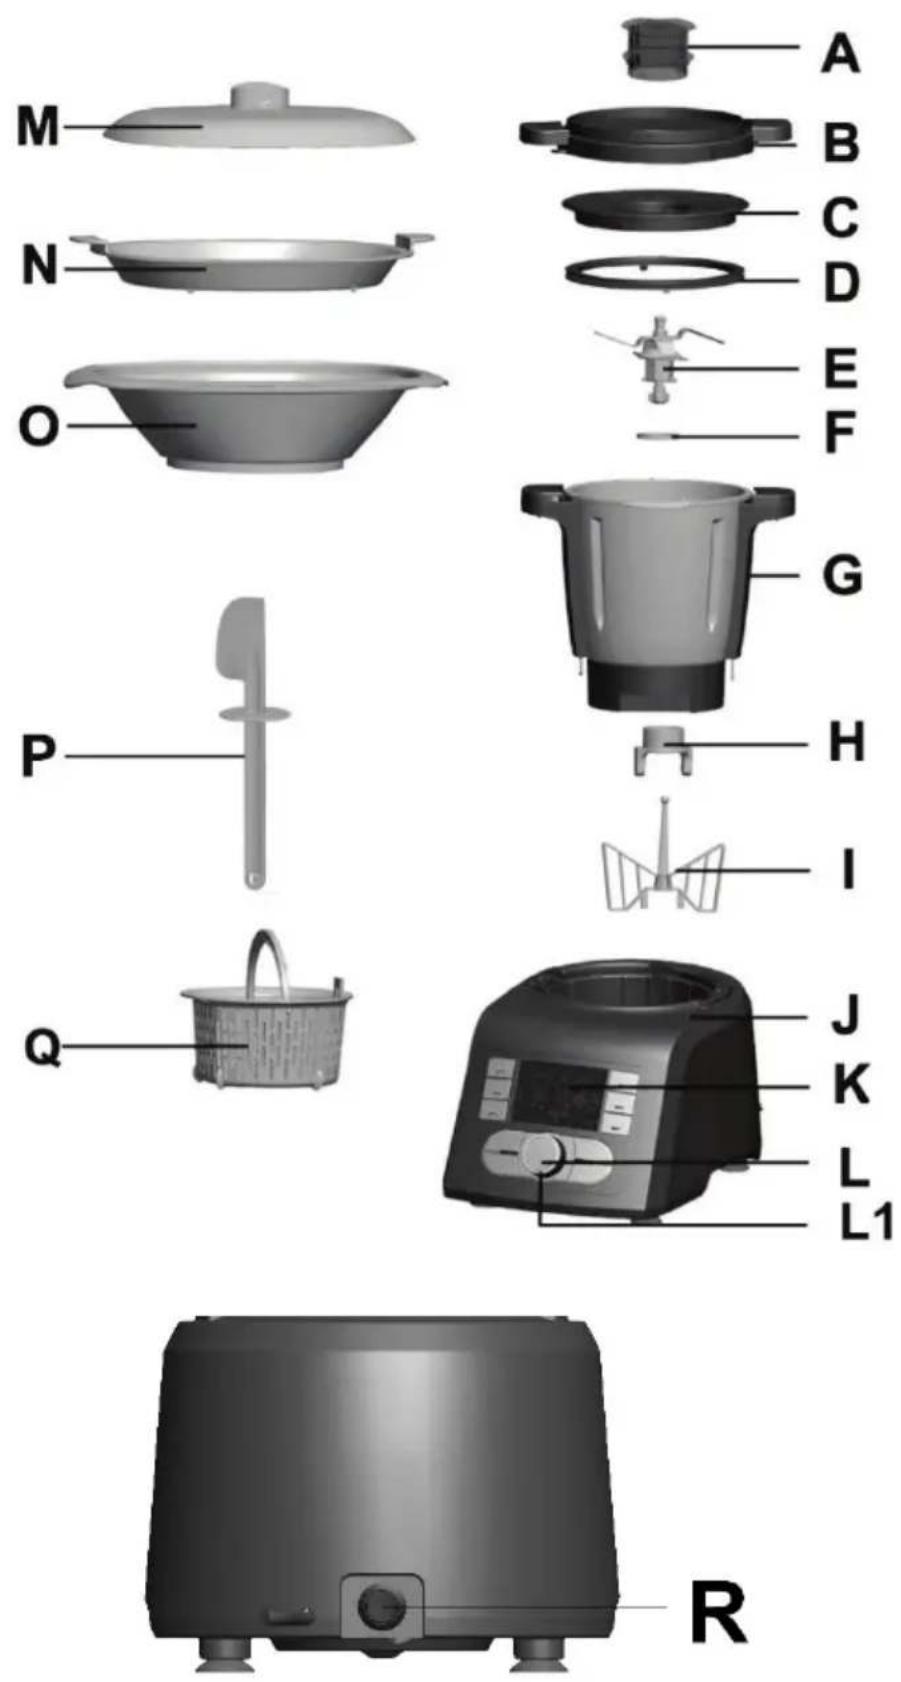
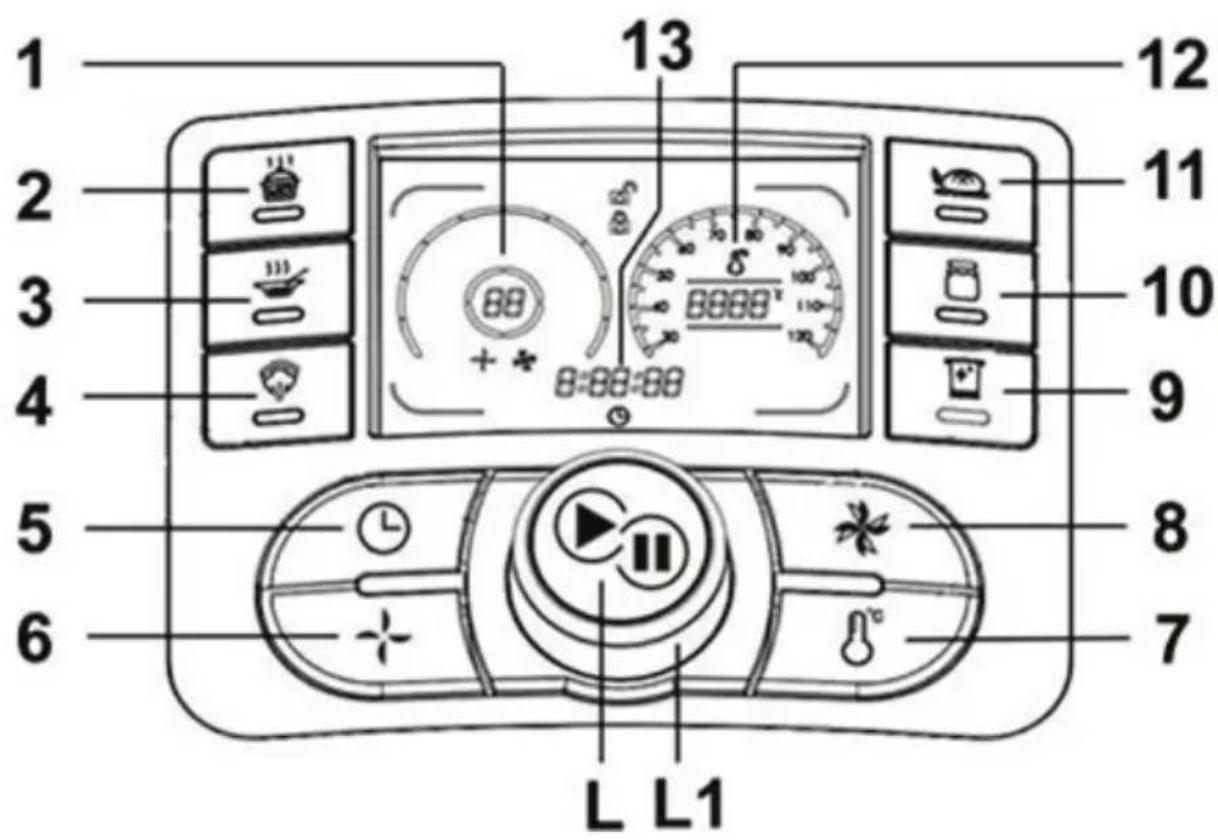
| A. Measuring cup (Max. 100ml) P. Spatula | |
| B. Bowl lid Q. Inner basket | |
| C. Inner bowl lid R. “On/Off” button | |
| D. Airproof ring 1 1. “Speed” display | |
| E. 4-blade knife | 2." Simmer" button |
| F. Airproof ring 2 3. “Soup “button | |
| G. Bowl | 4." Steamer" button |
| H. Spanner | 5. “Timer” button |
| I. Butterfly (stirring attachment) | 6. “Speed” button |
| J. Main appliance 7. “Temperature” button | |
| K. LCD screen | 8. “Pulse” button |
| L."Start/Stop" button | 9. “Easy Cleaning” button |
| L1. “Timer/ Temperature/ Speed” setting knob | 10." Jam" button |
| M. lid 11. “Dough” button | |
| N. Food steamer (tray) | 12.“Temperature” display |
| O. Steamer | 13. “Timer” display |
Tips: if you press "Start/Stop" button longer than 3 seconds under any working status, the appliance will go back to stand-by status. All your settings will be cleared.
The bowl
The maximum capacity of the bowl is 2 liters. Don't put more than 2 liters of
food!
Caution:

"Hot surface" logo marked on the bowl:
To indicate that the marked item can be hot and should not be touched without taking care!

natural_image
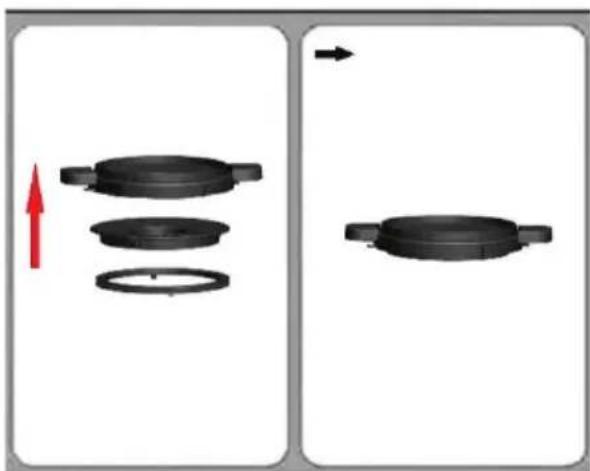
Black industrial waste bin with warning symbol (no text or labels visible)How to install the Airproof ring 1
natural_image
Diagram showing two states of a mechanical component with arrows indicating direction, no text or symbols present.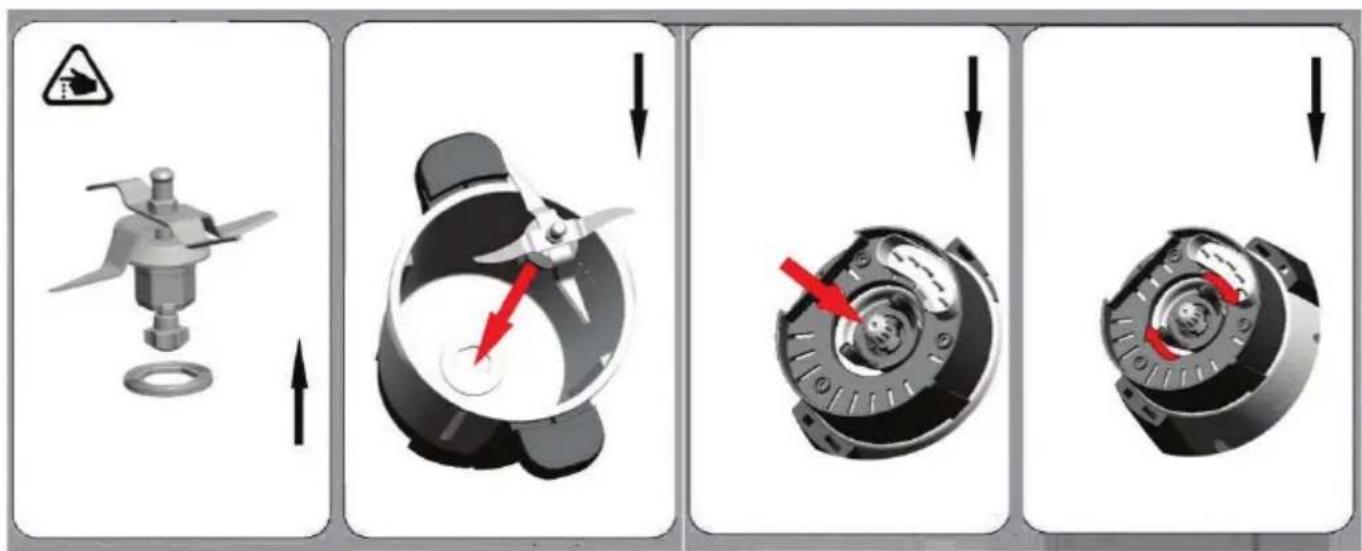
How to install the 4-blade knife:
- Put the airproof ring on the 4-blade knife. Push the 4-blade knife through the opening in the bottom of the bowl.
- Hold the upper part of the 4-blade knife with one hand, and put the spanner with the other hand. And then insert the spanner on the bottom
of the 4-blade knife. Rotate the spanner clockwise to assemble tightly on the bowl. (See above figure)
Caution:
- The knife is very sharp! Please handle it with care!
- Only hold the upper part of the knife!
- The airproof ring must to be fitted on the knife! If there is no airproof ring, the food to be chopped or cooked may leak out and damage the appliance.
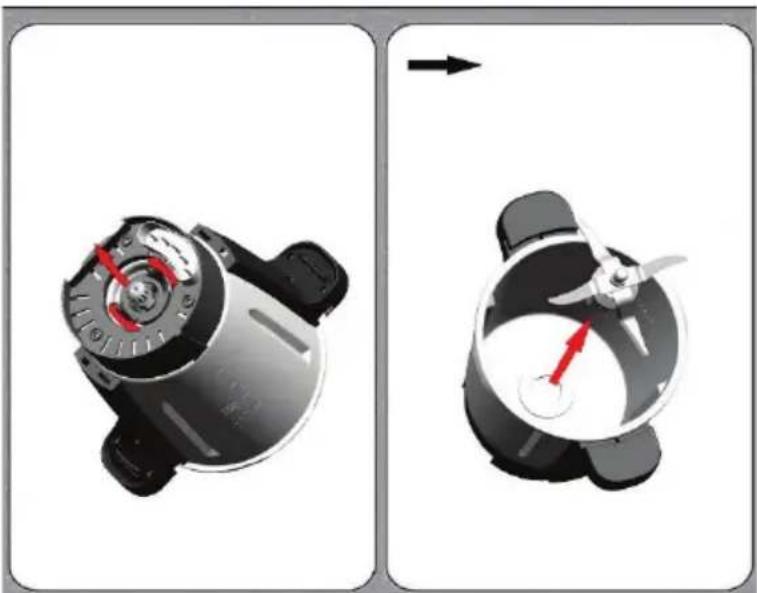
How to remove the 4-blade knife:
natural_image
Two-step diagram showing a mechanical device before and after assembly, with no visible text or symbols.Rotate the spanner anti-clockwise to remove the 4-blade knife. (See above figure)
Caution:
- The knife is very sharp! Please handle it with care!
- Only hold the upper part of the knife!
How to install the bowl :
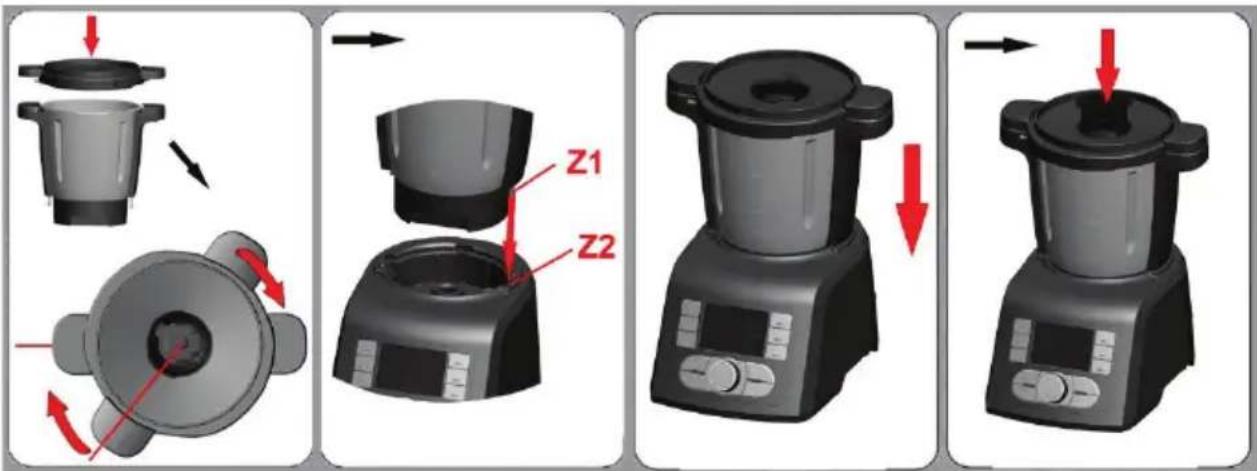
- Put the bowl lid on the bowl. And rotate the bowl lid clockwise to lock it on the bowl. Sound "click" will be heard at this time, which means lid is correctly installed.
- Insert the bowl onto the bowl socket. Be sure to make place Z1 point to place Z2. Sound "click" also will be heard at this time, which means the bowl is well in position.
- Insert the measuring cup on the bowl lid. (See above figure)
How to remove the bowl :
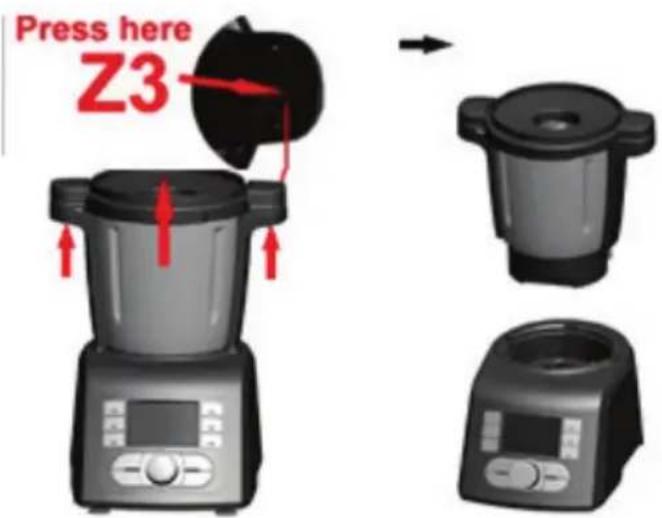
Press the button "Z3" (button on the handle of bowl) with both hands, and then draw the bowl out of the main appliance at the same time. The bowl can be easily removed.
Stand-by status:
Button function introduction:
1."Speed" display: denotes the speed (range: 00, 01-10).
2."Simmer" button: you may use it to stew meat for instance.
Default setting:
Speed: working speed is 00-01..
Temperature: target temperature is 100°C.
Time: working time is 2 hours. You may reset the time (hour, minute or second) between 1 hour and 3 hours by pressing “Timer” button and rotating knob (L1).
Tips:
(1)LCD will show the total working time after the "Start" button pressed.
(2) After the appliance finishes working, sound "beep" will be heard and lasted for 5 seconds.
3."Soup" button: you may use it to make delicious vegetable soup.
Default setting:
LCD only shows total working time 36 minutes.
Step 1: working time is 20 minutes, speed is 01 and target temperature is 100^ C.
Step 2: working time is 15 minutes, speed is 04 and temperature is 0°C.
Step 3: working time is 1 minute, speed is 10 and temperature is 0°C.
Tips:
(1) All the above default settings can't be reset.
(2) After the appliance finishes working, sound “beep” will be heard and lasted for 5 seconds.
4."Steamer" button: you may use it to cook vegetable and fish.
Default setting:
Temperature: target temperature is 100°C.
Time: working time is 20 minutes. You may reset the time (hour, minute or second) between 10 minutes and 60 minutes by pressing “Timer” button and rotating knob (L1).
Tips:
(1) LCD will show the total working time after the "Start" button pressed.
(2) After the appliance finishes working, sound “beep” will be heard and lasted for 5 seconds.
5."Time" button: press "Timer" button, and then rotate knob (L1) to set time (hour, minute or second) (Timer range: 0-3 hours).
Tips: if you don't set the working time, the working appliance will automatically stop after 3 hours!
6."Speed" button: press "Speed" button, and then rotate knob (L1) to set working speed (Speed range: 00, 01-10).
7."Temperature" button: press "Temperature" button, and then rotate knob (L1) to set working temperature (temperature range: 30-120°C).
8."Pulse" button: rapid speed acceleration function. You may use it to mix food quickly. Press "Pulse" button, the appliance instantly starts to run at the highest speed 10. If you release the button, the appliance will recover the previous working speed soon.
Tips: When the temperature in the bowl is ≥ 60°C, PULSE cannot be used, and the device will occur “Beep Beep Beep” sound to alert.
9."EasyCleaning" button:
Tips: You may use “Easy Cleaning” button under stand-by status. We recommend you cleaning the bowl (G) with adding 500ml water and appropriate detergent.
Default setting:
Speed: working speed is limited at 10.
Temperature: working temperature is 40^ C. You may reset working temperature between 35^ C and 55^ C.
Time: working time is 5 minutes. You may reset working time between 1 and 10 minutes.
10."Jam" button: you may use it to do delicious fruit jam
Default setting: LCD only shows total working time 1 hour and 2 minutes.
Step 1: working time is 2 minutes, speed is 05.
Step 2: working time is 1 hour, speed is 01 and target temperature is 100°C. You may only reset the time (hour, minute or second) between 30 minutes and 90 minutes by pressing “Timer” button and rotating knob (L1).
Tips: after the appliance finishes working, sound “beep” will be heard and lasted for 5 seconds.
11."Dough" button: you may use it to make bread dough.
Default setting:
Speed: working speed is 03.
Time: working time is 2 minutes and 30 seconds.
Tips:
You may reset the temperature between 0°C and 35°C.
Caution:
Do not exceed 300G flour/500G(total weight)--- you may over load the unit.
Do not knead for longer than 2 minutes and 30 seconds.
- "Start/Stop" button: To start/stop the working. Press "Start/Stop" button, the current working will be stopped. When you press it again, the stopped working will be recovered.
Tips: if you press “Start/Stop” button longer than 3 seconds under any working status, the appliance will go back to stand-by status. All your settings will be cleared.
- "Time/ Temperature/ Speed" setting knob: Rotate knob (L1) to set time, temperature or speed you need.
How to use the steamer:
flowchart
graph TD
    A["Raw Material"] --> B["Preparation 1"]
    B --> C["Preparation 2"]
    C --> D["Preparation 3"]
    D --> E["Preparation 4"]
The steamer is perfectly suited for preparing some food such as vegetables with meat, sausages, steamed bread, steamed fish etc.
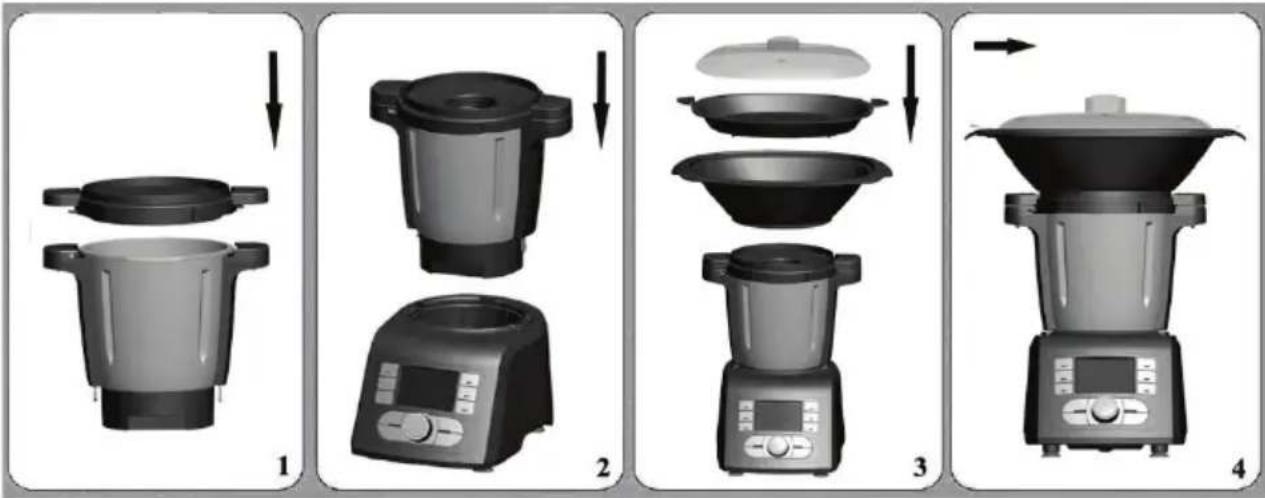
You can use the steamers in either of the following two combinations:
Combination 1: lid (M) + steamer (tray) (N) + steamer (O)
Use this combination for cooking different foods.
Combination 2: lid (M) + steamer (O)
Use this combination for larger amount of food, e.g. vegetables, potatoes or large pieces of meat or sausages.
Please follow the steps:
- Install the 4-blade knife, and then install the bowl on the main appliance.
- Add the water (0.5L≤water≤2L) in the bowl. (caution: the water in the bowl should be more than 0.5 liter. 0.5L water can be used for steaming food for 30 minutes.)
- Cover the bowl lid.
- Turn the bowl lid until it is locked in position.
- Put on the steamer.
- Put the food on the steamer, and then cover the lid.
- Plug in and press "On" button.
- Set the speed, the time and the temperature you need for now machine is in DIY pattern.
- Press "Start/Stop" button, the appliance starts to working and the timer is counting down.
- Sound "Beep" will be heard and lasted for 5 seconds after the working time is finished.
- After use, turn the main appliance off and remove the steamer lid.
- Take out the processed food from the steamer.
Caution:
- Danger of scalding by hot steam and hot condensed water.
- Never heat up the bowl when it is empty.
-
If the lid is not fitted properly, the steam will escape and food inside steamer will not cook properly.
-
Never leave the measuring cup on the bowl lid when using the steamer but must be with top cover.
-
The hot steam and hot condensed water is dangerous. Please handle it carefully.
-
Don't touch the metal part of the bowl while it is hot. Only hold the handle of the bowl to move the bowl.
-
30 minutes steam cooking requires 0.5 liter (500ml) of water, you need add around 250ml of water for each additional 15 minutes.
How to use the inner basket:
The inner basket is suitable for cooking small quantity food, such as vegetable, fish and meat.
Install inner basket:
flowchart
graph TD
    A["Step 1: Cover and lid"] --> B["Step 2: lid with lid, lid removed"]
    B --> C["Step 3: Plate with lid, lid removed"]
    C --> D["Step 4: Cooker oven with digital display"]
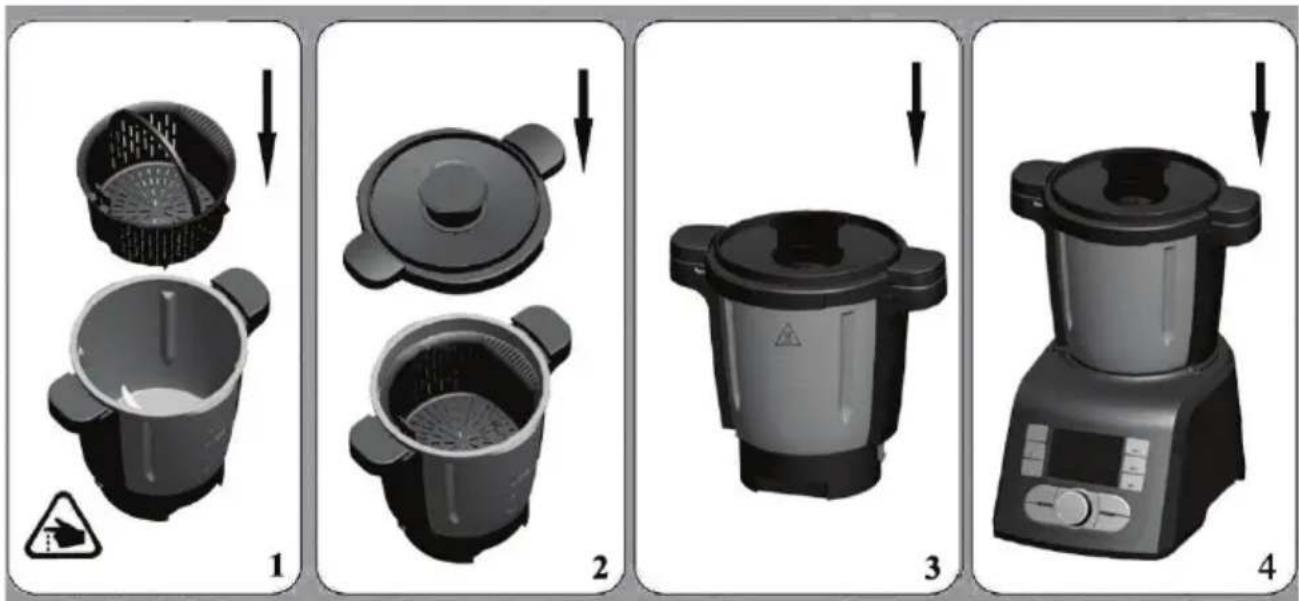
- Put the inner basket in the bowl, and install the bowl lid correctly.
- Insert the bowl on the main appliance.
Use the inner basket:
Please follow the steps:
- Install the 4-blade knife on the bowl.
- Add the water in the bowl (max 600ml and with the water level under the basket)
- Put the inner basket in the bowl, and add the food in the basket.
- Then cover the bowl lid.
- Turn the bowl lid until it is locked in position. And put the measuring cup on the bowl lid.
- Plug in and press "On/Off" button.
- In steamer, set the time, the speed (01-04) and temperature you need. Press "Start/Stop" button, the appliance starts to working and the timer is counting down. If you skip the timer setting, the timer is counting.
- Sound "Beep" will be heard and lasted for 5 seconds after the working time is finished.
- After use, turn the main appliance off. Remove the bowl lid and take out the inner basket.
- Take out the processed food from the basket.
Caution:
- The maximum water added in the bowl should be 600ml and with the level under the basket!
- Danger of scalding by hot steam and hot condensed water.
- The hot steam and hot condensed water is dangerous. Please handle it carefully.
- Don't touch the metal part of the bowl while it is hot. Only hold the handle of the bowl to move it.
Fault codes:
| Code | Status Solution | |
| E1 | Signal “E1” is flashing on LCD, accompanied with “beep” alarms heard. | Something goes wrong with the appliance. It must be sent to the approved service center for repairing. |
| E2 | Signal “E2” is flashing on LCD, accompanied with “beep” alarms heard. | The bowl wasn’t installed, or install incorrectly. Install the bowl again according to the operating instruction. |
 | Signal “  ows on LCD, accompanied with “beep” alarms heard. ows on LCD, accompanied with “beep” alarms heard. | The bowl cover wasn’t installed, or install incorrectly. Install the bowl cover again according to the operating instruction. |
| E4 | Signal “E4” is flashing on LCD, accompanied with “beep” alarms heard. | The temperature of appliance is too hot. Firstly let it cool down 30 minutes to 2 hours, and then reboot it. It must be sent to the approved service center for repairing if the previous cooperation doesn’t work. |
Cleaning:
- Before you clean the appliance, switch the appliance off and remove the plug from the socket.
- While cleaning, don't immerse the bowl in water.
- After the bowl cool down, remove the 4-blade knife from the bowl. Clean the inside and outside of the bowl. Always keep the contact pins at the bottom of the bowl clean and dry. Only wipe the contact pins with a wet cloth!
- Unscrew the screw ring and remove all parts of the attachment. Don't clean the metal bowl and blade in the dishwasher!
- Never use pointed or sharp objects for cleaning as this may damage functional parts or affect the safety of the appliance.
- The 4-blade knife is very sharp! Handle it with care!
- Wash all parts in hot soapy water. Clean them immediately after use. Rinse them with clear hot water and dry them immediately.
-
We advise you to lubricate the 4-blade knife with some vegetable oil.
-
Only wipe the main appliance with a damp soft cloth!
- It is not recommended to put the bowl and accessories in dishwasher.

natural_image
Symbol of a trash bin crossed with no text or labels, accompanied by a black rectangular block below (no readable text or symbols)If this logo appears on the appliance, it signifies that it should be scrapped in line with directive 2012/19/UE relating waste electronic and electric equipment (DEEE). All dangerous substances contained in electric and electronic equipment may exert deleterious effects on the environment and human health during processing. This explains why at the end of its useful life this appliance should not be disposed of with unsorted municipal waste. As end consumer, your role is essential in ensuring reuse, recycling or other form of value creation for this appliance. You have at your disposal several collection and recovery systems put in place by your local authority (recycling centre) and distributors. You have the obligation of using these systems.
The warranty does not cover the wear parts of the product, nor the problems or damage resulting from:
(1) surface deterioration due to normal wear and tear of the product;
(2) defects or deterioration due to contact with liquids and corrosion caused by rust;
(3) any incident, abuse, misuse, alteration, disassembly or Unauthorized repair;
(4) improper maintenance, improper use concerning the product or connection to an incorrect voltage;
(5) any use of accessories not supplied or not approved by the manufacturer.
The guarantee will be cancelled if the nameplate and / or serial number of the product are removed.