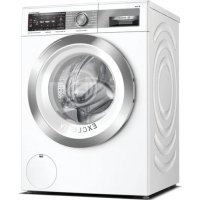
WAV28E93 - Washing machine BOSCH - Free user manual and instructions

Find the device manual for free WAV28E93 BOSCH in PDF.

BOSCH WAV28E93 - Washing machine
📄 505 pages English EN Download 💬 AI Question 11 questions ⚙️ Specs
Notice BOSCH WAV28E93 - page 111
Pick your language and provide your email: we'll send you a specifically translated version.
Product TypeFront-loading washing machine
BrandBosch
ModelWAV28E93
Washing capacity8 kg
Maximum spin speed1400 rpm
Energy efficiency classA+++
Power supply230 V, 10 A, 50 Hz
Dimensions (H x W x D)85 x 60 x 60 cm
Net weight75 kg
Noise level (wash/spin)52 dB / 76 dB
Wash programsCotton, Synthetics, Delicates, Wool, Quick 15 min, etc.
Special functionsDelayed start, Child lock, End delay, Drum cleaning
Control systemElectronic with digital display
Drum typeStainless steel, with VarioSoft structure
Drum volume58 liters
Annual water consumption9,500 liters
Annual energy consumption180 kWh
MaintenanceRegular cleaning of pump filter, detergent drawer, door gasket
Accessible spare partsTop, control panel, detergent drawer, door, door gasket, door lock, drum light, pump cover, front panel
RepairabilityDesigned for consumer repair according to EU regulation 2019/2023

Frequently Asked Questions - WAV28E93 BOSCH

How to remove the detergent drawer?
Open the detergent drawer, press the insertion button (1) and remove the drawer (2). Ensure the appliance is powered off and disconnected from the water supply.
How to change the door gasket?
First remove the top, control panel, detergent drawer, door and pump cover. Loosen the clamp and disconnect the door lock connector. Reassemble in reverse order, tightening the tension ring to 3.4 Nm. Wear protective gloves.
What to do if an error code is displayed?
Refer to the user manual for the meaning of the code. Common codes indicate a drainage problem, overload or door closure issue. Unplug the appliance for 30 seconds to reset. If the problem persists, contact after-sales service.
How to clean the pump filter?
Open the pump cover (bottom right), unscrew the filter and remove it. Clean it under running water. Place a container to catch residual water.
Can I repair the door lock myself?
Yes, but after replacement, an electrotechnical test by a qualified electrician is required (according to VDE 0701). Risk of electrocution if handled incorrectly.
How to change the drum light?
Remove the top, detergent drawer and control panel. Take out the light holder, disconnect the connections and replace the bulb. Unplug the appliance beforehand.
What is the safety procedure before any repair?
Always unplug the appliance from the power supply and shut off the water supply. Wear protective gloves against sharp edges. Secure the appliance against falling.
How to access the control panel?
First remove the top (screws at the back), then the detergent drawer. Remove the control panel screws, disconnect the cables and take it out. Beware of sharp edges.
What to do if the water does not drain?
Check the pump filter (often clogged) and the drain hose. If the problem persists, the drain pump may be defective. Unplug the appliance before any intervention.
How to reverse the door opening direction?
The repair guide does not mention this operation. In general, you must disassemble the door, remove the hinges and reposition them on the other side. Refer to the installation manual for detailed instructions.

User questions about WAV28E93 BOSCH

1 question about this device. Answer the ones you know or ask your own.

Ask a new question about this device

Your email remains private: it is only used to notify you if someone answers your question.

How to replace the heating element on the BOSCH WAV28E93 washing machine?
Frequently Asked Questions - 04/30/2026
Response Notice-Facile

Replacing the heating element on the BOSCH WAV28E93 washing machine is an advanced technical operation that requires special attention to safety instructions. Before any intervention, check that your machine is no longer under the Bosch manufacturer's warranty (normally 2 years), as an authorized service will provide better protection.

Essential preparation: Disconnect the machine from the power supply by unplugging it. Turn off the main water supply or disconnect the inlet and drain hoses. Allow the machine to cool for at least 1 hour after it has stopped, as the drum and internal components can be very hot. Slightly lift the machine using a jack or dolly to more easily access the rear panel.

Accessing the heating element: Remove the rear panel by unscrewing all the fixing screws (usually 4 to 6 screws depending on the model). Once the panel is removed, locate the heating element: it is usually mounted horizontally or in a U-shape under the drum. You will see the electrical connectors (red and black wires) connected to it. Carefully disconnect these connectors by gently pulling them towards you.

Removal and replacement: The element is held in place by a central retaining nut (usually 5 to 10 mm). Use an appropriate wrench to loosen this nut, then remove the old element by pulling it out horizontally. Before installing the new original Bosch element (specific reference for WAV28E93), ensure it is identical to the old one. Insert the new element, tighten the retaining nut with the same force as during removal, and then reconnect the electrical connectors ensuring they are securely clicked in place.

Essential recommendations: If your machine is still covered by the 2-year warranty, please contact an authorized Bosch service rather than attempting it yourself. Poorly executed electrical operations can damage your appliance's control board or pose electrocution risks. Before putting the machine back into service, restore the power supply, reconnect the hoses, and then run a test cycle without laundry to check that the water heats normally. If you are not familiar with this type of intervention, we strongly recommend calling a qualified Bosch technician.

Respond (be the first)

Download the instructions for your Washing machine in PDF format for free! Find your manual WAV28E93 - BOSCH and take your electronic device back in hand. On this page are published all the documents necessary for the use of your device. WAV28E93 by BOSCH.

USER MANUAL WAV28E93 BOSCH
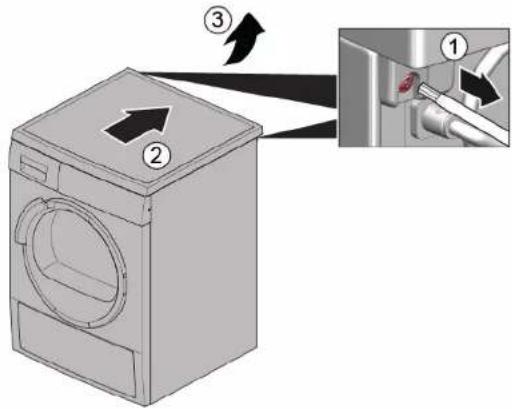
Diagram showing a washing machine with labeled parts and an inset close-up of the component being inserted.

BOSCH WAV28E93 - 2

Repair

  1. BOSCH WAV28E93 - Repair - 1

WARNING!

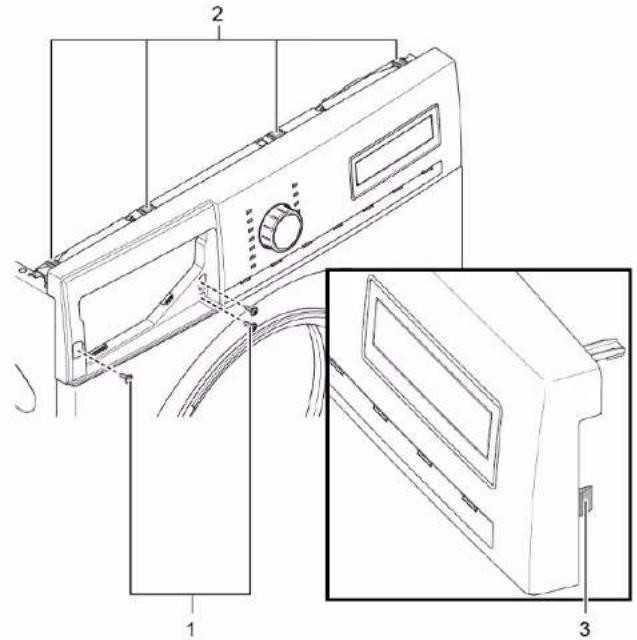
  1. Remove the screws (1).
  2. Release the fasteners (2, 3).

Technical diagram of a washing machine with labeled parts and exploded view.

3.1.2 Installing the worktop

▶ Install in reverse order.

BOSCH WAV28E93 - Installing the worktop - 1

Repair

3.2 Replacing the plate

BOSCH WAV28E93 - Replacing the plate - 1

BOSCH WAV28E93 - Replacing the plate - 2

Sharp edges on the housing!

Cuts

▶ Wear protective gloves.

BOSCH WAV28E93 - Replacing the plate - 3

BOSCH WAV28E93 - Replacing the plate - 4

Risk of tilted appliances slipping!

  1. Disconnect the control unit connector.
  2. Remove the panel.

3.2.2 Installing the panel

▶ Install in reverse order.

BOSCH WAV28E93 - Installing the panel - 1

Repair

3.3.2 Installing the detergent drawer

▶ Install in reverse order.

BOSCH WAV28E93 - Installing the detergent drawer - 1

Repair

  1. Remove the detergent drawer handle.

3.4.2 Installing the detergent drawer handle

▶ Install in reverse order.

BOSCH WAV28E93 - Installing the detergent drawer handle - 1

Repair

3.5 Replacing the door

BOSCH WAV28E93 - Replacing the door - 1

CAUTION

  1. Remove the door upwards.

3.5.2 Installing the door

Place in reverse order.

BOSCH WAV28E93 - Installing the door - 1

Repair

  1. Lower the device.

BOSCH WAV28E93 - Repair - 1

Repair

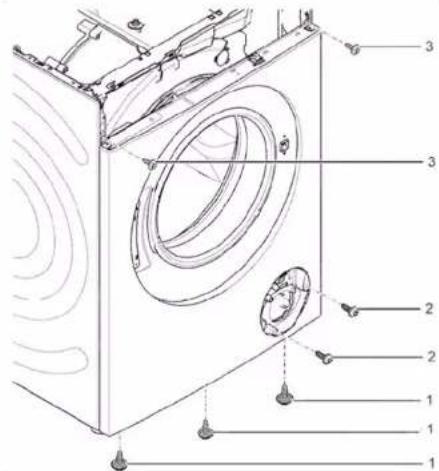
  1. Remove the screws in the pump area (2). 5. 1. Loosen the screws on the back of the device (1).
Technical diagram of a washing machine with numbered components for identification.

  1. Remove the worktop (2, 3).

Diagram showing a washing machine with labeled parts and a close-up of the component being inserted, illustrating the process.

BOSCH WAV28E93 - Repair - 3

Repair

  1. Remove the screws (1).
  2. Loosen the panel catches (2, 3).
  3. Loosen the dispenser housing screws.
  4. Loosen the panel catches (2, 3).
  5. Loosen the dispenser housing screws.

Technical diagram of a washing machine with labeled parts and exploded view.

  1. BOSCH WAV28E93 - Repair - 2

CAUTION

Danger of damaged surface!

  1. Remove the door seal.
  1. Remove the door lock.

BOSCH WAV28E93 - CAUTION - 1

Repair

3.8.2 Installing the door lock
Interior view of a washing machine showing internal components like hoses and gauges (no text or labels visible).

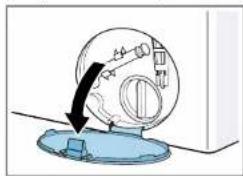
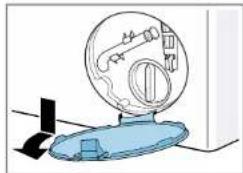
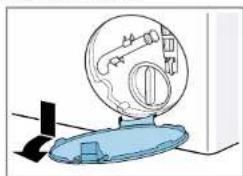
  1. Remove the pump cover.

Diagram of a mechanical device with a circular component and a blue base, showing internal components (no text or symbols).

3.10.2 Installing the pump cover

▶ Install in reverse order.

BOSCH WAV28E93 - Installing the pump cover - 1

Repair

  1. Lower the appliance.

BOSCH WAV28E93 - Repair - 1

Repair

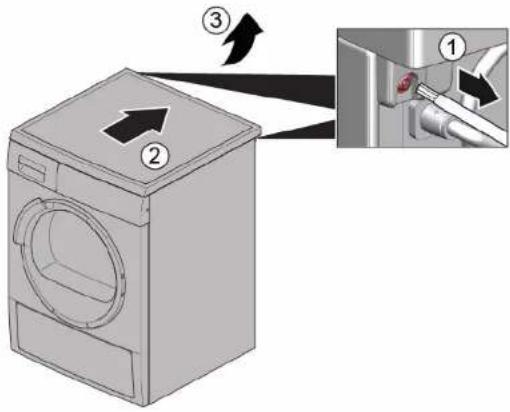
  1. Remove the screws (1).
  2. Push the worktop to the rear of the appliance (2).
  3. Move the worktop upwards (3) to remove it.
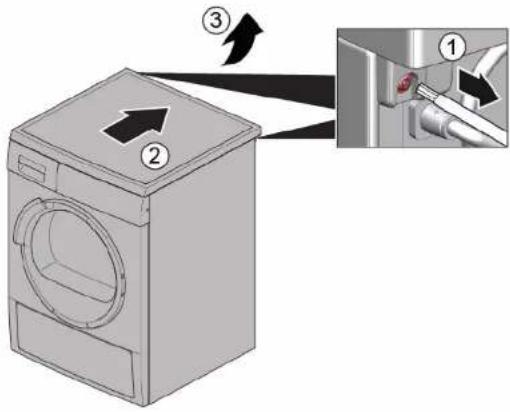
Diagram showing a washing machine with labeled parts and an inset close-up of the component being inserted into a pipe.

  1. Remove the screws (1).
  2. Release the retaining elements (2, 3).
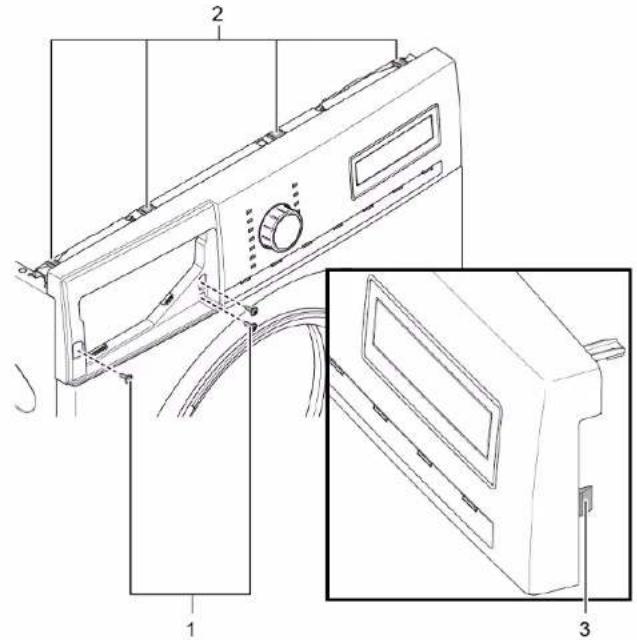
Technical diagram of a washing machine with labeled parts and exploded view.

  1. Remove the panel.

7.

BOSCH WAV28E93 - Repair - 3

BOSCH WAV28E93 - Repair - 4

CAUTION

  1. Remove the front panel.
  1. Lay the appliance down.

BOSCH WAV28E93 - Repair - 5

Repair

BOSCH WAV28E93 - Repair - 1

Repair

  1. BOSCH WAV28E93 - Repair - 1

WARNING

  1. Lay the appliance down.

BOSCH WAV28E93 - WARNING - 1

Repair

  1. Remove the door upward.
  1. Lower the appliance.

BOSCH WAV28E93 - Repair - 1

Repair

  1. Remove the screws in the pump area (2). 5. 1. Loosen the screws on the back of the appliance (1).
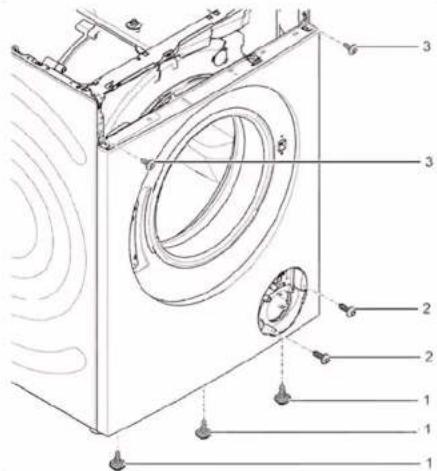
Technical diagram of a washing machine with numbered components for identification.

BOSCH WAV28E93 - Repair - 2

Repair

  1. Remove the screws (1).
  2. Release the locking elements of the control panel (2, 3).
  3. Loosen the screws of the dispenser housing.
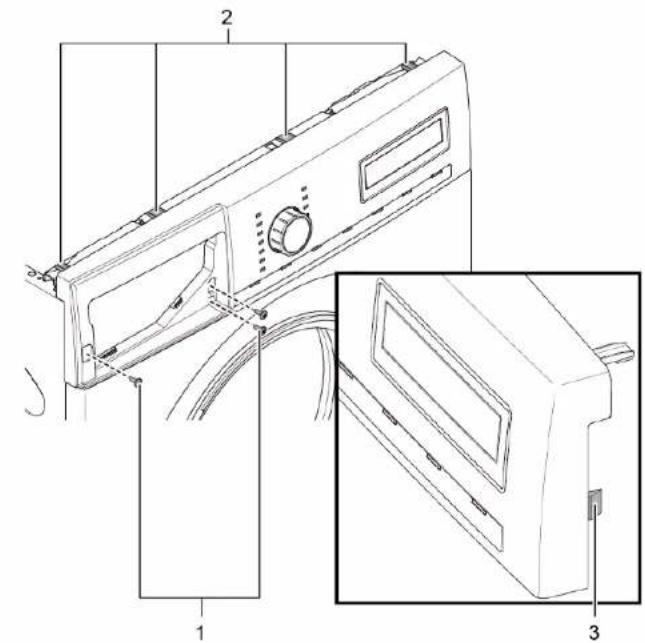
  4. Release the locking elements of the control panel (2, 3).
  5. Loosen the screws of the dispenser housing.

Technical diagram of a washing machine with labeled parts and exploded view.

  1. Remove the control panel.
  2. Remove the drum light holder at the top.
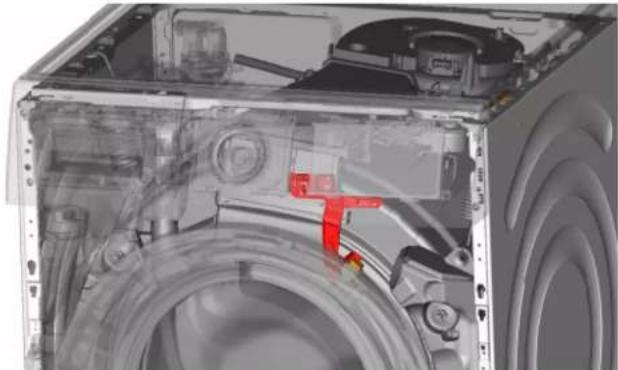
Interior view of a washing machine showing internal components like wheels and hoses (no text or symbols visible).

9.

BOSCH WAV28E93 - Repair - 3

NOTE!

Risk of damage to the surface!

  1. Remove the door gasket.
  1. Remove the door lock.

BOSCH WAV28E93 - NOTE! - 1

Repair

▶ Make sure to secure the appliance against slipping.

BOSCH WAV28E93 - Repair - 1

Interior view of a washing machine showing internal components like hoses and gauges.

  1. Open the pump cover.

Diagram showing a mechanical device interacting with a blue liquid, with a black arrow indicating motion direction.

  1. Remove the pump cover.

Diagram of a mechanical device with a circular component and a blue base, showing internal components.

  1. Lower the appliance.

BOSCH WAV28E93 - Repair - 5

Repair

  1. Remove the control panel.

7.

BOSCH WAV28E93 - Repair - 1

BOSCH WAV28E93 - Repair - 2

CAUTION

Risk of falling parts due to loosened screws! Personal injury due to falling parts.

▶ Make sure to secure the component against falling.

BOSCH WAV28E93 - Repair - 3

Repair

BOSCH WAV28E93 - Repair - 1

NOTE!

  1. Remove the front panel.

3.11.2 Mounting the front panel

3.1.2 Mounting the worktop

3.3.2 Mounting the detergent drawer

3.6.2 Mounting the door components
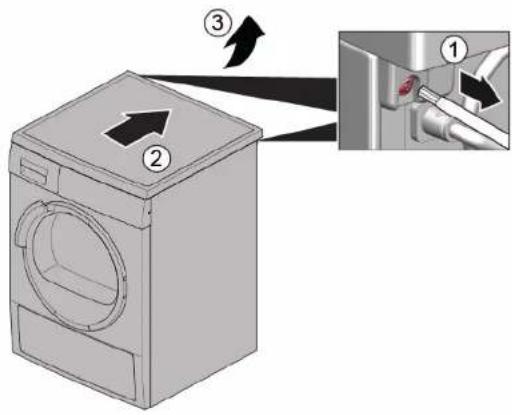
Diagram showing a washing machine with labeled parts and an inset close-up of the component being inserted.

BOSCH WAV28E93 - Mounting the door components - 2

Repair

  1. BOSCH WAV28E93 - Repair - 1

NOTE

3.10.2 Mounting the pump cover

Repair hints - Washing machine

i Concerning this document.... 108

1.1 Important information.... 108

1.1.1 Purpose.... 108

1.2 Explanation of symbols 108

1.2.1 Danger levels.... 108

1.2.2 Hazard symbols 108

1.2.3 Structure of the warnings.... 109

1.2.4 General symbols.... 109

Tools and aids.... 110

Repair 111

3.1 Replacing worktop.... 111

3.1.1 Removing worktop 111

3.1.2 Installing worktop 111

3.2 Replacing fascia panel.... 112

3.2.1 Removing fascia panel 112

3.2.2 Installing fascia panel 112

3.3 Replacing detergent drawer 113

3.3.1 Removing detergent drawer.... 113

3.3.2 Installing detergent drawer.... 113

3.4 Replacing detergent drawer handle 114

3.4.1 Removing detergent drawer handle.... 114

3.4.2 Installing detergent drawer handle.... 114

3.5 Replacing door 115

3.9.1 Removing drum light.... 123

3.9.2 Installing drum light.... 123

3.10 Replacing pump cover.... 124

3.10.1 Removing pump cover 124

3.10.2 Installing pump cover 124

3.11 Replacing front panel 125

3.11.1 Removing front panel.... 125

3.11.2 Installing front panel.... 127

i Concerning this document

1.1 Important information

1.1.1 Purpose

These repair hints support consumers to repair appliances by themselves according to the applicable eco-design regulation (as of 03/2021).

They contain information on how to exchange defined spare parts, including warnings and risks.

In case of questions, please contact our customer service. We will only be liable for damages if the repair hints have been followed properly.

1.2 Explanation of symbols

1.2.1 Danger levels

The warning levels consist of a symbol and a signal word. The signal word indicates the severity of the danger.

Warning level Meaning
DangerNon-observance of the warning message will result in death or serious injuries.
WarningNon-observance of the warning message could result in death or serious injuries.
CautionNon-observance of the warning message could result in minor injuries.
NoticeNon-observance of the warning message could result in damage to property.

Table 1: Danger levels

1.2.2 Hazard symbols

Hazard symbols are symbolic representations which give an indication of the kind of danger.

The following hazard symbols are used in this document:

Hazard symbol Meaning
BOSCH WAV28E93 - Hazard symbols - 1General warning message
BOSCH WAV28E93 - Hazard symbols - 2Danger from electrical voltage
BOSCH WAV28E93 - Hazard symbols - 3Risk of explosion
BOSCH WAV28E93 - Hazard symbols - 4Danger of cuts
BOSCH WAV28E93 - Hazard symbols - 5Danger of crushing

i Concerning this document

Hazard symbol Meaning
BOSCH WAV28E93 - i Concerning this document - 1Danger from hot surfaces
BOSCH WAV28E93 - i Concerning this document - 2Danger from strong magnetic field
BOSCH WAV28E93 - i Concerning this document - 3Danger from non-ionizing radiation

Table 2: Hazard symbols

1.2.3 Structure of the warnings

Warnings in this document have a standardized appearance and a standardized structure.

BOSCH WAV28E93 - Structure of the warnings - 1

BOSCH WAV28E93 - Structure of the warnings - 2

Type and source of danger!

Possible consequences of ignoring the danger / warning.

▶ Measures and prohibitions for preventing the danger.

The following example shows a warning that warns against electric shock due to live parts. The measure for avoiding the danger is mentioned.


BOSCH WAV28E93 - Structure of the warnings - 3

BOSCH WAV28E93 - Structure of the warnings - 4

Risk of electric shock due to live parts!

Death by electrocution

- Disconnect appliances from electrical supply at least 60 seconds before starting repairs.

1.2.4 General symbols

The following general symbols are used in this document:

Gen. symbol Meaning
Identification of a special tip (text and/or graphic)
Identification of a simple tip (only text)
Identification of a link to a video tutorial
Gen. symbol Meaning
Identification of required tools
Identification of required preconditions
Identification of a condition (if ..., then ...)
Identification of a result
Start Identification of a key or button
[00123456] Identification of a material number
Status Identification of displayed text / window(in the appliance's display)

Table 3: General symbols

BOSCH WAV28E93 - General symbols - 1

Tools and aids

Designation Details Images
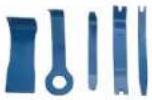
Auxiliary tool[15000155]Tool for loosening out of plastic partsBOSCH WAV28E93 - Tools and aids - 1
Screwdriver Torx T20 with bore hole [00340764]100 mm, for screws with safety pinBOSCH WAV28E93 - Tools and aids - 2
Torque spanner [15000441]Torque spanner 20 - 100 Nm
Slot screwdriver [00340854]Blade 3.5 mm x 0.6 mm x 100 mm, Protective Insulation 1000 V ACBOSCH WAV28E93 - Tools and aids - 3
Slot screwdriver [00340855]Blade 5.5 mm x 1.0 mm x 125 mm, Protective Insulation 1000 V ACBOSCH WAV28E93 - Tools and aids - 4
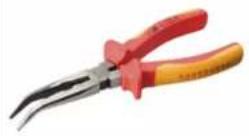
Needle-nose pliers, angled pattern [00341269]Length 200 mmBOSCH WAV28E93 - Tools and aids - 5
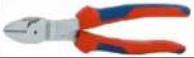
Side-cutting pliers [00342182]Length: 200 mmBOSCH WAV28E93 - Tools and aids - 6
Designation Details Images
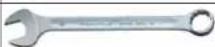
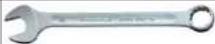
Combination wrench[00340811]Wrench size 10°mm, M6BOSCH WAV28E93 - Tools and aids - 7
BOSCH WAV28E93 - Tools and aids - 8
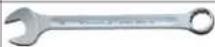
Combination wrench[00340814]Wrench size 13°mm, M8
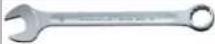
Combination wrench[00340817]Wrench size 17 mm, M10BOSCH WAV28E93 - Tools and aids - 9
Combination wrench[15000459]Wrench size 16°mm, M10BOSCH WAV28E93 - Tools and aids - 10

BOSCH WAV28E93 - Tools and aids - 11

Repair

3.1 Replacing worktop

Required tools:

Torx Bit TX20 with hole, long 6.3 mm (1/4") 152 mm, for screws [00341272] with safety pin

Prerequisite:

√ Appliance is disconnected from power supply. √ Appliance is disconnected from water supply.

3.1.1 Removing worktop

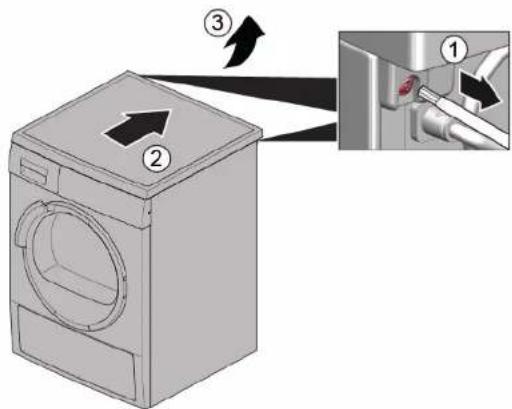
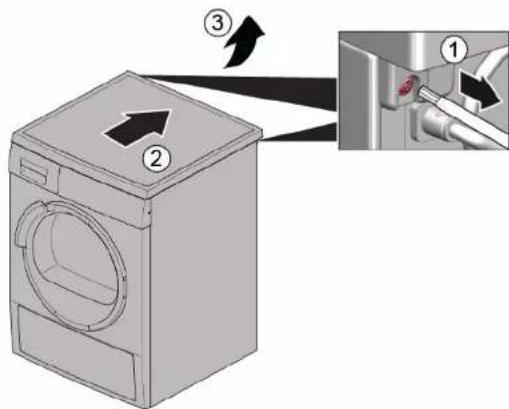
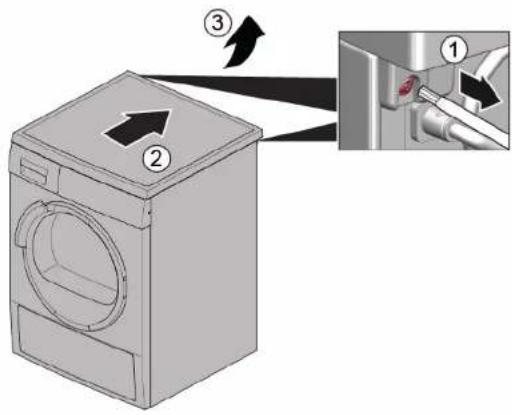
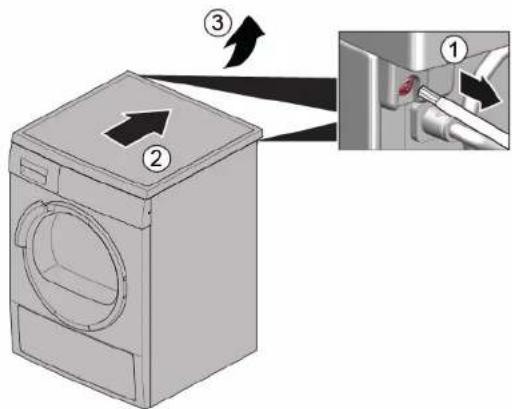
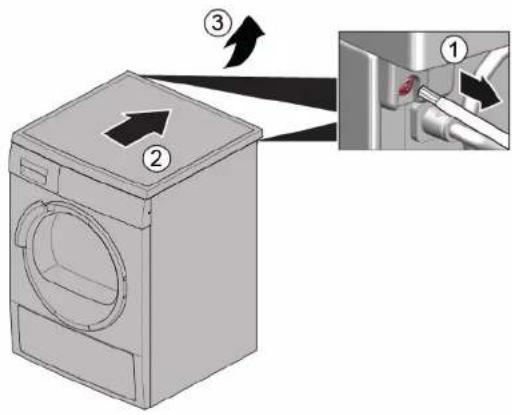
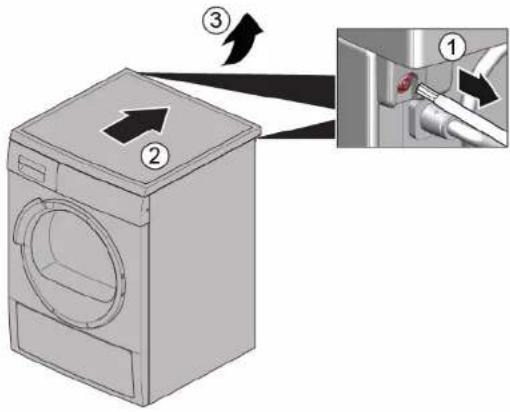
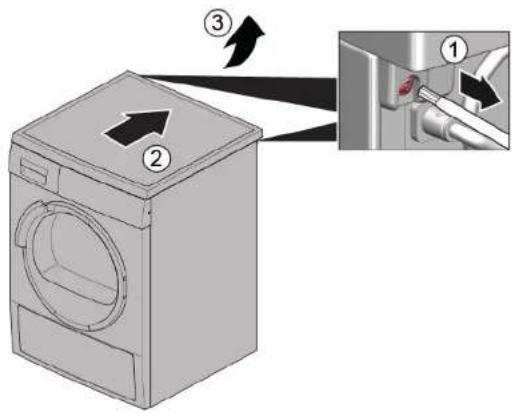
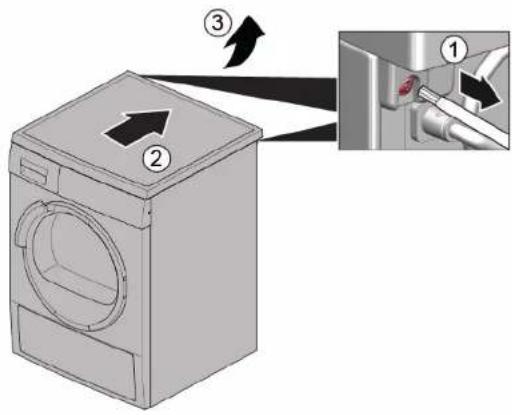
  1. Remove screws (1).
  2. Push worktop to the back of the appliance (2).
  3. Move worktop upwards (3) to remove it.
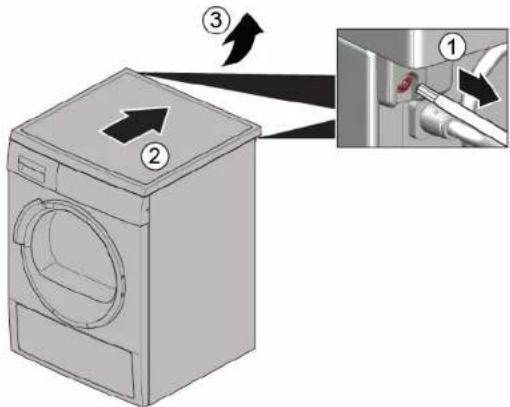
Diagram showing a washing machine with labeled parts and an inset close-up of the component being inserted into a pipe.

3.1.2 Installing worktop

▶ Install in reverse order.

Repair

3.2 Replacing fascia panel

BOSCH WAV28E93 - Replacing fascia panel - 1

BOSCH WAV28E93 - Replacing fascia panel - 2

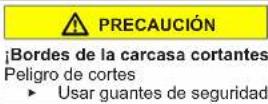
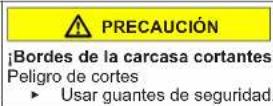
Sharp housing edges!

Cut injuries

▶ Wear protective gloves.

BOSCH WAV28E93 - Replacing fascia panel - 3

BOSCH WAV28E93 - Replacing fascia panel - 4

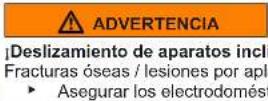
Slipping of tilted appliances!

Bone fractures / crush injuries

- Secure appliances against slipping.

BOSCH WAV28E93 - Replacing fascia panel - 5

BOSCH WAV28E93 - Replacing fascia panel - 6

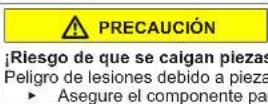
Risk of falling parts due to released screws!

Injury because of falling parts.

- Secure component from falling down.

BOSCH WAV28E93 - Replacing fascia panel - 7

BOSCH WAV28E93 - Replacing fascia panel - 8

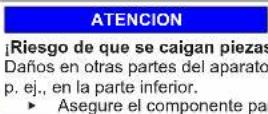
Risk of falling parts due to released screws!

Damage to other parts of the appliance or at customer's home e.g. bottom.

- Secure component from falling down.

Prerequisite:

√ Appliance is disconnected from power supply. √ Appliance is disconnected from water supply. √ Worktop has been removed. → Page 111 √ Detergent drawer has been removed. → Page 113

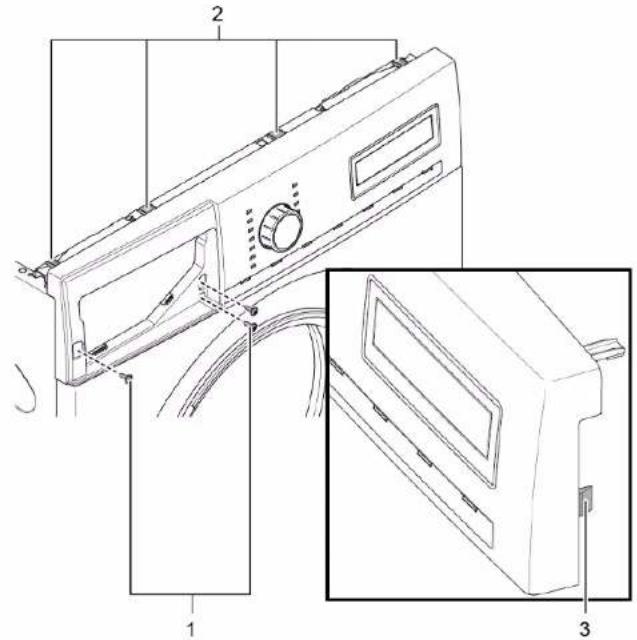
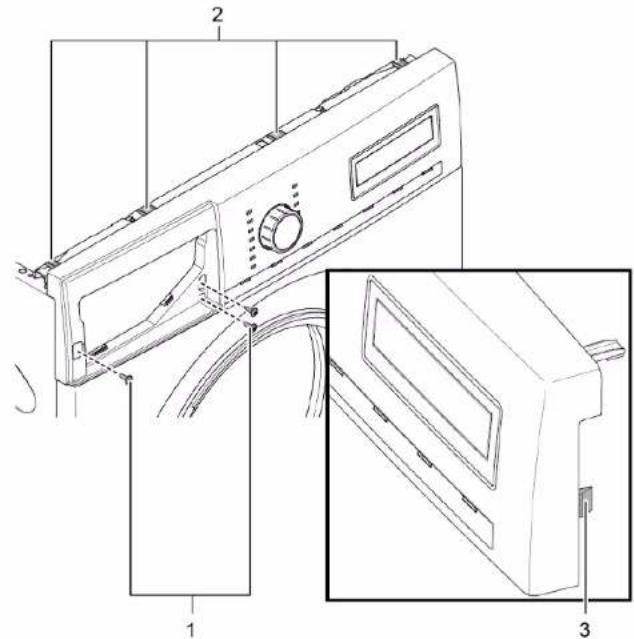
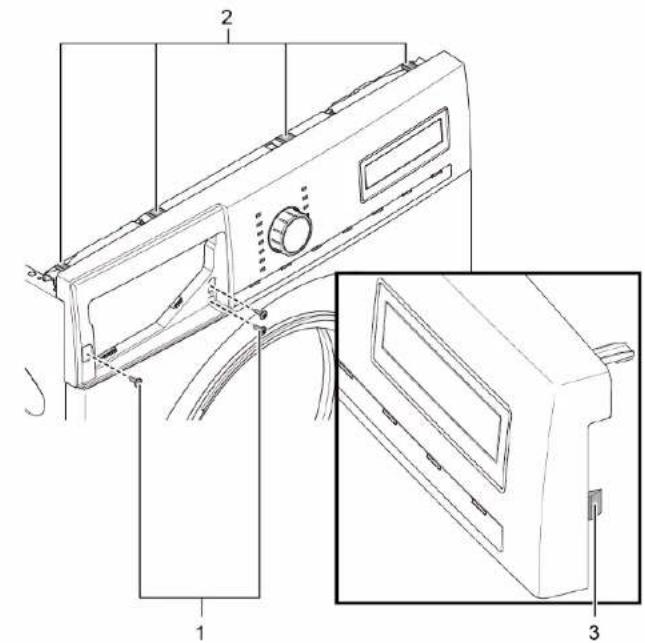
3.2.1 Removing fascia panel

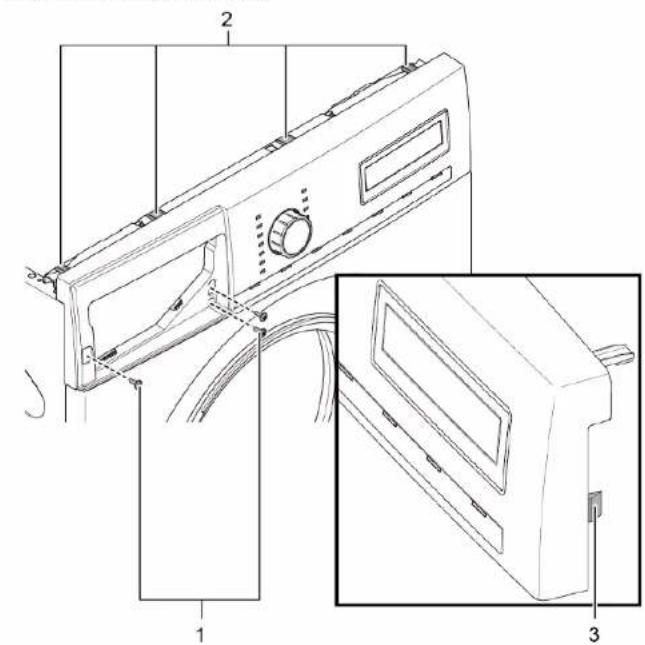
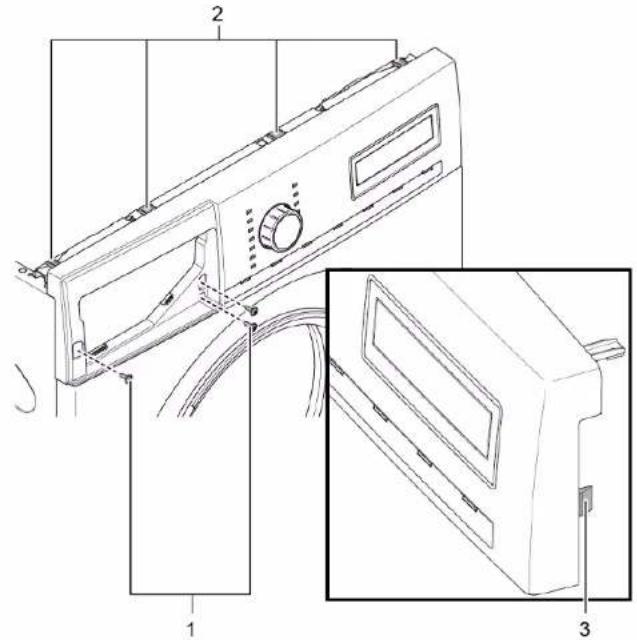
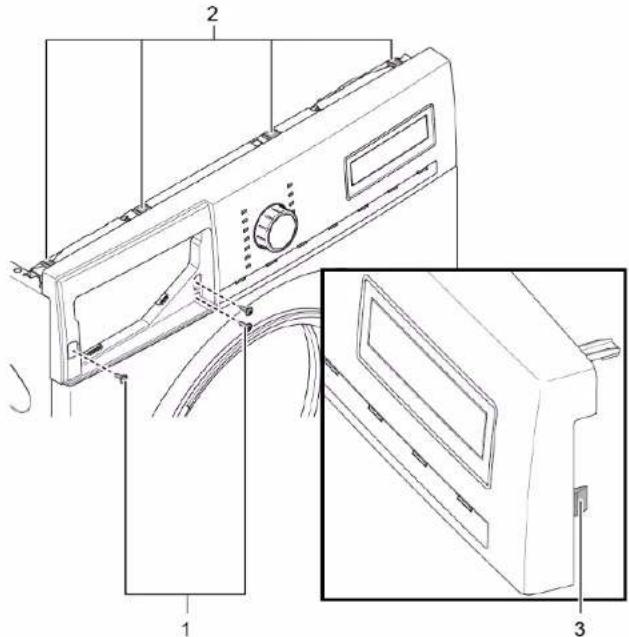
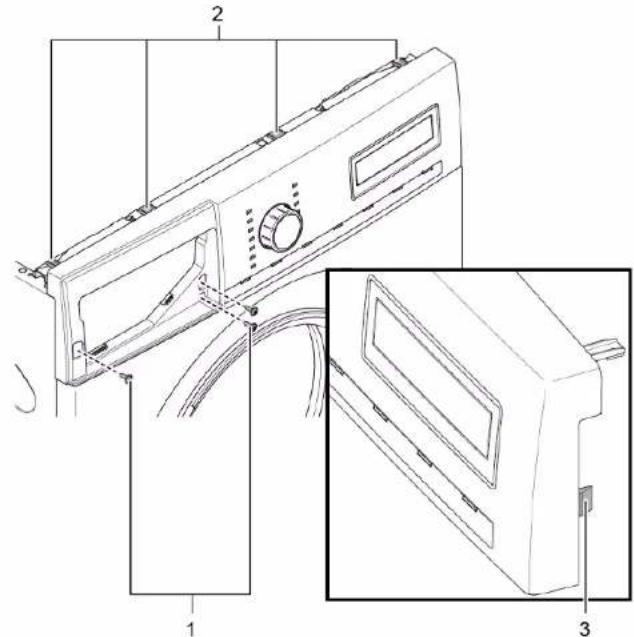
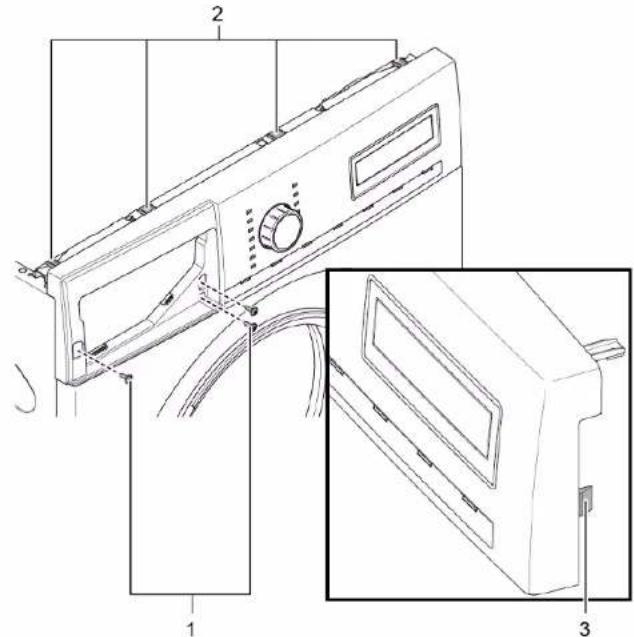
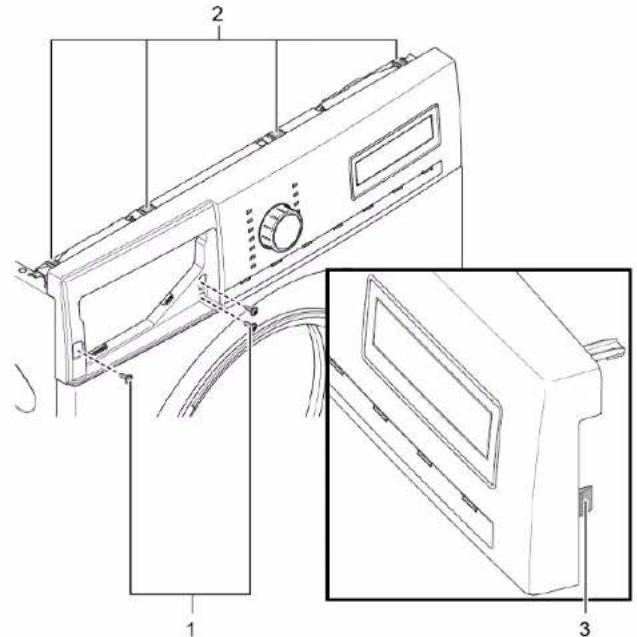
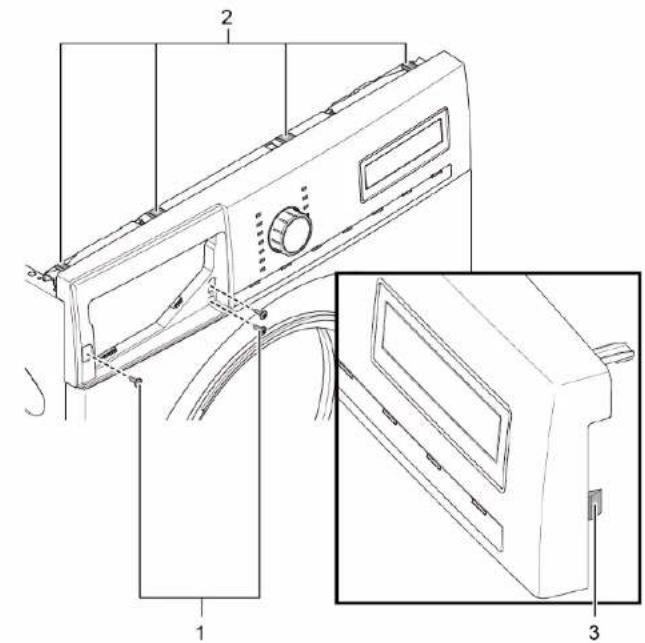
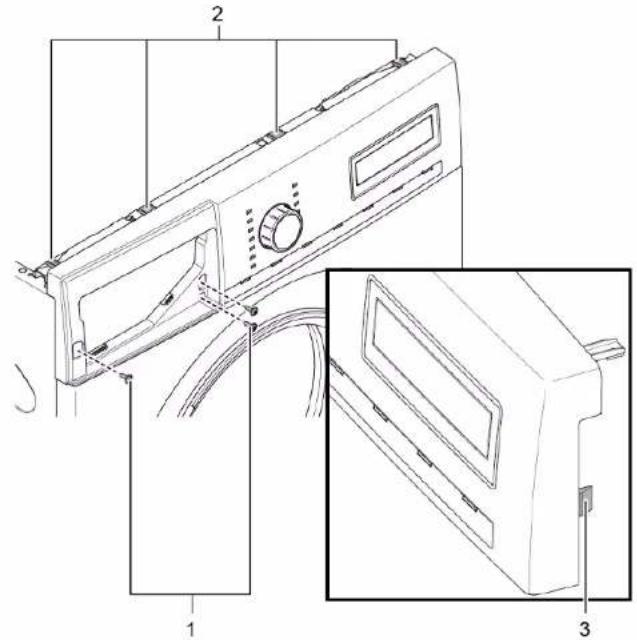
  1. Remove screws (1).
  2. Release catch elements (2, 3).

Technical diagram of a washing machine with labeled parts and exploded view.

  1. Release plug contact of control unit.
  2. Remove fascia panel.

3.2.2 Installing fascia panel

Install in reverse order.

BOSCH WAV28E93 - Installing fascia panel - 1

Repair

3.3 Replacing detergent drawer

Prerequisite:

Appliance is disconnected from power supply. Appliance is disconnected from water supply.

3.3.1 Removing detergent drawer

  1. Pull out detergent drawer.
  2. Press down on insert (1).
  3. Remove detergent drawer (2).

Diagram showing two labeled mechanical components with directional arrows indicating movement or force.

3.3.2 Installing detergent drawer

Install in reverse order.

BOSCH WAV28E93 - Installing detergent drawer - 1

Repair

3.4 Replacing detergent drawer handle

Prerequisite:

√ Appliance is disconnected from power supply. √ Appliance is disconnected from water supply. √ Detergent drawer has been removed. → Page 113

3.4.1 Removing detergent drawer handle

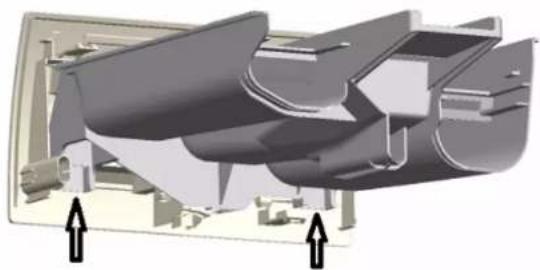
  1. Release catch elements.

3D cutaway diagram of a mechanical component showing internal layered structure and mounting features (no text or symbols).

  1. Remove detergent drawer handle.

3.4.2 Installing detergent drawer handle

Install in reverse order.

BOSCH WAV28E93 - Installing detergent drawer handle - 1

Repair

3.5 Replacing door

BOSCH WAV28E93 - Replacing door - 1

BOSCH WAV28E93 - Replacing door - 2

Caution

Open hinge area!

Finger crushing / entrapment

Do not reach into the hinge area.

Wear protective gloves.

Prerequisite:

√ Appliance is disconnected from power supply. √ Appliance is disconnected from water supply. √ Door is opened.

3.5.1 Removing door

1.

BOSCH WAV28E93 - Removing door - 1

Notice

Risk of falling parts due to released screws!

Damage to other parts of the appliance or at customer's home, e.g., bottom.

- Secure component from falling down.

BOSCH WAV28E93 - Notice - 1

BOSCH WAV28E93 - Notice - 2

Caution

Risk of falling parts due to released screws!

Injury because of falling parts.

▶ Secure component from falling down.

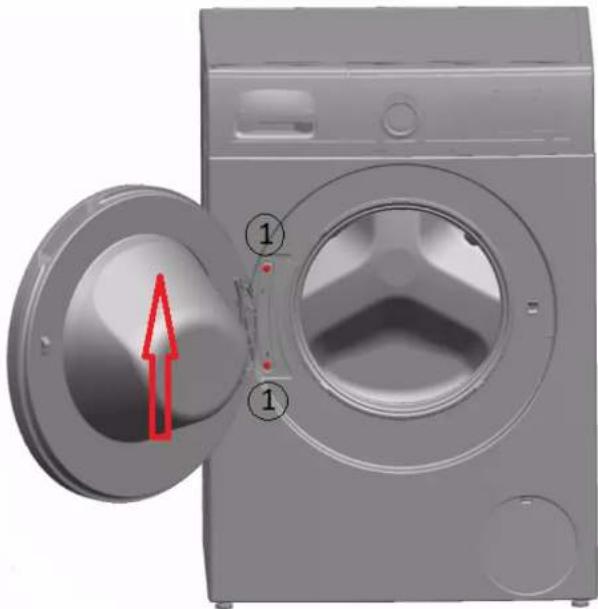
Remove screws (1).

3D rendering of a gray washing machine with a red arrow pointing to the door panel (no text or symbols visible).

  1. Remove door upwards.

Install in reverse order.

BOSCH WAV28E93 - Caution - 2

Repair

3.6 Replacing door components

BOSCH WAV28E93 - Replacing door components - 1

BOSCH WAV28E93 - Replacing door components - 2

Open hinge area

Finger crushing / entrapment

Do not reach into the hinge area.

Wear protective gloves.

Prerequisite:

Appliance is disconnected from power supply. Appliance is disconnected from water supply. Door has been removed. See page 115.

3.6.1 Removing door components

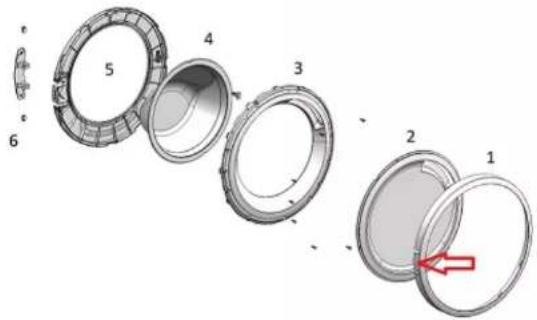
Disassemble door from outside to inside.

Exploded view diagram of a mechanical component with numbered parts and a red arrow indicating a specific section.

3.6.2 Installing door components

Install in reverse order.

BOSCH WAV28E93 - Installing door components - 1

Repair

3.7 Replacing door seal

BOSCH WAV28E93 - Replacing door seal - 1

BOSCH WAV28E93 - Replacing door seal - 2

Sharp housing edges!

Cut injuries

▶ Wear protective gloves.

BOSCH WAV28E93 - Replacing door seal - 3

BOSCH WAV28E93 - Replacing door seal - 4

Risk of falling parts due to released screws!

Injury because of falling parts.

- Secure component from falling down.

BOSCH WAV28E93 - Replacing door seal - 5

BOSCH WAV28E93 - Replacing door seal - 6

Risk of falling parts due to released screws!

Damage to other parts of the appliance or at customer's home e.g. bottom.

- Secure component from falling down.

Prerequisite:

√ Appliance is disconnected from power supply. √ Appliance is disconnected from water supply. Detergent drawer has been removed. → Page 113 √ Door has been removed. → Page 115 √ Pump cover has been removed. → Page 124

Slipping of tilted appliances!

Bone fractures / crush injuries

- Secure appliances against slipping.

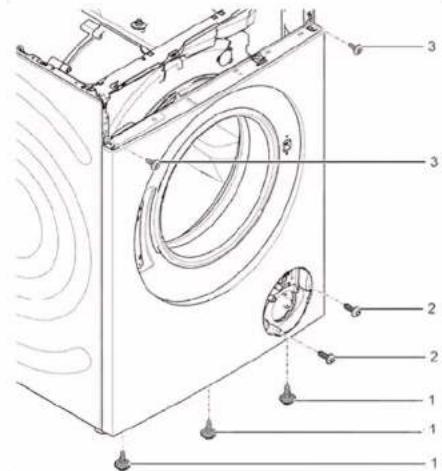
Lift up appliance at front.

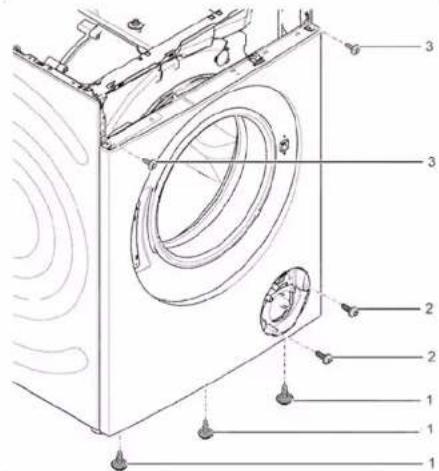
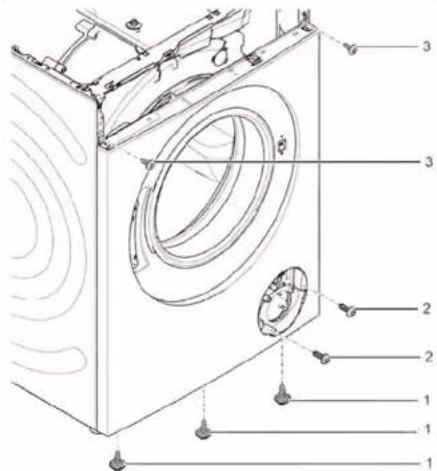
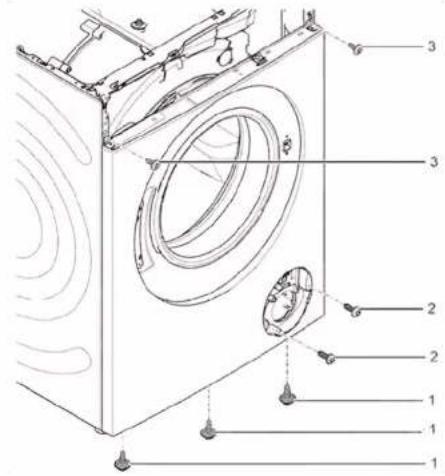
  1. Release screws at bottom of front panel (1).

Technical diagram of a washing machine with numbered components for identification.

  1. Lower appliance down.

BOSCH WAV28E93 - Prerequisite: - 2

Repair

  1. Remove screws in pump area (2). 5. 1. Release screws at back of appliance (1).

Technical diagram of a washing machine with numbered components for identification.

  1. Remove worktop (2, 3).

Diagram showing a washing machine with labeled parts and a close-up of the component being inserted, illustrating mechanical assembly or cleaning process.

BOSCH WAV28E93 - Repair - 3

Repair

  1. Remove screws (1).
  2. Release cat elements of fascia panel (2, 3).
  3. Release screws of dispenser housing.
  4. Release cat elements of fascia panel (2, 3).
  5. Release screws of dispenser housing.

Technical diagram of a washing machine with labeled parts and exploded view.

  1. Remove fascia panel.
  2. Remove drum light holder at top.

Interior view of a washing machine showing internal components like hoses and gauges (no text or labels visible).

  1. BOSCH WAV28E93 - Repair - 3

Notice

Risk of damaged surface!

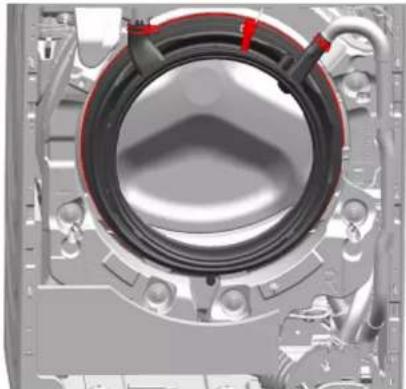
Surface of appliance can be scratched by using wrong tools. ▶ Only use plastic tools to replace the tension ring.

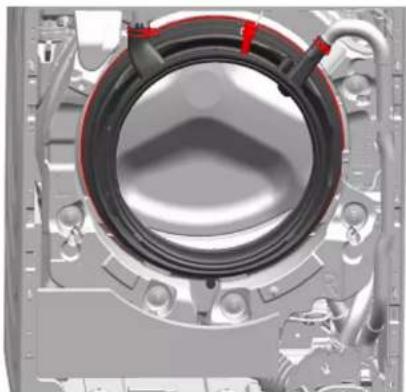
Remove tension ring from gasket with a plastic tool.

  1. Release door seal from front panel.
  2. Release cable connector from door lock.

BOSCH WAV28E93 - Notice - 1

Repair

  1. Release screws on top of front panel (3).

Technical diagram of a washing machine with numbered components and airflow indicators.

  1. Remove front panel.
  2. Release all hose connections.

3D rendering of a mechanical component with concentric rings and mounting brackets (no visible text or symbols).

  1. Remove door seal.

Warning Risk of falling parts due to incorrect installation Injury or damage to the appliance. ▶ Tighten tension ring of boot

▶ Install in reverse order.

BOSCH WAV28E93 - Repair - 3

Repair

3.8 Replacing door lock

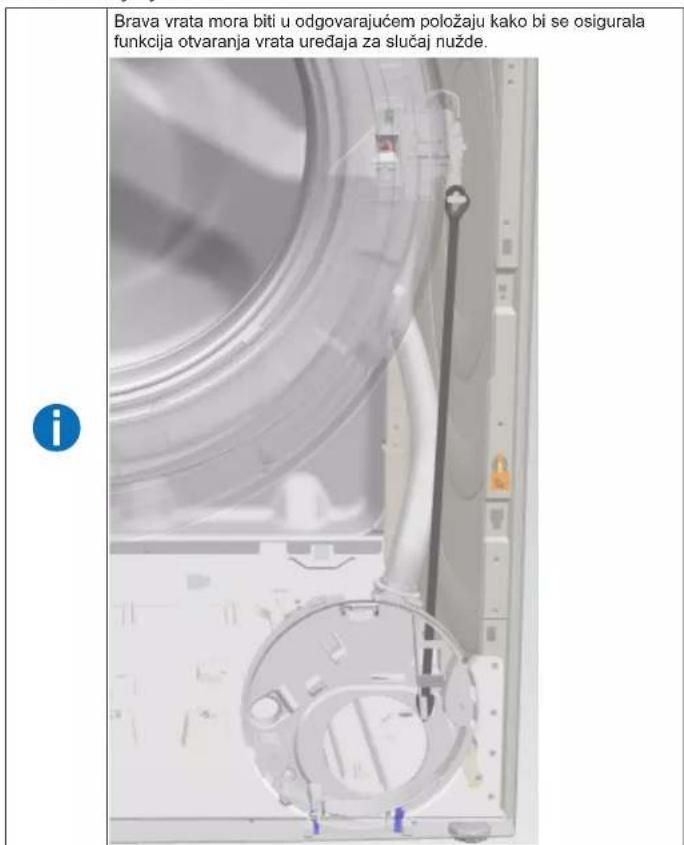
As a manufacturer, we are obliged to provide consumers with the spare part door lock including repair instructions in accordance with Regulation (EU) 2019/2023. However, we would like to point out that after replacing a door lock, an electrotechnical safety test by a qualified electrician is required before the device is put into operation. This person must be verifiably qualified according to the country-specific laws, regulations and standards.

BOSCH WAV28E93 - Replacing door lock - 1

BOSCH WAV28E93 - Replacing door lock - 2

Risk of electric shock due to live parts!

Danger to life through electric shock in case of improper repair

Electric parts should be repaired by qualified electricians.

After the repair have a safety test according to VDE 0701 or country-specific regulations performed.

BOSCH WAV28E93 - Replacing door lock - 3

BOSCH WAV28E93 - Replacing door lock - 4

Sharp housing edges!

Cut injuries

▶ Wear protective gloves.

BOSCH WAV28E93 - Replacing door lock - 5

BOSCH WAV28E93 - Replacing door lock - 6

Slipping of tilted appliances!

Bone fractures / crush injuries

▶ Secure appliances against slipping.

BOSCH WAV28E93 - Replacing door lock - 7

BOSCH WAV28E93 - Replacing door lock - 8

Risk of falling parts due to released screws!

Injury because of falling parts.

- Secure component from falling down.

BOSCH WAV28E93 - Replacing door lock - 9

BOSCH WAV28E93 - Replacing door lock - 10

Risk of falling parts due to released screws!

Damage to other parts of the appliance or at customer's home, e.g., bottom.

- Secure component from falling down.

Prerequisite:

√ Appliance is disconnected from power supply. √ Appliance is disconnected from water supply.

√ Appliance is freely accessible. √ Worktop has been removed. → Page 111 √ Fascia panel has been removed. √ Door has been removed. → Page 115 √ Tension ring has been removed. √ Front panel has been removed. √ Door seal has been removed.

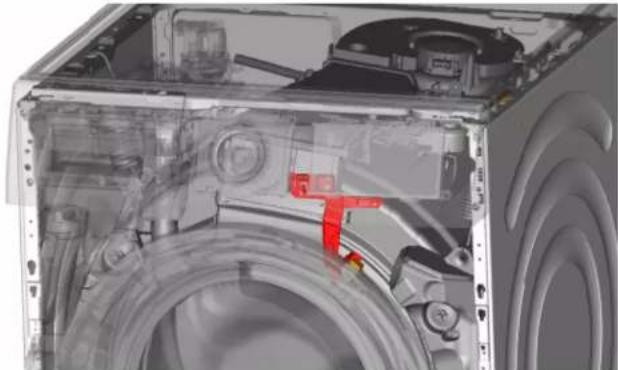
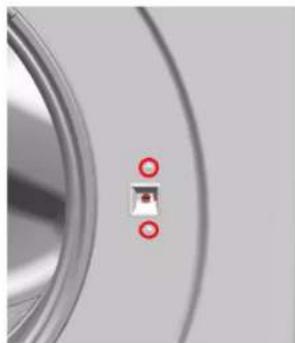
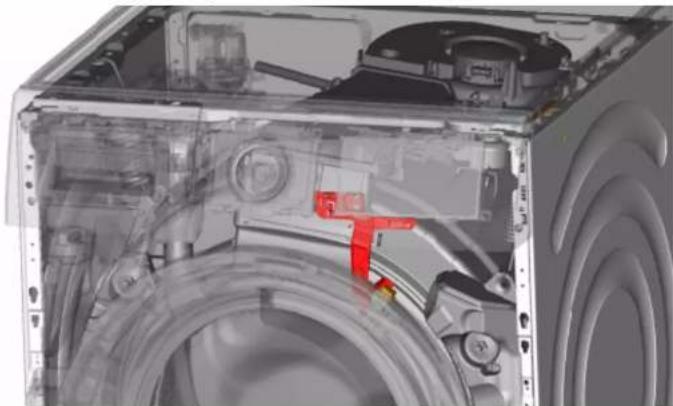
  1. Disconnect door lock plug.
  2. Release door lock.

Close-up of a metallic circular object with two red circular markers on its surface (no text or symbols visible).

  1. Remove door lock.

BOSCH WAV28E93 - Prerequisite: - 2

Repair

▶ Install in reverse order.

BOSCH WAV28E93 - Repair - 1

Repair

3.9 Replacing drum light

BOSCH WAV28E93 - Replacing drum light - 1

BOSCH WAV28E93 - Replacing drum light - 2

Sharp housing edges!

Cut injuries

▶ Wear protective gloves.

BOSCH WAV28E93 - Replacing drum light - 3

BOSCH WAV28E93 - Replacing drum light - 4

Slipping of tilted appliances!

Bone fractures / crush injuries

- Secure appliances against slipping.

BOSCH WAV28E93 - Replacing drum light - 5

BOSCH WAV28E93 - Replacing drum light - 6

Risk of falling parts due to released screws!

Injury because of falling parts.

▶ Secure component from falling down.

BOSCH WAV28E93 - Replacing drum light - 7

BOSCH WAV28E93 - Replacing drum light - 8

Risk of falling parts due to released screws!

Damage to other parts of the appliance or at customers home e.g. bottom.

- Secure component from falling down.

Prerequisite:

√ Appliance is disconnected from power supply. √ Appliance is disconnected from water supply. √ Appliance is freely accessible. √ Worktop has been removed. → Page 111 √ Detergent drawer has been removed. → Page 113 √ Fascia panel has been removed.

3.9.1 Removing drum light

Interior view of a washing machine showing internal components like hoses and gauges (no text or labels visible).

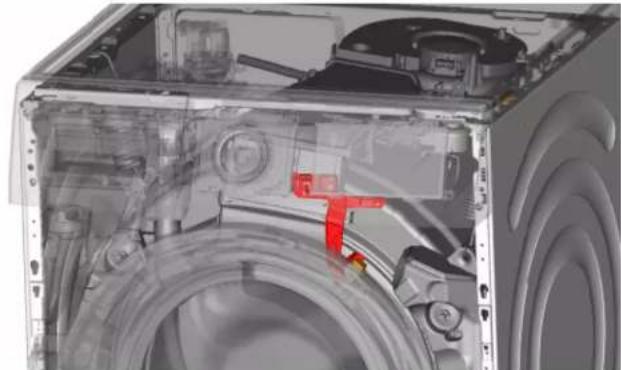
  1. Pull drum light holder out of appliance.
  2. Disconnect electrical connections.
  3. Remove drum light from drum light holder.

3.9.2 Installing drum light

Install in reverse order.

BOSCH WAV28E93 - Installing drum light - 1

Repair

3.10 Replacing pump cover

Prerequisite:

Appliance is disconnected from power supply. Appliance is disconnected from water supply.

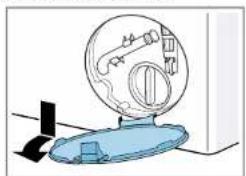
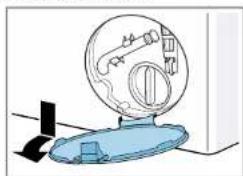
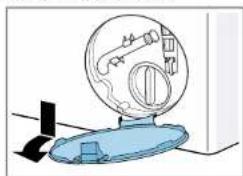
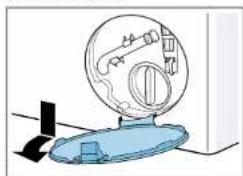
3.10.1 Removing pump cover

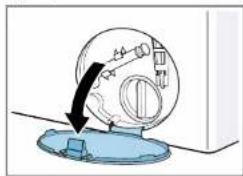
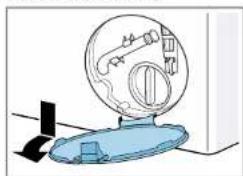
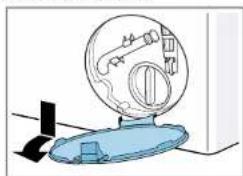
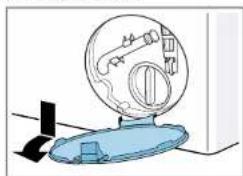
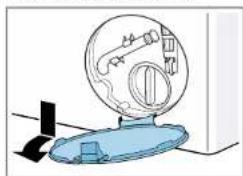
  1. Open pump cover.

Diagram showing a mechanical device interacting with a blue liquid, with an arrow indicating motion (no text or symbols present).

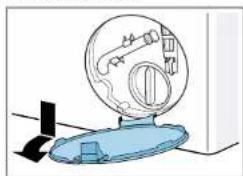
  1. Remove pump cover.

Diagram of a mechanical device with a circular component and a blue base, no visible text or symbols.

3.10.2 Installing pump cover

Install in reverse order.

BOSCH WAV28E93 - Installing pump cover - 1

Repair

3.11 Replacing front panel

BOSCH WAV28E93 - Replacing front panel - 1

BOSCH WAV28E93 - Replacing front panel - 2

Sharp housing edges!

Cut injuries

▶ Wear protective gloves.

Prerequisite:

√ Appliance is disconnected from power supply. √ Appliance is disconnected from water supply. √ Detergent drawer has been removed.→ Page 113 √ Door has been removed.→ Page 115 √ Door seal has been removed. √ Pump cover has been removed.→ Page 124

3.11.1 Removing front panel

1.

BOSCH WAV28E93 - Removing front panel - 1

BOSCH WAV28E93 - Removing front panel - 2

Slipping of tilted appliances!

Bone fractures / crush injuries

- Secure appliances against slipping.

Lift up appliance at front.

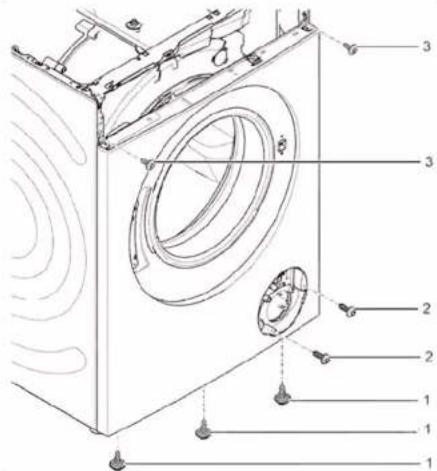
  1. Remove screws at bottom (1).

Technical diagram of a washing machine with numbered components for identification.

  1. Lower appliance down.

BOSCH WAV28E93 - Removing front panel - 4

Repair

  1. Remove screws (1).
  2. Push worktop to the back of the appliance (2).
  3. Move worktop upwards (3) to remove it.

Diagram showing a washing machine with labeled parts and an inset close-up of the component being inserted into a pipe.

  1. Remove screws (1).
  2. Release catch elements (2, 3).

Technical diagram of a washing machine with labeled parts and exploded view.

  1. Remove fascia panel.

7.

BOSCH WAV28E93 - Repair - 3

BOSCH WAV28E93 - Repair - 4

Caution

Risk of falling parts due to released screws! Injury because of falling parts.

▶ Secure component from falling down.

BOSCH WAV28E93 - Repair - 5

Repair

BOSCH WAV28E93 - Repair - 1

Notice

Risk of falling parts due to released screws! Damage to other parts of the appliance or at customer's home e.g. bottom.

▶ Secure component from falling down.

Remove screws at front beginning from bottom to top (2, 3).
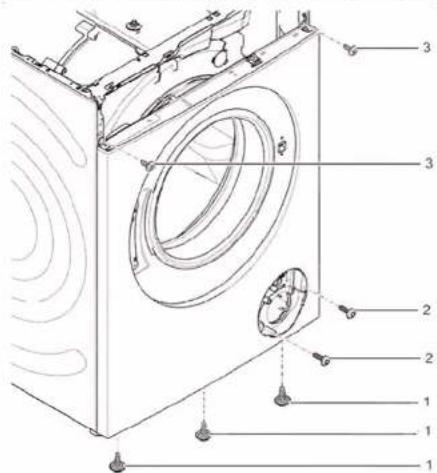
Technical diagram of a washing machine with numbered parts for identification.

  1. Remove front panel.

3.11.2 Installing front panel

▶ Install in reverse order.

▶ Install in reverse order.

BOSCH WAV28E93 - Installing front panel - 1

Repair

3.3.2 Installing the detergent drawer

▶ Install in reverse order.

BOSCH WAV28E93 - Installing the detergent drawer - 1

Repair

3.6.2 Installing the door parts

▶ Install in reverse order.

BOSCH WAV28E93 - Installing the door parts - 1

Repair

  1. Lower the appliance.

BOSCH WAV28E93 - Repair - 1

Repair

BOSCH WAV28E93 - Repair - 1

Repair

  1. BOSCH WAV28E93 - Repair - 1

CAUTION!

  1. Remove the door lock.

BOSCH WAV28E93 - CAUTION! - 1

Repair

  1. Remove the pump cover.

Diagram of a mechanical device with a circular component and a blue base.

3.10.2 Installing the pump cover

▶ Install in reverse order.

BOSCH WAV28E93 - Installing the pump cover - 1

Repair

3.11 Replacing the front panel

BOSCH WAV28E93 - Replacing the front panel - 1

BOSCH WAV28E93 - Replacing the front panel - 2

CAUTION!

  1. Lower the appliance.

BOSCH WAV28E93 - CAUTION! - 1

Repair

  1. Remove the screws (1).
  2. Release the fasteners (2, 3).

Technical diagram of a washing machine with labeled parts and exploded view.

  1. Remove the front panel.

3.11.2 Installing the front panel

3.3.2 Installing the detergent drawer

  1. Lower the machine.

BOSCH WAV28E93 - Installing the detergent drawer - 1

Repair

BOSCH WAV28E93 - Repair - 1

Repair

  1. BOSCH WAV28E93 - Repair - 1

CAUTION!

  1. Remove the door seal.
  1. Remove the pump cover.

Diagram of a mechanical device with a circular component and a blue base, showing internal components (no text or symbols)

  1. Lower the machine.

BOSCH WAV28E93 - CAUTION! - 2

Repair

  1. Remove the screws (1).
  2. Release the locking parts (2, 3).

Technical diagram of a washing machine with labeled parts and an exploded view.

  1. Remove the front panel.

3.11.2 Installing the front panel

BOSCH WAV28E93 - Installing the front panel - 1

Repair

  1. BOSCH WAV28E93 - Repair - 1
  1. Remove the door seal.
  1. Remove the door lock.

BOSCH WAV28E93 - Repair - 2

Repair

BOSCH WAV28E93 - Repair - 1

Repair

  1. BOSCH WAV28E93 - Repair - 1

WARNING

BOSCH WAV28E93 - WARNING - 1

Repair

  1. BOSCH WAV28E93 - Repair - 1

WARNING!

Diagram showing a washing machine with labeled parts and a close-up of the component being inserted, illustrating the process.

BOSCH WAV28E93 - WARNING! - 2

Repair

  1. BOSCH WAV28E93 - Repair - 1

WARNING!

Repair

  1. BOSCH WAV28E93 - Repair - 1

WARNING!

  1. Lower the load.

BOSCH WAV28E93 - WARNING! - 1

Repair

  1. Remove the worktop (2, 3).

Diagram showing a washing machine with labeled parts and a close-up of the component being inserted, illustrating a mechanical or electrical process.

BOSCH WAV28E93 - Repair - 2

Repair

  1. BOSCH WAV28E93 - Repair - 1

WARNING!

  1. Do not vacuum.

Diagram of a mechanical device with a circular component and a blue base, no visible text or symbols

  1. Lower the load.

BOSCH WAV28E93 - WARNING! - 2

Repair

  1. Remove the worktop (2, 3).

Diagram showing a washing machine with labeled parts and an inset close-up of the component being inserted.

BOSCH WAV28E93 - Repair - 2

Repair

  1. BOSCH WAV28E93 - Repair - 1

ATTENTION!

  1. Remove the pump cover.

Diagram of a mechanical device with a circular component and a blue base, no visible text or symbols.

3.10.2 Installing the pump cover

  1. Remove the front panel.

7.

BOSCH WAV28E93 - Installing the pump cover - 1

! WARNING

Risk of parts falling when loosening screws! Falling parts can cause injury.

  1. Disconnect the control unit plug.
  2. Remove the instrument panel.
  1. Lower the appliance.

Repair

  1. Remove the screws in the pump area (2). 5. 1. Loosen the screws on the back of the appliance (1).
Technical diagram of a washing machine with numbered components for identification

Repair

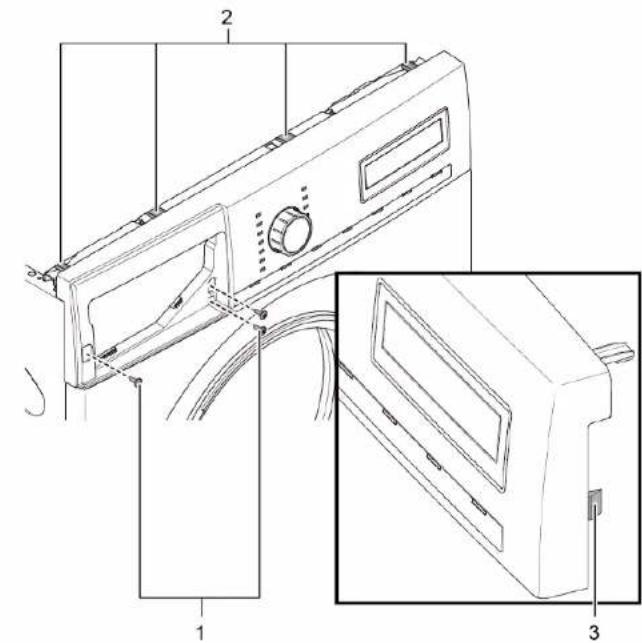
  1. Remove the screws (1).
  2. Release the locking elements of the control panel (2, 3).
  3. Loosen the screws in the dispenser housing.
  4. Release the locking elements of the control panel (2, 3).
  5. Loosen the screws in the dispenser housing.

Technical diagram of a washing machine with labeled parts and exploded view

  1. Remove the control panel.
  2. Remove the drum lamp holder at the top.
Interior view of a washing machine showing internal components like hoses and gauges (no text or symbols visible)

9.

BOSCH WAV28E93 - Repair - 3

Warning!

Risk of damage to the surface!

  1. Remove the front panel.
  2. Loosen all hose connections.

3D rendering of a mechanical component with concentric rings and mounting brackets (no visible text or symbols)

  1. Remove the door lock.

BOSCH WAV28E93 - Warning! - 2

Repair

  1. Remove the pump cover.

Diagram of a mechanical device with a circular component and a blue base, no visible text or symbols

  1. Lower the appliance.

Repair

  1. Remove the screws (1).
  2. Slide the worktop to the back of the appliance (2).
  3. Raise the worktop (3) to remove it.

Diagram showing a washing machine with labeled parts and an inset close-up of the component being inserted into a pipe.

  1. Remove the screws (1).
  2. Loosen the locking elements (2, 3).

Technical diagram of a washing machine with labeled parts and exploded view.

  1. Disassemble the instrument panel.

7.

BOSCH WAV28E93 - Repair - 3

BOSCH WAV28E93 - Repair - 4

CAUTION

  1. Remove the front panel.
  1. Lower the device.

BOSCH WAV28E93 - CAUTION - 1

Repairs

BOSCH WAV28E93 - Repairs - 1

Repairs

9.

BOSCH WAV28E93 - Repairs - 1

NOTE!

  1. Remove the pump cover.

Diagram of a mechanical device with a circular component and a blue base. No visible text or symbols.

  1. Lower the appliance.

BOSCH WAV28E93 - NOTE! - 2

Repairs

3.1.2 Install the dispenser

3.3.2 Install the detergent drawer

  1. Lower the appliance.

BOSCH WAV28E93 - Install the detergent drawer - 1

Repair

Diagram showing a washing machine with labeled parts and a close-up of the component being inserted, marked with arrows.

BOSCH WAV28E93 - Repair - 2

Repair

  1. Remove the screws (1).
  2. Release the snap-in elements of the front panel (2, 3).
  3. Loosen the screws of the dispenser housing.
Technical diagram of a washing machine with labeled parts and exploded view.

9.

BOSCH WAV28E93 - Repair - 2

CAUTION!

  1. Remove the pump cover.

Diagram of a mechanical device with a circular component and a blue base, no visible text or symbols.

3.10.2 Installing the pump cover

  1. Lower the appliance.

BOSCH WAV28E93 - Installing the pump cover - 1

Repair

  1. Remove the screws (1).
  2. Release the locking elements (2, 3).

Technical diagram of a washing machine with labeled parts and exploded view.

  1. Remove the front panel.

7.

BOSCH WAV28E93 - Repair - 2

BOSCH WAV28E93 - Repair - 3

CAUTION

  1. Remove the front panel.

3.11.2 Installing the front panel

3.6.2 Assembling the door components

  1. Lower the appliance.

BOSCH WAV28E93 - Assembling the door components - 1

Repair

BOSCH WAV28E93 - Repair - 1

Repair

  1. BOSCH WAV28E93 - Repair - 1
  1. Lower the appliance.

BOSCH WAV28E93 - Repair - 2

Repair

  1. Insert the control unit plug connector.
  2. Remove the trim panel.

3.2.2 Installing the trim panel

  1. Remove the door by lifting it upwards.

3.5.2 Installing the door

BOSCH WAV28E93 - Installing the door - 1

Repair

  1. Remove the trim panel.
  2. Remove the drum light holder from the top part.
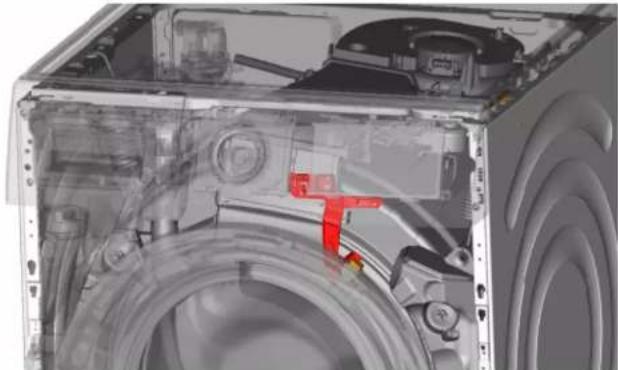
Interior view of a washing machine showing internal components like hoses and gauges (no text or symbols visible).

9.

BOSCH WAV28E93 - Repair - 2

CAUTION!

Risk of damage to the surface!

  1. Remove the door gasket.

BOSCH WAV28E93 - CAUTION! - 1

Repair

  1. Pull out the drum light holder of the appliance.
  2. Disconnect the electrical connections.
  3. Remove the drum light from the drum light holder.
  1. Remove the screws (1).
  2. Release the retaining clips (2, 3).

Technical diagram of a washing machine with labeled parts and exploded view.

  1. Remove the trim panel

7.

BOSCH WAV28E93 - Repair - 2

BOSCH WAV28E93 - Repair - 3

WARNING

  1. Remove the detergent drawer handle.
  1. Remove the door in an upward direction.
  1. Turn on the appliance.

BOSCH WAV28E93 - WARNING - 1

Repair

  1. Remove the work surface (2, 3).

Diagram showing a washing machine with labeled parts and a close-up of the component being inserted, illustrating the process.

BOSCH WAV28E93 - Repair - 2

Repair

  1. Remove the cornice panel.
  2. Remove the drum lamp holder at the top.
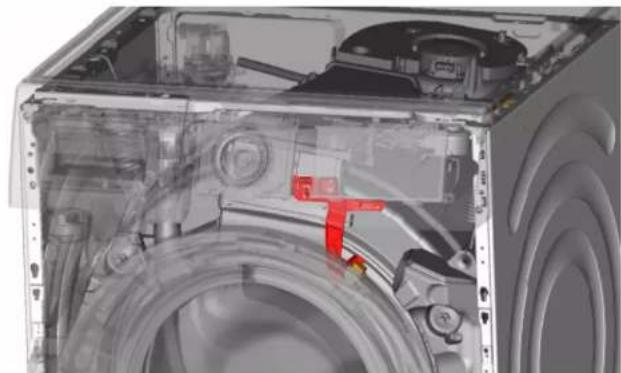
Interior view of a washing machine showing internal components like hoses and gauges (no text or labels visible).

  1. BOSCH WAV28E93 - Repair - 2

WARNING

  1. Remove the door seal.
  1. Remove the door lock.

BOSCH WAV28E93 - WARNING - 1

Repair

  1. Pull the drum lamp holder out of the appliance.
  2. Disconnect the electrical connectors.
  3. Remove the drum lamp from the drum lamp holder.
  1. Turn on the appliance.

BOSCH WAV28E93 - Repair - 1

Repair

  1. Remove the screws (1).
  2. Push the work surface towards the back of the appliance (2).
  3. Move the work surface upwards (3) to remove it.
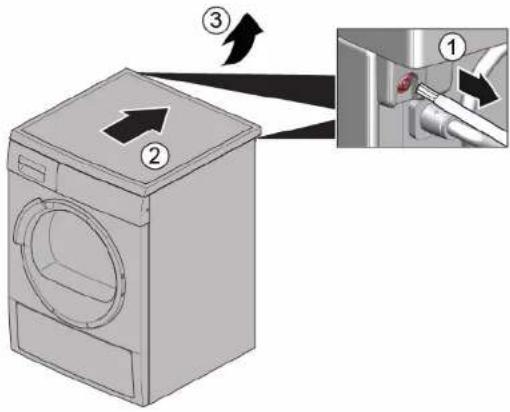
Diagram showing a washing machine with labeled parts and an inset close-up of the component being inserted into a pipe.

  1. Remove the screws (1).
  2. Release the retaining elements (2, 3).
Technical diagram of a washing machine with labeled parts and exploded view.

3.1.2 Mounting the top cover

▶ Mount in reverse order.

BOSCH WAV28E93 - Mounting the top cover - 1

Repair

3.2 Replacing the control panel

BOSCH WAV28E93 - Replacing the control panel - 1

BOSCH WAV28E93 - Replacing the control panel - 2

BOSCH WAV28E93 - Replacing the control panel - 3

BOSCH WAV28E93 - Replacing the control panel - 4

BOSCH WAV28E93 - Replacing the control panel - 5

BOSCH WAV28E93 - Replacing the control panel - 6

BOSCH WAV28E93 - Replacing the control panel - 7

BOSCH WAV28E93 - Replacing the control panel - 8

Requirement:

  1. Lower the device.

BOSCH WAV28E93 - Requirement: - 1

Repair

BOSCH WAV28E93 - Repair - 1

Repair

  1. BOSCH WAV28E93 - Repair - 1

ATTENTION

3.10.2 Mount the pump cover

▶ Mount in reverse order.

BOSCH WAV28E93 - Mount the pump cover - 1

Repair

3.11 Replace the front panel

BOSCH WAV28E93 - Replace the front panel - 1

BOSCH WAV28E93 - Replace the front panel - 2

Requirement:

  1. Lower the device.

BOSCH WAV28E93 - Requirement: - 1

Repair

  1. Disconnect the plug from the control unit.
  2. Remove the control panel.

3.2.2 Mount the control panel

3.6.2 Install the door components

  1. Lower the machine.

BOSCH WAV28E93 - Install the door components - 1

Repair

BOSCH WAV28E93 - Repair - 1

Repair

  1. BOSCH WAV28E93 - Repair - 1

NOTE!

  1. Remove the front panel.
  2. Remove all hose connections.

3D rendering of a mechanical component with concentric rings and mounting brackets (no visible text or symbols).

  1. Remove the door lock.

BOSCH WAV28E93 - NOTE! - 2

Repair

  1. Remove the pump housing.

Diagram of a mechanical device with a circular component and a blue base, no visible text or symbols.

3.10.2 Install the pump housing

  1. Lower the machine.

BOSCH WAV28E93 - Install the pump housing - 1

Repair

  1. Remove the control panel.

7.

BOSCH WAV28E93 - Repair - 1

BOSCH WAV28E93 - Repair - 2

CAUTION!

  1. Remove the front panel.

3.11.2 Mounting the front panel

  1. Lower the device.

BOSCH WAV28E93 - Mounting the front panel - 1

Repair

BOSCH WAV28E93 - Repair - 1

Repair

  1. BOSCH WAV28E93 - Repair - 1

CAUTION!

  1. Lower the device.

BOSCH WAV28E93 - CAUTION! - 1

Repair

  1. Remove the front panel.
Table of contents Click a title to access it
Manual assistant
Powered by Anthropic
Waiting for your message
Product information

Brand : BOSCH

Model : WAV28E93

Category : Washing machine