
SmartRack SR1UPNLTEMP - Room thermometer Tripp Lite - Free user manual and instructions
Find the device manual for free SmartRack SR1UPNLTEMP Tripp Lite in PDF.

| Product Type | Panel-Mount Ambient Thermometer |
| Brand | Tripp Lite |
| Model | SmartRack SR1UPNLTEMP |
| Dimensions (W x H x D) | Approximately 48.3 x 4.4 x 10 cm (19 x 1.75 x 4 in) |
| Weight | Approximately 0.5 kg |
| Power Supply | External power adapter, input 100-240 V AC, output 12 V DC |
| Display Type | LCD Display |
| Temperature Units | Selectable Celsius (°C) or Fahrenheit (°F) |
| Measurement Range | 0 °C to 40 °C (32 °F to 104 °F) |
| Accuracy | ±1 °C typical |
| Probe | External ambient temperature probe |
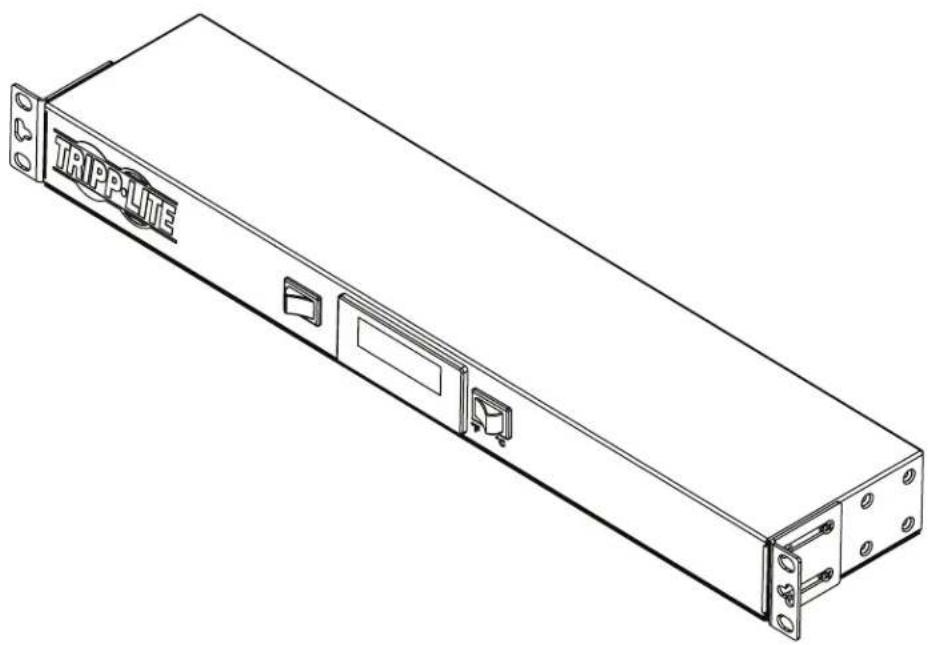
| Mounting | 1U rack mount, front mounting holes |
| Installation Environment | Indoor, technical room or data center, away from moisture and extreme temperatures |
| Power Consumption | Low (power adapter) |
| Maintenance | No maintenance required, do not open |
| Warranty | 2-year limited warranty |
| Included Accessories | Power adapter, temperature probe, mounting hardware |
| Country of Manufacture | China (probably) |
Frequently Asked Questions - SmartRack SR1UPNLTEMP Tripp Lite
User questions about SmartRack SR1UPNLTEMP Tripp Lite
0 question about this device. Answer the ones you know or ask your own.
Ask a new question about this device
Download the instructions for your Room thermometer in PDF format for free! Find your manual SmartRack SR1UPNLTEMP - Tripp Lite and take your electronic device back in hand. On this page are published all the documents necessary for the use of your device. SmartRack SR1UPNLTEMP by Tripp Lite.
USER MANUAL SmartRack SR1UPNLTEMP Tripp Lite
Panel-Mounted Ambient Air Temperature Monitor
Model: SR1UPNLTEMP
Espanol 5 · Francais 9
WARRANTY REGISTRATION
Register your product today and be automatically entered to win an ISOBAR surge protector in our monthly drawing!

triplite.com/warranty


Manufacturing Excellence
1111 W. 35th Street, Chicago, IL 60609 USA · triplite.com/support
Copyright © 2020 Tripp Lite. All rights reserved.
Important Safety Instructions

SAVE THESE INSTRUCTIONS
This manual contains instructions and warnings that must be followed during the installation and operation of the product described in this manual. Read all instructions and warnings thoroughly before attempting installation. Failure to comply may affect the warranty and cause property damage and personal injury.
Connection, Installation and LocationWarnings
- Inspect the shipping container and the unit for shipping damage. Do not use the unit if it is damaged.
This product is designed to be installed in commercial locations, such as IT data racks where only adults are normally present. - Install in a controlled indoor environment, away from moisture, temperature extremes, flammable liquids and gasses, conductive contaminants, dust and direct sunlight.
- For best performance, keep the indoor temperature between 32^ F and 104^ F ( 0^ C and 40^ C).
- Do not attempt to modify or drill holes into the enclosure for mounting. Use the mounting holes provided.
- Install in accordance with National Electrical Codes (220-240V models).
Install in accordance with National Electrical Code standards ANSI/NFPA 70 and Canadian Electrical Code, Part I, C22.1 (120V models).
To reduce the risk of fire, connect only to a circuit provided with branch circuit overcurrent protection in accordance with the National Electrical Code, ANSI/NFPA 70 and the Canadian Electrical Code, Part I, C22.1 (120V models). - Be sure to use maximum 16A overcurrent protection, in accordance with the plug/equipment rating, for the installation (220-240V models).
- Be sure to use maximum 20A overcurrent protection, in accordance with the plug/equipment rating, for the installation (120V models).
- The equipment must be connected to an earthed ground mains outlet.
- Securely fasten the fans in place with screws.
- When using tools, use eye protection and follow all other safety precautions recommended by the tool manufacturer and required by applicable regulations.
- This product does not require routine maintenance. Do not open the unit for any reason.
- Use of this equipment in life support applications where failure of this equipment can reasonably be expected to cause failure of the life support equipment or to significantly affect its safety or effectiveness is not recommended.
Explanation of Symbols
| ! | Caution, Risk of Danger |
| Caution, Moving Fan Blades |
Installation
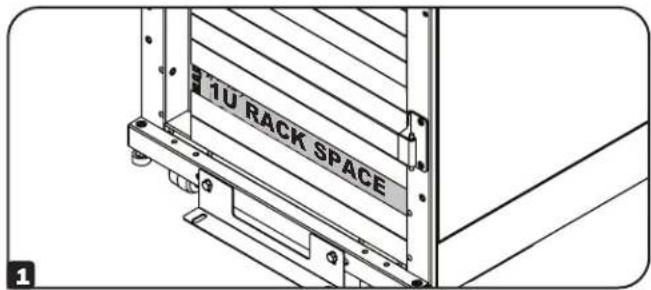
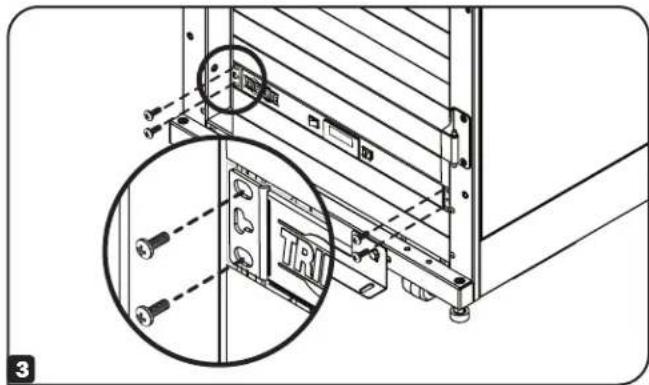
1 Identify the desired 1U space within a rack enclosure to mount the fan unit.
Align the mounting ears located on the front panel of the unit with the rack enclosure's front vertical mounting holes.
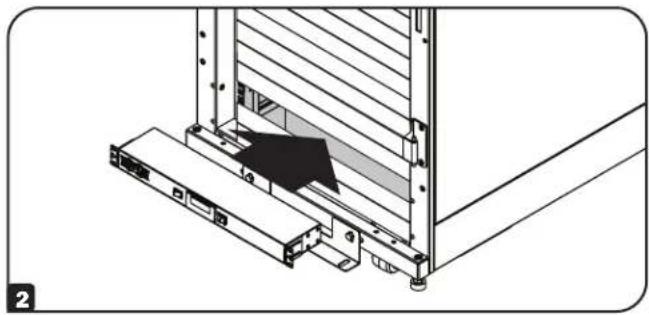
3 Attach and secure the unit to the rack enclosure with user-supplied hardware.
Note: The user must determine the fitness of hardware before mounting. If hardware and procedures are not suitable for your application, contact the manufacturer of your rack or rack enclosure for a solution.
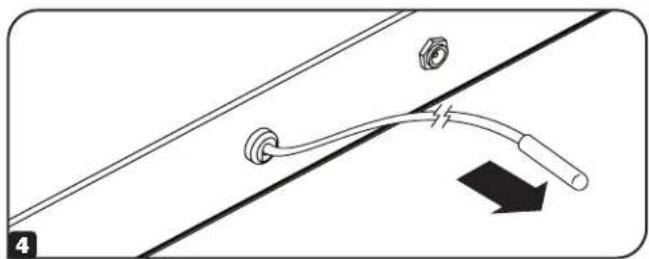
4 Install the ambient air sensor where it will sample an average air temperature.
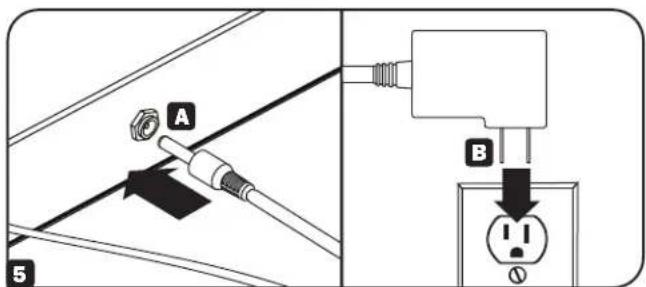
5 Connect the power adapter plug to the unit A, then plug the power supply into a power source that supports a NEMA 5-15P plug, such as a wall outlet, power distribution unit (PDU) or uninterruptible power supply (UPS) B.
Installation
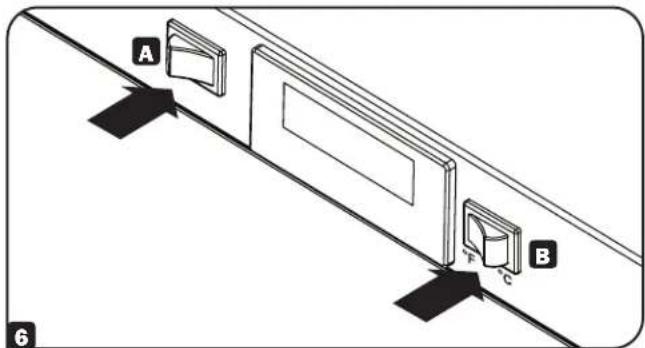
6 To turn on the unit, push the rocker switch A located on the front of the unit. The air temperature will display on the LCD. To switch from Fahrenheit and Celsius units, press the rocker switch B on the front of the unit.
Warranty and Product Registration
2-Year Limited Warranty
Sellw r t f 2 10
THIS WARRANTY DOES NOT APPLY TO NORMAL WEAR OR TO DAMAGE RESULTING FROM ACCIDENT, MISUSE, ABUSE OR NEGLECT. SELLER MAKES NO EXPRESS WARRANTIES OTHER THAN THE WARRANTY EXPRESSLY SET FORTH HEREIN, EXCEPT TO THE EXTENT PROHIBITED BY APPLICABLE LAW, ALL IMPLIED WARRANTYES, INCLUDING ALL WARRANTYES OF MERCHANTABILITY OR FITNESS, ARE LIMITED IN DURATION TO THE WARRANTY PERIOD SET FORTH ABOVE; AND THIS WARRANTY EXPRESSLY EXCUSES ALL INCIDENTAL AND CONSEQUENTIAL DAMAGES. (Some states do not allow limitations on how long an implied warranty lasts, and some states do not allow the exclusion or limitation of incidental or consequential damages, so the above limitations or exclusions may not apply to you. This warranty gives you specific legal rights, and you may have other rights which vary from jurisdiction to jurisdiction).
WARNING: The individual user should take care to determine prior to use whether this device is suitable, adequate or safe for the use intended. Since individual applications are subject to great variation, the manufacturer makes no representation or warranty as to the suitability or fitness of these devices for any specific application.
Product Registration
Visit triplite.com/warranty today to register your new Tripp Lite product. You'll be automatically entered into a drawing for a chance to win a FREE Tripp Lite product!* No purchase necessary. Void where prohibited. Some restrictions apply. See website for details.
Tripp Lite has a policy of continuous improvement. Specifications are subject to change without notice. Photos and illustrations may differ slightly from actual products.


Manufacturing Excellence.
1111 West 35th Street, Chicago, IL 60609 USA · triplite.com/support
Brand : Tripp Lite
Model : SmartRack SR1UPNLTEMP
Category : Room thermometer