HWCB 60D UKSSMN - Beverage fridge HOOVER - Free user manual and instructions
Find the device manual for free HWCB 60D UKSSMN HOOVER in PDF.

User questions about HWCB 60D UKSSMN HOOVER
0 question about this device. Answer the ones you know or ask your own.
Ask a new question about this device
Download the instructions for your Beverage fridge in PDF format for free! Find your manual HWCB 60D UKSSMN - HOOVER and take your electronic device back in hand. On this page are published all the documents necessary for the use of your device. HWCB 60D UKSSMN by HOOVER.
USER MANUAL HWCB 60D UKSSMN HOOVER
Thank you for purchasing this product.
Before using your refrigerator, please carefully read this instruction manual in order to maximize its performance. Store all documentation for subsequent use or for other owners. This product is intended solely for household use or similar applications such as:
- the kitchen area for personnel in shops, offices and other working environments
- on farms, by clientele of hotels, motels and other environments of a residential type
- at bed and breakfasts (B & B)
- for catering services and similar applications not for retail sale.
This appliance must be used only for purposes of storage of food, any other use is considered dangerous and the manufacturer will not be responsible for any omissions. Also, it is recommended that you take note of the warranty conditions.
SAFETY INFORMATION
Please read the operating and installation instructions carefully!
They contain important information on how to install, use and maintain the appliance.
The manufacturer is not liable if you fail to comply with the instructions and warnings.
Retain all documents for subsequent use or for the next owner.
- Do not connect the appliance to the electricity supply until all packing and transit protectors have been removed. Keep children away from packaging and its parts.
Danger of suffocation from folding cartons and plastic film!
- Leave to stand for at least 4 hours before switching on the product, to allow compressor oil to settle if transported horizontally.
• Make sure there is no transport damage.
- Do not damage the refrigerant circuit.
- Maintain the ventilation openings in the appliance enclosure or in the built-in structure, free of obstruction.
- Never use water to wash the compressor position, wipe it with a dry cloth thoroughly after cleaning to prevent rust.
- Handle the appliance always with at least two persons because it is heavy.
- Install and level the appliance in an area suitable for its size and use.
- Make sure that the electrical information on the rating plate agrees with the power supply. If it does not, contact an electrician.
- The appliance is operated by a 220-240 VAC/50 Hz power supply. Abnormal voltage fluctuation may cause the appliance to fail to start, or damage to the temperature control or compressor, or there may be an abnormal noise when operating. In such case, an automatic regulator shall be mounted.
- Only for UK: The appliance's power cable is fitted with 3-cord
(grounding) plug that fits a standard 3-cord (grounded) socket. Never cut off or dismount the third pin (grounding). After the appliance is installed, the plug should be accessible.
- Make sure that mains cable is not caught under the appliance during and after carrying/moving the appliance, to avoid the mains cable becoming cut or damaged. If the supply cord is damaged, it must be replaced by the manufacturer, its service agent or similarly qualified person in order to avoid a hazard.
- Do not install the appliance in humid, oily or dusty places, nor expose it to direct sunlight and to water.
- Do not install the appliance near heaters or inflammable materials.
- FOR appliances with a freezer compartment: if there is a power failure do not open the lid. Frozen food should not be affected if the failure lasts for less than the hours indicated on the rating label (Temperature rise time). If the failure is longer, then the food should be checked and eaten immediately or cooked and then refrozen.
- If you find that the lid of the appliance is difficult to open just after you have closed it, don’t worry. This is due to the pressure difference which will equalize and allow the lid to be opened normally after a few minutes.
- Do not store medicines, bacteria or chemical agents in the appliance. This appliance is a household appliance, it is not recommended to store materials that require strict temperatures.
- Do not excessively pull or fold the power cord or touch the plug with wet hands.
- Do not store products which contain flammable propellant (e.g. spray cans) or explosive substances in the appliance. Risk of explosion!
- Do not place unstable articles (heavy objects, containers filled with water) on top of the refrigerator, to ovoid personal injury caused by falling or electric shock caused by contact with water.
- Do not use electrical appliances inside the food storage compartments, unless they are of the type recommended by the manufacturer.
- Do not touch internal cooling elements, especially with wet hands, to avoid cracks or injuries.
- At risk here are children, people who have limited physical, mental or sensory abilities, as well as people who have inadequate knowledge concerning safe operation of the appliance.
- Check that children and vulnerable people have understood the hazards. A person responsible for safety must supervise or instruct children and vulnerable people who are using the appliance. Only
children aged 8 years and above may use the appliance.
• Children should not play with the appliance.
- Children aged from 3 to 8 years are allowed to load and unload this appliance.
- FOR appliances with a freezer compartment: do not store bottled or canned liquids (especially carbonated drinks) in the freezer compartment. Bottles and cans may burst!
- FOR appliances with a freezer compartment: never put frozen food straight from the freezer compartment in your mouth. Risk of low-temperature burns!
- Keep plastic parts and the door seal free of oil and grease. Otherwise, plastic parts and the door seal will become porous.
- Before performing any operation, unplug the power cord from the power socket.
- Do not use mechanical devices or other means to accelerate the defrosting process, other than those recommended by the manufacturer.
- Do not use pointed or sharp-edged objects such as knives or forks to remove the frost.
- Never use hairdryers, electrical heaters or other such electrical appliances for defrosting.
- It is recommended to keep the plug clean, any excessive dust residues on the plug can be the cause fire.
- Do not try to repair, disassemble or modify the appliance by yourself. In case of repair please contact always our customer service.
- Supervise children while the appliance is being cleaned or maintained.
- Do not clean the cold glass shelves with hot water. Sudden temperature change may cause the glass to break.
- WARNING: The tubes of the refrigeration circuit convey a small quantity of an environmentally friendly but flammable refrigerant (R600a) and insulating gas (cyclopentane). It does not damage the ozone layer and does not increase the greenhouse effect. If refrigerant escapes, it may injure your eyes or ignite.
- If the refrigerant circuit should be damaged:
- Switch off the appliance and pull out the mains plug,
- Keep naked flames and/or ignition sources away from the appliance,
- Thoroughly ventilate the room for several minutes,
- Inform customer service.
- WARNING: Do not damage the plug and/or the power cord; this could cause electrical shocks or fires.
- WARNING: Do not use multiple portable socket-outlets or portable power supplies. We do not recommend the use of extension leads and multi-way adapters.
- Do not attempt to sit or stand on the top of the appliance. You could injure yourself or damage it. This appliance is not designed for stacking with any other ones.
- The product is designed and built for domestic household use only.
- Only original parts supplied by the manufacturer may be used. The manufacturer guarantees that only these parts satisfy the safety requirements.
- Opening the door for long periods can cause a significant increase of the temperature in the compartments of the appliance.
-Clean regularly surfaces that can come in contact with food and accessible drainage systems.
- Clean water tanks if they have not been used for 48h; flush the water system connected to a water supply if water has not been drawn for 5 days.
-Store raw meat and fish in suitable containers in the refrigerator, so that it is not in contact with or drip onto other food.
- Two-star frozen-food compartments(if they are presented in the appliance) are suitable for storing pre-frozen food, storing or making ice-cream and making ice cubes.
-One-, two- and three -star compartments, if present in the appliance, are not suitable for the freezing of fresh food.
- If the appliance is left empty for long periods, switch off, defrost, clean, dry and leave the door open to prevent mould developing within the appliance.
- FOR Wine Coolers: this appliance is intended to be used exclusively for the storage of wine
- FOR a free standing appliance: this refrigerating appliance is not intended to be used as a built-in appliance
- FOR appliances without a 4-star compartment: this refrigerating appliance is not suitable for freezing foodstuffs
Scrapping old appliances
This appliance is marked according to the European directive 2012/19/EU on Waste Electrical and Electronic Equipment (WEEE).
WEEE contains both polluting substances (which can cause negative consequences for the environment) and basic components (which can be re-used). It is important to have WEEE subjected to specific treatments, in order to remove and dispose properly all pollutants, and recover and recycle all materials.
Individuals can play an important role in ensuring that WEEE does not become an environmental issue; it is essential to follow some basic rules:
- WEEE should not be treated as household waste;
- WEEE should be handed over to the relevant collection points managed by the municipality or by registered companies. In many countries, for large WEEE, home collection could be present.
In many countries, when you buy a new appliance, the old one may be returned to the retailer who has to collect it free of charge on a one-to-one basis, as long as the equipment is of equivalent type and has the same functions as the supplied equipment.
Conformity
By placing the C€ mark on this product, we are confirming compliance to all relevant European safety, health and environmental requirements which are applicable in legislation for this product.
Guarantee
Minimum guarantee is: 2 years for EU Countries, 3 years for Turkey, 1 year for UK, 1 year for Russia, 3 years for Sweden, 2 years for Serbia, 5 years for Norway, 1 year for Morocco, 6 months for Algeria, Tunisia no legal warranty required.
Energy Saving
For better energy saving we suggest :
- Installing the appliance away from heat sources and not exposed to direct sunlight and in a well ventilated roo.
- Avoid putting hot food into the refrigerator to avoid increasing the internal temperature and therefore causing continuos functionaliting of the compressor.
- Do not excessively stuff foods so as to ensure proper air circulation.
- Defrost the appliance in case there is ice to facilitate the transfer of cold.
• In case of absence of electrical energy, it is advisable to keep the refrigerator door closed. - Open or keep the doors of the appliance open as little as possible
- Avoid adjusting the setting to temperatures too cold.
- Remove dust present on the rear of the appliance
Replaceable (LED only) light source by a professional
This product contains a light source of energy efficiency class G.
INSTALLATION INSTRUCTIONS
Before Using Your Wine cooler
- Remove the exterior and interior packing.
- Before connecting the Wine cooler to the power source, let it stand upright for approximately 2 hours. This will reduce the possibility of a malfunction in the cooling system from handling during transportation.
- Clean the interior surface with lukewarm water using a soft cloth.
- When disposing your appliance, please choose an authorized disposal site.
Installation of Your Wine Cooler
- This appliance is designed to be for free standing installation or built-in (fully recessed) (Refer to sticker location the back of this appliance).
• This appliance is intended to be used exclusively for the storage of wine or beverages. - Place your Wine cooler on a floor that is strong enough to support it when it is fully loaded. To level your Wine cooler, adjust the front leveling leg at the bottom of the Wine cooler.
- This appliance is using flammability refrigerant. So never damage the cooling pipework during the transportation. Locate the Wine cooler away from direct sunlight and sources of heat (stove, heater, radiator, etc.). Direct sunlight may affect the acrylic coating and heat sources may increase electrical consumption. Extreme cold ambient temperatures may also cause the unit not to perform properly.
- Avoid locating the unit in moist areas.
- Plug the Wine cooler into an exclusive, properly installed-grounded wall outlet. Do not under any circumstances cut or remove the third (ground) prong from the power cord. Any questions concerning power and/or grounding should be directed toward a certified electrician or an authorized Products service center.
Attention
• Store wine in sealed bottles;
- Do not overload the cabinet;
- Do not open the door unless necessary;
- Do not cover shelves with aluminum foil or any other shelf material which may prevent air circulation;
- Should the Wine cooler be stored without use for long periods it is suggested, after a careful cleaning, to leave the door ajar to allow air to circulate inside the cabinet in order to avoid possible formations of condensation, mold or odors.
Ambient Room Temperature Limits
This appliance is designed to operate in ambient temperatures specified by its temperature class marked on the rating plate.
- extended temperate (SN): 'this refrigerating appliance is intended to be used at ambient temperatures ranging from 10 °C to 32 °C';
- temperate (N): 'this refrigerating appliance is intended to be used at ambient temperatures ranging from 16 °C to 32 °C';
- subtropical (ST): 'this refrigerating appliance is intended to be used at ambient temperatures ranging from 16 °C to 38 °C';
OPERATING YOUR WINE COOLER/BEVERAGE COOLER AND SETTING THE TEMPERATURE CONTROL
Control System Instruction

- “ ” Button
To control this appliance turn on/off ( press and hold this buttons for approximately 3 seconds).
- “ ” Button
To control the inner light turn on/off.
- “ △ ” Button
To set the temperature of the upper chamber.
- “ ▽ ” Button
To set the temperature of the lower chamber.
• LED display window on the left
To set the temperature of the upper chamber.
• LED display window on the right
To set the temperature of the lower chamber.
- indicator light
Compressor in operation display.
Setting The Temperature Controls
- When pressing “△” or “▽” button, the system will be entering the set up mode in the upper or lower compartment automatically. The LED will flashing and display the setting temperature.
Press once the button, the temperature will decrease or increase 1 °C. When exceeding the minimum value that can be established, it will jump to the highest adjustable temperature value automatically. After stopping pressing the button for 5 seconds, LED figure will stop flash, then revert back to display the temperature of the upper or lower compartment.
- After the unit is unplugged, the system will return to acquiescence temperature, which setting by factory. The acquiescence temperature as below:
Upper compartment: 6 °C
Lower compartment: 12 °C
- If want reveal every indoor setting temperature, please corresponding to press "Set Upper" or "Set Lower" button, the LED will flash and display the setting temperature. After stopping pressing the button for 5 seconds, LED figure will stop flash, then revert back to display the actual temperature.
Upper compartment: The temperature setting can be adjusted from 5^ C to 10^ C.
Lower compartment: The temperature setting can be adjusted from 10^ C to 18^ C.
Temperature Alarm
If the temperature inside is higher than 23 °C, it will display "HI" on the display panel, and after one hour after the alarm / buzzer will sound. This indicates that the temperature inside is too high. If the temperature inside is lower than 0 °C, it will display "LO" on the display panel and at the same time the alarm also malfunction indicator is active
Temperature Recollection Function
In the event of a power interruption, wine chiller can remember the previous temperature settings, and when the power is recovery, the cooler temperature will go back the same setting temperature as power off.
Internal light
In order to reduce energy consumption, this wine cabinet will automatically switch off the LED lights after 10 minutes.
If you want the LED light to remain on continuously, this is possible. Please press and hold the "LIGHT" button for 5 seconds, the display will show "LP". After 4 seconds the display will revert back to normal and the light will remain on until manually switched off.
If you want to revert back and conserve energy (recommended), please press and hold the "LIGHT" button for 5 second, the display will show "LF", after 4 seconds the display will revert back to normal, and the light will automatically switch off after 10 minutes.
Shelves
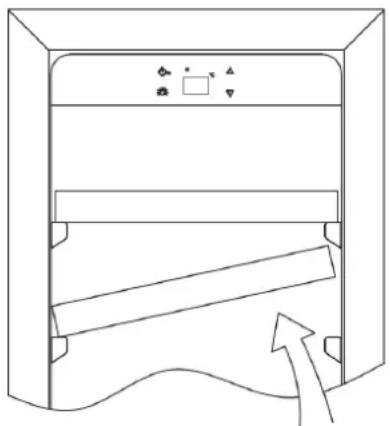
- To prevent damaging the door gasket, make sure to have the door all the way opened when pulling shelves out of the rail compartment.
- For easy access to the storage content, you must pull the shelves approximately 1/3 out of the rail compartment, however this unit was designed with a notch on each sides of the shelf tracks to prevent bottles from falling.
- When removing any of these shelves out of the rail compartment, To fit or remove the shelf, tilt the shelf as per the diagram and simply pull out, or push in the shelf until it sits on the support brackets securely.
NOTE:
- If the unit is unplugged, power lost, or turned off, you must wait 3 to 5 minutes before restarting the unit. If you attempt to restart before this time delay, the Wine cooler/beverage cooler will not start.
- When you use the Wine cooler/beverage cooler for the first time or restart the Wine cooler/beverage cooler after having been shut off for a long time, there could be a few degrees variance between the temperature you select and the one indicated on the LED readout. This is normal and it is due to the length of the activation time. Once the Wine cooler/beverage cooler is running for a few hours everything will be back to normal.
natural_image
Line drawing of a mechanical device with a handle and internal components, no text or symbols present
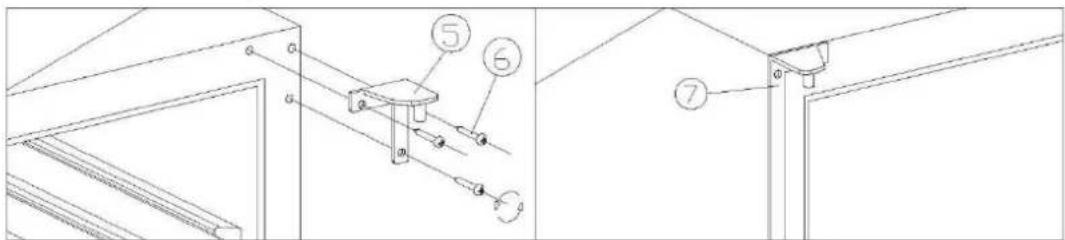
How to change the door opening
This appliance has reversible doors but is delivered with a right hinged door. The left hand hinge kit comes with the unit (in the box), should you wish to reverse the hinge on your unit.
Type A (for full glass/stainless steel door)
-
Lower hinge (Right) 2. Screws 3. Door axis
-
Door 5. Top hinge (Right) 6. Hinge Screws
-
Top hinge (Left)
-
Hole cover
-
Lower hinge (Left)
-
Door limit device 11. Screw
-
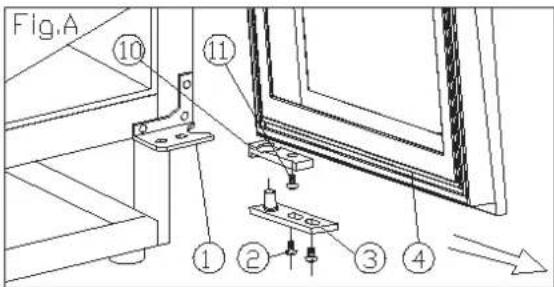
Open the door to a 90 degrees angle, take out the 2 screws (2) from lower door axis (3), remove the door (4), Remove the axis plate (3) from the door, (Fig. A).
- Unscrew the screw (11) located underneath the doorframe and the limit device (10), and relocate it at left end side of the door frame. (Fig. A/B)
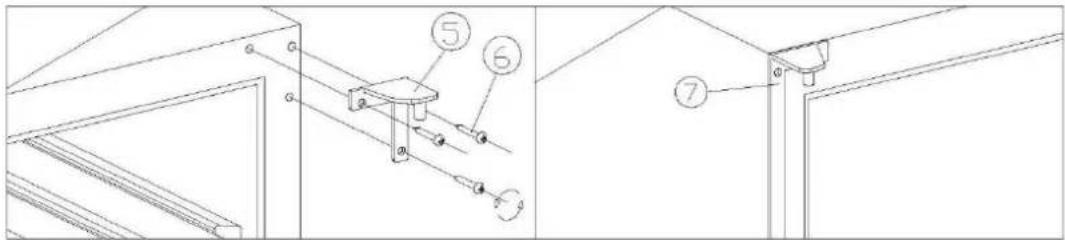
- Take out the 3 hinge screws (6) from the top hinge (right) (5) and remove it. (Fig. C)
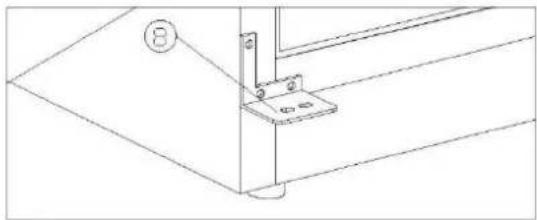
- Remove decorative nail (8) from left top of cabinet and install spare top hinge (Left) (7) at left top of cabinet with 3 screws. (Fig. D)
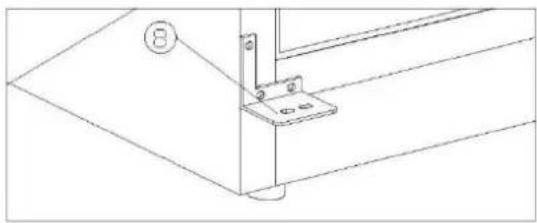
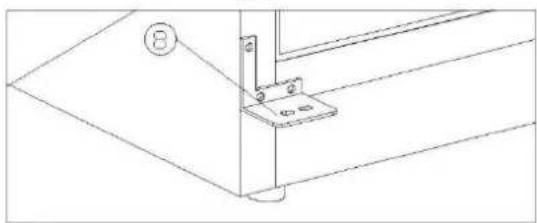
- Following the above procedure, install the spare lower hinge to the left (9). (Fig. E)
- Install and aligned the door.
- Insert the plastic caps to cover the holes(8)
text_image
Fig.A ⑩ ⑪ ① ② ③ ④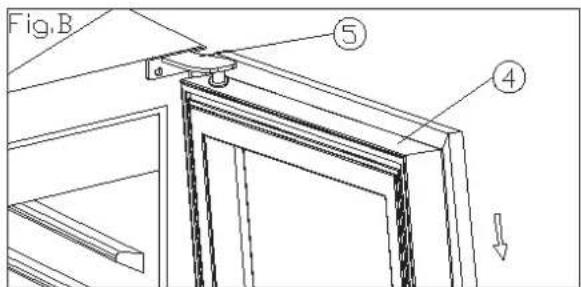
text_image
Fig.B ⑤ ④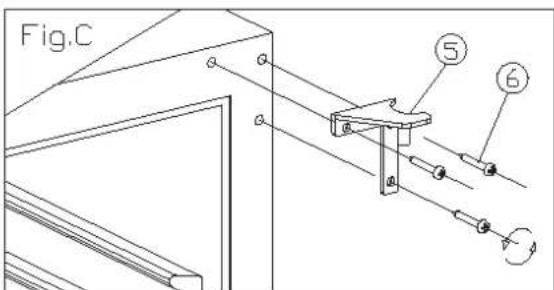
text_image
Fig.C ⑤ ⑥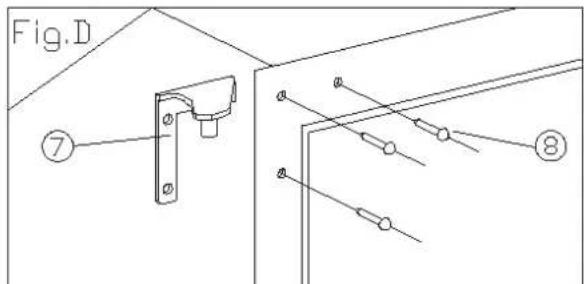
text_image
Fig.D ⑦ ⑧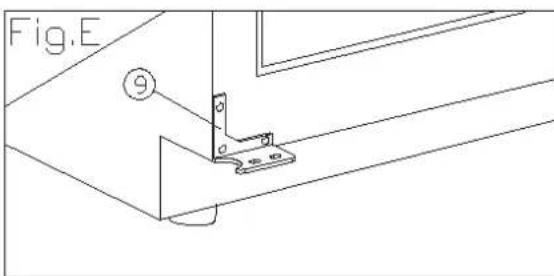
text_image
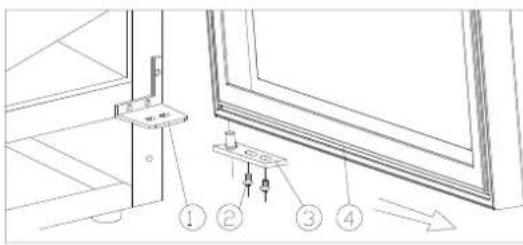
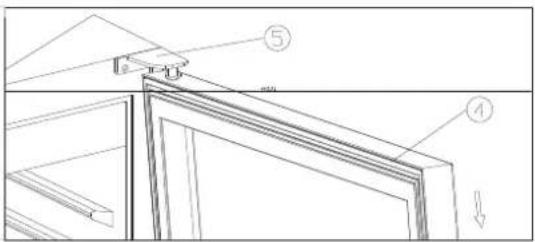
Fig.E ⑨Type B (for slim stainless steel door)
- Bottom hinge (Right)
- Screws
- Door axis
2.4. Door - Top hinge(Right)
- screws
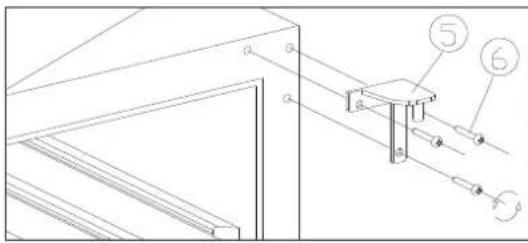
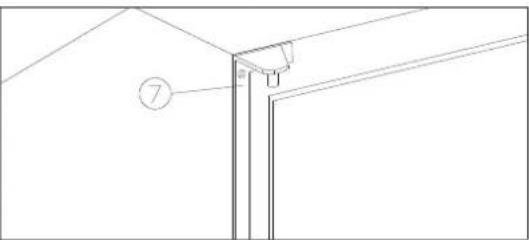
- Top hinge(Left)
- Bottom hinge (Left)
A
text_image
Technical diagram showing a window with labeled components and directional arrows indicating assembly or installation steps.B
text_image
Technical diagram showing labeled components of a door frame assembly with numbered parts and directional arrowC
text_image
Technical diagram showing structural components with numbered labels 5 and 6, likely from an engineering or mechanical drawing.E
natural_image
Architectural line drawing of a corner detail with a numbered label (7), no text or symbols presentE
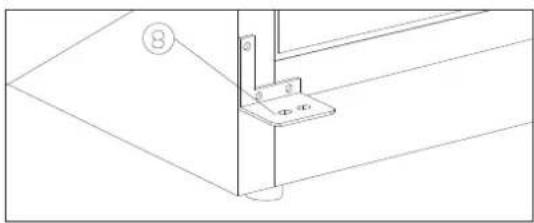
natural_image
Technical line drawing of a corner bracket assembly with mounting holes and a numbered detail (no text or symbols)- Remove 2 screws(1), then pulldoor(4) as per arrowhead direction, You will remove the door. Please remove bottom hinge (Right) (1) as well for the assembly. (Fig.A & Fig.B)
- To remove 3 screws(6) of right upper Hinge, then to remove right upper(5) & Right bottom hinges(1). (See fig.C)
- To use the screws which you removed From right side hinges to fix left upper& bottom hinges(7)(8). (See Fig.D & Fig.E)
- To rotate door at 180 degrees, then assemble the door as per the reverse way of remove
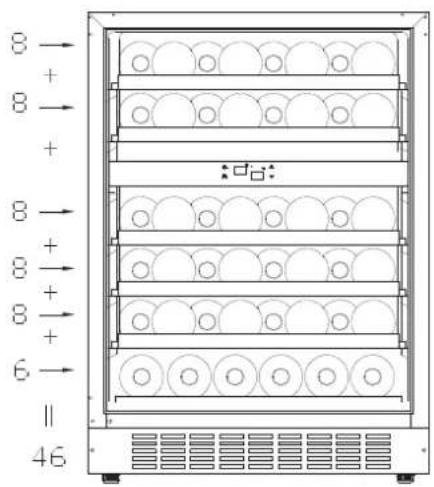
Storage diagram
According to the actual configuration of your product, please check the relative Storage diagram.
Total: 46 bottles (Max)
text_image
8 → 8 + - + + 8 → 8 + - 8 + - 6 → = 46 □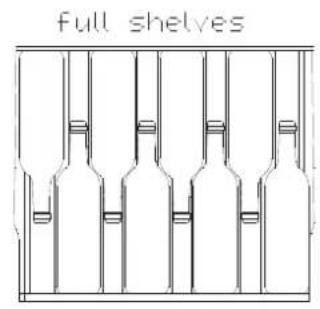
text_image
full shelves
text_image
Half shelves Ø76.4 300.5The most energy-saving configuration requires shelves to be positioned in the product, please refer to the above pictures.
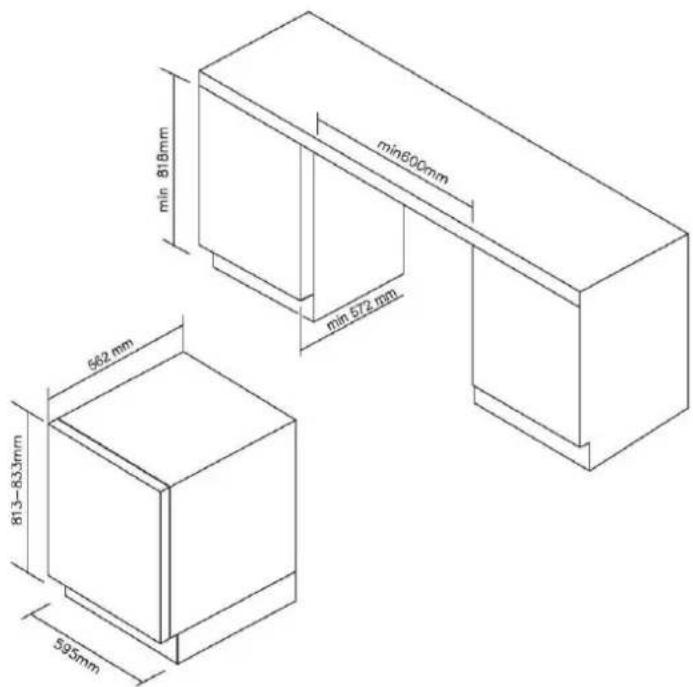
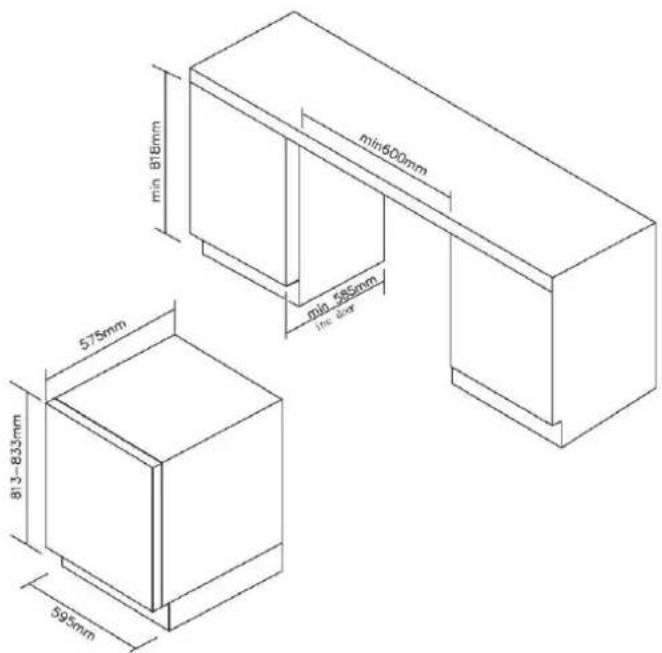
➢ Installation specifications for built-in purposes For height 813mm with full glass/stainless steel door
text_image
min 818mm min600mm min 672 mm 662 mm 813-833mm 595mmFor height 813 with slim stainless steel door
text_image
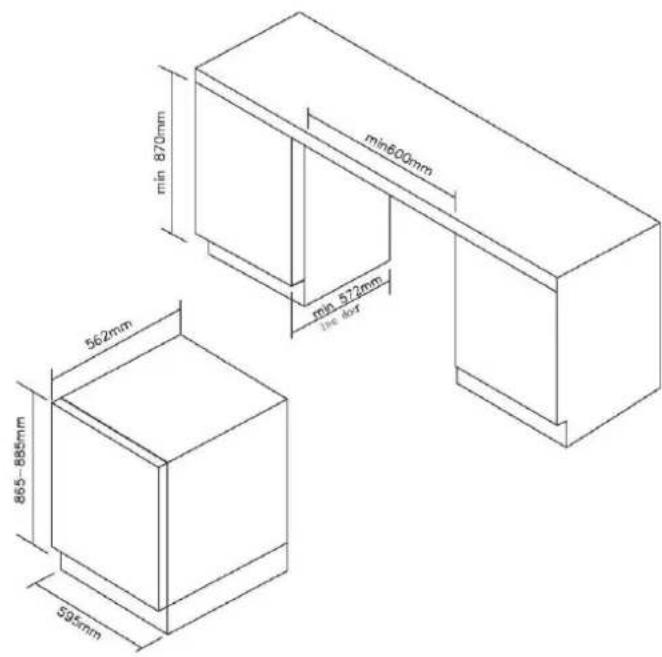
min 818mm min 600mm 575mm 813-833mm 595mm min 585mm the doorFor height 865mm with full glass/stainless steel door
text_image
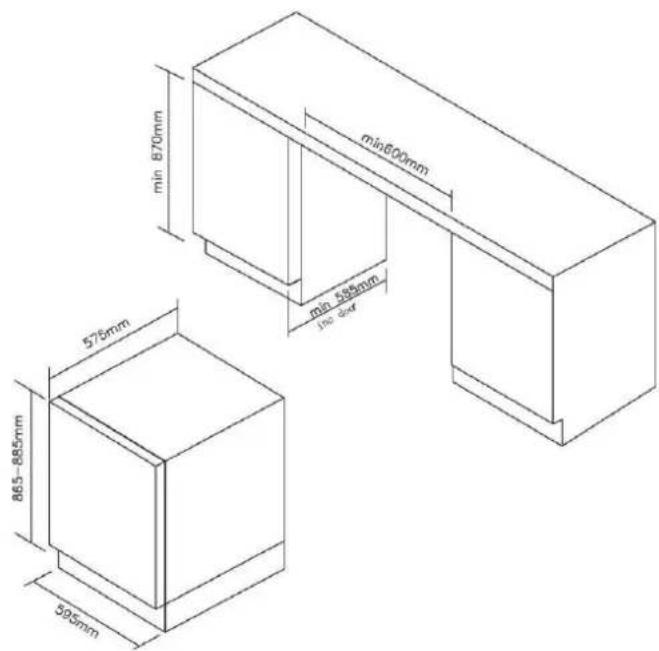
min 870mm min600mm min 572mm 1.6 dvs 562mm 865-885mm 595mmFor height 865mm with slim stainless steel door
text_image
min 870mm min600mm min 585mm 1pc door 575mm 865-885mm 595mmCARE AND MAINTENANCE
Cleaning Your Wine Cooler
• Turn off the power, unplug the appliance, and remove all items including shelves and rack.
- Wash the inside surfaces with a warm water and baking soda solution. The solution should be about 2 tablespoons of baking soda to a quart of water.
- Wash the shelves with a mild detergent solution.
- Wring excess water out of the sponge or cloth when cleaning area of the controls, or any electrical parts.
- Wash the outside cabinet with warm water and mild liquid detergent. Rinse well and wipe dry with a clean soft cloth.
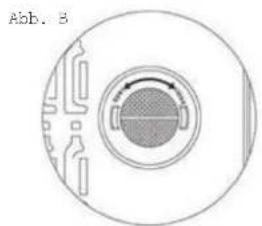
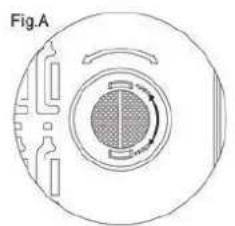
How to replace the charcoal filter (if present in your appliance)
• Charcoal filters are located in the top right corner of each wine cabinet zone.
- Open the door and remove the top 2 shelves (see removing the shelves).
• Turn the filter as per Fig A.
• As per Fig B, the filter should line up with the notches as shown.
• Pull the filter out (Fig C).
- Insert replacement filter and twist as per Fig A to lock into position.
• Re-install the shelves.
natural_image
Circular diagram with a central circular component and internal grid pattern, labeled Fig.A (no text or symbols within the diagram itself)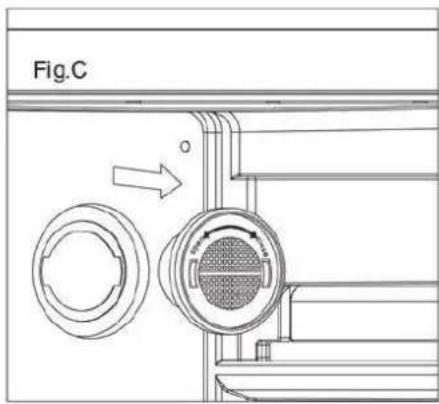
text_image
Fig.C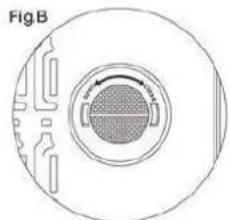
natural_image
Circular diagram with a central circular component and internal structure, labeled Fig B (no text or symbols within the diagram itself)Power Failure
- Most power failures are corrected within a few hours and should not affect the temperature of your appliance if you minimize the number of times the door is opened. If the power is going to be off for a longer period of time, you need to take the proper steps to protect your contents.
Vacation Time
- Short vacations: Leave the Wine Cooler operating during vacations of less than three weeks.
- Long vacations: If the appliance will not be used for several months, remove all items and turn off the appliance. Clean and dry the interior thoroughly. To prevent odor and mold growth, leave the door open slightly: blocking it open if necessary.
Moving Your Wine Cooler
- Remove all items.
- Securely tape down all loose items (shelves) inside your appliance.
- Turn the adjustable leg up to the base to avoid damage.
- Tape the door shut.
- Be sure the appliance stays secure in the upright position during transportation. Also protect outside of appliance with a blanket, or similar item.
Energy Saving Tips
- The Wine Cooler should be located in the coolest area of the room, away from heat producing appliances, and out of the direct sunlight.
PROBLEMS WITH YOUR WINE COOLER/BEVERAGE COOLER?
You can solve many common Wine cooler/beverage cooler problems easily, saving you the cost of a possible service call. Try the suggestions below to see if you can solve the problem before calling the servicer.
TROUBLESHOOTING GUIDE
| PROBLEM | POSSIBLE CAUSE |
| Wine cooler/beverage cooler does not operate. | Not plugged in.The appliance is turned off.The circuit breaker tripped or a blown fuse. |
| Wine cooler/beverage cooler is not cold enough. | Check the temperature control setting.External environment may require a higher setting.The door is opened too often.The door is not closed completely.The door gasket does not seal properly. |
| Turns on and off frequently. | The room temperature is hotter than normal.A large amount of contents has been added to the Wine cooler/beverage cooler.The door is opened too often.The door is not closed completely.The temperature control is not set correctly.The door gasket does not seal properly. |
| The light does not work. | Not plugged in.The circuit breaker tripped or a blown fuse.The bulb has burned out.The light button is “OFF”. |
| Vibrations. | Check to assure that the Wine cooler/beverage cooler is level. |
| The Wine cooler/beverage cooler seems to make too much noise. | The rattling noise may come from the flow of the refrigerant, which is normal.As each cycle ends, you may hear gurgling sounds caused by the flow of refrigerant in your Wine cooler/beverage cooler.Contraction and expansion of the inside walls may cause popping and crackling noises.The Wine cooler/beverage cooler is not level. |
| The door will not close properly. | The Wine cooler/beverage cooler is not level.The door was reversed and not properly installed.The gasket is dirty.The shelves are out of position. |
To contact the technical assistance, visit our website: https://corporate.haier-europe.com/en/Under the section "website", choose the brand of your product and your country. You will be redirected to the specific website where you can find the telephone number and form to contact the technical assistance
Availability Of Spare Parts
- Thermostats, temperature sensors, printed circuit boards and light sources are available for a minimum period of seven years after placing the last unit of the model on the market.
- Door handles, door hinges, trays and baskets for a minimum period of seven years and door gaskets for a minimum period of 10 year, after placing the last unit of the model on the market.
Recommended temperature SETTINGS
For storing ALL TYPES OF WINES
12 °C to 14
°C
Recommended DRINKING temperature
Champagne NV, Sparkling 6 °C
Champagne Vintage 10 °C
Dry White Semillon, Sauvignon Blanc 8 °C
Red Cabernet, Merlot, French, Australian, New Zealand, Chilean, Argentinean, Italian, Spanish, Californian 18 °C
Red Grenache, Syrah
16 °C
For further information about the product, please consult https://eprel.ec.europa.eu/ or scan the QR on the energy label supplied with the appliance
Čeština
natural_image
Line drawing of a cabinet or rack with an arrow indicating motion or movement, no text or symbols present.
text_image
Fig.A ⑩ ⑪ ① ② ③ ④
text_image
Fig.B ⑤ ④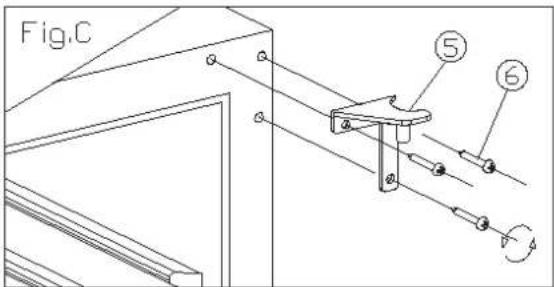
text_image
Fig.C ⑤ ⑥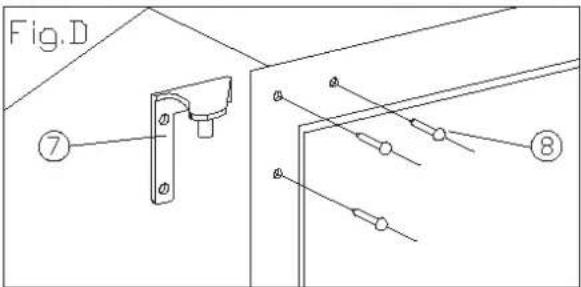
text_image
Fig.D ⑦ ⑧
text_image
Fig.E ⑨text_image
full shelves
text_image
Half shelves Ø76,4 300,5text_image
min 870mm min600mm 562mm 865-885mm 595mm 512mm the doxnatural_image
Warning symbol of a flame inside a triangle (no text or numbers)text_image
Technical diagram of a mechanical device with labeled components and an arrow indicating motion or force direction.
text_image
Fig.A ⑩ ⑪ ① ② ③ ④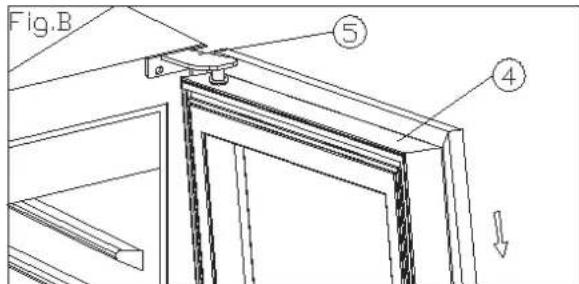
text_image
Fig.B ⑤ ④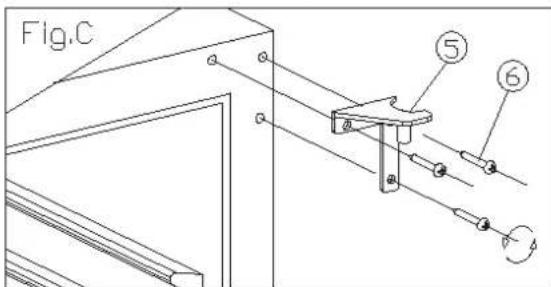
text_image
Fig.C ⑤ ⑥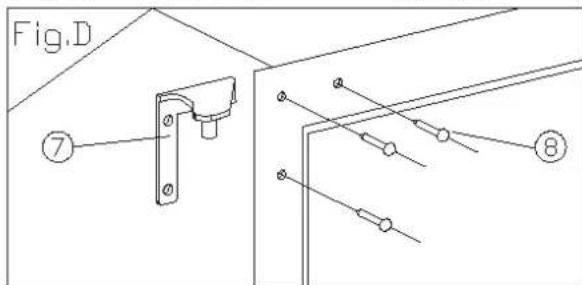
text_image
Fig.D ⑦ ⑧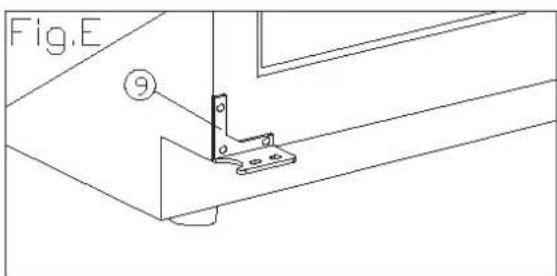
text_image
Fig.E ⑨text_image
8 → + 8 → + 8 → 8 → 8 + 8 → + 6 → = 46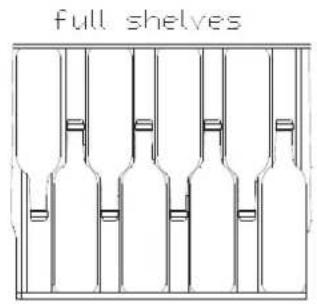
text_image
full shelves
text_image
Half shelves Ø76,4 300,5text_image
min 870mm min600mm min 572mm 100 mm 562mm 865–885mm 595mmnatural_image
Circular diagram with internal components and circuit-like patterns, no visible text or symbolsnatural_image
Line drawing of a mechanical device with a scroll and directional arrow (no text or symbols)
text_image
Fig.A ⑩ ⑪ ① ② ③ ④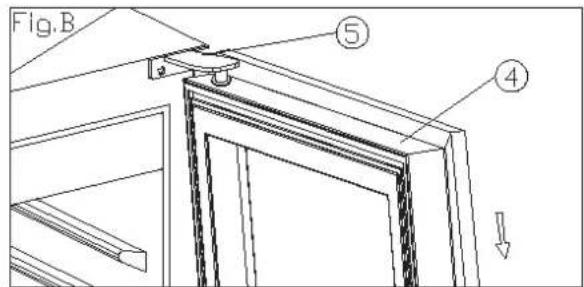
text_image
Fig.B ⑤ ④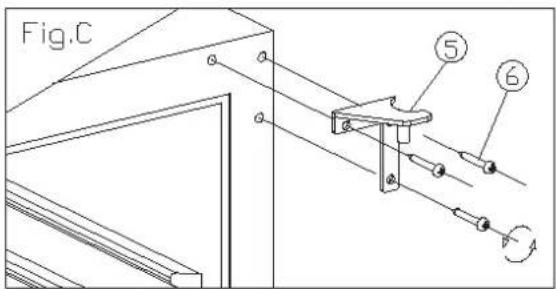
text_image
Fig.C ⑤ ⑥ 4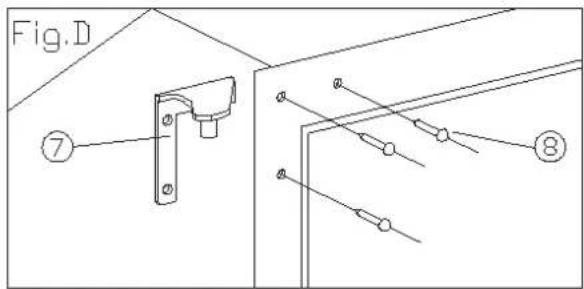
text_image
Fig.D ⑦ ⑧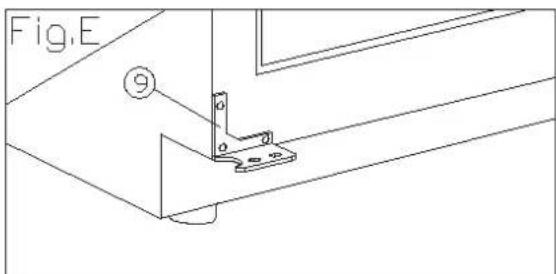
text_image
Fig.E ⑨text_image
full shelves
text_image
Half shelves Ø76,4 300,5text_image
min 670mm min 512mm min 512mm 1st door 562mm 865–885mm 595mmnatural_image
Circular diagram with a central circular component and internal structure, labeled Fig.A (no text or symbols within the diagram itself)
text_image
Fig.C
natural_image
Circular diagram with a central shaded circular area and internal circuit-like patterns, labeled Fig.B (no text or symbols within the diagram itself)Panne de courant
natural_image
Line drawing of a mechanical device with a handle and internal components, no text or symbols presenttext_image
Fig.A ⑩ ⑪ ① ② ③ ④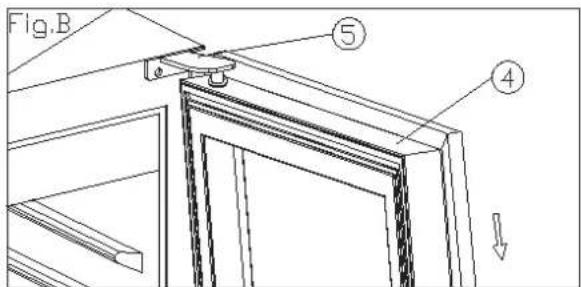
text_image
Fig.B ⑤ ④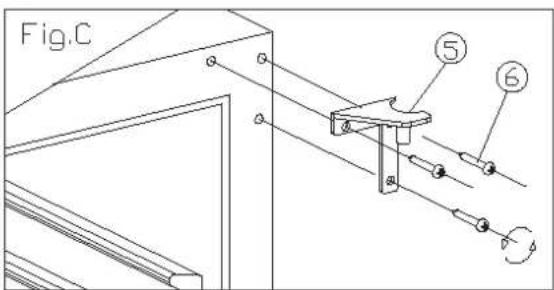
text_image
Fig.C ⑤ ⑥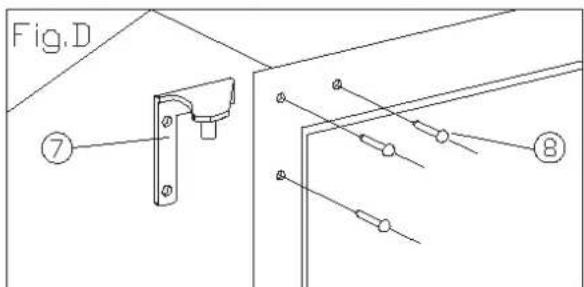
text_image
Fig.D ⑦ ⑧
text_image
Fig.E ⑨text_image
8 → + 8 → + 8 → 8 → 8 + 8 → + 6 → = 46
text_image
full shelves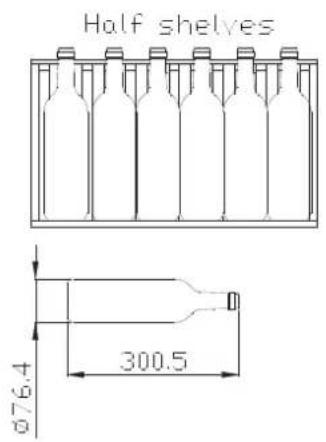
text_image
Half shelves Ø76,4 300.5text_image
min 870mm min600mm 562mm 865–885mm 595mm 512mm the doornatural_image
Circular diagram with a central circular component and internal circuit-like patterns, labeled Fig.B (no text or symbols within the diagram itself)natural_image
Line drawing of a mechanical device with a handle and control panel, showing no text or symbols
text_image
Fig.A ⑩ ⑪ ① ② ③ ④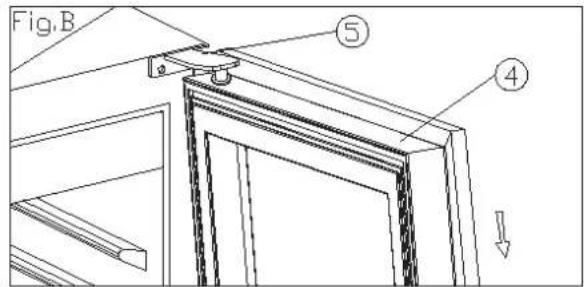
text_image
Fig.B ⑤ ④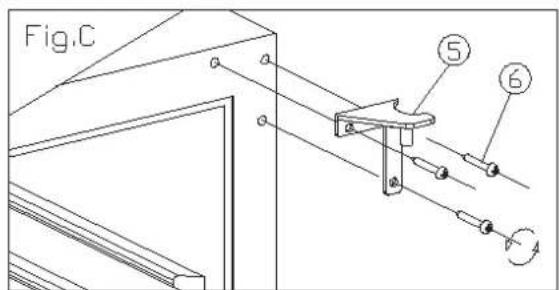
text_image
Fig.C ⑤ ⑥
text_image
Fig.D ⑦ ⑧
text_image
Fig.E ⑨text_image
8 → 9 + → + :□□: 8 → 8 + → 8 + → 6 → = 46
text_image
full shelves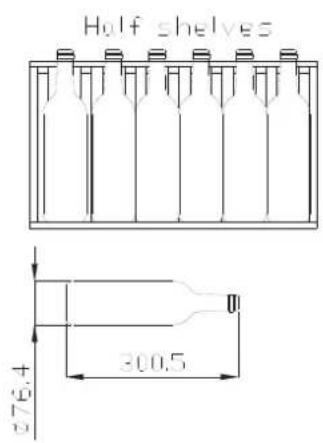
text_image
Half shelves 300.5 76.4natural_image
Circular diagram with concentric rings and internal components, labeled Fig.B (no text or symbols on the diagram itself)Stroomuitval
natural_image
Line drawing of a mechanical device with an arrow indicating motion or force (no text or symbols)
text_image
Fig.A ⑩ ⑪ ① ② ③ ④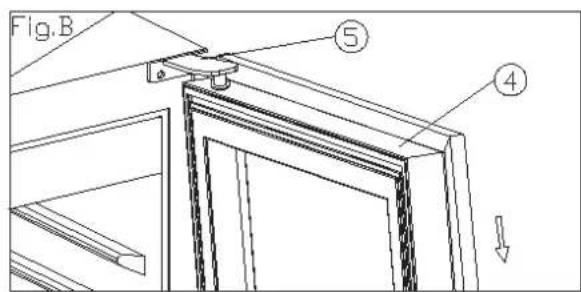
text_image
Fig.B ⑤ ④
text_image
Fig.C ⑤ ⑥
text_image
Fig.D ⑦ ⑧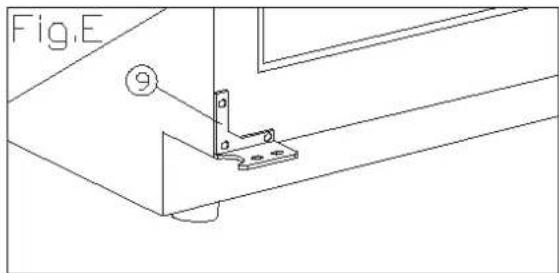
text_image
Fig.E ⑨text_image
Technical diagram showing eight sequential steps of window installation or mounting process with labeled components and directional arrows.text_image
full shelves
text_image
Half shelves Ø76,4 300,5natural_image
Circular diagram with internal circular structure and labeled 'Fig.A' (no readable text or symbols)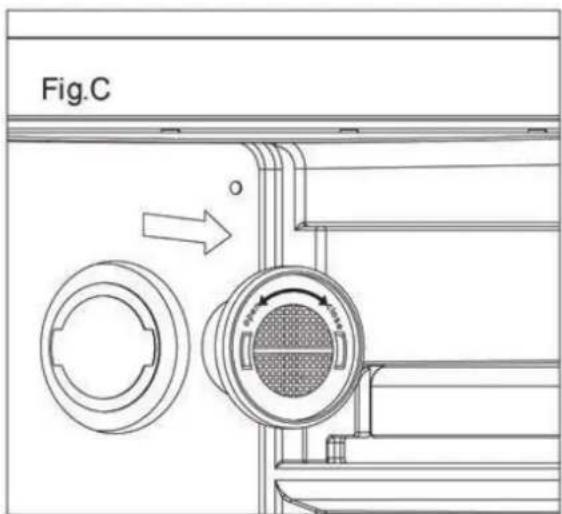
text_image
Fig.C
text_image
Fig.BAwaria zasilania
natural_image
Line drawing of a mechanical device with a handle and internal components, no text or symbols present
text_image
Fig.A ⑩ ⑪ ① ② ③ ④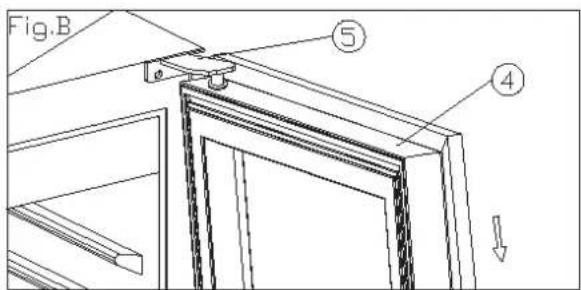
text_image
Fig.B ⑤ ④
text_image
Fig.C ⑤ ⑥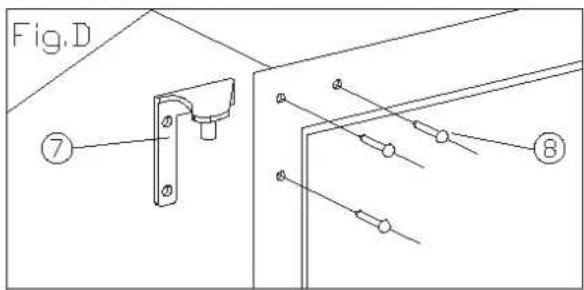
text_image
Fig.D ⑦ ⑧
text_image
Fig.E ⑨text_image
full shelves
text_image
Half shelves Ø76.4 300.5natural_image
Circular diagram with a central shaded region and directional arrows, labeled Fig.A (no text or symbols within the diagram itself)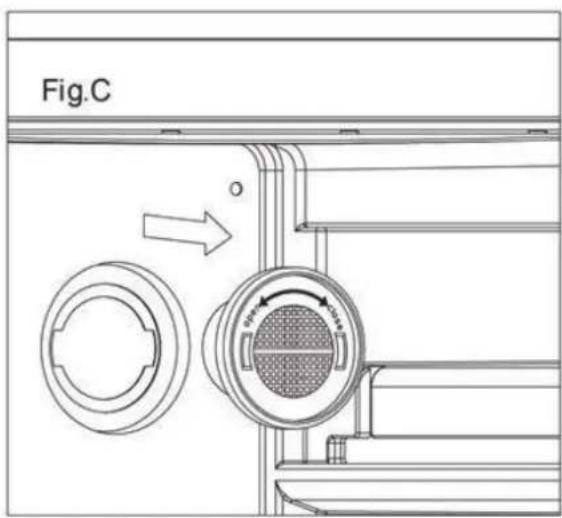
text_image
Fig.C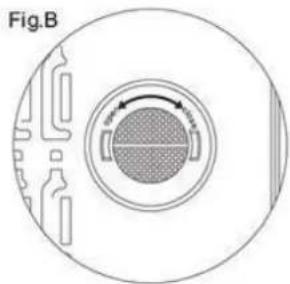
natural_image
Circular diagram with internal components and labeled Fig.B (no readable text or symbols)Falha de energia
POKYNY NA INŠTALÁCIU
natural_image
Line drawing of a mechanical device with a handle and base, showing no text or symbolsAko zmenit otváranie dvierok
text_image
Fig.A ⑩ ⑪ ① ② ③ ④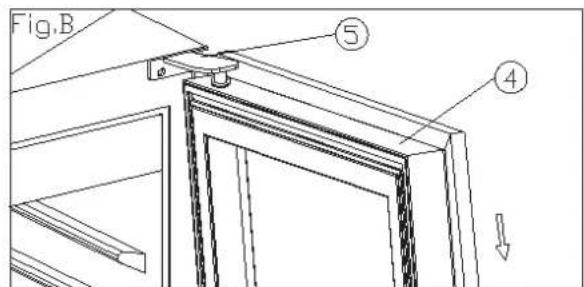
text_image
Fig.B ⑤ ④
text_image
Fig.C ⑤ ⑥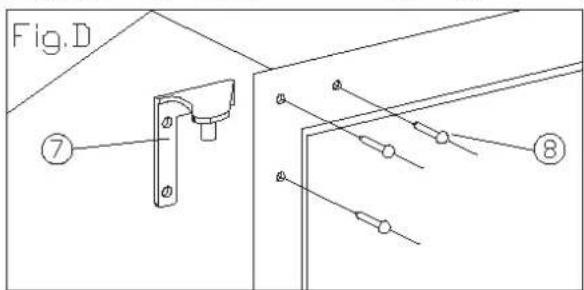
text_image
Fig.D ⑦ ⑧
text_image
Fig.E ⑨natural_image
Line drawing of a full shelves with five bottles arranged in rows (no text or symbols)
text_image
Half shelves Ø76,4 300,5natural_image
Circular diagram with a central shaded circular area and internal components, labeled Fig.B (no text or symbols within the diagram itself)- Informer kundeservice.
natural_image
Line drawing of a mechanical device with a handle and base, showing no text or symbols
text_image
Technical diagram showing labeled components of a door frame assembly with numbered parts and directional arrow
text_image
Fig.C Fig.D ⑤ ⑥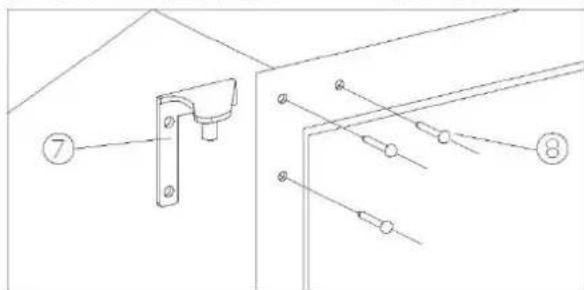
text_image
Technical diagram showing labeled components of a mechanical or electrical assembly with numbered parts 7 and 8
text_image
Fig.E 9text_image
Technical diagram showing labeled components of a window frame assembly with numbered partsB
C
text_image
Technical diagram showing structural components with numbered labels, likely from an engineering or architectural drawing.E
natural_image
Technical line drawing of a mechanical bracket or mounting bracket with no visible text or symbolsnatural_image
Circular diagram with a central shaded region and directional arrows, labeled Fig.A (no text or symbols within the diagram itself)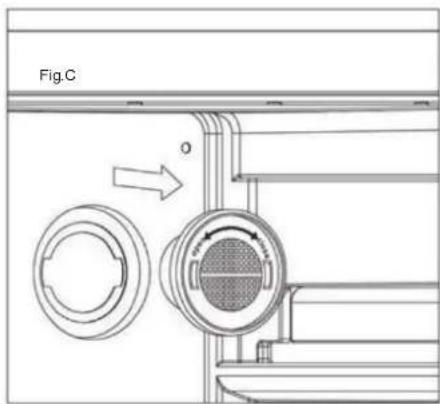
text_image
Fig.C o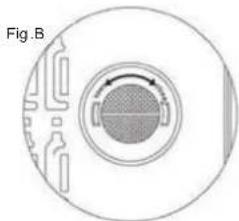
natural_image
Circular diagram with a central circular component and internal structure, labeled Fig.B (no text or symbols within the diagram itself)Strømsvigt
natural_image
Line drawing of a mechanical device with a handle and base plate, showing no text or symbols
text_image
Technical diagram showing labeled components of a structural joint or bracket assembly, with numbered callouts 7 and 8.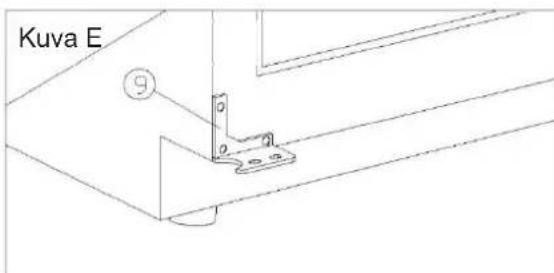
text_image
Kuva E 9text_image
Technical diagram showing labeled components of a window frame assembly with numbered partsB
C
text_image
Technical diagram showing structural components with numbered labels and directional arrows indicating motion or force directions.D
E

natural_image
Technical line drawing of a mechanical bracket or mounting structure with no visible text or symbolstext_image
8 → + 8 → + 8 → 8 → + 8 → + 8 → 6 → || 46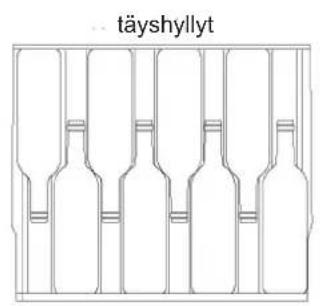
natural_image
Circular diagram with a central shaded region and labeled 'Kuva A' (no other text or symbols)
text_image
Kuva C o
text_image
Kuwa RSähkökatkos
natural_image
Line drawing of a mechanical device with a handle and base, showing no text or symbolstext_image
Technical diagram showing labeled components of a mechanical or electrical assembly with numbered callouts.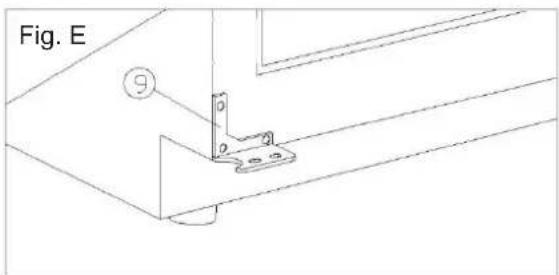
text_image
Fig. E 9text_image
Technical diagram showing labeled components of a window frame assembly with numbered partsB
C

text_image
Technical diagram showing structural components with numbered labels and directional arrows indicating motion or force directions.D
E
natural_image
Technical line drawing of a mechanical bracket or mounting structure with no visible text or symbolsnatural_image
Circular diagram with a central circular component and internal structure, labeled 'Fig. A' (no text or symbols within the diagram itself)
text_image
Fig. C o
natural_image
Cross-sectional diagram of a circular device with internal components and labeled Fig. B (no text or symbols beyond label)Strømbrudd
Red Cabernet, Merlot, French, Australian, New Zealand, Chilean, Argentinean, Italian, Spanish, Californian 18 °C
Red Grenache, Syrah 16 °C
For ytterligere informasjon om produktet, se https://eprel.ec.europa.eu/ eller skann QR-koden på energimerket som fulgte med apparatet.
Svenska
natural_image
Line drawing of a mechanical device with a handle and mounting holes, showing no text or symbols.
text_image
Fig.A ⑪ ⑪ ① ② ③ ④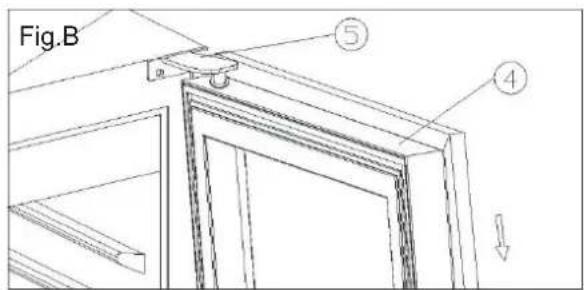
text_image
Fig.B ⑤ ④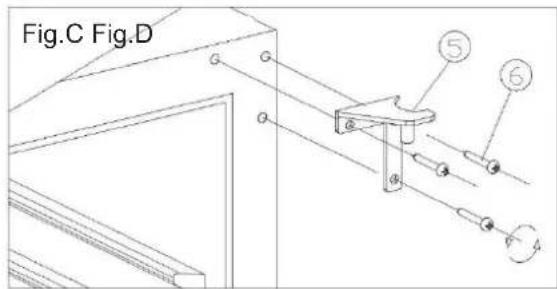
text_image
Fig.C Fig.D ⑤ ⑥ ④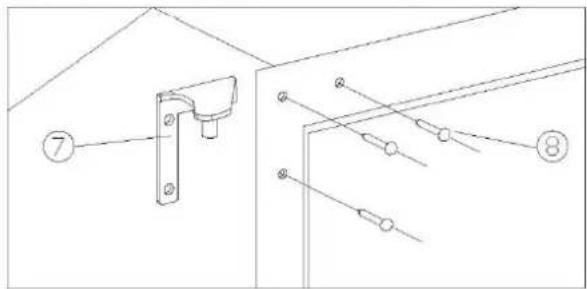
text_image
Technical diagram showing labeled components of a mechanical or electrical assembly with numbered callouts.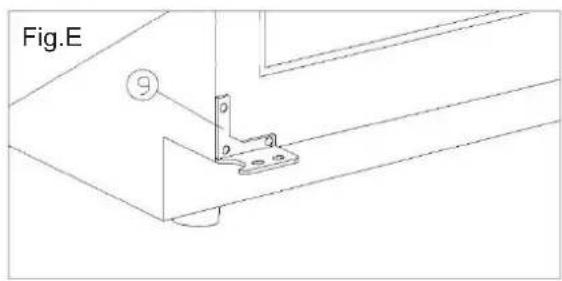
text_image
Fig.E 9text_image
Technical diagram showing labeled components of a window frame assembly with numbered parts and directional arrowsB
C

text_image
Technical diagram showing structural components with numbered labels and directional arrows indicating motion or force directions.D
E
natural_image
Technical line drawing of a mechanical bracket or mounting structure with no visible text or symbolsnatural_image
Circular diagram with a central circular component and internal structure, labeled Fig. A (no text or symbols within the diagram itself)
text_image
Fig.C o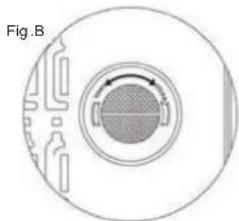
natural_image
Cross-sectional diagram of a circular device with internal components and labeled Fig.B (no text or symbols beyond label)Strömavbrott
natural_image
Line drawing of a mechanical device with a handle and internal components, no text or symbols presentnatural_image
Circular diagram with a central circular component and internal circuit-like patterns, labeled 'Silka A' (no text or symbols within the diagram itself)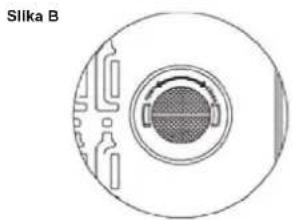
natural_image
Circular diagram with internal components and a central circular area, labeled 'Silka B' (no text or symbols within the diagram itself)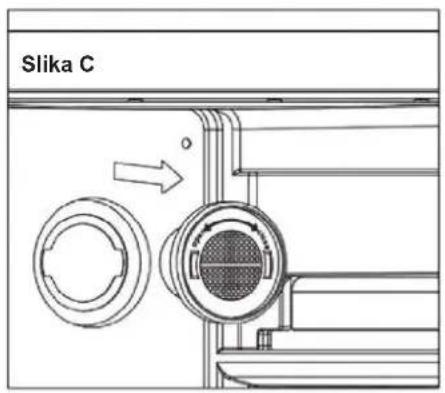
text_image
Slika Cnatural_image
Line drawing of a cabinet with an arrow indicating motion or force (no text or symbols)natural_image
Circular diagram with concentric rings and internal structures, no visible text or symbols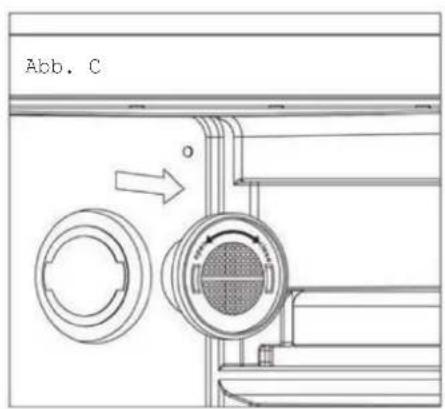
text_image
Abb. C