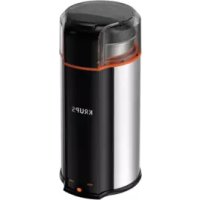
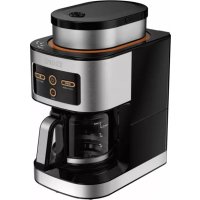
GX4208 - Coffee grinder KRUPS - Free user manual and instructions
Find the device manual for free GX4208 KRUPS in PDF.

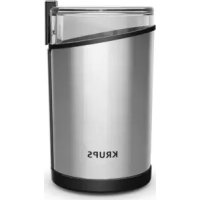
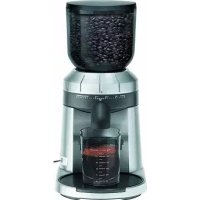
| Product type | Conical burr coffee grinder |
| Brand | KRUPS |
| Model | GX4208 |
| Number of grind settings | 39 (from finest to coarsest) |
| Operating modes | Cups, Weight, Manual |
| Built-in scale | Yes, weighing up to 100 g |
| Tare function | Yes, allows resetting scale for other containers |
| Ground coffee container capacity | Up to 100 g |
| Overheating protection | Yes, automatic stop and E01 display |
| Automatic stop | Yes, in Cups and Weight modes |
| Auto sleep | After 2 minutes of inactivity |
| Included accessories | Ground coffee container, lid, plastic filter holder, cleaning brush |
| Housing material | Plastic and stainless steel (scale plate) |
| Cleaning | Removable upper burr, cleaning brush included, clean with damp cloth |
| Recommended maintenance | Empty container after each use, do not immerse |
| Safety | Polarized plug, short cord, stop if hopper not properly engaged, overheating protection |
| Warranty | 2 years (KRUPS International Warranty) |
| Use | Household use only |
Frequently Asked Questions - GX4208 KRUPS
User questions about GX4208 KRUPS
0 question about this device. Answer the ones you know or ask your own.
Ask a new question about this device
Download the instructions for your Coffee grinder in PDF format for free! Find your manual GX4208 - KRUPS and take your electronic device back in hand. On this page are published all the documents necessary for the use of your device. GX4208 by KRUPS.
USER MANUAL GX4208 KRUPS

natural_image
Illustration of a hand pressing a glass grater into a container (no text or symbols visible)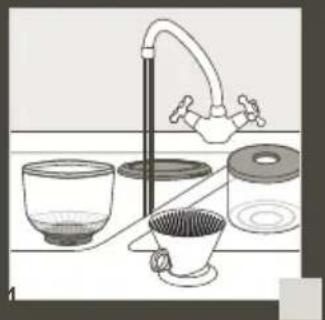
natural_image
Line drawing of a kitchen sink with water bath, glass bowl, and filter (no text or symbols)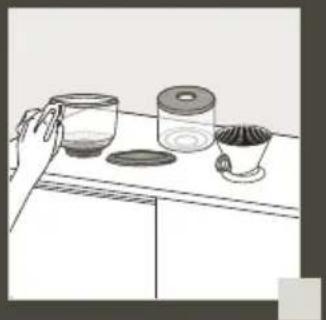
natural_image
Line drawing of a kitchen scene with a hand holding a cup, a jar, and a spoon on a cabinet (no text or symbols)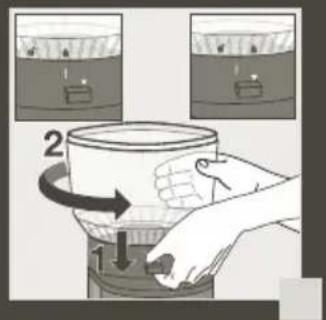
natural_image
Illustration of a hand turning a mechanical component with an inset showing the top view (no text or symbols)
natural_image
Hand holding a tool interacting with a circular mechanical component (no text or symbols visible)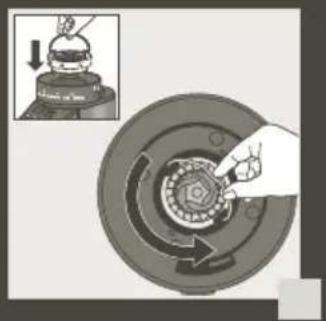
natural_image
Mechanical assembly diagram showing a hand turning a gear with a magnified inset of the top component (no text or symbols)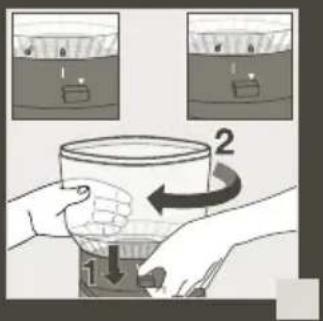
natural_image
Illustration of a hand pouring dried herbs into a glass bowl using a microwave (no text or symbols)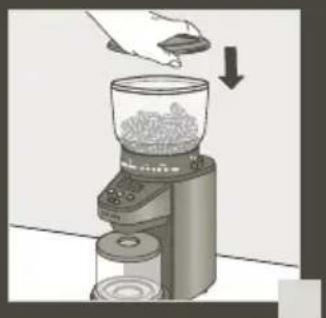
natural_image
Illustration of a hand using a tool to press granular material into a glass bowl on a digital kitchen (no text or symbols visible)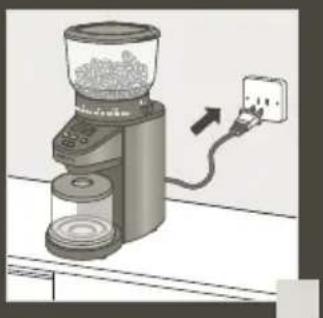
natural_image
Illustration of a coffee maker with a power outlet connected to a plug (no text or symbols visible)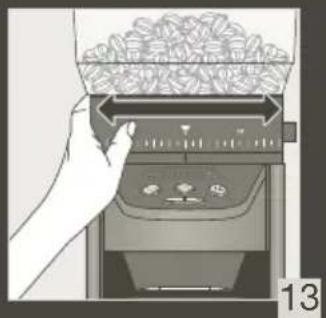
natural_image
Illustration of a hand pressing a food processor with granular contents (no text or symbols visible)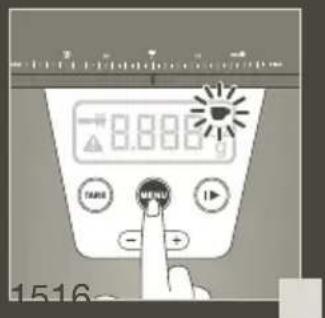

natural_image
Illustration of a coffee maker with granular contents and a side panel, no text or symbols present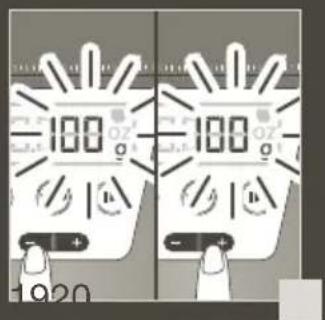
SAFETY INSTRUCTIONS
IMPORTANT SAFEGUARDS
When using electrical appliances, basic safety precautions should always be followed:
- Read all instructions.
- To protect against fire, electric shock and injury to persons, do not immerse cord, plugs or machine in water or other liquid.
- Close supervision is necessary when any appliance is used by or near children.
- Unplug from outlet when not in use, before putting on or taking off parts, and before cleaning. To unplug, grasp plug and pull from electrical outlet. Never pull cord.
- Avoid contact with moving parts.
- To reduce the risk of severe injury to persons or damage to the appliance, keep hands and utensils out of the bean hopper while grinding, and when the appliance is plugged in.
- Do not operate the grinder with a damaged cord or plug or after the appliance malfunctions, or is dropped or damaged in any manner. In this case, return the appliance to the KRUPS approved Service Center for examination, repair, or electrical or mechanical adjustment.
- The use of attachments not recommended or sold by KRUPS may cause fire, electric shock or injuries.
- Do not use outdoors.
- Do not let cord hang over edge of table or counter or touch hot surfaces, including the stove.
- Check hopper for presence of foreign objects before using.
- Always operate the burr grinder with the lid securely in place.
- Do not place on or near a hot gas or electric burner or in a heated oven.
- Do not operate the appliance when empty.
- This product has been designed for household use only. Any professional use, inappropriate use or failure to comply with the instructions will void the manufacturer's Warranty.
- Do not use appliance for other than intended use.
- All machines are subject to stringent quality control. Practical tests using machines taken at random are conducted and this may explain any slight marks or coffee residue showing prior to use.
SAVE THESE INSTRUCTIONS
CAUTION
This appliance is for household use only. Any servicing other than cleaning and user maintenance should be performed by the nearest authorized KRUPS Service Center.
■ Do not immerse appliance in water.
■ To reduce the risk of fire or electric shock, do not dismantle the appliance. Repair should be done by an authorized KRUPS Service Center only.
SHORT CORD INSTRUCTIONS
Regarding your Cord Set:
A. A short power-supply cord is provided to reduce the risks resulting from becoming entangled in or tripping over a longer cord.
B. Extension cords should be used with caution.
C. If an extension cord is used, (1) the marked electrical rating of the extension cord should be at least as great as the electrical rating of the appliance, (2) if the appliance is of the grounded type, the extension cord should be of a grounded type and (3) the longer cord should be arranged so that it will not drape over the counter top or table top where it can be pulled on by children or tripped over.
POLARIZED PLUG
This appliance has a polarized plug (one blade is wider than the other), to reduce the risk of electrical shock. This plug will fit into a polarized outlet only one way. If the plug does not fit fully into the outlet, reverse the plug. If it still does not fit, contact a qualified electrician. Do not modify the plug in any way.
Thank you for choosing an appliance from KRUPS.
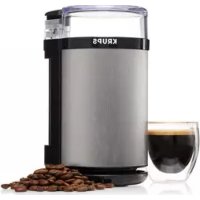
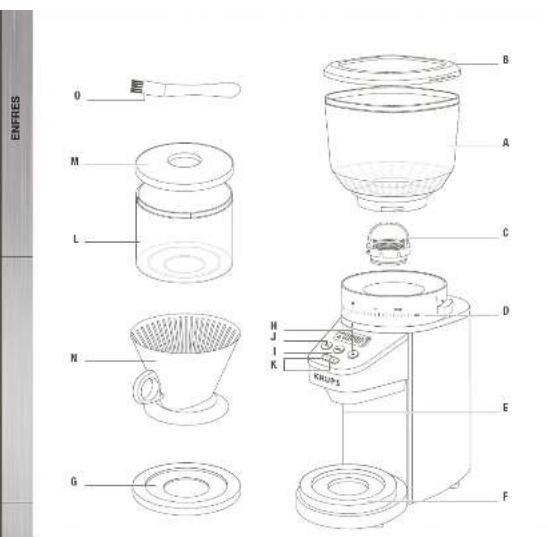
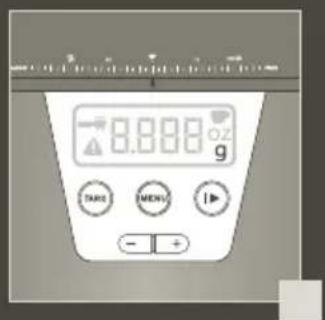
DESCRIPTION
Body:
A Coffee bean hopper
B Coffee bean hopper lid
C Removable upper conical burr
D Ground coffee fineness ring
E Ground coffee dispenser
F Scale
G Stainless steel plate
Control panel:
H START/STOP button
I MENU button
J TARE button
K - & + Select buttons
Accessories:
L Ground coffee container
M Ground coffee container lid
N Plastic dripper
- Cleaning brush
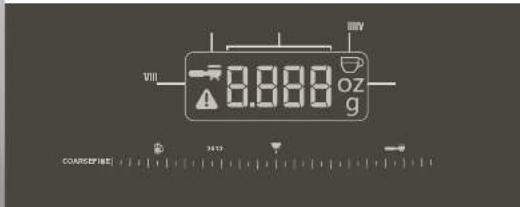
Display:
I Number of cups selector
II Manual mode indicator
III Unit indicator
IV Digit indicator
V Warning indicator
ABOUT GRINDING COFFEE
The proper grind gives the most flavorful cup of coffee. The grind size and amount depends on the method by which the coffee is to be brewed. Generally, the finer the grind the more quickly the coffee should be prepared. That is why coffee ground for an espresso machine extraction is much finer than coffee to be brewed in a drip system.
Coffee that is ground too fine for a particular brewing process – (For example, fine espresso grind used in a filter drip coffee machine) will result in over-extraction and bitter, pungent tasting coffee. Conversely, coffee that is too coarse for a particular brew method will result in under-extraction and weak, watery coffee. If the correct grind is used, adding more coffee simply makes a brew stronger without making it bitter.
In addition to providing a range of grind settings, coffee grinders provide a consistent grind. This is important to ensure the extraction is consistent across all of the ground coffee particles.
BEFORE FIRST USE
Before using the coffee grinder, wipe the housing and bean hopper with a clean damp cloth. Wash the ground coffee container and the ground coffee container lid in hot soapy water, then rinse and dry. (fig 1 - 3)
SET THE HOPPER
To remove the hopper
- Make certain the coffee grinder is unplugged.
- Hold down the hopper release lever located at the opposite of the grinding size markings (fig 4)
- With your other hand, turn the hopper counter-clockwise until the unlock icon f is aligned with the arrow and lift it up. (fig 4)
To replace the hopper:
- Make certain the top part of the conical burr is clear of coffee grind residues. If not, you can use the brush provided to clean around the top part of the burr. (fig 6)
- Align the unlock icon on the base with the arrow on the hopper. (fig 10)
- Hold down the hopper release lever located at the opposite of the grinding size markings (fig 8)
- With your other hand, turn the hopper clockwise until the lock icon 🔒 is aligned with the arrow and click. (fig 9)
NOTE: If the hopper is not set properly the coffee grinder won't turn on.
NOTE: The hopper is designed with a trap door system to allow you to secure the coffee beans inside and allow you to remove the hopper from the grinder body without the mess.
SET COFFEE GRIND SIZE
- Fit the ground coffee container (fig 9) and its lid (H and I) in their correct positions. Check that the assembly is correctly positioned in the body.
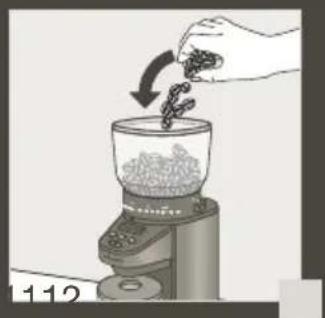
- Open the lid of the coffee bean hopper and fill the bean hopper (fig 10) with desired whole coffee beans. Close the lid (fig 11), you can now adjust the coffee grind size.
- Your coffee grinder has 39 grind size options. To adjust the grind size, rotate the hopper and adjust from fine to coarse depending of the type of coffee you are brewing. (fig 13)
NOTE: Avoid adjusting the grind size during operation it will affect the coffee ground coarseness.
See chart below:
GRIND SIZE SETTING RECOMMENDATIONS
| Brewing Method Espresso | Pour Over Drip Coffee | French Press Cold Brew | |
| Suggested Grind Size | Fine Medium Coarse | ||
| Grind Setting Fine - 12 | 12 - 26 26 - Coarse |
You can choose between the 3 different modes on of your coffee grinder with scale:
- Cups mode - allows you to choose grinding amount by the number of cups
- Weight mode - allows you to set the quantity you want using Grams or Ounces
- Manual mode - allows you to grind coffee without using the integrated scale and manually Start and Stop grinding operation.
To select the desired mode, simply press the Menu button (fig 14). Once selected, you can adjust desired grinding amount in the selected mode.
NOTE: Your coffee grinder with scale will display in Cups mode by default.
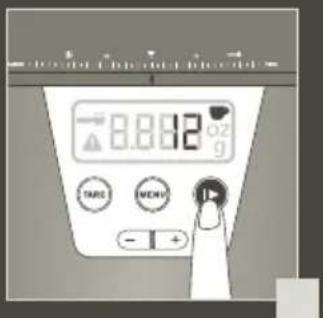
CUPS MODE
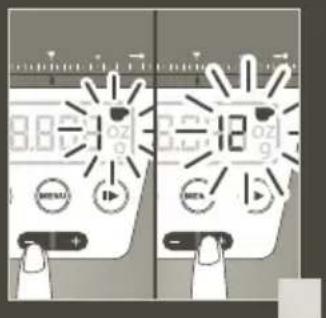
- Set the quantity of ground coffee by using the - & + buttons according to the desired number of cups (up to 12 cups). (fig 15)
- Press the START/STOP ▶ buttons to start grinding, the display will begin counting up the number of cups during operation until it reaches the desired quantity. (fig 16)
Once the selected amount has been reached, the appliance will stop automatically.
NOTE:
If you want to stop the appliance before grinding is complete, press the START/STOP button. To resume operation, press the START/STOP button again and it will continue the cycle until completion.
■ If you remove the coffee grounds in the container during an active grinding operation, it will reset the scale and start the cycle over.
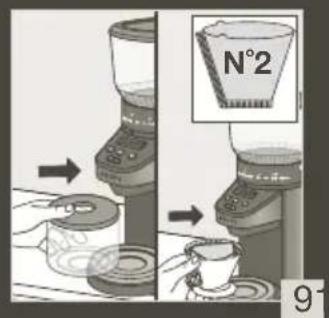
- Remove the ground coffee holder, tap the container gently, remove the lid and pour the ground coffee into the filter of the coffee maker or use a measuring spoon. (fig 17)
- To obtain additional ground coffee, you can adjust the number of cups and press the START/STOP again. You can also empty the container and repeat the operation.
NOTE: Selected settings will be retained from one use to the next.
NOTE: You must empty the container after each cycle completion. If you try to start an additional cycle without emptying the container, a warning icon ⚠ will display.
| Cups 1 2 3 4 | 5 6 7 | 8 9 10 | 11 12 | |||||||||
| Grams 8 17 2 | 25 33 | 41 50 | 58 66 | 7 | 4 83 | 9 | 1 99 |
NOTE: The coffee ratio is based on SCAA gold cup standard for the best quality coffee.
NOTE: If you want to use the dripper provided or another container to catch the ground coffee please refer to the TARE FUNCTION paragraph.
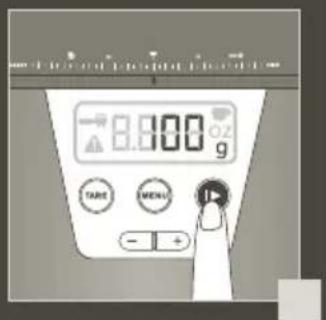
WEIGHT MODE
- Set the quantity of ground coffee using the - & + buttons until you reach the desired weight (up to 100g). To adjust the quantity faster, simply hold the - or + button accordingly. (fig 18)
- Press the START/STOP button to start grinding. The display will flash during operation and the scale will start weighting the coffee grind on display. (fig 18)
- Once the selected quantity has been reached, the appliance will stop automatically.
NOTE:
If you want to stop the appliance before grinding is complete, press the START/STOP ▶ button. To resume the operation, press the START/STOP ▶ button again and it will continue the cycle until completion
If you remove the coffee ground in the container, it will reset the scale and start the cycle over.
-
Remove the ground coffee holder, tap the container gently, remove the lid and pour the ground coffee into the filter of the coffee maker or use a measuring spoon. (fig 17)
-
To obtain additional ground coffee, adjust the desired quantity and resume operation. You can also empty your container and repeat the operation.
NOTE: The coffee grinder will display the last selected setting.
NOTE: If you want to use the dripper provided or another container please refer to the TARE FUNCTION paragraph.
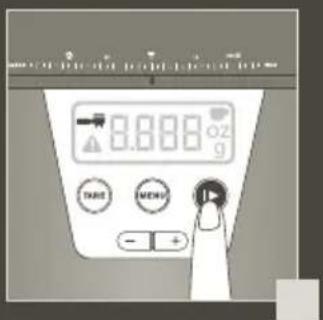
MANUAL MODE
During the manual mode the built-in scale is deactivated. This mode is recommended for grinding straight into portafilters for espresso extractions.
- Press the START/STOP ▶ button to start grinding. The display will begin counting up time during operation until you stop. (fig 19)
- Once the desired quantity has been reached, press again the START/STOP ▶ button to stop the operation. (fig 19)
NOTE: To obtain additional ground coffee, repeat the operating cycle. Always first make sure that the ground coffee does not go above the maximum capacity of the container(100g/3.55oz)
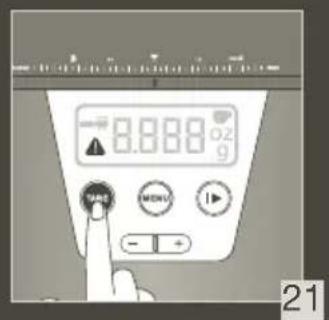
TARE FUNCTION
Your coffee grinder is designed to be used with the original bean container. If the original bean container is not empty or if you are using another container, you will be notified with the Warning indicator in the display and won't be able to start grinding until the grinder has been tared/zeroed out.
If you want to use the dripper provided or another container, you must reset the scale using the TARE button prior to selecting the weight and start operation.
- Place the new recipient on the scale (fig 9)
- Reset the unit using the TARE button. (fig 21)
- Once the scale is reset, the Warning ⚠ button will turn off. (fig 22)
IMPORTANT!
For your appliance to run correctly, make certain that:
■ The lid to the coffee-bean hopper is correctly closed.
■ The ground coffee holder and its lid are correctly placed in the body of the appliance.
This appliance is equipped with an overheat protective device. If the appliance overheats, it will switch off automatically. In this case let is cool down for 1 hour then restart by pressing the START/STOP ▶ button.
■ NOTE: Once you have complete your grinding, the unit will automatically go into sleep mode within 2 minutes.
PRACTICAL HINTS
■ It is best to store coffee beans in a dry, cool place. Beans should be kept in an opaque, airtight container.
■ For best results, always grind coffee just prior to brewing. The coffee just prior to brewing it.
■ Selecting the correct grind size for desired brewing method will result in best in cup flavors. When experimenting with grind size, adjust only 1 or 2 grind units.
■ Use the fineness selector to adjust the grind according to the type of brewing method.
■ Generally, the quicker the brewing method (ex. espresso are extracted between 25-35 seconds), the finer the ground coffee should be.
A “medium” ground is suited for making filter drip coffee while a “fine” ground would be more suitable for making Espressos.
For the first use, we suggest that you use a standard recommended position and adjust settings according to your taste. Once you have used the appliance a few times, you will find the ideal grind setting to suit your taste and brew method.
■ Do not store the coffee ground in the coffee container over 24 hours.
■ For Coffee beans, we recommend to always store coffee in a air-tight and cool area.
Cups Ratio Guideline
■ The more cups you select, the longer the appliance will run.
| Cups 1 2 3 4 | 5 6 7 8 | 9 10 | 11 12 | |||||||||
| Coffee (g): 8 | 16 24 | 32 40 | 48 56 | 6 | 4 72 | 8 | 0 88 | 9 | 6 | |||
| Water (ml): 15 | 0 300 | 450 | 600 | 750 | 900 | 1 | 050 | 12 | 00 13 | 50 150 | 0 1650 | 1800 |
NOTE: the coffee ratio is based on SCAA gold cup standard for the best quality coffee.
MAINTENANCE
- To keep all your coffee's aroma and to avoid a degradation of the ground coffee, empty the ground coffee container after each use.
■ Always unplug from the power outlet before cleaning.
■ Never place the grinder, power supply cord or plug in water or under running water.
■ Do not use strong detergents or abrasive pads to clean the appliance.
■ Clean the lids and the ground coffee holder in warm, soapy water.
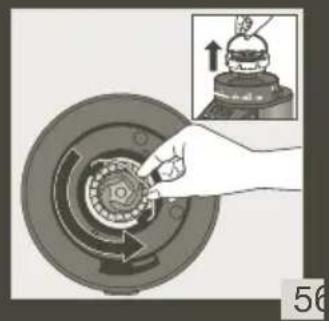
■ To remove the upper burr (g), hold of the upper mill and turn counter clockwise, then raise it vertically to remove. (fig 5)
■ Clean the upper burr with the cleaning brush (g). (fig 6)
■ Carefully clean the inside of the coffee-bean hopper (fig 2) with a damp cloth.
■ To replace the upper burr, insert the burr and turn it once in the clockwise direction. For proper alignment, residual coffee and coffee grounds in the lower burr will need to be cleared. (fig 7)
■ Carefully clean the ground coffee dispenser and the body of the appliance with a damp cloth.
TROUBLESHOOTING GUIDE
| The appliance does not work. | Check the electrical connection. |
| The ground coffee holder is not correctly positioned | |
| The appliance stops during operation. | · The appliance has overheated.· The overheat protection mechanism has been activate and E01 will display· Appliance has been unplugged.· Detach the upper burr for cleaning and remove any obstacle.· Leave the appliance to cool down for 1 hour before next use.· If the appliance is still not working, please contact Krups customer service.· Causes of overheating to be avoided: The maximum capacity of beans in the bean hopper, or the maximum capacity of ground coffee in the ground coffee holder has been exceeded. |
| The fineness selector does not work anymore. | Check that the upper burr is correctly positioned. (See paragraph concerning the maintenance in the manual). |
| No coffee ground dispense | Stop the unit, remove the outer grinder and clean. |
| The grinder won’t start grinding and an Err message display - E01 | · The coffee hopper might not be correctly set, please refer to the “SET THE HOPPER” instructions.· The hopper is empty, fill up the tank and resume operation by pressing the Menu button.· The grinder is jammed, please clean it before resumming operation. |
KRUPS INTERNATIONAL LIMITED GUARANTEE
: www.krups.com
This product is repairable by KRUPS during and after the guarantee period.
Accessories, consumables and end-user replaceable parts can be purchased, if locally available, as described on the KRUPS internet site www.krups.com
The Guarantee:
This product is guaranteed by KRUPS (company address and details included in the country list of the KRUPS International Guarantee) against any manufacturing defect in materials or workmanship for a period of 2 years starting from the initial date of purchase or delivery date.
The international manufacturer's guarantee by KRUPS is an extra benefit which does not affect consumer's Statutory Rights.
The international manufacturer's guarantee covers all costs related to restoring the proven defective product so that it conforms to its original specifications, through the repair or replacement of any defective part and the necessary labour. At KRUPS's choice, a replacement product may be provided instead of repairing a defective product. KRUPS's sole obligation and your exclusive resolution under this guarantee are limited to such repair or replacement.
Conditions & Exclusions:
The international KRUPS guarantee only applies within the guarantee period and for those countries listed in the country list attached and is valid only on presentation of a proof of purchase. The product can be taken directly in person to an authorised service centre or must be adequately packaged and returned, by recorded delivery (or equivalent method of postage), to a KRUPS authorised service centre. Full address details for each country's authorised service centres are listed on KRUPS website (www.krups.com) or by calling the appropriate telephone number as set out in the country list to request the appropriate postal address.
KRUPS shall not be obliged to repair or replace any product which is not accompanied by a valid proof of purchase.
This guarantee will not cover any damage which occurs as a result of misuse, negligence, failure to follow KRUPS instructions, use on current or voltage other than as stamped on the product, or a modification or unauthorised repair of the product. It also does not cover normal wear and tear, maintenance or replacement of consumable parts, or the following:
– using the wrong type of water or consumable
– damage as a result of lightning or power surges
- scaling (any de-scaling must be carried out according to the instructions for use)
– damages or poor results due to wrong voltage or frequency
– professional or commercial use
- ingress of water, dust or insects into the product (excluding appliances with features specifically designed for insects)
– mechanical damages, overloading
- accidents including fire, flood, thunderbolt, etc
– damage to any glass or porcelain ware in the product
This guarantee does not apply to any product that has been tampered with, or to damages incurred through improper use and care, faulty packaging by the owner or mishandling by any carrier.
In order to offer the best possible after-sales service and constantly improve customer satisfaction, KRUPS may send a satisfaction survey to all customers who have had their product repaired or exchanged in a KRUPS authorised service centre.
The international KRUPS guarantee applies only for products purchased in one of the countries listed, and used for domestic purposes only in one of the countries listed on the Country List. Where a product purchased in one listed country and then used in another listed country:
a. The international KRUPS guarantee does not apply in case of non conformity of the purchased product with the local standards, such as voltage, frequency, power plugs, or other local technical specifications
b. The repair process for products purchased outside the country of use may require a longer time if the product is not locally sold by KRUPS
c. In cases where the product is not repairable in the new country, the international KRUPS guarantee is limited to a replacement by a similar product or an alternative product at similar cost, where possible.
Consumer Statutory Rights:
This international KRUPS guarantee does not affect the statutory rights a consumer may have or those rights that cannot be excluded or limited, nor rights against the retailer from which the consumer purchased the product. This guarantee gives a consumer specific legal rights, and the consumer may also have other legal rights which vary from State to State or Country to Country. The consumer may assert any such rights at his sole discretion.
For Australia only:
Our goods come with guarantees that cannot be excluded under the Australian Consumer Law. You are entitled to a replacement or refund for a major failure and compensation for any other reasonably foreseeable loss or damage. You are also entitled to have the goods repaired or replaced if the goods fail to be of acceptable quality and the failure does not amount to a major failure.
*** Please keep this document for your reference should you wish to make a claim under the guarantee